What did you do to your FB today?


not a bad price.
Lookin forward to getting a bit more negative camber. I'll have it aligned for street camber and then for track camber and mark both positions so I can set it up as
needed when needed.
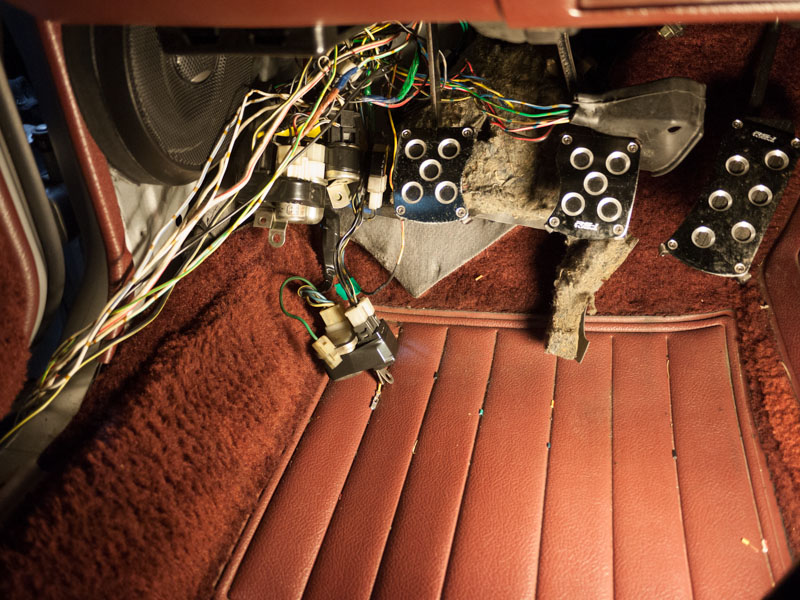
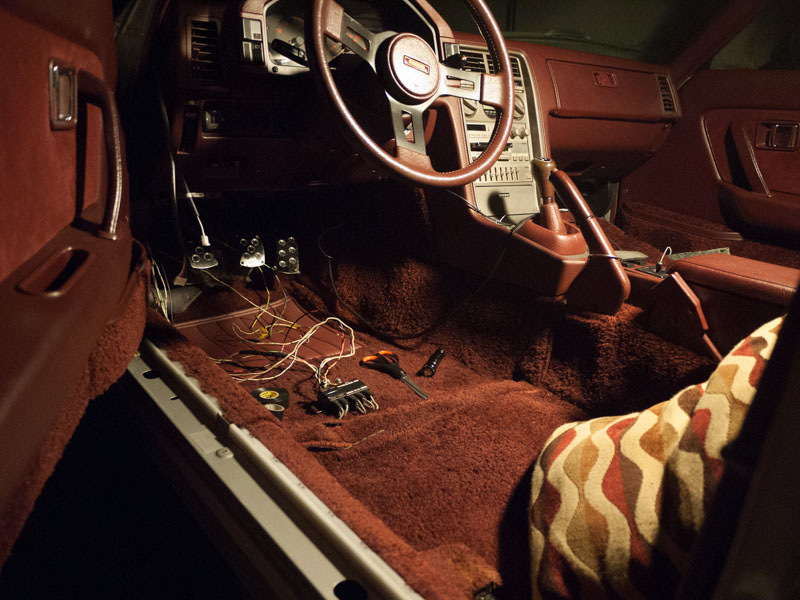
Last Friday i plugged in the battery to test out the wire tuck so far - immediately blew the injection fusible link. I found this odd as I have removed most of the injection harness. In fact, all of it save for a few wires.
Checked and double checked the harness, everything looked clean. I then realized it was 2am when I tested it - weary and overly enthusiastic to see it work. I had left several wires dangling - even though they all had a clean cut or an insulated connector, one of them was obviously making contact.
Removed ALL old ECU wiring from the car, taped off any un-terminate wires, and voila no blown fuse.
Now I can solidify the relays and fusible link blocks (with FC style drop in fuses) and start wiring in the Megasquirt!
Final component is to get some fusible link wire in for the alternator wires, then wire in the megasquirt harness!
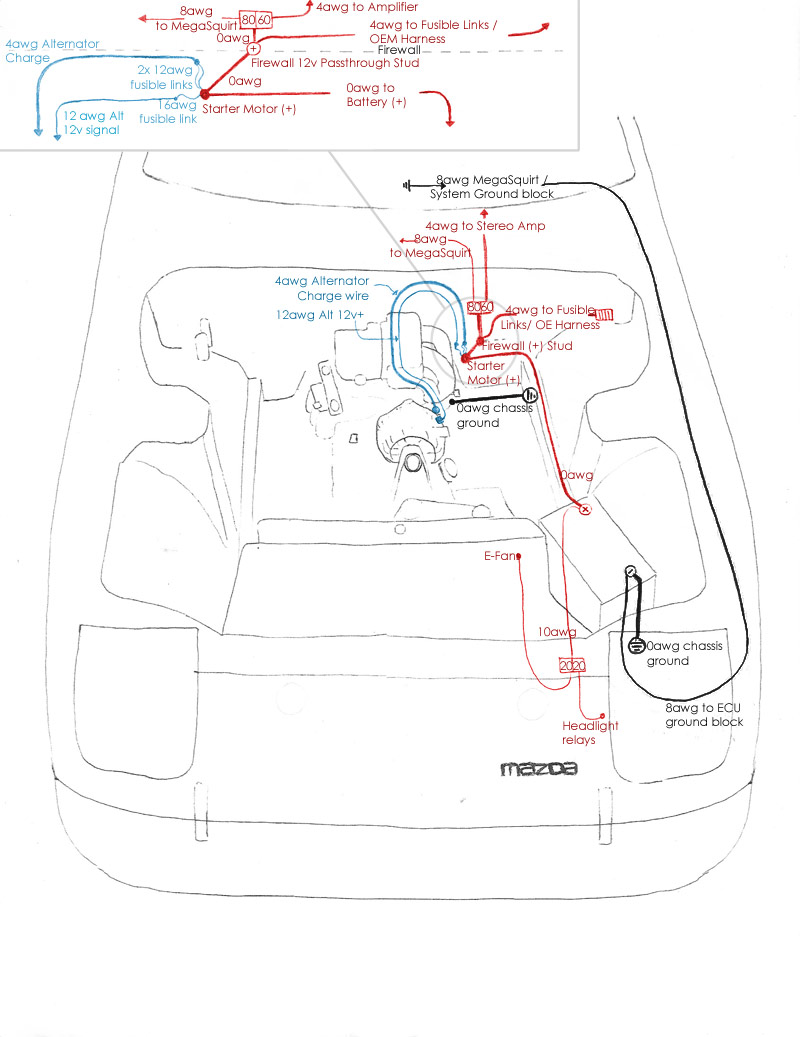
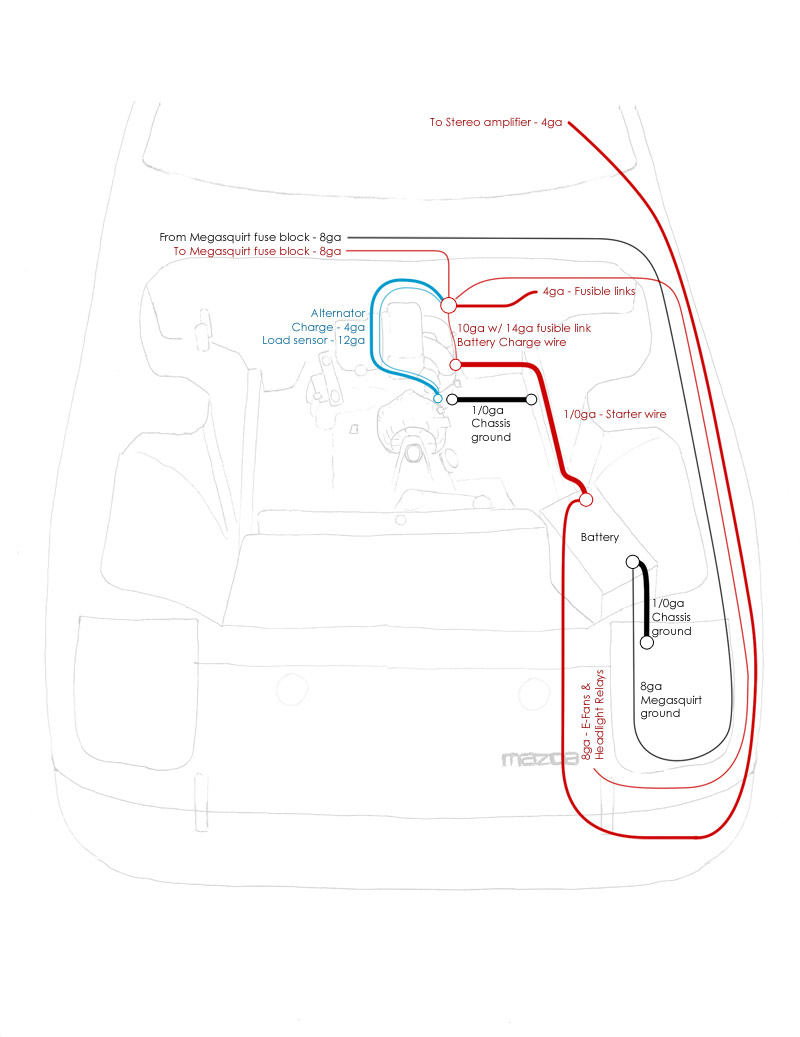
I've included a diagram of the power grid I'm building - I just got the insulated firewall lug for the 0gauge feed into the cabin, will put that in tonight. The only difference between this layout and the grid as its being installed is that I'm pulling the alternator and sensor wire to the firewall stud instead of the starter motor. I had to hella compress the image size to meet the forum requirements (i severely dislike this forum software and how they've chosen to configure it). Contact me for a hi-res version.
Bundling up the relays to tuck under the dash (fusible links are dangling out the door):
Fusible links ready to be plugged in and tested (make sure to put them in a plastic dish or something in case they blow - they may burn through the cloth insulation)
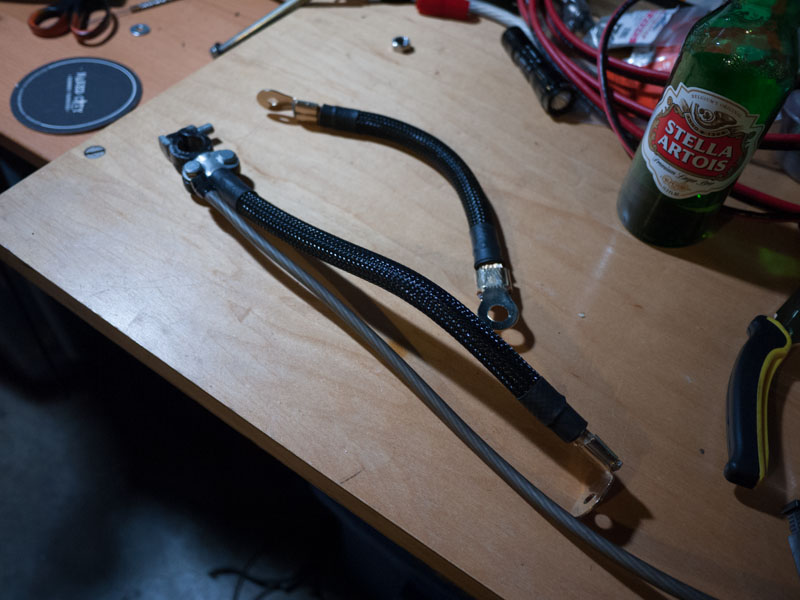
1/0 awg ground wires - the dual one goes from battery - to frame rail, then the 8awg wire goes up to the Megasquirt fuse / ground distro block. Other short length of 1/0 awg goes from rear iron starter motor bolt over to the frame rail where the power steering line bolt is.
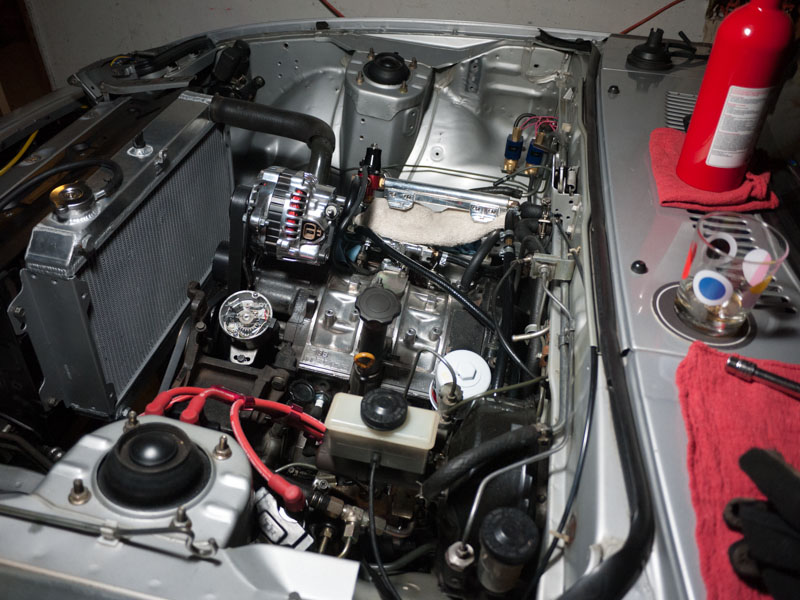
Progress so far (including shitty radiator that doesnt fit and won't accept any OEM sensors! bonus!)
Checked and double checked the harness, everything looked clean. I then realized it was 2am when I tested it - weary and overly enthusiastic to see it work. I had left several wires dangling - even though they all had a clean cut or an insulated connector, one of them was obviously making contact.
Removed ALL old ECU wiring from the car, taped off any un-terminate wires, and voila no blown fuse.
Now I can solidify the relays and fusible link blocks (with FC style drop in fuses) and start wiring in the Megasquirt!
Final component is to get some fusible link wire in for the alternator wires, then wire in the megasquirt harness!
I've included a diagram of the power grid I'm building - I just got the insulated firewall lug for the 0gauge feed into the cabin, will put that in tonight. The only difference between this layout and the grid as its being installed is that I'm pulling the alternator and sensor wire to the firewall stud instead of the starter motor. I had to hella compress the image size to meet the forum requirements (i severely dislike this forum software and how they've chosen to configure it). Contact me for a hi-res version.
Bundling up the relays to tuck under the dash (fusible links are dangling out the door):
Fusible links ready to be plugged in and tested (make sure to put them in a plastic dish or something in case they blow - they may burn through the cloth insulation)
1/0 awg ground wires - the dual one goes from battery - to frame rail, then the 8awg wire goes up to the Megasquirt fuse / ground distro block. Other short length of 1/0 awg goes from rear iron starter motor bolt over to the frame rail where the power steering line bolt is.
Progress so far (including shitty radiator that doesnt fit and won't accept any OEM sensors! bonus!)
Nice work ioTus! Today, with the help of j9fd3s, the stock Nikki, rats nest, and air pump are gone and the Weber 45 DCOE/Lake Cities intake manifold is in! He did most of the grunt work getting the carb and intake ready while I did my best to pull the old stuff out of the car. The car idles at 1500 now, so we suspect an air leak between the carb and IM (I forgot to get new gaskets and re-used the old ones). I've got new gaskets on order, but I'm also going to try checking the air balance between the carbs to be sure they are balanced.
Took her out for a jaunt. I can't believe what a difference it made. The stock Nikki was like a stick in the mud...took forever to rev. The Weber revs up quickly and pulls like a train from 3-5K and has a decisively impressive bark. I can tell this will make a measurable difference at the opening auto-x meet in Feb.
As mentioned before, I still need to replace the old gaskets, re-check the air balance, and get some velocity stack filter caps (the air filter cannot be removed once the carb is in place, and that won't do).
Overall, a very good day. I'd have never been able to do this without the help of j9fd3s...I owe him big!
fm
Fixed my wiring diagram
The previous diagram is wrong and should be disregarded completely However it will live in infamy until the system crashes and all attachments are deleted. But then so will the corrected one:
The previous diagram is wrong and should be disregarded completely
However it will live in infamy until the system crashes and all attachments are deleted. But then so will the corrected one:
The car ran really well the other day with the Weber, with the exception of the high idle. I went out to start the car yesterday and it was a no go. I'm pretty sure it's just not getting enough fuel.
So this evening, I removed my intake manifold and Weber in order to replace the carb -> IM gasket. It was leaking fuel when we first got the whole setup on. We tightened it up and got it to stop leaking fuel, but we had a high idle, which we suspected was an air leak. I got new gaskets in the mail yesterday courtesy of Pierce Manifolds. While I could have struggled to get the carb off the manifold, those bolts and nuts are a real b*tch to get off as you can't get a ratcheting spanner around either of them. j9fd3s suggested I get allen head bolts so I could get a tool under the manifold should I need to remove the carb again, but I forgot and wanted to get this sorted out tonight. Hope I don't regret that.
The gasket I replaced was completely different than the one I replaced it with. The old gasket was a rubber o-ring like thing connected in the center with a wide flat piece of rubber. I can see why the gasket leaked. If any one side of the carb was bolted down more than the others, the other sides would lift, allowing air/fuel to escape. You have to bolt this thing down evenly in order to get this thing to not leak. The new gaskets were a pair of thick, paper gaskets that had a lot more meat to seal off potential leaks than the thin rubber o-ring gasket, thus seems to be a lot more forgiving. Here's what I mean:
Old:

New:

I got it all back together and put the IM back on the engine. There was one thing I had not considered when swapping gaskets. The old gasket was slightly thicker. Thick enough to allow the accelerator linkage move through its entire arc. With the new gasket, it brought the carb closer to the IM, which caused the accelerator cam to hit the brake booster bung about 1/4 throttle. Ugh...this won't do.
So I spent an hour with a set of files, removing bits of IM until the accelerator cam would move through its entire range again. Once that was sorted out, I installed an FPR. Tomorrow, I'm going to have a friend over and we're going to try to get it started again. If we do, we'll see how the idle fares this time around. If it's not happy, I'm going to look into a different idle jet.
Oh, and obligatory pics, to prove this all happened.


fm
So this evening, I removed my intake manifold and Weber in order to replace the carb -> IM gasket. It was leaking fuel when we first got the whole setup on. We tightened it up and got it to stop leaking fuel, but we had a high idle, which we suspected was an air leak. I got new gaskets in the mail yesterday courtesy of Pierce Manifolds. While I could have struggled to get the carb off the manifold, those bolts and nuts are a real b*tch to get off as you can't get a ratcheting spanner around either of them. j9fd3s suggested I get allen head bolts so I could get a tool under the manifold should I need to remove the carb again, but I forgot and wanted to get this sorted out tonight. Hope I don't regret that.
The gasket I replaced was completely different than the one I replaced it with. The old gasket was a rubber o-ring like thing connected in the center with a wide flat piece of rubber. I can see why the gasket leaked. If any one side of the carb was bolted down more than the others, the other sides would lift, allowing air/fuel to escape. You have to bolt this thing down evenly in order to get this thing to not leak. The new gaskets were a pair of thick, paper gaskets that had a lot more meat to seal off potential leaks than the thin rubber o-ring gasket, thus seems to be a lot more forgiving. Here's what I mean:
Old:
New:
I got it all back together and put the IM back on the engine. There was one thing I had not considered when swapping gaskets. The old gasket was slightly thicker. Thick enough to allow the accelerator linkage move through its entire arc. With the new gasket, it brought the carb closer to the IM, which caused the accelerator cam to hit the brake booster bung about 1/4 throttle. Ugh...this won't do.
So I spent an hour with a set of files, removing bits of IM until the accelerator cam would move through its entire range again. Once that was sorted out, I installed an FPR. Tomorrow, I'm going to have a friend over and we're going to try to get it started again. If we do, we'll see how the idle fares this time around. If it's not happy, I'm going to look into a different idle jet.
Oh, and obligatory pics, to prove this all happened.
fm
GSL-EV
Joined: Jun 2012
Posts: 450
Likes: 8
From: Rapid City, SD
Iotus,
You probably want to tie the batt neg to the chassis at the same point as you run over to the starter/engine block. The steel in the chassis is not the most excellent conductor.
It was marginally warm enough to drive the EV to the car wash so I did that. Just broke 2200 EV miles. Performance was pretty poor due to the cold soak the batteries have had this last week.
Worked some more on the sun roof for the GSL-SE. I need a perfect part to make a mold from so I am stripping the paint off the outside face and fixing the dings. It looks like there are four different types of coatings. Clear Coat, Sunrise Red color coat, Light grey primer/filler and dark grey primer. Anyone know why two different primers?
I had a friend over this evening and we got her started. I had to simulate a choke by covering the velocity stacks, then she fired right up. Still has a high idle, so I'm gonna look into a different idle jet.
The FPR I installed leaks and didn't show consistent pressure, so I removed it. I may add another new one later, but for the now, I'm good.
A super bowl party got out of hand in my neighborhood and cops were on the scene just as I got the car running. Then I turned off the car. I'd forgotten about the backfire. BOOM!!! That got their attention, but they had their hands busy. Brilliant!
fm


Finished the power window conversion, and tested it. No issues with that. Then i decided to install my fc fuse block and get rid of that stupid brown fusible link connector...i would post a pic of what i have so far but the mobile app is an ******* and keeps crashing when i try to attach the photos. When i get home ill look over the fsm and make sure everything is connected properly, then apply battery power and hope nothong explodes or smokes...EDIT...and somehow the mobile app added 4 pics of the bottom of the fuse block.....
 just pitchin ya ****
Taking a break from Weber carbs and fireballs, I pulled one of my custom lower links off to take the the machinist. He's going to be making custom hat bushings to fit the links perfectly so that there's no slop. That should quiet everything down back there.
fm
fm
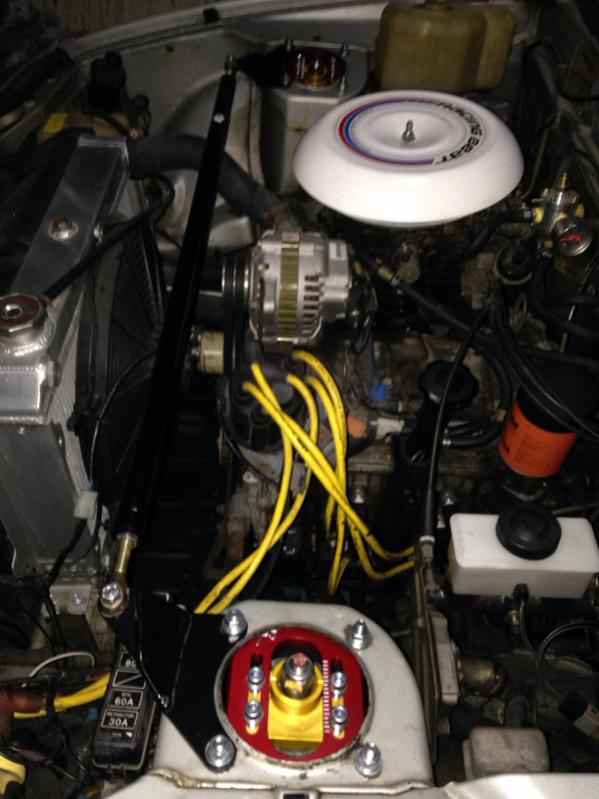
Fc fuse block in its temporary home. When my bracket arrives it will find a permanent home somewhere. Relocated my coolant overflow bottle to make room for the CAI piping but forgot to get an updated engine bay pic 

She has been sitting up at Speed 1 as it was on the dyno for final tuning and there were issues with the timing under boost. After some investigation, it seemed that I had software for a non-turbo so the ECU had to be pulled and sent to Australia and then Dave got hurt, I moved and bought a house, was unemployed for about six months and then started a new job etc so it sat up at Speed 1. New year, issues worked out and safe in its new garage.
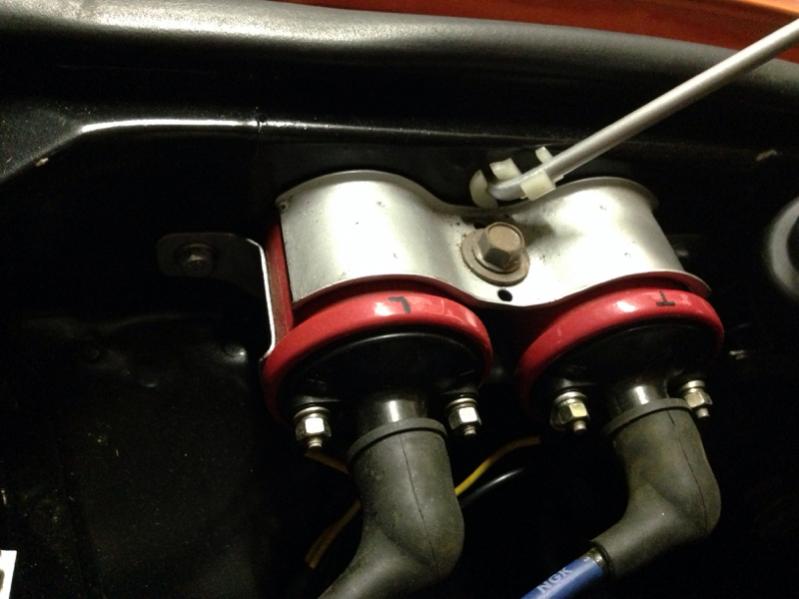
Started clearing a spot on the shock tower to install the clamp for my MSD Blaster 2 coils. Engine bay is crowded because I still have full a/c components (hasn't worked since I purchased the car 8 months ago, needs servicing and belts). Toyed with the idea of getting rid os the a/c but summers in Kelowna can be brutal!!
BTW, are we ABSOLUTELY sure that Blaster 2 coils need to be installed vertically?! It would be so much easier to just slip them into the spot occupied by the original coils inside the fender. Any thoughts?
BTW, are we ABSOLUTELY sure that Blaster 2 coils need to be installed vertically?! It would be so much easier to just slip them into the spot occupied by the original coils inside the fender. Any thoughts?