
What did you do to your FB today?

GSL-EV
Joined: Jun 2012
Posts: 450
Likes: 8
From: Rapid City, SD
Made an offer on an OEM power steering setup from an 84 GSL-SE that will go in my 85 GSL-SE.
Drove the GSL-SE to lunch and it started pretty easily. When I got done with lunch it turned into an adventure of sorts. It flooded and I couldn't get it to run. Got my tow vehicle and while towing home I put it in third and let out the clutch and started instantly. I don't think they like low battery voltage much at all. Drove it around town and got it warmed up and battery somewhat charged. As part of my drive I let a local forum member drive the car a little. Going out in a few minutes to put the charger on it. I had the alternator tested and it does put out 60 amps but I think it may not be regulating to a high enough voltage to get the battery completely charged.
Spent a little time working on my door cup pull project cleaning up the mold I made.
It ended up being a good day!


Drove the SA to work and back... as I do 4 other days of the week :P
Really can't wait to put the old 79 off the road for a while and do a resto. Gotta get that 84 running so I'll have a ride. Might end up just doing N/A for the moment; haven't made up my mind yet.
Really can't wait to put the old 79 off the road for a while and do a resto. Gotta get that 84 running so I'll have a ride. Might end up just doing N/A for the moment; haven't made up my mind yet.
Deep in the flow on the MSIII & FC ignition install and tuck.
I've finally given up on the idea of keeping the air conditioner, and pulled the main unit from under the dash.
I used to have a sort of sentimental attachment to it, a creature-comfort that was top-of-the-line, factory installed on this premium GSL-SE. and anyways it already had the unit, condenser, and hard lines, all it needed was the pump. Why get rid of a system that was meant to be there?
Well, in my quest for the most optimal NA/FB configuration, I've already had to ditch the condenser to fit the cold air induction. I then decided to move the radiator overflow bottle up there as well to clean up the engine bay. Yet I was still not convinced to ditch the whole thing. Surely there was some way to retrofit some small form-factor, aftermarket condenser into the OEM system?
*Sigh,* this was starting to sound rare and expensive, two things I don't want to be building into my car.
I came to a realization - honestly, the only reason I would keep A/C in the car would be to keep a lady comfy. But ladies prefer to be warm, not cold. And when ladies are warm, they wear less clothing. I would prefer ladies that wear less clothing. No need for AC.
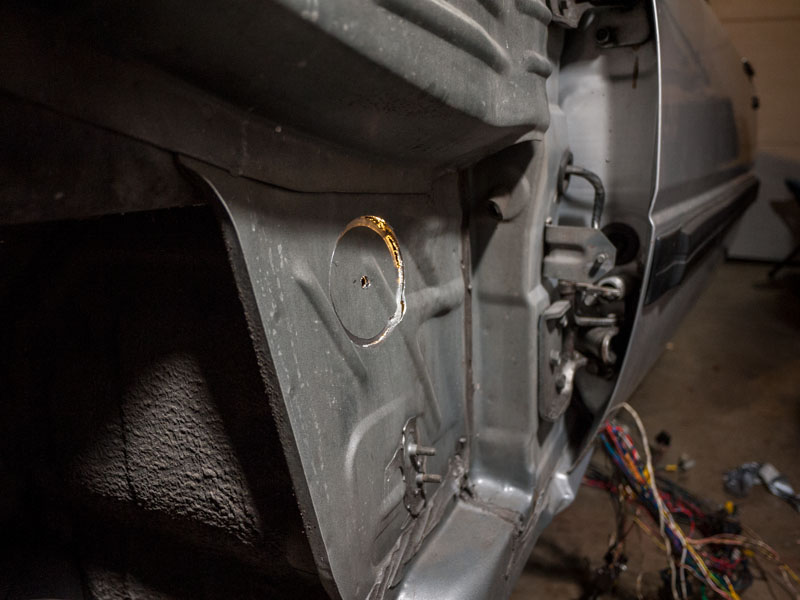
Today when I pulled off the driver-side wheel, fender liner, fender, and headlight for the tuck, I found there are handy holes along the entire length of the fender bracing, almost as if specifically made for wire harness plugs. And, as it turns out, I have a bunch of these plugs left over from where the harness connected on the inside of the engine bay
Also pulled out the main ground and power wires. These OEM wires be crimpin my style.
The new starter line will drop down to the frame rail and back to the firewall, across to the starter. The ground wire will drop off the front of the battery, tuck under the battery tray, back the frame rail, grounding out at the strut tower ps cooling line bolt. From here under and across to the rear iron of the engine block. My hope here is that it will better ground out the block, intake, and related ECU sensors, rather than dangling off the back of the starter bolt as was previously.
I will also run another 10ga ground wire back through the fender and across to the ECU. It's best to keep related systems powered and grounded on the same circuit, to isolate and reduce ground loops.
This past week I pulled the engine harness back into the cabin for the wire tuck. I found that the harness that wraps around the nose and back the passenger side fender is the ignition system harness, terminating at the 6-pin connector on the passenger side firewall. It connects into the main harness via a thick 12v black/white stripe and a yellow/green stripe tach signal from the trailing coil.
Since I'm installing an FC direct fire ignition with a standalone computer to control it, this entire harness can be removed. I pulled the thick 12v back into the cabin to hook up to additional hardware such as gauges, ECU, and related relays. Pretty sure it goes back to the fusible links as 12v constant, but I could be mistaken.
Tomorrow I will scope out some firewall grommets for the fender hole, and then buy a large-diameter circular drill bit to match. I need to pull through the stereo power wire as well, which I definitely want to isolate from the rest of the harness.
That's all for now, pictures after the break.
~Geoff
I've finally given up on the idea of keeping the air conditioner, and pulled the main unit from under the dash.
I used to have a sort of sentimental attachment to it, a creature-comfort that was top-of-the-line, factory installed on this premium GSL-SE. and anyways it already had the unit, condenser, and hard lines, all it needed was the pump. Why get rid of a system that was meant to be there?
Well, in my quest for the most optimal NA/FB configuration, I've already had to ditch the condenser to fit the cold air induction. I then decided to move the radiator overflow bottle up there as well to clean up the engine bay. Yet I was still not convinced to ditch the whole thing. Surely there was some way to retrofit some small form-factor, aftermarket condenser into the OEM system?
*Sigh,* this was starting to sound rare and expensive, two things I don't want to be building into my car.
I came to a realization - honestly, the only reason I would keep A/C in the car would be to keep a lady comfy. But ladies prefer to be warm, not cold. And when ladies are warm, they wear less clothing. I would prefer ladies that wear less clothing. No need for AC.
Today when I pulled off the driver-side wheel, fender liner, fender, and headlight for the tuck, I found there are handy holes along the entire length of the fender bracing, almost as if specifically made for wire harness plugs. And, as it turns out, I have a bunch of these plugs left over from where the harness connected on the inside of the engine bay
Also pulled out the main ground and power wires. These OEM wires be crimpin my style.
The new starter line will drop down to the frame rail and back to the firewall, across to the starter. The ground wire will drop off the front of the battery, tuck under the battery tray, back the frame rail, grounding out at the strut tower ps cooling line bolt. From here under and across to the rear iron of the engine block. My hope here is that it will better ground out the block, intake, and related ECU sensors, rather than dangling off the back of the starter bolt as was previously.
I will also run another 10ga ground wire back through the fender and across to the ECU. It's best to keep related systems powered and grounded on the same circuit, to isolate and reduce ground loops.
This past week I pulled the engine harness back into the cabin for the wire tuck. I found that the harness that wraps around the nose and back the passenger side fender is the ignition system harness, terminating at the 6-pin connector on the passenger side firewall. It connects into the main harness via a thick 12v black/white stripe and a yellow/green stripe tach signal from the trailing coil.
Since I'm installing an FC direct fire ignition with a standalone computer to control it, this entire harness can be removed. I pulled the thick 12v back into the cabin to hook up to additional hardware such as gauges, ECU, and related relays. Pretty sure it goes back to the fusible links as 12v constant, but I could be mistaken.
Tomorrow I will scope out some firewall grommets for the fender hole, and then buy a large-diameter circular drill bit to match. I need to pull through the stereo power wire as well, which I definitely want to isolate from the rest of the harness.
That's all for now, pictures after the break.
~Geoff

777CheekZ
Joined: May 2011
Posts: 138
Likes: 1
From: Montreal
Yesterday I couldn't get much done cuz I had to shovel out a path to get to my garage..but I managed to untangle some wires and build a bracket for my relay panel fusible links(which are relocated inside the car now) and the fuse box 
Wiring is a pain in the ***...only cuz it takes so damn long
Wiring is a pain in the ***...only cuz it takes so damn long
Yet again, I am ecstatic that I don't live where it routinely snows deeper than my dog is tall. It still got down to 18 degrees, which is far too cold for North Texas. thankfully no moisture. I'm staying inside - I'm not a "cold" person at all.


Got my 1983 FB on Sunday, got it home, and ran into fuel starvation problems the first drive I took it on since its arrival in my driveway. Replaced the fuel filter and am hoping that did the trick. We shall see...
On a similar note, when I replaced the fuel filter, the gas in the tank had a yellow tinge to it, anyone have any ideas what that could be? Rust? Some additive the guy who sold it to me put in so I could get it home before it broke down? Maybe just old gas?
On a similar note, when I replaced the fuel filter, the gas in the tank had a yellow tinge to it, anyone have any ideas what that could be? Rust? Some additive the guy who sold it to me put in so I could get it home before it broke down? Maybe just old gas?

My Mazda Mistress
Joined: Nov 2008
Posts: 22
Likes: 3
From: Louisville
Year of Manufature Plates
I renewed my vehicle registration last week and opted for a historic vehicle registration so I could put the original 1982 "year of manufacture" plate back on it today. Then I took it out for a spin to see if the 32 year old license plate caught the attention of any rookie cops in the area.
My Mazda Mistress
Joined: Nov 2008
Posts: 22
Likes: 3
From: Louisville
estevan that polish is looking amazing keep it up!
---
I promised myself that this winter I would do a wire tuck.
I put it off as long as I could, made excuses on how I needed to wait until I got the new computer in, or until mercury hits retrograde.
Enough bullshitting, time to actually do it. Thanks to Dave and Jesus for all the inspiration and help!
3" hole drilled into the kick panel above the foot rest. (Note to self: buy that plug-in drill, batteries suck.) I used duct tape on the inside of the kick panel to catch dropped metal shards and the final 3" chunk.
I then took a dremel to the sharp edge and smoothed it down, then cut a bit of vacuum hose and made a temporary gromet. Eventually I'll make a more permanant setup with some split bike tubes covering top and bottom half, allowing a split down the center for the loom.

After spending all of today out and about gathering the electrical supplies, connectors, wires, terminals, etc that I would need for the tuck, I finally get into the flow at 9pm only to realize my wire crimps do not work for the non-insulated butt connectors I plan to use.
And nobody's open.
In a frantic dash, my roomie and I hit up Fred Myer, and they have the absolute junkiest piece possible. but i pay $14 for it anyways, grab a box of Bitter American session ale, and make for the door.
They worked even worse than I had imagined.
Not willing to give up after building so much momentum, i dug through the garage and found a crimp tool that had a solid non-ins crimp. Whew! Time to dive in.
Dave convinced me to switch out all the connectors to weather pack. they will last forever, and the crimping tool is SOLID. I figured if i'm going to be extending or crimping anyways, might as well do it right and do it once.
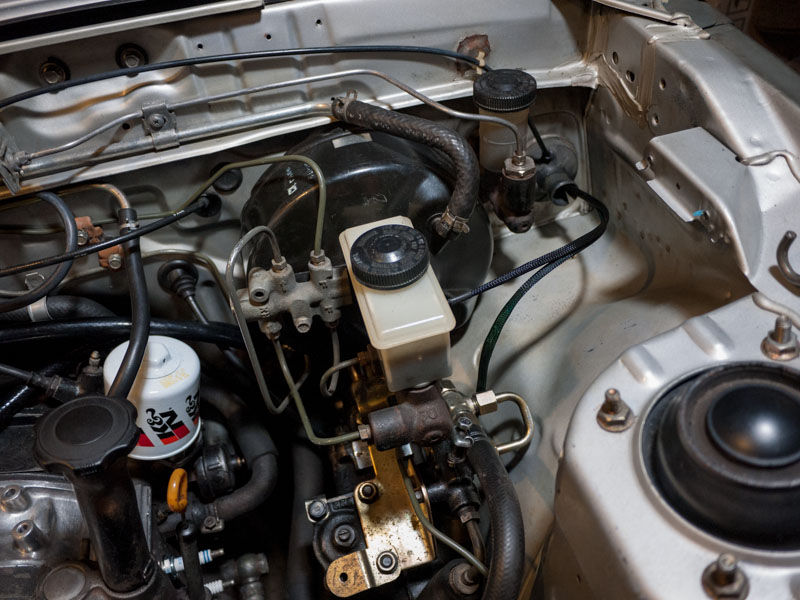
An extended and weather-packed brake fluid signal wire
The steering column wire joins the party
Looking so much better!
Time to get some rest and dive back in tomorrow.
---
I promised myself that this winter I would do a wire tuck.
I put it off as long as I could, made excuses on how I needed to wait until I got the new computer in, or until mercury hits retrograde.
Enough bullshitting, time to actually do it. Thanks to Dave and Jesus for all the inspiration and help!
3" hole drilled into the kick panel above the foot rest. (Note to self: buy that plug-in drill, batteries suck.) I used duct tape on the inside of the kick panel to catch dropped metal shards and the final 3" chunk.
I then took a dremel to the sharp edge and smoothed it down, then cut a bit of vacuum hose and made a temporary gromet. Eventually I'll make a more permanant setup with some split bike tubes covering top and bottom half, allowing a split down the center for the loom.
After spending all of today out and about gathering the electrical supplies, connectors, wires, terminals, etc that I would need for the tuck, I finally get into the flow at 9pm only to realize my wire crimps do not work for the non-insulated butt connectors I plan to use.
And nobody's open.
In a frantic dash, my roomie and I hit up Fred Myer, and they have the absolute junkiest piece possible. but i pay $14 for it anyways, grab a box of Bitter American session ale, and make for the door.
They worked even worse than I had imagined.
Not willing to give up after building so much momentum, i dug through the garage and found a crimp tool that had a solid non-ins crimp. Whew! Time to dive in.
Dave convinced me to switch out all the connectors to weather pack. they will last forever, and the crimping tool is SOLID. I figured if i'm going to be extending or crimping anyways, might as well do it right and do it once.
An extended and weather-packed brake fluid signal wire
The steering column wire joins the party
Looking so much better!
Time to get some rest and dive back in tomorrow.
GSL-EV
Joined: Jun 2012
Posts: 450
Likes: 8
From: Rapid City, SD
Yesterday was a nice day (this is relative) with a high of around 55 so I cleared a spot on the garage floor and unloaded the power steering parts for the GSL-SE from the back of the GSL-EV which I used to pick them up earlier in the week. Then I took the EV to a car wash for a very needed bath. Used the Meguiars Ultimate Black product on the black side protectors and bumpers. This is a good product and seems to do for the exterior plastic parts what good wax does for paint. I applied this to the GSL-SE in November after Seven Stock and it still looks like I just applied it. I had cleaned up a piece of interior trim and painted it a few months ago and I put that back on the car. And with all the driving around I managed to break the 2000 miles driven mark as an Electric.
It was a good day to own an FB!
It was a good day to own an FB!
lwrobins - looks amazing! Engine bay is looking great, and the Enkei / IMSA combo is just perfect.
And you're local! When i get my car on the road lets go for a cruise / photo shoot.
Doug - I'm going to have to check out that Maguires Ultimate Black. Have you tried out Armorall Extreme - Wheel & Tire cleaner? It makes your rubber look like it just came from the manufacturer, and your rims will never be cleaner! Watch out tho, if you have chips or cracks in the finish of the wheel, this stuff will take off any flakes.
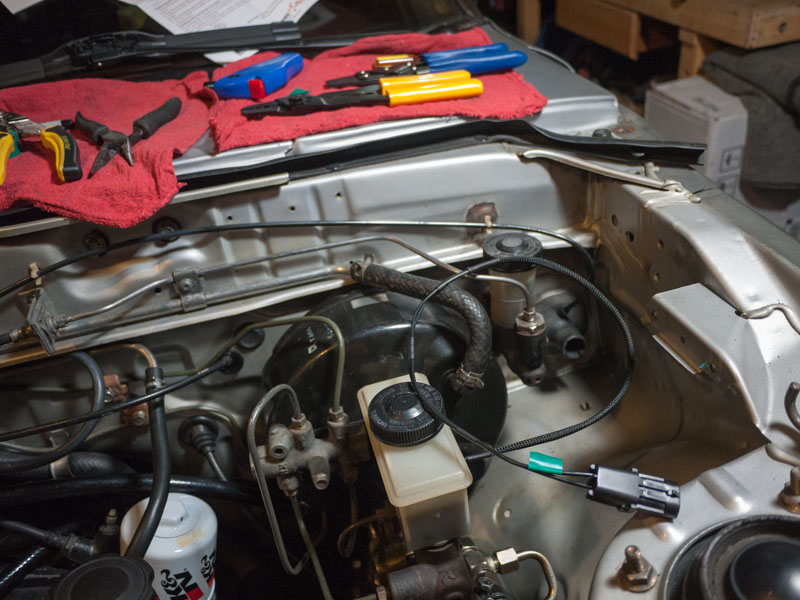
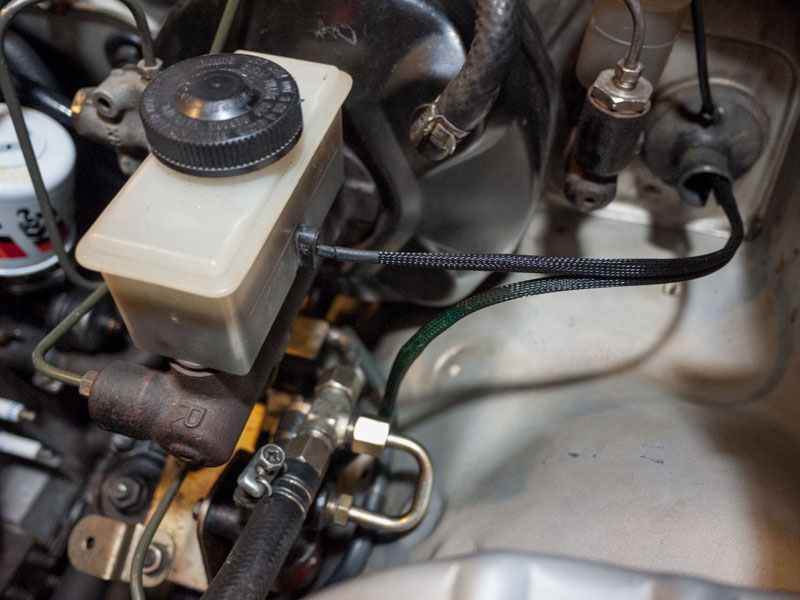
Last night I finished up most of the driver's side harness tuck / extend. I've gone through 3 pairs of crimps trying to find the best ones for the solderless crimps i'm using. So far the $7 cheapos have the best/strongest crimp. The $14 ones have the best strippers, and i'm guessing the $20 "heavy duty" ones will be good for the battery cable.
I read in Aaron Cake's "How to Megasquirt your RX7" website that you should only use adhesive-lined heat shrink as normal heat shrink won't protect from moisture. Well, nobody in Seattle sells adhesive lined heat shrink, so i'm making do with what I've got.
I re-did the power steering column wiring with some black heat shrink underneath, I wasn't down with the green-through-black look. Also tried a little experiment with the brake booster hose. Not sure if I like enough to do all the hoses under the hood, I'm thinking i should just leave them bare/clean rubber.
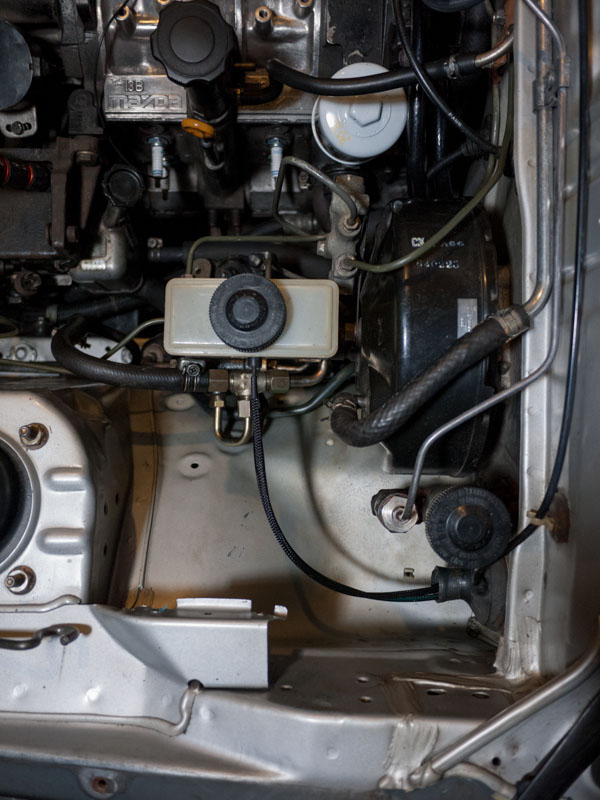
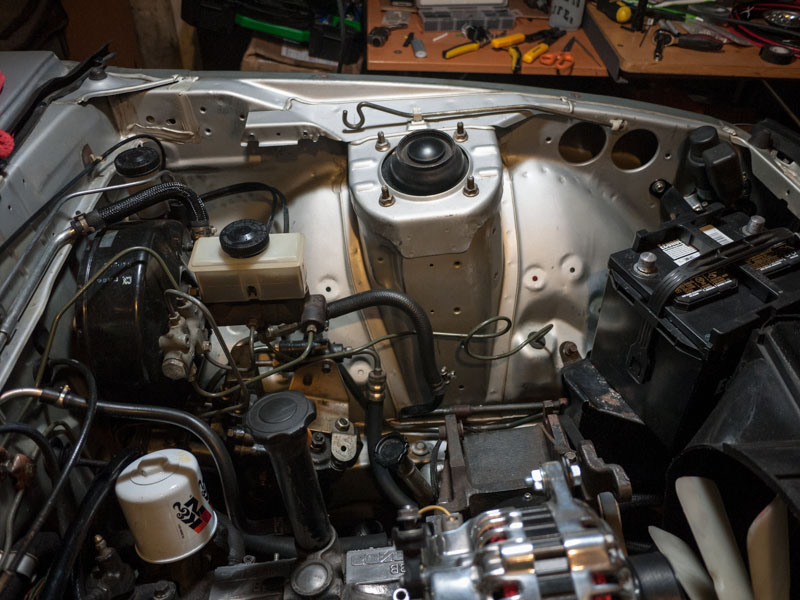
As I've been pulling everything out, I've been deep cleaning the engine bay. I'm employing the use of my Sonicare tooth brush - works GREAT for tight squeezes, behind the brake booster, in the corners, etc. However, nothing can re-apply corroded and stripped paint, and I've got quite a bit of that. Near the battery tray, driver strut tower, and behind / below the brake booster and clutch master.
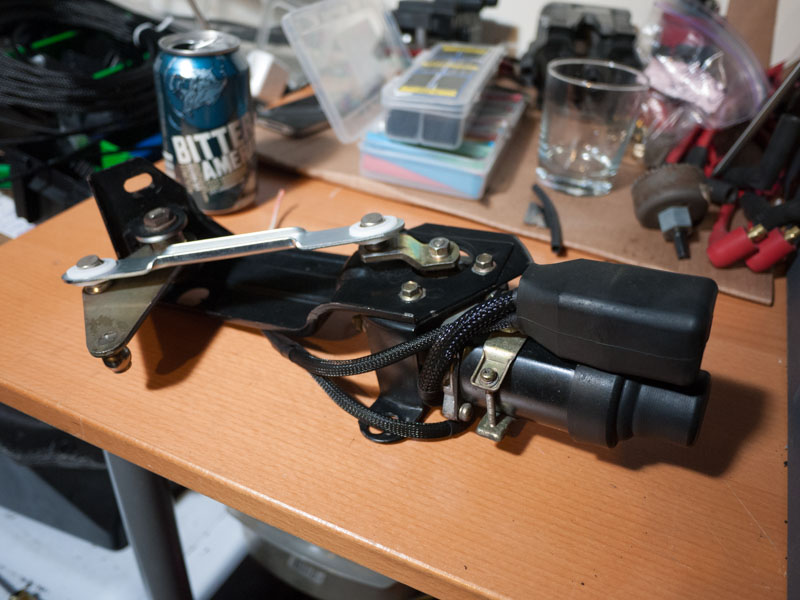
While I had the headlight retractor out, I decided I might as well freshen up the wiring on that as well. For all the work, when I installed it I realized you can barely see it, but oh well at least its unique and I'LL know that I did it
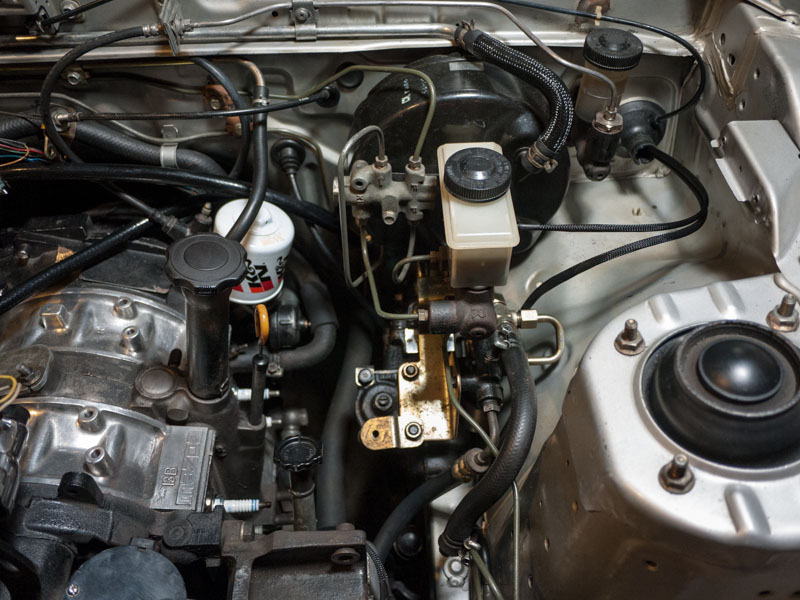
These photos aren't quite an accurate representation of the bay yet, as I still have to install the ignition. For now I'm going to work on a strut tower mount, and re-use my Magnecor R100's. When I get the rack & pinion installed (some distant time down the road, RE-Speed we miss you!) then I'll more than likely relocate the ignition down to the frame rail.
Right now I'm only re-wiring the OEM harness, which includes the lighting harness, radiator wires, horns, and retractor motors. After I've got all this rewired and tucked, then I'll route and install the Megasquirt harness, part of which will drop down the transmission tunnel to the block, and the other part will wrap around the driver fender up to the nose and back (for CAS) and out the factory harness grommet (for ignition)
And you're local! When i get my car on the road lets go for a cruise / photo shoot.
Doug - I'm going to have to check out that Maguires Ultimate Black. Have you tried out Armorall Extreme - Wheel & Tire cleaner? It makes your rubber look like it just came from the manufacturer, and your rims will never be cleaner! Watch out tho, if you have chips or cracks in the finish of the wheel, this stuff will take off any flakes.
Last night I finished up most of the driver's side harness tuck / extend. I've gone through 3 pairs of crimps trying to find the best ones for the solderless crimps i'm using. So far the $7 cheapos have the best/strongest crimp. The $14 ones have the best strippers, and i'm guessing the $20 "heavy duty" ones will be good for the battery cable.
I read in Aaron Cake's "How to Megasquirt your RX7" website that you should only use adhesive-lined heat shrink as normal heat shrink won't protect from moisture. Well, nobody in Seattle sells adhesive lined heat shrink, so i'm making do with what I've got.
I re-did the power steering column wiring with some black heat shrink underneath, I wasn't down with the green-through-black look. Also tried a little experiment with the brake booster hose. Not sure if I like enough to do all the hoses under the hood, I'm thinking i should just leave them bare/clean rubber.
As I've been pulling everything out, I've been deep cleaning the engine bay. I'm employing the use of my Sonicare tooth brush - works GREAT for tight squeezes, behind the brake booster, in the corners, etc. However, nothing can re-apply corroded and stripped paint, and I've got quite a bit of that. Near the battery tray, driver strut tower, and behind / below the brake booster and clutch master.
While I had the headlight retractor out, I decided I might as well freshen up the wiring on that as well. For all the work, when I installed it I realized you can barely see it, but oh well at least its unique and I'LL know that I did it
These photos aren't quite an accurate representation of the bay yet, as I still have to install the ignition. For now I'm going to work on a strut tower mount, and re-use my Magnecor R100's. When I get the rack & pinion installed (some distant time down the road, RE-Speed we miss you!) then I'll more than likely relocate the ignition down to the frame rail.
Right now I'm only re-wiring the OEM harness, which includes the lighting harness, radiator wires, horns, and retractor motors. After I've got all this rewired and tucked, then I'll route and install the Megasquirt harness, part of which will drop down the transmission tunnel to the block, and the other part will wrap around the driver fender up to the nose and back (for CAS) and out the factory harness grommet (for ignition)
777CheekZ
Joined: May 2011
Posts: 138
Likes: 1
From: Montreal
Yesterday I rewired a few more things..I see another 2 pounds of wires coming off the car can't wait to finish this wire tuck so I can get the engine out and shave the bay
Today I'm heading to the garage to finish up the untangling of the harness
can't wait to finish this wire tuck so I can get the engine out and shave the bay Today I'm heading to the garage to finish up the untangling of the harness
After a long break from the garage, I finally went out there this evening. First I installed the Momo steering wheel I got from a race car at the junk yard:

It's by no means mint, but it's got no tears, doesn't feel like a mac truck wheel in my hands, and the flat spot at the bottom clears my legs nicely for when I move my seat up for auto-x runs. Need a horn button, but that's easy enough to source.
Then I went crazy and borrowed my neighbor's heat gun and took off my side moldings:

It looks terrible now, but I haven't cleaned it up yet. The car will be getting a new look sometime during this year, so this is the prep for that new look. Very excited to get that chapter started.
fm
It's by no means mint, but it's got no tears, doesn't feel like a mac truck wheel in my hands, and the flat spot at the bottom clears my legs nicely for when I move my seat up for auto-x runs. Need a horn button, but that's easy enough to source.
Then I went crazy and borrowed my neighbor's heat gun and took off my side moldings:
It looks terrible now, but I haven't cleaned it up yet. The car will be getting a new look sometime during this year, so this is the prep for that new look. Very excited to get that chapter started.
fm
Fungus - go get a pinstripe eraser from the local parts store, one that specializes in paint/body work. You hook it up to a drill and its literally a circular rubber erarser. It pulls that stuff up without hitting the paint too hard.
Just don't lean too hard into it, that WILL take off the paint
Just don't lean too hard into it, that WILL take off the paint