What did you do to your FB today?
 04-26-13, 01:29 AM
#2776
I chose a known working waterpump so I'd have one less thing to worry about during its first heat cycle coming up. Like DD, I like to make things pretty, and since this one passes the 20/20 test, I was like, ok I'll just throw it on. Then I remembered the thermostat was a modded one from a previous project. Ok. Gotta pop off the upper part now and swap thermostats. I have a new one and a new gasket sitting over in the "new" pile. Slide the wp on the engine studs so I can take off the bolts. All was well. The gasket stuck to the thermostat housing and came cleanly off the waterpump. Will I need the new gasket? Pop out the modded Tstat and drop in the new one. Hmm, should I just apply RTV and call it good? Yep. Same for the wp itself. The gasket was still viable so I just gooped it up and slid it back on the engine studs. Also had to grab an alt to get the alt braket aligned as the bolt was tightened.
Hoses took a while to do. One set of really nice ones had been hacked up for other projects, so the search began for still good enough but not visually ugly or too stiff and old to use. They had a little rust inside so I cleaned it out with a dremel attatchment (don't know what it's called but looks like a scotchbright material, and cleans rubber really well!). The lower went on well enough. The I grabbed an FC/FB hybrid clutch fan and a tall style fan shroud. Spin the fan = bump bump bump against the shroud. Crap. This means I can a) trim some fins which often brings an imbalance or b) drill new holes to raise the shround up and trim plastic where needed. I've done it before on a short style shroud. Lots of fitment trial and error. Then I realized I have a c) option. A 16" electric fan, with stainless thermocouple thermostatic switch. Duh! Might as well. PercentSevenC's car has had one of these fans with a turbo and it didn't overheat. Mine is just an NA. A fresh rebuilt NA, but an NA all the way.
I installed the fan on the brand new radiator core. I guess I should have cringed when I pushed the sharp metal object through the pristine fins to make room to get the plastic fan attatchment things through. But I didn't.
Then I hooked up power and noticed it didn't really pull well, buit reverse polarity and it pushed really well. Hmm, must need the blade reversed. Then I struggled with that for a good hour as it was not only a little rusty (rusty steel inside of brass = stucksville, but it can be worked free thankfully) but the top was too wide to allow it to pass through. Agains dremel saved the day by removing .05mm from the steel which let the brass part slide up and off. So finally got it off and flipped around. Now it's a puller.
Tomorrow wiring the thermoswitch, hose clamps, coolant, maybe fuel system and DLIDFIS.
 04-26-13, 09:59 AM
#2778
 I re-used the original bracket-locking flange bolt (the upper one that holds the alt to the long curved bracket.) It's got a much wider than usual flange on it, not an easy-to-find item.
The pivot (lower) bolt, though... I think you'd need a mirror to read the legend on the bolt head, considering its position. But eventually I'll score original hardware for it.
I need to find an insulating boot for the output connector, too - - I don't like that direct-to-high-current-source stud sticking out there all naked & just waiting to get tapped by a grounded tool at some point. *POW*
Thank you, sir. I can't wait to see it out in the sunlight. Thus far, it's only been in the garage.
04-26-13, 12:19 PM
#2780
The last set of frosted tail lights i made (was either for Direct Freak or Vipernicus, don't recall) had a bad gasket, so I just picked up some adhesive-backed sealant strips from O'Reiley's and stuck it on & trimmed it down.
Unfortunately - both of them took their cars out of commission for other endeavors right afterwards so i never heard back if it worked out or not.
But thats what I'd suggest.
Unfortunately - both of them took their cars out of commission for other endeavors right afterwards so i never heard back if it worked out or not.
But thats what I'd suggest.
04-26-13, 11:02 PM
#2789
The two leading coils for DLIDFIS are in. The center brass electrodes were kinda gross so I swapped in some from old points coils. I knew I kept them around for something. Then I installed one of them in the old leading coil location as a way to keep the trailing coil in place and it's got a convenient stud to hook up a ring terminal. Tomorrow, if I have time, I'll do the ignitors.
The hose clamps are on. Filled with coolant. So far ok until I noticed the water temp sensor is a little damp. Ok, go to tighten it, the oil pressure sender is in the way. Tomorrow. Heh.
The hose clamps are on. Filled with coolant. So far ok until I noticed the water temp sensor is a little damp. Ok, go to tighten it, the oil pressure sender is in the way. Tomorrow. Heh.
04-27-13, 02:32 AM
#2790
Bolted up my rotary engine stand adapter to the other 12A with low comp sitting in my garage in preparation for tear down. Need to have my friend come over tomorrow eve to help me lift that thing onto the stand. So, I took a break from the oily bits and went to work removing my maroon pinstripes from the car.
I got 3/4 through, but the rear half of the car was a real b*tch. The PO had the rear resprayed (rust damage to the hatch area, I'm sure) and the shop must have masked off the tape and sprayed around it. To cover up the areas of overspray on the the pinstriping, they put another layer of pinstriping on top of the original. So I go the take off the stripes with my razor blade (which had worked swimmingly on the passenger fender and door) and it keeps chipping off in chunks. Or, what I believed to be a long strip of pinstripe, comes off only to leave another, identical pinstripe underneath. Of course, since they masked, there is a lovely step in the paint where the stripe was. On some areas, the paint just chipped away. It looks way worse now.
I'm not going to get too broken up over it. I plan on doing an IMSA makeover anyway. I guess it will be sooner than later.
fm
04-27-13, 11:13 AM
#2791
Why do so many people believe the engine has to be on a stand in order to take it apart? I've never used a stand for disassembly. Sounds tedious to me. You gotta fight gravity on parts that have been together for 30 years. Coolant and/or oil spilling out onto your shoes and floor. No thanks.
Go grab a simple drip pan from the auto parts store. Gotta take off oil pan first. Then remove the front oil pressure regulator from front cover, and oil pick up tube. Place engine on drip pan. Then take off front 19mm bolt and cover, thrust stuff, then tension bolts. No more fighting gravity. The irons slide easily on the drip pan surface. No mess on your floor. But then that's too smart for some folks I guess.
What are you gonna do, fungus?
04-27-13, 12:43 PM
#2792
I use a large (2x3 ft, I think) square drip pan clamped to the base of the engine stand with c-clamps; catches pretty much everything. Putting a couple layers of paper towels in it first prevents splashing. But there are many 'correct' ways to do a teardown; whatever works, works.
I've done an on-the-bench teardown before too, and that works fine.
Just expect that there will be more water and oil coming out than you would think, even if it was drained carefully.
I've done an on-the-bench teardown before too, and that works fine.
Just expect that there will be more water and oil coming out than you would think, even if it was drained carefully.
04-27-13, 05:52 PM
#2793
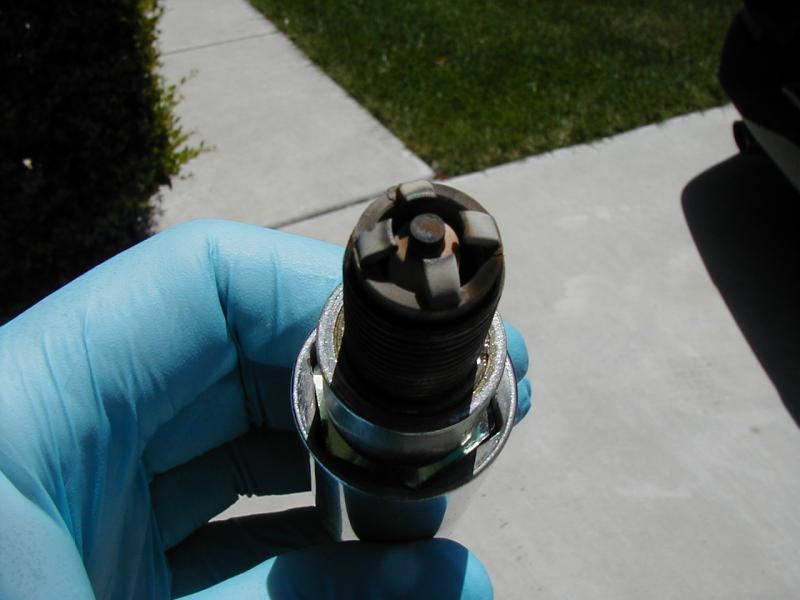
Changed oil & filter, pulled and cleaned plugs, wires, wire contacts, and burnished cap and rotor contacts. Checked timing, which was dead-on. Also tightened the alt belt, which was making a touch of noise at idle. Running very nicely. Oil useage is just below a quart per thousand road miles.
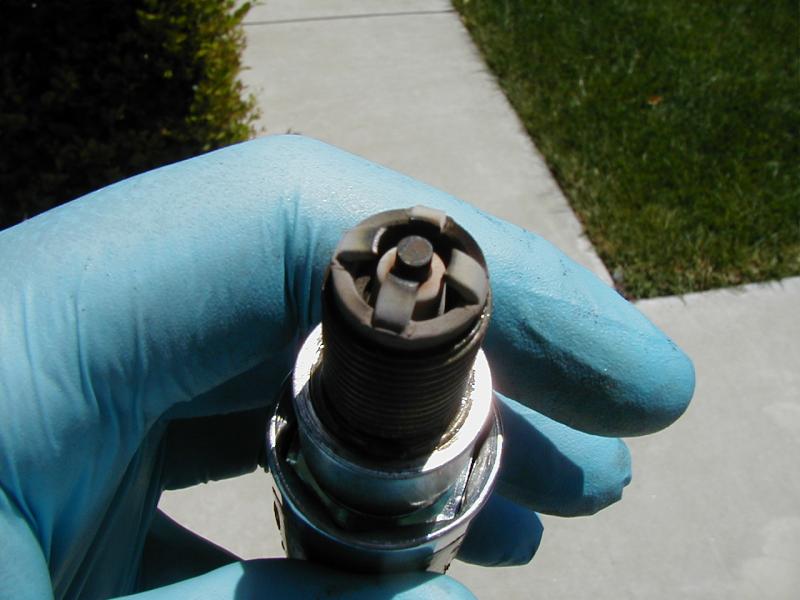
(Leading) plug condition coming out: Front rotor
Rear rotor
(Leading) plug condition coming out: Front rotor
Rear rotor
04-27-13, 07:53 PM
#2794
Changed oil & filter, pulled and cleaned plugs, wires, wire contacts, and burnished cap and rotor contacts. Checked timing, which was dead-on. Also tightened the alt belt, which was making a touch of noise at idle. Running very nicely. Oil useage is just below a quart per thousand road miles.
(Leading) plug condition coming out: Front rotor
Rear rotor
(Leading) plug condition coming out: Front rotor
Rear rotor
04-28-13, 12:44 AM
#2796
Why do so many people believe the engine has to be on a stand in order to take it apart? I've never used a stand for disassembly. Sounds tedious to me. You gotta fight gravity on parts that have been together for 30 years. Coolant and/or oil spilling out onto your shoes and floor. No thanks.
Go grab a simple drip pan from the auto parts store. Gotta take off oil pan first. Then remove the front oil pressure regulator from front cover, and oil pick up tube. Place engine on drip pan. Then take off front 19mm bolt and cover, thrust stuff, then tension bolts. No more fighting gravity. The irons slide easily on the drip pan surface. No mess on your floor. But then that's too smart for some folks I guess.
What are you gonna do, fungus?
Go grab a simple drip pan from the auto parts store. Gotta take off oil pan first. Then remove the front oil pressure regulator from front cover, and oil pick up tube. Place engine on drip pan. Then take off front 19mm bolt and cover, thrust stuff, then tension bolts. No more fighting gravity. The irons slide easily on the drip pan surface. No mess on your floor. But then that's too smart for some folks I guess.
What are you gonna do, fungus?
The reason I'm doing all this is that I got three 12A engines, a 6-port 13B engine, and engine stand, a modified Nikki, and a Weber 45DCOE from a guy for almost nothing. He just wanted it all out of his garage. One of the 12A engines was a nice street port with great compression, which I sold. The 13B also has great compression and is being prepped to go into my car. The other two 12As had bad apex seals on at least one rotor, so I'm tearing them down for the fun of it. That 's how you learn, isn't it?
I'll either part them out or I'll recycle them if the parts are too far gone. Anyway, my friend came over, helped me put the thing on the stand (took all of 5 minutes), and it's ready. 4-1/2 minutes of that was taken by him ogling the ultra-low mileage '03 Civic Si I picked up as a daily so I can start doing work on my FB.
fm
04-28-13, 08:59 AM
#2798
Isn't the quote supposed to be "How hard could it be?" (Jeremy Clarkson of Top Gear)
And then follow that up with "Job done!" (Ed China of Wheeler Dealers)
The rotting examples I am looking at have a lip that goes under the edge of the lens and a radius that is supposed to blend with the body shape in addition to curving around the complex shape of the tail light assembly. If only it was that easy I would have some made up.
My idea was to use black RTV silicone rubber somehow. I know, not much of an idea and no details as to how it would be done. Maybe a 3D printer that can print with black silicone rubber. I suppose I could invent that.
"If you paint it black it will disappear." (Jack Rickard and Brian Noto of EVTV)
04-28-13, 09:17 AM
#2799
Junior Member

Join Date: Mar 2013
Location: Central Ontario
Posts: 6
Likes: 0
Received 0 Likes
on
0 Posts
Previously refinished some waffle rims, replaced old plus rims with refinished waffles installed new rubber all around. 83 gsl. Pics of before during and after.
04-28-13, 10:12 AM
#2800
Yesterday I took a nice drive through the Black Hills in the GSL-SE to a lunch place where the area bikers go (Sugar Shack). I had been thinking about rolling resistance and a way to test if changes make a difference. It had been mentioned that a soap box derby type test might be useful so I decided to give it a try. There is a road in front of the building where I work that seemed like it might work so I gave it a try. I made 5 runs without changing anything to see how consistent it is. I marked the spot where the front tire came to rest with orange spray paint. It appears that even a small breeze makes a difference. I took these two photos after the 4th run and the difference was about 50 ft between the longest and shortest coast down distance.
When I got back home I decided to finish up the front speakers. I got the right front one in but I didn't get finished because I found some wires from a car stereo and alarm system the PO had removed (poorly). I finished removing those wires but there is still a rats nest under the steering wheel column that needs cleaning up. Maybe this afternoon.
When I got back home I decided to finish up the front speakers. I got the right front one in but I didn't get finished because I found some wires from a car stereo and alarm system the PO had removed (poorly). I finished removing those wires but there is still a rats nest under the steering wheel column that needs cleaning up. Maybe this afternoon.