4-Rotor FC Build
 04-10-12, 03:19 PM
#526
 Do you happen to remember the square dimensions?
http://home.deds.nl/~dhb/Collector%2...3,5%20inch.DXF
Cut out the pattern and fold it around a 3,5" OD. piece of pipe. Mark the notches, cut it out and hammer the remaining pieces round a piece of roundbar.
As promised, some pictures of the intake manifold.
Really happy with the filter, it's a bit pricey but should work very well.
Airhorns! These were made from delrin, I hand machined them on a lathe

I had to machine a flat side to the outer ones to make room for the filter button fasteners
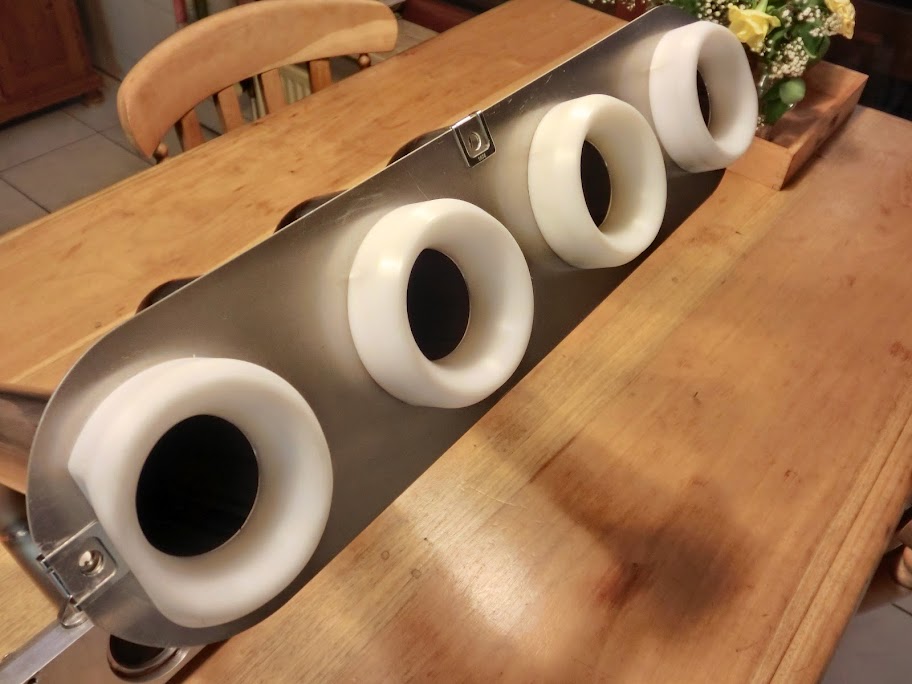
The delrin airhorns are a snug fit onto the intake tube, a stainless steel clamp will clamp them together. The 4 bolts are to fix the airhorns with the aluminium baseplate

With the filter mounted


 04-13-12, 10:11 AM
#532
Junior Member
i love this build, can't wait to see finished product! I carefully inspected every picture and diagram. Details are amazing.
By the way did you hear about people in California US, who made 4 rotor RX8? They called BMI Racing here is link to their site.
http://bmiracing.net/
By the way did you hear about people in California US, who made 4 rotor RX8? They called BMI Racing here is link to their site.
http://bmiracing.net/

 04-15-12, 10:18 AM
#538
It's an ITG filter, here is their site http://www.itgairfilters.com/
I just looked up a local distributor. I think they can make a custom one, but it will be expensive. They do have a lot of different sizes, so there's probably one that will work. The one I got came with a blank baseplate so you can mount it on pretty much anything.
I just looked up a local distributor. I think they can make a custom one, but it will be expensive. They do have a lot of different sizes, so there's probably one that will work. The one I got came with a blank baseplate so you can mount it on pretty much anything.
04-15-12, 09:51 PM
#540
Passion for Racing
Join Date: Aug 2010
Location: Crown Point, Indiana
Posts: 1,066
Likes: 0
Received 2 Likes
on
2 Posts
Let me know how that filter works out, I see it on everything and they make them fit to our normal stock air boxes, so that might be an option to consider. The only thing that might turn me off of them is them not being rechargeable like the K&N filters.
 04-16-12, 05:54 PM
#542
It's the JC70 one
You can remove the filter itself, wash it and put it back on. The filter should last longer than the rest of the engine.
Made some progress today, I'm currently busy getting the e-shaft ready for balancing. First I lightened and weight-matched all the rotors. The 2 engines I used had different rotor weights, over 50 grams difference. So in the mill they go, the rotors are a bit lighter now, and are all equal to within one gram.

Next up was making bob weights, these are carefully machined to a certain weight which matches the weight of the rotor, seals and the oil inside the rotor when the engine is running.

Next up are the counterweights. Using computer simulation I can design counterweights that will theoretically work. The shaft still needs to be dynamically balanced, but it will get me close so that hopefully only a bit of drilling is needed. The front counterweight can be easily modified to work, but I'm not so sure about the rear one. There needs to be a keyway added to it, which weakens the counterweight. Might be a bad idea with all that power going through it, and a failing counterweight could make things very ugly.
Made some progress today, I'm currently busy getting the e-shaft ready for balancing. First I lightened and weight-matched all the rotors. The 2 engines I used had different rotor weights, over 50 grams difference. So in the mill they go, the rotors are a bit lighter now, and are all equal to within one gram.
Next up was making bob weights, these are carefully machined to a certain weight which matches the weight of the rotor, seals and the oil inside the rotor when the engine is running.
Next up are the counterweights. Using computer simulation I can design counterweights that will theoretically work. The shaft still needs to be dynamically balanced, but it will get me close so that hopefully only a bit of drilling is needed. The front counterweight can be easily modified to work, but I'm not so sure about the rear one. There needs to be a keyway added to it, which weakens the counterweight. Might be a bad idea with all that power going through it, and a failing counterweight could make things very ugly.
04-16-12, 08:05 PM
#544
Well I've thought about it, but this header is already a on the long side, adding an adjustable piece would only make it longer, so it probably wouldn't do any good. I might do some testing with header designs when the car is up and running, but for now I just wanted a header that is in the ballpark and get on with the project.
Outside dimensions are roughly 70mm x 70mm. If you want to duplicate it print this .dxf file on a 1:1 scale:
http://home.deds.nl/~dhb/Collector%2...3,5%20inch.DXF
Cut out the pattern and fold it around a 3,5" OD. piece of pipe. Mark the notches, cut it out and hammer the remaining pieces round a piece of roundbar.
Most of the fabrication is done at work after hours.
As promised, some pictures of the intake manifold.
Really happy with the filter, it's a bit pricey but should work very well.
Airhorns! These were made from delrin, I hand machined them on a lathe
I had to machine a flat side to the outer ones to make room for the filter button fasteners
The delrin airhorns are a snug fit onto the intake tube, a stainless steel clamp will clamp them together. The 4 bolts are to fix the airhorns with the aluminium baseplate
With the filter mounted
 04-16-12, 08:11 PM
#545
i'm not sure i agree with the lightening method though. if you look at factory rotors they are balanced like a wheel just like the rotating assembly. taking material off equally will cause an imbalance in the spinning mass.
no idea how you could accomplish that though without a dedicated balancer for the rotors themselves.
no idea how you could accomplish that though without a dedicated balancer for the rotors themselves.
04-17-12, 05:29 AM
#547
Are you sure about that? I know that the rotors are balanced from the factory, so in it's stock shape it should be in balance when spun around the rotor bearing center axis. I aligned the milling machine to this axis, and machined the holes a certain dimension from this axis. They are all exactly the same size, and machined outside of the stock balancing holes so those are unaffected. I also did both sides of the rotor equally. I wonder if this will affect the balance a lot, if it does what about people running carbon apex seals, or people grinding down the sides of the rotor for clearance, or people beveling the edges of the rotors for earlier intake opening, I've even seen people removing the oil slinger. There isn't a great deal or material removed, the worst one had 51 grams removed. But maybe I'll take them to the local balancing shop and see if they can check it.
04-17-12, 09:10 AM
#549
Full Member
iTrader: (2)
Join Date: Oct 2010
Location: Kentucky
Posts: 126
Likes: 0
Received 0 Likes
on
0 Posts
You could get some of the titanium rotors that Mazdatrix is designing. They weigh about 6 pounds and would be great for what you need. May have to wait a little longer until they go into production though.
04-17-12, 09:30 AM
#550
Rotary Enthusiast
iTrader: (2)
Join Date: May 2005
Location: E-L Netherlands
Posts: 1,165
Likes: 0
Received 0 Likes
on
0 Posts
and if you have read the thread you would have known this a pretty much a low-budget build. instead of buying stuff, John makes it himself to keep things interesting..
buying titanium rotors to use in a 4-rotor will pretty much bankrupt anyone