4-Rotor FC Build


 04-02-12, 05:15 PM
#504
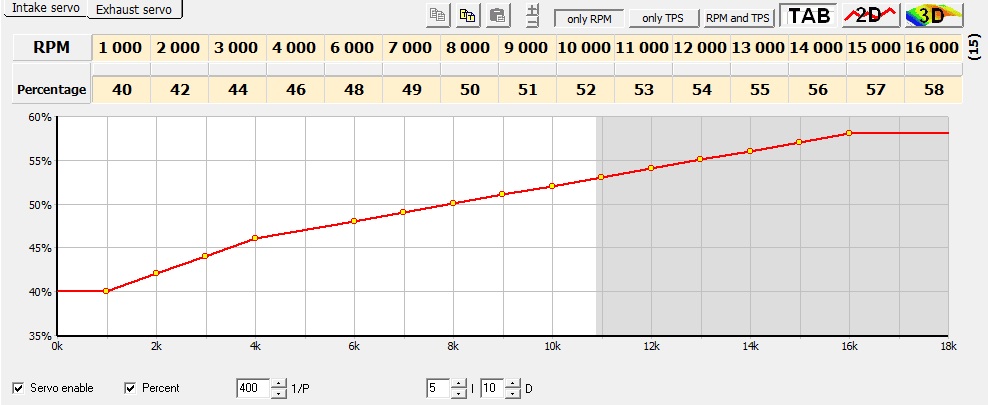
Yes, muffler design can be tricky. I think most of the designs you posted are too restrictive for a pp, and might have problems holding up with the temperatures. I'm going with a simple absorption style because of it's low backpressure. There are some tricks to get them working pretty good. On my gsx-r motorbike I'm using a similar absorption style muffler, and on tracks with strict decibel limits I usually mount a db-killer, which is basically a smaller tube with a ring around it stuffed in the back of the muffler. Modern bikes have a servo driven throttleplate in the exhaust which does the same thing. The ECU I've got is used a lot on motorbikes, so it has the function to run such a servo. Setting a servo up like that is really easy, and it can be programmed depending on engine rpm and throttle position. Setup looks like this:
Might try it when the car is up and running, but first things first.
I fusion welded it. No need for filler when everything fits together without any gaps. I did use backing-gas and a pulsating setting (60amp high, 40amp low). The backing-gas really helps getting everything smooth on the inside. I try to keep the temperatures down when welding, by welding it pretty quickly using a pretty high amperage, just fusing it without wire and using a sharp electrode. This way the welds will turn out gold coloured and it minimizes distortion. If you weld it slowly, or use a lot of filler wire the welds will turn into a dark blue colour. I used argon gas. Welding setup looks like this: the second tig welder isn't being used, the gas bottle from it is used for the backing gas, which flows through the blue hose. The tape on the exhaust flange is to keep the gas inside the exhaust, theres a small hole in it so the air can be pushed out.

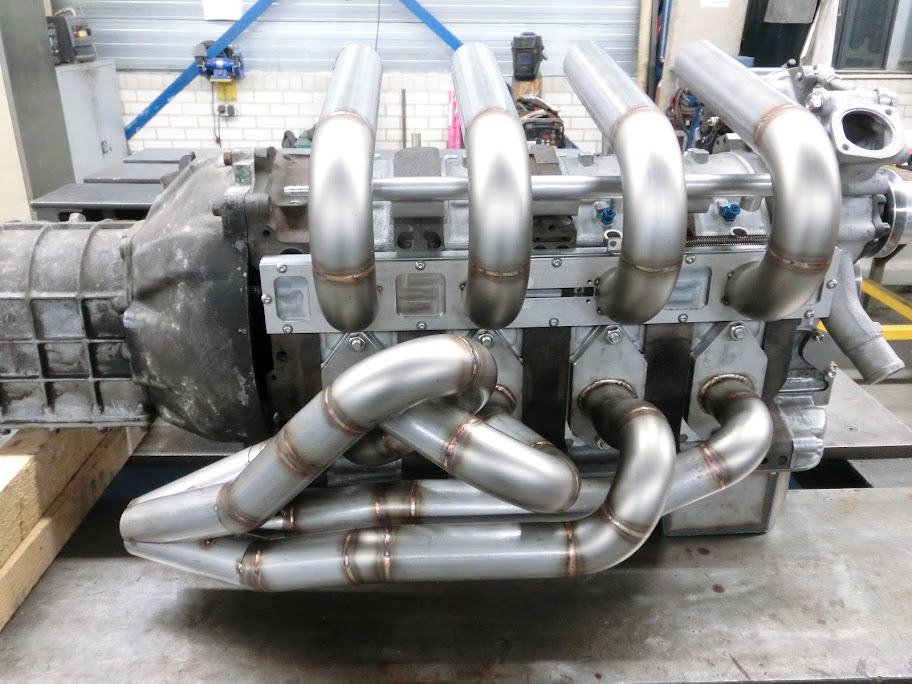
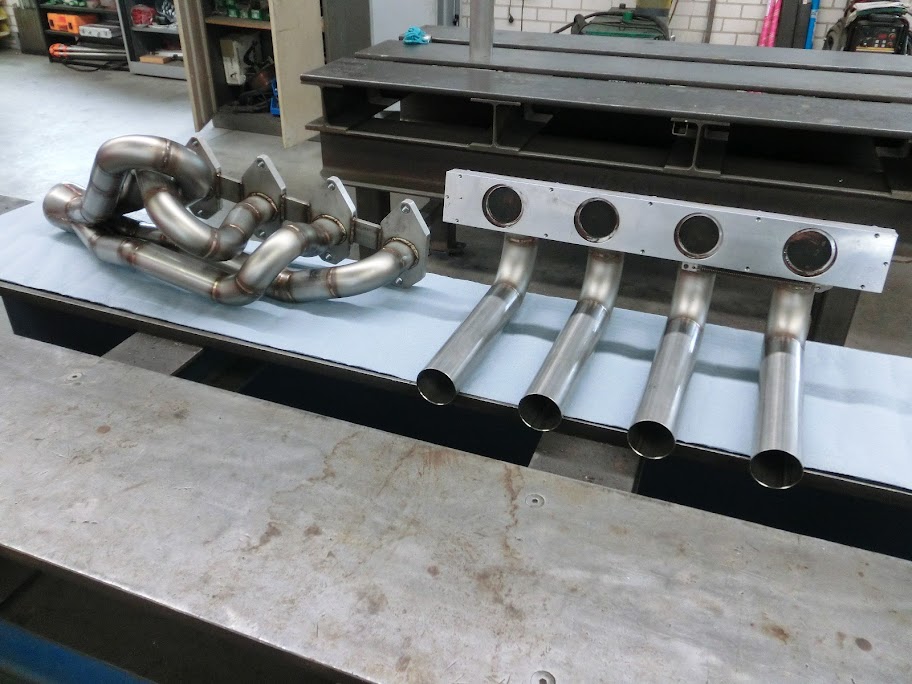
Header is getting there by the way, just need to weld the collector. Look at the intake / exhaust clearance now The #3 header pipe was completely remade. At first it went straight out the engine for about 4", but now it curves to the front so doesn't need to be angled upwards so much when it comes around. I'm still going to make a heat shield that fits between the intake and exhaust though.

Might try it when the car is up and running, but first things first.
I fusion welded it. No need for filler when everything fits together without any gaps. I did use backing-gas and a pulsating setting (60amp high, 40amp low). The backing-gas really helps getting everything smooth on the inside. I try to keep the temperatures down when welding, by welding it pretty quickly using a pretty high amperage, just fusing it without wire and using a sharp electrode. This way the welds will turn out gold coloured and it minimizes distortion. If you weld it slowly, or use a lot of filler wire the welds will turn into a dark blue colour. I used argon gas. Welding setup looks like this: the second tig welder isn't being used, the gas bottle from it is used for the backing gas, which flows through the blue hose. The tape on the exhaust flange is to keep the gas inside the exhaust, theres a small hole in it so the air can be pushed out.
Header is getting there by the way, just need to weld the collector. Look at the intake / exhaust clearance now
The #3 header pipe was completely remade. At first it went straight out the engine for about 4", but now it curves to the front so doesn't need to be angled upwards so much when it comes around. I'm still going to make a heat shield that fits between the intake and exhaust though.
04-02-12, 05:26 PM
#505
Red Pill Dealer
iTrader: (10)

John, those are beautiful welds but the color is just a form of oxidation. it can be minimized with more shielding. I could not see the nozzle but, are you using a wide mouth gas lens?
Some will say it's not welding if you don't add some filler because there is always some gap and the weld will be thin at the fuse. I'm not saying I personally agree with that but, it is a valid point.
Anyways, that header is a piece of art and the welds look awesome.
Some will say it's not welding if you don't add some filler because there is always some gap and the weld will be thin at the fuse. I'm not saying I personally agree with that but, it is a valid point.
Anyways, that header is a piece of art and the welds look awesome.
 04-03-12, 11:05 AM
#508
Moderator
iTrader: (3)
Join Date: Mar 2001
Location: https://www2.mazda.com/en/100th/
Posts: 30,816
Received 2,587 Likes
on
1,838 Posts
Yes, muffler design can be tricky. I think most of the designs you posted are too restrictive for a pp, and might have problems holding up with the temperatures. I'm going with a simple absorption style because of it's low backpressure. There are some tricks to get them working pretty good. On my gsx-r motorbike I'm using a similar absorption style muffler, and on tracks with strict decibel limits I usually mount a db-killer, which is basically a smaller tube with a ring around it stuffed in the back of the muffler. Modern bikes have a servo driven throttleplate in the exhaust which does the same thing. The ECU I've got is used a lot on motorbikes, so it has the function to run such a servo.
you're on the right track though, tailpipe size is the biggest thing. adding another absorption muffler inline doesn't do a lot.
04-03-12, 05:32 PM
#511
John, those are beautiful welds but the color is just a form of oxidation. it can be minimized with more shielding. I could not see the nozzle but, are you using a wide mouth gas lens?
Some will say it's not welding if you don't add some filler because there is always some gap and the weld will be thin at the fuse. I'm not saying I personally agree with that but, it is a valid point.
Anyways, that header is a piece of art and the welds look awesome.
Some will say it's not welding if you don't add some filler because there is always some gap and the weld will be thin at the fuse. I'm not saying I personally agree with that but, it is a valid point.
Anyways, that header is a piece of art and the welds look awesome.
About the filler, I know welding without filler is not normally recommended, I usually use filler, but with this thinner (it's 16 gauge) stainless steel tubing welding without filler just worked better for me, just as long as there is no visible gap. It looks better, the inside is nice and smooth, and it's more than strong enough. There were a few spots that had a 0,5mm - 1mm gap, I did use filler there.
I'll try to get hold of really thin filler if I'll ever make another header like this one, maybe that will work better. Still learning about this, this is the first serious header I've ever made.
header and intake look really good! i've been meaning to write something up as a standalone piece, but i've crammed a bunch of things in the PP's tailpipe (even a banana) and its been interesting to see what works and what doesn't.
you're on the right track though, tailpipe size is the biggest thing. adding another absorption muffler inline doesn't do a lot.
you're on the right track though, tailpipe size is the biggest thing. adding another absorption muffler inline doesn't do a lot.

 , did it work?
Sure thing, just did some work to it


Had to port it out a bit to get it smooth. There are some darker spots visible on the inside, that's from welding the backside which was pretty difficult, but the surface feels smooth.
Last edited by John Huijben; 04-03-12 at 05:34 PM.
04-03-12, 06:18 PM
#512
Red Pill Dealer
iTrader: (10)
Originally Posted by John Huijben
I'll try to get hold of really thin filler if I'll ever make another header like this one, maybe that will work better. Still learning about this, this is the first serious header I've ever made.
04-04-12, 03:04 PM
#513
Moderator
iTrader: (3)
Join Date: Mar 2001
Location: https://www2.mazda.com/en/100th/
Posts: 30,816
Received 2,587 Likes
on
1,838 Posts
04-05-12, 11:41 AM
#514
Senior Member

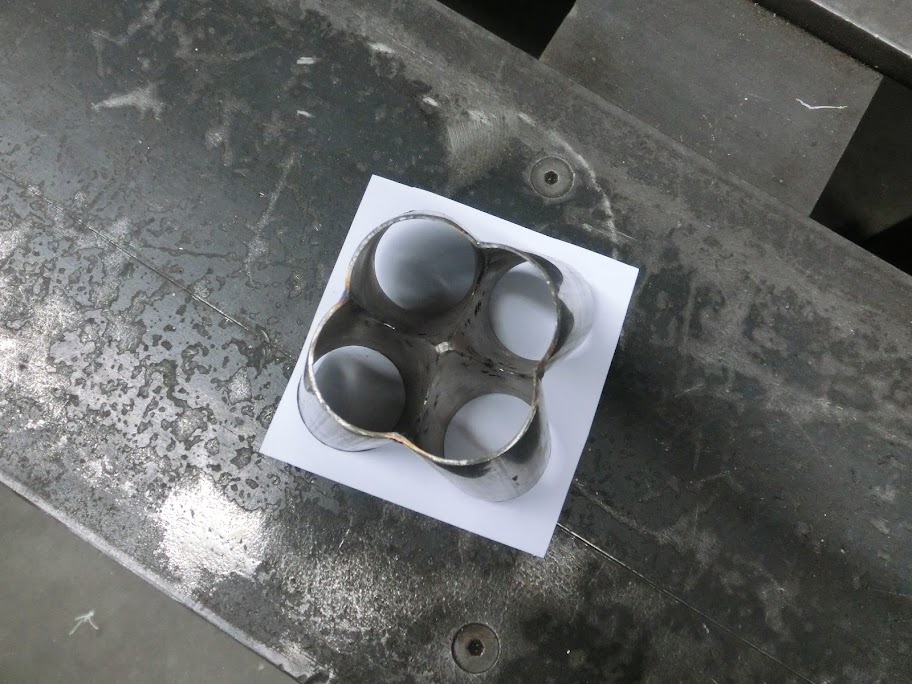
Beautiful. Love how them 4 pipes come together. Guess now is to punch out the cloverleaf shape into a circle?
04-08-12, 12:09 PM
#518

After this I clamped a piece of roundbar onto the weldingtable and tapped the end of the tube in the correct shape

After a bit of matching I welded it, and cleaned the inside up so everything will flow smoothly.
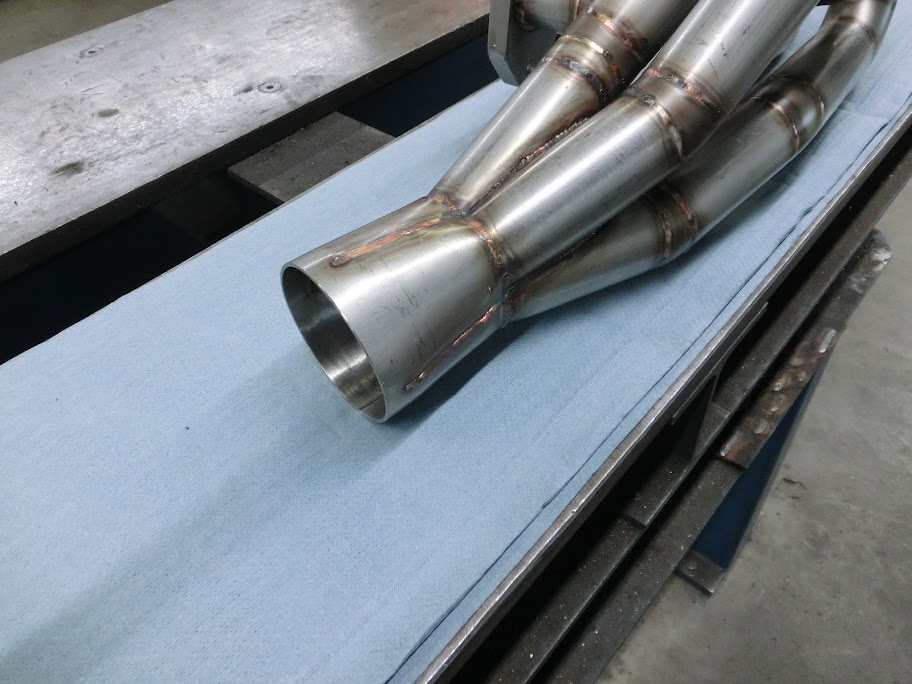
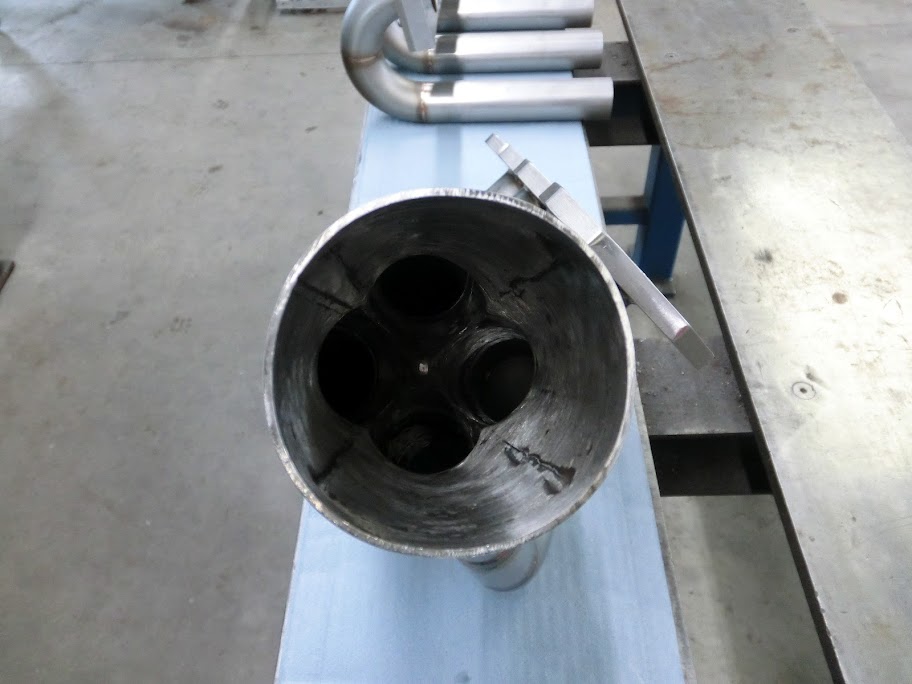
All done! Just need a V-band flange and an o2 sensor bung. I also welded the intake manifold today.

 04-09-12, 11:55 AM
#520
Senior Member
Very clever. What's the theory behind the 4 pipes necking down where they all join then expanding again to then join with the rest of the exhaust system?
04-09-12, 05:29 PM
#521
Made some progress on the intake today
Airhorns are done, and the airbox / filter is on. Looks wicked and fits perfectly
04-09-12, 09:59 PM
#522
4th string e-armchair QB
iTrader: (11)
Join Date: May 2005
Location: North Bay, Ontario
Posts: 2,745
Likes: 0
Received 0 Likes
on
0 Posts
Did you consider leaving the primaries adjustable in the exhaust system, or are you confident enough in your estimations/not worried enough about the small benefits that can be achieved by tuning it?
 Do you happen to remember the square dimensions?
04-10-12, 12:36 PM
Do you happen to remember the square dimensions?
04-10-12, 12:36 PM
#524
Now With 10th AE Fun!
iTrader: (1)
Join Date: Jun 2005
Location: CA
Posts: 1,869
Likes: 0
Received 0 Likes
on
0 Posts
May I ask is this your home garage or work? It is a very nice setup! This is the most detailed fab buildup thread that I can remember. It is truly inspiring! Keep up the good work and I can't wait to hear a video of that beastly exhaust.