4-Rotor FC Build

 04-25-12, 12:31 AM
#579
For my radiator, I'm using Howe Racing. SUPER cool guys, build quality is fantastic, and the pricing is amazingly well priced. Mine is a dual pass core, 24" x15 core, 2 -20AN fittings welded on it and 2 1/4" L brackets for mounting. Fully tig welded etc. $310 plus shipping, 2 week lead time. They can build ANYTHING you want. Just draw it up and email it to them and they'll build it.
 04-27-12, 10:06 AM
#582
For my radiator, I'm using Howe Racing. SUPER cool guys, build quality is fantastic, and the pricing is amazingly well priced. Mine is a dual pass core, 24" x15 core, 2 -20AN fittings welded on it and 2 1/4" L brackets for mounting. Fully tig welded etc. $310 plus shipping, 2 week lead time. They can build ANYTHING you want. Just draw it up and email it to them and they'll build it.
Basically a bit like this:
http://amsperformance.com/amsperform...-042409012.jpg
04-27-12, 03:19 PM
#583
Senior Member

 04-27-12, 04:59 PM
#584
Speaking of PPRE, went into their workshop the other day while a mate was having his 7 dynoed and took a couple shots of this beauty... (Bit more progress than their FB shots...) They are certainly pumping these motors out, there was another two under construction as well!
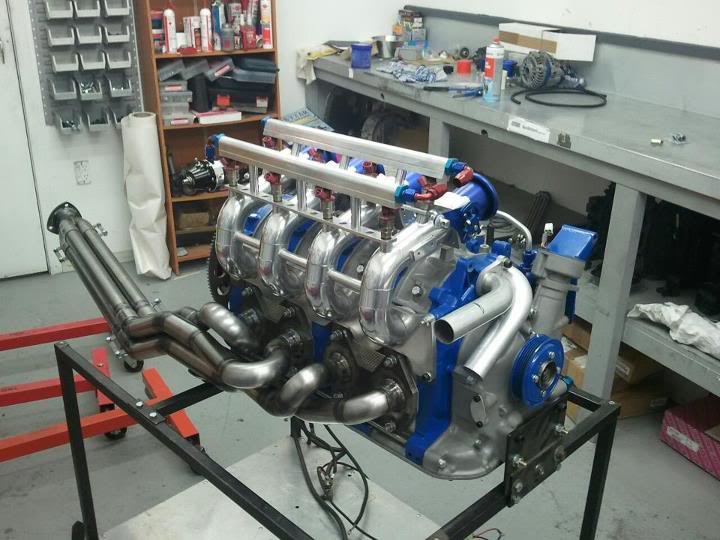
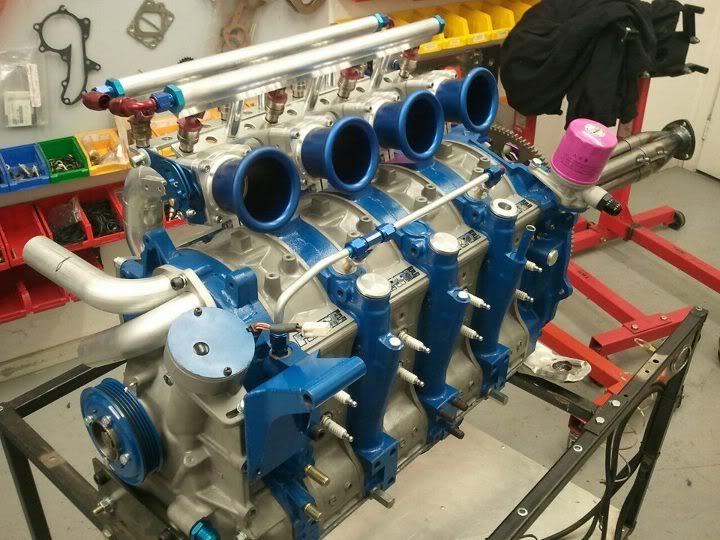
Btw John really nice build I'll be checking this out with interest!! Bet you can't wait until its all done!
 04-28-12, 02:00 PM
#586
Update
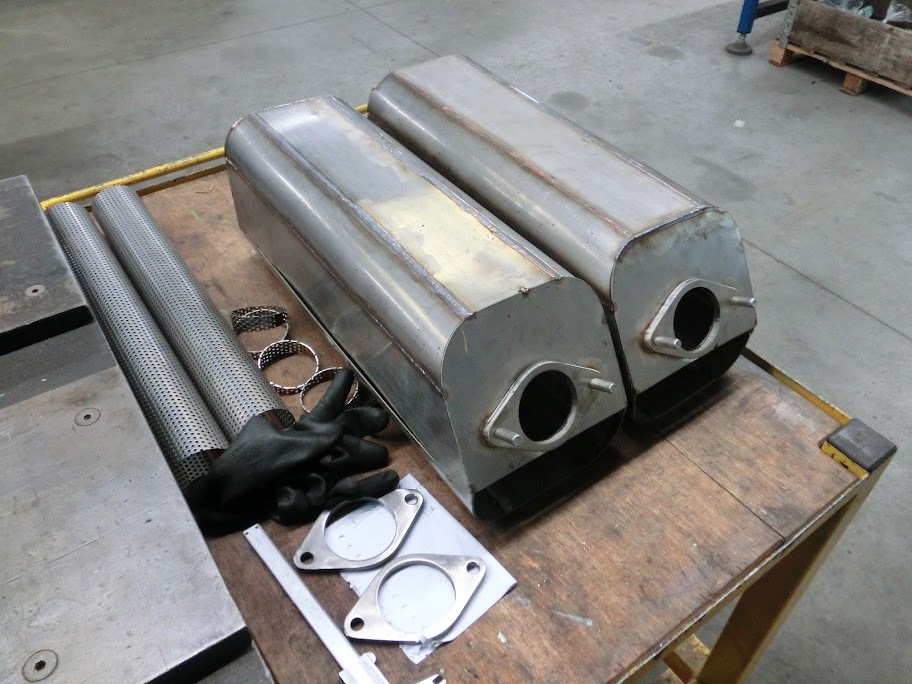
Couldn't machine the e-shaft counterweight because I didn't have the material for it yet, so I started on the exhaust silencers . I'm building 2 very simple absorption style mufflers. To make them work well I just made them as big as possible, and used pretty thick material. These won't be the most prettiest mufflers ever, but I think they will work pretty good. Outer dimensions are 7,5" x 7,5" x 20".
Some cut up scrap material, 13 gauge 304L

Tacked together, these will make the outer shells

Exhaust pipe goes in at an angle, this is so the exhaust can clear the rear drive axles easily
Couldn't machine the e-shaft counterweight because I didn't have the material for it yet, so I started on the exhaust silencers
. I'm building 2 very simple absorption style mufflers. To make them work well I just made them as big as possible, and used pretty thick material. These won't be the most prettiest mufflers ever, but I think they will work pretty good. Outer dimensions are 7,5" x 7,5" x 20". Some cut up scrap material, 13 gauge 304L
Tacked together, these will make the outer shells
Exhaust pipe goes in at an angle, this is so the exhaust can clear the rear drive axles easily
 04-29-12, 02:28 PM
#588
Junior Member

Join Date: Apr 2012
Location: Germany
Posts: 9
Likes: 0
Received 0 Likes
on
0 Posts
 05-01-12, 12:40 AM
#590
Can Post Only in New Member Section

Join Date: Sep 2011
Location: Canada
Posts: 1
Likes: 0
Received 0 Likes
on
0 Posts
hey john. i too am in the process of build a 4 ROTOR. beautiful craftmanship by the way!!! I did a little test run on the block tonight to cheack oil pressure. i built a 1 to 1 gear ratio drive for the stock oil pump just as u did! my question is tho that when i cranked the engine at 1000rmp, im making 70psi and the excess oil is FLYING out of the relief valve. Im worried that at high rpm, the relief valve will not be cappable of returning the high volume of oil back to the sump fast enough. just a heads up on the setup, more tests to follow tomorrow. i think im going to also ad a few more ports in the relief valve to help reduse the pressure and keep it consistant on the top end. \ let me know what u think. thanks john.
05-01-12, 02:08 PM
#591
Moderator
iTrader: (3)
Join Date: Mar 2001
Location: https://www2.mazda.com/en/100th/
Posts: 30,832
Received 2,599 Likes
on
1,846 Posts
Update
Couldn't machine the e-shaft counterweight because I didn't have the material for it yet, so I started on the exhaust silencers. I'm building 2 very simple absorption style mufflers. To make them work well I just made them as big as possible, and used pretty thick material. These won't be the most prettiest mufflers ever, but I think they will work pretty good. Outer dimensions are 7,5" x 7,5" x 20".
]
Couldn't machine the e-shaft counterweight because I didn't have the material for it yet, so I started on the exhaust silencers
. I'm building 2 very simple absorption style mufflers. To make them work well I just made them as big as possible, and used pretty thick material. These won't be the most prettiest mufflers ever, but I think they will work pretty good. Outer dimensions are 7,5" x 7,5" x 20". ]
 05-01-12, 05:08 PM
#592
hey john. i too am in the process of build a 4 ROTOR. beautiful craftmanship by the way!!! I did a little test run on the block tonight to cheack oil pressure. i built a 1 to 1 gear ratio drive for the stock oil pump just as u did! my question is tho that when i cranked the engine at 1000rmp, im making 70psi and the excess oil is FLYING out of the relief valve. Im worried that at high rpm, the relief valve will not be cappable of returning the high volume of oil back to the sump fast enough. just a heads up on the setup, more tests to follow tomorrow. i think im going to also ad a few more ports in the relief valve to help reduse the pressure and keep it consistant on the top end. \ let me know what u think. thanks john.

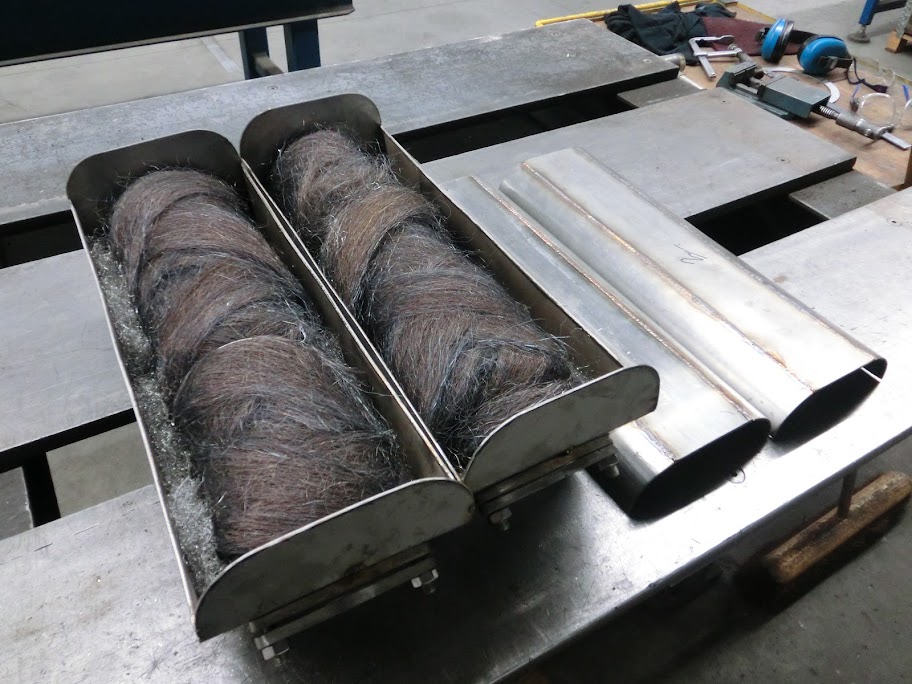
Some pictures from this evening:
The entry point is at an angle, so I had to "bend" the perforated tube.

Now we're getting somewhere!

Wrapping and filling them, ran out of packing material

 05-01-12, 06:15 PM
#593
Moderator
iTrader: (3)
Join Date: Mar 2001
Location: https://www2.mazda.com/en/100th/
Posts: 30,832
Received 2,599 Likes
on
1,846 Posts
lmao, you should just put a hinge on the top, so you can repack em! i'm toying with the idea of making a muffler for mine too, nobody makes an 8"x20" can in the US except the MFR part and its $500!
 05-03-12, 05:34 PM
#596
Full Member

Join Date: Jul 2006
Location: Canada
Posts: 89
Likes: 0
Received 0 Likes
on
0 Posts
I think you will blow the steel wool out of those mufflers within a week, I used to have just a street port with header and straight pipe to the muffler and it would burn the guts out pretty fast. I finally started filling it with lava rock, it worked pretty well and lasted almost a year of daily driving.
05-03-12, 05:44 PM
#597
, can't wait to find out how well they will work. I actually made some repackable mufflers in the past, they tended to be louder and leak. Also in the amount of time needed to fabricate a muffler like that I can cut a muffler open, repack it and weld it back shut 2-3 times.I think you will blow the steel wool out of those mufflers within a week, I used to have just a street port with header and straight pipe to the muffler and it would burn the guts out pretty fast. I finally started filling it with lava rock, it worked pretty well and lasted almost a year of daily driving.
Update
Finally some progress on the rear counterweight. This thing was jinxed, every single time I wanted to start maching it somebody called with an emergency job or something else happened. Not tonight though
, Almost done, still need to machine the flywheel centering surface. To do that I'll mount the counterweight onto the 4-rotor e-shaft, align the e-shaft using the main bearing surfaces, and then machine the flywheel mating surface. That way I'll know for sure that the flywheel and clutch won't wobble.Counterweight shape might be a bit odd compared to the oem one, this one is obviously suited for a 4-rotor, but the mass is also more localised, reducing weight and inertia. Inertia of this counterweight is 38% less than the oem S5 one


Last edited by John Huijben; 05-03-12 at 05:52 PM.