4-Rotor FC Build


 05-09-12, 08:06 PM
#627
Moderator
iTrader: (3)
Join Date: Mar 2001
Location: https://www2.mazda.com/en/100th/
Posts: 30,848
Received 2,609 Likes
on
1,851 Posts
although at some point its probably better than the stock radiator, and those work ok
 05-10-12, 05:10 PM
#629
Tried that, made the middle part of the radiator inefficient, and I really don't want that, since my coolant fans are there.
I dig the S2000 intake plenum. I've actually heard of locals fitting s2000 intake manifolds to other engines, somebody tried it because "well an s2000 makes a hell of a lot of power for a 2l, so the manifold can't be bad", and it worked great so more people are starting to use it.
I think most of the end tanks I tried out work just as well or better than the stock one. Any design will probably work, but I had some spare time and thought it was interesting.
Update
Did some actual work for a change Since I haven't finished any manufacturing drawings for the radiator end tanks yet I started doing the exhaust. I already made the header, and the biggest part of the mufflers, but the rest still needed to be done. This is basically the result of 2 evenings of fiddling. Takes longer than I thought, but I want to get it right.
Still need to hang the mufflers, and make 2 pipes between them and the Y-piece

I like V-Bands

This Y-piece was tricky to get right

Making sure the Y-piece flows ok

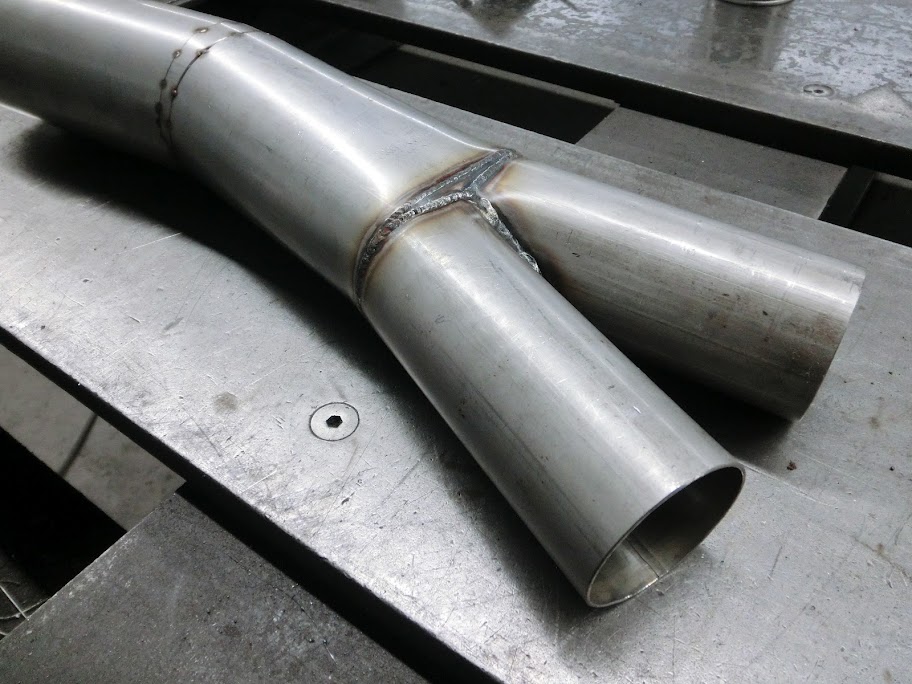
There's light at the end of the tunnel!

[img]
I think most of the end tanks I tried out work just as well or better than the stock one. Any design will probably work, but I had some spare time and thought it was interesting.
Update
Did some actual work for a change
Since I haven't finished any manufacturing drawings for the radiator end tanks yet I started doing the exhaust. I already made the header, and the biggest part of the mufflers, but the rest still needed to be done. This is basically the result of 2 evenings of fiddling. Takes longer than I thought, but I want to get it right.Still need to hang the mufflers, and make 2 pipes between them and the Y-piece
I like V-Bands
This Y-piece was tricky to get right
Making sure the Y-piece flows ok
There's light at the end of the tunnel!
[img]
 05-11-12, 04:18 PM
#632
I'm going to ask a very broad and general question, which you aren't required to answer...
When I found this thread, I found a few others on the Ausrotary site where guys machined splines into stock eshafts to make their 4 rotors and one guy had videos of it running. Of course it was a big bang engine where 2 rotors fired at once.
Is there any major concern doing in doing it that way if one were to stay NA and sideport?
Grannys speedshop also did it and they have crude plans as well.
05-12-12, 09:37 AM
#633
Well it can work, but joining two shafts like that will always be weaker. It would probably be fine if you stay sideport and use a big-bang firing order, but what's the point in that? You'll end up with 350-ish hp depending on further modifications and it will sound like stock. Going turbo will be far easier and probably more reliable too. I'm all for trying different things and fabricating 4-rotors, but I think the ending result might be a bit dissapointing. If you want to get serious and go with peripheral ports and a 90dgr. firing order 2 joined shafts probably won't be reliable. Believe me, I did my homework before spending a few months building my custom one, On paper it isn't strong enough. I've seen more stuff fail on paper and work in real life but do you want to take the risk? The shaft is only part of the cost of a 4-rotor engine, there are soo many more expensive things you must build / buy.
05-12-12, 12:11 PM
#634
If you would connect two 13B-shaft, the best way would be to put them togheter 90dgr so the big bang is gone? Or am I drunk right now?
Stock 13B are 180dgr, and the 26B firing 1-3-2-4, so if you put the two 13B after eachother, and put the rear part 90dgr from the front, you achive 1-3-2-4 firing order?
If not, I will stop drinkig beer for tonight
Stock 13B are 180dgr, and the 26B firing 1-3-2-4, so if you put the two 13B after eachother, and put the rear part 90dgr from the front, you achive 1-3-2-4 firing order?
If not, I will stop drinkig beer for tonight
 05-13-12, 04:12 PM
#637
If you would connect two 13B-shaft, the best way would be to put them togheter 90dgr so the big bang is gone? Or am I drunk right now?
Stock 13B are 180dgr, and the 26B firing 1-3-2-4, so if you put the two 13B after eachother, and put the rear part 90dgr from the front, you achive 1-3-2-4 firing order?
If not, I will stop drinkig beer for tonight
Stock 13B are 180dgr, and the 26B firing 1-3-2-4, so if you put the two 13B after eachother, and put the rear part 90dgr from the front, you achive 1-3-2-4 firing order?
If not, I will stop drinkig beer for tonight
smallupdate
Finished fiddling with radiator designs, didn't end up with a really fancy design but it's easy to fabricate and according to the simulation it will work very well. Flow is a bit biased towards the center of the core but that's ok since my cooling fans are there.


http://www.youtube.com/watch?v=xfYSRublm9g&list
Also continued with the exhaust, hope to get that done tomorrow.
 05-14-12, 04:54 PM
#642
Exhaust work Didn't get it completely finished because I ran out of 2,5" 304 tubing but I'm almost there . Just takes a lot of time to get it right, I really focussed on getting as much ground clearance as possible because this car will be low, and mounting the mufflers was tricky because they are just so big, sloppy mountings would make them bounce between the gastank and the rear wheels. Ended up using 3 mounts per muffler, 2 to carry all the weight and 1 to limit side movement. 
You can see where I ran out of tubing, really frustrating since I only need a few more inches to be able to finish it

Tried to get it as tight as possible without any chance of rattling

Those big boxes better work, I think I'll paint them black though even if they are stainless, they really stand out when looking at the rear of the car

Heat shielding had to go, just doesn't fit anymore, got more packing material so I'll probably finish the mufflers tomorrow
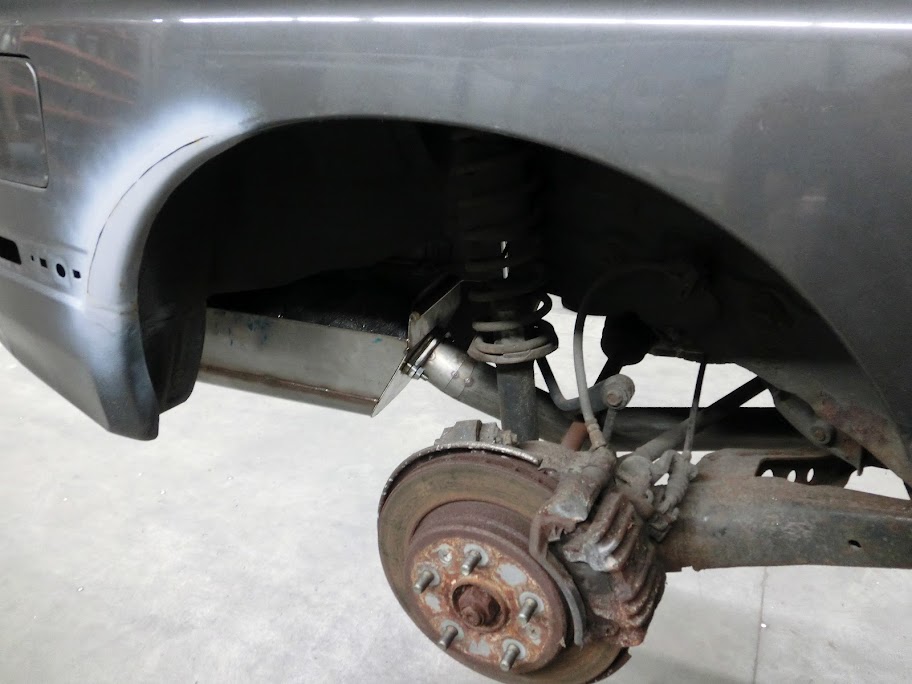
Didn't get it completely finished because I ran out of 2,5" 304 tubing but I'm almost there . Just takes a lot of time to get it right, I really focussed on getting as much ground clearance as possible because this car will be low, and mounting the mufflers was tricky because they are just so big, sloppy mountings would make them bounce between the gastank and the rear wheels. Ended up using 3 mounts per muffler, 2 to carry all the weight and 1 to limit side movement. You can see where I ran out of tubing, really frustrating since I only need a few more inches to be able to finish it
Tried to get it as tight as possible without any chance of rattling
Those big boxes better work, I think I'll paint them black though even if they are stainless, they really stand out when looking at the rear of the car
Heat shielding had to go, just doesn't fit anymore, got more packing material so I'll probably finish the mufflers tomorrow
05-14-12, 06:03 PM
#643
Moderator
iTrader: (3)
Join Date: Mar 2001
Location: https://www2.mazda.com/en/100th/
Posts: 30,848
Received 2,609 Likes
on
1,851 Posts
since you're going to pummel the exhaust with supersonic exhaust gasses @1000C, the more hangers the better....

 05-15-12, 04:11 PM
#648
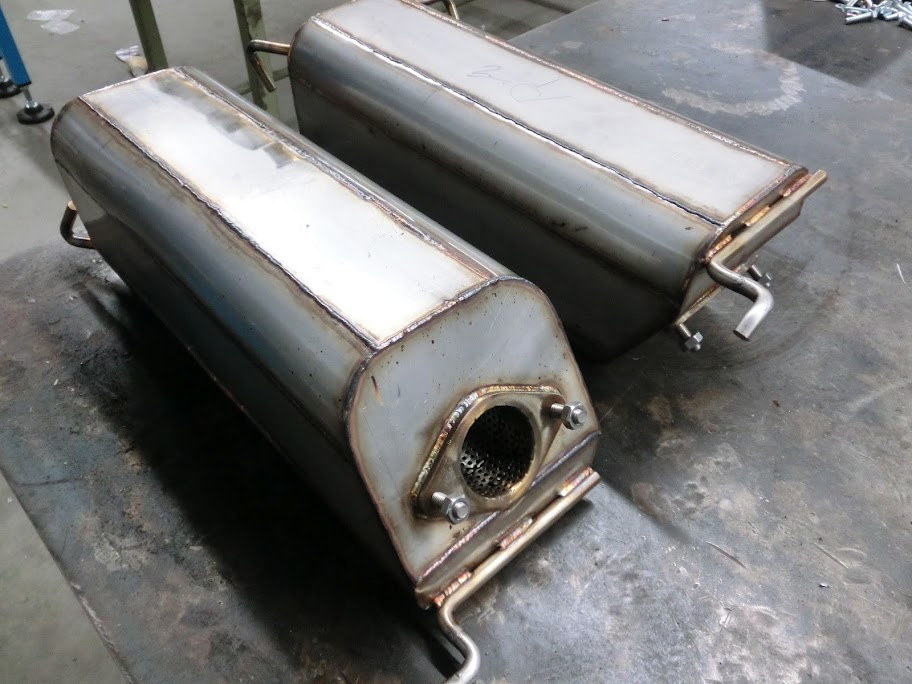
, that's why the exhaust is hanging on a total of 9 mounting points. The mountings of each muffler alone are strong enough to hold a muffler and a person hanging onto it, guess how I figured that one out , I just completed and weighed the mufflers, and they're about 10kg's (22lbs) each, so it's basically like there are 2 very small children hanging underneath the car , I don't mind though, happy to trade a lot of exhaust noise for some weight.Nope, I don't think it's needed here. First of all these mufflers are entirely made out of thick 304 stainless steel, which will last a LOT longer than most galvanised steel mufflers, I'm also not using a catalytic converter (those things 'produce' a lot of water), and the rotaries exhaust temperature will be very high so any water should evaporate.
Pictures of the finished mufflers:

 05-15-12, 05:04 PM
#650
Full Member

Join Date: May 2012
Location: NV
Posts: 177
Likes: 0
Received 0 Likes
on
0 Posts
You're really talented, that's amazing to me. I wish I could do stuff like this haha, I can just do computer stuff which is way less cool to me :P
Anyways, subscribed to the project
Anyways, subscribed to the project