When you click on links to various merchants on this site and make a purchase, this can result in this site earning a commission. Affiliate programs and affiliations include, but are not limited to, the eBay Partner Network.
Please rethink running fuel (*high pressure, at that) inside the passenger compartment, for safety's sake. Any leak could result in either overpowering fumes, and/or a fire that will leave you little room for escape. I don't know of any race sanctioning body that would allow this, even if it were a pure track car. We all love these cars, but not enough to die in them.
Please rethink running fuel (*high pressure, at that) inside the passenger compartment, for safety's sake. Any leak could result in either overpowering fumes, and/or a fire that will leave you little room for escape. I don't know of any race sanctioning body that would allow this, even if it were a pure track car. We all love these cars, but not enough to die in them.
I really would have rather kept it outside the passenger compartment, but there isn't much anywhere else to put it. I've seen one setup where it fits under the car (different tank), but with my configuration and parts it will not work. Also it won't be the high pressure side of things, everything inside will only be at 4psi max, if there's any pressure at all since it returns freely via a new 3/8" line to the tank.
Many prebuilt surge tank setups look like they are designed to be installed on top of something, be that a trunk or floor or whatever. Since we don't have a trunk, it would seem that putting it in an enclosed area is better than mounting it to the hatch floor where it's out in the open. Downside is of course it's a lot more difficult to get to in case of fire, although there are access holes that can be used for an extinguisher.
I'll have one more look over the whole situation before I go further, but I was just about to start running lines. We'll see though, because I'm not a fan of running four fuel lines through my floor either.
My setup is entirely under the car. You don't need a monster pump like that for the lift pump, a cheapo $39 parts store pump works great. It is never going to build any pressure, all it does is feed the box, and it will flow a lot more at zero PSI than it will at four or six.
Besides, I think that style of pump is not self-priming, and shouldn't be mounted that high relative to the fuel tank. Mind you, I used to run the same pump on my previous car, but I also had it mounted a lot lower. I am also pretty sure that the motor has to be higher than the pump, in case the seal leaks. Wouldn't want the fuel to fill up the motor.
The square pump is the lift pump, it feeds from the right and pumps out to the left, up to a hardline that goes behind the surge tank to the fitting in the middle. The bottom of the tank feeds the pump, which blows into a fuel filter for a '92 Century (because quick disconnects are great) and then up the stock hardline to the engine. Return line from the engine goes to the lower side fitting, and there is a port on top that goes to the stock return line to the tank.
It's been like this for eight years, still works a treat. I figure the surge tank holds .7l of fuel, which is enough for WOT for far longer than I'm going to be cornering to the left.
My setup is entirely under the car. You don't need a monster pump like that for the lift pump, a cheapo $39 parts store pump works great. It is never going to build any pressure, all it does is feed the box, and it will flow a lot more at zero PSI than it will at four or six.
The square pump is the lift pump, it feeds from the right and pumps out to the left, up to a hardline that goes behind the surge tank to the fitting in the middle. The bottom of the tank feeds the pump, which blows into a fuel filter for a '92 Century (because quick disconnects are great) and then up the stock hardline to the engine. Return line from the engine goes to the lower side fitting, and there is a port on top that goes to the stock return line to the tank.
It's been like this for eight years, still works a treat. I figure the surge tank holds .7l of fuel, which is enough for WOT for far longer than I'm going to be cornering to the left.
That's an impressively packaged little setup you've got there, and that sure is a funky looking lift pump . I've been trying to keep from mounting the pumps to the back of the bin area like that for noise reasons. My car is daily driven as well, although I've managed to keep it fairly civil in terms of noise until you get on it. I know I'll hear the Carter regardless of where it's mounted, I just didn't want to amplify it any more than possible.
Also I don't know how the fueling requirements of a bridge vs a "low psi" turbo setup compare, but I'd much rather have my high pressure pump start to wane than my lift pump and run out of fuel completely. In other words, I trust the Carter to not suddenly fail having run them before, and it also flows 273LPH unrestricted so it should theoretically never be the bottleneck.
For the sake of not clogging up this thread even more, I'll further detail the setup in my build thread (also that way I can find the discussion more easily in the future).
Cleaned and resealed the passenger side tail light lens with some black rtv. Also replaced the driver side tail light that had a chunk broken off it when I got the car.
Polished them with some PlastX and put new Silver Star bulbs in them. I was worried the brake light portion wasn't working while testing with the engine off but it must have been a low battery issue as they light up each time the brake is pressed with the engine running.
Nice!
I'm intrigued, how did you separate the clear lens from the lighting body? I have a tail light with a yellowed hot glue looking adhesive. It's visible through the clear outer lens and I'd love to disassemble it and remove the yellow adhesive, replace it with black.
I'm intrigued, how did you separate the clear lens from the lighting body? I have a tail light with a yellowed hot glue looking adhesive. It's visible through the clear outer lens and I'd love to disassemble it and remove the yellow adhesive, replace it with black.
The lens was already coming loose when I got the car. I wasn't able to get rid of all the old yellow glue but got rid of some by carefully chipping away at it with a leatherman knife then just put the black rtv over it.
I did the same thing not too long ago ......but mine were cracked and I polished the set I got .......and installed all LEDs all the way around the outside and change the sockets of the side markers and changed the licence plate plugs to use 194 LEDs instead of the ultra expensive factory mini bulbs ......
Also I don't know how the fueling requirements of a bridge vs a "low psi" turbo setup compare, but I'd much rather have my high pressure pump start to wane than my lift pump and run out of fuel completely. In other words, I trust the Carter to not suddenly fail having run them before, and it also flows 273LPH unrestricted so it should theoretically never be the bottleneck.
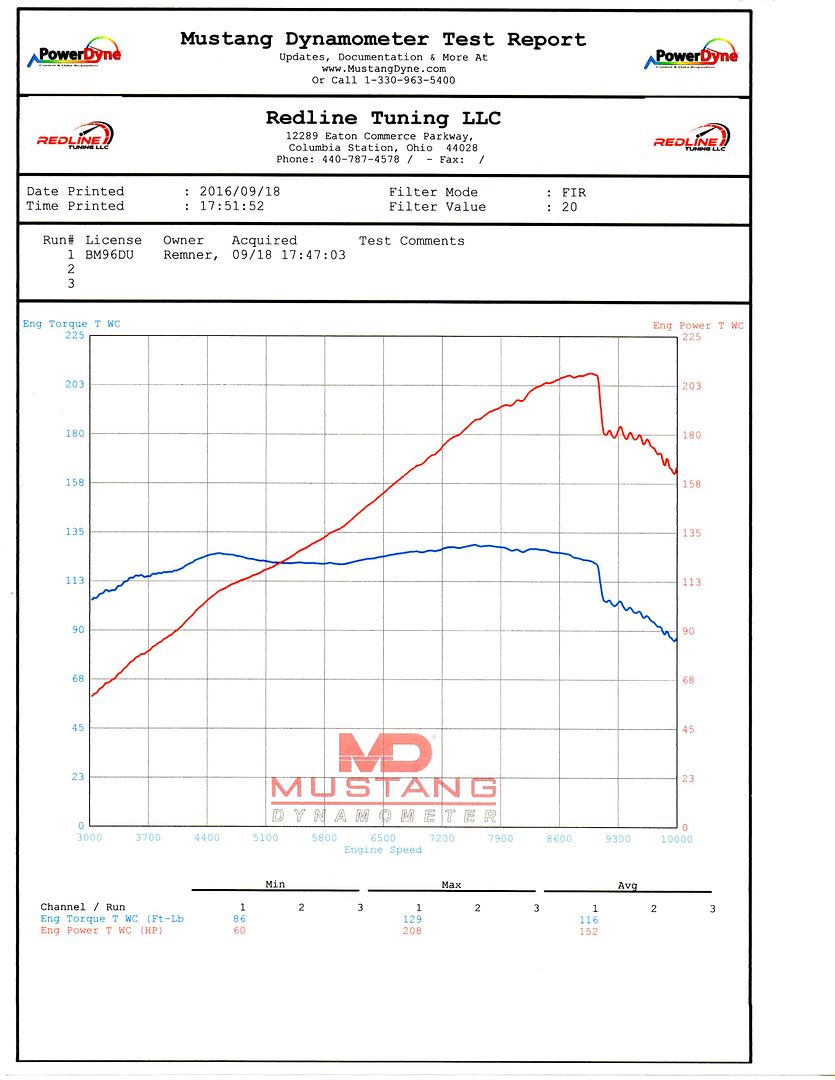
It runs 25% richer over 9000 to kill power so I don't overrev it when I hit a slick spot. Kills the power right away, but it also requires a lot of fuel.
Mind you this is on a Mustang dyno, not a Dynojet.
Yes sir......those exactly. I used them on the license plate and on all 4 parking lights .....the copper connectors on the parking lights they were corroded and they were beaking off so I took them out and modified the rubber base to use the new plugs.....
Finished work on the battery. Got a new positive cable from the local Mazda dealer part# FA54-67-250E. The two sections of negative cable I found at Napa part# 712234 and 712994, no more issues with power occasionally cutting while starting.
Finally installed a new battery hold down from Amazon since the original was missing, Part #B09BJ5CMC5. I sawed off a bit of the extra length of the outer bolt so it wouldn't hit the hood.
looking for the plastic pieces that hold these door locks in place.
I bought a pair from kutukutu1. He makes them on his 3d printer....... He is a member here.....I looked at his eBay page but it doesn't have any there for sale.....try to contact him to see if he got any available ....
Went down to the dealership to order a new thermostat. I haven't set foot in a Mazda dealership in years!
Side note, seems very dumb to have to go there in person to do a special order, vs just taking my CC information over the phone, but it was nice to see all the new Mazdas that I can't afford!
Went down to the dealership to order a new thermostat. I haven't set foot in a Mazda dealership in years!
Side note, seems very dumb to have to go there in person to do a special order, vs just taking my CC information over the phone, but it was nice to see all the new Mazdas that I can't afford!
If something should happen to my S60R, I will buy a Mazda3 turbo AWD hatchback. Because they are the simplest cars you can buy in 2021, the manumatic gate in the shifter moves in the correct direction, and Mazdaspeed discount. Also, I think it is awesome that Mazda is not only still selling cars and not SUVs like everyone else (I have all my teeth and am not married to my sister, i don't want to drive a truck) but they are cramming their best engine in their smallest hatchback and throwing AWD in to boot. For a fairly low price too!
But the S60R is paid for, and makes oodles more power, and has a higher towing capacity, and is the polar opposite of Mazda as far as rust is concerned. I mean, I love the car, so I'm going to hang on to it, but worst case, I'll make my first and only stop the Mazda dealership. $30-35k out the door is cheap in 2021. Next option is an off-lease Audi RS3 at $50k or so.
 12-03-21, 03:50 PM


 . I've been trying to keep from mounting the pumps to the back of the bin area like that for noise reasons. My car is daily driven as well, although I've managed to keep it fairly civil in terms of noise until you get on it. I know I'll hear the Carter regardless of where it's mounted, I just didn't want to amplify it any more than possible.