
My FD build


Found this; https://www.rx7club.com/interior-exterior-audio-26/new-evo-r-rr-sleek-headlight-kit-942345/
FINALLY!!!
FINALLY!!!
Gary and I pulled the motor, trans. and drive line as well as the fuel tank. Finally some progress and some time spent on the project. The car and all it's parts are coming home this Friday! There are a lot of small projects that I've been waiting years to get going on. I'm really excited. I also came across a source of quality, purple anodized accessories to add to my build...http://www.millturncnc.com/billetbitz.html
They make a really cool rotor shaped alternator pulley, might have to part with the Feed ones.
They make a really cool rotor shaped alternator pulley, might have to part with the Feed ones.
Spoke with Ric, the GM at Levelten, he assured me that my transmission will be able to reliably handle 700 h.p. I'm really looking forward to doing business and putting the upgrades to the test. He did say the transmission computer will take a few months to make.
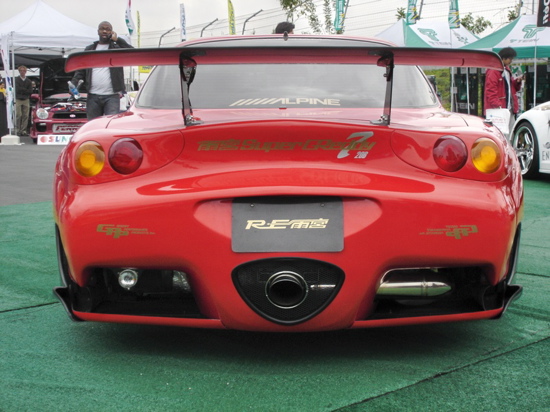
Had some great weather for 1 day, finally... I removed the stock rear bumper, it took removing all of the hatch interior to get to some hidden fasteners in the fenders. I also removed the exhaust. Next, I installed the RE Amemiya Super Greddy 7 rear bumper in it's place. Sean @ A-spec Tuning pm'ed me today and said the manifold is progressing. It seems that there will be some fitment issues with the TiAL mv-r wastegates, so he's switching to a pair of purple anodized mv-s'. (38s instead of 44s) All V-band connections still. Sean thinks they'll do the job and offer better response. Wish I could see some pics, but he wants to wait til the manifold is finished. The small Feed spoiler that I just purchased looks great with the larger Feed adj. spoiler. I still need to fasten it to the hatch. In all so far, I think it's a great combo of aero parts. I have some trimming to do on the front Feed fenders, then I'll mount them and the rears. Pics to come...
Thanks, I miss my Mac. It was easy, just plug in the camera and it would automatically import the photos into Iphoto. From there I could drag them into a car designated folder. Labeled, they were easy to find to post on here. The wife plugged the camera into this laptop and it gave it a virus. I need to work it out. I removed both pop up light assemblies and my aftermarket hid kit. Slowly removing everything in the engine bay for paint. I'll be tackling the electrical soon. Wire tuck-relocation of fuses/relays to driver's storage bin next to the battery that's in the passenger's bin already.
I have mounted it, and it doesn't interfere with the Feed rear fenders. Superb fitment! I'm trying to see if there are clear lenses available to replace the red/amber ones. Went to the manufacturer's website and even a Japanese auction site but haven't figured out what type of vehicle the original lenses were used on. I figure there is an aftermarket. The reverse light supplied with the kit is being replaced by two bright white l.e.d. strips, which I'm mounting on each side of the exhaust tunnel to the undersides of the flat areas. I'd like to mount l.e.d. rings in the brake/turn housings eventually, but I'm going to try some "tower style" l.e.d. bulbs from www.autoillumination.com first.
This bumper kit's design keeps the soot from the tail pipe from building up on the bumper provided you route it through the rotor shaped opening. (shown above)
Adds asymmetry which I feel is important to such a balanced car.
Adds asymmetry which I feel is important to such a balanced car.
I have mounted it, and it doesn't interfere with the Feed rear fenders. Superb fitment! I'm trying to see if there are clear lenses available to replace the red/amber ones. Went to the manufacturer's website and even a Japanese auction site but haven't figured out what type of vehicle the original lenses were used on. I figure there is an aftermarket. The reverse light supplied with the kit is being replaced by two bright white l.e.d. strips, which I'm mounting on each side of the exhaust tunnel to the undersides of the flat areas. I'd like to mount l.e.d. rings in the brake/turn housings eventually, but I'm going to try some "tower style" l.e.d. bulbs from www.autoillumination.com first.
 Please post some more pics if you can.. Thanks!
Thanks guys! I can't wait to see how the turbo setup will look like with the inconel heat shielding and the turbos polished up. Thinking of having the whole exhaust from front to back done in it. I hope Turblown gives me a great deal.
I test fitted the Feed front fenders and noticed that my driver's side door's hinge needs to come forward some more. Today, I removed the door and started working on the list of changes that I've been wanting to do to it. I applied power to the window switch and rolled it up to get the Bose speaker unit out. I swear that sucker weighed at least 5 lbs! I then removed the mirror assy. and wiring harness to the plug to make way for the Craftsquare mirrors. The vertical door hinges require that you lengthen the wiring harness for the added range of movement, so I started by separating the wires from the door's plug. I also disconnected the fender's plug and moved it inside the car and reconnected the plugs together. Now I have to add and reroute the wiring through the hole directly behind the front tire and around the fender to the door. I'll be adding in another plug for ease of removing the door in the future. I'm thinking some black braided kevlar would make for a nice conduit. I'd also mentioned earlier in this thread that I'll be adding my Varad led kit to the underside of the doors. My plan is to flush mount them inside the door by drilling out a couple of 3/4" holes for the domes to fit inside. The units are waterproof, so no worries. Looks like I have lots of room inside the door to accomplish what I want to do. Next, I'll need to get some speaker mounting brackets, speakers and some quality wiring before I finish the harness. I'll also need to redo the mounting bracket for my aftermarket power door locks since they were mounted to the Bose unit. With the door off, now's the perfect time to revisit the welds and prep for paint. I found a guy, locally who does show quality work for sema bound cars.
Here's a picture of the small Feed wing with the adjustable large Feed wing/spoiler (Aerofiber replica). Just got a macbook and digital camera, more to follow...

I love it!
Can we get pics of the whole car now that you have got a Digital Camera?
I would like to see the over all progress you have made. I have been following this build for years and now I love it!
So some pics from the front, side, rear just we can see all the hard work you have done!
How is the engine setup comming? Do you have a time line for when the engine will be done/running?
Great work brotha! keep it up +1
-Taylor
Edit: Your turbo set up is amazing, I love it. Looks awesome. This car is going to put down some serious power!