
Project Keiko Part IV - Tri-Engine Teardowns I

Thread Starter
Joined: May 2002
Posts: 5,972
Likes: 37
From: Ottawa, Soviet Canuckistan
Project Keiko Part IV - Tri-Engine Teardowns I
---Edit: Here are the other chapters of the project, for easy reference---
Project Keiko - Helping a friend
Project Keiko Part II - Exterior, Seals, and Engine Bay Teardown
Project Keiko Part III - Engine Removals
Project Keiko Part IV - Tri-Engine Teardowns I
Project Keiko Part V - Tri-Engine Teardowns II
Project Keiko Part VI - Engine Build I
Project Keiko Part VII - Rotor Seals Assembly
Project Keiko Part VIII - Week Of Crazyness
Project Keiko Part IX - End of Season Update
Project Keiko Part X - Spring 2009 Update
Project Keiko Part XI - Another Engine, Ready to Start
Project Keiko Part XII - Up For Sale
---/Edit---
And now, on with the first half of Part IV, the teardown of the three engines.
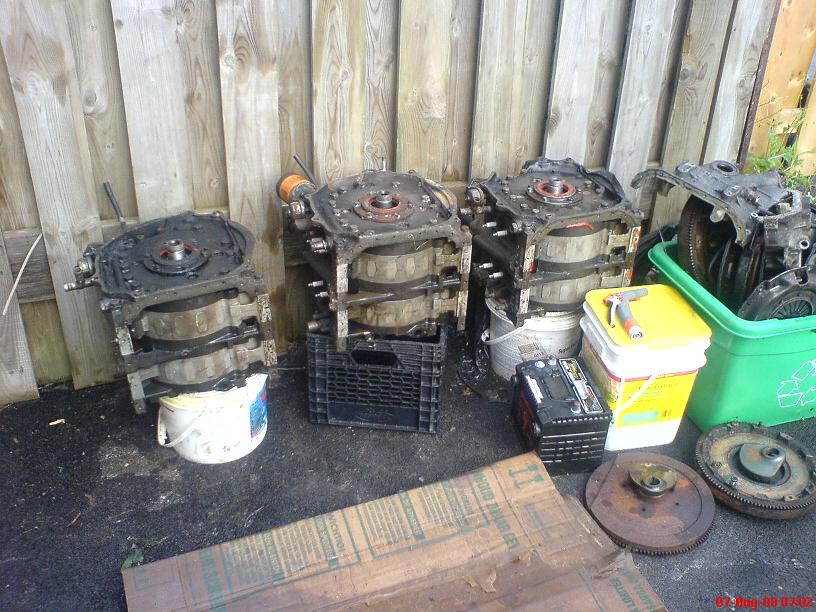
We started off by stripping the three engines of all their accessories. One had a carb, intake, exhaust manifold and air pump on it, and the others had a few misc bits like the beehive oil coolers, pressure plates and clutch discs etc...
The distributors were removed from the engines which had them, as were the engine mounting brackets, water pumps, and main pulleys.
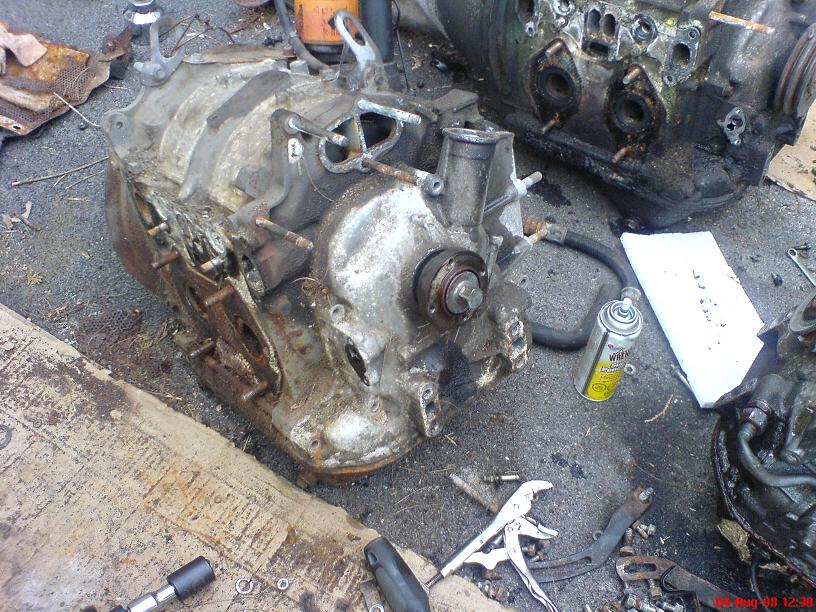
With the engines down to "short blocks" I made it a point to crack loose all the front pulley bolts, since those can be a real pain.
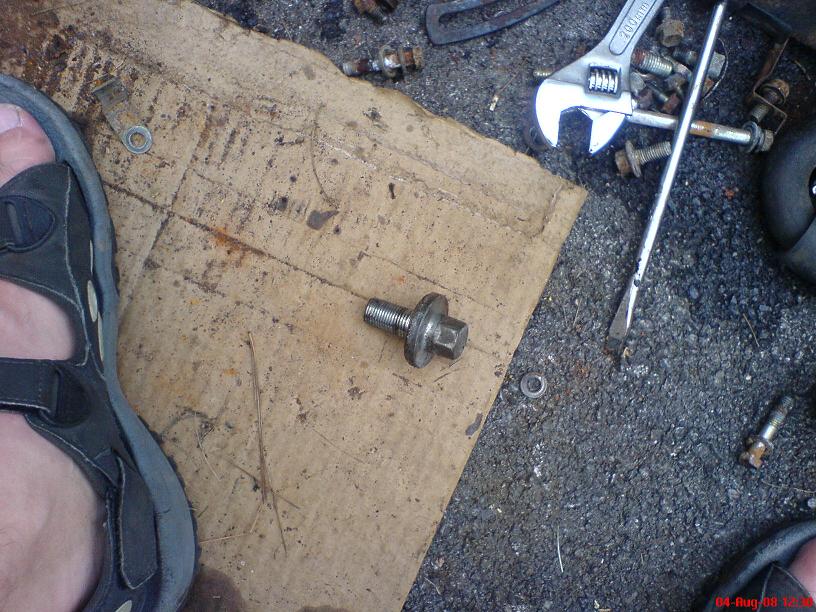
Which then allowed me to remove the font pulley hub

We ended up filling one of my spare recycling boxes with bits and parts, as well as having more stuff than that (like the air pump, intake, carb, exhaust) stuffed into the shed
Project Keiko - Helping a friend
Project Keiko Part II - Exterior, Seals, and Engine Bay Teardown
Project Keiko Part III - Engine Removals
Project Keiko Part IV - Tri-Engine Teardowns I
Project Keiko Part V - Tri-Engine Teardowns II
Project Keiko Part VI - Engine Build I
Project Keiko Part VII - Rotor Seals Assembly
Project Keiko Part VIII - Week Of Crazyness
Project Keiko Part IX - End of Season Update
Project Keiko Part X - Spring 2009 Update
Project Keiko Part XI - Another Engine, Ready to Start
Project Keiko Part XII - Up For Sale
---/Edit---
And now, on with the first half of Part IV, the teardown of the three engines.
We started off by stripping the three engines of all their accessories. One had a carb, intake, exhaust manifold and air pump on it, and the others had a few misc bits like the beehive oil coolers, pressure plates and clutch discs etc...
The distributors were removed from the engines which had them, as were the engine mounting brackets, water pumps, and main pulleys.
With the engines down to "short blocks" I made it a point to crack loose all the front pulley bolts, since those can be a real pain.
Which then allowed me to remove the font pulley hub
We ended up filling one of my spare recycling boxes with bits and parts, as well as having more stuff than that (like the air pump, intake, carb, exhaust) stuffed into the shed
Last edited by vipernicus42; Aug 25, 2009 at 07:46 PM.
Thread Starter
Joined: May 2002
Posts: 5,972
Likes: 37
From: Ottawa, Soviet Canuckistan
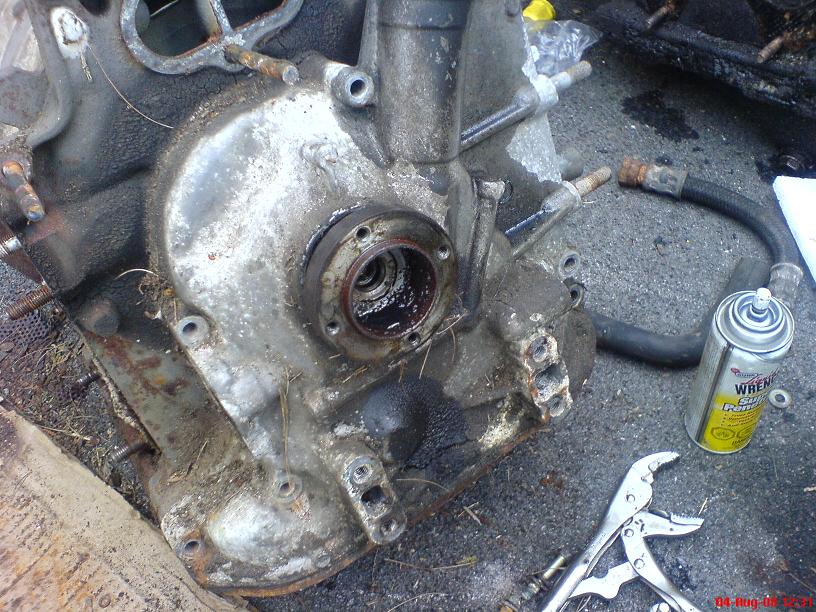
Using the hoist, we then lifted the engines to remove their oil pans and oil pickup tubes so they would sit flat on the ground. This makes it much easier to deal with that flywheel bolt.
I missed taking pictures of a few things but once the engines were flat on the ground I had a piece of flat-iron bar with holes drilled in it that I used to immobilize the flywheel. We then used a 2 1/8" (54mm) socket and a 3ft breaker bar to crack the flywheel nuts.
Threading the nut back on two or three turns to stop the flywheel from "flying" off when it was removed, we used a 2.5lb sledge hammer and a couple persuasive taps to get the flywheels loose. They then came off along with the bolts and the engines were turned flywheel-side-down onto buckets so the front cover could be removed.
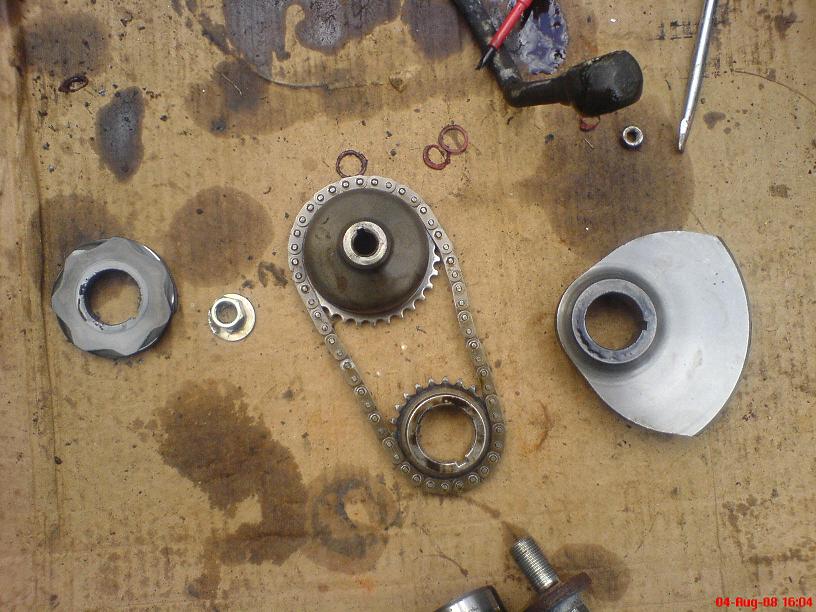
The distributor drive gear is the first thing on top of the stack, and it simply slides up and off
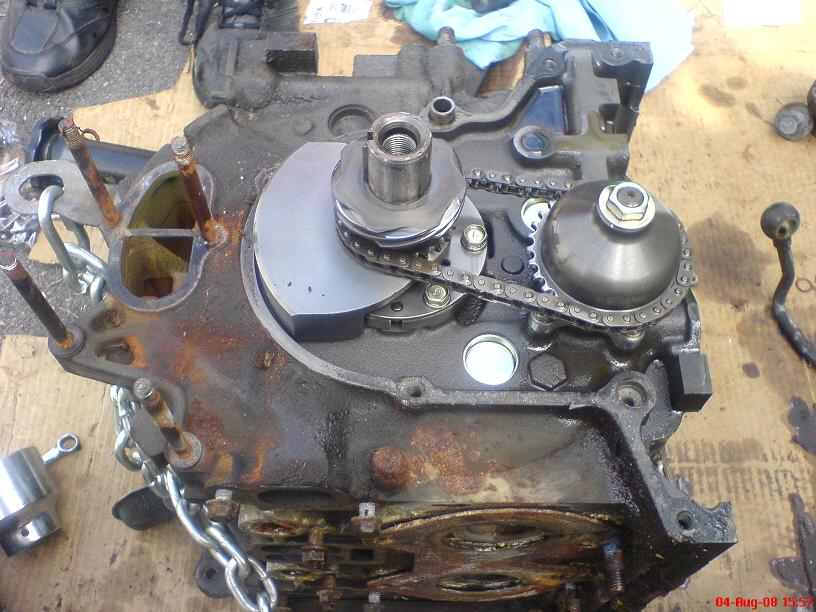
Here's a close up of the bolt that holds the oil pump gear in place and the washer which is bent up to keep it from turning. Once you pry the washer flat as it is here the bolt can be removed
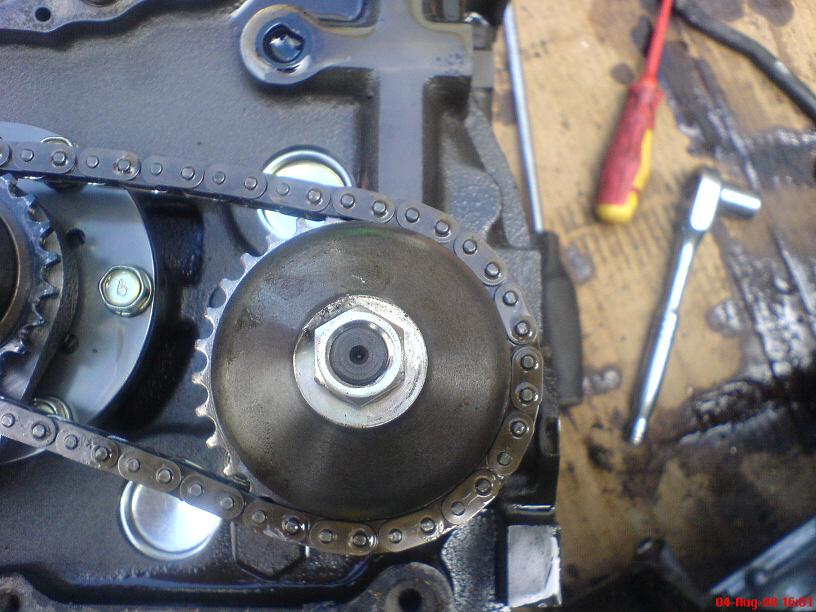
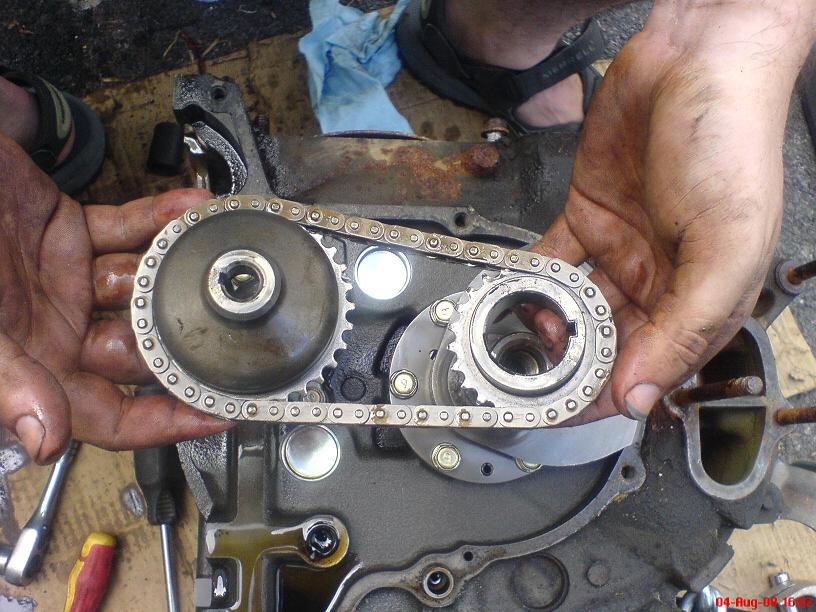
And with the bolt out of the way, you can slide the oil pump drive gear, oil pump chain and oil pump gear straight up off their respective shafts.
That gone, you now have access to the front counterweight., which can just slide up and off.
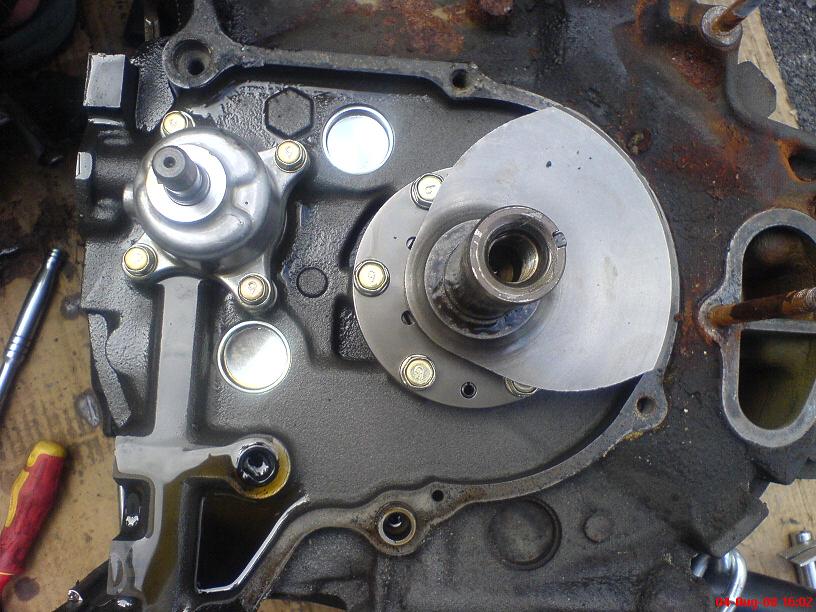
Underneath the front counterweight we find the first of two thrust bearings. Thankfully all of mine were in excellent shape, which doesn't always happen.

I missed taking pictures of a few things but once the engines were flat on the ground I had a piece of flat-iron bar with holes drilled in it that I used to immobilize the flywheel. We then used a 2 1/8" (54mm) socket and a 3ft breaker bar to crack the flywheel nuts.
Threading the nut back on two or three turns to stop the flywheel from "flying" off when it was removed, we used a 2.5lb sledge hammer and a couple persuasive taps to get the flywheels loose. They then came off along with the bolts and the engines were turned flywheel-side-down onto buckets so the front cover could be removed.
The distributor drive gear is the first thing on top of the stack, and it simply slides up and off
Here's a close up of the bolt that holds the oil pump gear in place and the washer which is bent up to keep it from turning. Once you pry the washer flat as it is here the bolt can be removed
And with the bolt out of the way, you can slide the oil pump drive gear, oil pump chain and oil pump gear straight up off their respective shafts.
That gone, you now have access to the front counterweight., which can just slide up and off.
Underneath the front counterweight we find the first of two thrust bearings. Thankfully all of mine were in excellent shape, which doesn't always happen.
Thread Starter
Joined: May 2002
Posts: 5,972
Likes: 37
From: Ottawa, Soviet Canuckistan
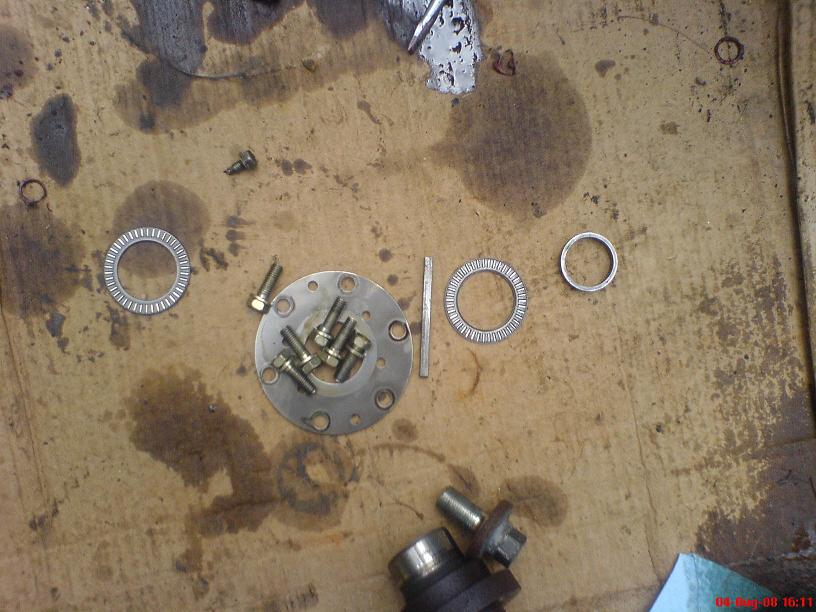
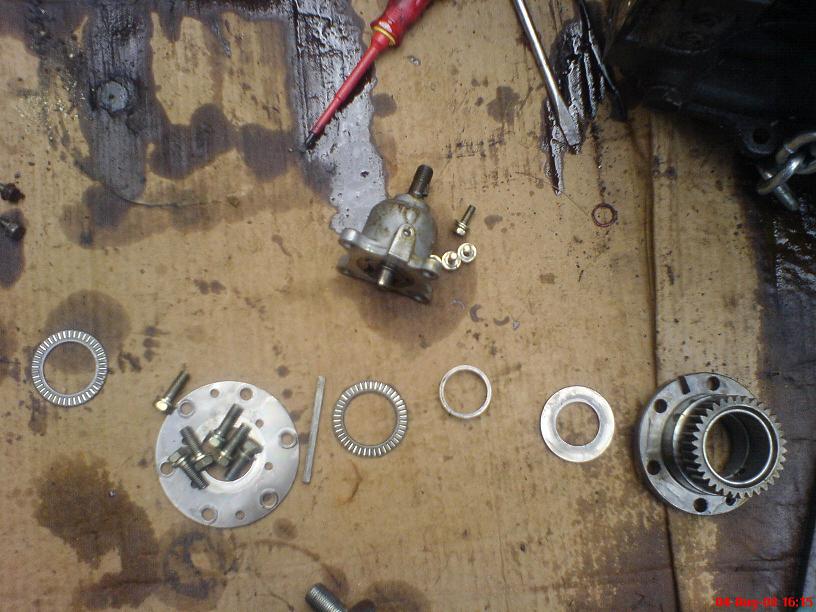
Here's a line-up pic of the first bunch of "front of the engine" bits we've removed so far
And here's what it looks like with the thrust bearing removed
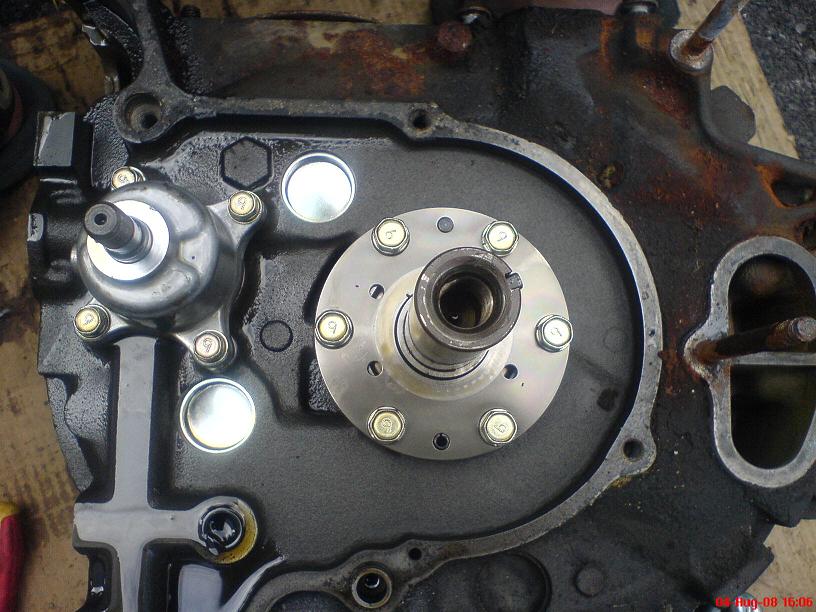
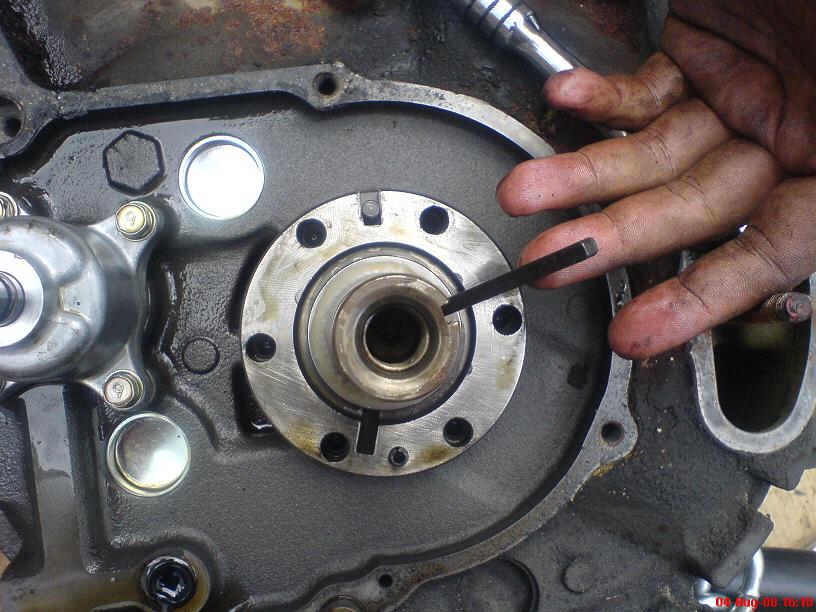
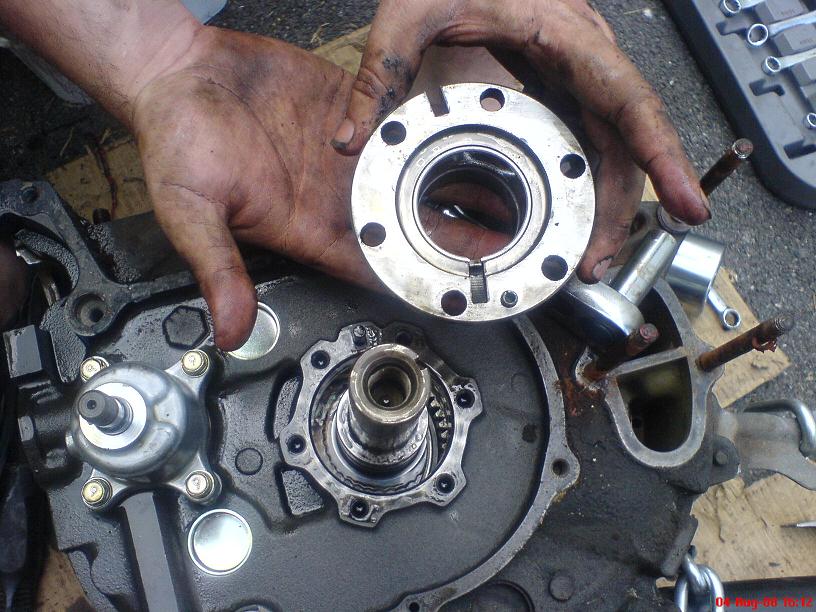
You can now remove the 12mm bolts that hold the bearing plate in place. This also holds the front stationary gear to the engine and keeps the "stack" of the thrust plate, second thrust bearing and end play spacer together under the bearing plate
Now you can remove the key bar which kept everything aligned
And here we see the end play spacer

And here's what it looks like with the thrust bearing removed
You can now remove the 12mm bolts that hold the bearing plate in place. This also holds the front stationary gear to the engine and keeps the "stack" of the thrust plate, second thrust bearing and end play spacer together under the bearing plate
Now you can remove the key bar which kept everything aligned
And here we see the end play spacer
Last edited by vipernicus42; Aug 6, 2008 at 10:56 PM.
Thread Starter
Joined: May 2002
Posts: 5,972
Likes: 37
From: Ottawa, Soviet Canuckistan
So here's the second set of engine bits removed so far:
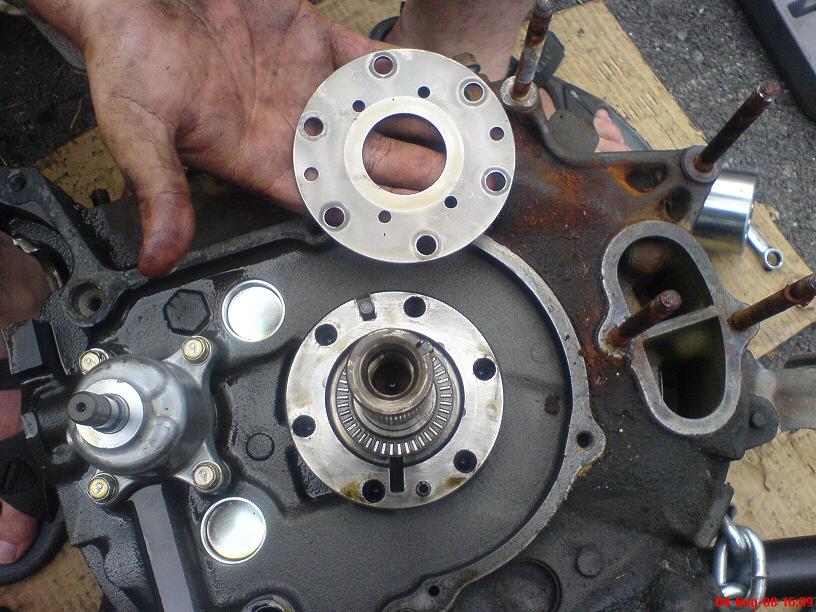
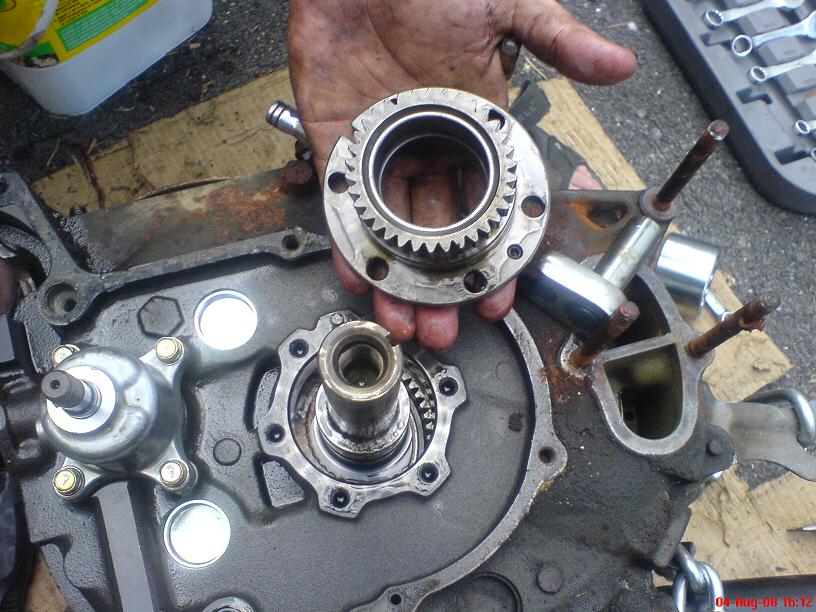
Leaving only one thing left on the stack - the Thrust Plate

So then the Stationary Gear can slide up and out
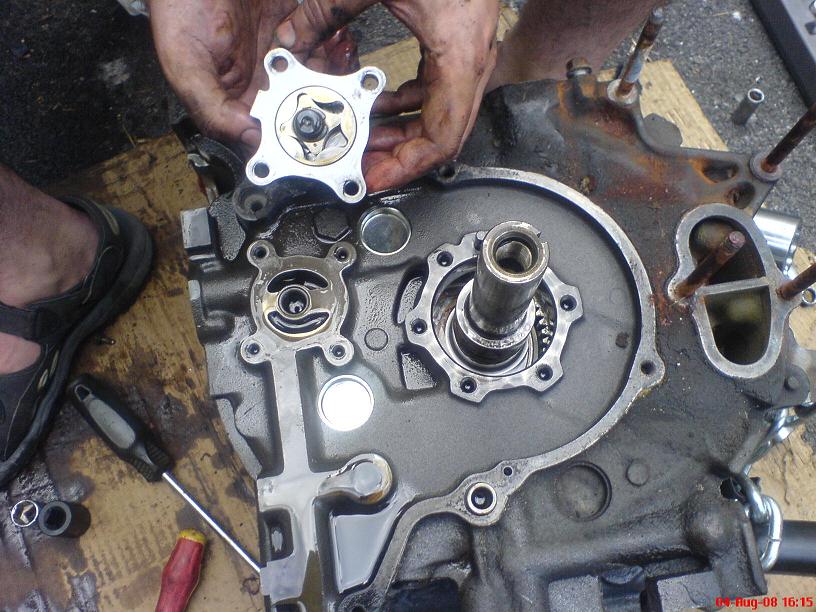
And with 4 10mm bolts, the oil pump can be removed as well
Leaving only one thing left on the stack - the Thrust Plate
So then the Stationary Gear can slide up and out
And with 4 10mm bolts, the oil pump can be removed as well
Last edited by vipernicus42; Aug 6, 2008 at 10:55 PM.
Thread Starter
Joined: May 2002
Posts: 5,972
Likes: 37
From: Ottawa, Soviet Canuckistan
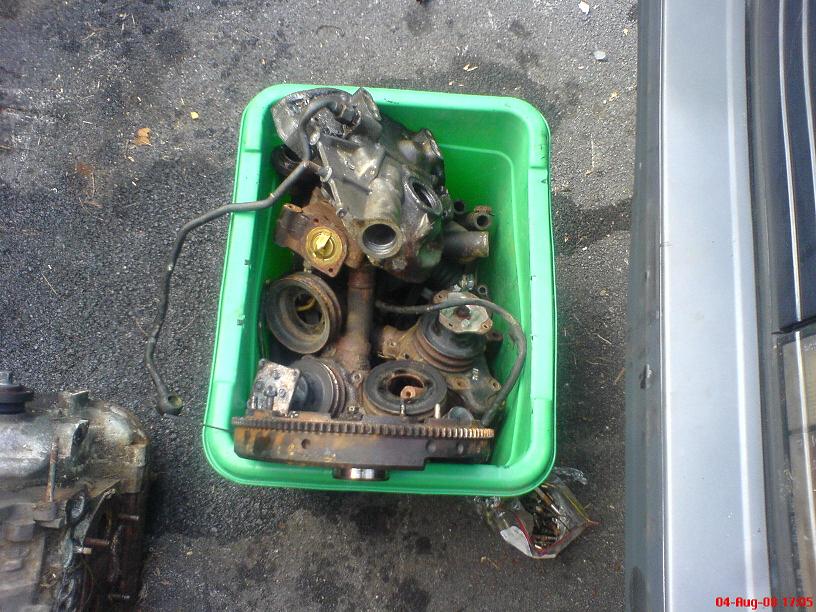
So here's what all the remaining bits look like laid out
Which all ended up in my big Bucket O Parts

That took me almost to the end of day Monday, where we had one engine completely stripped and sitting on a bucket ready for disassembly, and the other two in "short block" form
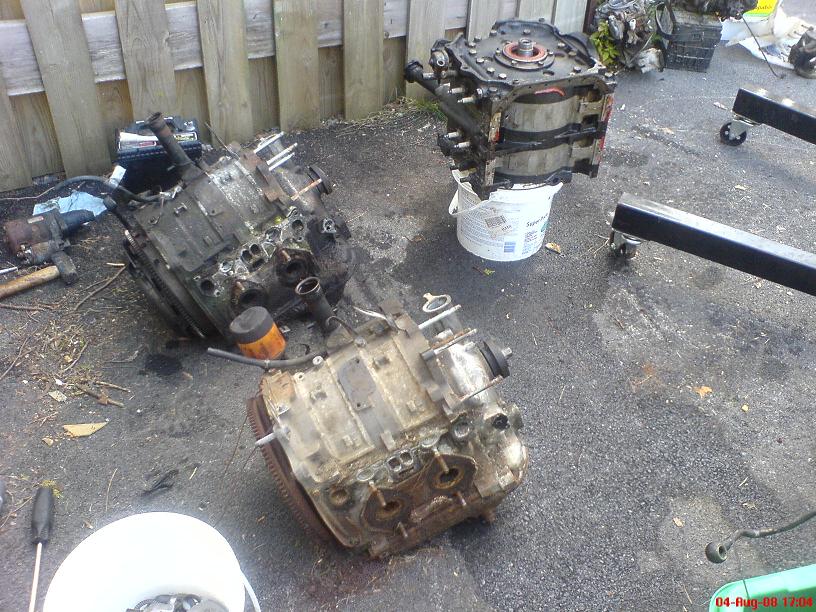

And Tuesday I managed to get the oil pans and pick up tubes off the other two so they could sit flat
Today I got the other two engines right up to the same point, so they're all sitting on buckets now awaiting disassembly. I'll grab a picture of all three of them in the morning before work.
So that's "Part 1" of the dissasembly of the 3 Engines. The next thread should be late on Sunday since it's the next day I'll have a chance to work on them. Hopefully I'll have enough time on Sunday to completely take them all apart and we'll see what we can salvage from the insides. So far we definitely have enough good front-of-engine bits to build at least two running engines, so we'll see what surprises are in store for us once we get into the main block.
Here's keeping my fingers crossed for some good rotor housings!
Jon
Which all ended up in my big Bucket O Parts
That took me almost to the end of day Monday, where we had one engine completely stripped and sitting on a bucket ready for disassembly, and the other two in "short block" form
And Tuesday I managed to get the oil pans and pick up tubes off the other two so they could sit flat
Today I got the other two engines right up to the same point, so they're all sitting on buckets now awaiting disassembly. I'll grab a picture of all three of them in the morning before work.
So that's "Part 1" of the dissasembly of the 3 Engines. The next thread should be late on Sunday since it's the next day I'll have a chance to work on them. Hopefully I'll have enough time on Sunday to completely take them all apart and we'll see what we can salvage from the insides. So far we definitely have enough good front-of-engine bits to build at least two running engines, so we'll see what surprises are in store for us once we get into the main block.
Here's keeping my fingers crossed for some good rotor housings!
Jon
Thread Starter
Joined: May 2002
Posts: 5,972
Likes: 37
From: Ottawa, Soviet Canuckistan
For anyone needing a reference for the front cover pieces and the order in which they go, the Mazdatrix site has a numbered diagram and matching part numbers.
http://www.mazdatrix.com/b5.htm
And since the last time I went there, they got "competition" bearings! I didn't know those existed, I guess I'll have to add that to the "Ultimate N/A 12a" build I do for my car in a year or two's time.
http://www.mazdatrix.com/b5.htm
And since the last time I went there, they got "competition" bearings! I didn't know those existed, I guess I'll have to add that to the "Ultimate N/A 12a" build I do for my car in a year or two's time.
Awesome posts Jon. PLEASE keep updating the disassembly of the engine in this format. You have made it soooo easy to follow, that it makes me want to go buy a blown 12A just to take apart for fun.  If you document the rest of the disassembly this well it would make a GREAT addition to our archives.
Jamie
P.S. Did those fuel sender screws show up yet?
If you document the rest of the disassembly this well it would make a GREAT addition to our archives.Jamie
P.S. Did those fuel sender screws show up yet?
Trending Topics
Thread Starter
Joined: May 2002
Posts: 5,972
Likes: 37
From: Ottawa, Soviet Canuckistan
No sign of the fuel sender screws yet but Monday was a stat holiday so I expect that the post office has been playing catch-up this week.
Yeah I'm enjoying taking the engines apart. I actaually did buy a blown 12a at one point and took it apart for fun. I didn't end up getting much salvageable out of it, but the core only cost me $100 and it was a great learning experience that, along with the shop manual and Aaron Cake's engine build thread, prepped me for this.
Don't worry I'll keep the updates coming My hope is to have all 3 blocks disassembled on Sunday and if there's time left then I'll clean all the parts and pick the ones I'm going to use for the rebuild.
I've still got a few things to look up before the rebuild so hopefully I'll get those details ironed out by the end of the week (such as, how to align the distributor when I stab it back in and how to decide which way the front main pulley goes back on)
Jon
Yeah I'm enjoying taking the engines apart. I actaually did buy a blown 12a at one point and took it apart for fun. I didn't end up getting much salvageable out of it, but the core only cost me $100 and it was a great learning experience that, along with the shop manual and Aaron Cake's engine build thread, prepped me for this.
Don't worry I'll keep the updates coming
My hope is to have all 3 blocks disassembled on Sunday and if there's time left then I'll clean all the parts and pick the ones I'm going to use for the rebuild. I've still got a few things to look up before the rebuild so hopefully I'll get those details ironed out by the end of the week (such as, how to align the distributor when I stab it back in and how to decide which way the front main pulley goes back on)
Jon
Not sure about the front main pulley, but I know that when you re-install the distributor you normally align the timing indicator pin with your leading timing mark. Align the dimple on the distributor driven gear with the indicator mark on the distributor body, and stuff it in. Be careful cause sometimes they jump a tooth when you stuff them in.
Thread Starter
Joined: May 2002
Posts: 5,972
Likes: 37
From: Ottawa, Soviet Canuckistan
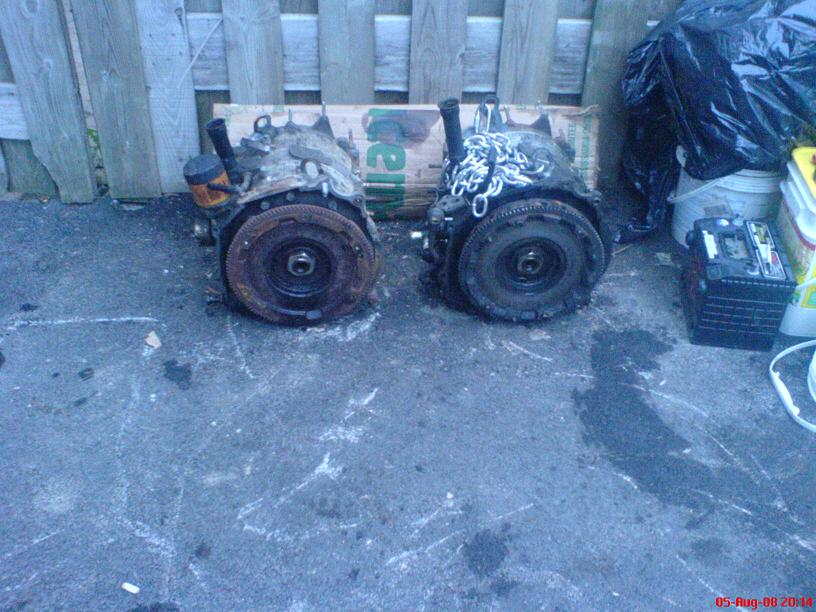
As promised, here's a picture of where we stand right now, with the engines on "stands" stripped down to the bare blocks.
Sunday they come apart and we get to see what's hidden inside
Well... I guess technically the Oil Pressure Sensors, Water Temp Sensors and one of the oil filter pedestals are still attached... but they're about as close to "bare" as they get for now.
Jon
Sunday they come apart and we get to see what's hidden inside
Well... I guess technically the Oil Pressure Sensors, Water Temp Sensors and one of the oil filter pedestals are still attached... but they're about as close to "bare" as they get for now.
Jon
Looking great so far Jon. I agree that these threads are excellent. I was really excited to tear down my 12A. I just have to wait until after I move before I can save the funds to actually rebuild it. Are you going to be doing threads on how to measure wear in the housings, irons, and rotors and basically how to spec out possible re-usable parts? That would be awesome. A well documented re-assembly and re-installation in the car would also be fantastic and a great asset to the archives
Thread Starter
Joined: May 2002
Posts: 5,972
Likes: 37
From: Ottawa, Soviet Canuckistan
I'm definitely documenting the rest of the teardown and reassembly. I haven't figured out what I'm doing for spec-ing out reusable parts. I don't have one of those funky dial indicators to measure stepwear and this is a budget build so I don't know how precisely I'm going to be spec-ing stuff. Whatever I can do with my vernier caliper I'll definitely do, I'll have to read the shop manual and see what special tools I need for the rest.
Whatever I do I'll document for you guys to see.
Jon
Whatever I do I'll document for you guys to see.
Jon
Joined: Feb 2006
Posts: 3,162
Likes: 1
From: London, Ontario, Canada
You know, I always knew you were a nice guy. Keep up the good work man, I'm sure your friend will be thrilled. I couldn't imagine getting a gift like an FB.
Thread Starter
Joined: May 2002
Posts: 5,972
Likes: 37
From: Ottawa, Soviet Canuckistan
It was unavoidable. It has rained something like 19 out of the last 30 days here and I don't have a garage.
I'll just have to clean and oil everything really well and get into the project before rust starts to form or get too bad. I made sure to put all the front engine pieces in a cardboard box inside the car to keep them from getting rained on.
Jon
I'll just have to clean and oil everything really well and get into the project before rust starts to form or get too bad. I made sure to put all the front engine pieces in a cardboard box inside the car to keep them from getting rained on.
Jon
Thread Starter
Joined: May 2002
Posts: 5,972
Likes: 37
From: Ottawa, Soviet Canuckistan
I had them covered with garbage bags. It works alright.
I should have them apart on Sunday hopefully, so then I'll be able to clean all the parts, dry them all off and bring them into the house.
Jon
I should have them apart on Sunday hopefully, so then I'll be able to clean all the parts, dry them all off and bring them into the house.
Jon

Thread Starter
Joined: May 2002
Posts: 5,972
Likes: 37
From: Ottawa, Soviet Canuckistan
Yeah Sam I am a week behind. Thanks for shipping the distributor so quickly though!
Between the rain and some crazy stuff happening here I haven't been able to work on it as much as I'd like.
Jon
Between the rain and some crazy stuff happening here I haven't been able to work on it as much as I'd like.
Jon