
Project Keiko IX - End of Season Update

Thread Starter
Joined: May 2002
Posts: 5,972
Likes: 37
From: Ottawa, Soviet Canuckistan
Project Keiko IX - End of Season Update
---Edit: Here are the other chapters of the project, for easy reference---
Project Keiko - Helping a friend
Project Keiko Part II - Exterior, Seals, and Engine Bay Teardown
Project Keiko Part III - Engine Removals
Project Keiko Part IV - Tri-Engine Teardowns I
Project Keiko Part V - Tri-Engine Teardowns II
Project Keiko Part VI - Engine Build I
Project Keiko Part VII - Rotor Seals Assembly
Project Keiko Part VIII - Week Of Crazyness
Project Keiko Part IX - End of Season Update
Project Keiko Part X - Spring 2009 Update
Project Keiko Part XI - Another Engine, Ready to Start
Project Keiko Part XII - Up For Sale
---/Edit---
Well the end of the good weather season is here. Naomi (my "good" 7) went into storage this past weekend, and Keiko was towed home from my friend Marc's place, whose garage I was using to do that "week of crazyness" work indoors where it was warm.
Here are some pictures of how that week wrapped up, and an update as to where we are in the project as we end the season. I may still do a little work on it before the snow, since I have a few parts coming in, but it looks official that it won't be licensed for the road this year. On the bright side, prospects look very good to have it running early in the spring
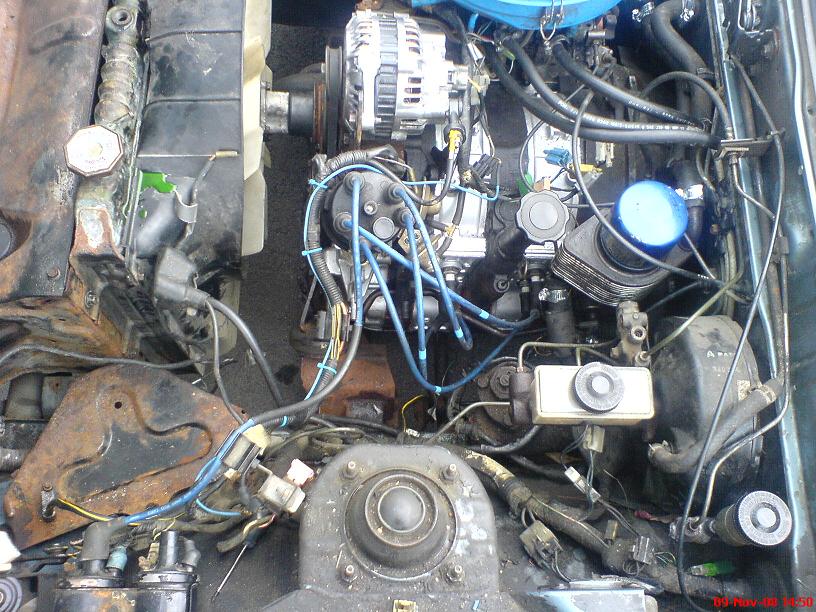
The engine bay is pretty much completed. One ignition wire, a coolant level sensor, a battery, some headlight motor relays and a coolant resivoir bracket are all that are needed to tie everything up there. Oh, and a throttle return spring for the carb, I need one of those too.
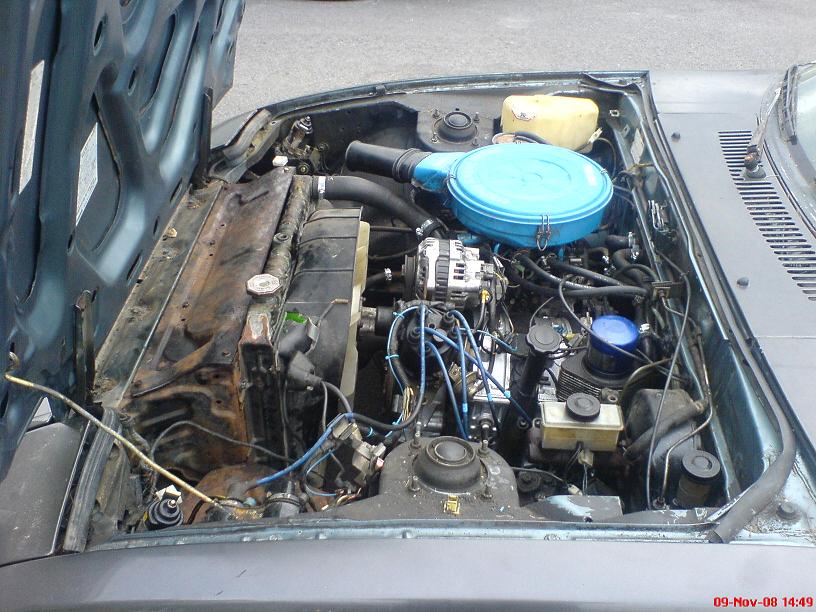
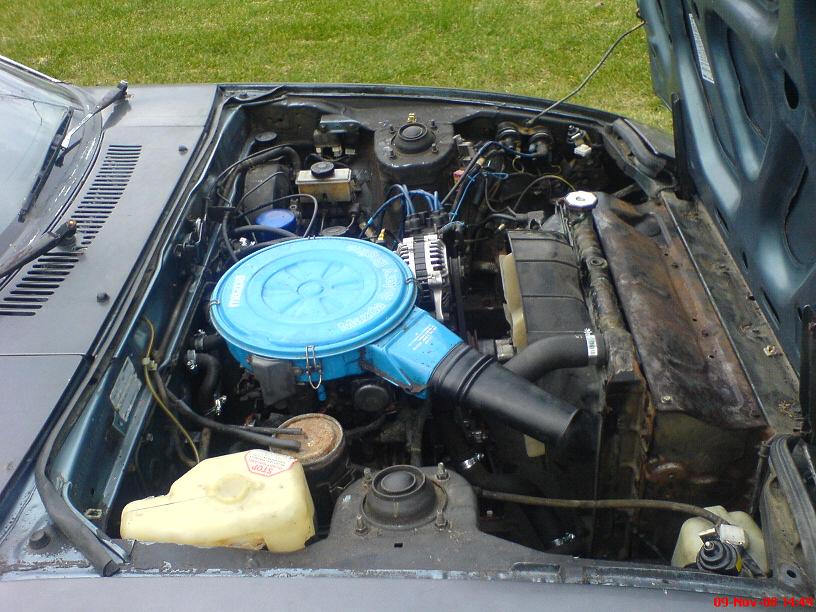

It's by far not the prettiest engine bay in the world, but that will slowly change. Once I get it on the road next year, Phase II of the project will involve cleaning and painting things in the engine bay, working on the interior, and probably getting the car painted as well.
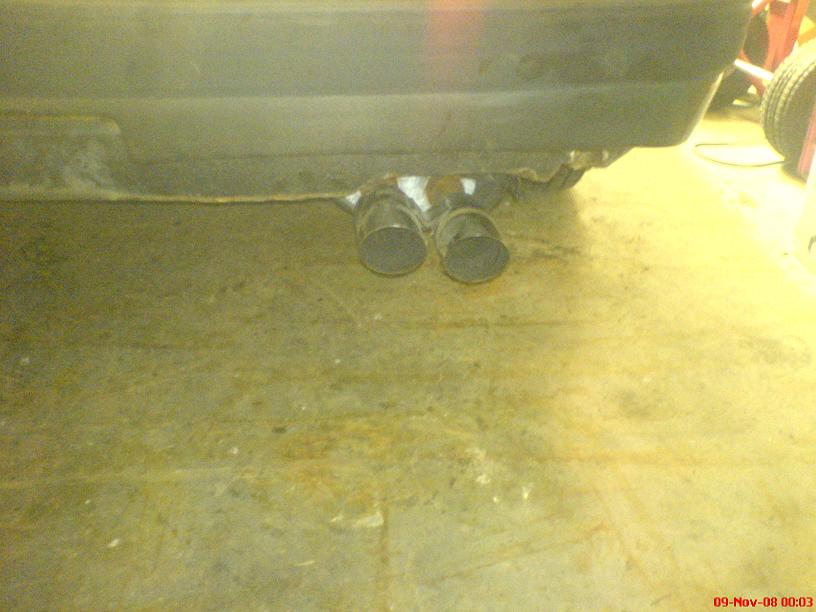
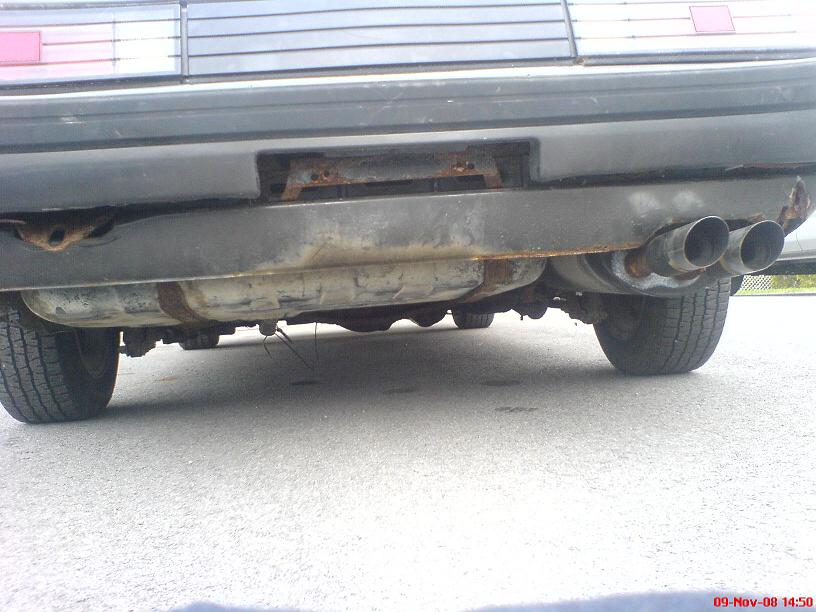
We got the muffler installed, though we found one of the hanger brackets was missing so right now it hangs crooked because it's only supported on one side. Still, it's very solid as it is now, so once it's running I'll just drop by the exhaust shop and have them fix it up for me.
We got the gas tank installed along with the fuel pump and hoses. Fuel flows to the carb and returns to the tank as intended, so everything works well.
Project Keiko - Helping a friend
Project Keiko Part II - Exterior, Seals, and Engine Bay Teardown
Project Keiko Part III - Engine Removals
Project Keiko Part IV - Tri-Engine Teardowns I
Project Keiko Part V - Tri-Engine Teardowns II
Project Keiko Part VI - Engine Build I
Project Keiko Part VII - Rotor Seals Assembly
Project Keiko Part VIII - Week Of Crazyness
Project Keiko Part IX - End of Season Update
Project Keiko Part X - Spring 2009 Update
Project Keiko Part XI - Another Engine, Ready to Start
Project Keiko Part XII - Up For Sale
---/Edit---
Well the end of the good weather season is here. Naomi (my "good" 7) went into storage this past weekend, and Keiko was towed home from my friend Marc's place, whose garage I was using to do that "week of crazyness" work indoors where it was warm.
Here are some pictures of how that week wrapped up, and an update as to where we are in the project as we end the season. I may still do a little work on it before the snow, since I have a few parts coming in, but it looks official that it won't be licensed for the road this year. On the bright side, prospects look very good to have it running early in the spring
The engine bay is pretty much completed. One ignition wire, a coolant level sensor, a battery, some headlight motor relays and a coolant resivoir bracket are all that are needed to tie everything up there. Oh, and a throttle return spring for the carb, I need one of those too.
It's by far not the prettiest engine bay in the world, but that will slowly change. Once I get it on the road next year, Phase II of the project will involve cleaning and painting things in the engine bay, working on the interior, and probably getting the car painted as well.
We got the muffler installed, though we found one of the hanger brackets was missing so right now it hangs crooked because it's only supported on one side. Still, it's very solid as it is now, so once it's running I'll just drop by the exhaust shop and have them fix it up for me.
We got the gas tank installed along with the fuel pump and hoses. Fuel flows to the carb and returns to the tank as intended, so everything works well.
Last edited by vipernicus42; Aug 25, 2009 at 07:45 PM.
Thread Starter
Joined: May 2002
Posts: 5,972
Likes: 37
From: Ottawa, Soviet Canuckistan
So what's left?
Well the brake line going from the brake proportioning valve to the rear of the car is completely missing (you can see the open hole on the brake proportioning valve above). So in the short term, if I wanted to make the car movable I could block that hole in the proportioning valve with an M10x1.0 bolt and bleed the front brakes and end up with partial braking.... It wouldn't pass safety that way and I wouldn't want to drive it far, but it would make it easier to move the car in and out of the driveway for sure.
The clutch rod is also strangely missing. I've got one of those coming in from a friend of mine in the next few days, so once that's here I'll be able to bleed the clutch properly.
We did a test of the electrical and everything checks out. Signal lights, flashers, the headlights and high beams work, but since we're missing the relays for the headlight motors we had to put them up manually. The trunk release and the release for the gas cover work... the reverse lights and brake lights work, the blowers for the heater system work, the fuel pump works, and so does the starter!
Which leads me to our first attempt to start it!
Without a throttle return spring, a clutch rod, or brakes, we knew that we wouldn't be able to go anywhere with the car if it did start but we figured we'd try it anyway. The engine was filled with oil and coolant, and the tranny was filled with fluid as well. We put a battery in it and jumped the fuel pump to fill the float bowls on the carb. We cranked it over and... nothing.
We checked for spark, and we were getting nice looking sparks on both leading and trailing plugs. We checked for fuel and we definitely got fuel in the carb float bowls, and the accelerator pump worked so we shot a few squirts of gas down for good measure. With no throttle return spring, we closed the throttle by hand after shooting some gas in and tried again, but no luck... Well we had fuel and spark, so what about compression?
Well, taking out one leading plug at a time and turning the engine we got three very distinct "whoosh" sounds from each rotor, which was encouraging. The problem is that the car was cranking slowly...
...REALLY slowly, even on booster cables attached to my good 7 that has the 100amp FD alt, with the choke out running about 2-3krpm. We suspect the starter or battery cables to be the issue, so those are now on the list of things to replace. I'll get a new Bosch starter and make some larger copper-core battery cables for it, but part of me thinks it might not be a starter issue at all.
The engine is a little harder to turn by hand than my 7 or my friend Joel's 7. In fact, it barely moves by hand so I use a ratchet with a 19mm socket to turn it. It doesn't take much force with the ratchet, but enough to say that it's more difficult than Naomi. So I've started thinking of things that could make it do that, and I've come up with a pretty broad list
- The tranny spent a few months without oil in it, and with no clutch rod the engine and tranny must spin together so the added resistance of the tranny might be slowing it down?
- The engine hasn't cranked enough for the oil pump to fully lubricate everything in the engine either. I did apply some oil when assembling the engine, but it might be a bit more resistant than usual as well until oil gets flowing
- There might be something wrong in the front-of-engine area. I was VERY careful when I put it together, but when we were mating the engine and tranny we did something *very* stupid. We flipped the engine onto its front and stood it on the front pulley, lowering the transmission onto it. In retrospect, this was probably a bad thing to do and might have caused issues in the front cover that are adding the extra resistance.
- I suspect a possible issue with the pilot bearing. While I don't see how this could create extra resistance for cranking, the reason I suspect an issue is because of how difficult it was to mate the engine and tranny. I used a clutch alignment tool when setting up the clutch and flywheel (though it was a generic one that didnt' fit as snugly as I would like and did allow for the disc to "look" straight but be off a little possibly).. but when we went to mate the engine and tranny together the input shaft slid easily through the disc, then got stuck on the pilot bearing. Since the engine and tranny were about a half inch from being mated together, I threaded the bolts and tightened them a little at a time until the engine and tranny were mated together. Probably not the best idea. Does anyone have any experience to suggest whether that was the right way to do it or should it just slip together easily? I seem to remember the engine and tranny being difficult to take apart so I figured it was supposed to be a tight fit, but after reading a bit more about the pilot bearing that doesn't seem likely. I didn't replace the pilot bearing when I did the engine rebuild, I didn't have a puller tool and it looked/felt fine. In retrospect that would have been the better thing to do.
So if anyone has more ideas as to what could be causing the resistance, let me know. If I'm lucky, this is all just me being paranoid and once I get a new starter and battery cables and the engine and tranny lube up properly it'll crank right up and be good to go.
I plan to give it another try if I get the clutch rod and block-off bolt before the weekend and if the weather is nice. We'll see what happens.
Jon
Last edited by vipernicus42; Nov 11, 2008 at 06:34 PM.
Thread Starter
Joined: May 2002
Posts: 5,972
Likes: 37
From: Ottawa, Soviet Canuckistan
Remaining To-Dos:
To Be Done, once parts arrive or first thing in spring:
- Headlight Relays
- Clutch Rod, C-Clip
- Cotter pins for OMP, Fast Idle rods
- Trunk piston c-clip, driver's side
- Coolant Resivoir Mounting Bracket
- Coolant Level Sensor
- Hook up fuel level sender
- Block off brake line to rear
- Bleed Clutch and Brakes
- Install new starter
- Make and install new battery cables
- Put a battery in it
To do in spring by Glen (local mechanic that does grunt work I don't feel like doing or don't have tools for):
- Brake line from proportioning valve to rear
- E-brake cable
- Install new XTD clutch disc and pressure plate
with new throwout bearing and pilot bearing
I figure that Glen has done clutch jobs on my car before and since he has a lift he usually just drops the tranny and leaves the engine in place. That's much easier than what I have to do if I want to swap it, which is to dissassemble the entire engine bay and pull both the engine and tranny again. Since he's going to do the brake line and e-brake cable anyway, I figure a clutch swap wouldn't be a bad idea. I should have thought of it before, but I didn't realize how cheaply clutch kits were available! I *know* the XTD kit isn't high quality, but with this car being a stock carb'd, stock exhaust'd 12a with under-spec seals I don't think I'll be putting down enough power for it to be an issue, and at $130, you can't go wrong for a budget build like this. I guarantee that it's better than the used clutch I put in there!
Jon
Joined: Jun 2008
Posts: 8,376
Likes: 30
From: Chino Hills, CA
Pilot bearing only comes into play when the clutch is disengaged, so that's not it.
Did you check youre end play after assembling the keg? I still have nightmares about the time I didn't check it properly (I thought you were supposed to PRY at it), and had insufficient play. Engine only lasted a few thousand miles.
Belts too tight? Alt binding?
Did you check youre end play after assembling the keg? I still have nightmares about the time I didn't check it properly (I thought you were supposed to PRY at it), and had insufficient play. Engine only lasted a few thousand miles.
Belts too tight? Alt binding?
Thread Starter
Joined: May 2002
Posts: 5,972
Likes: 37
From: Ottawa, Soviet Canuckistan
I didn't measure but all three engines had the exact same end play spacer (K I believe) so when I built the engine I figured it would be ok. It had some play, but not a huge amount.
Other than the end-play spacer what else affects end play?
I don't think it's a belt thing but it's a good thing to check... the alt did spin nicely on its own and I chose the water pump because it, too, spun nicely on its own.
Jon
Other than the end-play spacer what else affects end play?
I don't think it's a belt thing but it's a good thing to check... the alt did spin nicely on its own and I chose the water pump because it, too, spun nicely on its own.
Jon
The thickness of the hardened thrust plate can vary a bit, as can the thin front spacer (that rides against the front counterweight). Thrust plate is usually 3.00mm. Thin front spacer is usually around 1.00mm. When you combine thinner than average parts, the bearings experience more slop so it's a good idea to... well, you shouldn't even trust factory parts. I've seen factory end play up to .0035" which is too sloppy for me. I like Judge Ito's recommended .002" for my builds.
Edit: something to add. You say the waterpump spun nicely on its own? Nicely as in easily or nicely as in smoothly? If it spins easily it means the seal is old and could begin letting water seep through the weep hole. Take a look for signs of water damage around the bottom bolt (there are three 12mm head bolts that hold the impeller to the waterpump housing - look at the bottom-most one).
Edit: something to add. You say the waterpump spun nicely on its own? Nicely as in easily or nicely as in smoothly? If it spins easily it means the seal is old and could begin letting water seep through the weep hole. Take a look for signs of water damage around the bottom bolt (there are three 12mm head bolts that hold the impeller to the waterpump housing - look at the bottom-most one).
Last edited by Jeff20B; Nov 12, 2008 at 02:37 AM.
Thread Starter
Joined: May 2002
Posts: 5,972
Likes: 37
From: Ottawa, Soviet Canuckistan
It spun smoothly. One of my other water pumps was practically seized but the one I chose spun without feeling grainy or requiring a lot of force. I'm not sure how to describe it but yes I know what you mean, it wasn't *too* easy to spin, it just wasn't seized or offering the kind of resistance that would make the engine hard to turn is what I meant.
Jon
Jon

Thread
Thread Starter
Forum
Replies
Last Post