
Project Keiko Part VIII - Week of crazyness

Thread Starter
Joined: May 2002
Posts: 5,972
Likes: 37
From: Ottawa, Soviet Canuckistan
Project Keiko Part VIII - Week of crazyness
Hey Guys,
---Edit: Here are the other chapters of the project, for easy reference---
Project Keiko - Helping a friend
Project Keiko Part II - Exterior, Seals, and Engine Bay Teardown
Project Keiko Part III - Engine Removals
Project Keiko Part IV - Tri-Engine Teardowns I
Project Keiko Part V - Tri-Engine Teardowns II
Project Keiko Part VI - Engine Build I
Project Keiko Part VII - Rotor Seals Assembly
Project Keiko Part VIII - Week Of Crazyness
Project Keiko Part IX - End of Season Update
Project Keiko Part X - Spring 2009 Update
Project Keiko Part XI - Another Engine, Ready to Start
Project Keiko Part XII - Up For Sale
---/Edit---
Unfortunately the engine build ended up taking place so late in the evening a few weeks ago that none of my pictures turned out. I wasn't too worried about it, because Aaron Cake's engine build thread has just as much information in it as mine would.
The last update was over a month ago and other than actually assembling the engine, not much happened since then... Until now.
I took this week off work to try and seriously get some work done on Keiko. When I started the week, both of my FBs were off the road and I knew that with winter looming I had to get one if not both running before then so that I could put one in storage and have enough driveway space. (For those of you who don't live in snowy climates, you can park on the street in the summer, but in the winter any cars parked on the street get towed away so the snow plows can do their job. I have 2 FBs and each of my parents have their own car, so with a 3-car driveway ONE of the FBs has to go to storage before the snow hits)
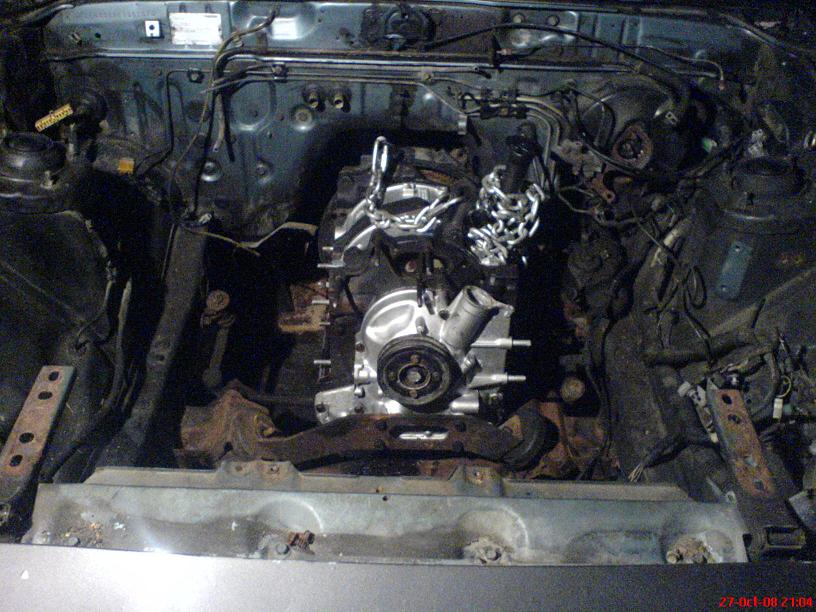
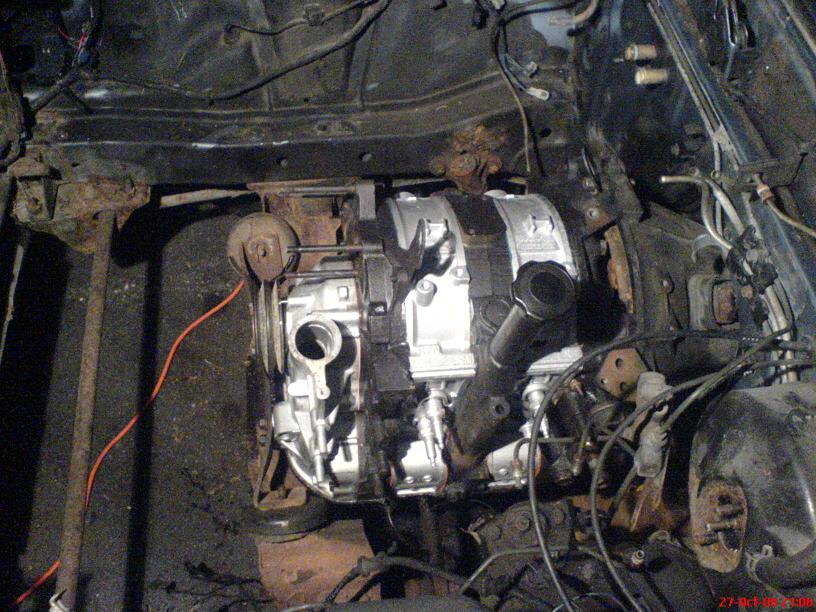
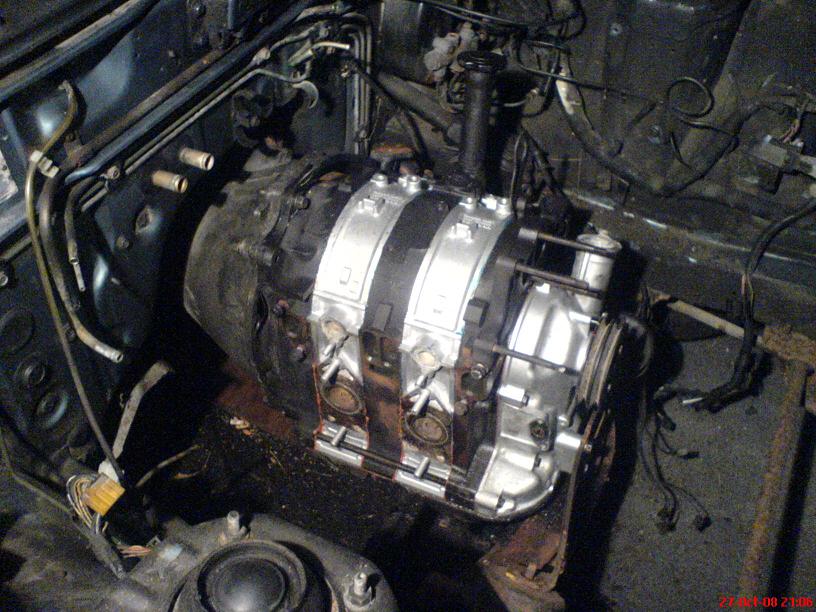
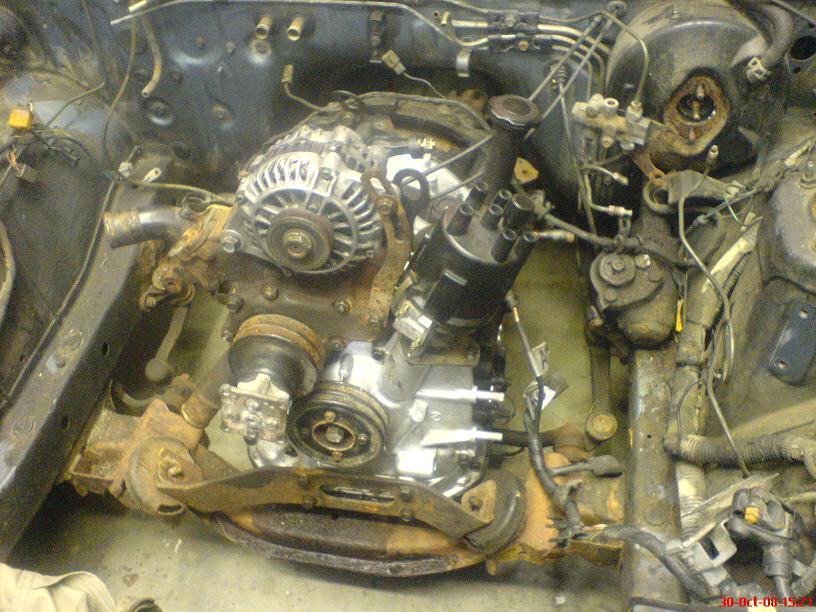
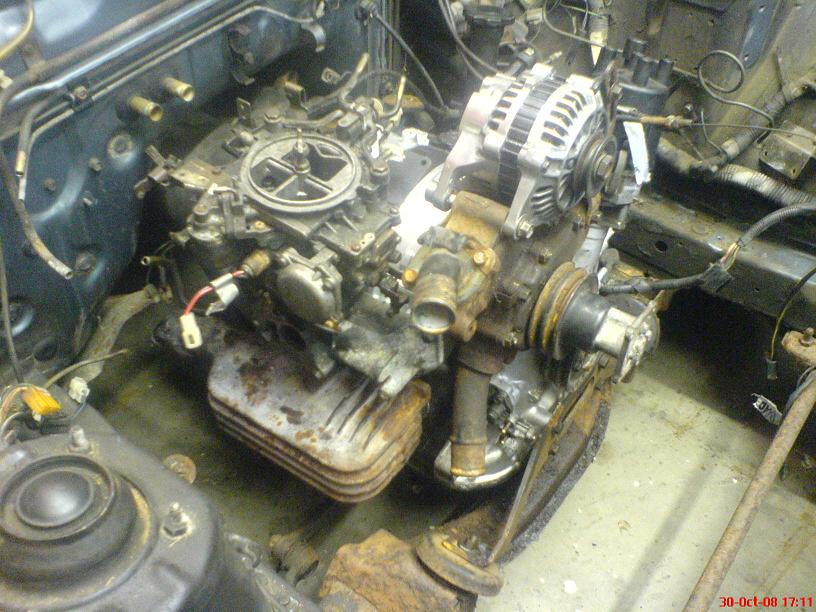
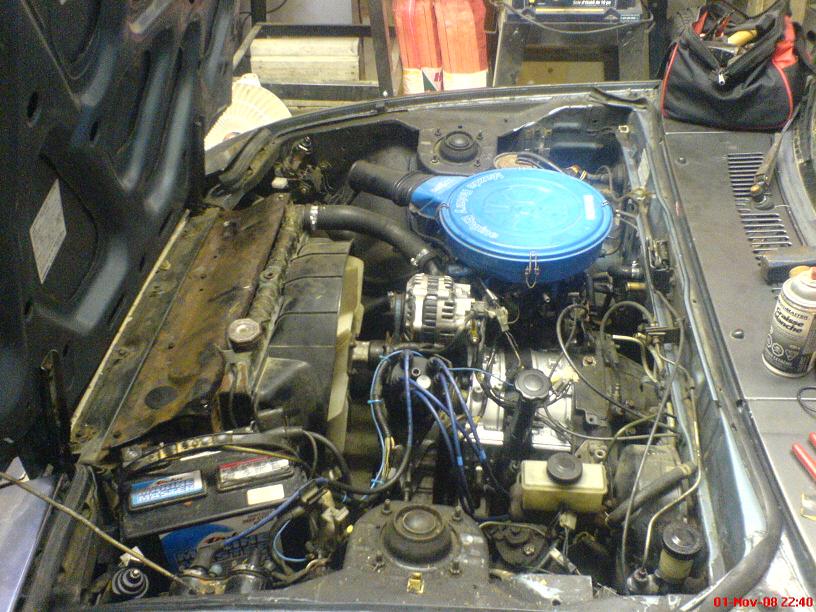
Yesterday we mated the engine and tranny together and dropped it in. Here are a few pics of what the engine bay looks like now.
This morning we towed the car to my friend Marc's place. He has a garage, and since it's hovering around 0*C here this week, we figured a nice heated garage would be the place to work. I plan to do a *bunch* of work on it this week, so stay tuned. I'll toss all my updates and pictures in this thread as it goes on.
Basically my 9-5 job this week is working on Keiko.... of course I'll probably pull lots of "overtime" since I have to have it back at my place by end of day Sunday. How hard and long I work on it will determine whether it gets towed back or driven back. Let the games begin!
Jon
---Edit: Here are the other chapters of the project, for easy reference---
Project Keiko - Helping a friend
Project Keiko Part II - Exterior, Seals, and Engine Bay Teardown
Project Keiko Part III - Engine Removals
Project Keiko Part IV - Tri-Engine Teardowns I
Project Keiko Part V - Tri-Engine Teardowns II
Project Keiko Part VI - Engine Build I
Project Keiko Part VII - Rotor Seals Assembly
Project Keiko Part VIII - Week Of Crazyness
Project Keiko Part IX - End of Season Update
Project Keiko Part X - Spring 2009 Update
Project Keiko Part XI - Another Engine, Ready to Start
Project Keiko Part XII - Up For Sale
---/Edit---
Unfortunately the engine build ended up taking place so late in the evening a few weeks ago that none of my pictures turned out. I wasn't too worried about it, because Aaron Cake's engine build thread has just as much information in it as mine would.
The last update was over a month ago and other than actually assembling the engine, not much happened since then... Until now.
I took this week off work to try and seriously get some work done on Keiko. When I started the week, both of my FBs were off the road and I knew that with winter looming I had to get one if not both running before then so that I could put one in storage and have enough driveway space. (For those of you who don't live in snowy climates, you can park on the street in the summer, but in the winter any cars parked on the street get towed away so the snow plows can do their job. I have 2 FBs and each of my parents have their own car, so with a 3-car driveway ONE of the FBs has to go to storage before the snow hits)
Yesterday we mated the engine and tranny together and dropped it in. Here are a few pics of what the engine bay looks like now.
This morning we towed the car to my friend Marc's place. He has a garage, and since it's hovering around 0*C here this week, we figured a nice heated garage would be the place to work. I plan to do a *bunch* of work on it this week, so stay tuned. I'll toss all my updates and pictures in this thread as it goes on.
Basically my 9-5 job this week is working on Keiko.... of course I'll probably pull lots of "overtime" since I have to have it back at my place by end of day Sunday. How hard and long I work on it will determine whether it gets towed back or driven back. Let the games begin!
Jon
Last edited by vipernicus42; Aug 25, 2009 at 07:45 PM.
Thread Starter
Joined: May 2002
Posts: 5,972
Likes: 37
From: Ottawa, Soviet Canuckistan
For those of you who are interested, here's my To-Do list for the week:
• Install distributor
• Install water pump, thermostat, thermostat cover
• Install beehive, front cover fitting and oil hard line
• Have exhaust taken apart, sanded, new studs installed
• Paint exhaust with high temp black paint
• Install Exhaust
• Finish carb rebuilds (soak in degreaser, reassemble, oil/grease linkage)
• Install frost plugs in intake passages
• Install fuel tank, pump, fuel lines and filter
• Install intake manifold, carb, airbox and filter
• Install brake master and clutch master and slave cylinders
• Rad panels, rad, coolant hoses, battery tray, battery, ignition coils, ignition wires, alternator and all the other misc engine bay items
• Replace brake pads and shoes
• Install new e-brake Y-cable
• Test all lights, horn, signals
Definitely not a short list!
I'll look around and see if I can salvage any of the engine build pics.
Jon
Thread Starter
Joined: May 2002
Posts: 5,972
Likes: 37
From: Ottawa, Soviet Canuckistan
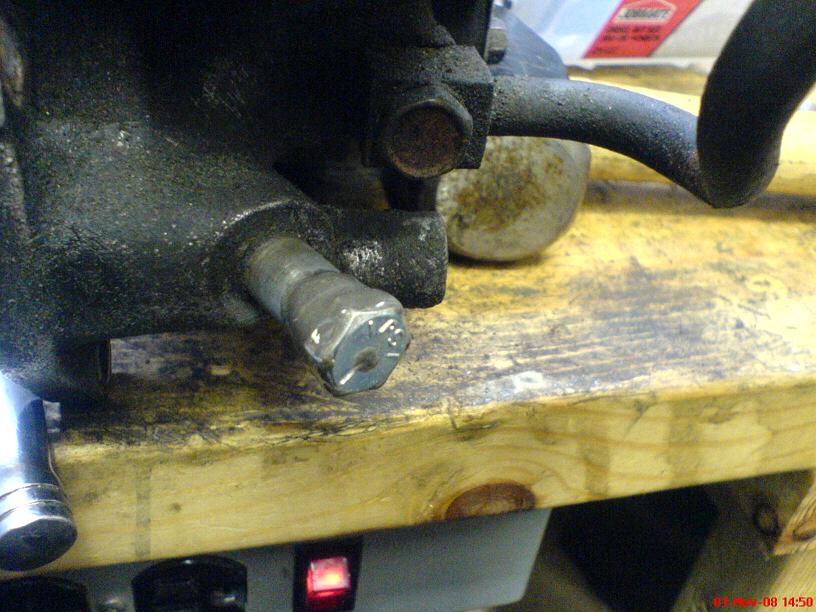
One issue that I had that I forgot to mention was with the Transmission mount.
Somehow I managed to mangle the threads of one of the holes. The bolts are fine, but I can only get a bolt into one of the holes.
For some reason I can't understand, there is another set of identical holes about an inch and a half further forward. They have obviously never had anything screwed into them, so I don't know what they're for. For the time being to get the car moving I mounted the tranny mount in the further front hole on one side and the further back hole on the other.
Anyone know what I could do to fix the mangled threads on the bolt hole for the tranny?
Jon
2nd set of tranny mounts are for the auto tranny. To repair the stripped threads, either drill and retap to the next larger size or find a metric helicoil repair kit. Standard will work in a pinch if you don mind an odd bolt.
With all the good work you're doing, I'm surprised you haven't treated the rusted parts and detailed the engine bay, tsk tsk.
With all the good work you're doing, I'm surprised you haven't treated the rusted parts and detailed the engine bay, tsk tsk.
Too old to act my age
Joined: Feb 2005
Posts: 3,164
Likes: 0
From: Tulsa, Ok.
Thread Starter
Joined: May 2002
Posts: 5,972
Likes: 37
From: Ottawa, Soviet Canuckistan
*laughs* Originally, cleaning everything up was part of the plan. Unfortunately, life is what happens while you're busy making plans, and the project got both delayed and rushed, and this is the result.
While I'd love to take the time to detail everything, the truth is that for now the priority is trying to get her running before winter. I can tear the engine bay back apart in the spring and clean stuff if needed. Heck, Rome wasn't built in a day, and my other car went through similar stages, eventually ending up as awesome as it is now. I plan to replace the clutch on it eventually anyway, so I'll clean the tranny at that point, and that black tar all over the engine bay is nearly impossible to remove so I'll figure that out when I have more time.
Jon
Trending Topics
Joined: Jun 2008
Posts: 8,376
Likes: 30
From: Chino Hills, CA
So I'm doing a lot more prettification at the moment than I am mechanical movement forward. No sense in fuelling the carb if it'll just end up sitting for months. Around xmas time is the restart target now.
Last edited by DivinDriver; Oct 29, 2008 at 10:16 AM.
Too old to act my age
Joined: Feb 2005
Posts: 3,164
Likes: 0
From: Tulsa, Ok.
Well, that works too.....
I was thinking "Quite F'in True".......
I know the trans can be cleaned pretty easily during a clutch replacement, but I didn't mind my recent clutch replacement, since the trans was already rather clean. The dirty part was dealing with rear of the trans, after removing the driveshaft. I couldn't find anything to plug that hole effectively. Next time, I'll cut up an old driveshaft to get the front yoke for plugging that hole......
Joined: Jun 2008
Posts: 8,376
Likes: 30
From: Chino Hills, CA
Try using a thick plastic bag and tape or rubber bands on the outside of the tailshaft. Works well enough to prevent major messes, if you don't have a spare yoke about.
Thread Starter
Joined: May 2002
Posts: 5,972
Likes: 37
From: Ottawa, Soviet Canuckistan
It's MegaUpdate Time
Hey Guys,
So I've slacked a bit on making updates this week, but I definitely haven't slacked on work. So here's an update to let you know how things are progressing.
One thing I don't have a picture of, but that was a real worry for a while is a problem we had with the tranny mount. More specifically, we stripped the threads on one of the holes for one of the two tranny mount bolts when we were putting the engine and tranny in on Monday. I didn't bother addressing the problem at the time since I just wanted the tranny "solid enough" to move. Well we fixed the problem today. Turns out that Marc's dad had a full tap and die set, so I was able to recover the threads (they weren't damaged too badly and the tap was able to straighten them out to the original size) and get the mount secured properly!
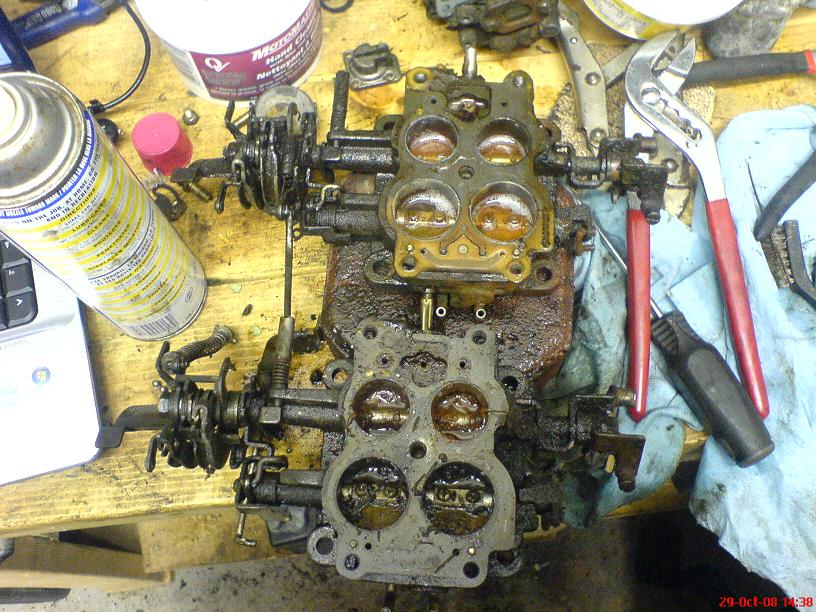
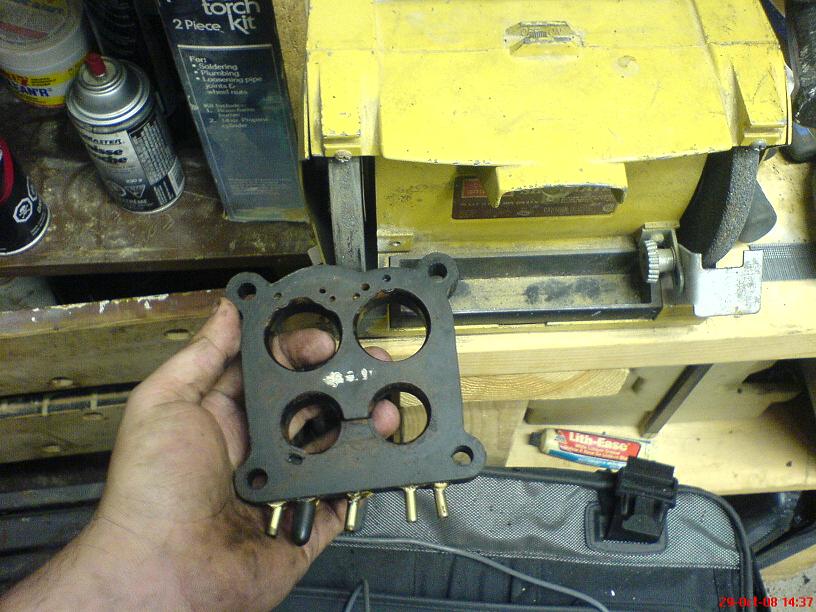
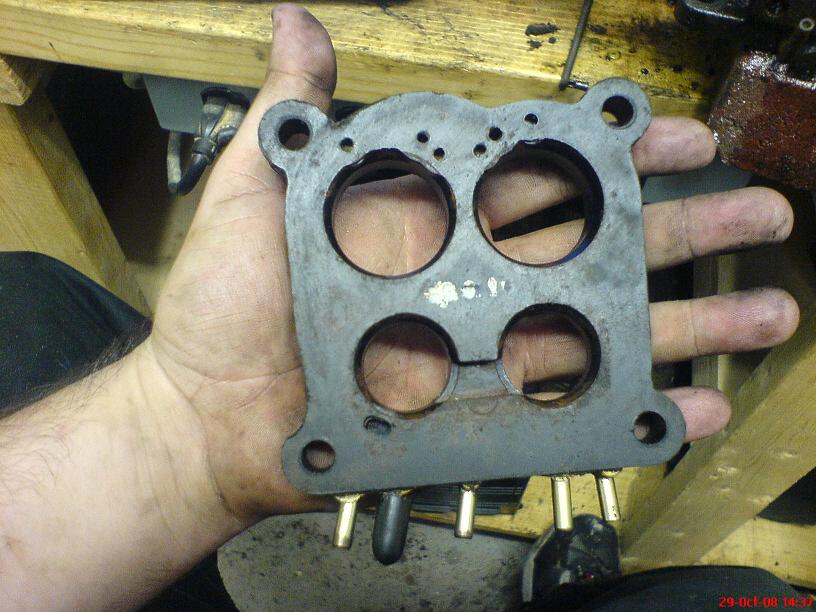
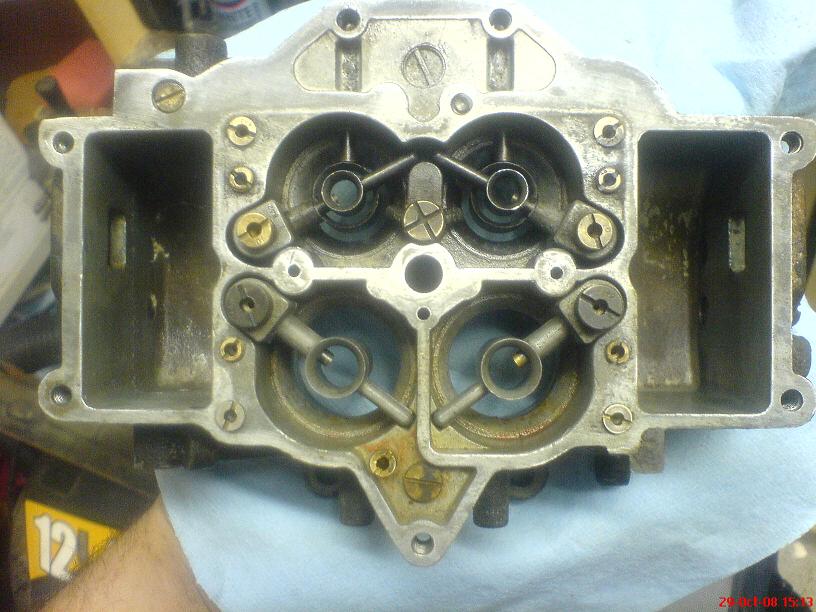
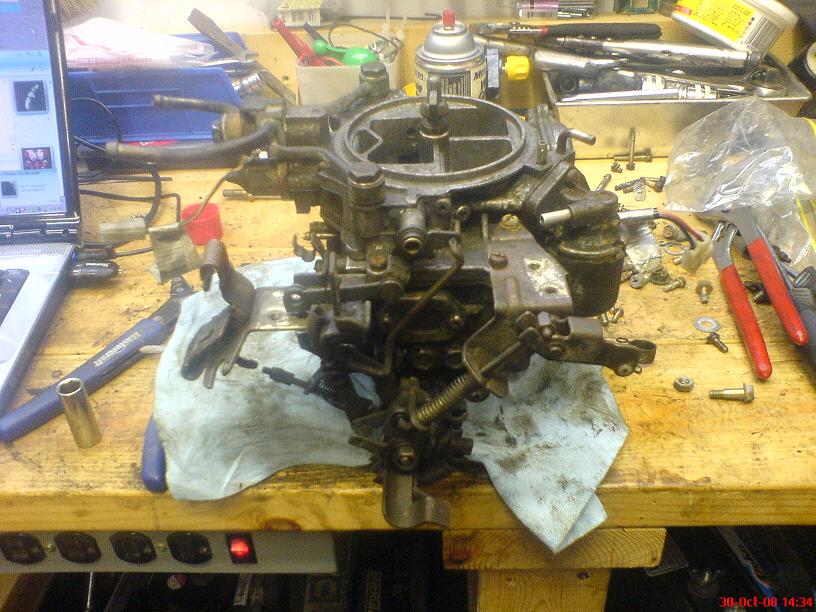
One of the major things I did this week was the carb rebuild. The two carbs I had looked like they had spent the majority of their 20+yr lives living at the bottom of the ocean. I don't have many before pics, but this pic of what the base of one looked like after dissasembly should give you an idea of what I was dealing with

The carb spacer had a big crack in it, so I broke the rest of it off and used a handy spinning stone to trim it neatly all around. Sure it won't shield against the heat, but hey it looks better than a cracked one. The one on my car is actually done this way too and I haven't noticed a big difference.
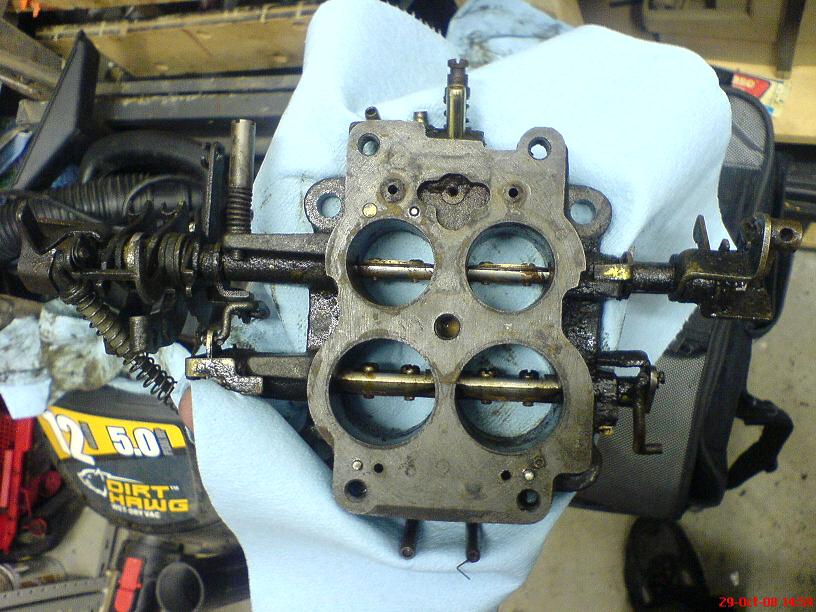
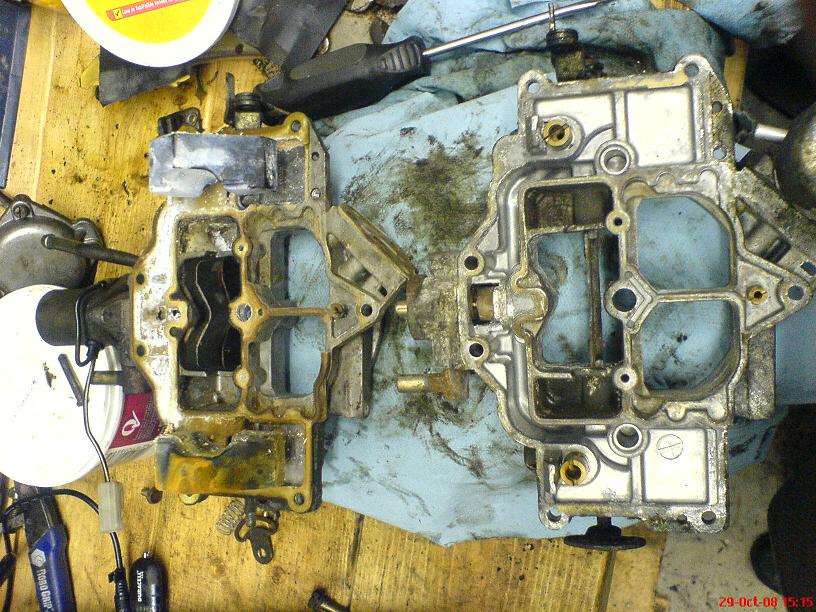
I took some pictures midway through the cleaning process for the carb parts. They were coming along nicely. Here's how that ugly base was turning out at the time I snapped the pics. I went back and finished it up a bit more after. When I first started, neither of the bases' butterflies would open at all. Neither primaries or secondaries. All linkages and butterflies on both carbs were totally seized
Here's what the underside of the main body looked like partway through its cleaning
So I've slacked a bit on making updates this week, but I definitely haven't slacked on work. So here's an update to let you know how things are progressing.
One thing I don't have a picture of, but that was a real worry for a while is a problem we had with the tranny mount. More specifically, we stripped the threads on one of the holes for one of the two tranny mount bolts when we were putting the engine and tranny in on Monday. I didn't bother addressing the problem at the time since I just wanted the tranny "solid enough" to move. Well we fixed the problem today. Turns out that Marc's dad had a full tap and die set, so I was able to recover the threads (they weren't damaged too badly and the tap was able to straighten them out to the original size) and get the mount secured properly!
One of the major things I did this week was the carb rebuild. The two carbs I had looked like they had spent the majority of their 20+yr lives living at the bottom of the ocean. I don't have many before pics, but this pic of what the base of one looked like after dissasembly should give you an idea of what I was dealing with
The carb spacer had a big crack in it, so I broke the rest of it off and used a handy spinning stone to trim it neatly all around. Sure it won't shield against the heat, but hey it looks better than a cracked one. The one on my car is actually done this way too and I haven't noticed a big difference.
I took some pictures midway through the cleaning process for the carb parts. They were coming along nicely. Here's how that ugly base was turning out at the time I snapped the pics. I went back and finished it up a bit more after. When I first started, neither of the bases' butterflies would open at all. Neither primaries or secondaries. All linkages and butterflies on both carbs were totally seized
Here's what the underside of the main body looked like partway through its cleaning
Thread Starter
Joined: May 2002
Posts: 5,972
Likes: 37
From: Ottawa, Soviet Canuckistan
More pictures!
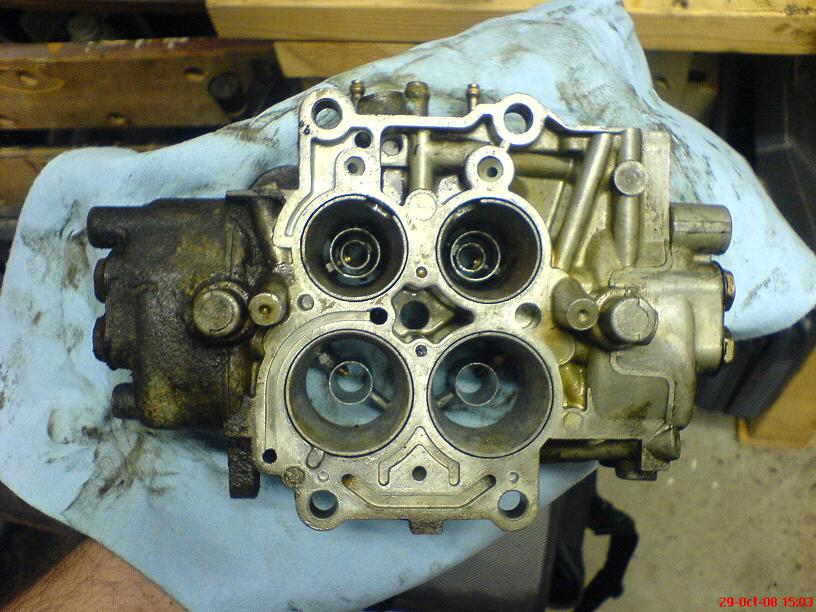
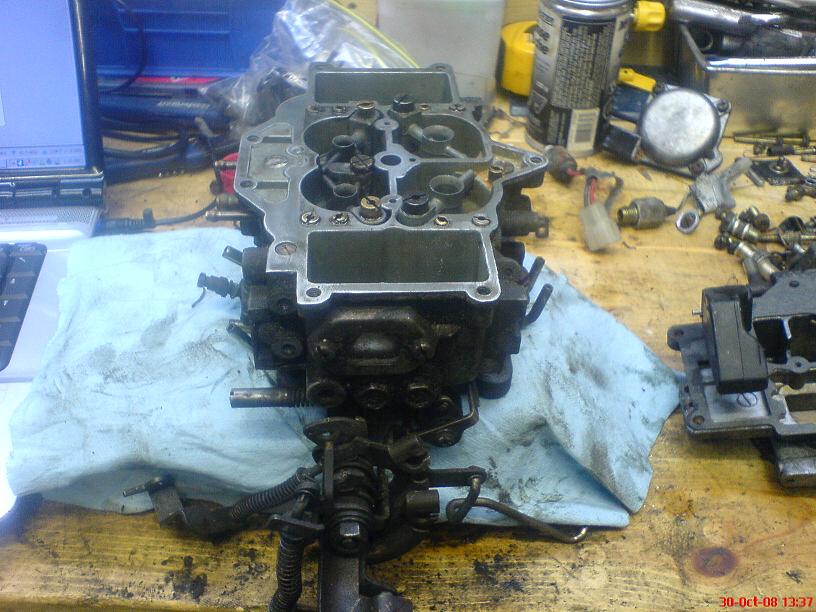
Here's the carb body after the first round of cleaning
This is a good "before" pic of the air horns
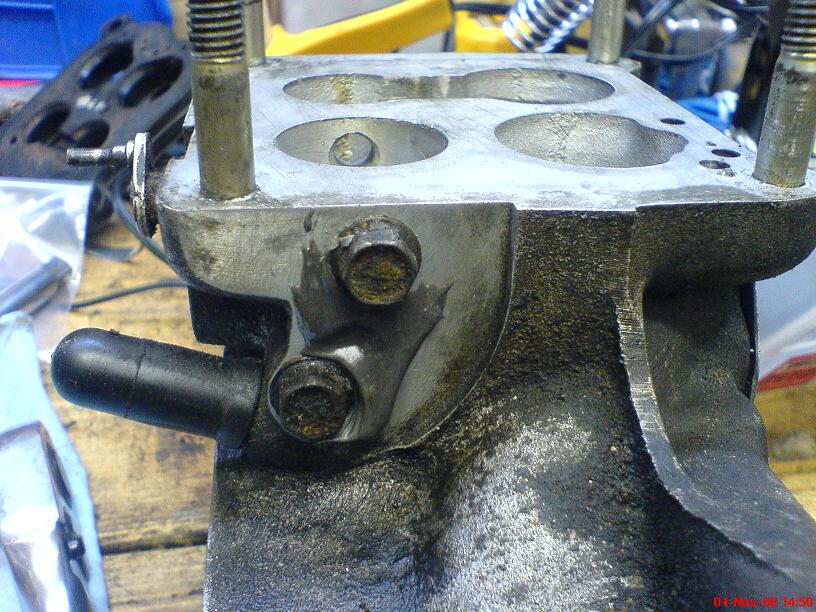
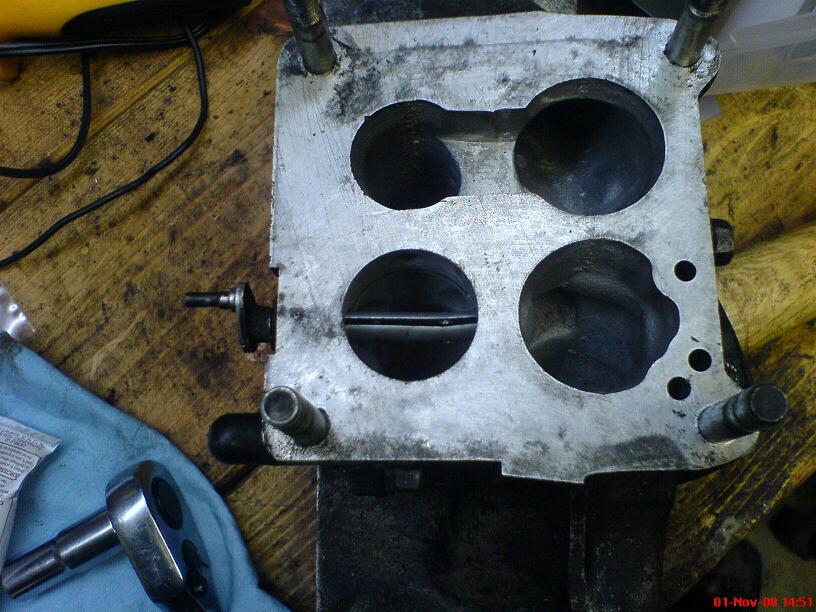
I had to do some major cleaning on the intake manifold too

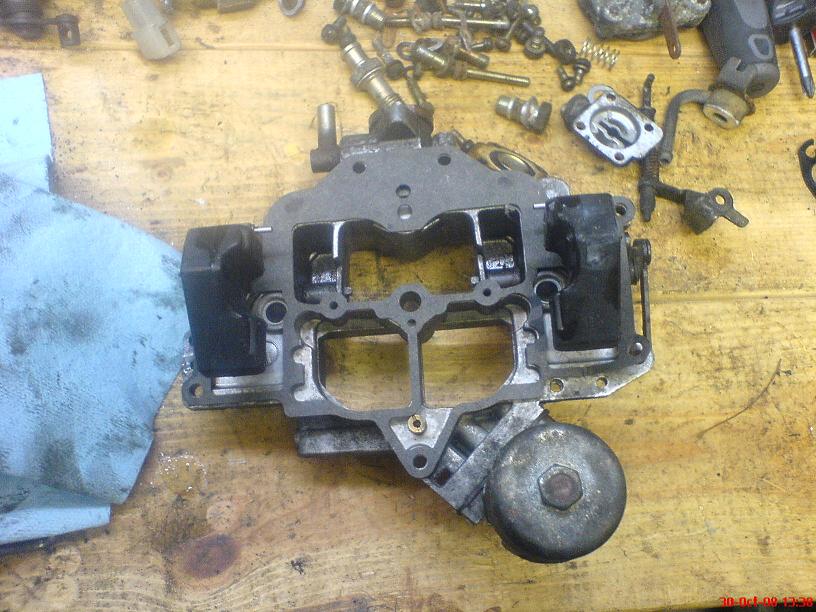
Once things got cleaned up I started re-assembling the carb
The air horn looks much nicer now that it's clean, and the floats actually *move* now!
And that brings us to a (nearly) complete carb. I say nearly because there are still a few vacuum caps to be put on and I need to source a primary throttle return spring (neither of my carbs had one) before it's done. Even the accelerator pump works on this one
This is a good "before" pic of the air horns
I had to do some major cleaning on the intake manifold too
Once things got cleaned up I started re-assembling the carb
The air horn looks much nicer now that it's clean, and the floats actually *move* now!
And that brings us to a (nearly) complete carb. I say nearly because there are still a few vacuum caps to be put on and I need to source a primary throttle return spring (neither of my carbs had one) before it's done. Even the accelerator pump works on this one
Thread Starter
Joined: May 2002
Posts: 5,972
Likes: 37
From: Ottawa, Soviet Canuckistan
And yet more!
But the week wasn't all about carb rebuilds (though that did suck up more time than I figured it would because of the poor condition of the cores I started with).
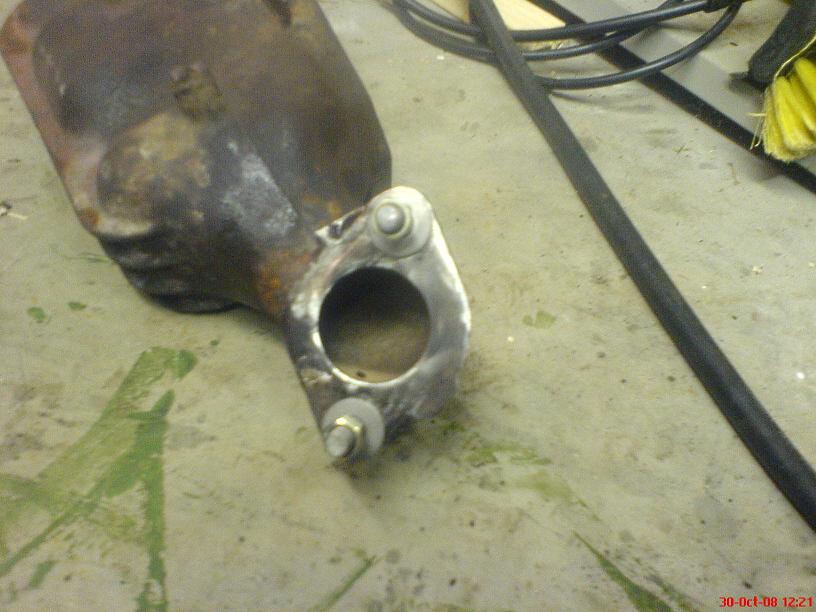
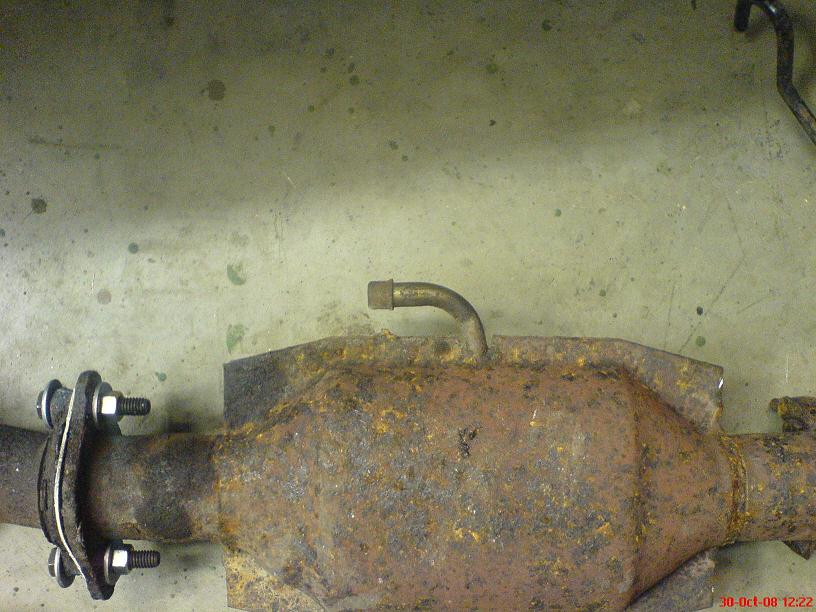
Where there's intake there must be exhaust! Thanks to Dan Atkins, I grabbed some exhaust gaskets back when I bought the rebuild kit for the engine. Yesterday I took the entire exhaust (minus muffler) and brought it down to a local "Mr. Muffler". I walked into the store with the three cats and punctured midpipe in one hand, and a brand new midpipe and gaskets in the other hand. Put it all on the counter and said "take this, replace this pipe with this one, install these gaskets, replace ALL the studs and nuts, and attach it to the manifold I'm going to bring in here in a sec".
I put the exhaust manifold down on the counter and one of the guys looked at it and said "What the heck is that from?". Before I could answer his manager cut in "It's from an early Rx7, I used to have one" $44 later all the studs and nuts were replaced, the new gaskets were in place, my new midpipe was in its spot and I was all set to go. The guy even ground down every single mating surface including the one where the manifold mates to the engine. Now *that* is service!
Here are a few pictures of what it looked like after I got it back, before installing it

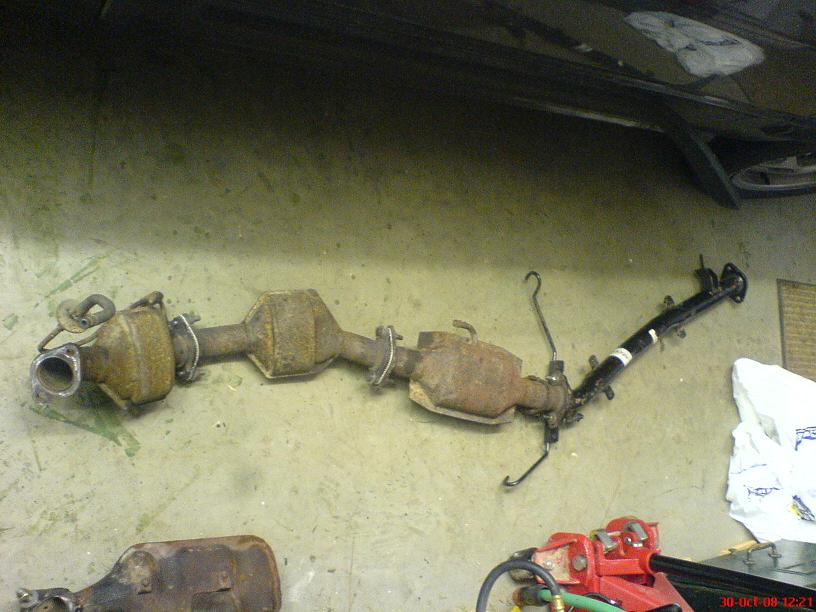
Here's an oddity... The main cat air pipe was capped by the previous owner. The air pipe for the first precat is still there so maybe they aren't clogged yet. Here's hoping!
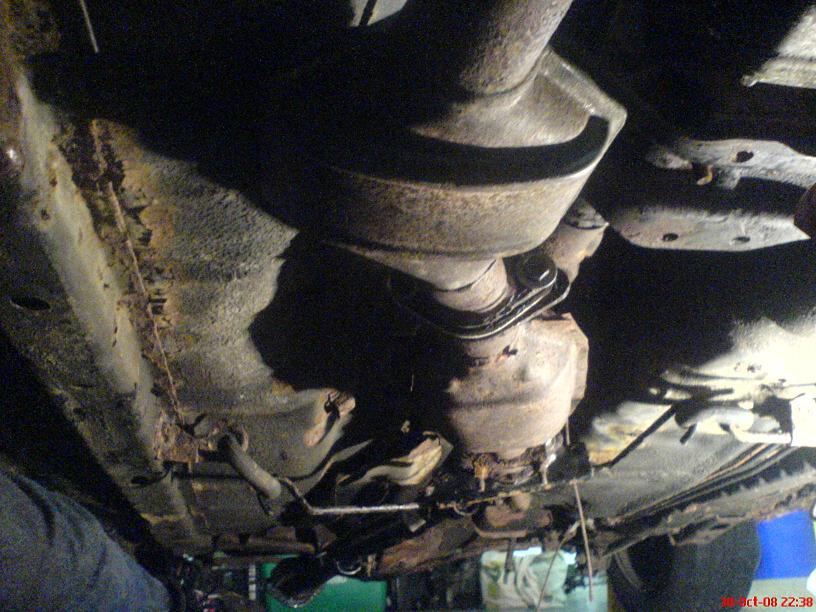
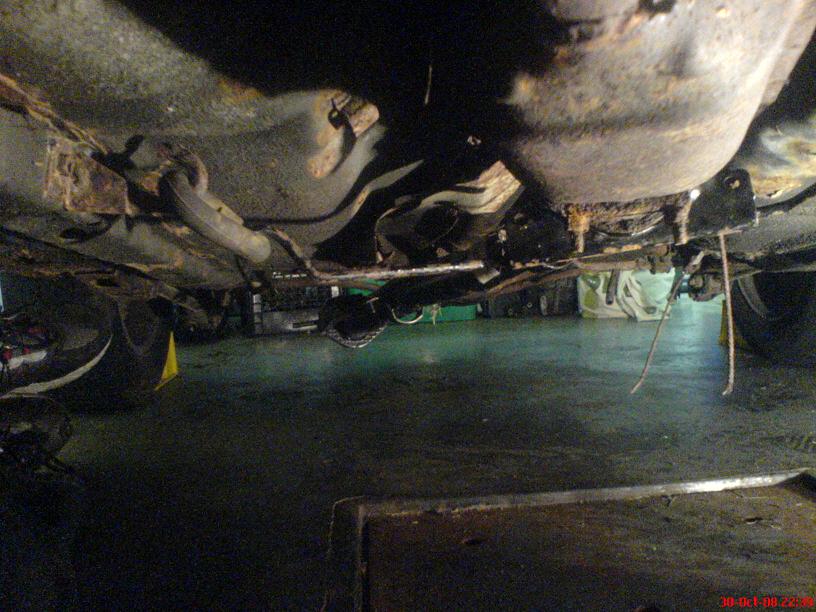
And here it all is installed. The muffler is still back at my place but it will get installed soon, when I'm under there doing the gas tank install. in the second pic you can see both pieces of my snapped ebrake cable on the right, that's one more thing on the list *sigh*
Where there's intake there must be exhaust! Thanks to Dan Atkins, I grabbed some exhaust gaskets back when I bought the rebuild kit for the engine. Yesterday I took the entire exhaust (minus muffler) and brought it down to a local "Mr. Muffler". I walked into the store with the three cats and punctured midpipe in one hand, and a brand new midpipe and gaskets in the other hand. Put it all on the counter and said "take this, replace this pipe with this one, install these gaskets, replace ALL the studs and nuts, and attach it to the manifold I'm going to bring in here in a sec".
I put the exhaust manifold down on the counter and one of the guys looked at it and said "What the heck is that from?". Before I could answer his manager cut in "It's from an early Rx7, I used to have one"
$44 later all the studs and nuts were replaced, the new gaskets were in place, my new midpipe was in its spot and I was all set to go. The guy even ground down every single mating surface including the one where the manifold mates to the engine. Now *that* is service!Here are a few pictures of what it looked like after I got it back, before installing it
Here's an oddity... The main cat air pipe was capped by the previous owner. The air pipe for the first precat is still there so maybe they aren't clogged yet. Here's hoping!
And here it all is installed. The muffler is still back at my place but it will get installed soon, when I'm under there doing the gas tank install. in the second pic you can see both pieces of my snapped ebrake cable on the right, that's one more thing on the list *sigh*
Thread Starter
Joined: May 2002
Posts: 5,972
Likes: 37
From: Ottawa, Soviet Canuckistan
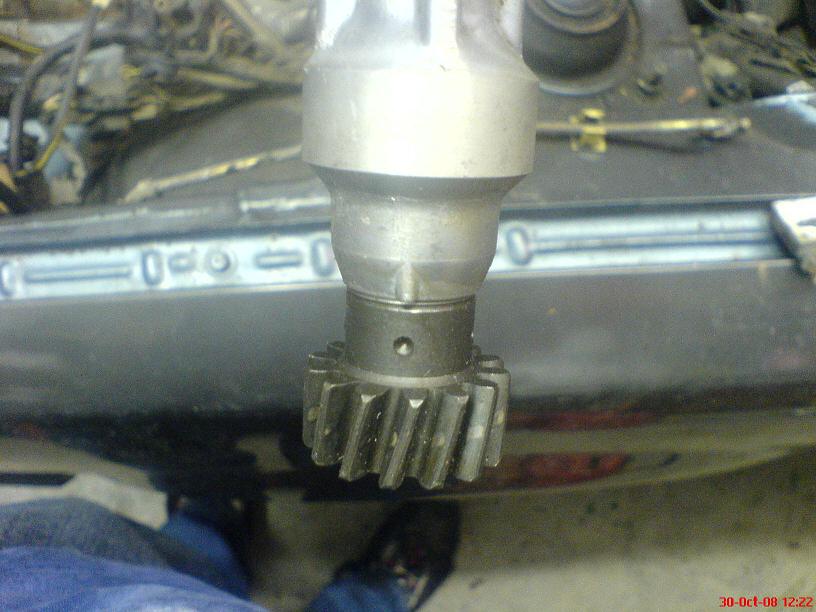
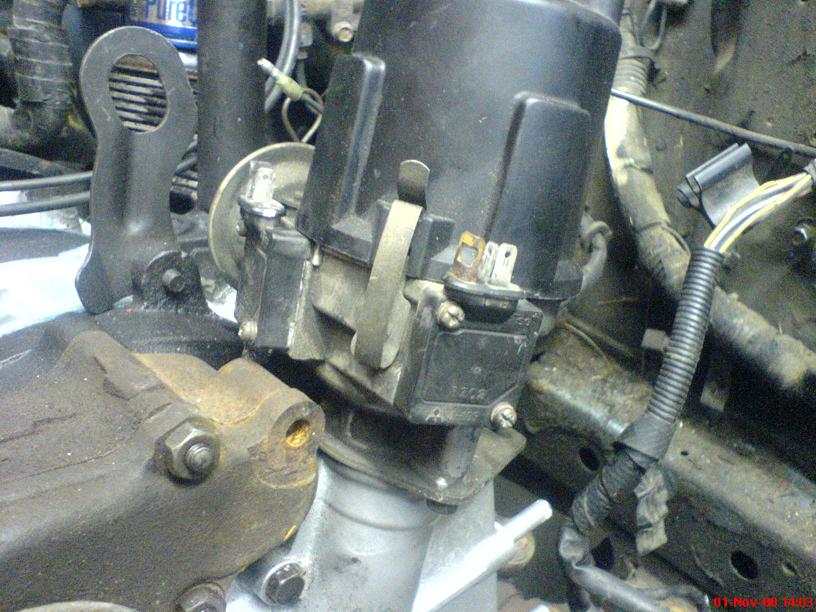
I had to install the dizzy so after reading and re-reading the procedure for doing that, I took some good pictures of what I did. Hopefully I didn't skip a tooth but basically you have to line up the dimple on the dizzy drive gear with the raised spot in the casting of the dizzy body, then line up the main pulley with the leading timing mark, hold the rotor so that the dizzy gear doesn't turn and drop it straight in with the adjustment area about halfway. No matter how carefully you do it, it's almost impossible to tell if you've skipped a tooth so we'll see what happens when I fire it up. Ah, more unknowns to add to the mix
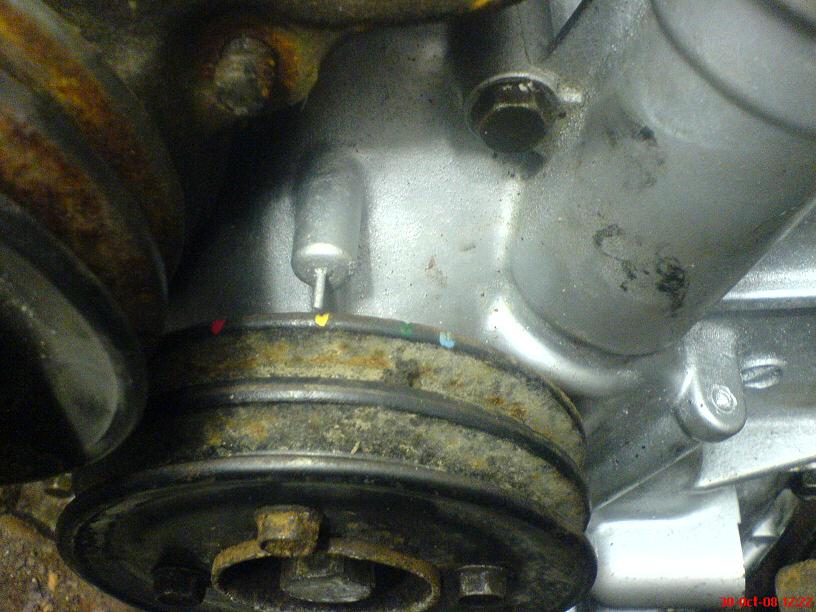
You can see that I have added two more timing marks to my dizzy. These are for experimenting later on. They represent I believe 16 and 24 degrees, where I read most 12a rotaries make their best power. I made the pulley months ago so I'll have to double check the numbers and which colour is which, but at least I have them. I left the stock marks on there and did a touch up of the colours so they'd be easy to see
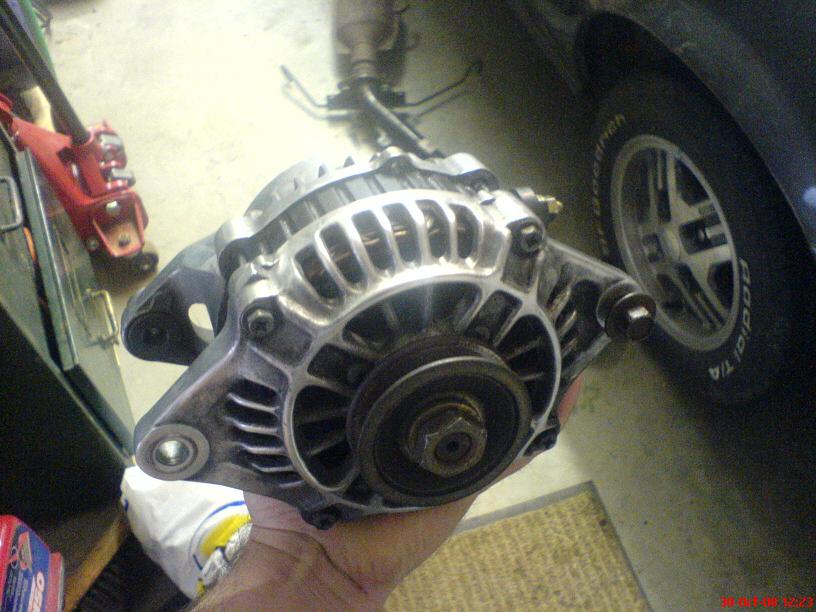
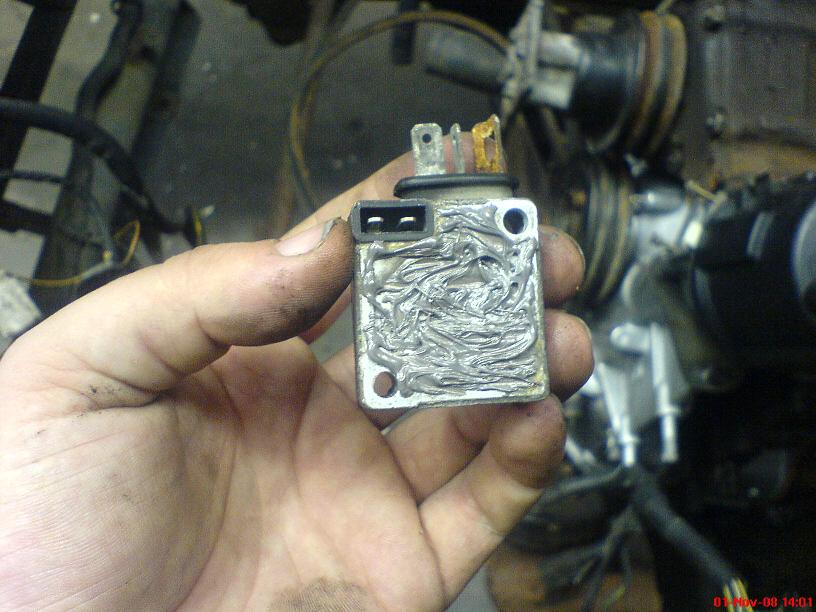
One of the few upgraded parts on Keiko is an FC alt. There's really no point in rebuilding or replacing stock FB alts since a brand new 50amp FB alt costs about $220 and a brand spankin' new 100amp FD alt costs $250 (including the fact that you don't have a core to give them). In this case I got a pair of FC alts from my friend Azad for cheap, so I'm using those. There are some wiring differences since this is an S5 alt, but I'll cover that later when I actually bother to do *anything* with the car's electrical system. Right now I'm ignoring it.
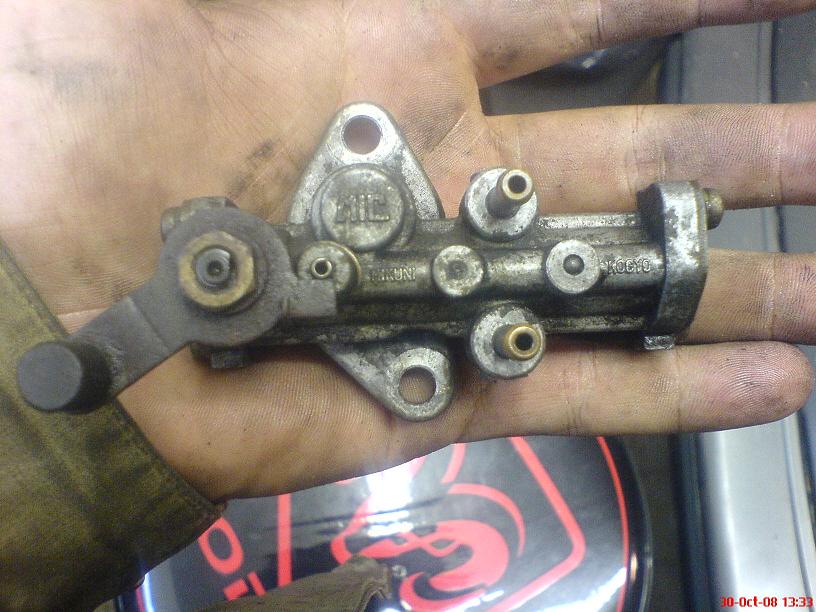
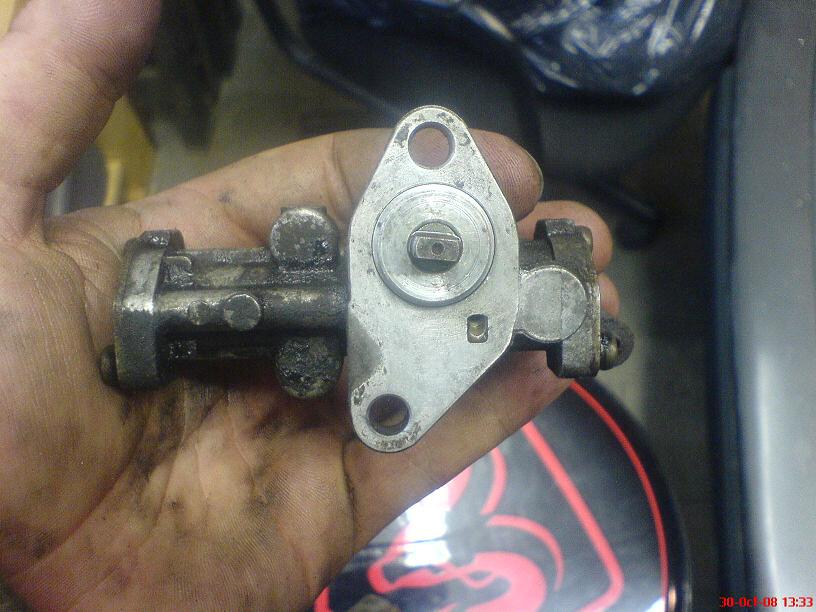
Along with the carb rebuild I also did a once-over of the three OMPs I had lying around. This one had good seals so I put it back together, gave it a bit of a cleaning and called it a day. Rebuild kits are available from "Lowe Performance" (or is it "Lowe's Automotive Performance"?) in Florida. They used to have a website but it was long since neglected and went down. A search on the forum here will find their phone number, you can call them to get OMP rebuild kits. I'm hoping that somebody buys one of each type and sources the parts so that one of the more well known shops like ReSpeed, Mazdatrix or Racing Beat starts carrying them.
You can see that I have added two more timing marks to my dizzy. These are for experimenting later on. They represent I believe 16 and 24 degrees, where I read most 12a rotaries make their best power. I made the pulley months ago so I'll have to double check the numbers and which colour is which, but at least I have them. I left the stock marks on there and did a touch up of the colours so they'd be easy to see
One of the few upgraded parts on Keiko is an FC alt. There's really no point in rebuilding or replacing stock FB alts since a brand new 50amp FB alt costs about $220 and a brand spankin' new 100amp FD alt costs $250 (including the fact that you don't have a core to give them). In this case I got a pair of FC alts from my friend Azad for cheap, so I'm using those. There are some wiring differences since this is an S5 alt, but I'll cover that later when I actually bother to do *anything* with the car's electrical system. Right now I'm ignoring it.
Along with the carb rebuild I also did a once-over of the three OMPs I had lying around. This one had good seals so I put it back together, gave it a bit of a cleaning and called it a day. Rebuild kits are available from "Lowe Performance" (or is it "Lowe's Automotive Performance"?) in Florida. They used to have a website but it was long since neglected and went down. A search on the forum here will find their phone number, you can call them to get OMP rebuild kits. I'm hoping that somebody buys one of each type and sources the parts so that one of the more well known shops like ReSpeed, Mazdatrix or Racing Beat starts carrying them.
Thread Starter
Joined: May 2002
Posts: 5,972
Likes: 37
From: Ottawa, Soviet Canuckistan
And that brings us to where I left off tonight. A lot of progress has been made but unfortunately even more work is left to be done. I don't think my original hope of driving this car home at the end of the weekend will materialize, but it will definitely be a lot closer to finished than it was when I started this week. I'm pretty happy with progress so far and despite some nasty snags (stripped tranny bolt holes, ocean-dwelling carb rebuilds) things have progressed quite a bit.
I'll post the updated to-do list in a bit, but here are pictures of the progress (the first one is from early in the day, but it shows the dizzy and the last pic of the day doesn't.)
Jon
I'll post the updated to-do list in a bit, but here are pictures of the progress (the first one is from early in the day, but it shows the dizzy and the last pic of the day doesn't.)
Jon
Thread Starter
Joined: May 2002
Posts: 5,972
Likes: 37
From: Ottawa, Soviet Canuckistan
� Install beehive, front cover fitting and oil hard line
� Install frost plugs in intake passages
� Install fuel tank, pump, fuel lines and filter
� Install airbox and filter
� Install brake master and clutch master and slave cylinders
� Rad panels, rad, coolant hoses, battery tray, battery, ignition coils, ignition wires, alternator and all the other misc engine bay items
� Replace brake pads and shoes
� Install new e-brake Y-cable
� Test all lights, horn, signals
And a few more things added:
- Replace #2 temp sensor on back of water pump
- Make blockoff plates for ACV, Intake Mani, JBWeld shutter valve vac source
- Install Muffler
- Don't forget tranny fluid as well as other fluids (oil, coolant)
- Clutch fan and shroud
- Hook up all electrical. Seriously.
Thread Starter
Joined: May 2002
Posts: 5,972
Likes: 37
From: Ottawa, Soviet Canuckistan
And for those of you who are curious, yes I do plan to strip this engine bay back down to the keg and clean/paint everything next year sometime. Right now my priority is to try and get it as close to running as possible before winter.
Function over form right now. We can deal with form later, priorities.
Jon
Function over form right now. We can deal with form later, priorities.
Jon
Thread Starter
Joined: May 2002
Posts: 5,972
Likes: 37
From: Ottawa, Soviet Canuckistan
Nope, no porting. That would have taken time and money that I don't have for this project, so for the time being it's a stock port 12a.
I honestly considered doing something crazy like a half-bridge for this car but since it's going to have a stock exhaust, carb, intake, and fuel pump there's pretty much no point to that.
I'm still up in the air as to whether my main car will get a large street port or a half bridge when I do its engine.
Jon
Thread Starter
Joined: May 2002
Posts: 5,972
Likes: 37
From: Ottawa, Soviet Canuckistan
Nearly There!
Alrighty, time for another large set of updates!
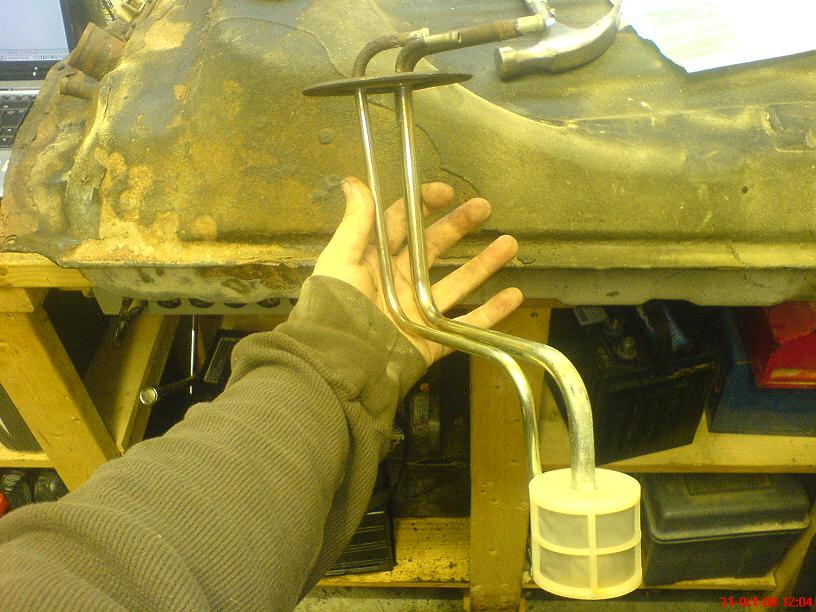
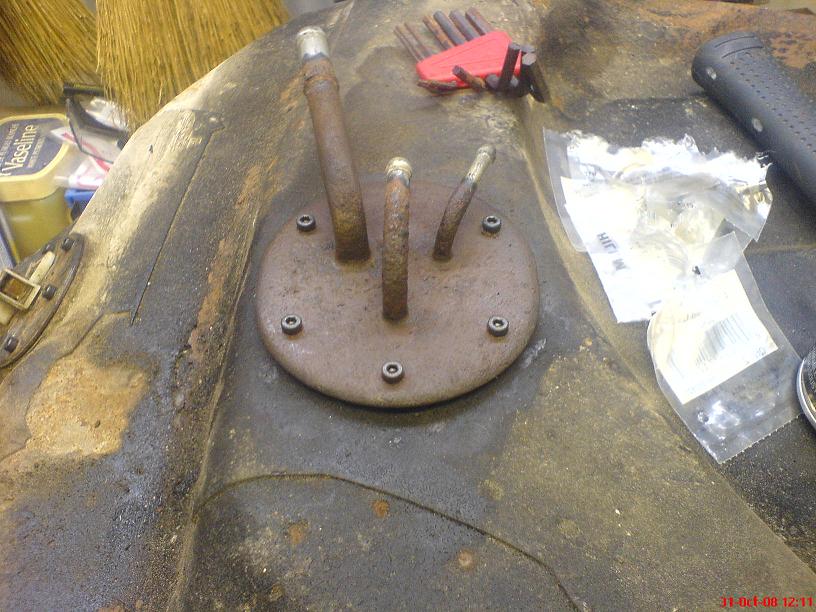
Jamie will be happy to know that I finally put those screws he sent me to a good use- I got the fuel level sender and the fuel send/return tubes installed in the tank. The fuel level sender actually sits perfectly flush on the bottom of the tank when in its "empty" position. It was neat being able to see that since the fuel tubes were out at the time.
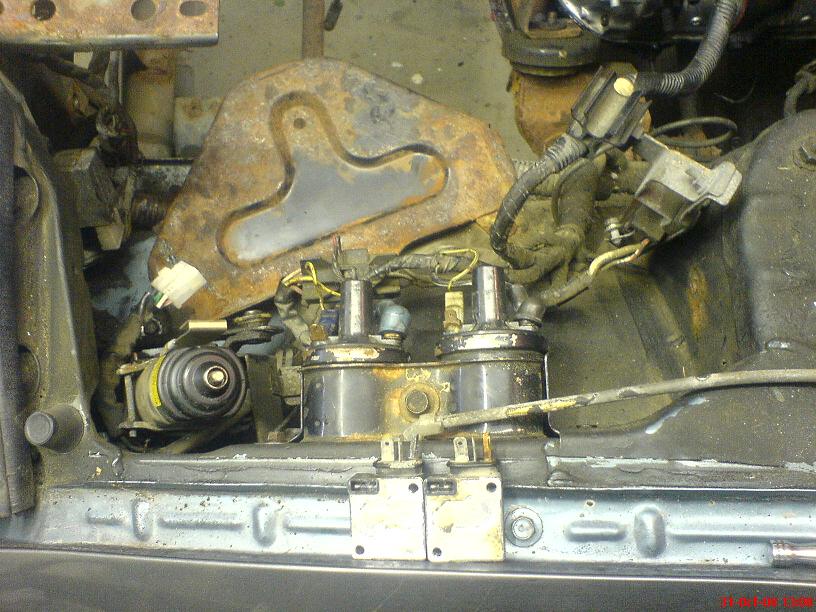
With the tank prepped, I turned my attention to other things. I got the ignition coils, battery tray, fusible link box and a couple other things bolted into place.
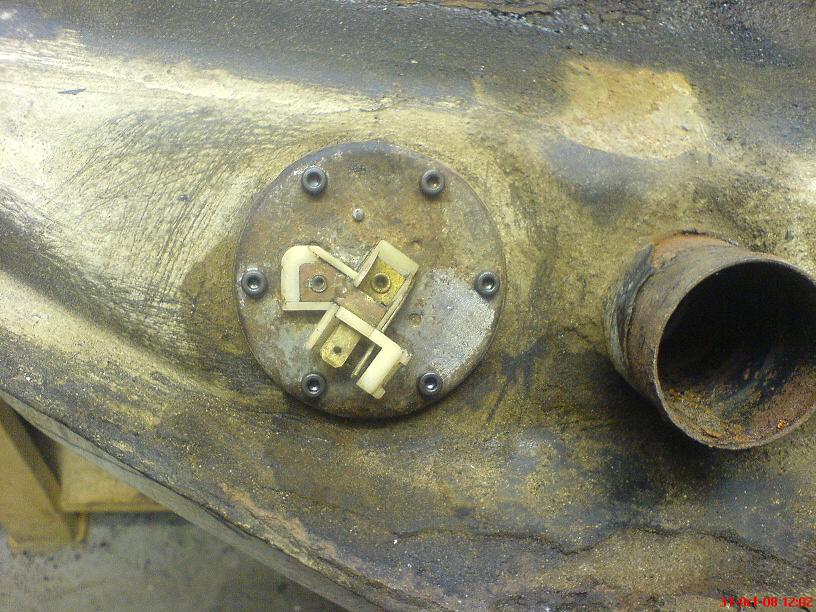
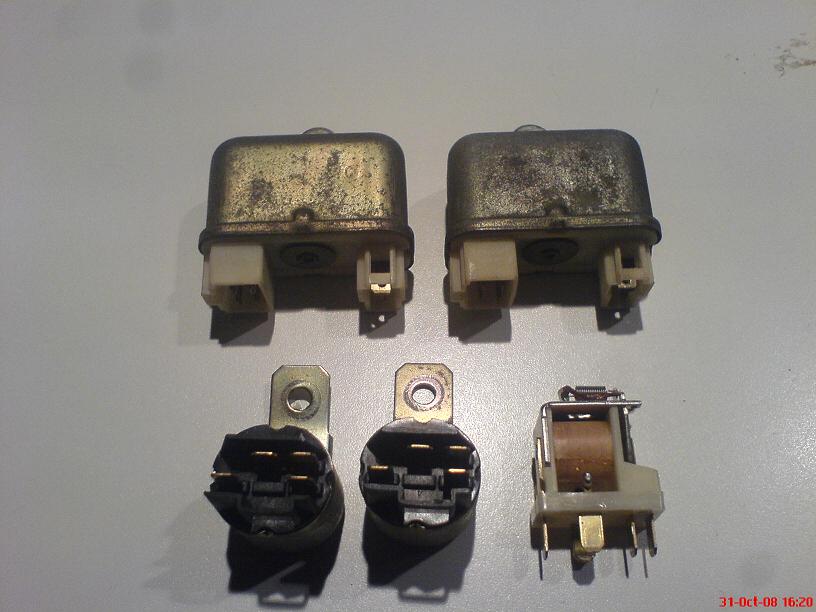
And I got a lovely package in the mail on Friday which contained a bunch of relays. The round ones are the Fuel Pump Relays (used on the S3 FBs to make it so that the fuel pump only pumps when cranking or running, not just when you're in the "accessory" position) - I needed one for both my DD and for Keiko. The rectangular-ish ones are the Choke and Check relays - the little bugger that was causing the alt on my DD to blow constantly. I needed one because I stole the one from Keiko to get my DD running, and the guy I got them from was nice enough to throw in a spare just in case. The funky looking one with a coil in it is the Signal Light Relay, which I also needed for my DD.
I got the fuel filler neck attached to the tank (no pic yet) but since I dont' have bolts for the gas tank straps, I couldn't do that. That will have to be done later in the week.
Jamie will be happy to know that I finally put those screws he sent me to a good use- I got the fuel level sender and the fuel send/return tubes installed in the tank. The fuel level sender actually sits perfectly flush on the bottom of the tank when in its "empty" position. It was neat being able to see that since the fuel tubes were out at the time.
With the tank prepped, I turned my attention to other things. I got the ignition coils, battery tray, fusible link box and a couple other things bolted into place.
And I got a lovely package in the mail on Friday which contained a bunch of relays. The round ones are the Fuel Pump Relays (used on the S3 FBs to make it so that the fuel pump only pumps when cranking or running, not just when you're in the "accessory" position) - I needed one for both my DD and for Keiko. The rectangular-ish ones are the Choke and Check relays - the little bugger that was causing the alt on my DD to blow constantly. I needed one because I stole the one from Keiko to get my DD running, and the guy I got them from was nice enough to throw in a spare just in case. The funky looking one with a coil in it is the Signal Light Relay, which I also needed for my DD.
I got the fuel filler neck attached to the tank (no pic yet) but since I dont' have bolts for the gas tank straps, I couldn't do that. That will have to be done later in the week.
Thread Starter
Joined: May 2002
Posts: 5,972
Likes: 37
From: Ottawa, Soviet Canuckistan
When I mounted the dizzy earlier, I didn't mount the ignitors because I didn't have any heatsink compound. The ignitors get very hot and the metal body of the distributor acts like a heatsink for the excess heat. To make sure my ignitors last a long time and don't burn out, I cleaned both the back of the ignitor and the mating surface on the dizzy with 400grit sandpaper, then applied a good helping of Arctic Silver heatsink compound.
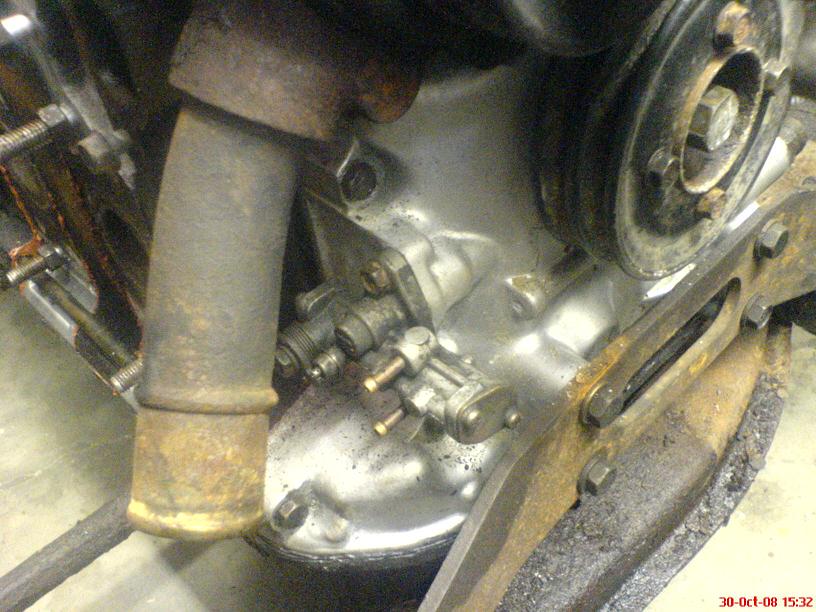
There are quite a few potential sources of vacuum leak on the stock intake manifold. Since this car doesn't have to pass emissions (there is no emission testing in Quebec and across the river in Ontario it would be exempt anyway) I figured that I would save us some potential headaches by blocking off some things.
The shutter valve was removed and the vacuum opening for it was closed through the use of some JBWeld. The port for the Anti-Afterburn Valve was also blocked off with a spare bolt and a good helping of JBWeld. I usually JBWeld the shutter valve butterfly in the full-open position but it was siezed shut. My best attempts to free it resulted in it getting somewhat bent so I just removed the butterfly, but left the rod. It's not the nicest setup, but it'll work.
Thread Starter
Joined: May 2002
Posts: 5,972
Likes: 37
From: Ottawa, Soviet Canuckistan
There are a bunch of steps that I didn't bother taking a picture of because they're pretty small and boring details, but basically I went about reassembling almost all the remaining engine bay pieces.
We put a battery in it and tested as much of the electrical system as we could short of starting and running it. I'm happy to say that everything we could test works fine (signals, brake lights, headlights and high beams, reverse lights, trunk release, gas filler cover release, heating/cooling fans).
So we ended the week with the car about 90% done. Here's what we're missing:
- Install fuel tank, fuel pump and hose
- Install muffler
- Install Beehive and oil hard line
- Fill the transmission with fluid, fill oil and coolant
- Get a clutch pedal rod and install it, bleed the clutch
At that point we should be able to try starting it. Of course it can't drive without brakes, and we found out that the metal hardline from the master cyl to the rear is missing so we'll have to run one of those before we can bleed the brakes. Then replace the e-brake cable and we should be able to take it for a test drive.
We're going to try for the work to get it started later this week, and probably defer the brakes until spring. It's been a heck of a week, but we're almost there.
Jon
I've found that some aftermarket cats come with the air tube capped. I suppose it's so the cat can be used on different vehicles. I also noticed your fuel supply/return tubes appear to be for an SE but I didn't notice a sump cup in the tank. I still can't believe the rust you get up there. I'd go nuts restoring parts if it was that bad down here.