
She Followed Me Home, Honest


Like 90% of the Z cars you'll ever see, this dash has a "dash cap", a molded cover that hides the original cracked vinyl. Thing is, they fit really, really well and unless you know to look they're very convincing.
I made one last Hail Mary run to the yard, looking for switches.
This time I focused on all the oddball makes/models I'd previously ignored but still no joy.
Fact is, the set I have is perfect in every respect save that it fouls the dash and for a change I'm trying to learn from past mistakes.
Mainly, I'm resisting the lure of making a permanent, unalterable change, especially since I have no spare dash to fall back on if things go pear shaped.
Which they frequently do.
While at the yard I also grabbed a 240 SX throttle body.
Looks like this:

Although it is 10mm larger than stock (60mm vs. 50mm), that is of less interest to me than the fact that it's cable actuated (I really dislike the stock bellcrank/rod mechanical setup) and it has zero emissions nonsense.
Like everyone else, Datsun struggled with early emissions regs and their solutions were always slapdash and rarely effective. Add in the complications of early fuel injection* and crude computers (our ECU might have been designed by Charles Babbage and is possibly steam powered) and it was a miracle the poor thing ran at all.
Because of our pre-1985 build date, the car only faces a tailpipe test, no visual, no rolling road.
I'm betting she'll run better and cleaner without all the emission add ons and this throttle body is a step in that direction.
We've also upgraded to a ZX electronic distributor and I'm going to try the RX-7 S5 AFM in place of the original metal, flapper door part (it looks very like a S4 unit but bigger). Also have a Maxima 110A alternator on the way.
*Because of the intake-over-exhaust head, Zs always had heat soak/vapor lock issues and this was a real issue for the later injected cars.
One of Datsun's early "fixes" was to clamp wooden clothes pins (how many of you remember them?) onto the fuel rail, using them as ad hoc heatsinks.
It did not work well.

Joined: Mar 2001
Posts: 31,859
Likes: 3,243
From: https://www2.mazda.com/en/100th/
Like everyone else, Datsun struggled with early emissions regs and their solutions were always slapdash and rarely effective. Add in the complications of early fuel injection* and crude computers (our ECU might have been designed by Charles Babbage and is possibly steam powered) and it was a miracle the poor thing ran at all..
the BAC valve was just a big adjustment screw.
what a car though, ride and handling are unbelievably good, the engineering is on par with your datsun, its amazing the windows went up
My fantasy is to get a set of the 240 carb intake manifolds, weld injector bungs in and slap two throttle bodies in place of the original SUs.
I have no practical experience doing any of that but it would look cool as hell.
Work on the electrical will commence for real on Saturday.
When the alternator arrives and is in place (which could be interesting), most of the major components will be present and the tedious process of hooking it all up can begin.
There will also be several hours of stripping/delooming the original harness, a sticky job I don't look forward to.
Meanwhile, my undisciplined mind was at work in the junkyard, always alert for something (potentially) cool for the FC.
And I may have found an interesting solution for an issue I currently face.
I obtained enough parts to explore the possibility, just need the time/energy to follow through.
More as it develops.

Prior to my recent big trip, I tried to get the radio working by connecting the windshield antenna and that didn't work out too well.
Because windshield antennas suck.
The original power antenna was long gone and I didn't particularly want to deal with its "reverse polarity" activation anyway, so something better was called for.
I had already fixated on this little VW/Audi fixed mast antenna for use on the Z (I put one on my old '71 240) and decided it would look great on the FC as well.
This one came from a 2002 new Beetle.
The big issue turned out to be the proprietary connector they use, which would not mate to the more standard "motorola" cable Mazda uses. I bought an extension cable at Pep Boys so I could graft its connector to the VW cable end.
(Oddly, a 144" Metra cable was $4 cheaper than the 48" cable...go figure)
I had to learn how to splice an antenna cable (thank you YouTubers!) and grafted 36" (with the proper end) onto the VW part.
So far, so good.
As a test, I installed the unit in the stock location...which was fun.
Reception is much, much better.
This is Stage One of the great antenna project.
(Ever notice how many of my projects have "stages" and how frequently they die between stage one and stage two? Yeah, me too.)
Now that I know it works, Stage Two is actually putting it where I really think it would look cool...in the spot currently occupied by the (nonfunctional) washer nozzle at the center/top of the hatch.
Which I'm not at all certain can be easily done.
Unfortunately, the hatch will have to come off to even explore this possibility as I can't get a very good idea of the territory with it in place.
At this point I can't even see how the washer nozzle is removed and I don't want to break it, just in case this doesn't work out.
I also picked up one of these antennas for the Z where it will be much simpler to mount.
So, baby steps again.
Work continues today on the Z, the new alternator should be here and who knows what else...
Thanks.
I hope I get motivated to pull the hatch and explore the next step soon...but I kind of doubt it.
Because...
Things are heating up in the Z garage (which is odd because it's definitely getting colder outside) and stuffs are happening.
Like the intake.
This is the stock throttle body:
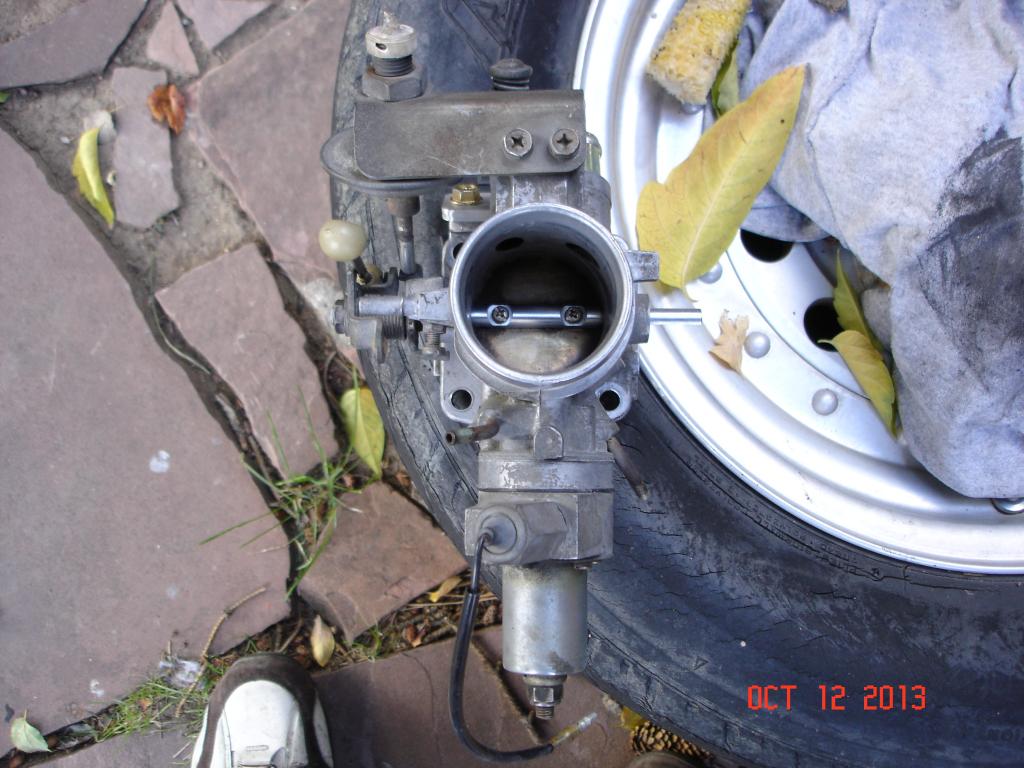
Compare it to the 240SX unit pictured above and you can see the cosmetic imperative driving the swap.
The original has a dashpot to slow the throttle under decel and that horrible wart on the bottom which is some sort of emission device, the 240 piece is just a throttle plate/shaft with enough metal to support it.
And of course, it's cable activated.
We just ordered the spacer necessary to use this new throttle body, so it's only loosely hanging in the next pics:
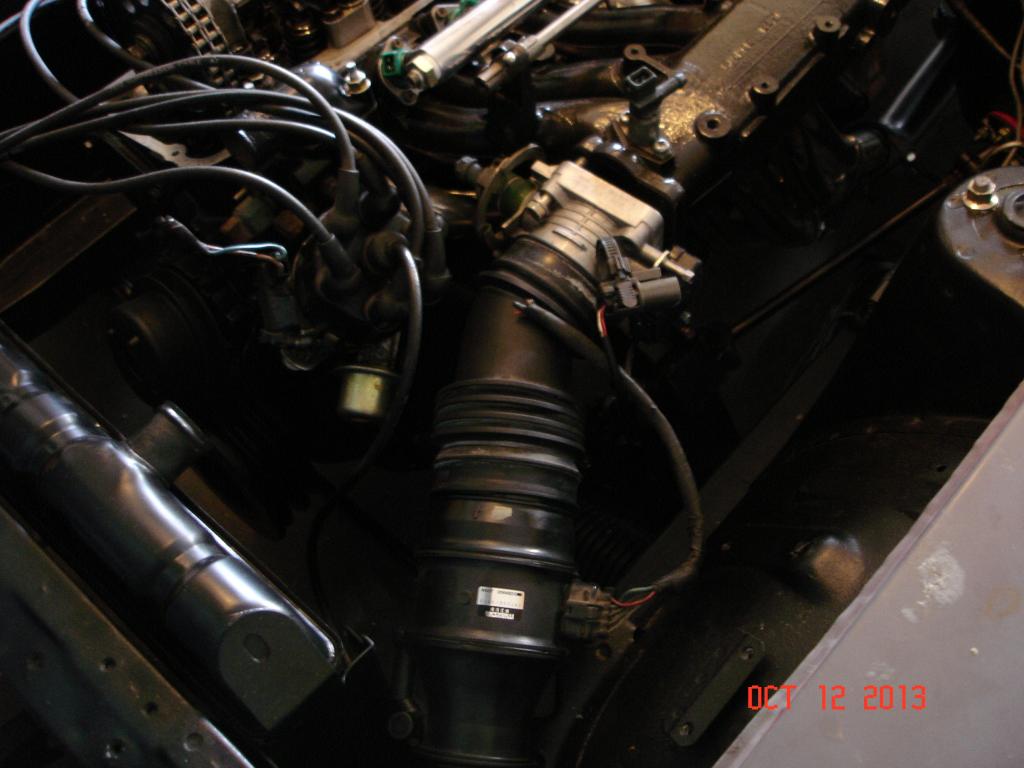
Barely visible in the frame is the S5 AFM that I hope to use.
We'll see how that goes.
My research paid off and the new Maxima 90A alternator is a perfect fit.
The Z's v-belt pulley needed to be bored out slightly to fit, I did that last night at home.
It's good to have a lathe.
Semi-stymied by lack of parts, we moved on to the valve cover- the last big cosmetic decision in the engine bay. We'd delayed this conversation till the bay began taking shape and we had a better idea of the overall appearance.
And now Sigfrid will make an appearance: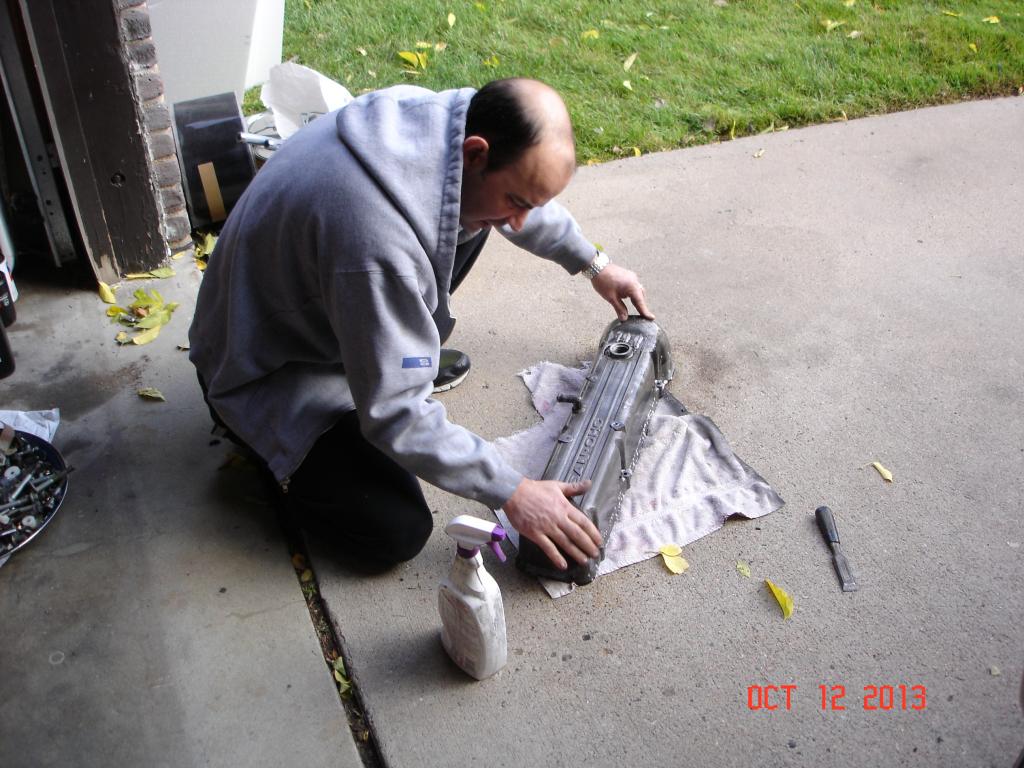
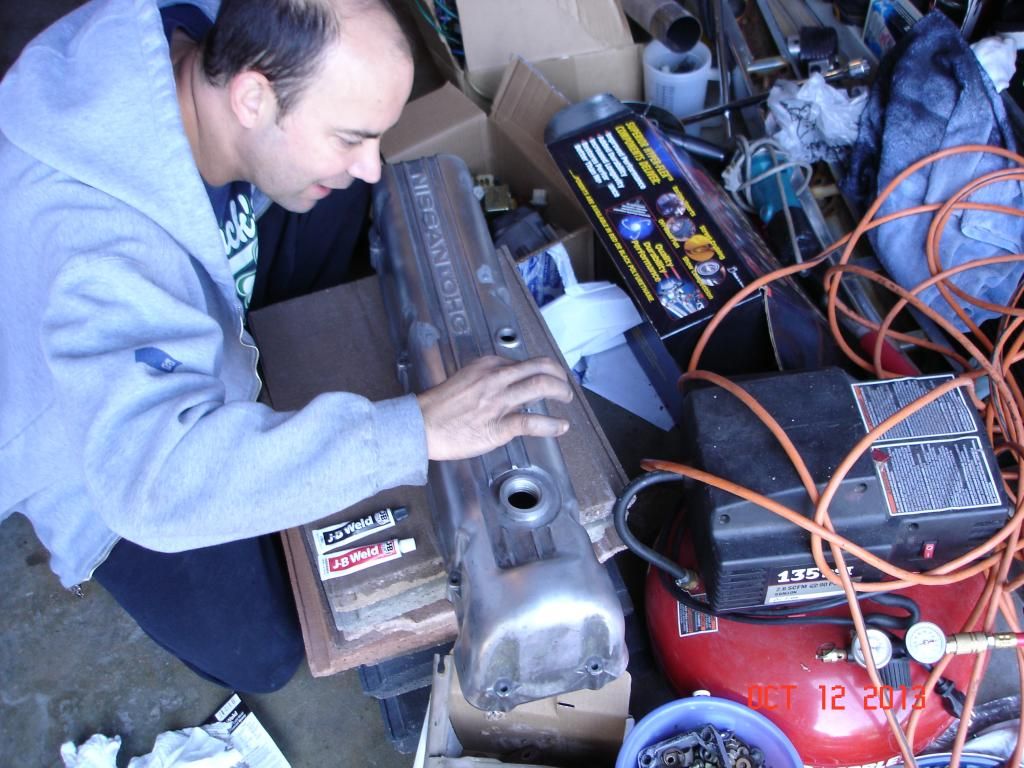
S. jumped into this with a vengeance and within a few hours had ground off three unused bosses w/holes (which he filled with JB weld and then screwed bolts into) and almost got it ready for paint.
Another few hours of prep and we'll be ready.
As S. got medieval on the valve cover, I was just floating around, doing nebulous things (it's a curse and a gift).
And then I saw this:
See anything not quite right here?
Moving on...
Sigfrid had decided that we were going to delete the side marker lights (because they are huge and ugly...we may add more modern lights later...) and so we made metal scab plates and JB welded them from inside the body:
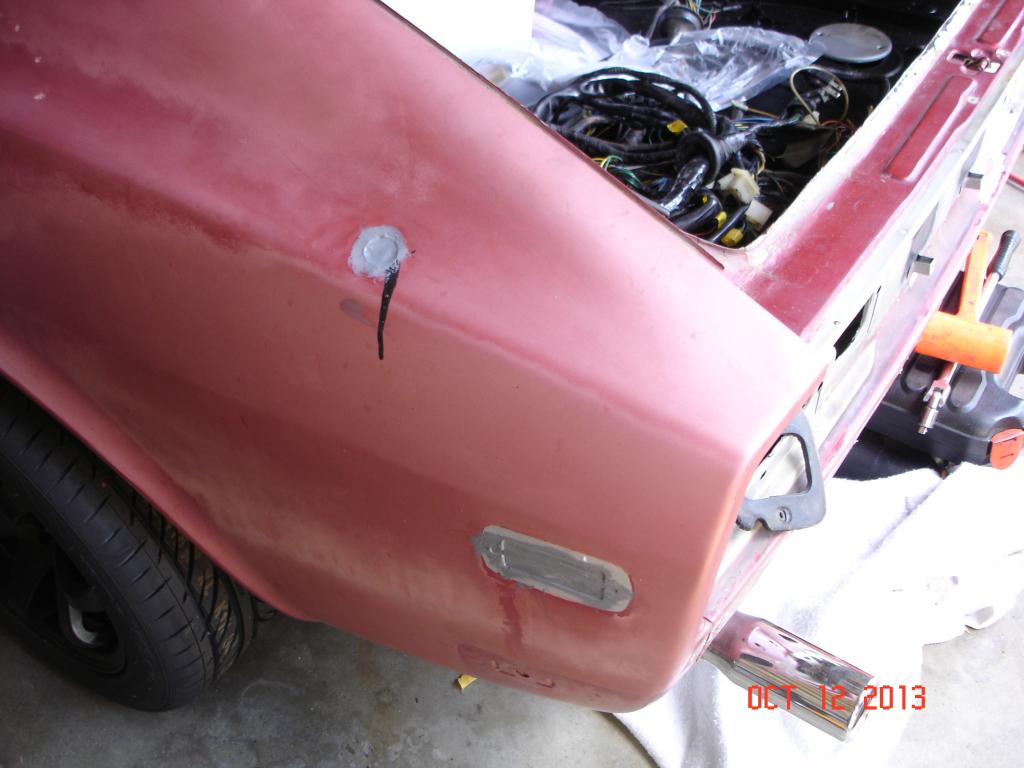
S. claims a skim coat of Bondo will finish this off. I'm not a body guy, so I'm letting him roll with it.
Another "we'll see" project.
That's about where we ended up yesterday.
There may be something big brewing but it's too soon to share, so...
I hope I get motivated to pull the hatch and explore the next step soon...but I kind of doubt it.
Because...
Things are heating up in the Z garage (which is odd because it's definitely getting colder outside) and stuffs are happening.
Like the intake.
This is the stock throttle body:

Compare it to the 240SX unit pictured above and you can see the cosmetic imperative driving the swap.
The original has a dashpot to slow the throttle under decel and that horrible wart on the bottom which is some sort of emission device, the 240 piece is just a throttle plate/shaft with enough metal to support it.
And of course, it's cable activated.
We just ordered the spacer necessary to use this new throttle body, so it's only loosely hanging in the next pics:


Barely visible in the frame is the S5 AFM that I hope to use.
We'll see how that goes.
My research paid off and the new Maxima 90A alternator is a perfect fit.
The Z's v-belt pulley needed to be bored out slightly to fit, I did that last night at home.
It's good to have a lathe.
Semi-stymied by lack of parts, we moved on to the valve cover- the last big cosmetic decision in the engine bay. We'd delayed this conversation till the bay began taking shape and we had a better idea of the overall appearance.
And now Sigfrid will make an appearance:


S. jumped into this with a vengeance and within a few hours had ground off three unused bosses w/holes (which he filled with JB weld and then screwed bolts into) and almost got it ready for paint.
Another few hours of prep and we'll be ready.
As S. got medieval on the valve cover, I was just floating around, doing nebulous things (it's a curse and a gift).
And then I saw this:

See anything not quite right here?
Moving on...
Sigfrid had decided that we were going to delete the side marker lights (because they are huge and ugly...we may add more modern lights later...) and so we made metal scab plates and JB welded them from inside the body:

S. claims a skim coat of Bondo will finish this off. I'm not a body guy, so I'm letting him roll with it.
Another "we'll see" project.
That's about where we ended up yesterday.
There may be something big brewing but it's too soon to share, so...
Joined: Mar 2001
Posts: 31,859
Likes: 3,243
From: https://www2.mazda.com/en/100th/
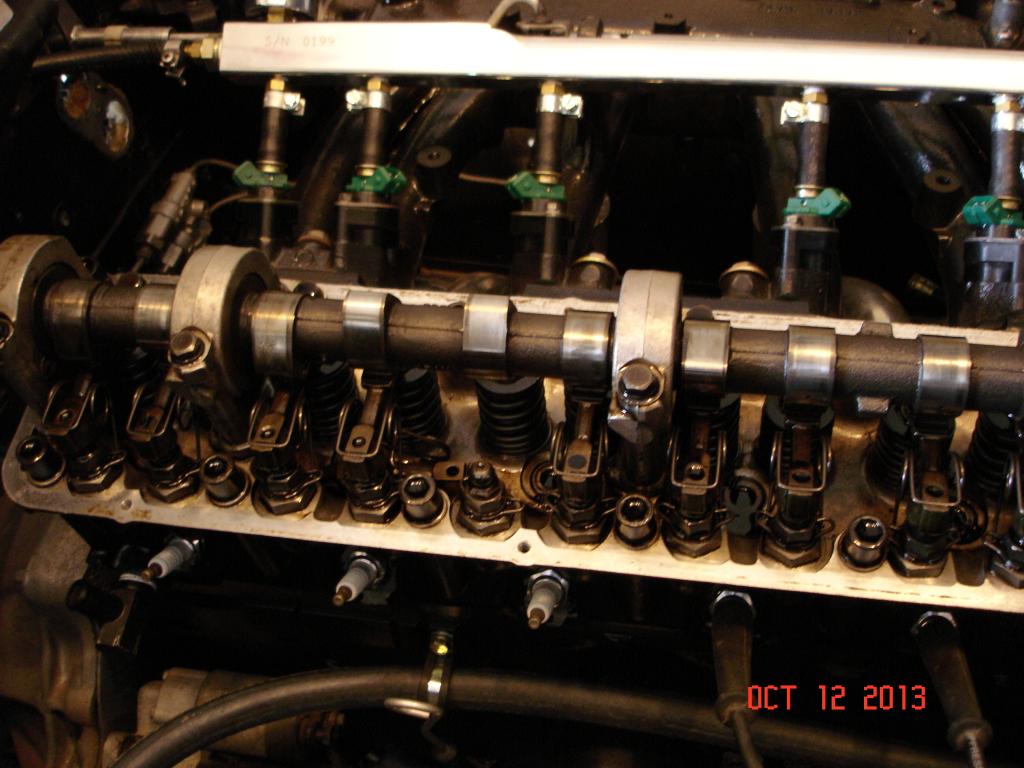
Bingo!
The missing rocker, along with the hairspring retainer and the contact pad from the valve top, were just sitting in the space between the valves.
Not a mark on 'em and no signs of them bouncing around under the cover.
We have only run the engine the one time on the day of purchase...it was horrible but we heard nothing that sounded fatal/broken.
Since then we found loose spark plugs/wires, a multitude of broken wiring and hoses and I now think the main pulley is installed backwards (we're still checking this out)...at any rate, a lot of signs that this engine may have been hastily assembled and half-assed thrown into the car.
We already knew that the engine serial # didn't match the chassis but that's relatively common these days and wasn't a big deal.
Now I'm wondering what the hell we have.
Yeah, it's strange.
The inside of the valve cover was spotless.
Speaking of which...

Sigfrid just sent me that pic, showing the progress he's made this morning.
The three dark dots you see are where the three bosses he ground off used to be.
Almost ready for paint.
The inside of the valve cover was spotless.
Speaking of which...

Sigfrid just sent me that pic, showing the progress he's made this morning.
The three dark dots you see are where the three bosses he ground off used to be.
Almost ready for paint.
The center will be gloss black, the lettering and detail lines will be sanded back to bare metal.
The main body will be a satin aluminum.
Red is only being used sparingly as an accent color, for instance, the real spark plug wires will be red.
The engine bay has pretty much been my baby so far and it's been slowly revealing how it wants to look.
The bay was originally in such poor condition and we've modified it so much that only recently have I begun to see how it will present as an overall package.
There are two more important visual components yet to be added and I hope they will tie all this together. They are a development of a mod I'd done on my old 240z and should be the cherry on the top, aesthetics-wise.
This morning I head over to the garage and install the now prepped alternator.
Then it's off to the junkyard to scavenge more parts.
Looks like rain though, so we'll see...
Yesterday's junkyard jaunt was very successful, maybe the best yet.
First of all, the weather was perfect- not too hot, not too cold, not too sunny...so I could spend time productively searching instead of wishing I were dead.
Also, as the project coalesces the parameters become more defined,it's easier to imagine the parts needed to finish.
I got two "primary" components and one "secondary".
"Primary" parts are those I need and have no original to work with, "secondaries" are parts I'd like to get for convenience/aesthetic reasons but don't need for operation.
This weeks secondary part was a 90� fitting for the intake manifold to provide vacuum to the brake booster.
I had spotted this part a few weeks ago but was unable to harvest it because it is some odd size...17mm was too small, 19mm, too big.
Yesterday I was packing an 18mm wrench and it succumbed to my blandishments.
The first important part(s) I found were the bulb harnesses for the taillights.
The Z has a funky setup where the turn signal and brake share a filiment...it's too stupid to describe, suffice to say, I'm changing that.
There are two bulb sockets per lamp (actually, three but the reverse lamp doesn't matter now) and I'll now have a dual filiment socket for each, a total of four filiments to handle running lights, turnsignals and brake.
Not sure how I'll allocate them yet.
I'm thinking one for running, one for turn signal and two for brakes.
I should play around with them and see how bright everything looks before deciding.
I also needed to get a throttle cable for the new 240SX body.
This is actually a two part deal, I'm only concerned about the outer sheath/fittings at this point.
The cable itself and its end pieces will be custom made.
Back in the eighties I worked at a small race bike shop and we made cables as necessary. We had a contract with a company that maintained pinball machines and in our downtime- between the Finals and Daytona-we made replacement cables for them. I have literally made hundreds of cables from scratch.
Anyway, the two important things I was looking for was the correct length (which is a total guess at this point) and a easy way to retain it at the firewall.
Many cars have a fitting at the firewall that is retained with bolts and I didn't want to get that fancy. Fortunately, Toyotas have a simple clip retaining system and I found a very promising candidate to try.
Even if found unsuitable, this cable will allow for accurate measurements so the second attempt can be better.
But I think it'll work.
Find out in a few hours.
troubleshooting sucks
Joined: Sep 2011
Posts: 575
Likes: 0
From: sweden
Im starting to wonder if it would be rude of Me to ask you to keep an eye out for some taillights to my fc when your on your junkyard adventures.. Will you not be having a reverse light at all?
troubleshooting sucks
Joined: Sep 2011
Posts: 575
Likes: 0
From: sweden
I'll get right on that, Rose.
I rarely find FCs in my yard...like, almost never. That's why I'm always trying to adapt crap off other cars...
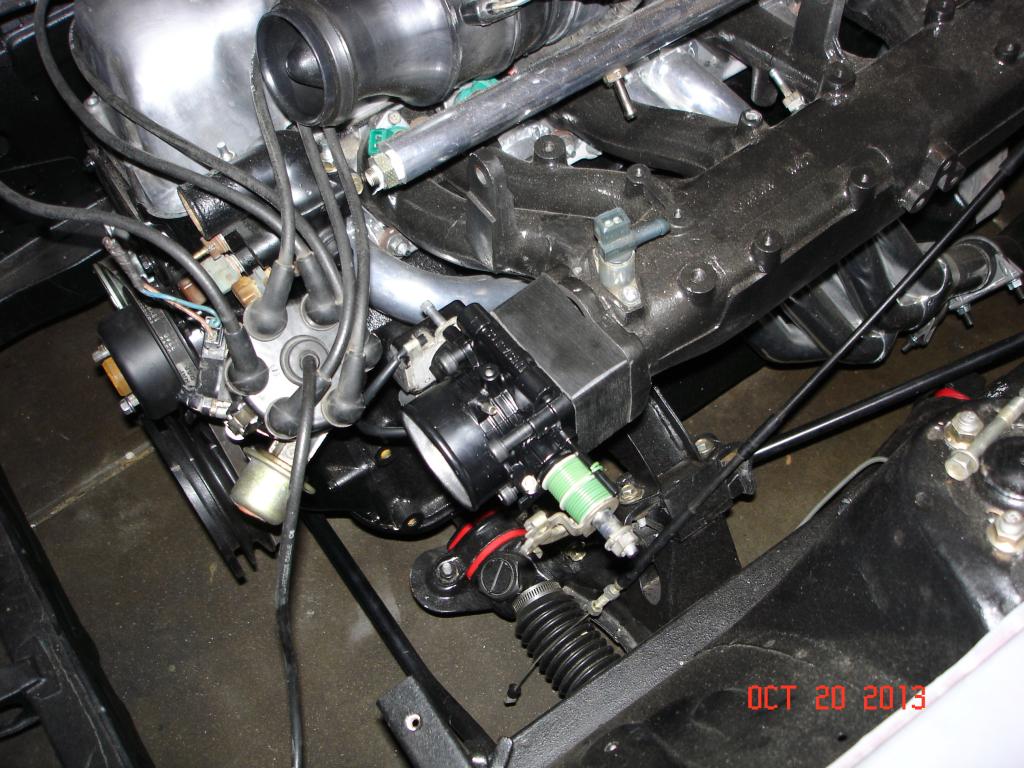
Speaking of adapting from other cars, today I ran into a perfect example of why projects like this take so much time.
One of our (multitudinous) modifications is converting to a 240SX throttle body, an upgrade semi-common on the Z forums.
"Semi-common" means that several people have talked about it but there's no definitive how-to available.
There are two major obstacles to be overcome- a cable must be installed, replacing the original rod/balljoint linkage and a spacer must be made.
I'll get to the spacer later, today I was most concerned about the cable.
It's really not the cable itself, rather it's the wheel on the throttle shaft that the cable connects to/pulls on.
In its original home, the 240 body sits at an angle and the cable approaches from the top.
In our application, the body sits straight and the cable comes from the back.
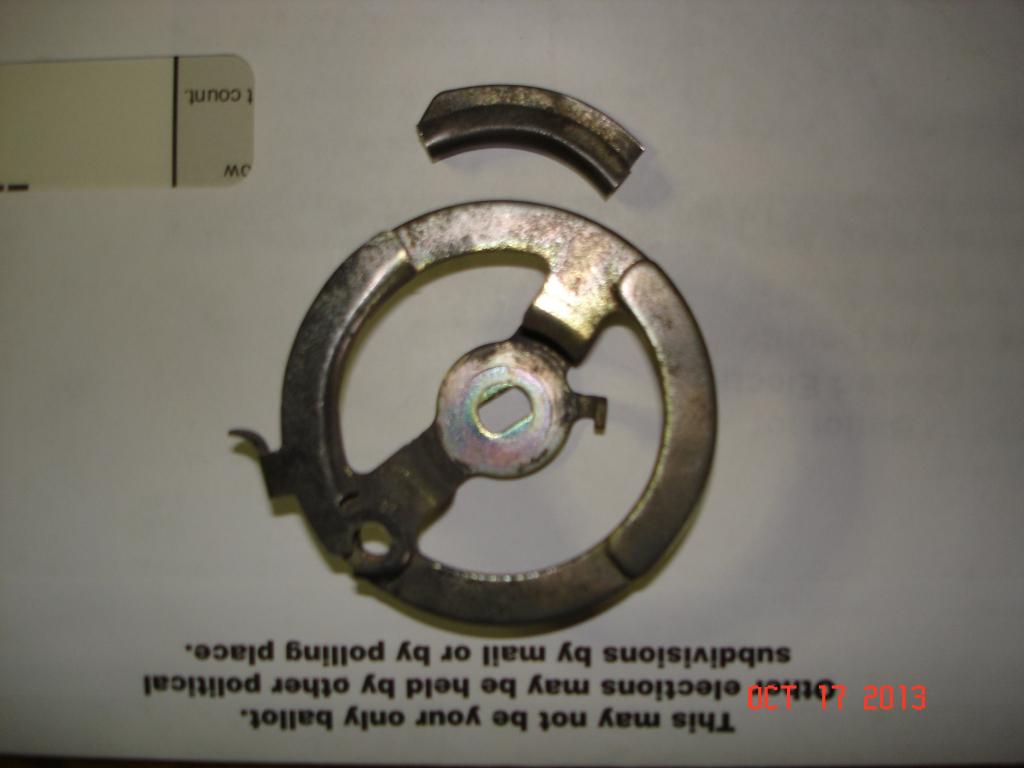
Here is a pic of the wheel in question, in approximately its installed orientation:
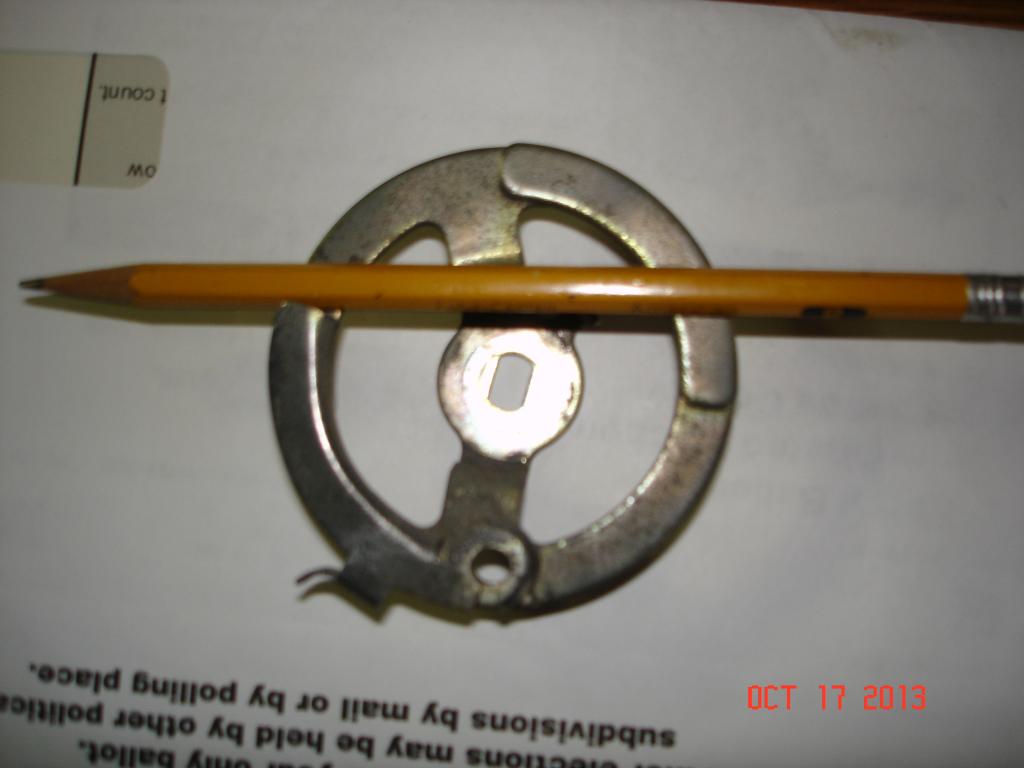
The cable end is retained at 6 o'clock and the cable guide extends up to @ 9:30.
The pencil (pointy end faces front of car) shows the approach angle of our cable and the resulting sharp bend the cable would make before it was on the guide.
Not good.
I pondered a few different ways to fix this and finally decided that extending the guide up to the top of the rim would be the easiest, least destructive method. I snagged a wheel off one of my spare FC throttle bodies, drilled out the three spot welds that held it and removed a segment of guide channel.
This piece was then cut/filed to fit:
I JB Welded it to the 240 wheel and now have a continuous guide around the active half of the rim.
Then painted both the wheel and throttle body black.
Because I could.
Basically, I spent all day on a tiny part that will never call attention to itself or appear obviously modded and TBH, probably didn't need to be done.
This is why project cars take time.
A lot more time than most folks appreciate.
I rarely find FCs in my yard...like, almost never. That's why I'm always trying to adapt crap off other cars...
Speaking of adapting from other cars, today I ran into a perfect example of why projects like this take so much time.
One of our (multitudinous) modifications is converting to a 240SX throttle body, an upgrade semi-common on the Z forums.
"Semi-common" means that several people have talked about it but there's no definitive how-to available.
There are two major obstacles to be overcome- a cable must be installed, replacing the original rod/balljoint linkage and a spacer must be made.
I'll get to the spacer later, today I was most concerned about the cable.
It's really not the cable itself, rather it's the wheel on the throttle shaft that the cable connects to/pulls on.
In its original home, the 240 body sits at an angle and the cable approaches from the top.
In our application, the body sits straight and the cable comes from the back.
Here is a pic of the wheel in question, in approximately its installed orientation:

The cable end is retained at 6 o'clock and the cable guide extends up to @ 9:30.
The pencil (pointy end faces front of car) shows the approach angle of our cable and the resulting sharp bend the cable would make before it was on the guide.
Not good.
I pondered a few different ways to fix this and finally decided that extending the guide up to the top of the rim would be the easiest, least destructive method. I snagged a wheel off one of my spare FC throttle bodies, drilled out the three spot welds that held it and removed a segment of guide channel.
This piece was then cut/filed to fit:

I JB Welded it to the 240 wheel and now have a continuous guide around the active half of the rim.
Then painted both the wheel and throttle body black.
Because I could.
Basically, I spent all day on a tiny part that will never call attention to itself or appear obviously modded and TBH, probably didn't need to be done.
This is why project cars take time.
A lot more time than most folks appreciate.
You're preaching to the choir on those statements right there. Keep up the good work.
I like seeing these kind of builds so much. It differs from the 4 rotor build by John Huijben because if he needs a part....he would just CNC it and boom out comes a perfect piece. You have to take some existing piece that you just found and McGyver it into the application needed.
It shows how even though stuff comes from different manufacturers and makers, a lot of stuff is compatible.
It shows how even though stuff comes from different manufacturers and makers, a lot of stuff is compatible.
Ok, this is how it goes...
Yesterday I went to get spacer material and visit the junkyard again.
At the yard I was primarily interested in getting some nicely shaped hose for the brake booster vacuum line. Ended up pulling hose and a check valve from three different cars. Found a much nicer vac fitting than the one I'd grabbed a few days ago.
It should look quite tidy when installed.
Because I'd spent so much time on the cable-pull wheel the day before, I was hyper aware of them in the yard cars. I thought it was likely that the ideal wheel existed and sure enough, I found one.
Pictured are the vac fitting and the two cable wheels:
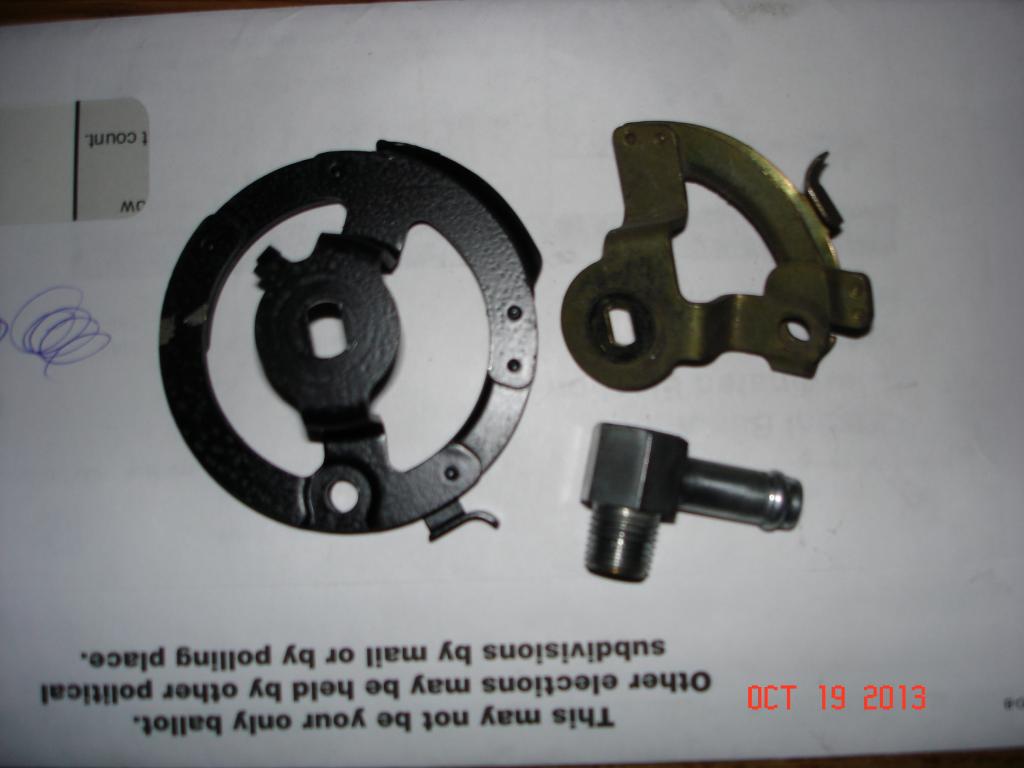
The black one on the left is the one I modded/painted, on the right is the new 1/4 sector "skeletonized" replacement. Note that the center keyway will need enlarging.
Cialis, maybe?
Or half hour with Dremel, which is what I did...
Essentially, I spent all that time teaching myself what I really wanted. Education be hard.
I found a chunk of black Delrin at the plastic supplier (4" x 12" x 1 1/2" for $16).
Normally, these spacers are 1" thick but I didn't see how the extra 1/2" would hurt us and Delrin is a pleasure to work with.
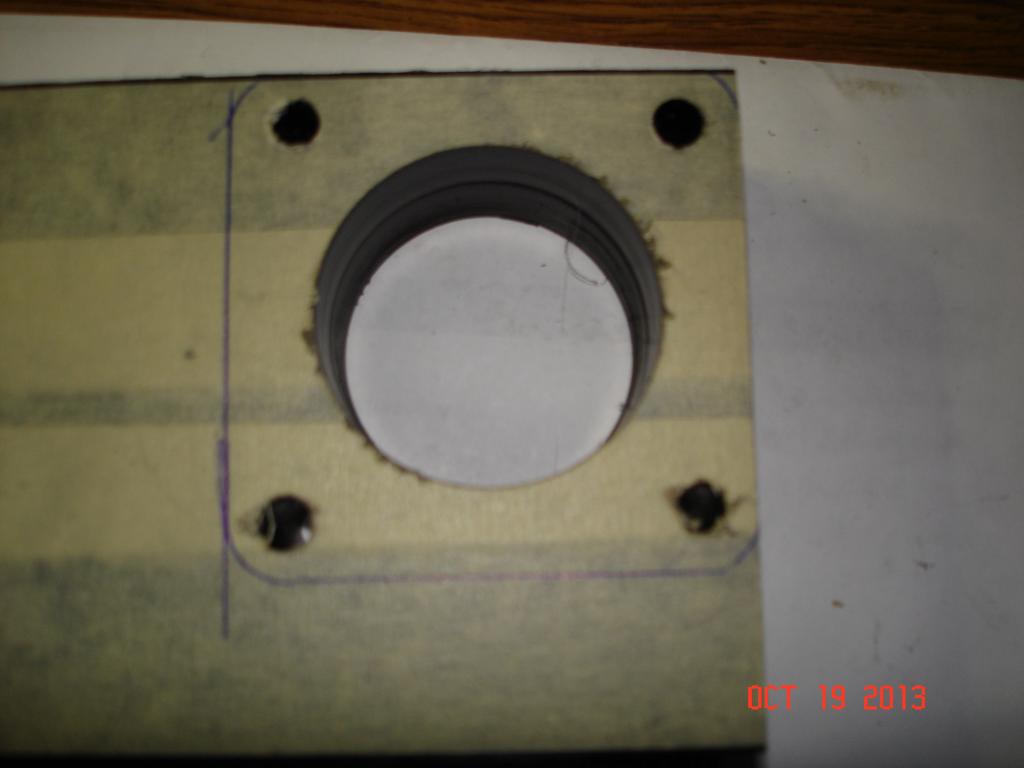
The 50mm center hole and the four mount bolt holes have been drilled/bored here.
Cut to shape with a radial arm saw, sanded the edges and radiused the corners with a belt sander.
Still haven't decided how to port the center bore (it has to go 50mm>60mm), Sigfrid and I will figure it out tomorrow.
So far:
Although not totally finished, this gets me far enough along that the throttle cable can be built.
I also may have found the material for the last major engine bay mod.
I've had this in mind since day one, it's an extension of something I'd done to the 240z and was quite fond of. Not only functional, this mod will complete the overall design aesthetic that I'm dreaming of.
I'm very excited to see how it turns out.
Yesterday I went to get spacer material and visit the junkyard again.
At the yard I was primarily interested in getting some nicely shaped hose for the brake booster vacuum line. Ended up pulling hose and a check valve from three different cars. Found a much nicer vac fitting than the one I'd grabbed a few days ago.
It should look quite tidy when installed.
Because I'd spent so much time on the cable-pull wheel the day before, I was hyper aware of them in the yard cars. I thought it was likely that the ideal wheel existed and sure enough, I found one.
Pictured are the vac fitting and the two cable wheels:

The black one on the left is the one I modded/painted, on the right is the new 1/4 sector "skeletonized" replacement. Note that the center keyway will need enlarging.
Cialis, maybe?
Or half hour with Dremel, which is what I did...
Essentially, I spent all that time teaching myself what I really wanted. Education be hard.
I found a chunk of black Delrin at the plastic supplier (4" x 12" x 1 1/2" for $16).
Normally, these spacers are 1" thick but I didn't see how the extra 1/2" would hurt us and Delrin is a pleasure to work with.

The 50mm center hole and the four mount bolt holes have been drilled/bored here.
Cut to shape with a radial arm saw, sanded the edges and radiused the corners with a belt sander.
Still haven't decided how to port the center bore (it has to go 50mm>60mm), Sigfrid and I will figure it out tomorrow.
So far:

Although not totally finished, this gets me far enough along that the throttle cable can be built.
I also may have found the material for the last major engine bay mod.
I've had this in mind since day one, it's an extension of something I'd done to the 240z and was quite fond of. Not only functional, this mod will complete the overall design aesthetic that I'm dreaming of.
I'm very excited to see how it turns out.
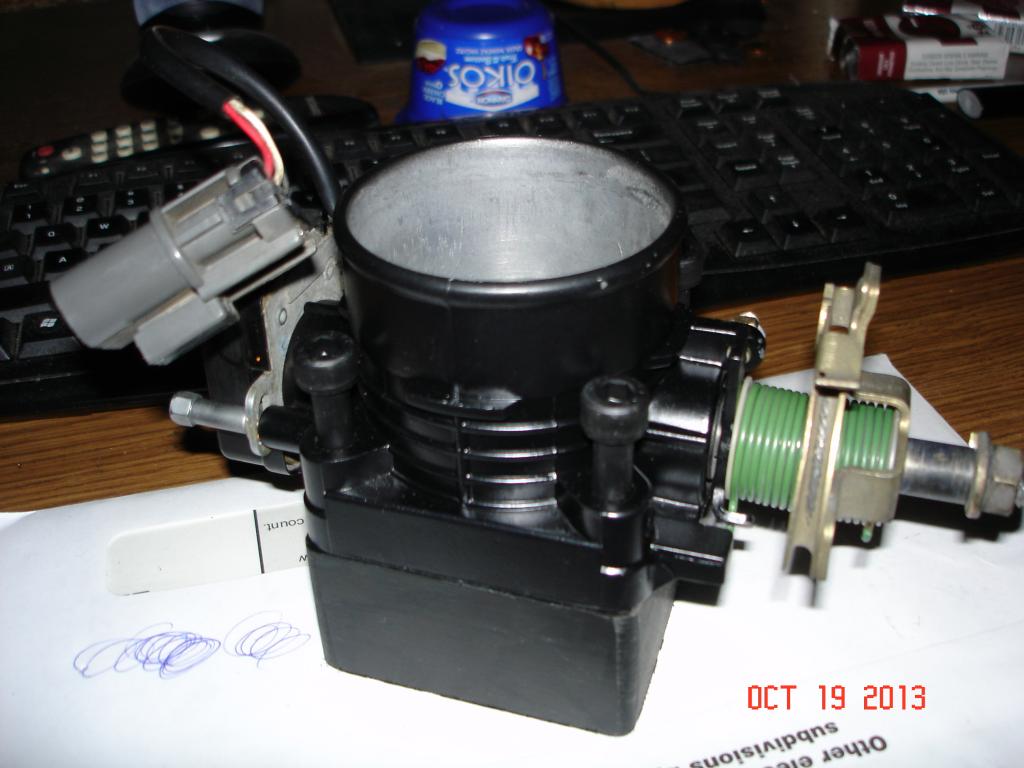
Well, today some things went very well:
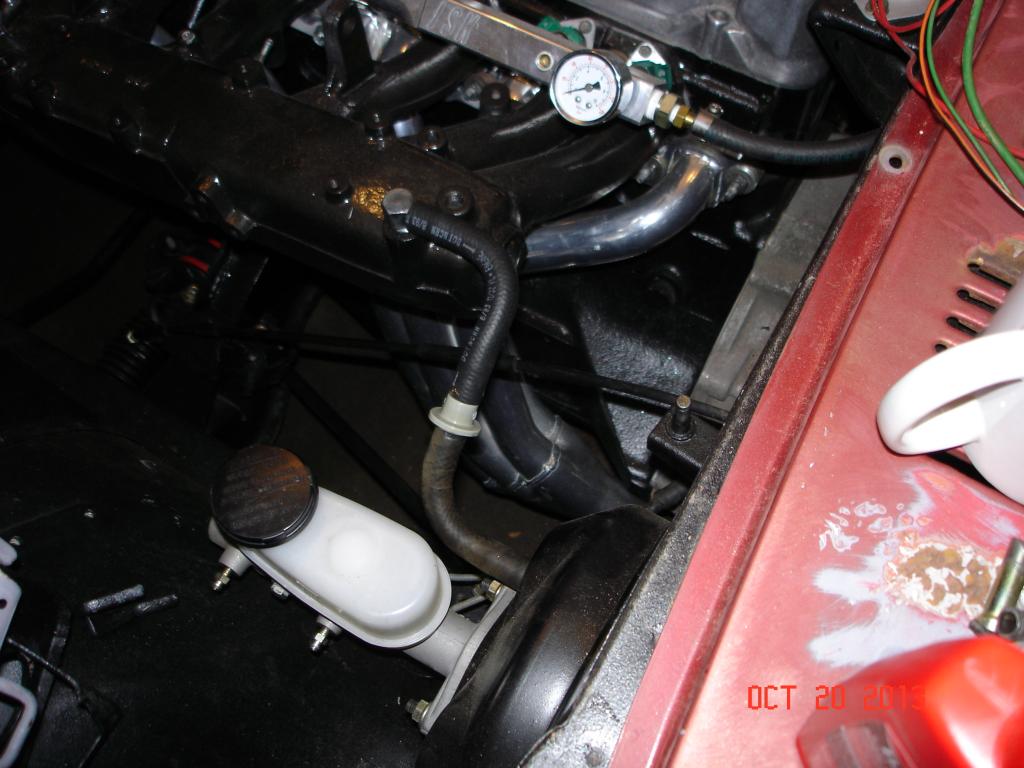
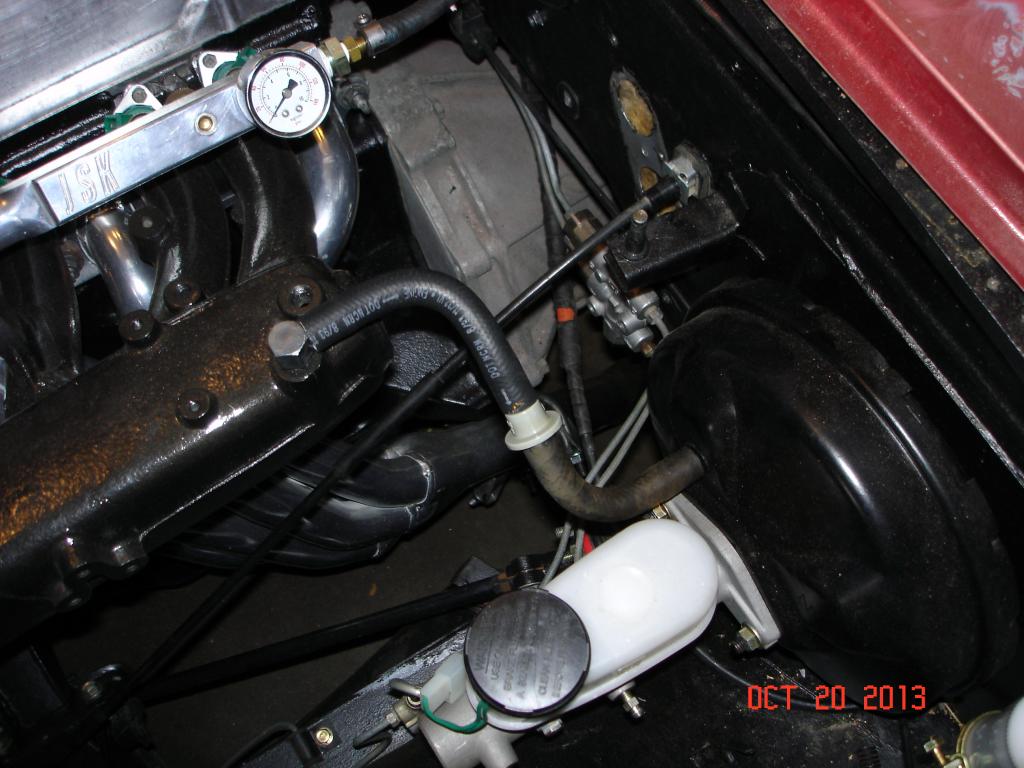
With the vac line complete, the brakes are finished.
And some things, like the throttle body, will need some work.
Turns out there is a downside to the extra 1/2" thickness of the spacer...it brings the cable wheel very close to the distributor. It could be made to work but it's just as easy to flip the throttle body upside down and avoid the problem altogether.
This will make for a super clean cable run as well:

I discovered a passage on the manifold flange that the spacer does not cover (that definitely needs to be blocked), so I'll have to remake the spacer anyway.
I'd like to incorporate the cable stop/holder into the spacer if possible, we'll see what comes to mind.
I brought the valve cover home with me, time to get it finished.
We have cold/snow for the next few days, so staying home and finishing up these little things sounds appealing.


With the vac line complete, the brakes are finished.
And some things, like the throttle body, will need some work.
Turns out there is a downside to the extra 1/2" thickness of the spacer...it brings the cable wheel very close to the distributor. It could be made to work but it's just as easy to flip the throttle body upside down and avoid the problem altogether.

This will make for a super clean cable run as well:

I discovered a passage on the manifold flange that the spacer does not cover (that definitely needs to be blocked), so I'll have to remake the spacer anyway.
I'd like to incorporate the cable stop/holder into the spacer if possible, we'll see what comes to mind.
I brought the valve cover home with me, time to get it finished.
We have cold/snow for the next few days, so staying home and finishing up these little things sounds appealing.
