
She Followed Me Home, Honest


Joined: Mar 2001
Posts: 31,859
Likes: 3,243
From: https://www2.mazda.com/en/100th/
I think that Sigfrid is only now beginning to appreciate the scope of this project. Fresh as I was from the rebuild of Sweetheart, I knew exactly what we were undertaking and the effort required to complete it.
I'm not complaining, mind you.
My contribution to the project is sweat equity, he pays for everything.
Since he has a full time job and family obligations, Sigfrid obviously hasn't the free time I do, nor is he as monomaniacally focused.
Dysfunctional as it could be, the symbiosis actually works pretty well.
So far.
my friend and i built the race car, and i've found his monkey with a screwdriver and my turd polishing, really work well together too.
Tomorrow my hiatus from the Z ends and it's back to work.
I guess everything is cool with Sigfrid's wife (who's always been nice to me) and they're going camping, so I have three straight days to go wild.
With the diff side seals in hand (finally!), Job #1 will be installing the rear suspension and finally getting the car back on the ground.
On her new wheels for the first time.
Whoa.
After that, I'll be floundering for a while as I move into the bay and begin to see how to best proceed. I want to start at the bottom and work up, so first I'll replace the motor mounts then probably move to the hydraulics- clutch and brakes (both of which get new hard lines and hoses).
We also have some very suspect fuel and evap hard lines to assess and most likely replace.
Our system, although injected, only runs at 38psi and I'm somewhat partial to just running a one piece hose from the pump to the filter in the bay. We plan on relocating the fuel lines in the bay anyway and the hose would greatly simplify the process.
Not sure yet how that will play out.
Pretty sure I'll hang the new ceramic coated header as well, just to see how it looks.
I like shiny things sometimes too.
Entering the bay means entering the World Of A Million Little Brackets And Doodads, all of which will need some sort of refurb, so there's that as well.
No matter what, when I come home Sunday night this awaits me:

So Monday, Sweetheart (who will soon be eligible for "Sprocket" status) goes buns up kneelin (as Frank Zappa would say) and gets new rear wheel bearings and DTSS eliminators.
And thus begins the prep for her epic journey at month's end.
The fun just never ends at Chez Clokker.
Update on yesterday's progress.
It was hell.
Because I'm an idiot I forgot the camera, so my Pollack-esque word paintings will have to suffice for the nonce.
The first thing you have to know about the Z is that everything is bloody ******* heavy...because it's all fabricated steel and cast iron. The only aluminum is the rear brake drums, which seems like spitting in the ocean in terms of weight reduction.
I'd estimate that the rear strut assemblies with the LCA attached (as shown in some earlier pics) pork in at about 75lbs. apiece.
The diff is @76lbs (according to the always reliable interwebs)...the list goes on.
Coupled with the extreme weight is the ridiculous amount of fasteners.
Nothing is cast, everything is multi-piece and bolted together.
For instance, just the rear mount for the LCA is three separate pieces and requires 12 bolts and eight nuts to assemble.
All this is prelude to the admission that my previous estimate of two hours to completion was Pollyanna bullshit, it actually took eight.
Of course, a great deal of the delay was just me working alone, With help, it would have been a whole bunch easier.
I thought I'd taken relevant pics before disassembly but there were still grey areas I hadn't considered and in nearly every case there was an option, I chose wrong and had to redo it.
Oh well, it's done now.
Almost.
The last underside chassis brace was the transmission mount.
Just before leaving last week, we'd burned out the rubber so I could take the bracket home, cut out the sleeve and prep/paint it.
Turns out that of all the bushings replaced in the Energy Suspension kit, the trans mount is the ONLY ONE where you leave the OEM bushing sleeves in place.
There are no instructions of course but it was still my fault and either way, it's my job to fix it.
So, instead of moving on...and I am sick to death of the underside of this chassis...I must deal with this stupid error.
Home Depot here I come.
During all my work time so far I've uncovered and removed maybe 20 hornet/wasp nests from the car, they were everywhere. Most were abandoned but there were still a few active nests that required eradication. Which I did (hint: wasps don't like Purple Power too much).
Yesterday, as I lay on my back, inches from the underside of the car, I saw more wasps...they've returned and are building new nests on the chassis structure.
Dunno what it is about this car but it's a stinging insect magnet.
We are planning another power wash session after Sigfrid finishes prep for paint and I hope we can eradicate the little bastards for good.
Doubt it though.
After I fix the trans mount error I'll move onto something more fun.
The brakes.

Although I'm not proud of the carelessness that lead to the problem, the fix was gratifyingly simple and effective. Two $.29 ABS plumbing widgets and about 20 minutes at the lathe made it good as new.
So, moving on.
Before I came home to do this, the rest of the day had been spent bumbling around in the engine bay. The immediate prime goal is to get the brakes functional but many little things had to be attended to before the brake components could be mounted.
The hood release cable had to be cleaned and routed as did the speedo cable. Both were covered in crap and red overspray but otherwise fine.
Of more long term importance, I also had to start making decisions about how the harness(es) would be laid out. Kind of difficult as I have only a hazy idea of what is what and where it goes.
The very beginning of the harness (just as it exits from the firewall, roughly the same spot as the FC) was all I really needed to worry about as it would be hard to access once the hydraulics are in place.
It felt like I put in a lot of work but there's precious little to show for it.
First we see the undercarriage, hopefully for the last time:

About the hardware...nice hardware is a particular fetish of mine but my supply is severely depleted and a lot of the stuff is unique to the Z, so I reused what I started with. It looks kinda janky but under the surface corrosion, everything was in pretty good shape.
Hint:
Resist the urge to wire brush your old hardware. It removes what's left of the zinc protective coating (and the surface corrosion that replaces it) and the pieces will rust instantly and worse than before. The temporary aesthetic improvement is not worth the eventual result.
And so we leave the undercarriage and return topside:

Out of the frying pan and into the fire, the engine bay awaits.
There is so much going on and I'm not terribly familiar with any of it, so I'm groping my way through it, constantly aware that decisions made now will have later repercussions.
The Z is from the era before engines were "styled" (or, more accurately, "covered with plastic panels") and even new, it was hardly a very neat or organized bay. Hoses drape *****-nilly and the wiring harnesses just meander where they will.
The biggest issue is due to the fact that the car/model began carbureted and then morphed into an injected/emissioned unit.
Decisions made for the carbed model don't make sense for the injected units.
For instance, the location of the (giant) fuel filter up by the passenger headlight...that worked originally because it was right close to the cam driven mechanical fuel pump (even the late 280 engines still have this provision, just covered with a block off plate) but with injectors and the required electric fuel pump, the filter is terribly positioned and results in very long and awkward fuel lines.
Not to mention all the associated electrical components, which were just squeezed into whatever space was handy.
I have to keep reminding myself that it took me years to get the FC bay the way I wanted it and it's unrealistic to assume the Z will just fall into place on the first try.
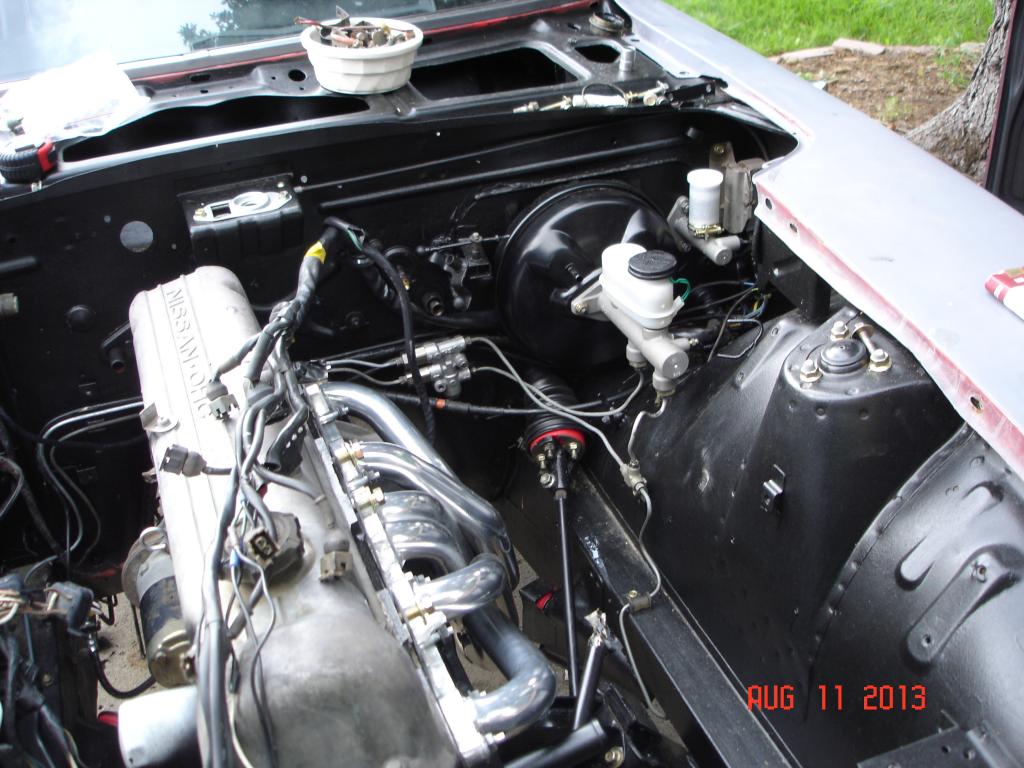
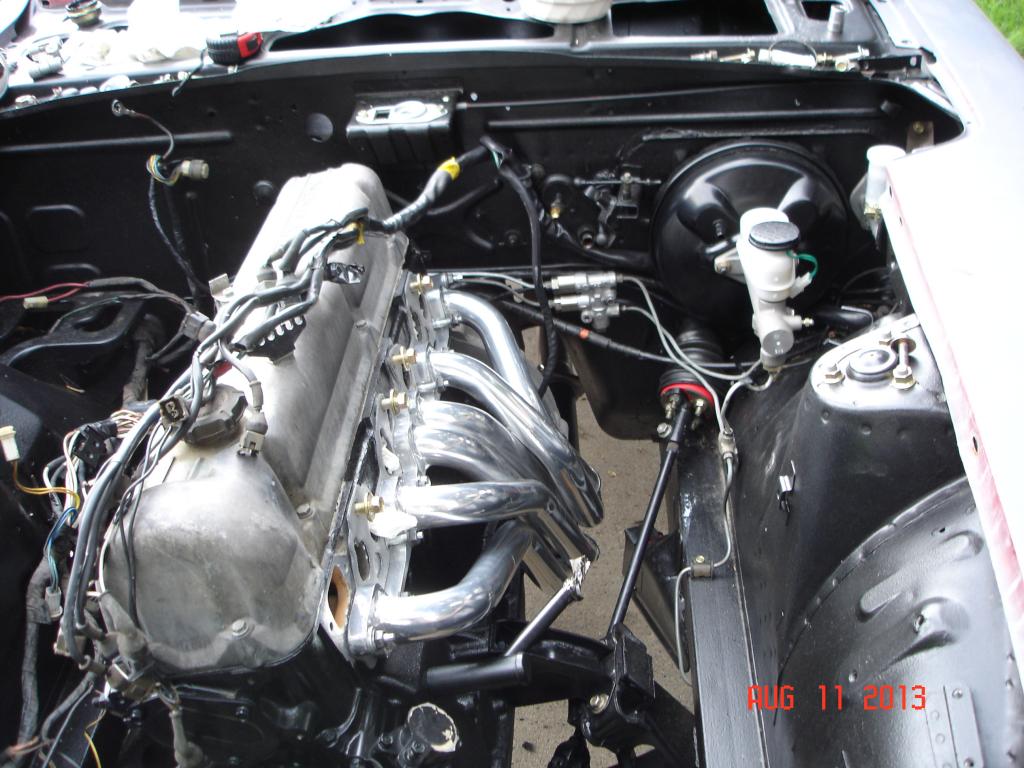
Anyway, the process has begun:

The 280ZX booster/MC (larger dual diaphragm booster and 1" MC) are in place and I'm experimenting with prop valve placement. the speedo cable and hood release are installed also.
My work on the Z now stops while I R&R the FC rear wheel bearings.
Assuming all goes well, I'll have time to visit the junkyard (I have a huge list of requirements) before we begin again next Saturday.
We'll see how that goes...

Dammit clokker, it never fails. I look at my car and think to myself "Well, it looks as nice as its going to get. You can only polish a turd so much." Then I look through your stupid thread and I'm reminded just how much better everything could come together if more attention was paid to the small details. Keep up the good work.
Thanks.
Proud as I am of my turd polishing skills, I'm very tired of employing them.
I just got a Factory Five info pack in the mail and am enjoying the prospect of working on a car that's all new and doesn't require gallons of Purple Power just to make it bearable to touch.
Proud as I am of my turd polishing skills, I'm very tired of employing them.
I just got a Factory Five info pack in the mail and am enjoying the prospect of working on a car that's all new and doesn't require gallons of Purple Power just to make it bearable to touch.
troubleshooting sucks
Joined: Sep 2011
Posts: 575
Likes: 0
From: sweden
they actually censored the word w i l l y. the englishman in me finds this highly amusing. clokker, your a trooper man. even though you have done alot,it still seems like your playing down the amount of effort youve put into this. are you guys gonna go with over-fenders on this baby? its just one of those cars that looks so good with them, as opposed to the fc. the fb looks good with them though. i apologise in advance for my immature questions 
Meercat, I was wondering what happened to you.
Figured a glacier crept up on you and you were out of commission til spring.
How's the new motor coming along?
I'm not intentionally downplaying the amount of work I've done but am aware that I preach to the choir when posting here. People who have done this sort of thing know what it entails while those who haven't will never understand.
It should go without saying that when working on older cars, nothing is straightforward or easy.
And speaking of straightforward and easy, let's talk about rear wheel bearing replacement and DTSS bushing install, shall we?
I've been reading up and asking about the procedure, trying to be ready for likely tough spots.
What a waste of time.
When I got the bearings about 4 days ago, they came out of the box and right into the freezer.
Granted, they'll only shrink a RCH but sometimes that makes a lot of difference and hey, it's free, so why not?
After jacking up the car and removing the wheel, it took maybe 15 minutes to get to this point:
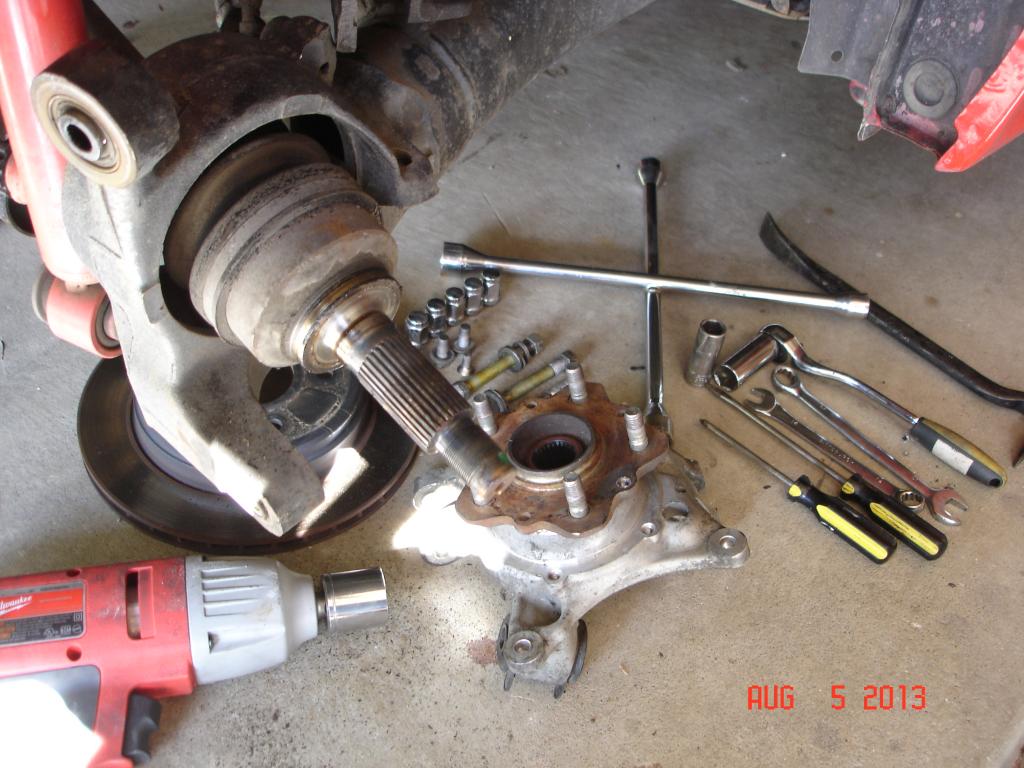
Tools required are:
12, 14, 17 and 21mm sockets/open end wrenches.
A 32mm socket for the axle nut (1 1/4" works fine here, that's what I used) and an impact gun or long cheater bar. Torque on the axle nut is 200 ft/lbs.
A big circlip pliers to remove the clip that retains the bearing.
How you press out the hub from the bearing and then press the bearing from the housing is up to you and what tooling you have available. I took it to my friend Dan's shop and used his bearing remove/install kit. A press would have been easier and faster but this was actually quite painless by hand. The frozen bearings slid right in.
RESIST TEMPTATION AND DO NOT TRY TO HAMMER THIS IN BY HAND.
ESPECIALLY THE DTSS BUSHING.
Neither the bearing or the bushing require all that much pressure but the pressure applied must be even, consistent and centered. You'll know it when you get it right.
With the parts all assembled, I headed home thinking I'd once again dodged a major bullet...this just wasn't all that hard.
Then came the part that absolutely no one mentioned.
Putting the hub back on the car was an absolute bloody ******* nightmare, very reminiscent of my struggles withe the Z strut/LCA.
The bottom pivot of the triaxial hub is a pillowball and I hate those things with the fire of a thousand burning suns (if a sun no longer burns, is it still technically a "sun"?).
Right up to the moment that perfect alignment occurs, a 100 ton press would not make this fit but when it finally does come together it'll slip into place almost without effort. The squishy rubber seals ain't doing you any favors either.
This is the first connection you must make...the bottom one.
Next you get the DTSS bolt at least started and you should do this by hand to prevent crossthreading. That's the big bolt with the 21mm head.
Having fun yet?
Then, the cherry on this metaphorical cake, the top pivot which features a large washer on one side and is just an absolute ball to weasel into place (because the other two pivots are already connected, you have very little wiggle room left.
And you're done.
You have my sympathy and admiration, I thought it was a real crappy job and am relieved it's over.
I'd been toying with the idea of bushing my car but after three straight weeks of suspension work, I need a break.
Maybe this winter...
I'm going through the same thing right now. When I took the triaxial hubs off, I managed to destroy that crappy plastic washer. Still haven't got a replacement yet.
But yes, putting them back on is no fun at all.
But yes, putting them back on is no fun at all.
Last edited by JerryLH3; Aug 6, 2013 at 04:44 PM.
It seems completely superfluous and no other bushing on the car has anything like it.
When I took the first hub off, I didn't realize it was a washer; it looks just like a bushing flange.
I also wonder how common the problems I was expecting (primarily, a frozen axle) really are compared to the frustration of reinstalling the SOB. After my battle with the Z's LCA>strut bushing/spindle I began to fear I was "bushing deficient" and just in the dark about techniques that everyone else knew about.
Meercat knows the feeling.
The FD rear suspension uses three of those infernal pillowballs on each side and I never got the hang of them either.


I was having mine pressed out today....until the moron forgot to take the circlip out and broke the hub....He broke 1 of 4. And go ******' figure it had a good DTSS still.
 I'm pissed.
It doesn't seem to do much. I've questioned its importance, but will probably drag myself to the dealer today and order one. If it wasn't for the RB DTSS instructions that explicitly mention to make sure you reinstall it, I would have almost had the rear end back together. That and my organizational skills have failed me and I have misplaced a pair of shock mounting nuts, but that's a different story.
Of all the hardware I removed from the Z- most of it completely generic- the only bolts I could not find were the caliper mounting bolts...decidedly NOT generic.
troubleshooting sucks
Joined: Sep 2011
Posts: 575
Likes: 0
From: sweden
 but im far too much of a model citizen to be getting up to those kind of shenanigans..
 as for the motor i have been promised it will be finished next week so you should be seeing some activity on my thread.
cool trick with the freezer btw!

You can do way more with heat than you can with cold. *85 to *0 is only an *85 change. the same change that heating one part to *170 gets you. I know there are concernes when it comes to rubber components and grease but you can still go way over *170 to get a better advantage.
Just my $.02.
Just my $.02.
Meercat, my (seemingly) glacial pace leaves me little room to chide others for inactivity.
Your car will happen when it happens.
Although I've not laid hands on the Z for most of the week, things have still been progressing and yesterday was quite fruitful.
Sigfrid and I began by travelling up the road a bit to answer a CL ad for parts...the guy was quite the hoarder. Lots of tempting trinkets but we kept it simple and only got a few things...a interior rear trim panel (covers the taillights and ours was totally missing), an earlier, non-EGR intake manifold (the new headers have no port for an EGR valve) and a pretty machined fuel rail.
Returning to the garage ("garage"= "driveway", actually), we ran headfirst into our greatest dilemma. We don't really know what we have exactly and aren't really sure what we want to end up with, so it's hard to figure out what needs changing.
The brakes are the poster child for this problem.
With rear drums and very heavy (but small) front calipers/rotors, it's certain that big changes will be happening but exactly what they may be is not yet known. I've already made changes by swapping up to the larger 280 ZX booster and MC but everything else is (refurbished) stock.
I'd previously blathered on about how awful the OEM hard brake lines were but in the end, it seemed prudent to just reuse them for now, given the high probability that the whole setup would be changed in the future. Unlike the FC, there is plenty of access to all the lines with the engine in situ, so that made the decision easier.
So, all the hydraulics are hooked up and will be bled this morning.
We then hope to hang the exhaust and run the new fuel lines, at which point she can go back on the ground.
And then I'm done for a few weeks.
I'm attending my niece's wedding on Sept. 1 and have been exercising my long dormant woodworking skills to make the gift.
It's in final glue up now, should be ready to show by tonight.
I have that project to finish as well as a checklist for the car to prep for the trip.
Replacing the wheelbearings was the only big job I'd planned but there's a lot of little **** to look at as well if I want to feel relatively confident of making it back home. With a 240k unrebuilt motor, one can not be too careful.
I'll do what I can do and hope for the best.
I'll try to get some pics up of the progress tonight but the return of Breaking Bad may slow me up a bit.
Must see TV and all that...
Well, yesterday went very well...right up until it didn't.
But we'll get to that.
The hydraulics are done.
Clutch and braking systems are complete and bled (and presumably, functional), although we'll surely rebleed in a few weeks to get those last pesky bubbles out.
Allow me to preemptively deflect criticism by admitting up front that the brake lines look like crap.This was "intentional" to the extent that I decided to reuse what lines we had because it's pretty certain that the brakes will be getting a major upgrade soon and I saw no point in obsessing over looks when it will all be changed.
The whole point of this first stage is to just get running and the original brakes have been totally refurbished and should work as well as they ever will, so we're good, even if the aesthetics are deficient.
I know I can- and will- do better on the next iteration.
Whenever that comes.
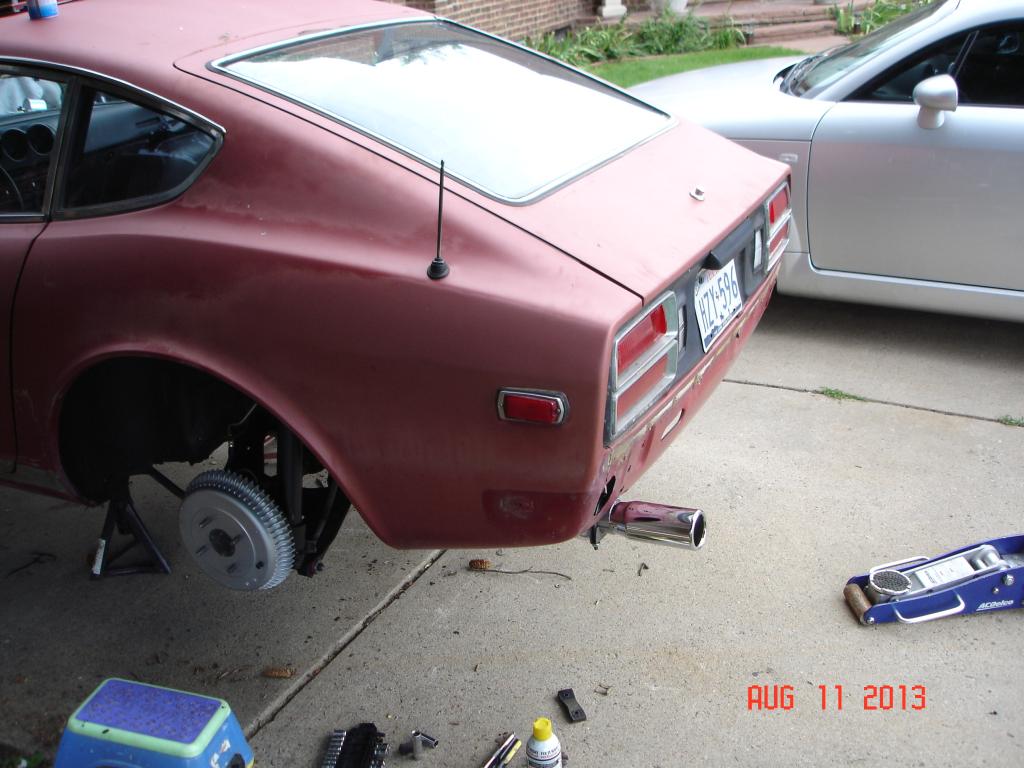
Also visible are the headers and exhaust:
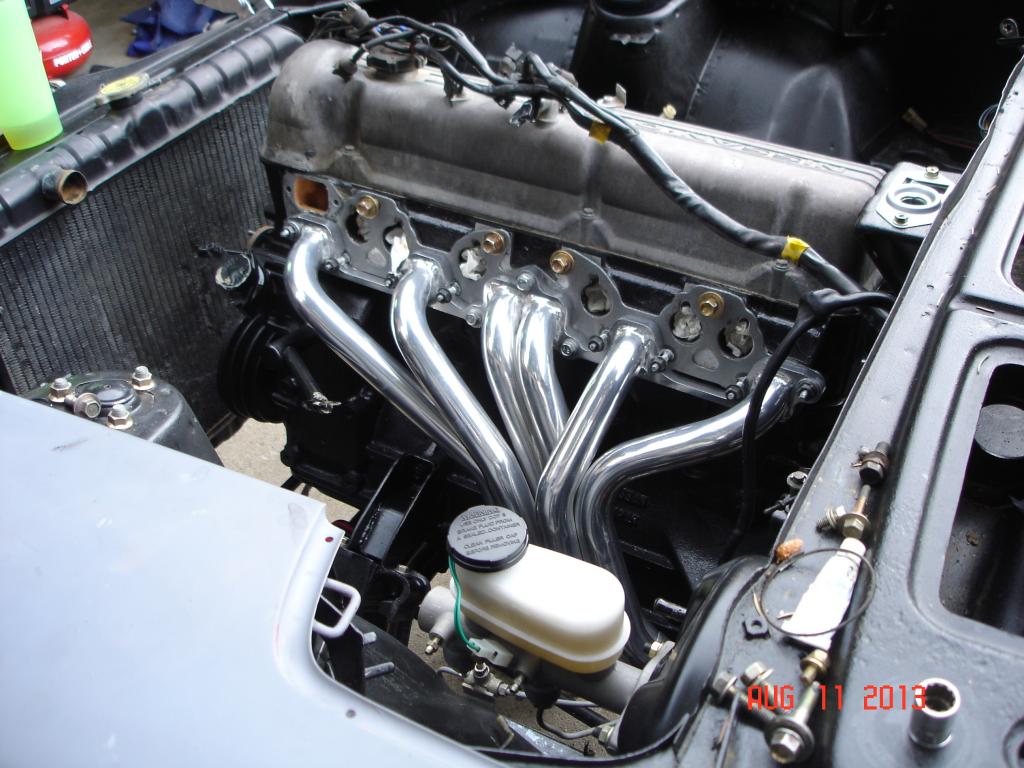
The headers are ceramic coated 6>2>1 going to mandrel bent piping to a rear mount muffler.
I replaced most of the original header hardware with studs to make life simpler.
The whole system fits very well, tucks up nicely and meets the hanger straps perfectly.
The only issue is the muffler tip and that's our fault, not the manufacturers. They build the system to fit the stock car but we've deleted the bumpers, so the tip extends much further than we need.
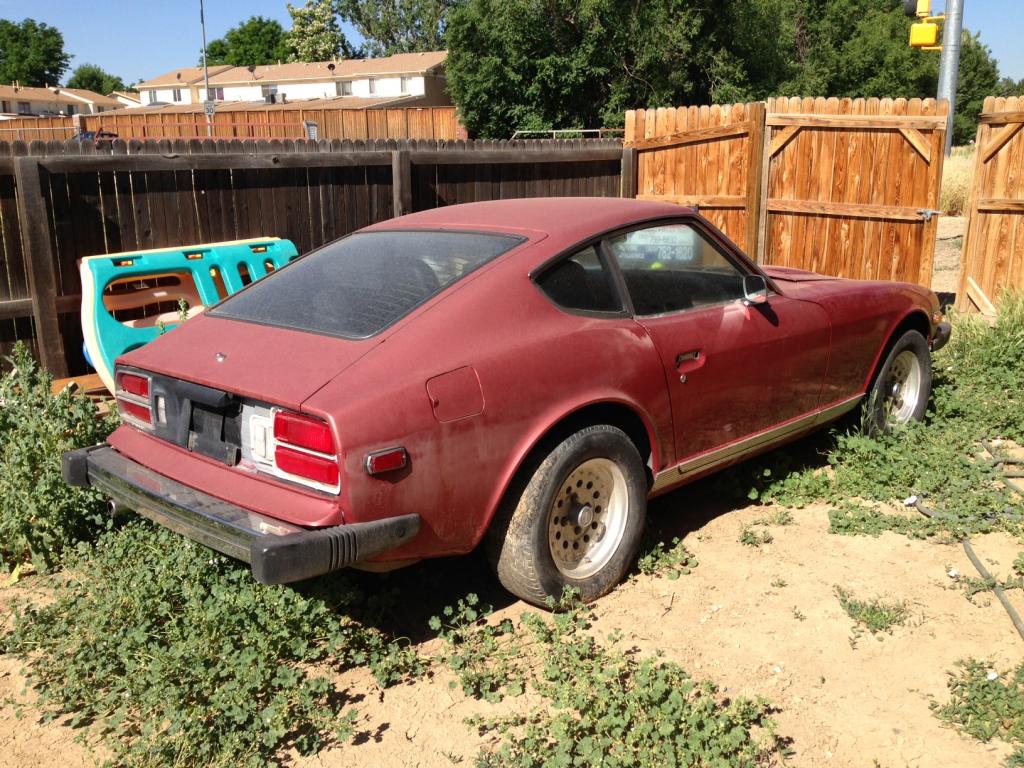
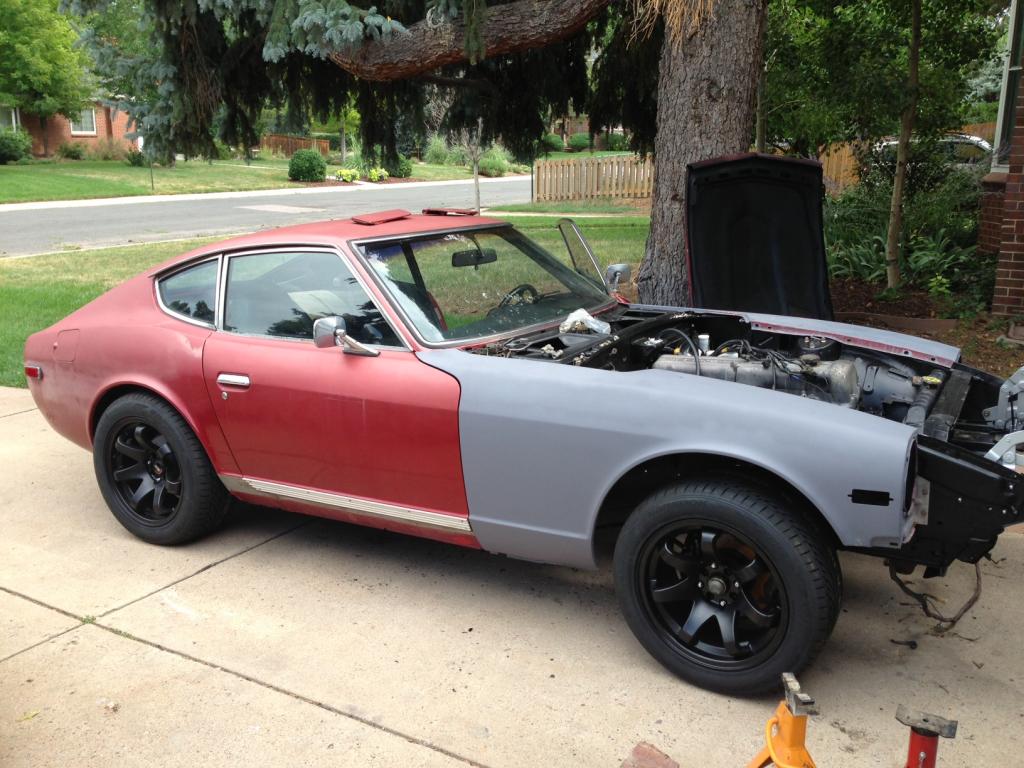
Here's a shot of the car as delivered:
And as she sits now:
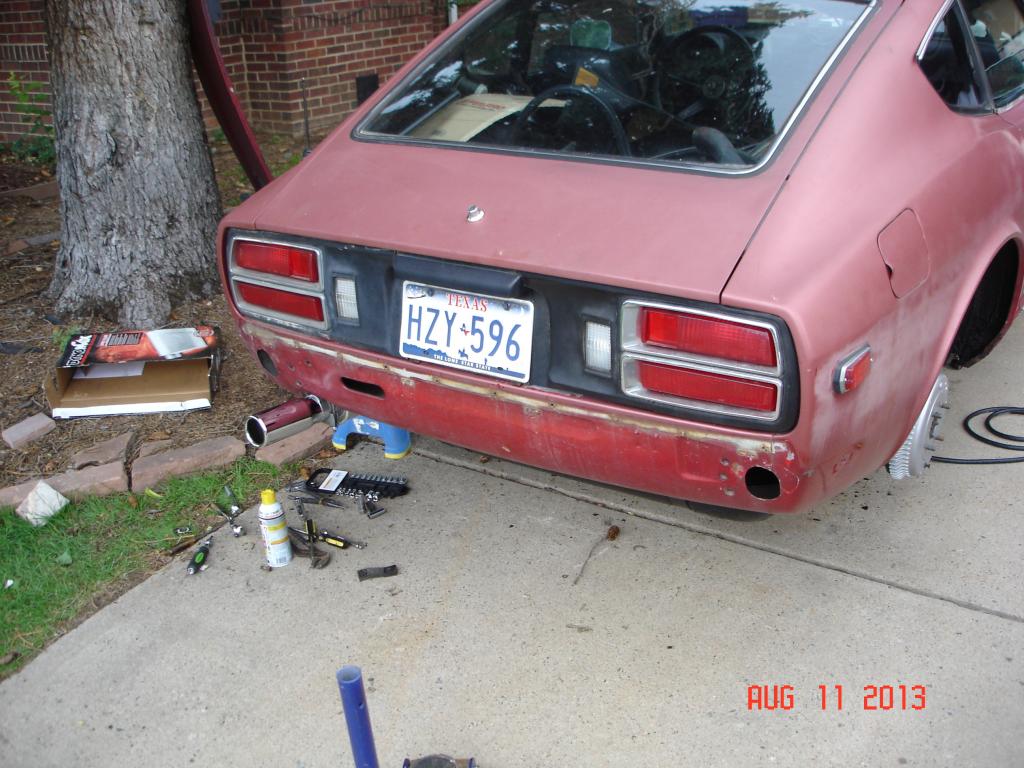
Also note that the body colored valence/filler panel has been removed.
This spanned the gap between the body and the bumper that we no longer have.
It was spot welded in place but yielded to persuasion (mostly just bending/twisting...as the spot welds gave way it got easier).
This shot of the rear perfectly illustrates a problem we also have in the front.
Below the massive crash bumpers (seriously, between the chromed steel bumpers and the supporting shocks we probably removed a hundred pounds), Datsun basically stopped designing the car, secure in the knowledge that it wouldn't be seen in normal circumstances.
It's riddled with openings and holes...we're not quite sure how to deal with this yet.
The rear is actually the easiest to deal with, the front is much more difficult- but we'll get to that later.
Anyway, the exhaust is done.
The fuel lines have also been dealt with.
The original feed/return lines run straight up the passenger side all the way to the headlight area where the filter and evap canister are located. The whole stock system is horribly ugly and convoluted, we're changing it up.
But of course, we're not exactly sure how that will evolve yet, so flexibility was called for and we opted to remove the hard lines altogether and run a single span of hose instead.
The fuel feed and return are one piece hose from the bay to the tank, eliminating several connection points and leaving options for bay routing open.
Our system runs at 38psi and the hose is rated at 225psi, so we have a fair margin of safety and using the original path under the car protects the hose very well.
So, all the major work under the car was done (she'll certainly be jacked up again but the BIG stuff is in place) and it was time for wheels and her first grounding.
She sits wrong.
The rear is damn nigh perfect but the front sits sky high.
She's got a "reverse musclecar" stance.
And this is where the lameness of the Z forums is clearly exposed.
This is apparently a very common issue and yet, forty years on, they can't seem to agree about the solution.
Some people advocate for swapping the springs front to back (one set of springs is about 2 1/2" taller than the other but they are clearly identified and I installed them per Eibach's instructions), some say to use rear springs on the front as well as the rear.
Others claim that loading the car with a driver and setting it on the ground with the LCAs and compression rods (don't even ask...) loose, and then tightening whilst loaded will solve the issue.
That's the easiest option and obviously the one we'll try first.
After that, I don't know.
The new, non-EGR intake has been cleaned and painted, assembly will take place mostly on the bench (new injectors and sensors all around) before it goes on the motor.
Much as I dislike the mechanical throttle linkage, we'll probably use it to start, see what happens.
Then comes the electrical.
We are probably a week or so of work from first startup but our schedules will probably spread that out over a month or so.
Oh well, we've accomplished a great deal in not much time and the primary reason for doing it this way- to get all over the chassis and verify it was worth working with- has been satisfied.
There have been a few glitches along the way but looking back, I think it was pretty damn smooth given the plethora of ways we could have been sabotaged.
So I'm happy and encouraged.
Meanwhile, back on the ranch, this has been happening:
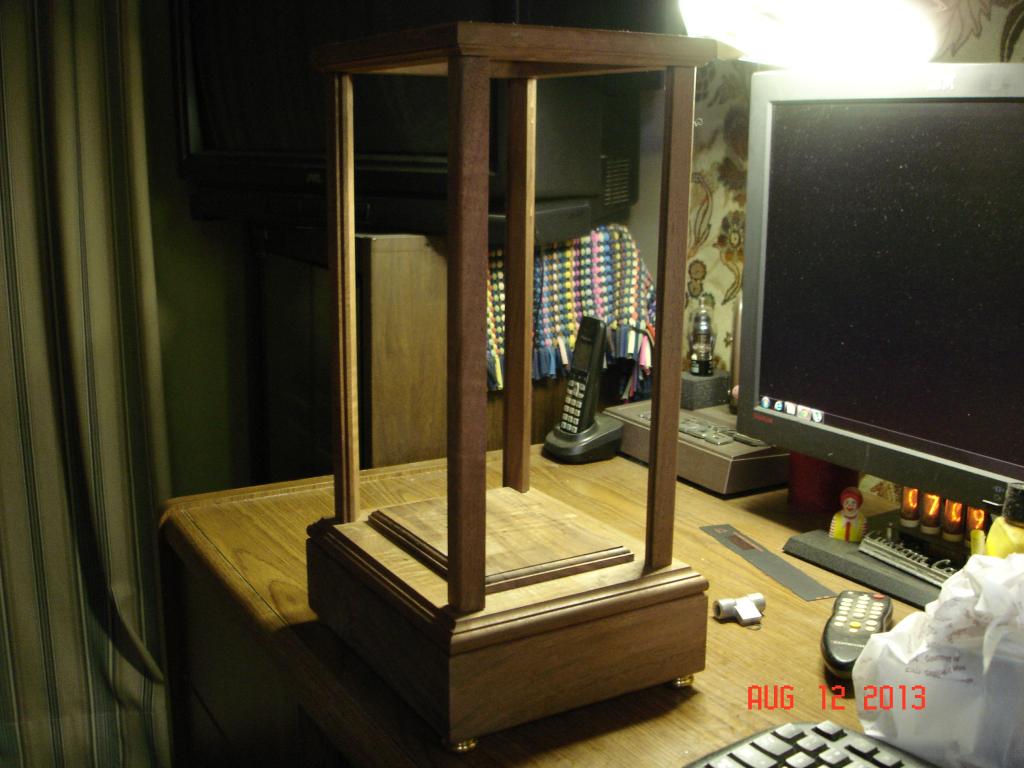
This is going to be the wedding present for my niece.
I'm hardly a real woodworker, but enjoy dabbling and think this is turning out OK.
It's cut from some black walnut that I've had for maybe twenty years and once the finish is applied, should look pretty cool, there's a lot of nice grain/figuring.
This will house the only prototype clock I ever made (and the only one I could afford to keep for myself...it's ironic that I could never afford the clocks I myself built but that's the way it goes).
I'll get into the clock itself later.
That's the update for today, carry on and tread lightly.
Edit:
Sigfrid just sent me some pics...I was so horrified by the stance I couldn't bring myself to photograph it but S. is made of sterner stuff:
Yikes!
And for no particular reason, a pic of my hands doing something:
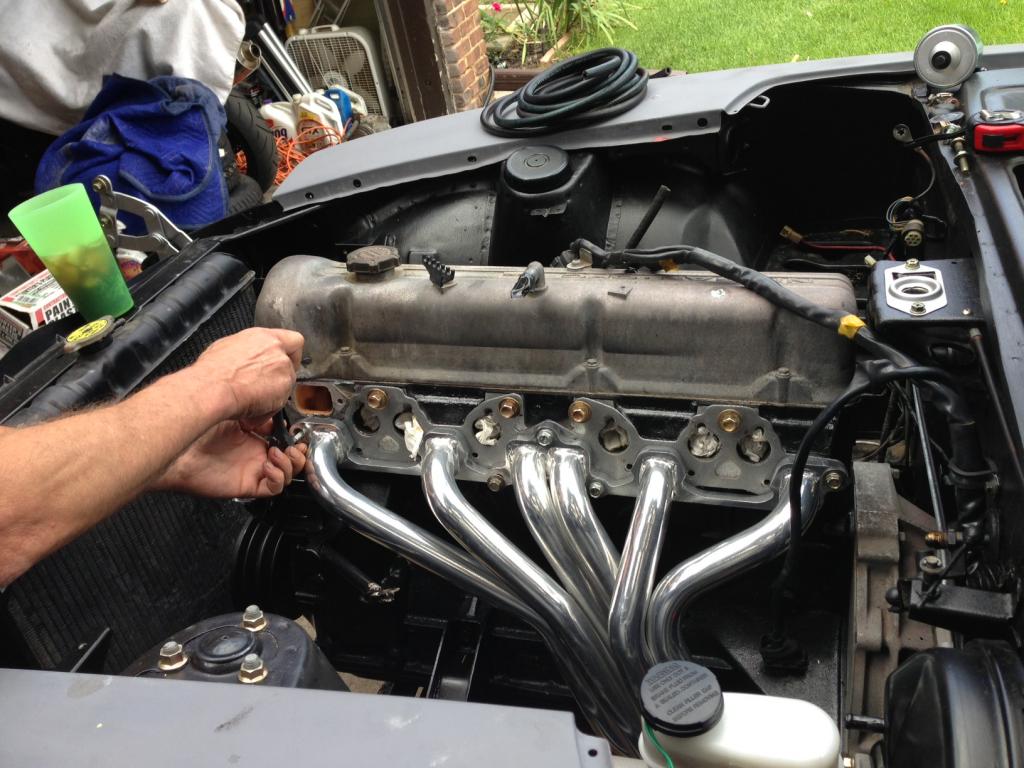
On the fender in the background you can see the fuel line hose awaiting install.
Good stuff, eh?
But we'll get to that.
The hydraulics are done.
Clutch and braking systems are complete and bled (and presumably, functional), although we'll surely rebleed in a few weeks to get those last pesky bubbles out.

Allow me to preemptively deflect criticism by admitting up front that the brake lines look like crap.This was "intentional" to the extent that I decided to reuse what lines we had because it's pretty certain that the brakes will be getting a major upgrade soon and I saw no point in obsessing over looks when it will all be changed.
The whole point of this first stage is to just get running and the original brakes have been totally refurbished and should work as well as they ever will, so we're good, even if the aesthetics are deficient.
I know I can- and will- do better on the next iteration.
Whenever that comes.
Also visible are the headers and exhaust:


The headers are ceramic coated 6>2>1 going to mandrel bent piping to a rear mount muffler.
I replaced most of the original header hardware with studs to make life simpler.
The whole system fits very well, tucks up nicely and meets the hanger straps perfectly.
The only issue is the muffler tip and that's our fault, not the manufacturers. They build the system to fit the stock car but we've deleted the bumpers, so the tip extends much further than we need.
Here's a shot of the car as delivered:

And as she sits now:


Also note that the body colored valence/filler panel has been removed.
This spanned the gap between the body and the bumper that we no longer have.
It was spot welded in place but yielded to persuasion (mostly just bending/twisting...as the spot welds gave way it got easier).
This shot of the rear perfectly illustrates a problem we also have in the front.
Below the massive crash bumpers (seriously, between the chromed steel bumpers and the supporting shocks we probably removed a hundred pounds), Datsun basically stopped designing the car, secure in the knowledge that it wouldn't be seen in normal circumstances.
It's riddled with openings and holes...we're not quite sure how to deal with this yet.
The rear is actually the easiest to deal with, the front is much more difficult- but we'll get to that later.
Anyway, the exhaust is done.
The fuel lines have also been dealt with.
The original feed/return lines run straight up the passenger side all the way to the headlight area where the filter and evap canister are located. The whole stock system is horribly ugly and convoluted, we're changing it up.
But of course, we're not exactly sure how that will evolve yet, so flexibility was called for and we opted to remove the hard lines altogether and run a single span of hose instead.
The fuel feed and return are one piece hose from the bay to the tank, eliminating several connection points and leaving options for bay routing open.
Our system runs at 38psi and the hose is rated at 225psi, so we have a fair margin of safety and using the original path under the car protects the hose very well.
So, all the major work under the car was done (she'll certainly be jacked up again but the BIG stuff is in place) and it was time for wheels and her first grounding.
She sits wrong.
The rear is damn nigh perfect but the front sits sky high.
She's got a "reverse musclecar" stance.
And this is where the lameness of the Z forums is clearly exposed.
This is apparently a very common issue and yet, forty years on, they can't seem to agree about the solution.
Some people advocate for swapping the springs front to back (one set of springs is about 2 1/2" taller than the other but they are clearly identified and I installed them per Eibach's instructions), some say to use rear springs on the front as well as the rear.
Others claim that loading the car with a driver and setting it on the ground with the LCAs and compression rods (don't even ask...) loose, and then tightening whilst loaded will solve the issue.
That's the easiest option and obviously the one we'll try first.
After that, I don't know.
The new, non-EGR intake has been cleaned and painted, assembly will take place mostly on the bench (new injectors and sensors all around) before it goes on the motor.
Much as I dislike the mechanical throttle linkage, we'll probably use it to start, see what happens.
Then comes the electrical.
We are probably a week or so of work from first startup but our schedules will probably spread that out over a month or so.
Oh well, we've accomplished a great deal in not much time and the primary reason for doing it this way- to get all over the chassis and verify it was worth working with- has been satisfied.
There have been a few glitches along the way but looking back, I think it was pretty damn smooth given the plethora of ways we could have been sabotaged.
So I'm happy and encouraged.
Meanwhile, back on the ranch, this has been happening:

This is going to be the wedding present for my niece.
I'm hardly a real woodworker, but enjoy dabbling and think this is turning out OK.
It's cut from some black walnut that I've had for maybe twenty years and once the finish is applied, should look pretty cool, there's a lot of nice grain/figuring.
This will house the only prototype clock I ever made (and the only one I could afford to keep for myself...it's ironic that I could never afford the clocks I myself built but that's the way it goes).
I'll get into the clock itself later.
That's the update for today, carry on and tread lightly.
Edit:
Sigfrid just sent me some pics...I was so horrified by the stance I couldn't bring myself to photograph it but S. is made of sterner stuff:

Yikes!
And for no particular reason, a pic of my hands doing something:

On the fender in the background you can see the fuel line hose awaiting install.
Good stuff, eh?
And, it's later.
This clock is unique among my builds because it was the only functional prototype I ever made. It was also the only clock where aesthetics instead of complications was the primary consideration.
The large greatwheel was the largest gear I had made to date, at 6.5" and 360 teeth...I wasn't sure I could do it.
After that, getting the rest of the gears proportioned pleasingly was the goal.
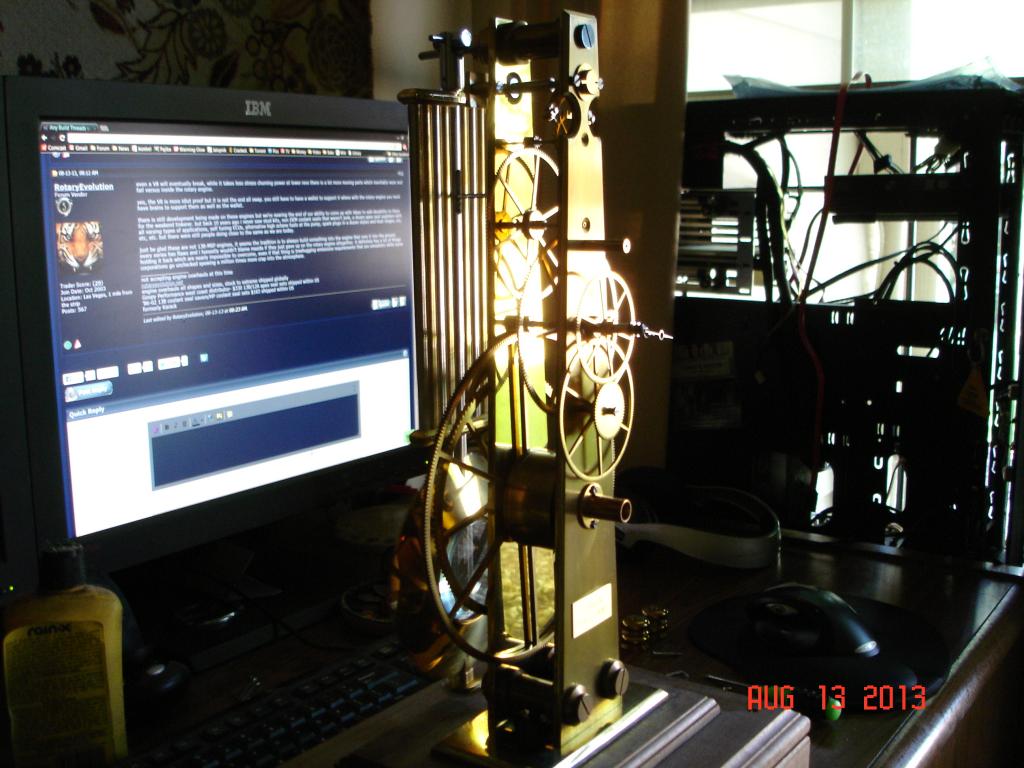
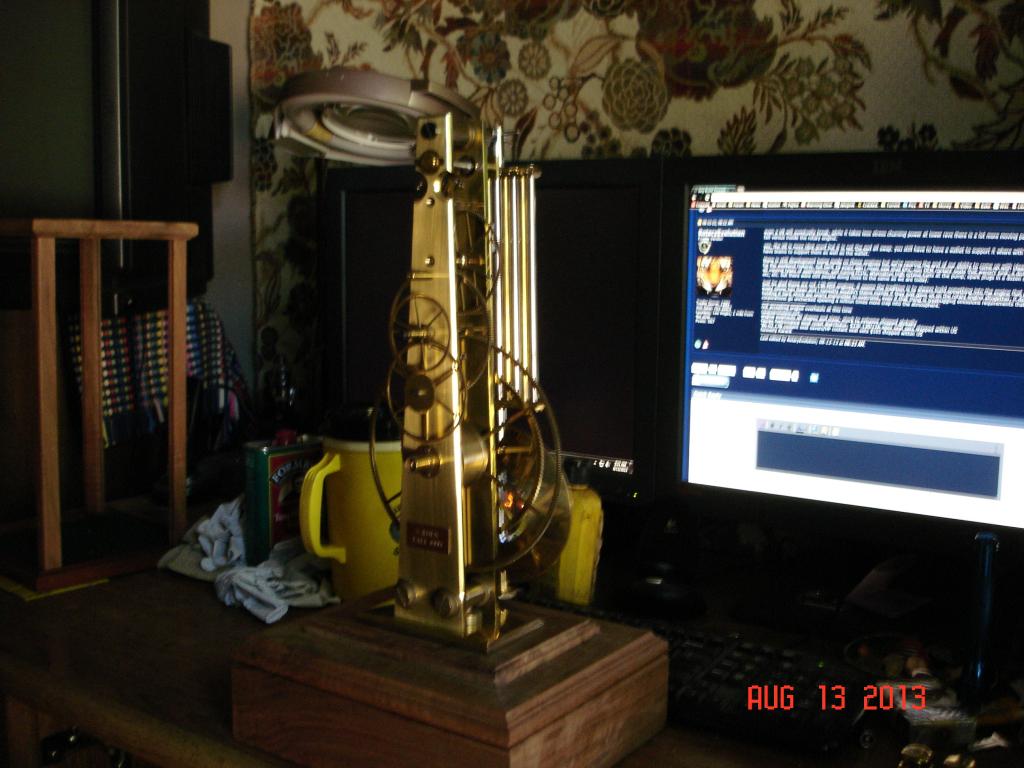
The prototype differs from the final competition piece in a multitude of technical details but the lineage is obvious:

A few years after this last pic was taken, the competition clock was retrofitted with a very rare and unique double pendulum setup that is fascinating to watch.
It took weeks of fiddling to get that to work reliably.
Although this prototype does run (and keep pretty good time, actually) it was never really meant to be a long term runner and at this point it's more of a display piece than anything else.
I hope Kristin enjoys it.