
She Followed Me Home, Honest

Thank you.
Nicely arranged engine bays are a particular fetish of mine.
In fact, to that very end I spent fours at the junkyard yesterday, looking for the very specialized widgets and doodads that in my mind, elevate the bay from "assembled" to "well put together".
This kind of junkyard jaunt is my favorite.
I wasn't looking for anything specific, so I could just gaze and let the oddities stand out.
And holy moly, there is so much weird/specialized **** to be found.
Stuff like hose guides/clips, oddball electrical harnesses, molded vac/water hoses and fittings, brackets...it's endless.
Of course, because they are so specific, most of these parts won't be used and will go into the goodie pile, perhaps to live another day.
But every once in a while you find something that is so perfect the factory would blush.
That's what makes it fun.
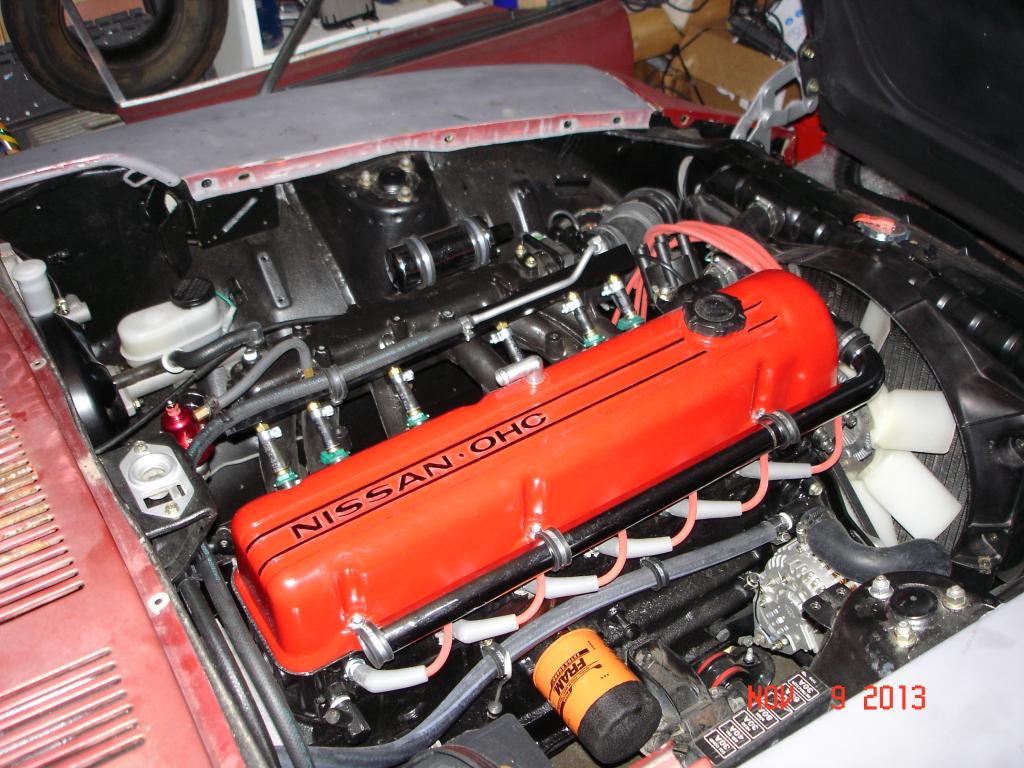
On the upside, the spark plug wires are done.
On the other hand, of all the stuff I'd grabbed at the yard, only a few pieces made the grade and of those, the main piece requires I disassemble the whole fuel rail.
A fuel rail I hate anyway.
I really miss my big lathes, my current one is too small to chuck up such a long piece or to make a replacement.
Oh well.
At the end of my 4 hours of labor, instead of being able to show a nearly complete engine I actually removed almost everything...so it looks worse than ever.
C'est la vie...
Jeez, sometimes the silliest little projects turn into runaway nightmares.
I went from vague dissatisfaction with the fuel rail to a full on rebuild without noticing the cliff I'd walked over.
Yikes!
Just last week I'd tightened the last clamp and declared the fuel system done, only to tear it completely apart and start over.
My primary concern was visual, the rail itself is too shiny and weirdly shaped.
It was also studded with hardware store plumbing fittings (supplied with the rail) and the overall effect was increasingly galling.
Worse was the fuel pressure regulator, a cheap ebay Chinese part that had ports threaded in some weird incompatible pattern...I still don't know what the hell they were supposed to be.
Whitworth, maybe.
The fittings supplied with this part (again, brass hardware store plumbing ****) would thread in maybe 1- 1 1/2 turns and that was it.
You know something is wrong when you doubt a part right out of the box, this thing has never seen a drop of fuel and I was already convinced it would leak.
Thus began a three day frenzy that involved two trips to the junkyard and ultimately, parts from four different cars (Audi, Honda, BMW and Jaguar), as I balanced what I wanted against what I could find and what I was capable of fitting.
All the machining and paintwork is done, I hope to assemble and install today.
Then we shall see.
I went from vague dissatisfaction with the fuel rail to a full on rebuild without noticing the cliff I'd walked over.
Yikes!

Just last week I'd tightened the last clamp and declared the fuel system done, only to tear it completely apart and start over.
My primary concern was visual, the rail itself is too shiny and weirdly shaped.
It was also studded with hardware store plumbing fittings (supplied with the rail) and the overall effect was increasingly galling.
Worse was the fuel pressure regulator, a cheap ebay Chinese part that had ports threaded in some weird incompatible pattern...I still don't know what the hell they were supposed to be.
Whitworth, maybe.
The fittings supplied with this part (again, brass hardware store plumbing ****) would thread in maybe 1- 1 1/2 turns and that was it.
You know something is wrong when you doubt a part right out of the box, this thing has never seen a drop of fuel and I was already convinced it would leak.
Thus began a three day frenzy that involved two trips to the junkyard and ultimately, parts from four different cars (Audi, Honda, BMW and Jaguar), as I balanced what I wanted against what I could find and what I was capable of fitting.
All the machining and paintwork is done, I hope to assemble and install today.
Then we shall see.


A fair lady, indeed.
We're toying with the idea of ZG flairs, I kinda like 'em.
And really, from a purely visual standpoint it's tough to trump triple sidedrafts.
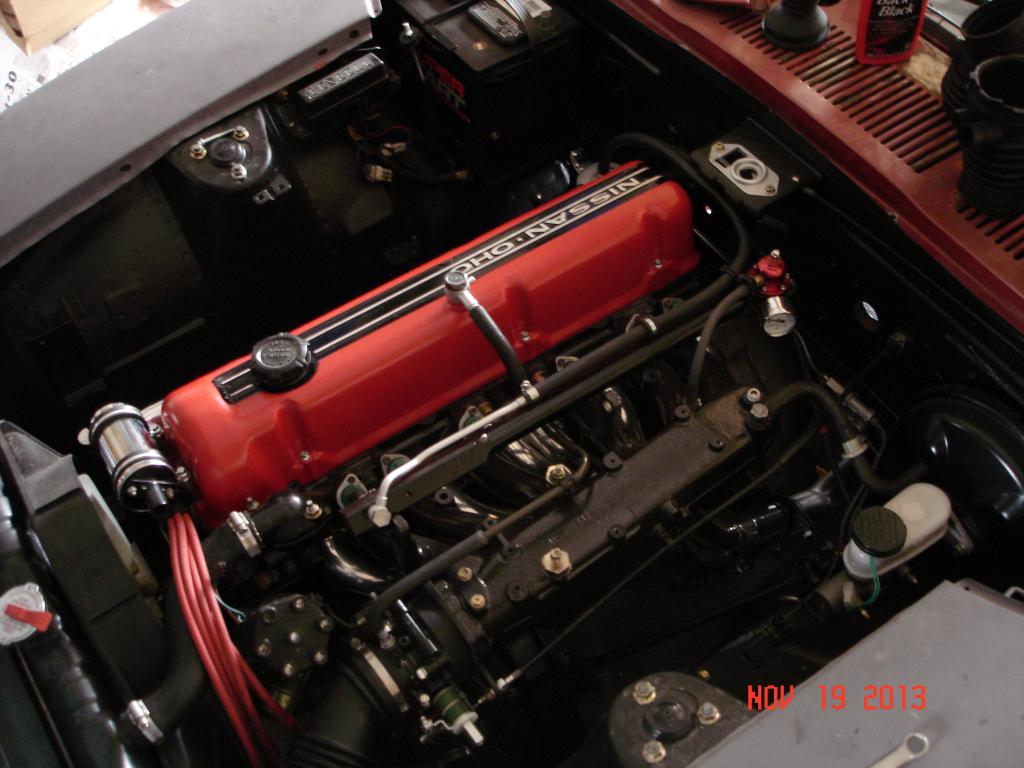
I worked solo today, redoing much of the fuel system and modifying the ignition cables.
Here are the beauty shots:
They're beautiful because they're poorly lit.
It's a gift.
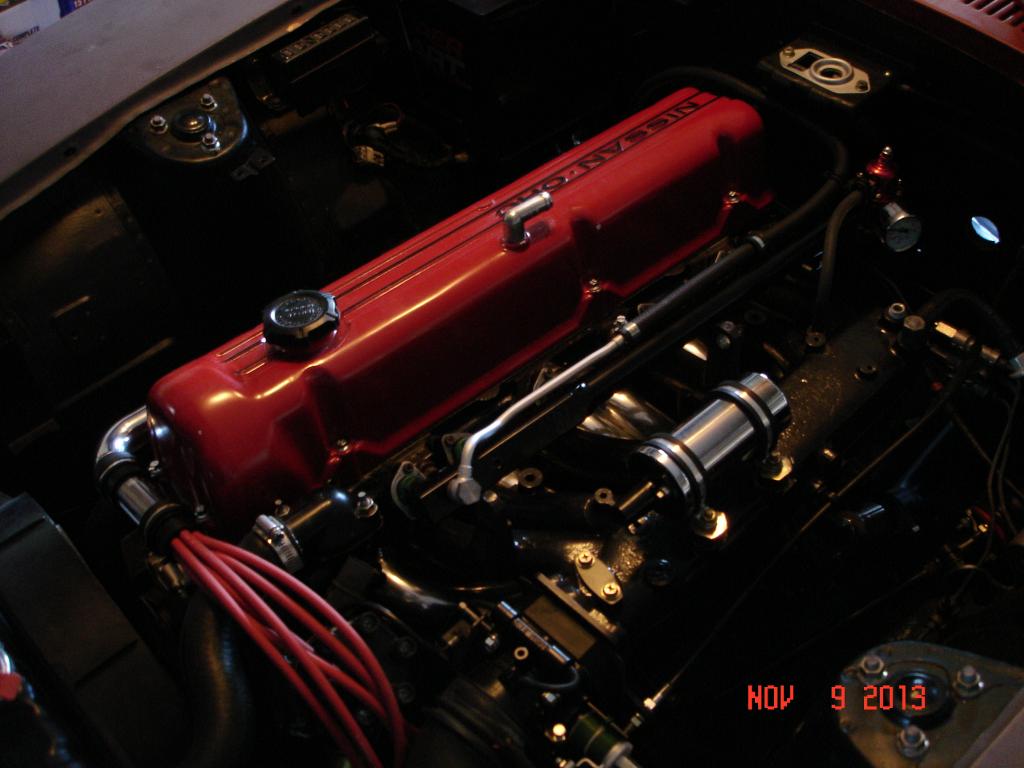
The fuel rail was painted satin black, effectively erasing it as a design element.
It was also completely stripped and redrilled/tapped to use real metric fittings.
This is the cleanest, most businesslike look yet, I think I'll keep it.
For a while, at least.
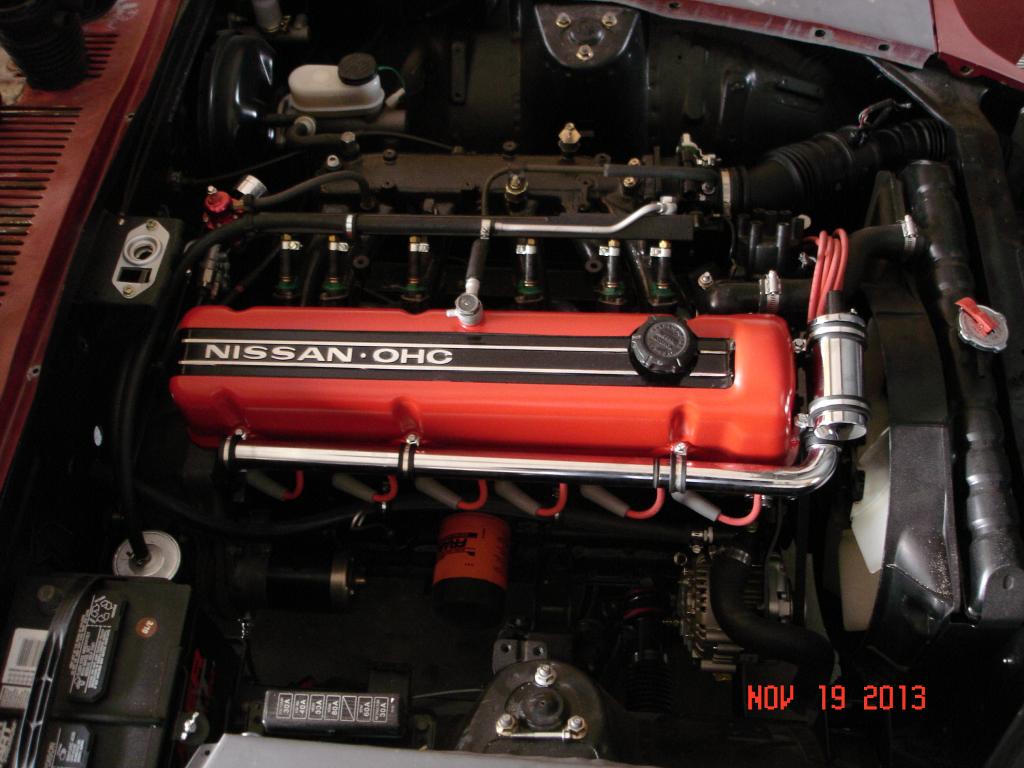
Completely took apart the ignition wires and tried to put it together with less wire tangling.
T'aint perfect, but oodles better and certainly usable.
I put it back on without the spacers I'd made.
This lowers/tucks the tube and shortens the exposed wire.
A little leaner/meaner, IMO.
Note that the second chrome tube- scheduled for the engine harness- has disappeared.
Too much of a good thing, I was thinking.
Besides, that particular section of the intake looks neat and tidy without any added attention grabbers.
I have a different plan now.
Here are two pics unflatteringly shot with the flash so you can actually see what I've been doing:
We're toying with the idea of ZG flairs, I kinda like 'em.
And really, from a purely visual standpoint it's tough to trump triple sidedrafts.
I worked solo today, redoing much of the fuel system and modifying the ignition cables.
Here are the beauty shots:


They're beautiful because they're poorly lit.
It's a gift.
The fuel rail was painted satin black, effectively erasing it as a design element.
It was also completely stripped and redrilled/tapped to use real metric fittings.
This is the cleanest, most businesslike look yet, I think I'll keep it.
For a while, at least.
Completely took apart the ignition wires and tried to put it together with less wire tangling.
T'aint perfect, but oodles better and certainly usable.
I put it back on without the spacers I'd made.
This lowers/tucks the tube and shortens the exposed wire.
A little leaner/meaner, IMO.
Note that the second chrome tube- scheduled for the engine harness- has disappeared.
Too much of a good thing, I was thinking.
Besides, that particular section of the intake looks neat and tidy without any added attention grabbers.
I have a different plan now.
Here are two pics unflatteringly shot with the flash so you can actually see what I've been doing:


Sigfrid and I have often discussed that very thing.
Well, sort of.
Assuming we get this thing running, we'll have some decisions to make.
It's almost certain that Sigfrid will want more power, so the decisions will revolve around the best way to advance.
As an interim move, I'd love to take a set of carb intakes and convert them to fuel injection with twin throttle bodies.
I have absolutely no experience doing anything like that and suspect it would end badly but think it would be fun to try.
That's just an idle dream though because IMO the answer lies this way:

The picture of j9's friends Z has highlighted (inadvertently, I'm sure) my current little dilemma...the valve cover "breather".
At first, my only concern was the fitting itself, I simply didn't like the way it looked but the system as a whole didn't faze me.
We'd either slap a little K&N on it or run it to a more elaborate catch can/breather unit...no big deal, really.
Then I actually opened up the service manual and looked at the emissions schematic, which very clearly shows that air goes IN the valve cover, not out.
The original system draws air from between the AFM and the throttle body (just like the FC) and into the valve cover.
This air is drawn into the crankcase (presumably through oil drain back passages) and then pumped out via a bung on the block (right below the distributor boss) into a PCV valve on the bottom of the intake manifold.
Functionally identical, either the clamp on filter or a catchcan is allowing unmetered air to eventually enter the intake (with an added load of oil mist).
Given the large number of FI L-series engines I see with open filters on the valve cover, I can only assume a few things:
- All these folks put a filter on the crankcase boss and the whole system just vents to atmosphere and not into the intake manifold.
- They do still plumb to the manifold but this extra, unmetered air does not effect the mixture enough to matter.
It's kind of a mystery but I'm aware that I may be overthinking this whole thing.
At any rate, other than visually, I see no downside to setting this up as original.
Which means I need to find a intake boot with a hose bung.
That should be fun.
I cannot figure out what thread the valve cover fitting is.
At this point I've decided it doesn't matter, the fittings I'd like to use are 16mm x 1.5 and I have that tap, so that's what it's going to be.
This will require boring out the stock hole and machining a plug to press in, a plug tapped for the fitting I like.
A bit tedious but quite simple from an execution standpoint.
On the other end is the intake boot between the AFM and the throttle body.
I have four candidates to try, see if I've even come close.
Although I oft wax rhapsodic about the junkyard, the reality is that it can frequently be quite frustrating.
I always assume that what I want can be found if only the right confluence of availability (my yard turns a car over about every 2-3 weeks) and focus (am I looking in the right place?) occurs.
Yesterday I was looking for rubber intake boots that:
- fit the 240SX throttle body on one end
- fit the RX7 AFM on the other
- is short as possible but must have a 45� bend in the middle
- has a hose bung, preferably on the inside of the bend and pointing up
After four hours I found four potential bits, two of which I'm pretty certain will not work but were close enough to risk trying.
It's likely none will be right.
This puts me in the classic modders dilemma...the RX7 AFM is just a wild gamble, I want to use it because it's so much smaller/compact and fits the space very well.
Schematically, it is identical to the Z original.
The dilemma arises when I don't want to sink a lot of money into a theoretical part but I don't want to sabotage it's (potential) success with a half assed execution, either.
I have hazily started formulating a backup Plan B, when I see the car today I'll know better what to do.
Plan B formulated, executed and successful.
Of the four boots I'd scavenged, two had no bungs- I figured I'd cobble something in if the rest was fine.
Naturally, those were the two that would potentially work out the best, in fact, they were nearly perfect.
Rather than work with the rubber, I decided I'd rather just drill the throat of the throttle body and put a bung there.
Schematically/functionally it's just like stock, was relatively easy to do and being a light press fit secured with JB Weld, should be plenty secure.
The valve cover was modified as I previously described, again, not very difficult.
The adhesion of our first paint job was dubious and we decided to just start from scratch.
I Zip Stripped the old stuff off and will finish the prep tonight.
This time I'll use a coarser scuff pad and self-etching primer (white, hopefully to brighten up the final red color coat).
Should have the first color coats on by Sunday night.
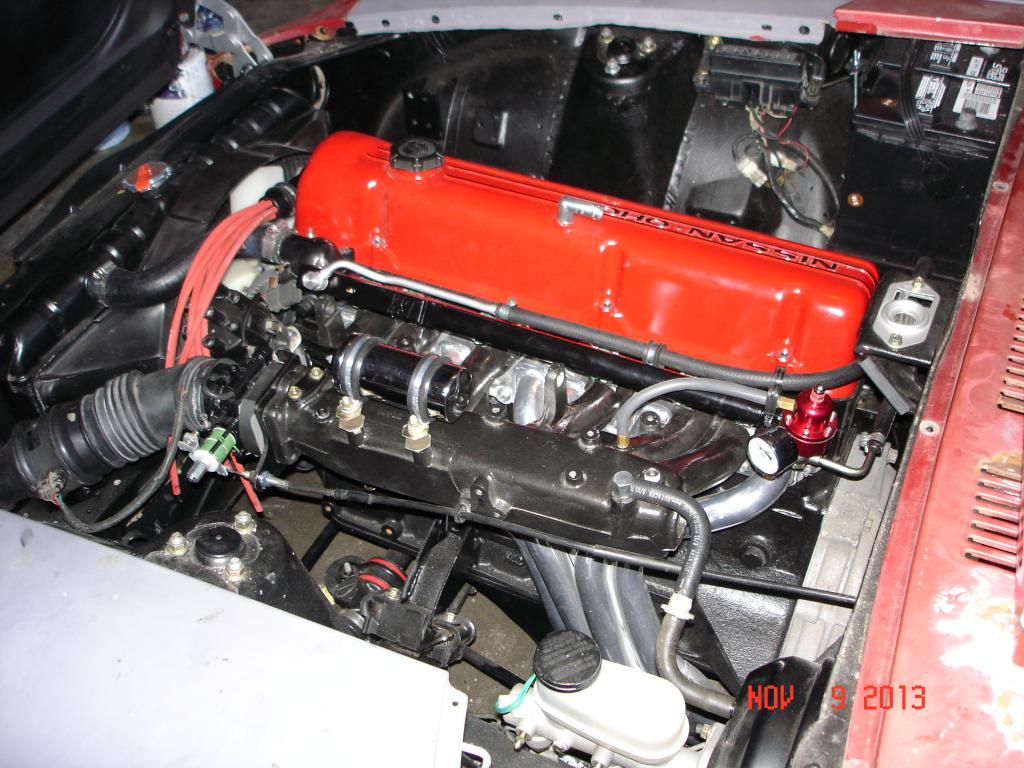
OK, engine dressing is "done".
"Done" in the sense that excepting electrical, everything is present and connected.
I might find nicer molded hoses or some tricky widget but for the most part, the overall concept has been realized.
A multitude of changes since last you saw her:
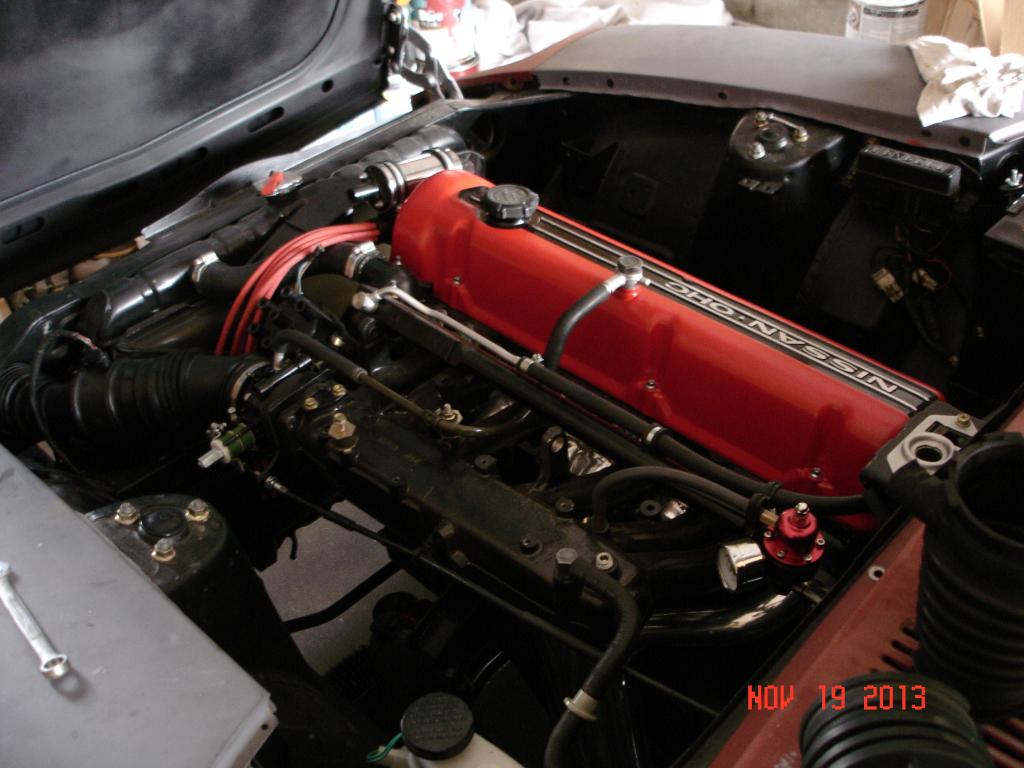
Electrical is next.
"Done" in the sense that excepting electrical, everything is present and connected.
I might find nicer molded hoses or some tricky widget but for the most part, the overall concept has been realized.
A multitude of changes since last you saw her:


Electrical is next.
Yeah, well...
Over the past few months I've tried to gather parts for the new electrical system but both my plans and understanding of the physical spaces have been hazy at best.
Things have coalesced though and I can now be much more specific about what I want/need and the exact physical layout of the ideal components.
Electrical components are just about the hardest things to find.
Not because I'm doing anything that's particularly schematically complex but because modern cars are so integrated physically.
Consider the engine bay fuse box in the FC...
All of the electrical either plugs in or screws on and is completely removable.
The housing has two simple flanges (on the same plane) with mounting holes.
It's practically aftermarket in its universality and it's easy to envision it in another car/location.
It is unfortunately, an anomaly.
Most components these days snap/slide/click together- removed from their original spot they have no simple/good mounting options. Certainly nothing as convenient as a flange with a hole.
Just as with the engine dressing, I want a completely custom electrical setup using OEM parts. It has to be neat, easily serviced and nicely mounted...like Datsun gave a crap (which they don't) and spent time making the bay look good.
Long story short, I think I've found what I need.
I have to inspect and clean them up and will get pics later.
I also began having problems with the steering column switches I'd bought a few months ago. They were very close to what I needed but had two glaring issues...making them fit to the dash would require lowering the steering column (there are interference problems with the electrical connectors) and I had no turn signal cancelling capability (turns out that this particular part uses the clockspring as the cancel mechanism...I have no clockspring hence, no auto cancel).
Attached as I was to the switchgear, I had to admit that it was going to cause more problems than I could solve.
Of course, finding something that satisfied my very specific and unusual requirements was never going to be easy but fate may have smiled on the Z and provided the solution.
In other words, I think I found a part that does everything I need...in fact, it should be a direct bolt on, no mods necessary.
Sadly, it's not as pretty as the other switchgear but I'll overlook that by claiming it's "period correct".
That can gloss over a lot of faults, I've found.
After this (presumed) junkyard triumph however, our plans took somewhat of a twist.
At my urging, we are now going to drop everything else and concentrate on the body.
As I've been powering through the mechanical work, very little has happened to the shell and it's now become an issue.
I don't want to start bolting stuff in only to have to worry about masking it all off to protect from the inevitable mess.
Right now the interior is completely stripped and could be powerwashed if we wanted (not advocating, but we could...), so it's the perfect time to finish this last messy part of the build.
Besides, WINTER IS COMING and we can do assembly in the snow if necessary but you can't paint in freezing weather.
We're going to talk it over on Saturday and I suspect I'm in for a couple weeks of sanding before I begin the electrical in earnest.


Sigfrid had hoped to work around the windshield and hatch glass but I was against it for two reasons.
First, I didn't see how it would be possible to sand up to (and under) a forty year old rubber gasket without trashing it and second, we needed to see the condition of the metal channel the gasket fits into as it's a notorious rust pocket.
I had arrived early and before S. got up I made the unilateral dick move decision to cut out the glass and be done with the discussion.
No rust at all.
With the glass gone I also pulled the hatch and hinges, I don't think there's anything else we can remove from the chassis, it's as stripped as can be.
The next several hours were spent sanding:

We are close to ready for the first primer/guide coat.
Not sure how/where we're going to be able to paint her.
Had this been done when it was still warm, the garage would have been fine.
Keep in mind that she's going to be flat black Plastidip, so the prep doesn't need to be perfect.
I guess we just keep on and hope for a few days of warm weather ...which is entirely possible around here.
The new electrical bits I got will be perfect, so I'm happy about that.
I'll go back Mon., Tues. and Wed. to continue the prep.
I really want to see what she looks like all one color.

Funny you noticed that.
Last spring Sigfrid's wife was taking an exercise class that featured these "exercise rings" (apparently, partially filling a hula hoop with sand and wrapping it in ribbon elevates it from toy to tool). The instructor was selling these things for $30-50 to the students.
Screw that she said, jumped on the net and found instructions to make her own.
Then she decided to undercut the instructor and sell to the class.
I was skeptical but she was selling a couple every week and the market seemed to be expanding, so she geared up and made a big batch.
And of course, people stopped buying, she'd saturated her market.
Pretty much analogous to making specialized rotary parts, I think.
troubleshooting sucks
Joined: Sep 2011
Posts: 575
Likes: 0
From: sweden
the engine bay looks proper nice! the contrast betwixt the shiny and painted bits is perfectly moderate. definately a clean look. im starting to envision how its going to look once the car is painted and its bloody exciting!
judging from the size of the garage, a reasonably small heating fan should do the trick. im actually jealous. having my own garage is my idea of heaven..
judging from the size of the garage, a reasonably small heating fan should do the trick. im actually jealous. having my own garage is my idea of heaven..
No matter what size garage you have, it is never big enough. If you have enough money to build or buy a garage/shop/building, then you also will have enough money to fill it with equipment, vehicles and projects. "If you build it, you will fill it." Its almost as bad as most women's closets with clothes, shoes and purses 
Last edited by DeaconBlue; Nov 25, 2013 at 01:23 PM.
troubleshooting sucks
Joined: Sep 2011
Posts: 575
Likes: 0
From: sweden
Someone needs to start developing some real-life tardis techology. It would be an absolute gold mine. My recent 'surprise garage move' served as a quite effective warning against hoarding. Problem is i still refuse to throw things away.. ill enjoy the legroom while i can hehe

Aw, doesn't this look festive?
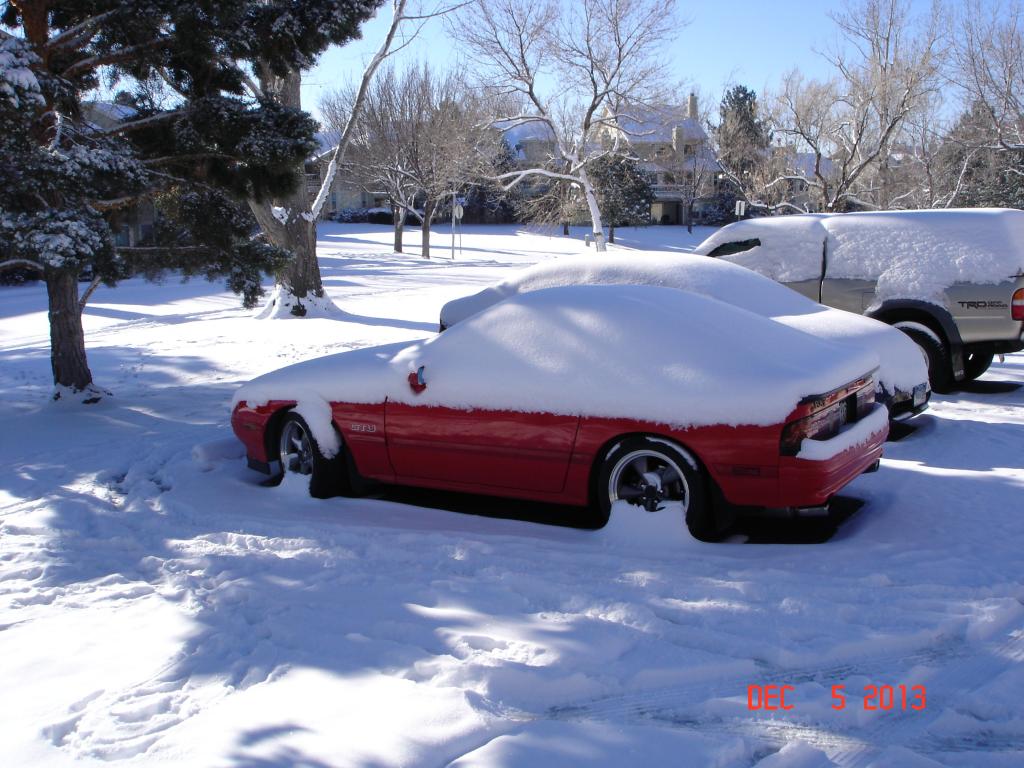
Currently 0�, up from last night's low of -15� and climbing to a high of 8�.
Almost ideal weather for some bodywork in the garage, eh?
Yeah, no.
The confluence of the holidays and this bloody socialist Canadian cold front have brought the Z project to a frigid halt.
Sigfrid being a family man, I expect December is chock full of school pageants, parties, shopping, etc., so his time will be spoken for.
I am not a sufficiently evolved masochist to drive across town and sand on a frozen car in a frigid garage.
What I will do I think, is go retrieve the wiring harness from the attic (where it is no doubt frozen into some impractical shape), let it warm up and begin stripping/weeding.
That at least gives me something to do and it's a sticky, messy job that I'll be glad to have out of the way.