
She Followed Me Home, Honest


Joined: Mar 2001
Posts: 31,859
Likes: 3,243
From: https://www2.mazda.com/en/100th/
it'll be so nice to work on the thing though, as you have done all the hard work, and hopefully all the suspension stuff that needs doing is just adjustments...
I can understand that the Z was designed at the dawn of the IRS/strut revolution but even so, it's a remarkably flawed and crudely built setup, the effects of which had to be known at the time.
Example 1: The front diff mount is mounted on the bottom of the diff's "nose". Because the diff wants to climb "up" under load (which is why many of us install snubbers above the diff), it just rips the mount in half. Rather than redesign the mount, Datsun retained it unchanged but added a big strap that loops over the nose to try and hold it down.
It looks like a lazy shadetree engineers solution rather than a factory fix.
Example 2: The rear pivot point for the LCA is held by two flat spring steel plates (@ 4" x 8" x 1/4") that drop down from the floor structure. A crossbar attached to these plates holds the rear pivots of the LCAs and is designed to intentionally flex.
How does letting your LCA dance around make any sense at all?
Normally I would have pics to show what I'm (poorly) describing but the project came to an ignominious halt yesterday.
Sigfrid's family unit was scheduled to return late last night.
For the past three weeks, the back patio has functioned as a workshop and although messy, was pretty well organized.
But a clear deathtrap for young children.
The ONLY part i needed to put the whole suspension back in the car was the diff side seals. Once in hand, I figured maybe two hours to wheels on the ground.
The seals arrived @1 PM- still plenty of time for me to finish- but were THE WRONG SIZE.
Damnit.
Now, rather than install all the parts I had to spend time figuring out where to hide/store them until work continues.
I spent the rest of the day erasing all evidence that instead of a bucolic retreat, we'd treated the patio as an industrial workspace. Thank Jeebus for powerwashers.
Sig has guests arriving Monday, so I can't return to work on the car till @ Thursday.
Initially disappointed, I'm now OK with this delay.
I've worked on the Z for 24 straight days, basically living over at Sigfrid's and it was beginning to feel more like a race than a fun project.
Although at the time I was frustrated by the slow pace of Sweetheart's rebuild, i realize now that I enjoyed it more than the current Z frenzy. I had the time to spend on ridiculous details that would please only me and explore little mods that might prove interesting.
I also had the time to study the entire gestalt of the car ("study the gestalt"="stoned and staring") and came to have a pretty good idea of how all the parts relate physically. This is quite useful at the junkyard as I visualize what might or might not be made to fit the RX...millimeters make all the difference.
Blazing through the Z car as I have been has narrowed my focus to just the parts I'm working on, not the surrounding areas and what's in them. I know the fuel pump is mounted right next to the LCA but don't really know much about the details because I haven't had time to just look.
This hasn't been a problem yet because there isn't much under the car besides the stuff I've been doing but in the crowded engine bay I'll need a much better grasp of the overall layout to indulge my propensity for modification.
I'll get there.
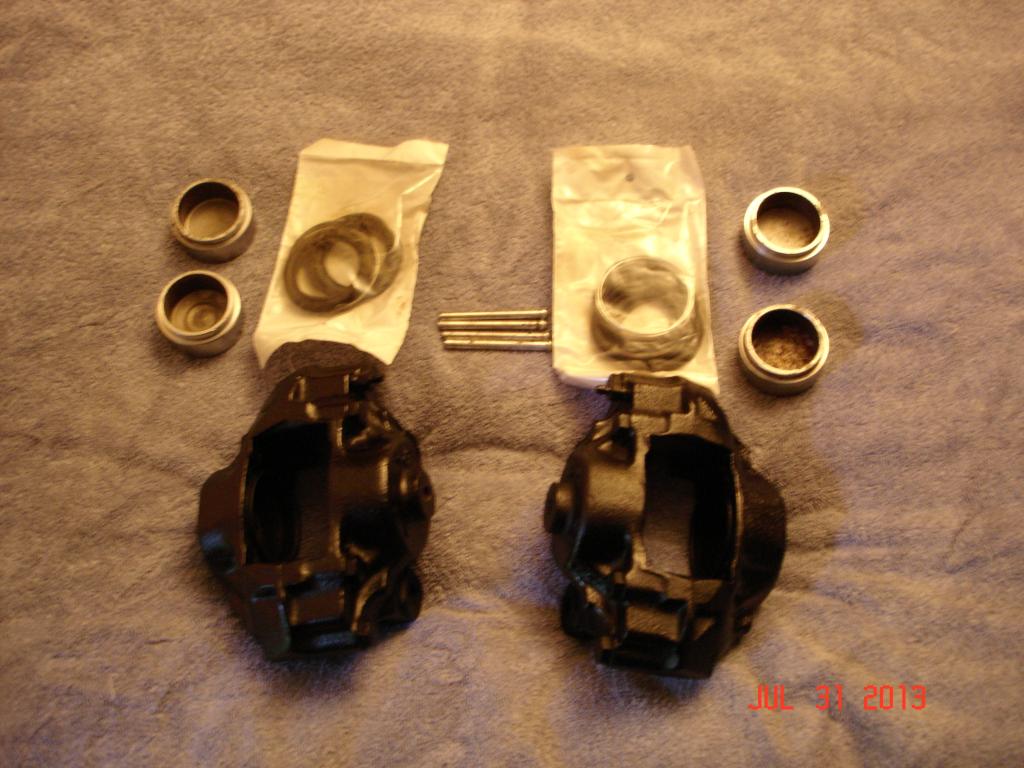
The hiatus also gives me time to leisurely rebuild the front calipers and wiper linkage.
I don't think the wipers could have worked very well because the pivots were almost totally frozen and all the bushings had perished (as the British would say). I want to give our (reputedly) problematic wiper motor it's best chance by making sure that the linkage isn't actively resisting its effort.
The brakes are a more complex issue.
Our stock setup is front opposed piston disc calipers and aluminum rear drums.
I've had the drums turned and we have new shoes, hardware kits and cylinders.
I'll rebuild the calipers and put in new pads.
I've already pulled the larger 280 ZX booster and MC from the junkyard.
All this for a system we're pretty sure we're going to jettison entirely.
Probably the most common first upgrade is the famous Toyota 4x4 four piston front caliper, a direct bolt on replacement. There's a different model with a wider body that accepts a vented rotor (the Z's is solid).
So, bigger booster, bigger master cylinder, bigger calipers and bigger rotors...BUT the same rear drums.
Might as well leave the drums off for all the good they're doing.
Retrofitting rear disks has been done a number of ways but none are cheap or particularly easy. Although I haven't researched in depth, most of the adventurous folk who undertake this project (correctly, IMO) also feel that you might as well go for broke and upgrade to CV joint axles (I have u-joints) and five lug hubs.
Which means swapping the front hubs to match- somehow ("somehow"= $500 for the front hub kit).
A mod to either end of the braking system ping pongs between front and rear, the domino effect made real. Fix the front and you must upgrade the back which then makes you change the front again.
Of course, our fresh stock brake system will be fine for now, especially given stock power levels.
But it's ugly.
Unlike crisply cast/machined modern calipers, the 60's era Datsun units look they were grown in a vat. Big, blobby things, the chrysalis of what it might finally look like if allowed to develop.
They offend my sensibilities.
So I'm painting them satin black and hoping they disappear into the black background.
I can also use the break to indulge in some restorative walks through the junkyard...we need a lot of fiddly bits and hardware to continue the rebuild nicely.
And I can sneak in a few naps, a luxury I've missed of late.
Joined: Mar 2001
Posts: 31,859
Likes: 3,243
From: https://www2.mazda.com/en/100th/
I also had the time to study the entire gestalt of the car...
The problem with the famous Toyota 4x4 front 4-piston caliper upgrade is that those caliper are cast iron and VERY heavy. Way too much unsprung weight to add to as you noted, a rather crude front suspension design. But yes they are inexpensive.
On my '71 240 I ended up with Outlaw 4 piston billet calipers, Sterling vented rotors, Volvo 2 piston calipers in the rear (no parking brake, sadly) and an unboosted double master cylinder/bias bar setup.
That car could stop.
It could stop way in excess of how it could go which in a street car is not really such a bad thing.
Except for the fact that I could easily stop much quicker than most folks around me and I was in constant fear of being tailended. I ended up running more yellow lights than I'd care to just to make sure the lumbering SUV behind me didn't end up in my brainpan.
My friend with the all the S30's recommended light weight Wilwood calipers with 2-pcs Coleman rotors with the 280ZX rear disc brakes conversion and a Wilwood bias adjuster.
Until the car is complete and running, "upgrades" are a luxury we can't indulge.
To date, the work I've done has been messy and physically trying (my knee may never recover) but at the same time very straightforward and simple.
Unbolt part, clean and refurbish, bolt back on...if it fits, you're done.
Now I'll be moving to the engine bay where mechanical meets electrical, a melding fraught with peril.
The electrics in the Z are a mess.
Ignoring for the moment that the original design and execution were lame, time, the elements and previous owners have all damaged the system...some areas beyond repair.
I should mention here that we are under a state imposed time schedule.
Colorado has no provision for an "inop" car...once the title is transferred you have 60 days to get it registered/tagged, after which penalties accrue.
Before it can be tagged it must pass the emissions test, which means it has to be driveable.
A we're quite a ways from that point.
With 30 days or so left.
The return of Sigfrid's family means the intense everyday work thrash is over (at least for him) and progress will slow. Although I enjoy and am reasonably adept at electrical work, I can't say I'm fast and even a basic harness refresh is going to take time.
I haven't even found a decent schematic yet.
Careful readers might have noticed that I have yet to mention the interior.
That's because neither of us has spent any time looking at it.
We plan on totally stripping it and applying bedliner as extensively as possible but have no space to store all the parts til Sigfrid cleans up the garage and moves the goddam camper that completely fills it.
Compounding the time crunch is my upcoming vacation.
I'm attending my favorite niece's wedding in Chicago on Sept 1. From Chicago I go up to Traverse City, MI to spend a week with my brother and then up to the UP to visit my friend Kevin. Then back to Chicago and finally, Denver.
About 3200 miles in 2 1/2 weeks...in the RX7.
So, I need to spend some time prepping for the trip.
The only major thing I know must be done is replacement of the rear wheel bearings, one of which has started growling. I figure I to do DTSS bushings at the same time.
I'm current on regular maintenance, so that's no problem but the poor car is filthy and needs cosmetic attention so she doesn't look tatty on the highway.
Represent, right?
It's going to be a busy month.
Joined: Mar 2001
Posts: 31,859
Likes: 3,243
From: https://www2.mazda.com/en/100th/
Joined: Mar 2001
Posts: 31,859
Likes: 3,243
From: https://www2.mazda.com/en/100th/
yep! i don't know about the Datsuns, but i've worked on a bunch of 80's BMW's, and they are a like mess.
there is this connector, C-101, which goes between the engine harness and the relay box, on every car from 1981-2005, which sounds really awesome.
the C-101 is kind of like the connector under the dash on the FC/FD/JC cosmo, etc, so you can see where it would be really neat to have the same plugs in every car.
except its BMW, and they didn't standardize the pinout, so its just completely random. also since its a common connector, there isn't a pinout in the manuals.
how bad is it? well you can take the harness from an 89 325i, and plug it into a 1990 325i, which are two cars that appear identical, share the same engine, fuse box, and ecu, but the C-101 connector is totally random, so it doesn't work. if you're lucky you don't fry stuff.
My initial focus will have to be on the fusible link area, it crumbled during inspection and there's no way to get power to the main harness.
I've nabbed the fusebox from a RX vert in the junkyard and will splice it in to eliminate the links altogether.
Once the chassis is powered up, we'll just go from there.
Ultimately I'd like to rearrange the bay as I did in Sweetheart but I need to put it together first and see what is what before doing so.
That whole "gestalt" thing again.
Joined: Mar 2001
Posts: 31,859
Likes: 3,243
From: https://www2.mazda.com/en/100th/
Switching back to the 7 for a bit...
I've just ordered new rear wheel bearings, seals, axle nuts and DTSS eliminators and will install end of this week.
After my epic battle with the Z spindles (well, "epic" to me), I can't say I'm looking forward to the job with confidence...it seems to be one of the crankier operations to perform.
Any tips, shortcuts or advice would be appreciated.
the spindle comes off with 3-4 bolts, and you just pop out the DTSS bushing and bearing, and replace.
Joined: Mar 2001
Posts: 31,859
Likes: 3,243
From: https://www2.mazda.com/en/100th/
Ah, I can see how this is going to go then.
The first side will fall right apart, my hopes and confidence will be raised, then the second side will fight me like a bastard.
This will happen regardless of which side I start on.
The inevitability is depressing.
The first side will fall right apart, my hopes and confidence will be raised, then the second side will fight me like a bastard.
This will happen regardless of which side I start on.
The inevitability is depressing.
Joined: Mar 2001
Posts: 31,859
Likes: 3,243
From: https://www2.mazda.com/en/100th/
for instance i decided a functioning tach would be nice, so i looked up the tach pin on the FD ecu, 2B, and looked up the tach wire on the FC, which is um the yellow one. i grabbed a long wire out of the pile with an ECU pin on one end.
i spliced it into the gauge harness, ran it over to the ECU and discovered that i couldn't plug into pin 2B because there was no connector! nor did i have one in the 3 boxes of crap for the car...
pin 2B, or not pin 2B, that is the question:
Whether 'tis Nobler in the mind to suffer
The Slings and Arrows of outrageous Fortune,
Or to take Arms against a Sea of troubles,
And by opposing end them: to die, to sleep
No more; and by a sleep, to say we end
The Heart-ache, and the thousand Natural shocks
That Flesh is heir to?
troubleshooting sucks
Joined: Sep 2011
Posts: 575
Likes: 0
From: sweden
I should mention here that we are under a state imposed time schedule.
Colorado has no provision for an "inop" car...once the title is transferred you have 60 days to get it registered/tagged, after which penalties accrue.
Before it can be tagged it must pass the emissions test, which means it has to be driveable.
A we're quite a ways from that point.
With 30 days or so left.
It's going to be a busy month.
Because the Z is pre-1981, we take a simpler emission test, no visual, no rolling road, just a sniffer up the tailpipe and a run up to 2k RPM.
CO has no safety inspection, so we don't even have to have working lighting or anything.
The interior is Stage 3 of this initial build.
Stage 1 was the undercarriage/suspension/brakes/steering and that is essentially done.
Stage 2 is the engine bay and minor wiring...get her running.
Stage 3 is the exterior and interior.
There is of course, overlapping of the stages, timewise.
Because I'm doing the "heavy" mechanical work (due to Sigfrid's back surgery), he is supposed to be working on the exterior now.
In fact, the front fenders are already in primer and the hood is nearly ready to be painted but the bulk of the bodywork still lies ahead.
I think that Sigfrid is only now beginning to appreciate the scope of this project. Fresh as I was from the rebuild of Sweetheart, I knew exactly what we were undertaking and the effort required to complete it.
As we first contemplated the car after purchase and began to block out responsibilities and timeframes, I made up a crude flowchart of the work I'd be performing and the time it would take.
Before the diff seals brought me to a crashing halt, I was 3 days ahead of schedule.
He's about two weeks behind.
I'm not complaining, mind you.
My contribution to the project is sweat equity, he pays for everything.
Since he has a full time job and family obligations, Sigfrid obviously hasn't the free time I do, nor is he as monomaniacally focused.
Dysfunctional as it could be, the symbiosis actually works pretty well.
So far.
It's a slow news day, so I'll just drop this here:
Normally, a mundane subject like this would receive only passing mention but I have no access to the car till Friday, so this is all I got.
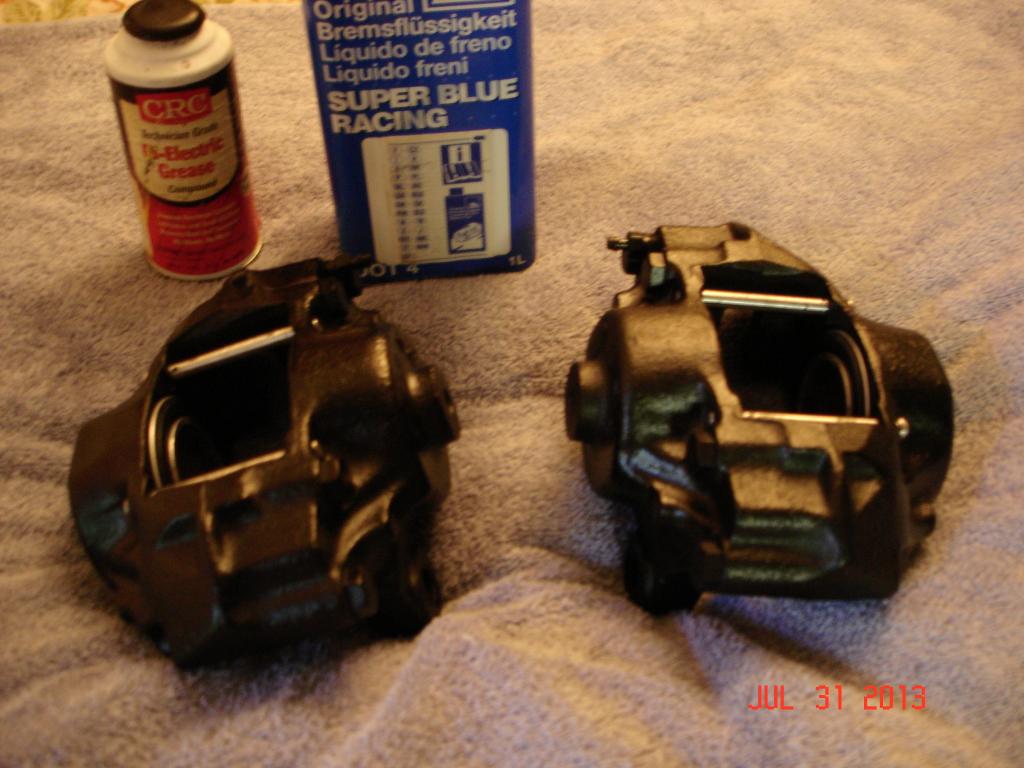
With the calipers rebuilt, the rear drums all renewed and the 280ZX MC/booster installed, all that's left is the brake lines. Specifically, the front brake lines which, in stock form, offend me greatly.
Instead of going through the wheelwell sheetmetal (like the 7, for instance), Datsun runs the hardline down and under the framerail, then back up into the well. Not only does this look clunky and awkward but worse is the fact that the line is exposed and unprotected on the bottom of the frame.
I'd long ago decided the front hardlines were going to be custom but need all the parts in place to see the best way to do it. With the calipers finished, that can now happen.
Baby steps, again.


Normally, a mundane subject like this would receive only passing mention but I have no access to the car till Friday, so this is all I got.
With the calipers rebuilt, the rear drums all renewed and the 280ZX MC/booster installed, all that's left is the brake lines. Specifically, the front brake lines which, in stock form, offend me greatly.
Instead of going through the wheelwell sheetmetal (like the 7, for instance), Datsun runs the hardline down and under the framerail, then back up into the well. Not only does this look clunky and awkward but worse is the fact that the line is exposed and unprotected on the bottom of the frame.
I'd long ago decided the front hardlines were going to be custom but need all the parts in place to see the best way to do it. With the calipers finished, that can now happen.
Baby steps, again.
