
She Followed Me Home, Honest

Hey, Clokker. Saw this and thought of you. Fairlady Z's and ginormous extra headlights on the front of a car...
Safari Rally
Safari Rally
troubleshooting sucks
Joined: Sep 2011
Posts: 575
Likes: 0
From: sweden
welcome back clokker! glad to hear you had a nice time. man your fc looks hawt! one is never satisfied when it comes to ones own polishing efforts but man she was gleaming on that driveway for sure!
did sigfrid have a crack at getting the z running?
looking forward to seeing the completed engine bay =)
did sigfrid have a crack at getting the z running?
looking forward to seeing the completed engine bay =)
Yup, that's me alright.
Those honkin big Hellas I tried on the 7 originally graced my 240z.
If the driver is wearing a cardigan, it'd be perfect.
Thanks.
Far as I know not a wrench was turned nor a panel sanded in my absence.
I'd like to see the completed engine bay, too.
Those honkin big Hellas I tried on the 7 originally graced my 240z.
If the driver is wearing a cardigan, it'd be perfect.
Far as I know not a wrench was turned nor a panel sanded in my absence.
I'd like to see the completed engine bay, too.
I spent a few hours yesterday contemplating the Z's engine bay, trying to take the first step.
The "first step" can seem quite innocuous, trivial even, but it starts the dominoes falling and determines how the project looks when finished.
In the RX7 bay, the first step was relocating the wiper reservoir.
That one decision lead to a cascade of changes that completely changed the layout/appearance of the entire space...for the better, I think.
I have (arbitrarily) long fixated on replacing the awful fusible links Datsun used with a Mazda fusebox, so that became the "first step" in this project.
Here are some of the foreseeable consequences of this decision:
- The fusebox occupies part of the space that originally located a giant metal plate/bracket that was a mount point for several other electrical components, like the external regulator for the alternator.
- If the external regulator is to go, the alternator must be replaced with a newer, (hopefully) better internally regulated unit and all the wiring must be redone (I want to do all the wiring anyway).
- With the battery/alternator/starter located and wired, the next step is the rest of the front chassis harness...high and low beams, horn and efan. (Turn signals and running lights require no relays or special wiring).
The obvious and best spot for all this is behind the passenger headlight area but that is where the vacuum (WTF?) system for the dash is located...
- Operating the dash actuators/controls with vacuum is simply unacceptable. I'll have to remove the dash as look at the details to see what can be done but something will change because I'll not stand for a vacuum system.
- The new light relay setup will require changing the steering column stalk unit.
- The new steering column stalk will require the taillights be modified...
It just goes on...
We work again tomorrow and my proposed course of action will be:
Having squandered weeks of (mostly) warm weather already, the body/chassis has fallen way behind schedule and needs to become a priority.
Our original plan was to strip the interior to finish inspecting for rust and then use the Rustoleum bedliner on the interior and jambs. This now works perfectly for my wiring plans, which require a fully stripped interior anyway.
We'd leave the interior bare till the exterior sanding/priming was done, no sense getting everything all dusty and we can assemble the cabin anytime, regardless of weather.
In fact, we can do most everything regardless of weather except paint, so it makes sense to stop everything else and get that done.
Winter is coming.
End of day, Saturday...
Interior stripped (mostly) bare and doors removed.
No real surprises (except perhaps the obscene weight of the doors), should be ready for bedliner in a few days.
Some random musings...
The HVAC controls are insane.
Grafted on to what is recognizably the same basic structure as the 240 is a Goldbergesque control system that has levers/rods, electrical switches and vacuum actuators. Which require a vacuum accumulator tank and two solenoids in the engine bay.
All this to accomplish the same things that the earlier cars did with 4 cables.
We are currently mulling options but keeping open minds, this part of the project is not a high priority and we have time to explore solutions. This "wait and see" decision was made easier by the fact that the dash is remarkably easy/convenient to r&r and we retain most of the necessary functions even with the vacuum crap removed.
We'll catch up with the HVAC again later.
The cabin/dash wiring is in generally good condition and seems (at least upon initial inspection) quite nicely laid out. I'll use as much as practical for the new harness but most of the controls and relays will be new. I'm on the fence about the cabin fusebox, it's conveniently laid out but uses the old glass tube fuses, which I don't like.
I'm excited to finally get a chance to build the "modular" harness I envisioned after wiring the FD.
Almost as soon as I finished that project I wanted to go back and redo it to incorporate the lessons I'd learned but sadly, never got the chance.
This car will be different.
Oh yes, much different.


Joined: Mar 2001
Posts: 31,859
Likes: 3,243
From: https://www2.mazda.com/en/100th/
The HVAC controls are insane.
Grafted on to what is recognizably the same basic structure as the 240 is a Goldbergesque control system that has levers/rods, electrical switches and vacuum actuators. Which require a vacuum accumulator tank and two solenoids in the engine bay.
All this to accomplish the same things that the earlier cars did with 4 cables.

It was chilly this morning so I turned the heat on in the RX7 - soon after the low coolant alarm when off. I guess I found and purged another air bubble in the coolant system.
This car has TWO water valves, one cable operated and the other, vacuum.
They are connected in series and I have no idea how they operate or what advantage the complexity confers.
Chances are real good that the whole thing will be jettisoned eventually but it's early days and I'm trying to keep an open mind.
I'm halfway curious to explore grafting on the electric actuators from the FC and using the logicon and FC water control valve.
Or some other, more modern car perhaps.
Fortunately, the HVAC is a pretty self contained system and except for fused/ign switched +12v and a ground, has no connection to the rest of the harness, so I don't need to integrate anything for it early on in the harness construction.
Joined: Mar 2001
Posts: 31,859
Likes: 3,243
From: https://www2.mazda.com/en/100th/
What a coincidence, I described that very detail to Sigfrid on Saturday.
This car has TWO water valves, one cable operated and the other, vacuum.
They are connected in series and I have no idea how they operate or what advantage the complexity confers.
Chances are real good that the whole thing will be jettisoned eventually but it's early days and I'm trying to keep an open mind.
I'm halfway curious to explore grafting on the electric actuators from the FC and using the logicon and FC water control valve.
Or some other, more modern car perhaps.
Fortunately, the HVAC is a pretty self contained system and except for fused/ign switched +12v and a ground, has no connection to the rest of the harness, so I don't need to integrate anything for it early on in the harness construction.
i just bought the automatic climate control system for my Rx8, its like the full auto FC one, you set temp, and it does everything else, putting something like that in the datsun isn't period, but might be uselessly cool


Interior got blacker today:
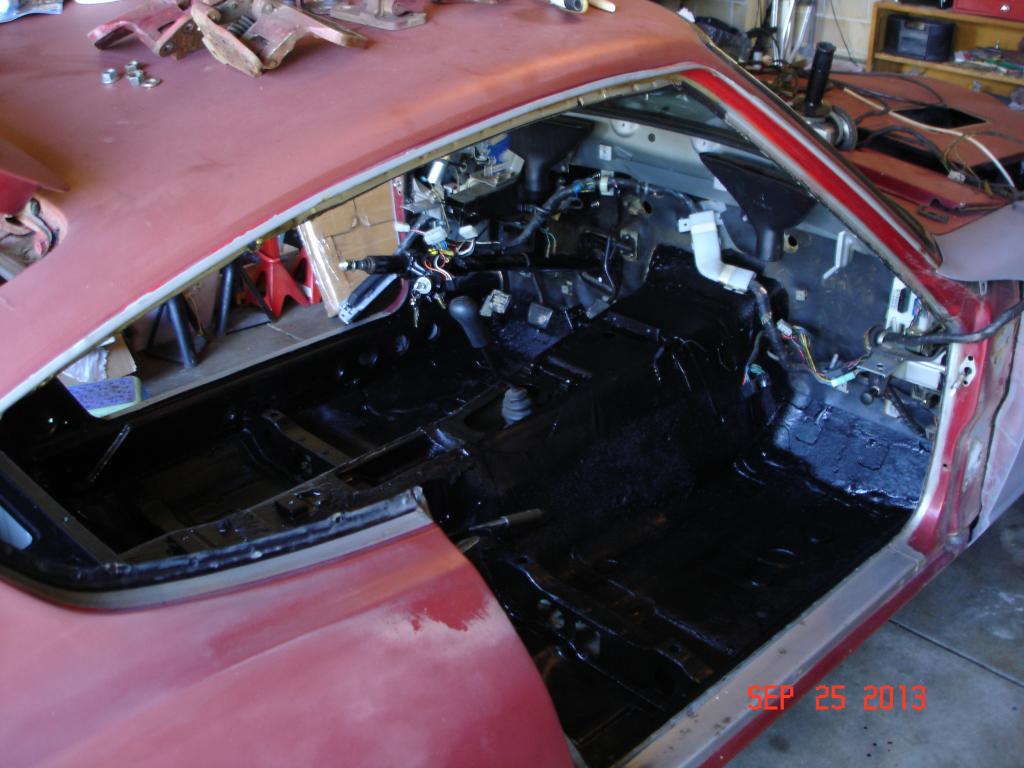
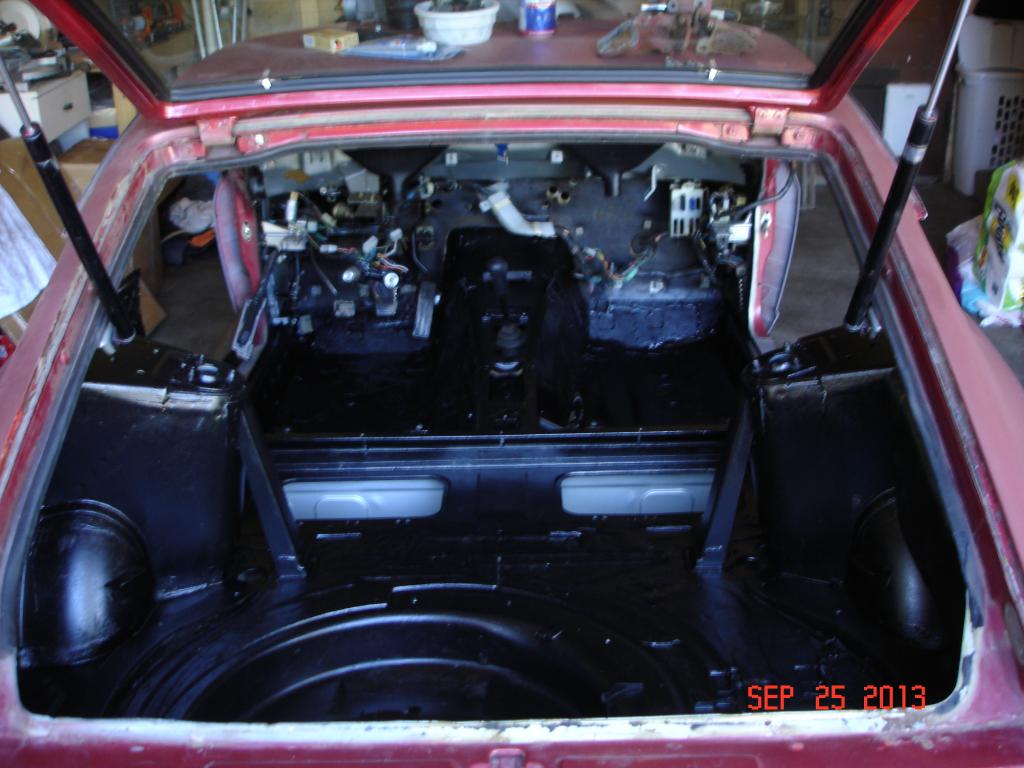
So glad that's done, took about 13-14 hours altogether.
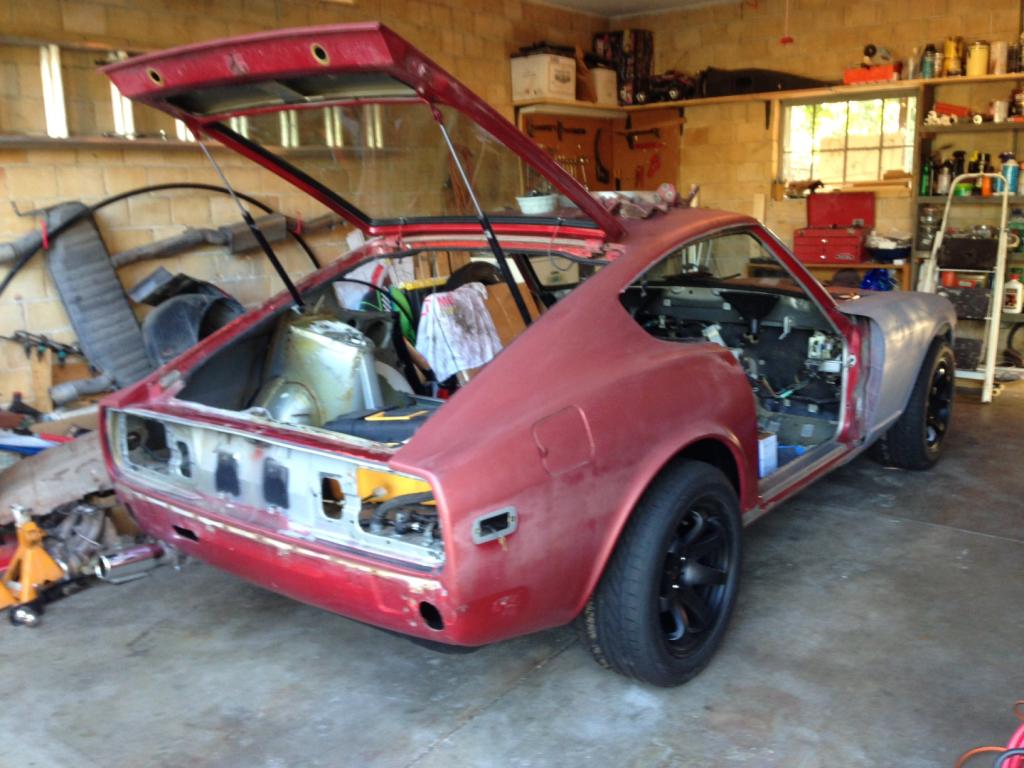
I've now spent a considerable amount of time up close and personal with the Z body shell, much like I did with the 7 last fall (was that really a year ago?) and the difference in construction is remarkable.
Which is why I'll be remarking upon them...
The Z is structurally little different than cars from the late fifties/early sixties, the body is a patchwork of small stampings with very simple profiles. The door/hatch jambs in particular are quite crude and unfinished looking compared to later cars.
Panels with compound curves are hilariously wrinkled, the trans tunnel looks like a walrus laying on the floorpan.
I'm assuming the body was designed back in the day of sliderules and drafting tables, when the main defense against flex was weight, because the Z is obviously structurally flawed but made of very heavy gauge steel. The doors in particular are stunningly heavy (and don't even have crash bars).
The "structural flaw" is one of the cars iconic lines, the side windows without a b pillar.
Every single Z you'll ever see has this crack:
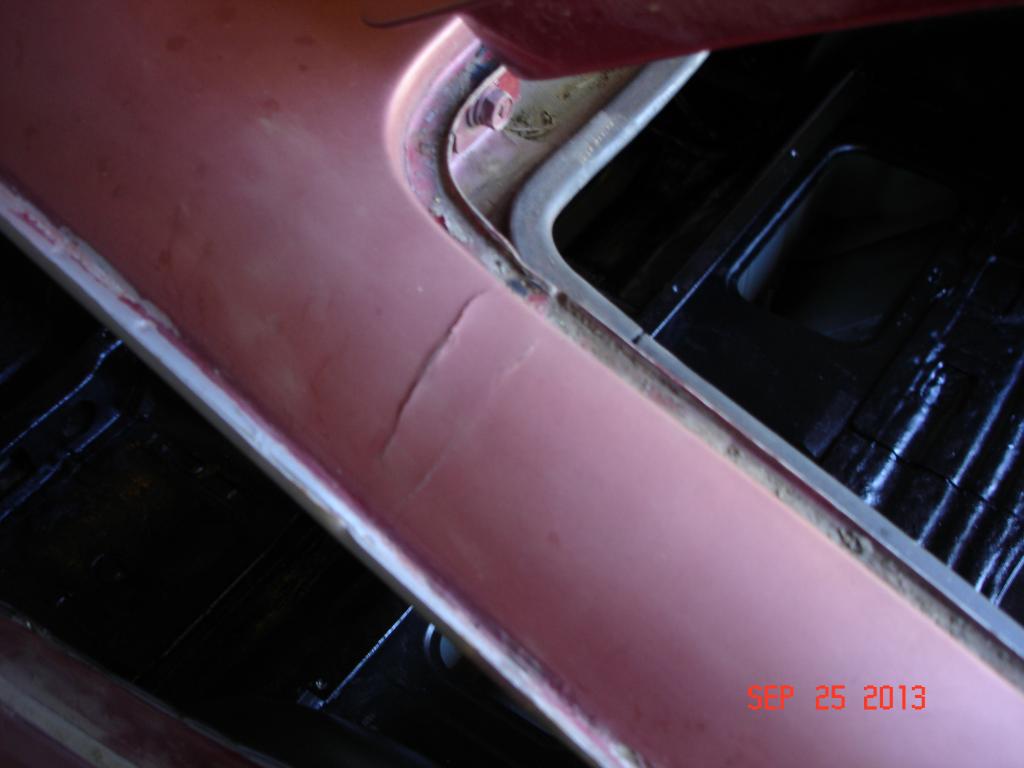
...which is where the roof panel joins the rear quarter panel.
(If the crack isn't there it's already been fixed)
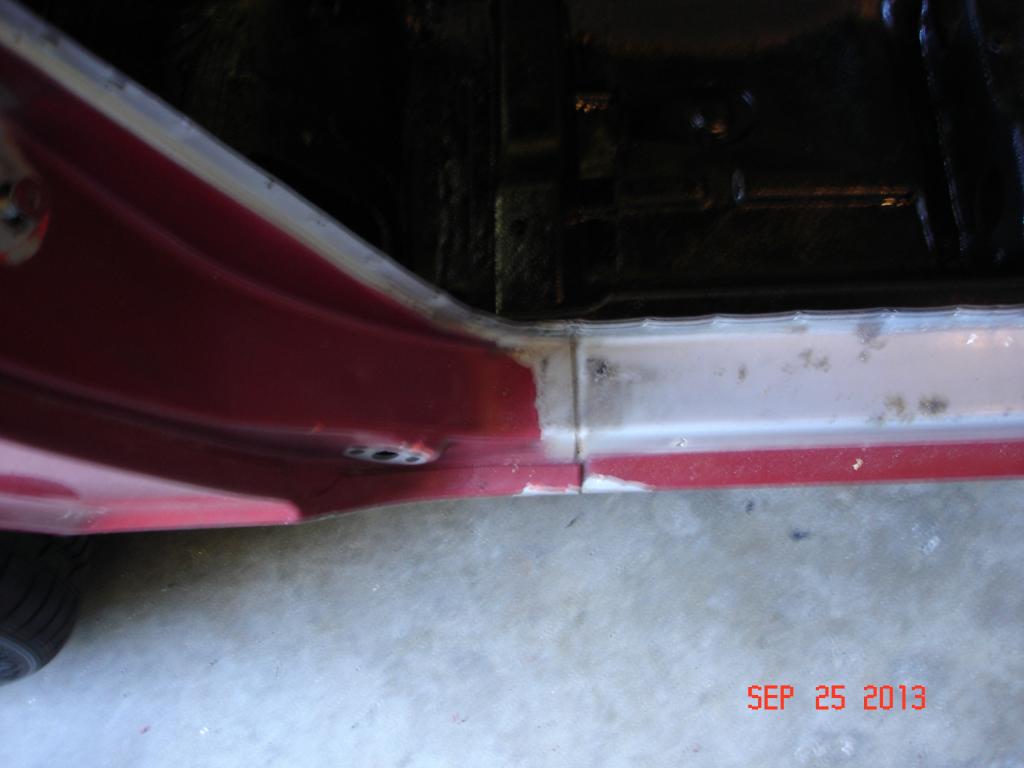
Another example of crumby (looking) assembly:
Anyway, my part of the bodywork is done- on to the electrics.


So glad that's done, took about 13-14 hours altogether.
I've now spent a considerable amount of time up close and personal with the Z body shell, much like I did with the 7 last fall (was that really a year ago?) and the difference in construction is remarkable.
Which is why I'll be remarking upon them...
The Z is structurally little different than cars from the late fifties/early sixties, the body is a patchwork of small stampings with very simple profiles. The door/hatch jambs in particular are quite crude and unfinished looking compared to later cars.
Panels with compound curves are hilariously wrinkled, the trans tunnel looks like a walrus laying on the floorpan.
I'm assuming the body was designed back in the day of sliderules and drafting tables, when the main defense against flex was weight, because the Z is obviously structurally flawed but made of very heavy gauge steel. The doors in particular are stunningly heavy (and don't even have crash bars).
The "structural flaw" is one of the cars iconic lines, the side windows without a b pillar.
Every single Z you'll ever see has this crack:

...which is where the roof panel joins the rear quarter panel.
(If the crack isn't there it's already been fixed)
Another example of crumby (looking) assembly:

Anyway, my part of the bodywork is done- on to the electrics.
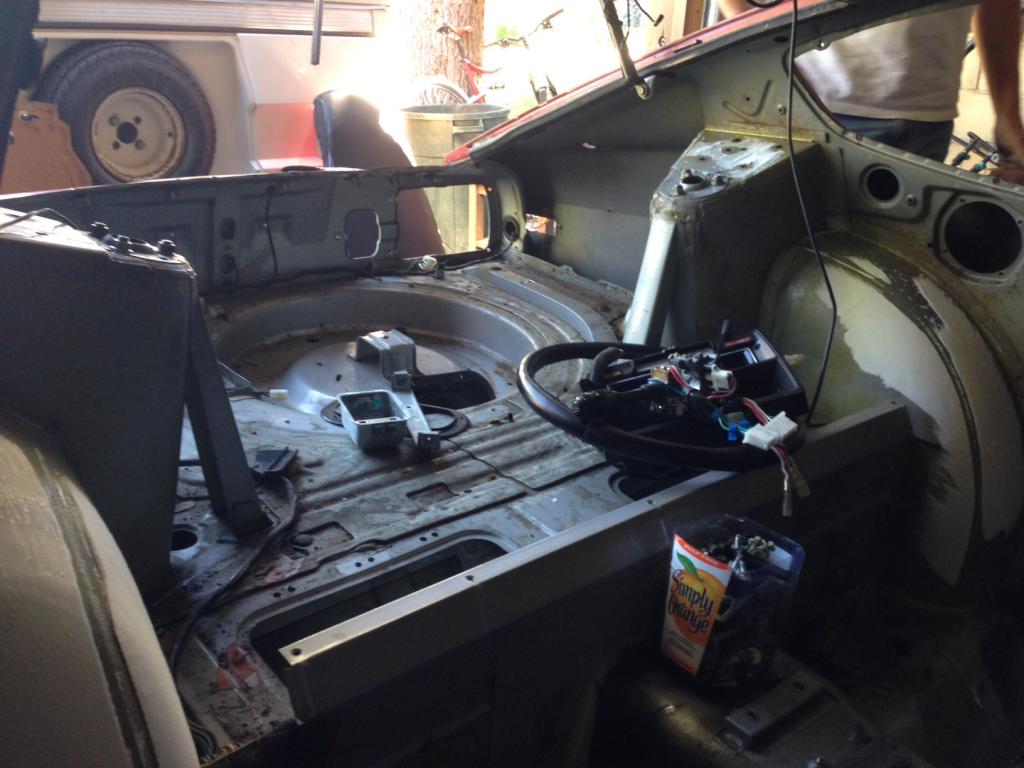
"On to the electrics" was somewhat misleading.
What I should have said was "Out with the electrics"...
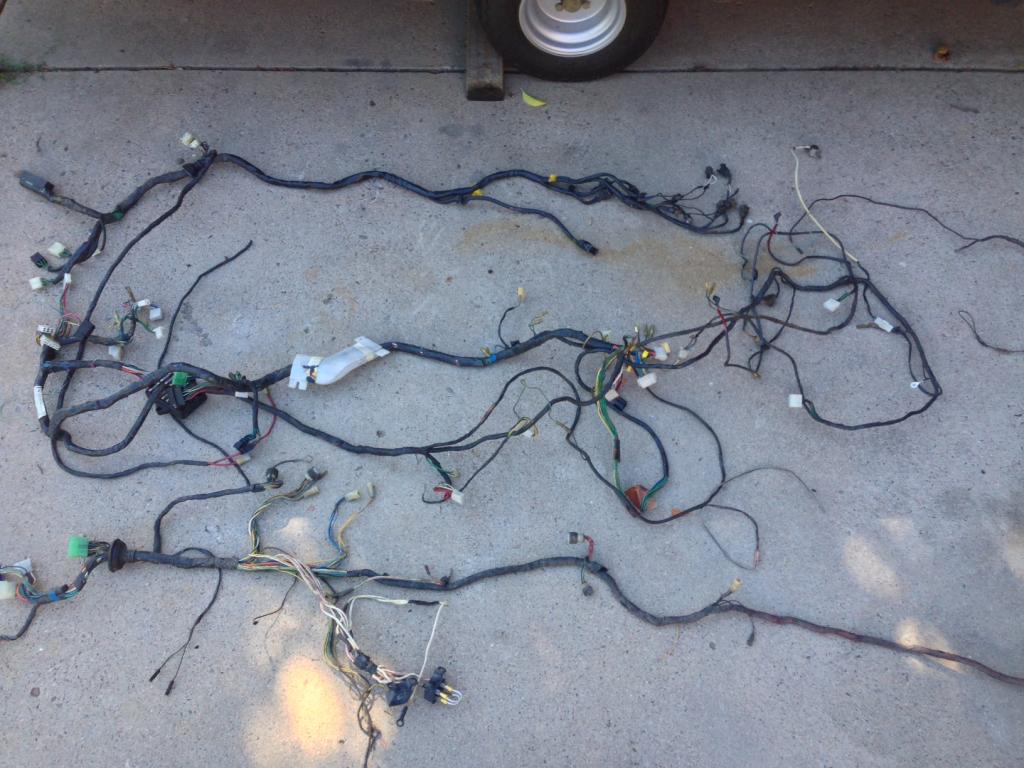
These are the three main harnesses and they will be significantly different when I'm finished with them.
Two of the harnesses are for the chassis- they run the length of the car, originating in the passenger footwell. The third is for the engine and starts in the drivers footwell where the ECU is located.
The chassis wiring will be the most modified, pruning out the federally mandated frippery and some Datsun nonsense along with major component swapping/relocation.
The engine harness will be mostly renovated (I have all new pigtails for the injectors and sensors) and the routing will be altered.
Monday I hit the junkyard to begin acquiring parts.
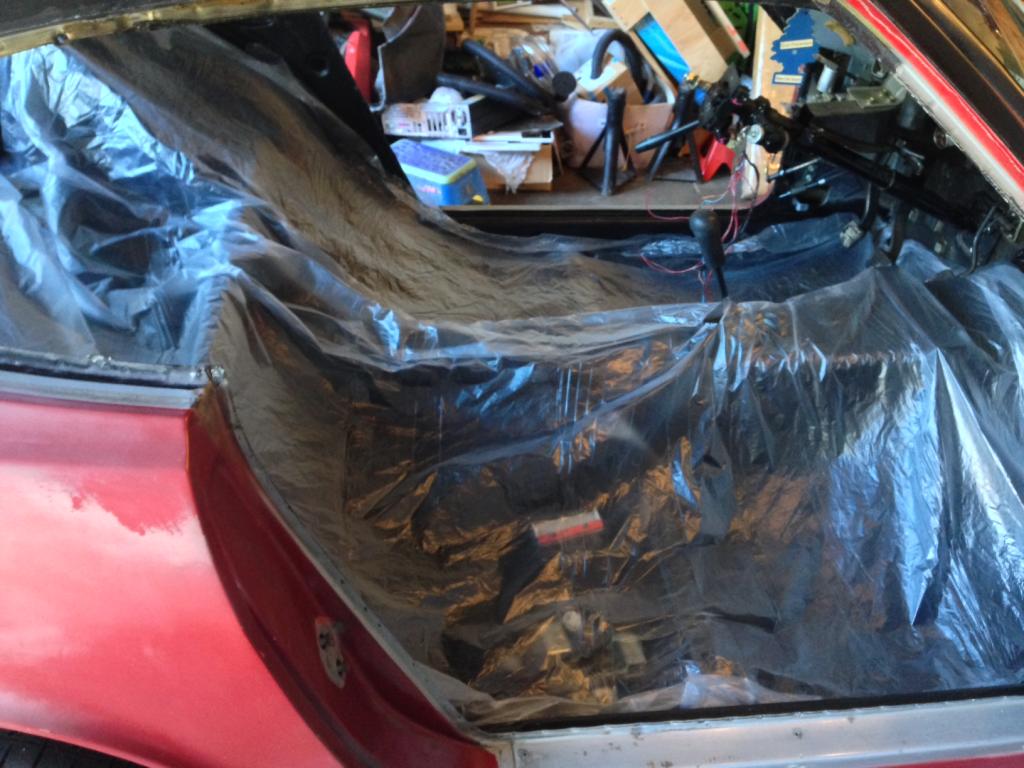
For now she's covered up and resting...
What I should have said was "Out with the electrics"...

These are the three main harnesses and they will be significantly different when I'm finished with them.
Two of the harnesses are for the chassis- they run the length of the car, originating in the passenger footwell. The third is for the engine and starts in the drivers footwell where the ECU is located.
The chassis wiring will be the most modified, pruning out the federally mandated frippery and some Datsun nonsense along with major component swapping/relocation.
The engine harness will be mostly renovated (I have all new pigtails for the injectors and sensors) and the routing will be altered.
Monday I hit the junkyard to begin acquiring parts.
For now she's covered up and resting...

Properly done, it would take multiples of that time.
The overarching point of this "first stage" of work was to closely examine the chassis for rot...she's nearly 40 after all.
Purchased for a song, we really expected some issues but have been pleasantly surprised at the integrity of the car. She really deserves a full strip/rotisserie restoration but that was not something we'd anticipated nor were capable of.
Accordingly, we decided to clean and preserve the chassis as best we could, while not making a future redo too difficult.
I did not remove any of the "asphalt" sound deadening/panel dampers because they were in perfect condition (and this interior will be noisy enough as it is), nor did I do any sanding.
Mostly I just washed and vacuumed the accumulated crud till I thought the bedliner would have a good chance of adhering, then went to town.
I could easily have spent several more days prepping, so I consider the work I did to be the bare minimum, not an example of patience or dedication.
Short- no photos- update.
Have spent the last two days at the junkyard and have one more to go.
My wish list is not all that long but I started with the real dealbreaker, the column switchgear, and that really slowed me down.
I finally had what I hope was a breakthrough and will try assembling parts from 4 different cars to make one unit.
Should be interesting.
After I get the switch thing together I have to go over to Sigfrid's house and drag the dash down from the attic, (loosely) install it and make sure the new part clears the dash. The Z dash is oddly shaped in that area and I'm not sure what kind of space I have to work with till I actually try.
Along with the switches I also got a Volvo fan/shroud, the wiper motor from one of the switch donor cars, two sets of Volvo fan relays (one for the fan and the other will serve the headlights) and four Volvo 40a relays. All the relays in the car will be the same, so one spare covers the whole system.
Also as usual, I grabbed a few handfuls of hardware and some interesting brackets.
Tomorrow I'm looking for an alternator (probably GM) and will decide on a steering wheel and some seats I've been mulling over.
Getting all the parts in place should be the hard part of the electrical...I hope.
Finally, a bit of eyecandy.

This is a Nissan part but as usual I have no clue what from.
I'm bad that way.
Anyways, it does NOT fit the Z column but I have a plan.
Whether or not this "plan" works out, our new wheel will need to be modded to work with the new switchgear.
This wheel is basically a prototype to see what will be involved, I seriously doubt Sigfrid will live with a non-leather rim for too long.
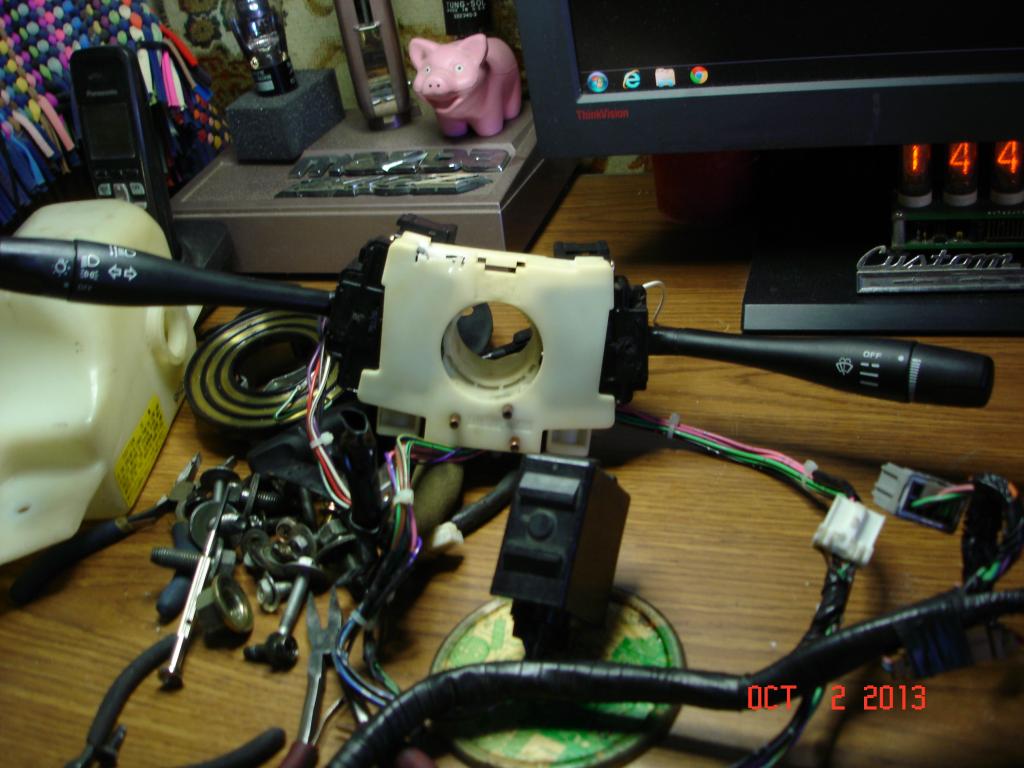
The new switchgear, nestled among piles of electrical crap that may or may not make the cut.
To go with the new switches I also snagged the wiper motor itself from the newest of the donor cars (the switchset was assembled with parts from three different cars).
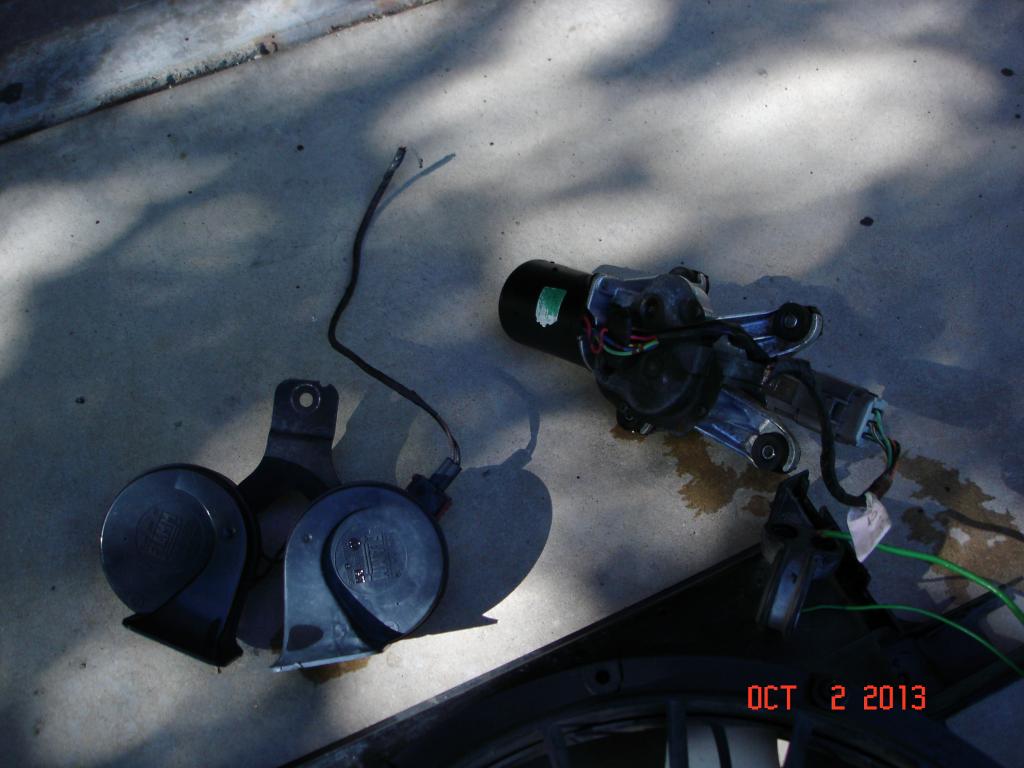
Next to the motor is a nice set of Fiamm horns, sourced from an Audi (of all things).
Along with the Volvo efan I also got a bunch of relays and wiring:
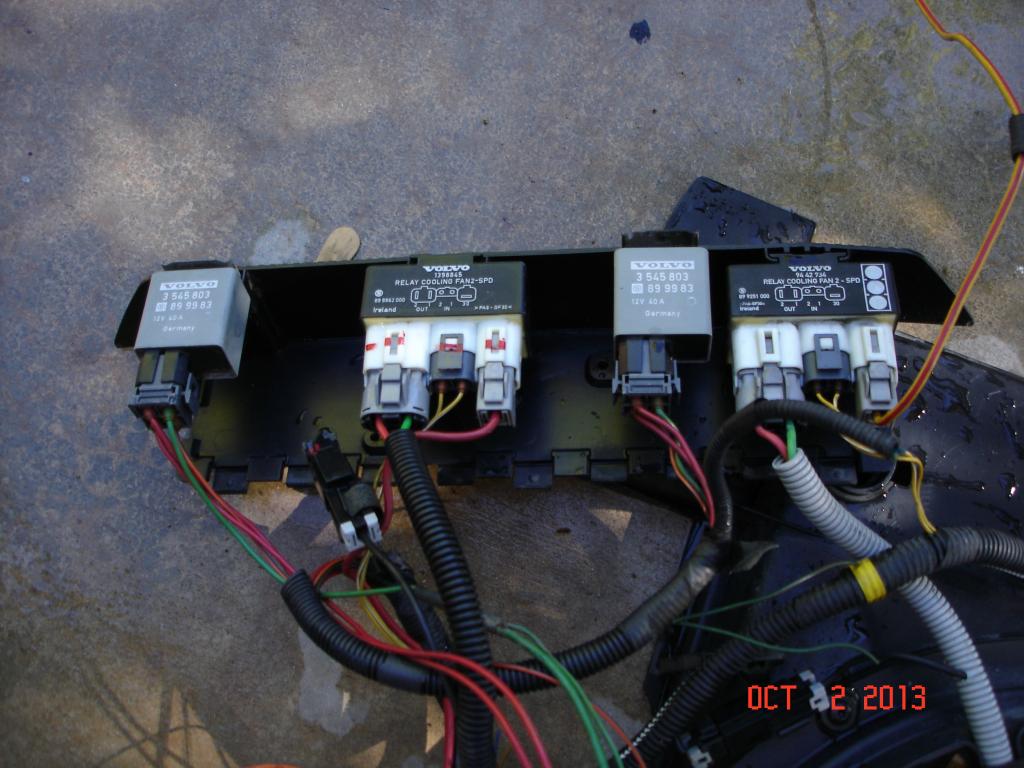
(That's about half of it...)
And the fan/shroud:
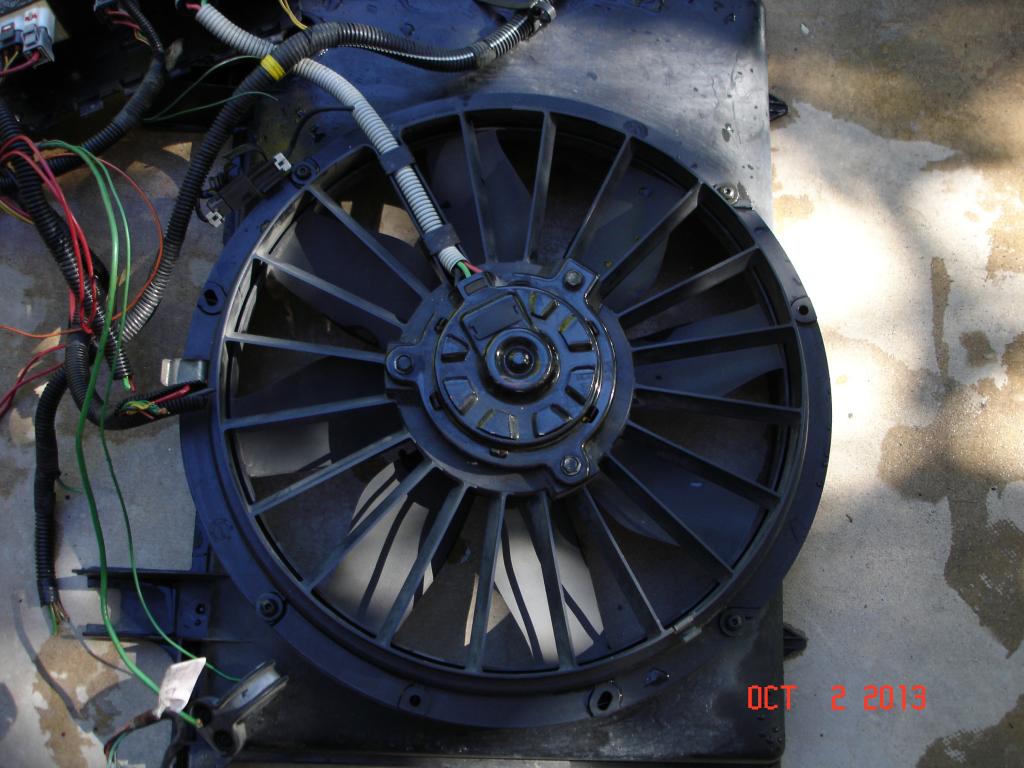
It's nice that the shroud is in good shape but I doubt it'll fit my rad and I didn't even measure to see.
It's irrelevant really, the main advantage of this particular part is that the fan unbolts from the shroud and can be mounted on a shroud of my own design. I'm suspecting this will need to be done as space is VERY tight, in fact, this may not be doable at all.
We'll see.
And we saw.
And what we saw was partially good and partially bad.
Start with the fan:
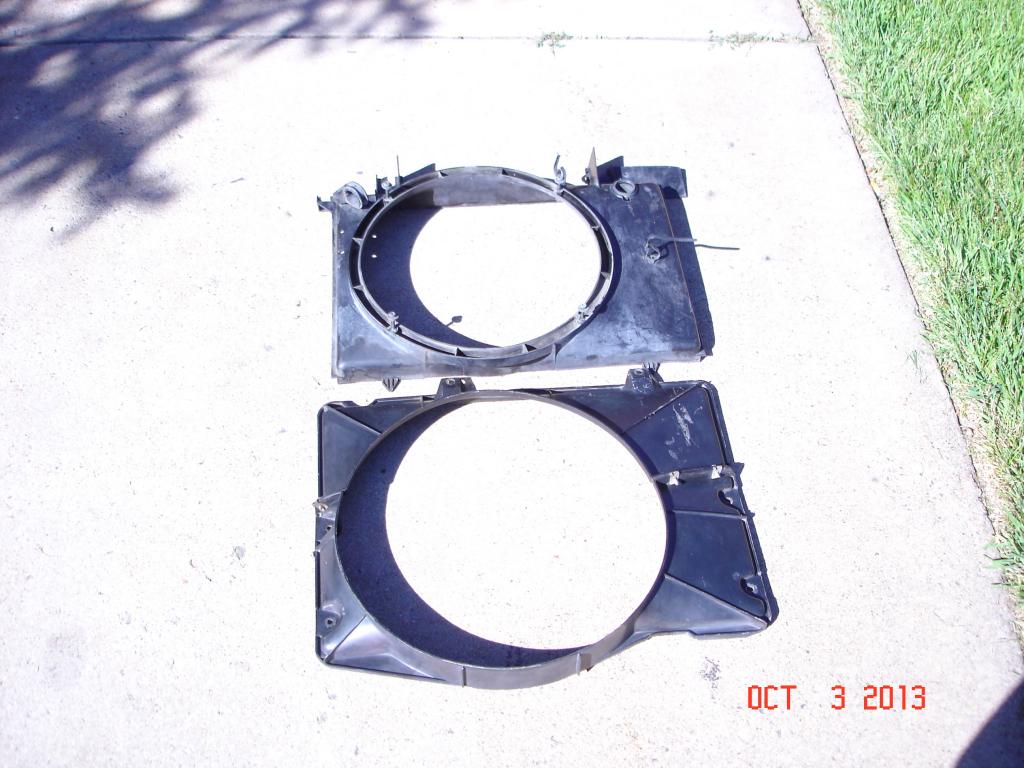
With a bit of trimmage, the Volvo shroud would be a beautiful drop in replacement for the original...it's one of the closest junkyard "upgrades" I've ever seen.
Of course, it won't fit because the clearance between the front of the engine and the rad core is only 3" and the Volvo part requires 5".
I've unbolted the fan from the shroud (which is why I got this particular unit in the first place) and will see if I can offset/squeeze it in on a flat plate shroud.
More on that later.
The horns and wiper motor are fine, as are all the relays.
The column controls were the big thing and it's going to be as bad as I'd feared.
You can see the switchgear I'd like to use in a previous post, here is the original setup:
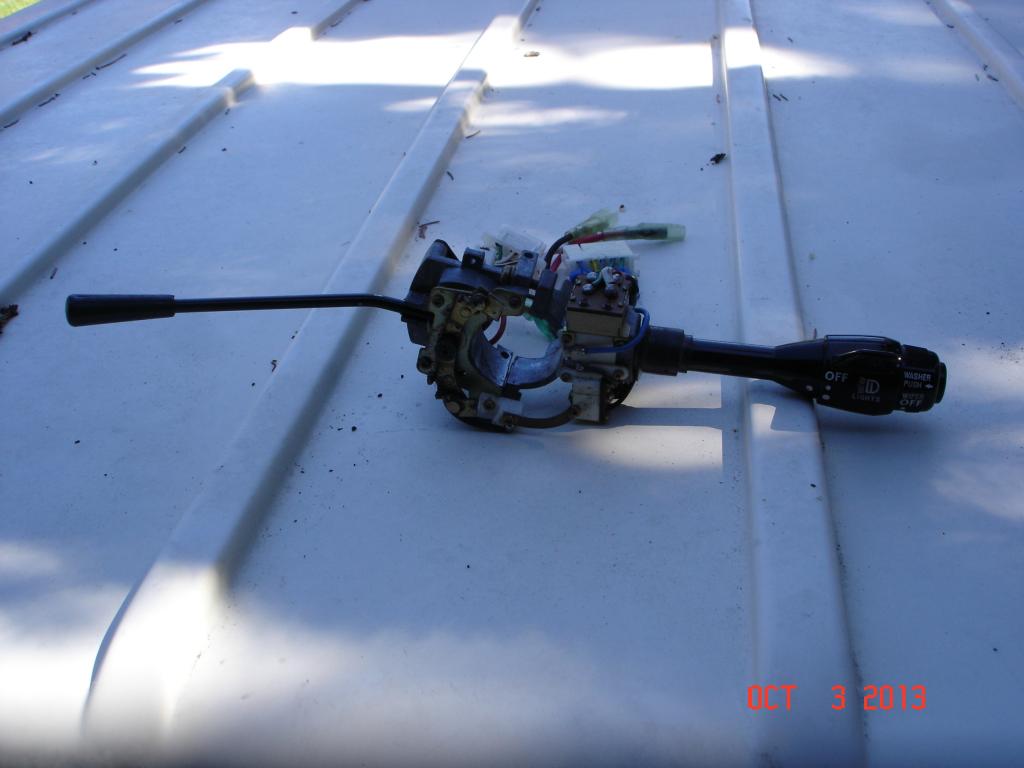
I have three major objections to this part:
- It looks terrible, as if Popeye got polio in one arm or something. The two stalks don't even look like they're from the same decade, much less the same car.
- The controls are configured differently from modern cars with the lights and wipers both on the right side and only signals on the left.
- (This is my main objection) For some incomprehensible reason Datsun did not use two filiment bulbs in the tail lights, so the turn signal and brake light share a common bulb. To make this work there's an override built into the TS switch that kills the brake signal to whichever side is signalling.
I recall having issues with this on my 240Z and am determined to get rid of the problem before I commit to the actual wiring.
Because I'm an idiot (or more generously, "I'm an optimist") I did not closely study the geography where the switches and the dash intersect before the dash was removed.
I knew there would be clearance problems but it turns out it's much worse than I thought.
This crappy pic shows the issues:
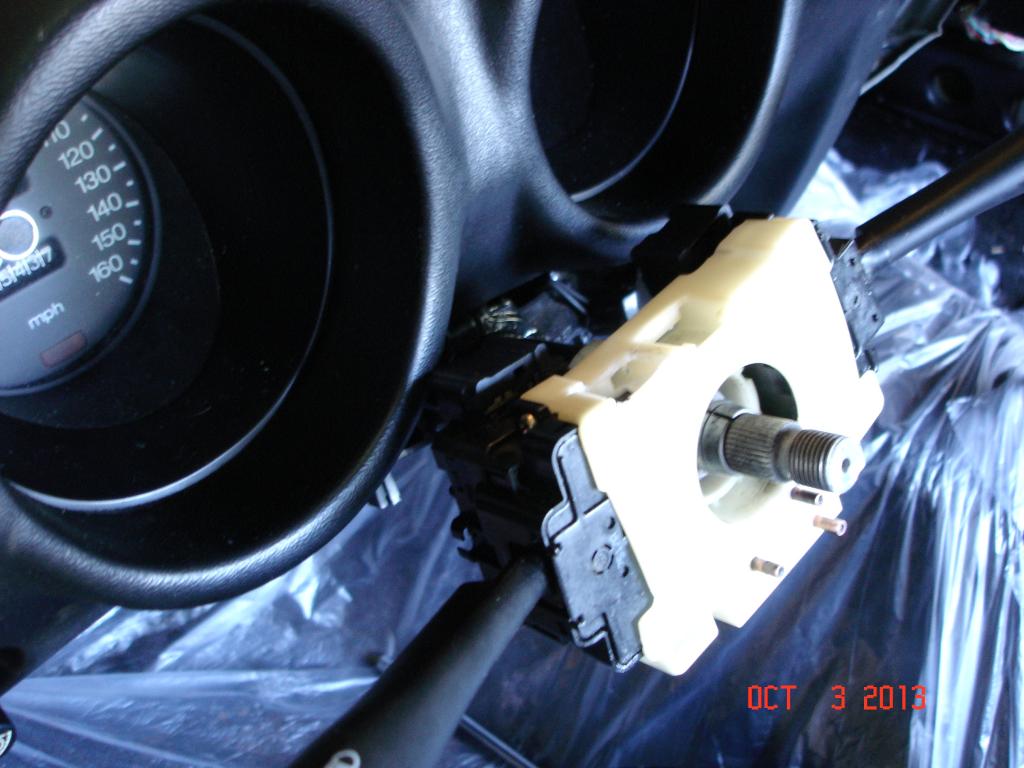
That's as far as the switches can be slid on the column before fouling the dash and I need at least another 2, maybe 3, inches before the steering wheel will fit.
And I don't even have the harness connected, which takes at least another inch to fit.
It all does look nice though as this "fantasy fit up" shows:
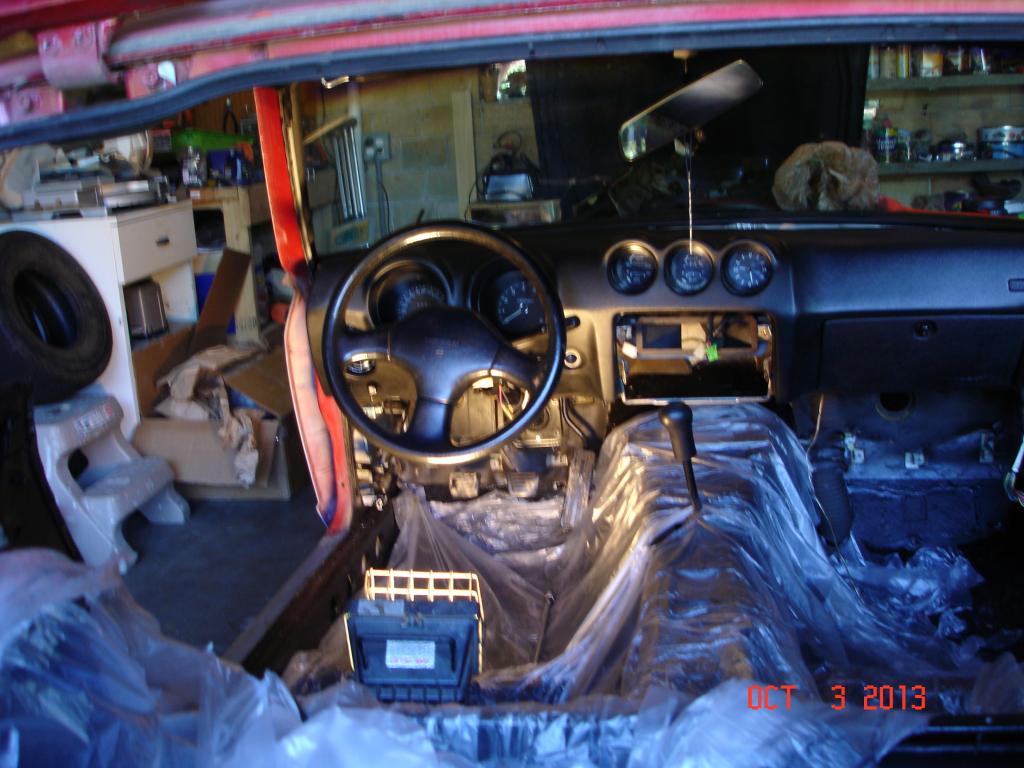
Although disappointed I'm not surprised- this is the way most of my projects go.
Now at least I can see what I have and what I want and where the conflicts arise.
An aside...
The Zs dash is one heavy ****.
Where our cars have a plastic shell, the Datsun is all metal.
On the one hand this is quite nice, the dash isn't crumbling to dust like the RX7s will and none of the mounting tabs are broken but on the other, it's a chore to install singlehanded.
Sigfrid and I meet again tomorrow and we'll see what we can come up with.
I already have a (fairly radical) idea.
Joined: Mar 2001
Posts: 31,859
Likes: 3,243
From: https://www2.mazda.com/en/100th/
- (This is my main objection) For some incomprehensible reason Datsun did not use two filiment bulbs in the tail lights, so the turn signal and brake light share a common bulb. To make this work there's an override built into the TS switch that kills the brake signal to whichever side is signalling.
I recall having issues with this on my 240Z and am determined to get rid of the problem before I commit to the actual wiring..
I recall having issues with this on my 240Z and am determined to get rid of the problem before I commit to the actual wiring..
Well, of all the stuff I spent three days at the yard acquiring (and @$100 buying), we'll end up using maybe half...not a real good average.
The relays, pigtails and horns are all useful- there was never any doubt of that- the fan, steering wheel and switches, not so much.
The fan and the switchgear absolutely break my heart.
They are both stunningly perfect for the application but neither will fit given the restraints of the "stock" set up.
I'm just going to salt the fan/shroud away and will resurrect it when (if?) we swap engines.
The switches are a lost cause.
Tomorrow I'll make one more run and see if I can find any switches better suited to the space I have available, but frankly, I'm not optimistic. The dash itself is fighting me, much like the RX-7's did when I tried to graft different switchgear into it and that's a battle I do not wish to repeat.
Fear not however, this minor setback has not stopped the silliness.
We're still planning on some "upgrades" that will test our creativity.
The stock 60a, externally regulated alternator will be replaced with a Maxima's 110a, internally regulated unit.
The stock throttle body will be swapped for a 240SX part...it has a larger throat, is cable actuated and does not have the crude, early emissions crap on it.
This part is the main reason for the junkyard trip tomorrow.
We've been talking about it forever but I've yet to actually pull the part and see how feasible it might be.
Both the alt and throttle body are mods I've read about on the HybridZ forum and they point up how much better this forum is in terms of hard info and "how to" help.
You'd think that after 40 years all the possible mods would have been explored in detail but that doesn't seem to be the case.
Folks TALK about these things all the time but proof of concept is hard to come by.
It's very weird.
For instance, as I was researching brake upgrades ( a particular fetish of mine), not once did anyone mention that the booster mounting studs are a different layout than normal.
The typical modern Japanese booster has a 80mm square stud pattern (or is it 70mm? Anyway, it's square), the Z has a 80 x 100mm layout.
Because of construction details, it's not possible to redrill the firewall (there is a giant support bracket in the way), so replacement options are severely limited.
How did everyone fail to mention this?
Like I said, very weird and VERY frustrating.
We spent yesterday mostly spitballing ideas but did a get a bit done...all piddly ****, sadly.
New sparkplugs are gapped and installed and some of the heater hoses are in place.
The battery mount is done. Horns are installed.
The new carpet arrived and it looks pretty good. It's now back in the box and up in the attic, where it will wait till we're ready for it.
Sigfrid actually spent some time on the body.
His particular "hook" is the driprails above the doors, that's where he's starting.
It's hard to explain what he's doing, pics will happen as he gets further along.
So this week we kind of lurched around, progress happened but it was not as much as I'd hoped for and not as easy either.
Typical, really.