
She Followed Me Home, Honest

Emboldened by my success yesterday and because all the supplies were still out, I polished off a little electrical project that's been abrewing for a while.
Love 'em or hate 'em (I love, you all hate), the driving lamps are back.
Whether the 6" Hellas make the cut or not, it's certain that I'll want some sort of auxiliary lighting and their siting is an open question. I have the Hellas, might as well start somewhere.
Once again, the harness is plug-n-play at the chassis harness interface.
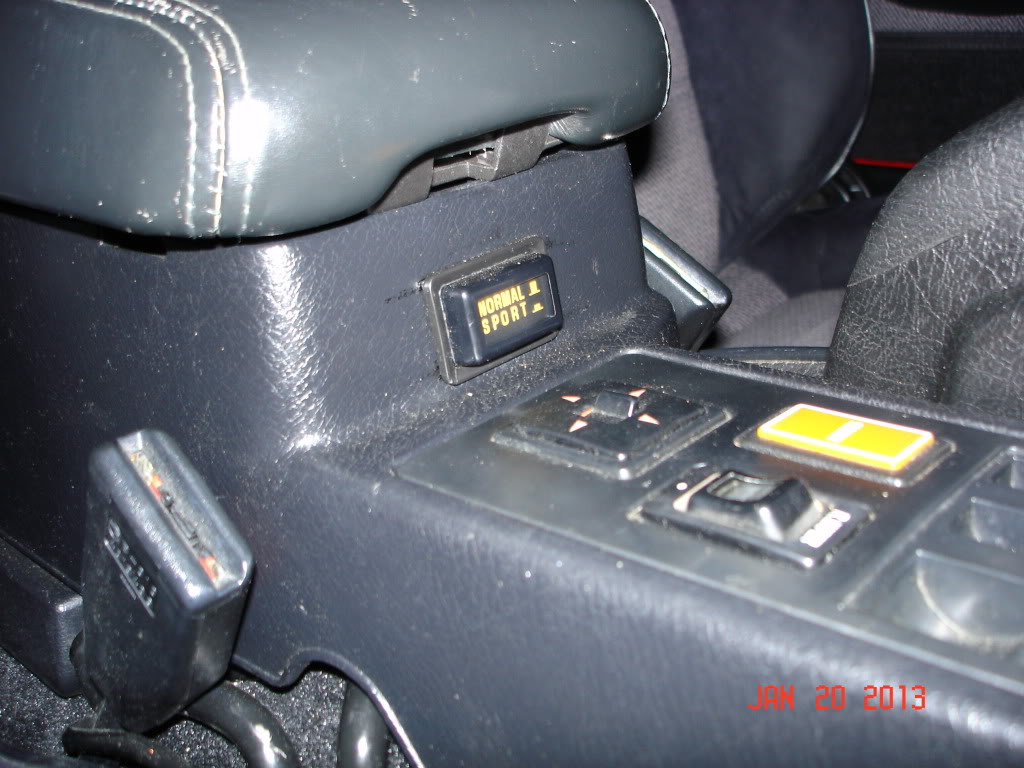
I pulled the fused 15a power from the stock fog lamp relay and used the R/W wire in the same connector to trigger the Volvo 40a relay. This R/W wire goes to the center console and the fog lamp switch. I have no fog switch, nor is there an open space for it, so I used a sport suspension switch located in the front wall of the armrest.
Now I need to find a good location to aim the lights.
Love 'em or hate 'em (I love, you all hate), the driving lamps are back.
Whether the 6" Hellas make the cut or not, it's certain that I'll want some sort of auxiliary lighting and their siting is an open question. I have the Hellas, might as well start somewhere.
Once again, the harness is plug-n-play at the chassis harness interface.
I pulled the fused 15a power from the stock fog lamp relay and used the R/W wire in the same connector to trigger the Volvo 40a relay. This R/W wire goes to the center console and the fog lamp switch. I have no fog switch, nor is there an open space for it, so I used a sport suspension switch located in the front wall of the armrest.
Now I need to find a good location to aim the lights.
I'll keep the lights aimed low and go for chickens instead...maybe I can wrangle some of your Mom's famous fried chicken if I provide the protein.
Today I have more light work to attend to.
Two things- one minor, one major- need addressing.
The minor issue is that the lighting circuit I made is not ignition switched, it's always hot. I'd prefer not to worry about leaving them on by accident so a change will be made.
More critical is actually mounting the lamps.
My temporary install is way too flimsy to survive, something must be done.
I've deleted the crash bar and crush boxes (both damaged by the PO), so there's a lot of empty space in the nose, which is good in one way but bad in the sense that a lot of easy mount spots disappeared with them.
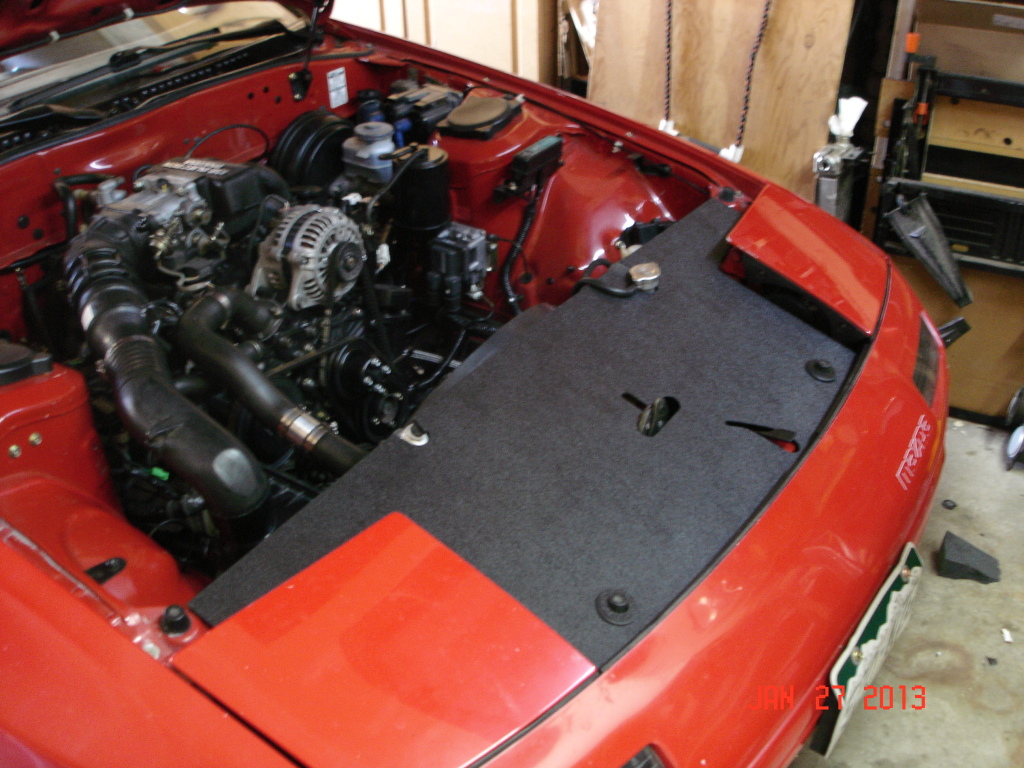
Now that the wiring is done (basically), I can spend some more time ruminating on the mounts.
Anything interesting occurs and pics will follow.
Felt quite frisky today, conceptually speaking...had all sorts of random ideas pop into my head.
One of them even came to fruition.
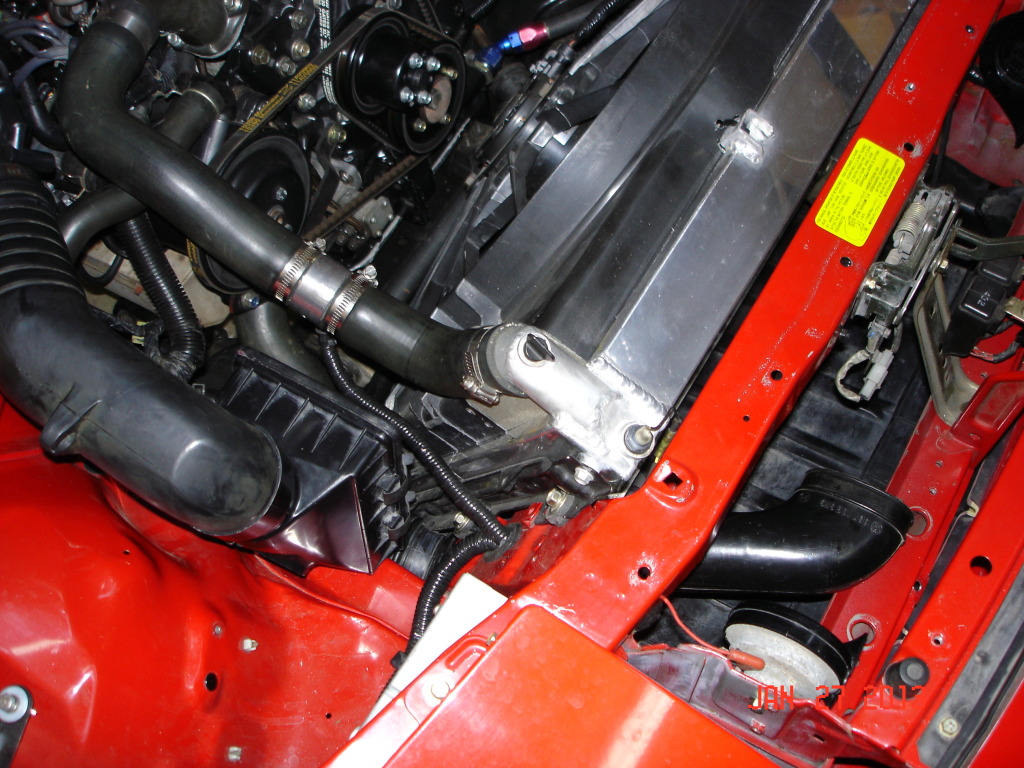
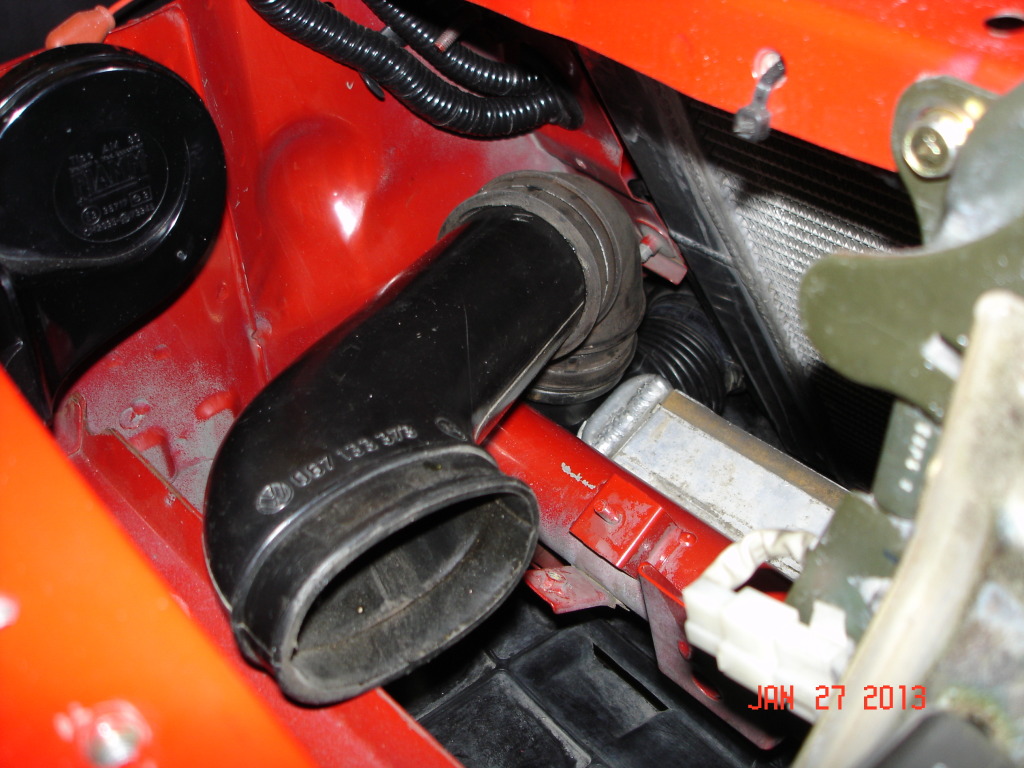
Ever since I first assembled the body back in September, I've known I should, and had every intention of doing, some ducting for the radiator/oil cooler.
I've looked at it since, wondering how it might be done...today it came to me.
I recently scored another load of the cool closed cell foam my friend's wife uses in her business. It occurred to me that it might just be the easiest and most effective way to get the air contained and headed for the cooling units.
I made up some half assed templates and started cutting.
I started with the easy-passenger- side (easy because there are no oil cooler lines in the way).
I made it from one piece, artfully (so I imagined) cut/slit/shaped to fit.
It was a bear to install...I really should have pulled the radiator or the oil cooler to make some space but I finally squeezed it in.
I realized there was no way a single piece was going to work on the more complicated driver side (those damn oil hoses!), so I pieced it together, making it up as I went along.
It's not as pretty but there are no gaps for the air to escape, so it's functionally fine.
Hard to take pics of but here's a try...
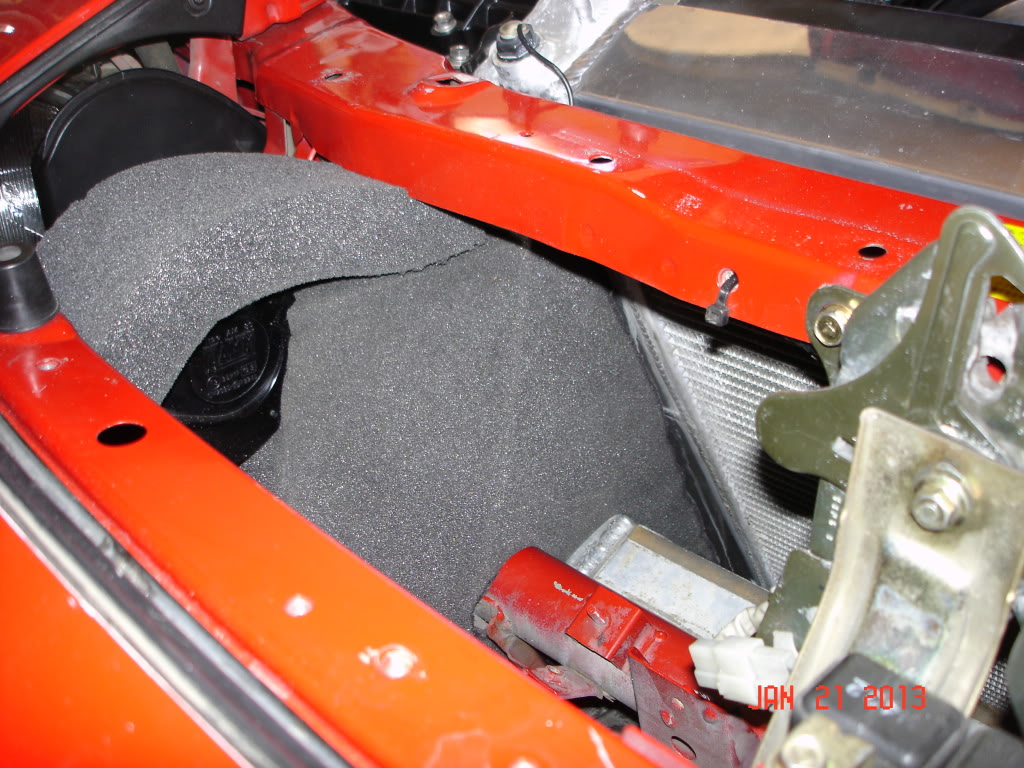
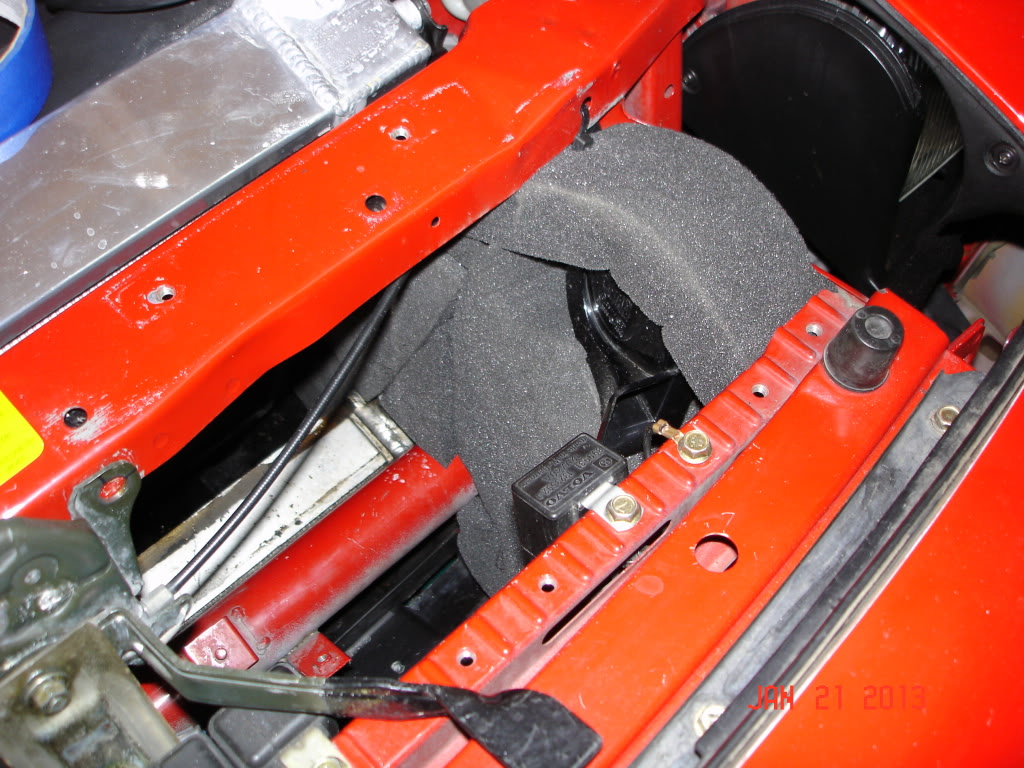
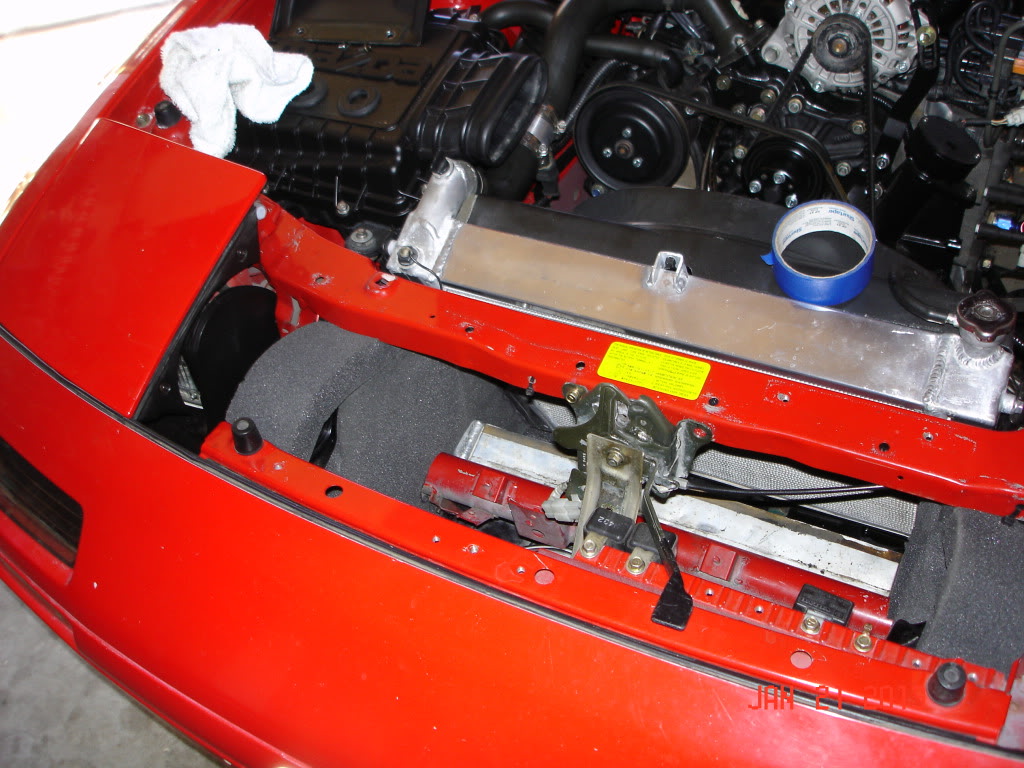
I only had two large pieces so I'll need more to complete the "walls" all the way to the nose opening but even so, I'd guess I've increased airflow/reduced bypass by several orders of magnitude.
Doubt I'll see any effects in this cool winter weather, but I'm glad I made a start and it'll be interesting to see how the material holds up.
As is typical with a project like this, my experience on the first attempt has given me ideas how to do it better the second time around. My material was overly thick (3"), something like 2" would be oodles easier to deal with.
I really hope it works out, the beauty of the foam is there are no fasteners or bracketry required, just shape it (I used a serrated bread knife which cut it nicely) and cram it into place.
So, there was that.
I remounted the lights, although I never did get around to the wiring...later will do.
I need/want to try them out before posting pics and exposing myself to the jibes/jeers that will surely ensue.
If they work well, I'll have a decision to make, if not, you'll never see 'em.
One of them even came to fruition.
Ever since I first assembled the body back in September, I've known I should, and had every intention of doing, some ducting for the radiator/oil cooler.
I've looked at it since, wondering how it might be done...today it came to me.
I recently scored another load of the cool closed cell foam my friend's wife uses in her business. It occurred to me that it might just be the easiest and most effective way to get the air contained and headed for the cooling units.
I made up some half assed templates and started cutting.
I started with the easy-passenger- side (easy because there are no oil cooler lines in the way).
I made it from one piece, artfully (so I imagined) cut/slit/shaped to fit.
It was a bear to install...I really should have pulled the radiator or the oil cooler to make some space but I finally squeezed it in.
I realized there was no way a single piece was going to work on the more complicated driver side (those damn oil hoses!), so I pieced it together, making it up as I went along.
It's not as pretty but there are no gaps for the air to escape, so it's functionally fine.
Hard to take pics of but here's a try...
I only had two large pieces so I'll need more to complete the "walls" all the way to the nose opening but even so, I'd guess I've increased airflow/reduced bypass by several orders of magnitude.
Doubt I'll see any effects in this cool winter weather, but I'm glad I made a start and it'll be interesting to see how the material holds up.
As is typical with a project like this, my experience on the first attempt has given me ideas how to do it better the second time around. My material was overly thick (3"), something like 2" would be oodles easier to deal with.
I really hope it works out, the beauty of the foam is there are no fasteners or bracketry required, just shape it (I used a serrated bread knife which cut it nicely) and cram it into place.
So, there was that.
I remounted the lights, although I never did get around to the wiring...later will do.
I need/want to try them out before posting pics and exposing myself to the jibes/jeers that will surely ensue.
If they work well, I'll have a decision to make, if not, you'll never see 'em.
Odd thing happened yesterday...I locked my keys in the car.
Boy, did I feel stoopid.
I only got one key with the car and even though I've meant to get it copied, I have yet to do so.
Today, for sure.
Anyway, despite never having done so, and with no real clear idea what I was doing, I decided to give it a go before calling a locksmith.
It took about 3 seconds, using nothing but a ruler.
I was shocked and amazed.
Yes, the alarm went off- flashing lights, honking horn, the whole shebang- but actually getting in the car was remarkably easy and fast.
Learn something new every day.
Neat idea - just not sure about the temperature rating of the material especially next to the radiator nor about its water retention. I know it is closed cell foam, but if it holds moisture and dirt, road grim against the painted steel structural parts, it will promote surface corrosion. Flaps / barriers made of fiber reinforced sheet rubber or sheet aluminum might be a better choice.
Time will tell, won't it?
TBH, I hadn't even considered either of the concerns you bring up but I'll keep an eye on it and see how it holds up.
My initial thought is that neither temp or water retention will be an issue...how hot does a radiator get (I figure @200-225� average) and how far away does that heat radiate?
As for water...how much water actually makes it's way into the nose cavity?
(I have no idea).
I will keep a cautiously optimistic eye out for any downsides.


Joined: Mar 2001
Posts: 31,863
Likes: 3,243
From: https://www2.mazda.com/en/100th/
Odd thing happened yesterday...I locked my keys in the car.
Boy, did I feel stoopid.
I only got one key with the car and even though I've meant to get it copied, I have yet to do so.
Today, for sure.
Anyway, despite never having done so, and with no real clear idea what I was doing, I decided to give it a go before calling a locksmith.
It took about 3 seconds, using nothing but a ruler.
I was shocked and amazed.
Yes, the alarm went off- flashing lights, honking horn, the whole shebang- but actually getting in the car was remarkably easy and fast.
Learn something new every day.
Boy, did I feel stoopid.
I only got one key with the car and even though I've meant to get it copied, I have yet to do so.
Today, for sure.
Anyway, despite never having done so, and with no real clear idea what I was doing, I decided to give it a go before calling a locksmith.
It took about 3 seconds, using nothing but a ruler.
I was shocked and amazed.
Yes, the alarm went off- flashing lights, honking horn, the whole shebang- but actually getting in the car was remarkably easy and fast.
Learn something new every day.
i slim jimmed my 1st gen with its own wiper blade once...
although, really if you want in, you can just break the window, so its not like the lock does anything important anyways

Rotary Enthusiast

Joined: Jan 2002
Posts: 845
Likes: 38
From: Oscoda, MI
There have been a number of threads on the subject of security. Personally, I only added an aftermarket alarm to mine for its keyless entry and remote functions, but I did implement its kill functions. In fact, I plan to upgrade to something more advanced in a few years.
One of the keys to effective security is making the installation as devious as possible; as well as making sure everything is wired and adjusted properly.
Don't use the manufacturer stickers; I used generic ones from a Honda (or don't use them at all). After all, why advertise? The alarm LED was blue and its trim plate had the manufacturer name, I used a 5mm bright red one with a generic holder. The box is in a non-standard place somewhere in the car. There are nooks and crannies that can easily accomodate a brain box and associated electronics.
Instead of mounting the siren in the engine compartment, I put it under the dashboard. I even integrated the wiring into the factory harness. You can go further and use all black wires (just be sure to carefully document and label everything). You can add other secondary devices such as a separate kill switch.
Don't forget one other important rule: don't leave valuables in plain sight. I had one break-in where I only had an empty holder for a PDA and some cell chargers in sight; the thief did $150 in damage (window, trim, and later some possible internal damage to the door) for less than $50 in personal belongings. It also didn't help that I parked away from the hotel I was staying at in a relatively dark place away from the cameras and lights (1 A.M. and being in a hurry to go to bed can make you stupid).
Intellectually, I understand security systems but I've never suffered a break in (even with a series of British sports cars, some of which didn't even have doorhandles, and living in some pretty sketchy neighborhoods), so my heart just isn't in it.
The old "It will never happen to me" syndrome.
This fall I was spending all day, every day out in the garage and there were a couple of cars somewhere in the neighborhood who's alarms went off constantly. It never once occurred to me that they were being stolen/vandalized, my response was that the systems were irritatingly disfunctional and the owner ought to fix 'em instead of just disarming/rearming five times a day.
Thinking back, it would be hilarious if the world's most inept thief was operating in my area and I was totally ignoring him...
On a different note...
I kept the original GTU open diff until I was sure the new (to me) LSD was working OK, which it is.
So, I really don't need it hanging around anymore...it's free to anyone who wants it.
Local pickup makes sense, who would pay shipping on such a mundane part?
If you're reasonably close to Denver, we can work something out maybe.
Let the frenzy begin.
Not much of a frenzy.
Understandable, really.
Anyway, here's some good old fashioned junkyard weirdness for ya...
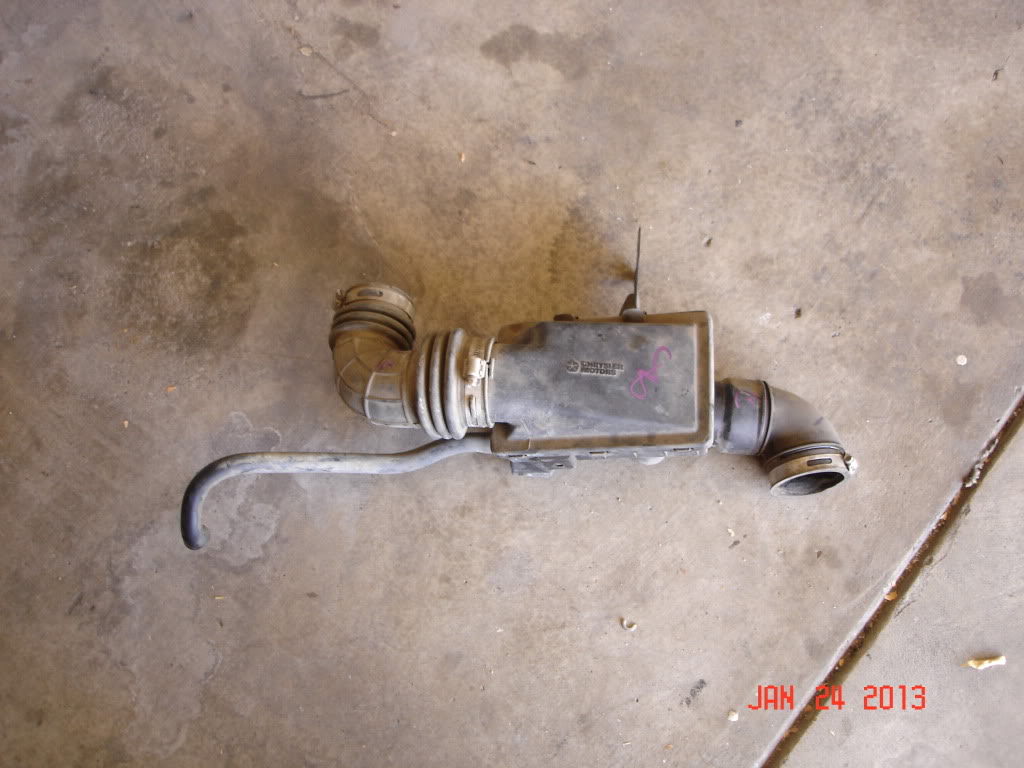
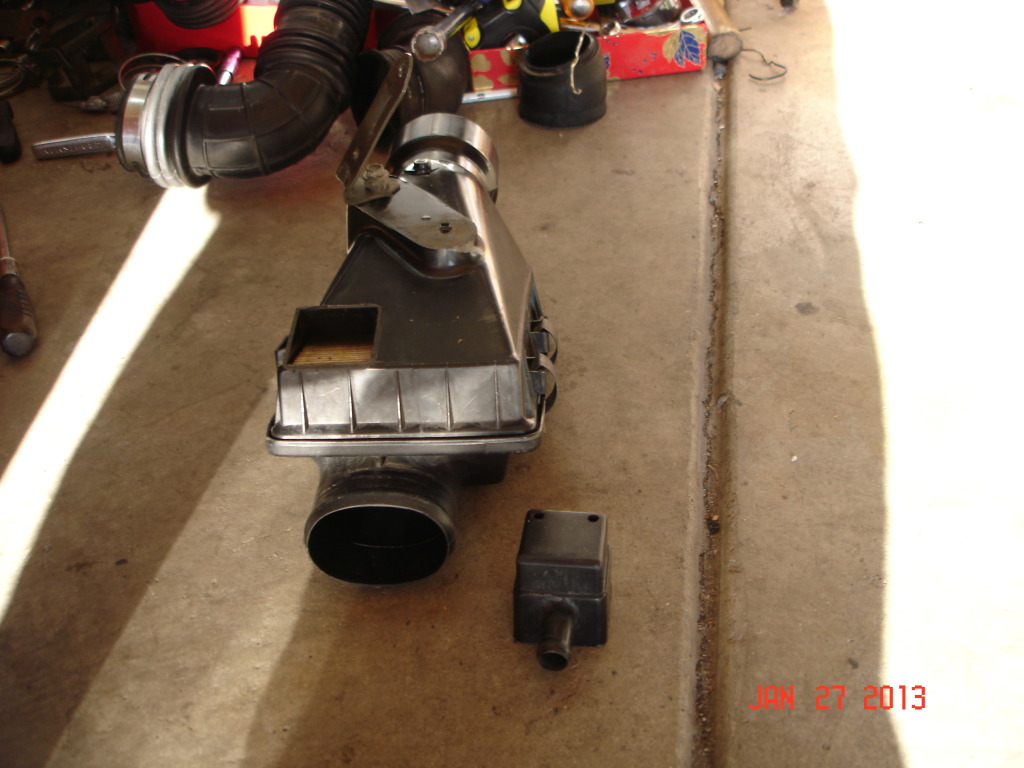
This is the airbox from a 1991 Grand Caravan.
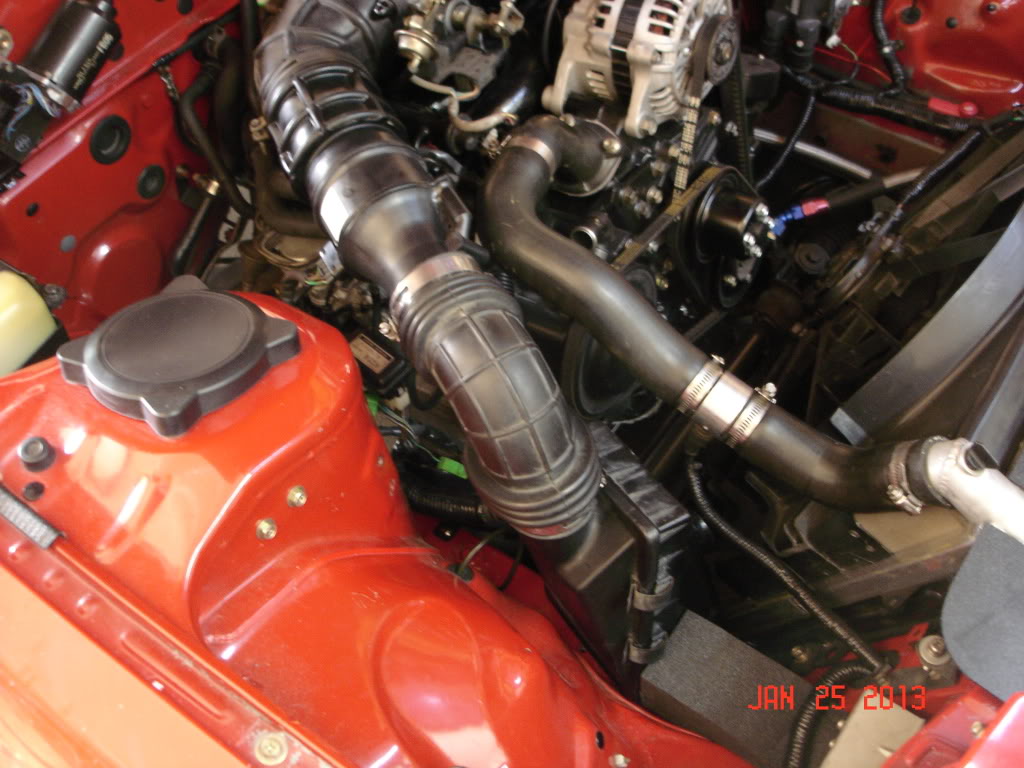
I've had a project- purely aesthetic- on my mind for a while and it requires changing the intake before I can begin, so I took advantage of today's stunning weather (70's!) and cruised the yard...this is what I came up with.
The intake I'd made up previously was removed intact and can go back anytime, all the rest of this is highly speculative at the moment.
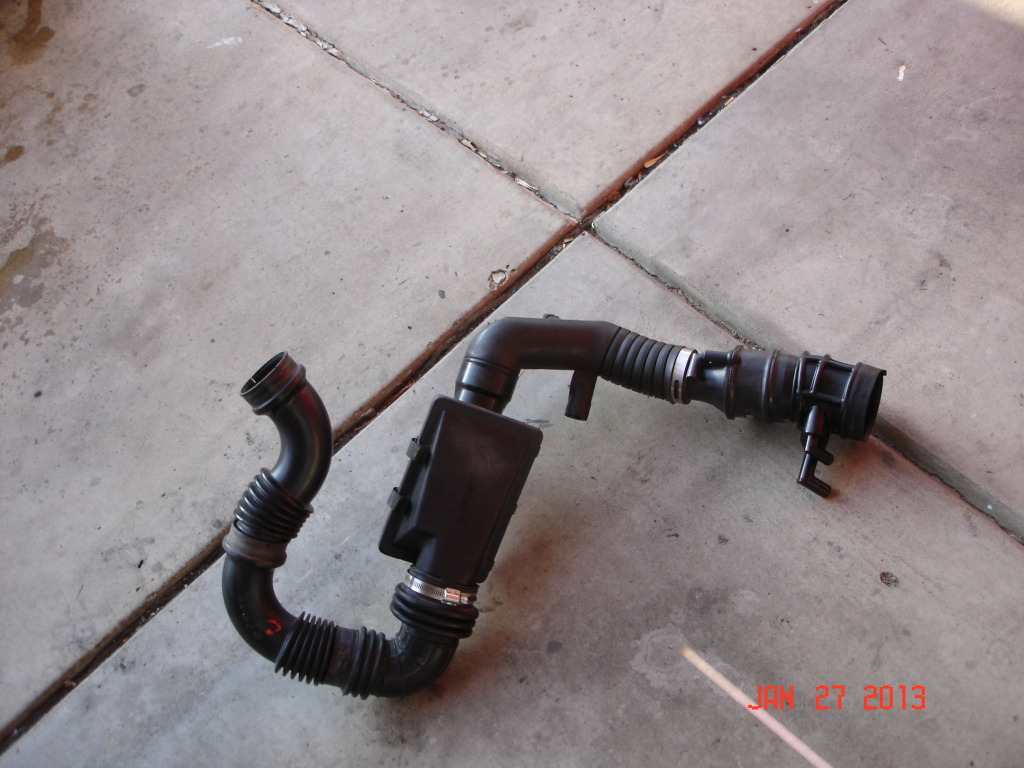
Here is the first full version:
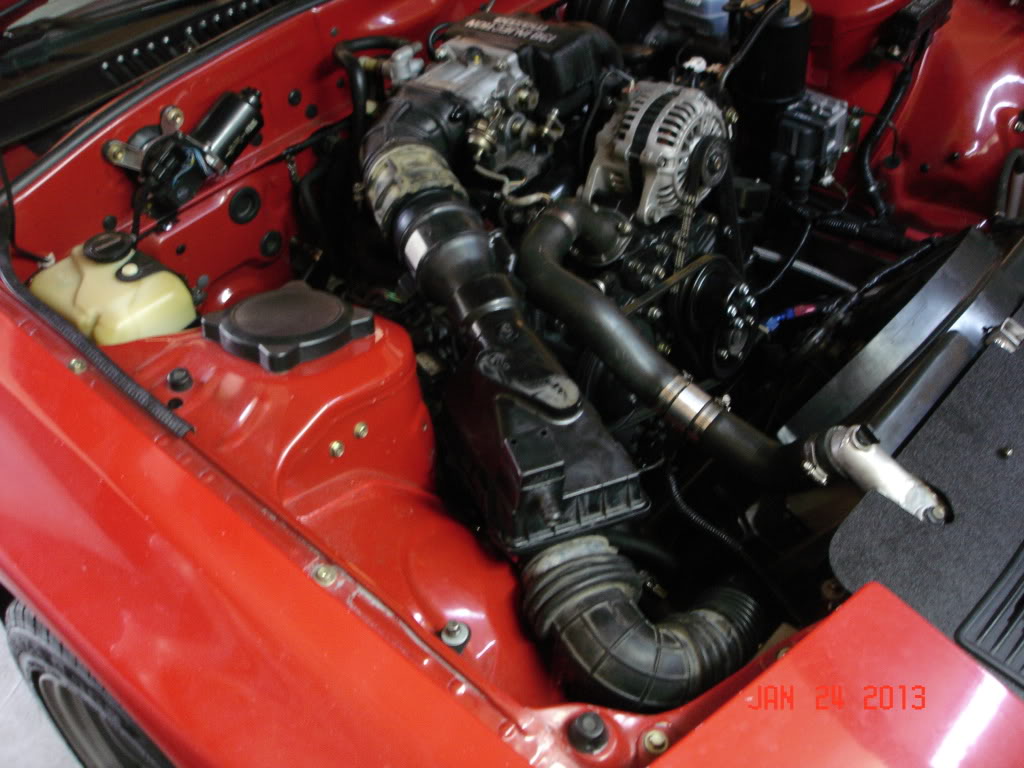
I used spare RX stuff and tubing from previous intake experiments to see what I could come up with.
It pulls air from in front of the bottom of the rad, by the framerail.
It's all well sealed and retains the bungs for the two metered air hoses.
I have no idea how it works yet.
Like I said, this was the first attempt and knowing how I do this sort of stuff, it'll change a lot before I am happy or abandon the idea altogether.
As usual, no animals were harmed during the project.
Understandable, really.
Anyway, here's some good old fashioned junkyard weirdness for ya...
This is the airbox from a 1991 Grand Caravan.
I've had a project- purely aesthetic- on my mind for a while and it requires changing the intake before I can begin, so I took advantage of today's stunning weather (70's!) and cruised the yard...this is what I came up with.
The intake I'd made up previously was removed intact and can go back anytime, all the rest of this is highly speculative at the moment.
Here is the first full version:
I used spare RX stuff and tubing from previous intake experiments to see what I could come up with.
It pulls air from in front of the bottom of the rad, by the framerail.
It's all well sealed and retains the bungs for the two metered air hoses.
I have no idea how it works yet.
Like I said, this was the first attempt and knowing how I do this sort of stuff, it'll change a lot before I am happy or abandon the idea altogether.
As usual, no animals were harmed during the project.
Joined: Mar 2001
Posts: 31,863
Likes: 3,243
From: https://www2.mazda.com/en/100th/
Intellectually, I understand security systems but I've never suffered a break in (even with a series of British sports cars, some of which didn't even have doorhandles, and living in some pretty sketchy neighborhoods), so my heart just isn't in it.
The old "It will never happen to me" syndrome.
This fall I was spending all day, every day out in the garage and there were a couple of cars somewhere in the neighborhood who's alarms went off constantly. It never once occurred to me that they were being stolen/vandalized, my response was that the systems were irritatingly disfunctional and the owner ought to fix 'em instead of just disarming/rearming five times a day.
Thinking back, it would be hilarious if the world's most inept thief was operating in my area and I was totally ignoring him...
and my idiot neighbor sets his alarm off for 5 minutes every time he gets in his car, its annoying...
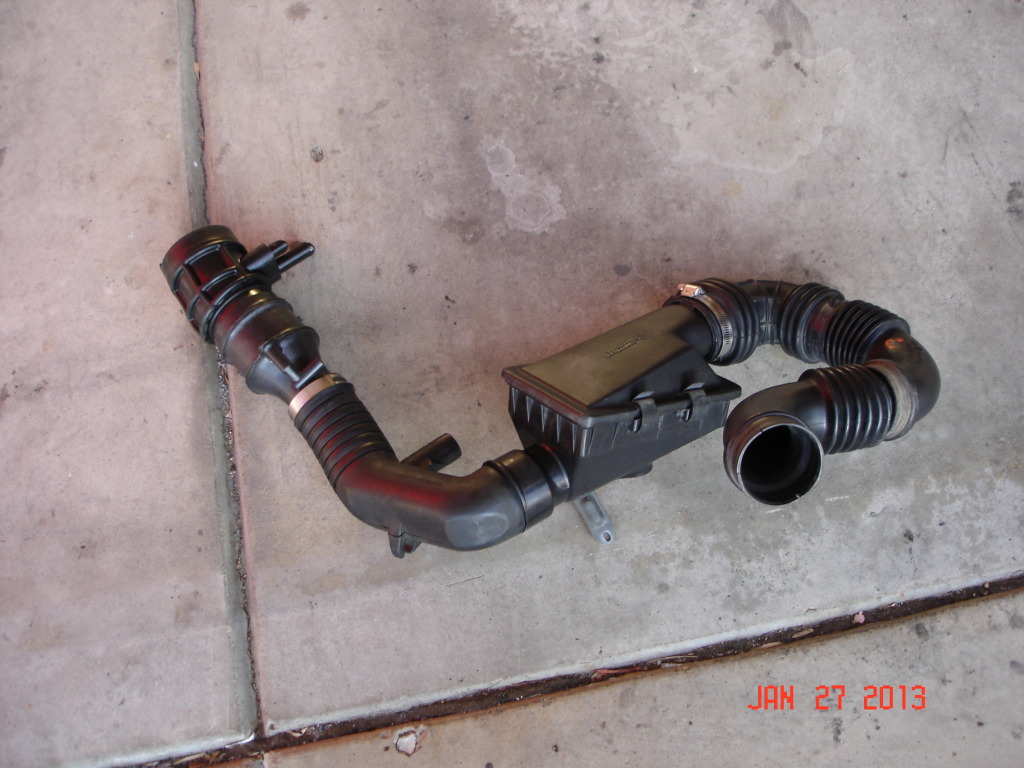
A few more hours of imagineering the intake lead to a very different result.
These first shots show how much was removed from the stock intake tube:
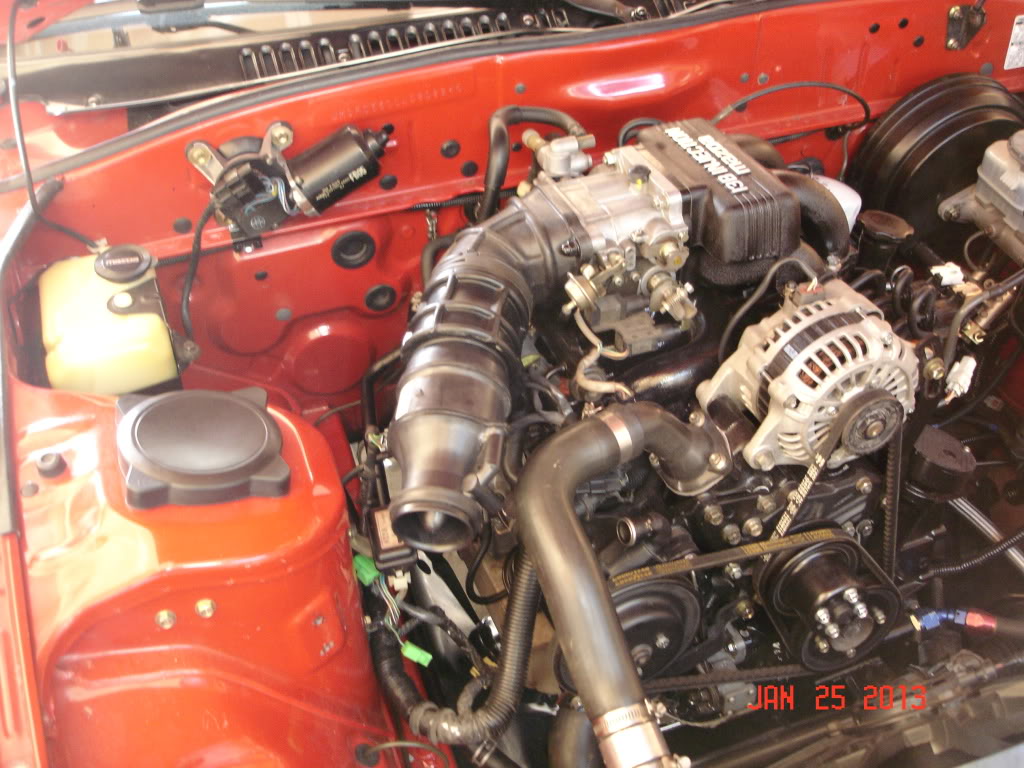
Cut down to the minimum, only leaving the metered air bungs.
Then I rearranged it so the box was much lower:
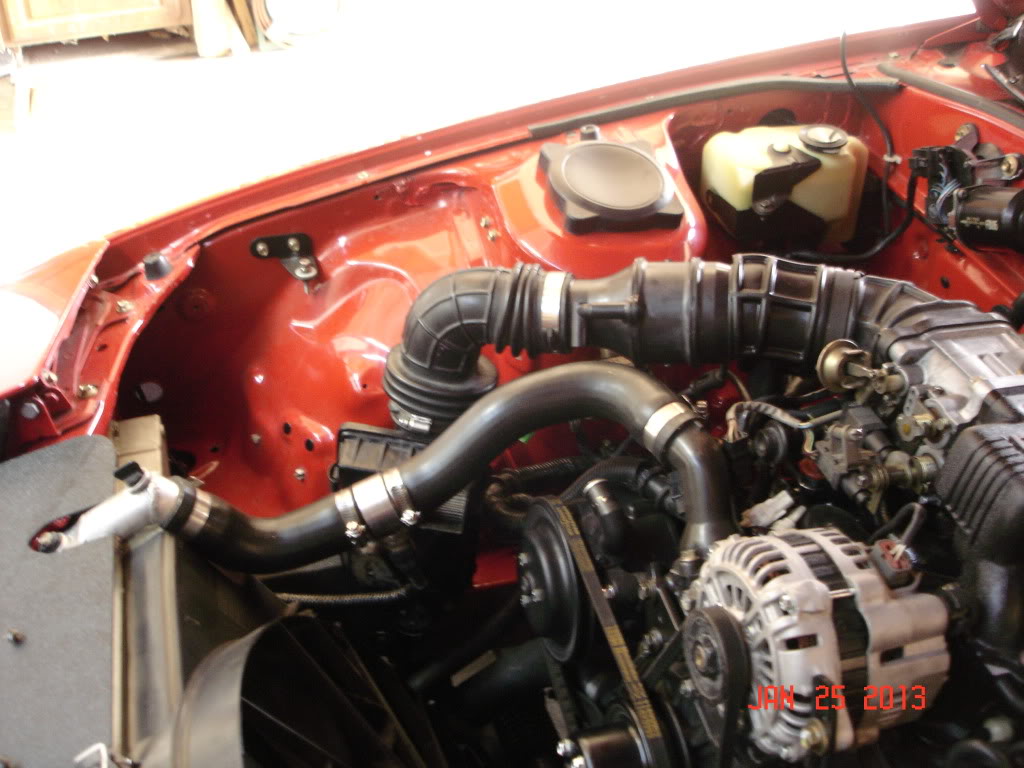
I liked this layout better but the 90� tube between the AFM and the box was ever so slightly off...too tall and would be better at a shallower angle, maybe 70�?
Back to the junkyard.
A junkyard disaster...
Between yesterday and today, they cleaned the yard. This happens every few weeks, they just clean all the space around the cars so you can walk around...I get it. Unfortunately, this means all the stuff that previous pickers have removed and discarded next to/underneath the car is gone and intakes are one of the first things removed from most engine bays to create access for more deeply buried goodies.
I got lucky though, it just took longer.
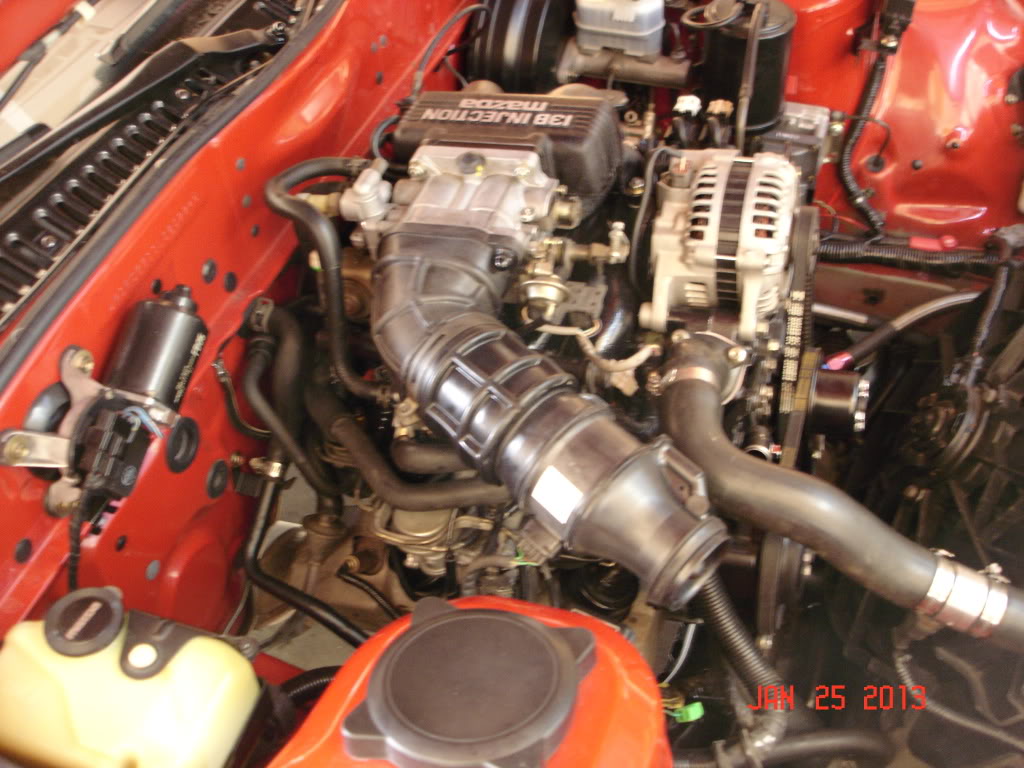
I found a tube that was almost shaped perfectly, looked like the ends were about right and even had a correctly sized port for the air pump feed. It's got an Audi logo on it but since I found it on the ground, I have no idea what model/year.
Got it home, cleaned it up and (ultimately) trimmed a few inches from one end to arrive at this:
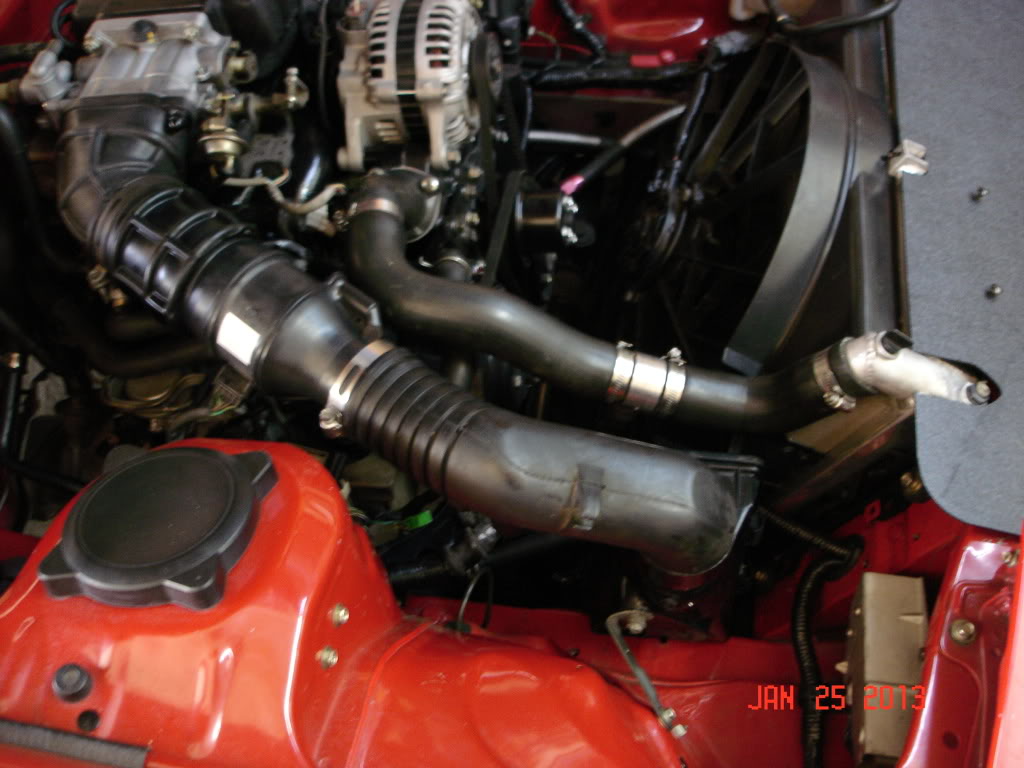
I'm really liking this version.
Because I'm a multi-tasker (or maybe just scatterbrained), I decided to use the trip to the yard as an experiment for the concept.
This also saves on some gas...
I had two major concerns to address:
-Would moving the AFM closer to the throttle body have any ill effects?
-Would the airbox/filter flow well enough for the (anemic) NA engine?
For the trip to the yard I removed the airbox altogether and clamped a K&N directly to the AFM. That should eliminate any flow issues and isolate the length as the main variable.
I altered the route to include highway miles.
Car drove perfectly- I can't claim "better" but certainly, no worse.
For the trip home I installed the airbox...again, fine.
Tomorrow morning I drive across town to help out on my friend's TT again, so I'll see how the new setup works.
I anticipate no problems.
Assuming all goes well, the final step will require messing with some of the foam ducting I just put in.
I have a perfect 90� tube for the airbox intake that will pull from way in the nose, I just need to provide space for it to exit the foam.
Pics will show what I'm talking about.
Joined: Mar 2001
Posts: 31,863
Likes: 3,243
From: https://www2.mazda.com/en/100th/
here is Mazda's chart on the length of the intake tube, you can see its fairly insensitive, but shorter is better. also the ID of the stock tube is pretty small (the OD is huge)
i've no idea why that is so small, the measurement starts @400mm and goes to 1000mm, the VE is 97-98-99-100. it is a bit odd they chose the lower VE option, everywhere else they didn't.
i've no idea why that is so small, the measurement starts @400mm and goes to 1000mm, the VE is 97-98-99-100. it is a bit odd they chose the lower VE option, everywhere else they didn't.
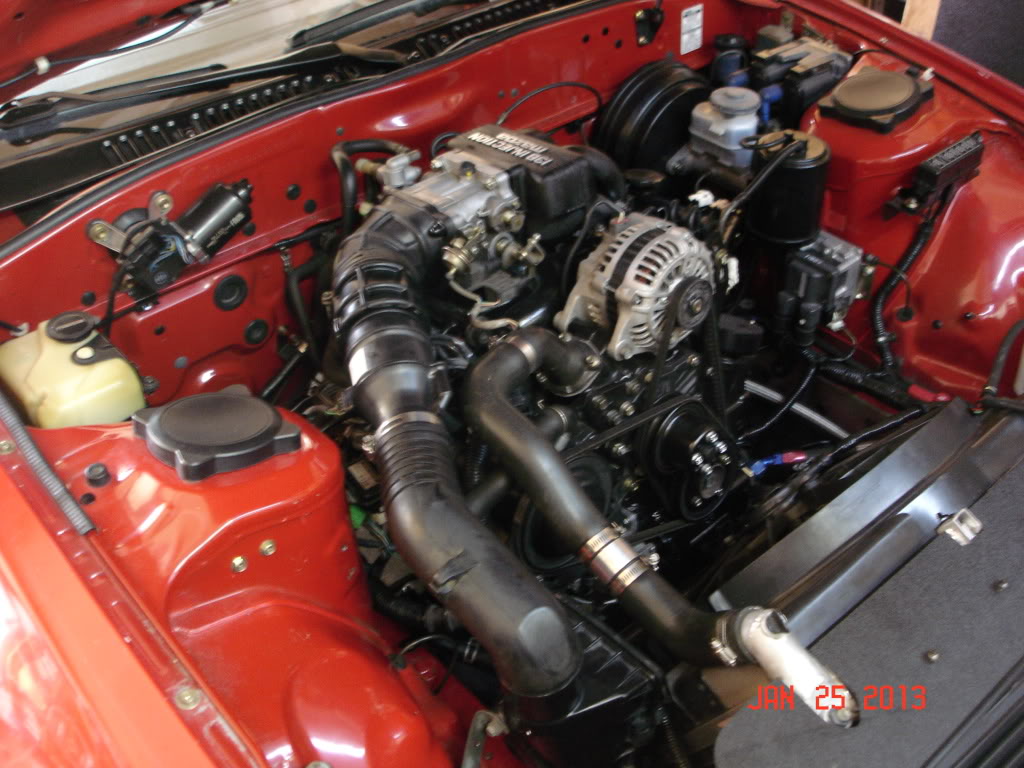
I bought this CAI setup from JohnV that was on his former Pro Solo II car.
https://www.rx7club.com/2nd-generati.../#post10601567
He did some interesting data loging with the air flow meter and found the factory inlet tubing had some "limitations".
Here are a couple photos of the setup installed on my car.
https://www.rx7club.com/2nd-generati.../#post10601567
He did some interesting data loging with the air flow meter and found the factory inlet tubing had some "limitations".
Here are a couple photos of the setup installed on my car.
Last edited by DeaconBlue; Jan 26, 2013 at 11:03 AM.
Jeez, you guys with your graphs, datalogging and maths and stuff...interesting.
I guess I needn't point out that I tend to take a more empirical approach, a "strap it on and let's ride!" type of thing.
Today's travels, with the new Audi hose setup strapped in, was a rousing success.
In that the car did not catch fire or go into limp mode.
Actually, she was perfectly normal although my friend (who besides me has the most seat time in my car) thought it was decidedly crisper and torquier than when installed in the '91.
Who knows.
I do have a question of a more theoretical nature though...
When I first started messing with the intake a few years ago, one of my baseless but unquestioned beliefs was that there was no advantage in using tubing larger than the intake end of the AFM, that the meter was the chokepoint in the system.
From a practical standpoint this has served me well...no reducers necessary and smaller tubing is easier to package. Plus, I can't say I've been able to detect even a whiff of hesitation or power loss compared to the stock intake (or the short intake with the K&N, for that matter).
But, is that really a fair assumption?
/inane questioning
My buddy gifted me with a new stereo headunit he'd forgotten he had, so music will be in the future...after I acquire some speakers.
Baby steps.
Tomorrow I remove the entire intake and prepare it for final install.
I'll show you what needs to be done then.
Joined: Mar 2001
Posts: 31,863
Likes: 3,243
From: https://www2.mazda.com/en/100th/
I do have a question of a more theoretical nature though...
When I first started messing with the intake a few years ago, one of my baseless but unquestioned beliefs was that there was no advantage in using tubing larger than the intake end of the AFM, that the meter was the chokepoint in the system.
When I first started messing with the intake a few years ago, one of my baseless but unquestioned beliefs was that there was no advantage in using tubing larger than the intake end of the AFM, that the meter was the chokepoint in the system.
i don't think the AFM helps, but its not hurting much. my friend has a t2, and when we put the haltech in it we left the stock AFM and TID and stuff, tuned it, and then step 2 was to replace the AFM with a pipe (which the S5 airbox will let you do), so we did.
i expected some huge change in the mixture, cause it was going to flow so much more air cause that teeny AFM was gone, but no; mixture was the same.
who knew?
I'm probably pushing (violently) the outer edges of the envelope in terms of tubing and config with this new setup.
There is a method to the madness however, obscure though it may be and I'll try to explain it in a bit.
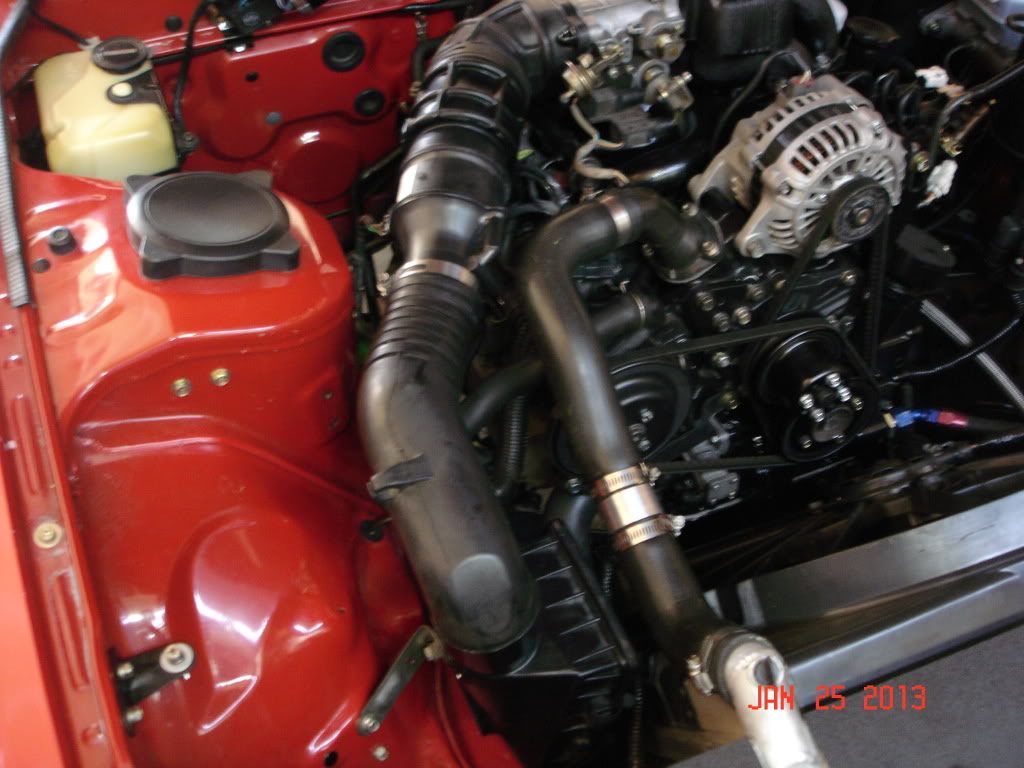
First up today was a minor mod to the airbox itself.
It had a port for a PVC valve (presumably) that was preventing the box from sitting the way I wanted, so off it came:


I used the top of the little box as the new cover for the hole, it was glued from the inside.
Now the airbox can sit flat on the framerail, tucked closer to the wheelwell.
I visited Home Depot Racing and got a 3/4" 90� barbed elbow to connect the air pump to the new Audi tube, it fits without modification to the hose.
(Remember, I want to be able to revert to the Mazda airbox if needs be...)
Then I spent a bunch of time just trial fitting various intake tubes I had laying around to see what I could do about pulling air from in front of the rad/oil cooler.
This was the first complete setup:
A bit Rube Goldbergesque, I'll admit.
This time I dropped the belly pan and undid the rad to move it over (hoses still connected) to make it easier to fish the hose through the channel between the lower part of the rad mount and the frame. Basically the same space occupied by the oil hoses on the other side.
Once the airbox and first hose were installed, did some more tube swapping till I arrived at this:
It's the nearly ideal spot from which to suck ambient air, it's just a shame I had to build a labyrinth to get to it.
I have the sneaking suspicion that I could remove all the hose and just pull from the bottom of the airbox (about halfway down the framerail, just next to the lower corner of the rad) and it wouldn't make a damn bit of difference.
I'll need some daily driving to see how it holds up.
The semi-unfinished (or finalized, to be more accurate) nature of the intake is still good enough for me to begin on the project that incited all this nonsense to begin with and I wasted no time:
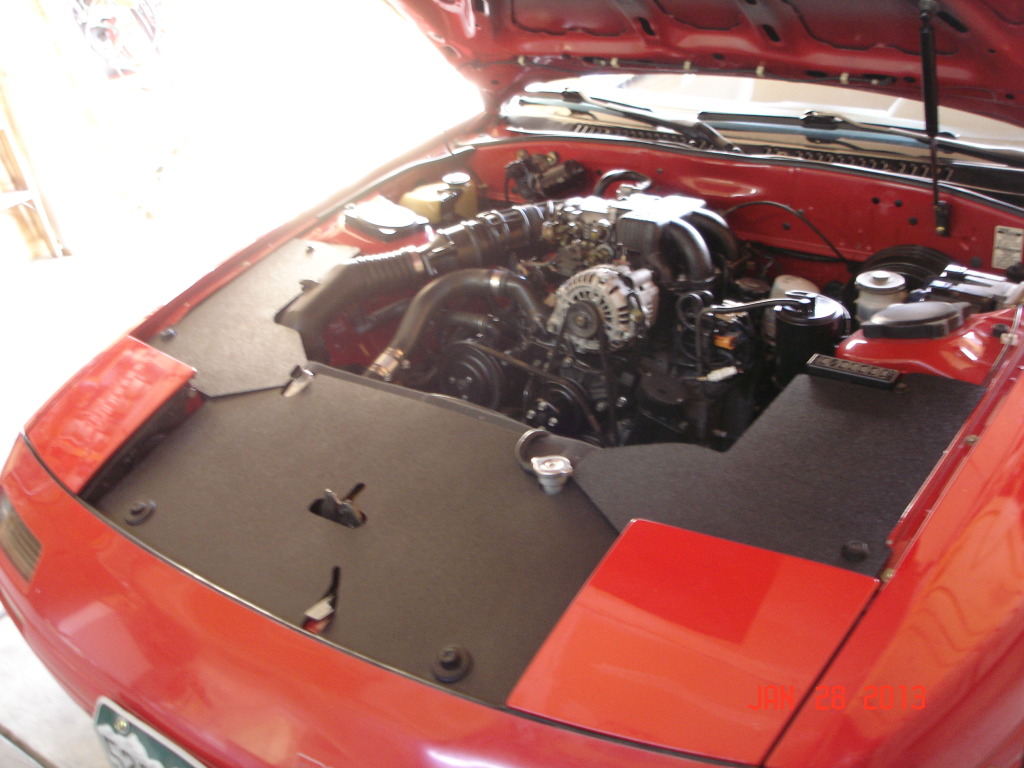
This new coverplate (or whatever it should be called) is the first step in what I think will be a three step program.
My immediate problem is that I can't decide what order to complete the final two stages...I could go either way and still be successful, I think.
This new rad shroud is the largest I've built so far.
It extends all the way over the top of the radiator and to the outer edge of the Taurus fan shroud and also behind the headlights.
Think of it as the artist stretching his canvas before painting...I wanted a big canvas.
More to come tomorrow.
Hmmmmm.... While I must commend you for your continued exhibition of junkyard ingenuity and general genius, I feel compelled to give my two cents on the intake. It's ugly. I don't see why you have not simply got some aluminum tubing and paint it black? That would get rid of all the weird plastic tabs and extrusions made for other engine bays and clean it up.
Otherwise this is really looking good, sir! Your meticulous attention to detail is inspiring, if not slightly psychotic.
Otherwise this is really looking good, sir! Your meticulous attention to detail is inspiring, if not slightly psychotic.
Hmmmmm.... While I must commend you for your continued exhibition of junkyard ingenuity and general genius, I feel compelled to give my two cents on the intake. It's ugly. I don't see why you have not simply got some aluminum tubing and paint it black? That would get rid of all the weird plastic tabs and extrusions made for other engine bays and clean it up.
As for the tubing itself...it's like legos, I can make all sorts of different layouts easily and cheaply (since I already have this stuff).
As I said before, I think most of the intake pre-airbox will be deleted anyway.
As I spent hour after hour cleaning/tapping, etc. I was visualizing what I might want the bay to look like and formed a fairly hazy concept that I am only now trying to implement.
"Trying" would be the operative word there, I kinda know what I want but I'm not quite sure how to get there on my budget and with my tooling/experience.
Some of these ideas can only be considered after made real, talking about them or drawing them (especially given my drafting skills) isn't enough.
And, it should be again noted...none of this is permanent or required drilling/modding the chassis at all...back to stock is an easily achieved goal.
Today I moved to the second stage of the project...probably the most debatable/controversial part of the job.
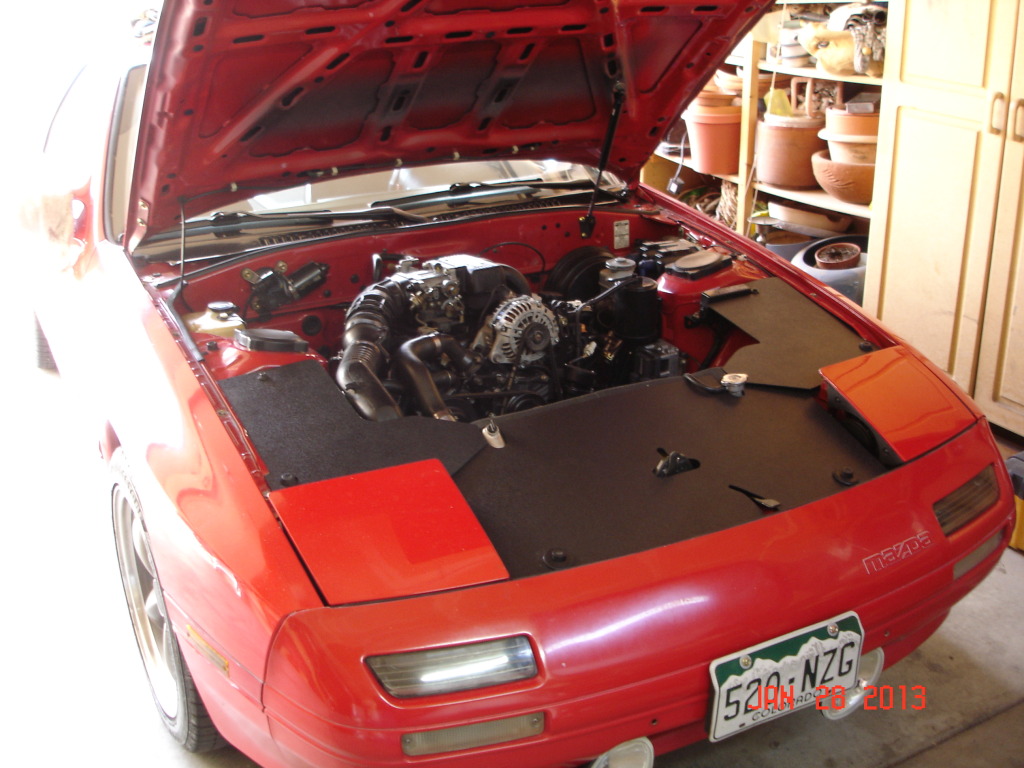
Now you begin to see what I'm going for.
This is the first attempt at the side sub-panels, fresh off the cutting table. The finished version would have fasteners joining the panels to the main center section but I don't want to commit to that just yet...if I change the design (likely) or decide against them altogether (quite possible), I don't want the center panel riddled with holes (because the center panel is a keeper).
Anyway, they should- and will- sit flat if I continue.
I only just finished up and haven't spent a lot of time contemplating the outcome, so I haven't formed much of a opinion either way.
I does look different though.
Pics of the bay w/o the side panels for comparison? It would be a shame to have gone through all that tuck work and not be able to see the results! It does have a real slick appearance all covered like that though... I like the center piece!