
My build up thread!

Thread Starter
Joined: Jan 2005
Posts: 4,658
Likes: 0
From: ludlow, pa
Your build is looking great! Whats the ETA until roll-off?
That's cool at least ya won't have to go far. Lights look good man. You'll be rolling before ya know it.
Pic request of AEM tru-boost solenoid and supplied lines (either how it is now or once its hooked up) please.
Debating which EBC to get and the Tru boost would fit where my boost gauge is now, plus match the AEM wideband......
Debating which EBC to get and the Tru boost would fit where my boost gauge is now, plus match the AEM wideband......
its a 2 wire solenoid and comes with fittings for AN or the barbed fittings. the main harness is 1 unit (already installed sorry) it splits so the main power harness can stay in the cabin and then has the LONG 2 wire hook up for the solenoid. havent seen it in action but i already think its a well priced piece!! the cheapest i could find was the link i gave above. i think 260 was the price shipped.

im not sure what the black thick rubber band thing is though??
this is exactly what came in the box (besides the gauge and harness and instructions) only thing im unsure about is it uses a percentage to turn the boost up. so when you turn it up it goes from say 1% to 90% gain. i guess when i am ready to turn it up ill just go 1% at a time untill i reach the desired amount.
Thread Starter
Joined: Jan 2005
Posts: 4,658
Likes: 0
From: ludlow, pa
this weekend should have some good updates!!!!
heres a teaser for ya!!!
this is a moc up for now......

more fav pics!!!!
hahahah
**edit**
i still need to seal up the polished parts
re-position the turbo
paint the TB......
few more things to do....
heres a teaser for ya!!!
this is a moc up for now......
more fav pics!!!!
hahahah
**edit**
i still need to seal up the polished parts
re-position the turbo
paint the TB......
few more things to do....
Thread Starter
Joined: Jan 2005
Posts: 4,658
Likes: 0
From: ludlow, pa
http://www.himni-racing.com/index.ph...oducts_id=1025
i was pretty worried after i bought it. it took a while and there communicaton sucks!!! its to bad. there work is outstanding!! i called numerous times (after getting there # from paypal) and after i left 2 messages i got an email stating they were going to start making it. i waited another week with no email or anything to find out they had there # disconnected!!!!
it was risky but DAMN worth it!!

Thread Starter
Joined: Jan 2005
Posts: 4,658
Likes: 0
From: ludlow, pa
thanks
the pod is from the company 5one5 innovatoins
they had them for sale on here a while back. they dont sel them anymore but some times you can get a forum member to give one up. thats how i got mine.
and i dont mind at all if you use the idea. i got it from this site as well. so im not the first to do it by any means. i just wanted a front mount without having to run piping all over hell and losing response.
last nite i was able to polish up the rest of my parts.
UIM
LIM
water pump housing
water neck
and my HIGI elbow
i then coated them in POR-15 clear coat made for polished alluminum. i think they turned out fine. ill post pics later on.
Thread Starter
Joined: Jan 2005
Posts: 4,658
Likes: 0
From: ludlow, pa
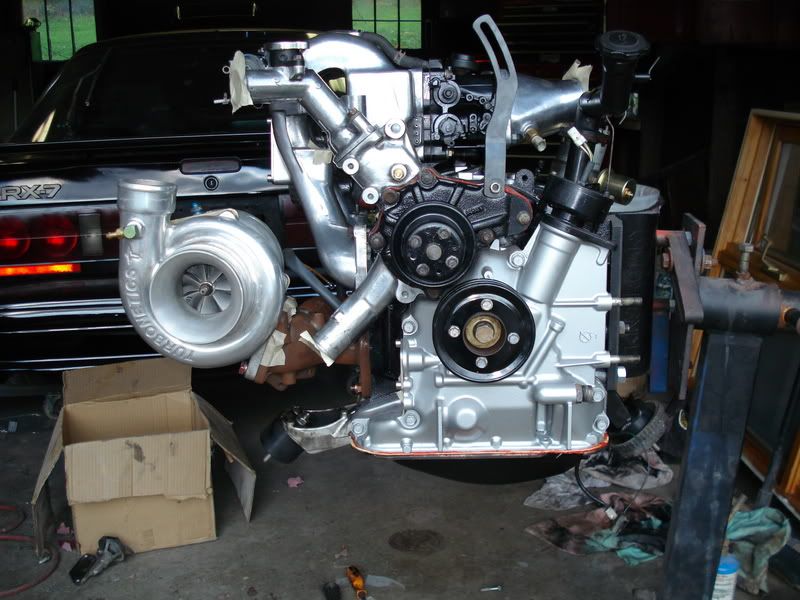
well, i didnt get done what i thought. as usual assembling a block you always run into problems. i did get about 90% of it done though.
i got the LIM (lower intake manifold) on, the water pump and housing, oil pan, blocked off the oil injector's.....im stuck on the air bleeds for the primary injectors (i think i got it now) and the pilot seal is gonna need some TLC to get out.
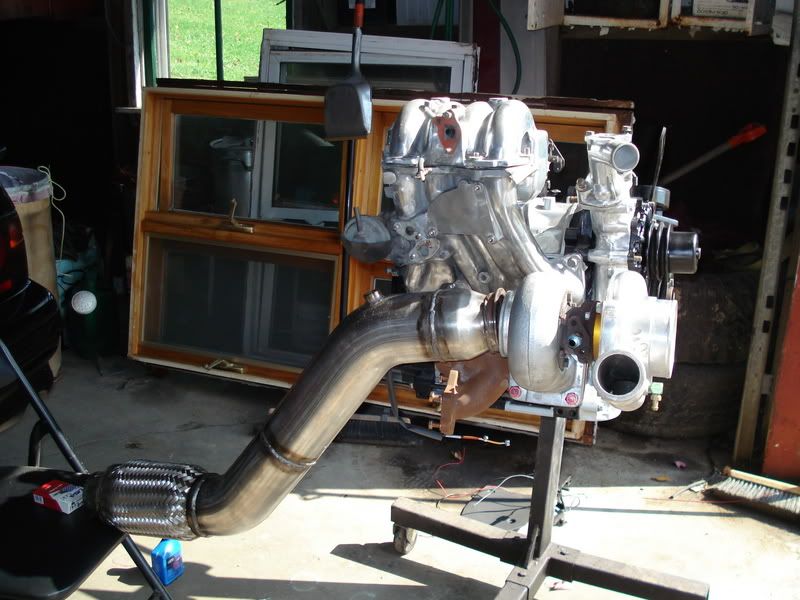
heres the motor after the parts were coated with the POR-15 clear coat stuff. really great product BTW!!!
you can see my higi elbow really turned out fantastic!!
there is tape between the turbo and manifold because i only set it on there to move the cartridge the way i needed it. its back off AGAIN for now.....
i got the LIM (lower intake manifold) on, the water pump and housing, oil pan, blocked off the oil injector's.....im stuck on the air bleeds for the primary injectors (i think i got it now) and the pilot seal is gonna need some TLC to get out.
heres the motor after the parts were coated with the POR-15 clear coat stuff. really great product BTW!!!
you can see my higi elbow really turned out fantastic!!
there is tape between the turbo and manifold because i only set it on there to move the cartridge the way i needed it. its back off AGAIN for now.....
Thread Starter
Joined: Jan 2005
Posts: 4,658
Likes: 0
From: ludlow, pa
wellllllll.....
i been trying to get this power steering rack taken care of. i been so busy with other things i havent had time. its apart and the seals are all out so its pretty much assembly time for the rack. heres the link to show how im doing it.ill also have a couple pics of my own. i will hopefully will have it done tommorow and install it. THEN the motor can be installed!!
this weekend im betting the motor will be in.


Thread Starter
Joined: Jan 2005
Posts: 4,658
Likes: 0
From: ludlow, pa
That's some nasty cigerettes that you smoke.
So you paint the parts with regular engine paint ****, and then clear coat it? Same with polished ****?
So you paint the parts with regular engine paint ****, and then clear coat it? Same with polished ****?
im not sure if you can brush the POR stuff onto painted parts??
http://www.por15.com/prodinfo.asp?grp=GPC&dept=6
thats what i used. i didnt brush it on the painted parts. maybe i should have tried it on something to see how it turned out.

but the paint i used is a high temp engine paint.
Ah okay, I was somewhat curious.
I'm happy that downpipe worked out pretty well. I was freaking out for a while when they weren't responding, and it being my recommendation, it would of been indirectly my fault.
You going to run a resonator inline? Or just sport a muffler?
I'm happy that downpipe worked out pretty well. I was freaking out for a while when they weren't responding, and it being my recommendation, it would of been indirectly my fault.
You going to run a resonator inline? Or just sport a muffler?
Thread Starter
Joined: Jan 2005
Posts: 4,658
Likes: 0
From: ludlow, pa
well, i bought a cheap cat that will get me through inspection (visual only) but i have a 3 inch cat back HKS HI power exhaust. a straight pipe will be put in place after inspection. or i may even hollow it out since its 3 inch...
Por 15
Originally Posted by im not sure if you can brush the POR stuff onto painted parts??
[url
[url
http://www.por15.com/prodinfo.asp?grp=GPC&dept=6[/url]
thats what i used. i didnt brush it on the painted parts. maybe i should have tried it on something to see how it turned out.
but the paint i used is a high temp engine paint.
thats what i used. i didnt brush it on the painted parts. maybe i should have tried it on something to see how it turned out.
but the paint i used is a high temp engine paint.
Thread Starter
Joined: Jan 2005
Posts: 4,658
Likes: 0
From: ludlow, pa

anyways..........
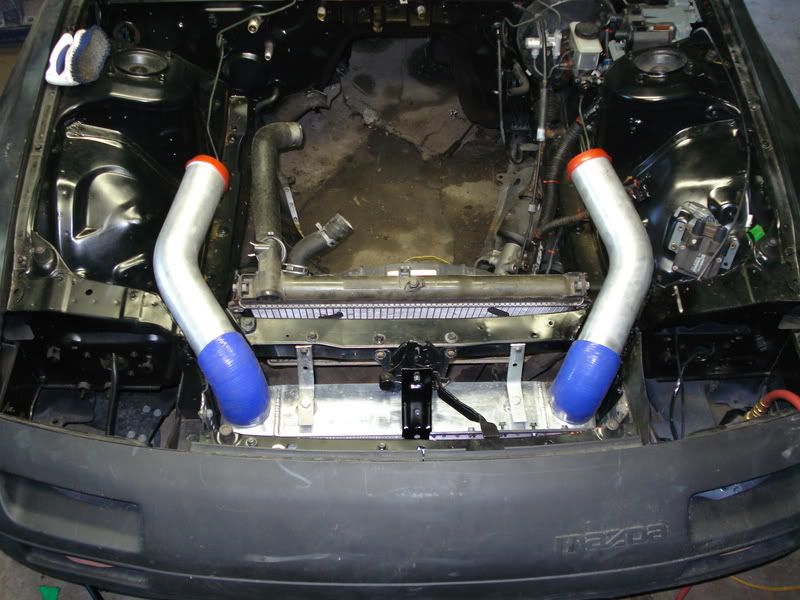
the motor is IN!!
pics are loading now.....you wont believe how short the piping is for the IC!!! i about shat my pants!! i had to moc it up to see how it worked out and im only using 3 pieces of IC pipe!!!!
the only trouble i had installing it (by myself) is crawling from under the car and back out COUNTLESS times to line everything up. other than that it went WAY better than expected!!
i should have pics in less than an hour so stay tuned!! you wont be dissapointed!!
Thread Starter
Joined: Jan 2005
Posts: 4,658
Likes: 0
From: ludlow, pa
so first you can see the pesky steering rack needed its fluid source taken care of.

i didnt get invloved in taking pics of the process since i posted a link on how i did it.
heres the motor hanging waiting for its home!!

also, those are the 17 inch rims and tires ill be using. im taking them to get powder coated black and ill have a polished lip for those who are wondering. i also had to switch shocks from my parts car since they had 2 year old tockico's
i didnt get invloved in taking pics of the process since i posted a link on how i did it.
heres the motor hanging waiting for its home!!
also, those are the 17 inch rims and tires ill be using. im taking them to get powder coated black and ill have a polished lip for those who are wondering. i also had to switch shocks from my parts car since they had 2 year old tockico's
more progress was made today:
after i finished boxing in the other side and cleaning it all up i got it painted up. I went to LOWES today to get my strap to run across the bottom of the IC for more support. i then took the latch support and marked it off and cut a slight line across so i could bend it alot easier. after i bent it into place i was able to clean it up and weld the line i cut into it to give back the support it needed for the hood latch. then i painted it. as you can see it turned out well IMO. i really like how the shortness of the IC pipes are for more boost response instead of running the IC pipes down and around. total cost of this was about $350. money well spent i think!!
and now for the pics!!:
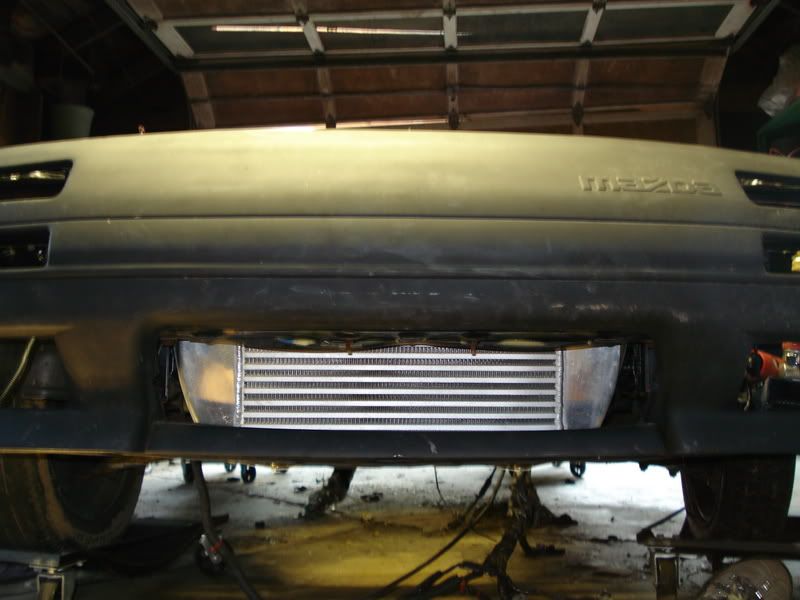
I overall recommend to box the IC/ RAD with sheetmetal because it just works!
There have been a lot tests, and it's also pretty obvious that it will help!
Anyway, your ride looks sweet, good luck with it!


Thread Starter
Joined: Jan 2005
Posts: 4,658
Likes: 0
From: ludlow, pa
Hey, about this, I have an idea for you that I saw in modified on the HKS drift Aletezza. HKS did this exact thing, and then took a plate, on top, with holes cut out for the IC pipes. Their's was Carbon fiber, but you could do the same with a piece of painted sheetmetal, and still get the same cooling benefit!
I overall recommend to box the IC/ RAD with sheetmetal because it just works!
There have been a lot tests, and it's also pretty obvious that it will help!
Anyway, your ride looks sweet, good luck with it!
I overall recommend to box the IC/ RAD with sheetmetal because it just works!
There have been a lot tests, and it's also pretty obvious that it will help!
Anyway, your ride looks sweet, good luck with it!
good thinking but im already 1 step ahead of you....

i have a rad. cover panel in my possesion that i will trim to fit and use foam strip anywhere possible for better air flow through the IC and rad.
thanks though!!
im also going to make my own ducting (next summer) before i start boosting. winter is RIGHT around the corner and im never going to have time to start tuning into boost. ill be lucky to break the motor in. im thinking all i will be able to do is drive it to my new home once i get it. then its back to storage...
Last edited by 88rxn/a; Oct 21, 2007 at 06:24 PM.