When you click on links to various merchants on this site and make a purchase, this can result in this site earning a commission. Affiliate programs and affiliations include, but are not limited to, the eBay Partner Network.
Looks great, can the contacts be re-plated, or are we just SOL?
I assume they can be but it would be a pain in the ***. There are home electroplating kits for small projects like this.
For the LHD combo switches at least you can still buy new switches from Mazda.
I lightly polished the contacts. I have read that others have found this only works for a while before becoming worse (perhaps due to corrosion). I'll consider putting in some kind of appropriate grease and see how it goes. I have some spare second-hand switches as well as new aftermarket switches that have new leafs.
Some further quick research indicates that you can buy brand new plated contacts in various sizes! Read here on how people restore these in old arcade machines: https://pinside.com/pinball/forum/to...-leaf-switches
I'm sure replacing just the contact itself is something that could be done for these switches if replacements of the whole switch is no longer possible.
Another option mentioned on a Miata forum is to tin the contacts using a soldering iron. The posters observe the power window switch contacts from Mazda are tin-plated. It looks to me like the contact themselves are copper and have been plated with tin or nickel. Tinning with solder would provide a similar finish and protect the terminal against oxidation. This might work provided that the tin layer was not too thick. See here: https://forum.miata.net/vb/showthread.php?t=127240
While chasing a gremlin that likes to shut down the fuel pump on our car we had much of the dash and center console out (the instrument pod was being serviced too). Since the audio system was out it was cleaned with contact cleaner then all pots and slider lubed with INOX. No more crackling noises from the audio and the power antenna works! Since the antenna started working we decided to clean and lube that too.
Last edited by injuhneer; Apr 29, 2020 at 12:02 AM.
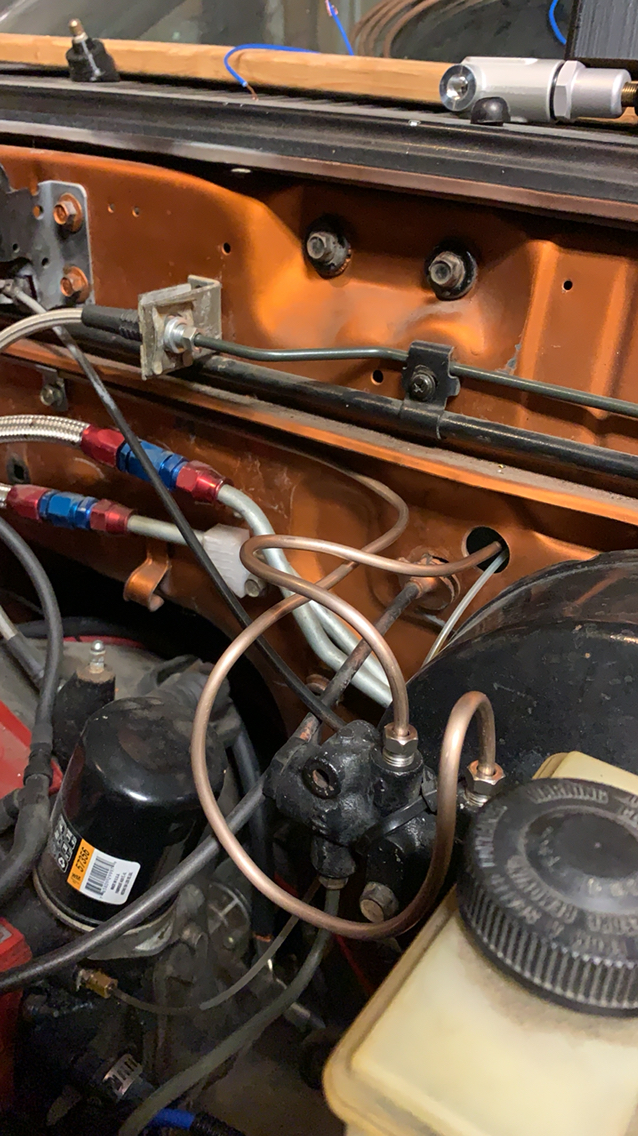
Continued work on doing all the brake line, wil wood prop valve. Been waiting for my braided axle to chassis line for over 10 days. Thanks Covid. Attachment 740861
I'm confused as to what's happening, are you running the OEM proportioning valve in to another prop valve (wilwood)?
would it not make more sense to delete the OEM and run the master directly to the wilwood unit?
Continued work on doing all the brake line, wil wood prop valve. Been waiting for my braided axle to chassis line for over 10 days. Thanks Covid. Attachment 740861
I have Fc calipers all around. It's a will wood inline prop valve just for the rear. I don't expect to have to change it much, more of a just in case
Unless someone with more experience can tell me otherwise or if I am doing something wrong. Thanks.
Replaced windshield washer nozzle with a dealer part.
It broke off where the clip presses against it. First it cracked and washer fluid just sprayed the area under the wipers.
Maybe too many years under the Texas sun made it brittle.
Have any of you guys ever used these type of solid motor mounts. I installed a set yesterday, I fell like it lifted my engine too much up and it's kinda slated upward. I wonder if this would cause drivetrain issues in the future. Do any of you guys have experience with these?
Those are awfully thick. I've not used them, but you may get some driveline vibration if they trans output and rear end angles changed too much. Not likely, but if it does at least you will know.
I finally drove my SA today. Been sitting on jack stands for nearly two months now (I know, that's not that long for a lot of folks projects) while I replaced a crushed thrust bearing, did some rust treatment (just surface rust thankfully) and other such things. Happy to report there are no leaks, the car drives beautifully (this also fixed my clutch issue), and I'm just plain out extatic to drive it again; I mean, it's my daily so these last couple months with COVID were well timed.
The new exhaust will hopefully ship out soon. RB has on their site that the 15th is the estimated availability date so I guess we'll see what happens soon.
A few other things I've taken this opportunity to do I'll list below:
- fixed the smashed up radiator fins by PO; took a bit over two hours to get everything back in place
- cleaned out the fmoc; someone at one point tried to paint it and all they did was completely clog it up. Should cool a lot better now
- relocated my subwoofer from behind the passenger seat to under the 'bin' area; I'll attach a photo, and of course because it's an SA there are no actual bins
- swapped engine braces as I never before noticed how bent the old one was; it came out of a car with front-end frame damage, go figure...
- rebuilt the omp; no more leaks!
- relocated the engine ground
- removed the remainder of the rats nest to replace with a generic pcv; that was the only thing left on the rats nest and it really cleaned up the top of the engine
- repainted the front cover; due to a myriad of coolant leaks and omp leaks it had gotten quite disgusting
- new hood rod clip; minor but definitely nice to have as the old one simply didn't exist
- glued the fmoc mounts; I used a contact adhesive as it remains flexible and so far it's holding up really well, but it's only been two days so... we'll see
- general rust treatment and painting; all minor surface rust thankfully
- rerouted the headlight hardness; it used to be this in-your-face bright yellow harness across the radiator shroud, now it's hidden below
- redid the timing marks; I tried a while back to do them with the pulley still installed. Needless to say it didn't work out so well
There's probably more but that's already long enough of a list to bore folks with. To wrap this up I'll include a before and after picture somewhere below.
At some point here I'll clean up the wiring for the alternator. While it works fine as is, it doesn't really look so great.
And finally here's a photo of the relocated subwoofer (it has less than a half inch of clearance under the cover plates once they're installed).
I picked mine up from Atkins when I ordered my other engine parts. Only $4.75 from them. And yes, the part is the same between first gen RX-7's and the 06-13 MX-5's (or at least that's what I see for part numbers).
Polished and care for the 32 year old Racing Beat exhaust. Surprised what a quality! Not shure a new muffler will compare to the rest of the old long primary exhaust and sounding as good.