Old School and Other Rotary Old School and Other Rotary Powered Vehicles including performance modifications and technical support

Tegheim - Home made 4 Rotor Wolvo project

Thread Tools
 
Search this Thread
 
Old 01-09-13, 10:06 PM
  #776  
4th string e-armchair QB

iTrader: (11)
 
Trots*88TII-AE*'s Avatar
 
Join Date: May 2005
Location: North Bay, Ontario
Posts: 2,745
Likes: 0
Received 0 Likes on 0 Posts
Originally Posted by John Huijben
Nice! I did mine just like that too. https://lh5.googleusercontent.com/-f...bB4/s912/9.JPG

You can place the fuel rail really close to the engine if you place the injectors here, it makes for a nice and compact setup. I'd like to try placing the injectors in front of the intake trumpets F1 style like this:

https://www.cloudshops.com.au/WebRoo...lery/PE042.jpg

But I think it might hurt the engine at idle / lower loads.
Do both, the port injection for idle/low speed, and staged secondaries in the trumpet for better atomization and I think you even get a bump in power from creating a more dense charge?
Old 01-10-13, 12:00 AM
  #777  
Senior Member

Thread Starter
 
tegheim's Avatar
 
Join Date: Nov 2003
Location: Sweden
Posts: 533
Likes: 0
Received 2 Likes on 1 Post
Originally Posted by Trots*88TII-AE*
I hate to ask, but is casting your own housings economically beneficial vs. new ones??? Or are you looking to create a better design, or just wanted to try doing it yourself because you can? Keep up the great work!
If I don't charge my own time it will be cheaper to do them myself, but thats really not the reason.
For the challenge! Mazda have already taken care of the design, all we have to do is make it shine
Old 01-10-13, 01:10 AM
  #778  
Progressive Rotorhead

iTrader: (9)
 
JDriftM's Avatar
 
Join Date: Jul 2003
Location: Cincinnati, OH
Posts: 622
Received 1 Like on 1 Post
I should have my direct injection 13b setup and running by June of this year. I will let you know how much we save on fuel consumption versus power gained with this setup. Should be interesting. I do like the custom cast housings.....would love to do this with DI.
Old 01-12-13, 12:05 PM
  #779  
Senior Member

Thread Starter
 
tegheim's Avatar
 
Join Date: Nov 2003
Location: Sweden
Posts: 533
Likes: 0
Received 2 Likes on 1 Post
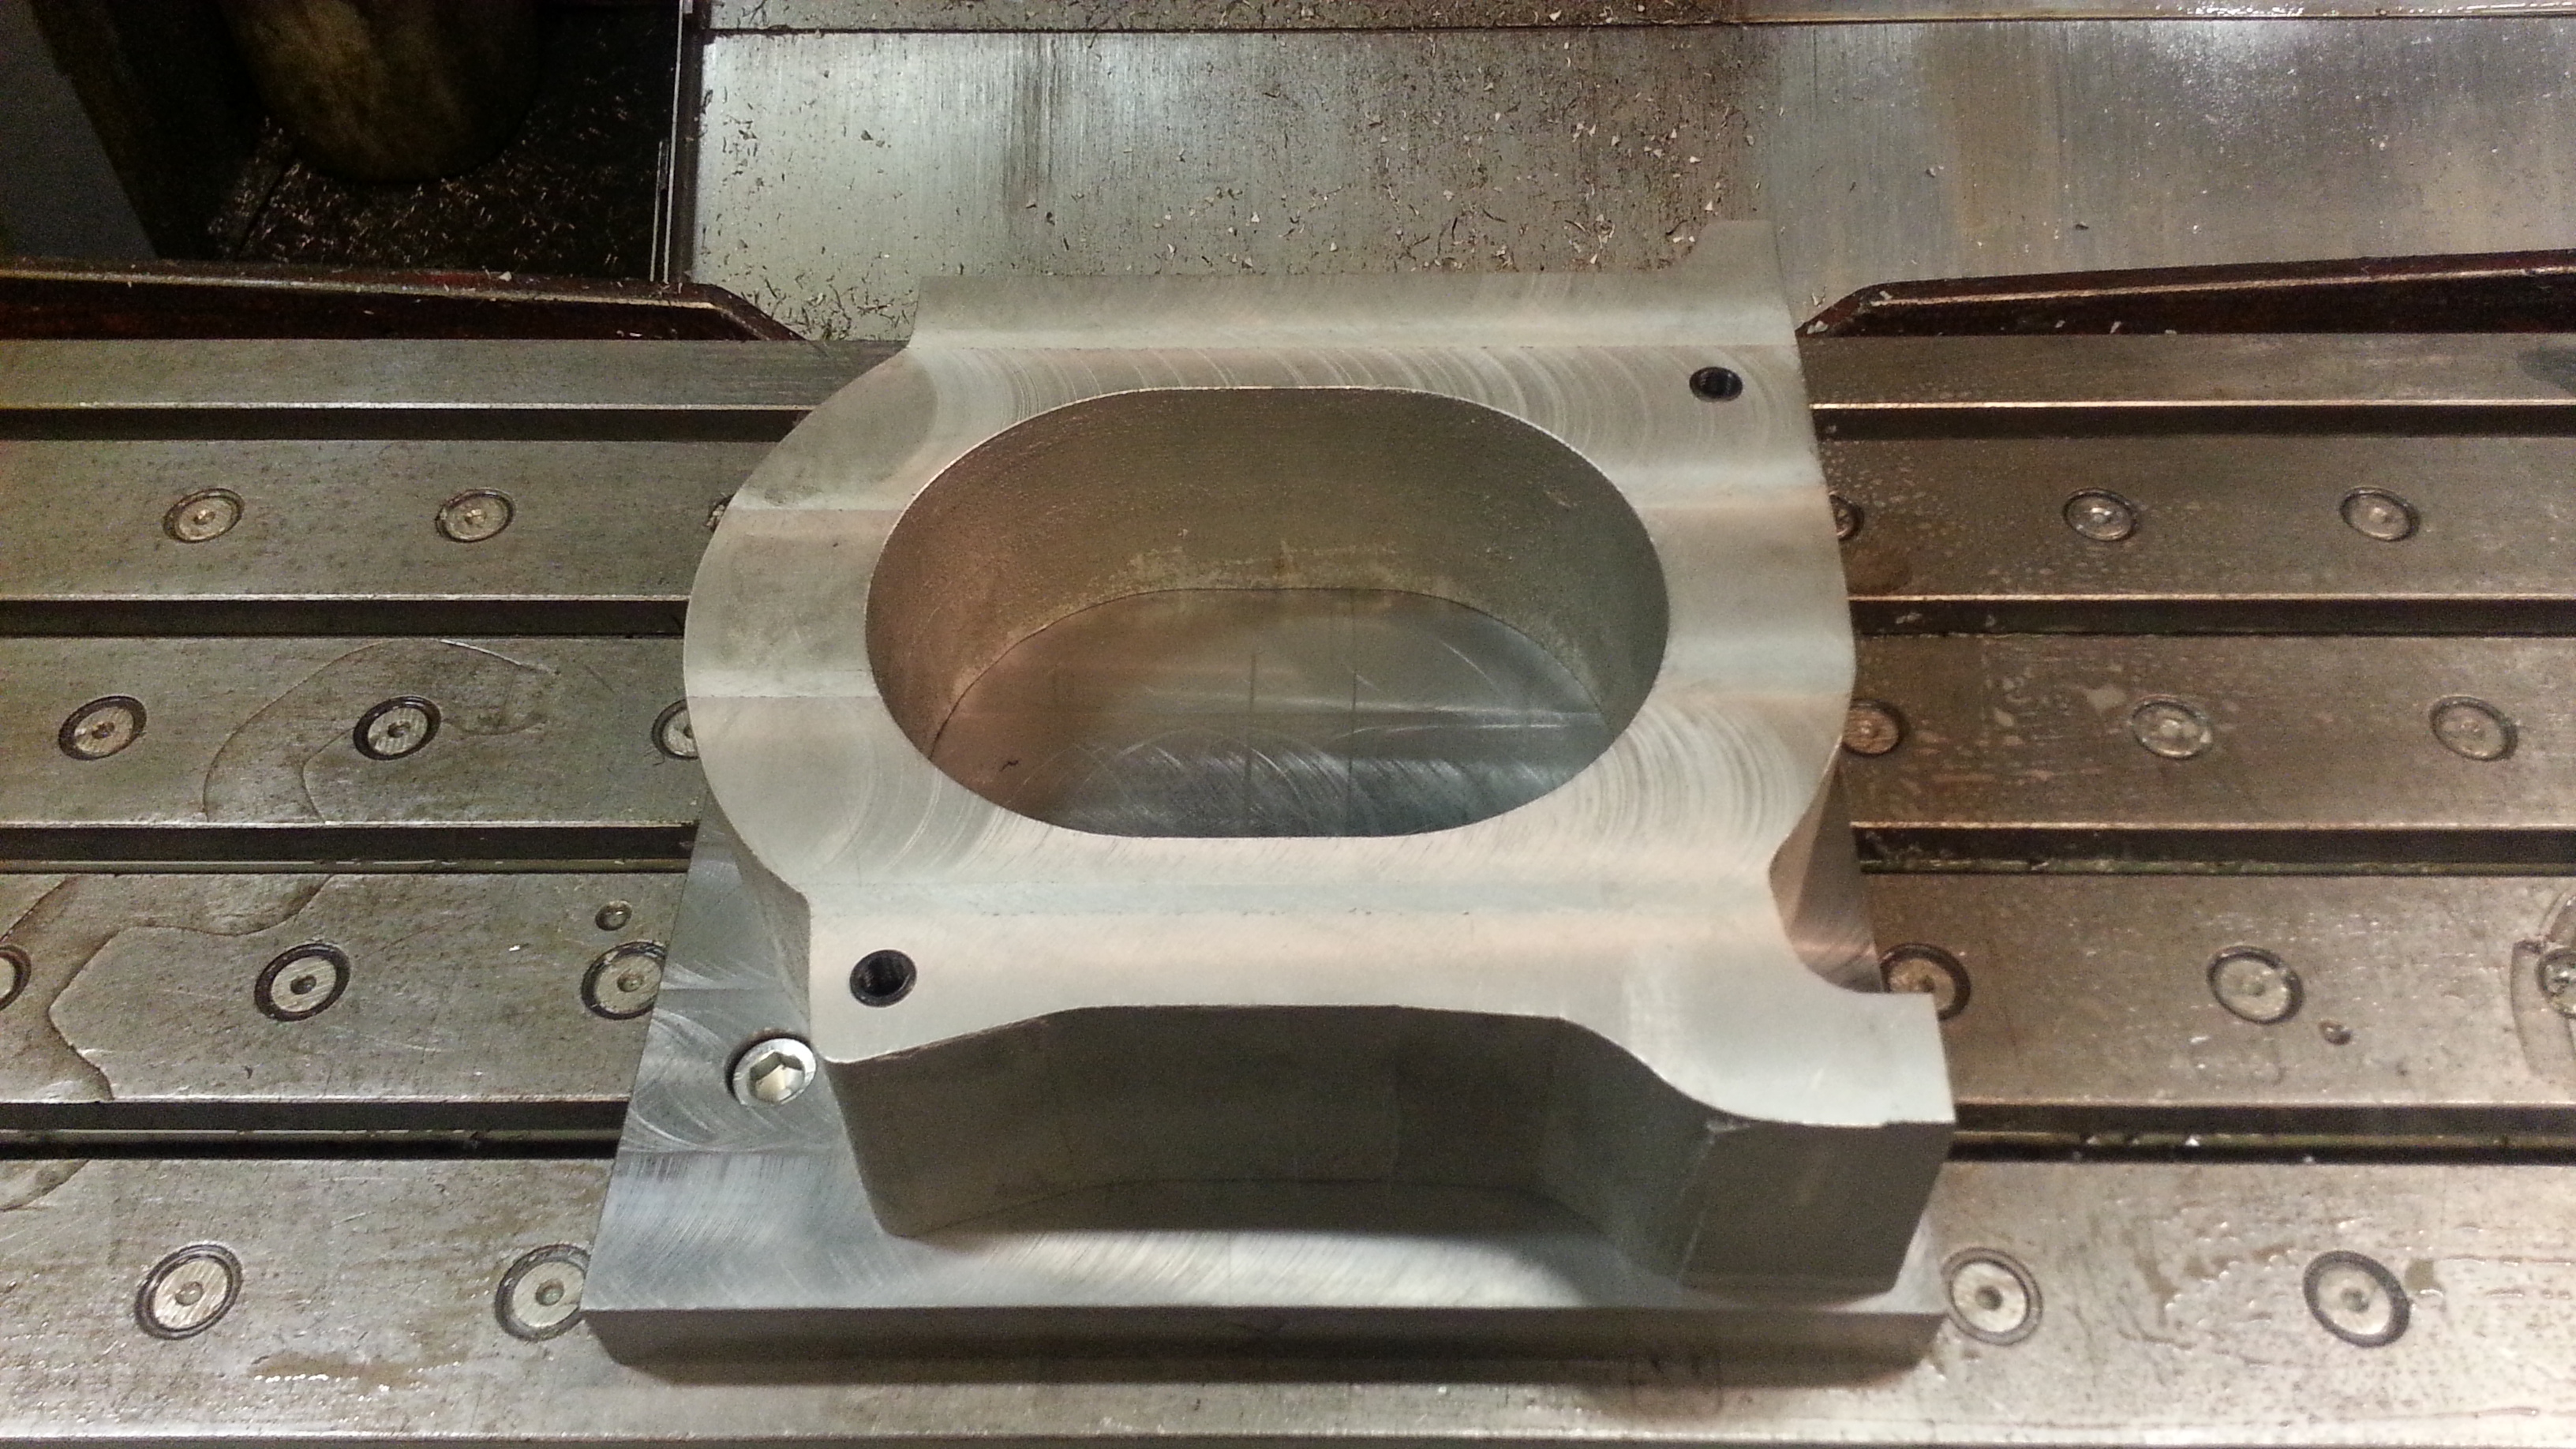
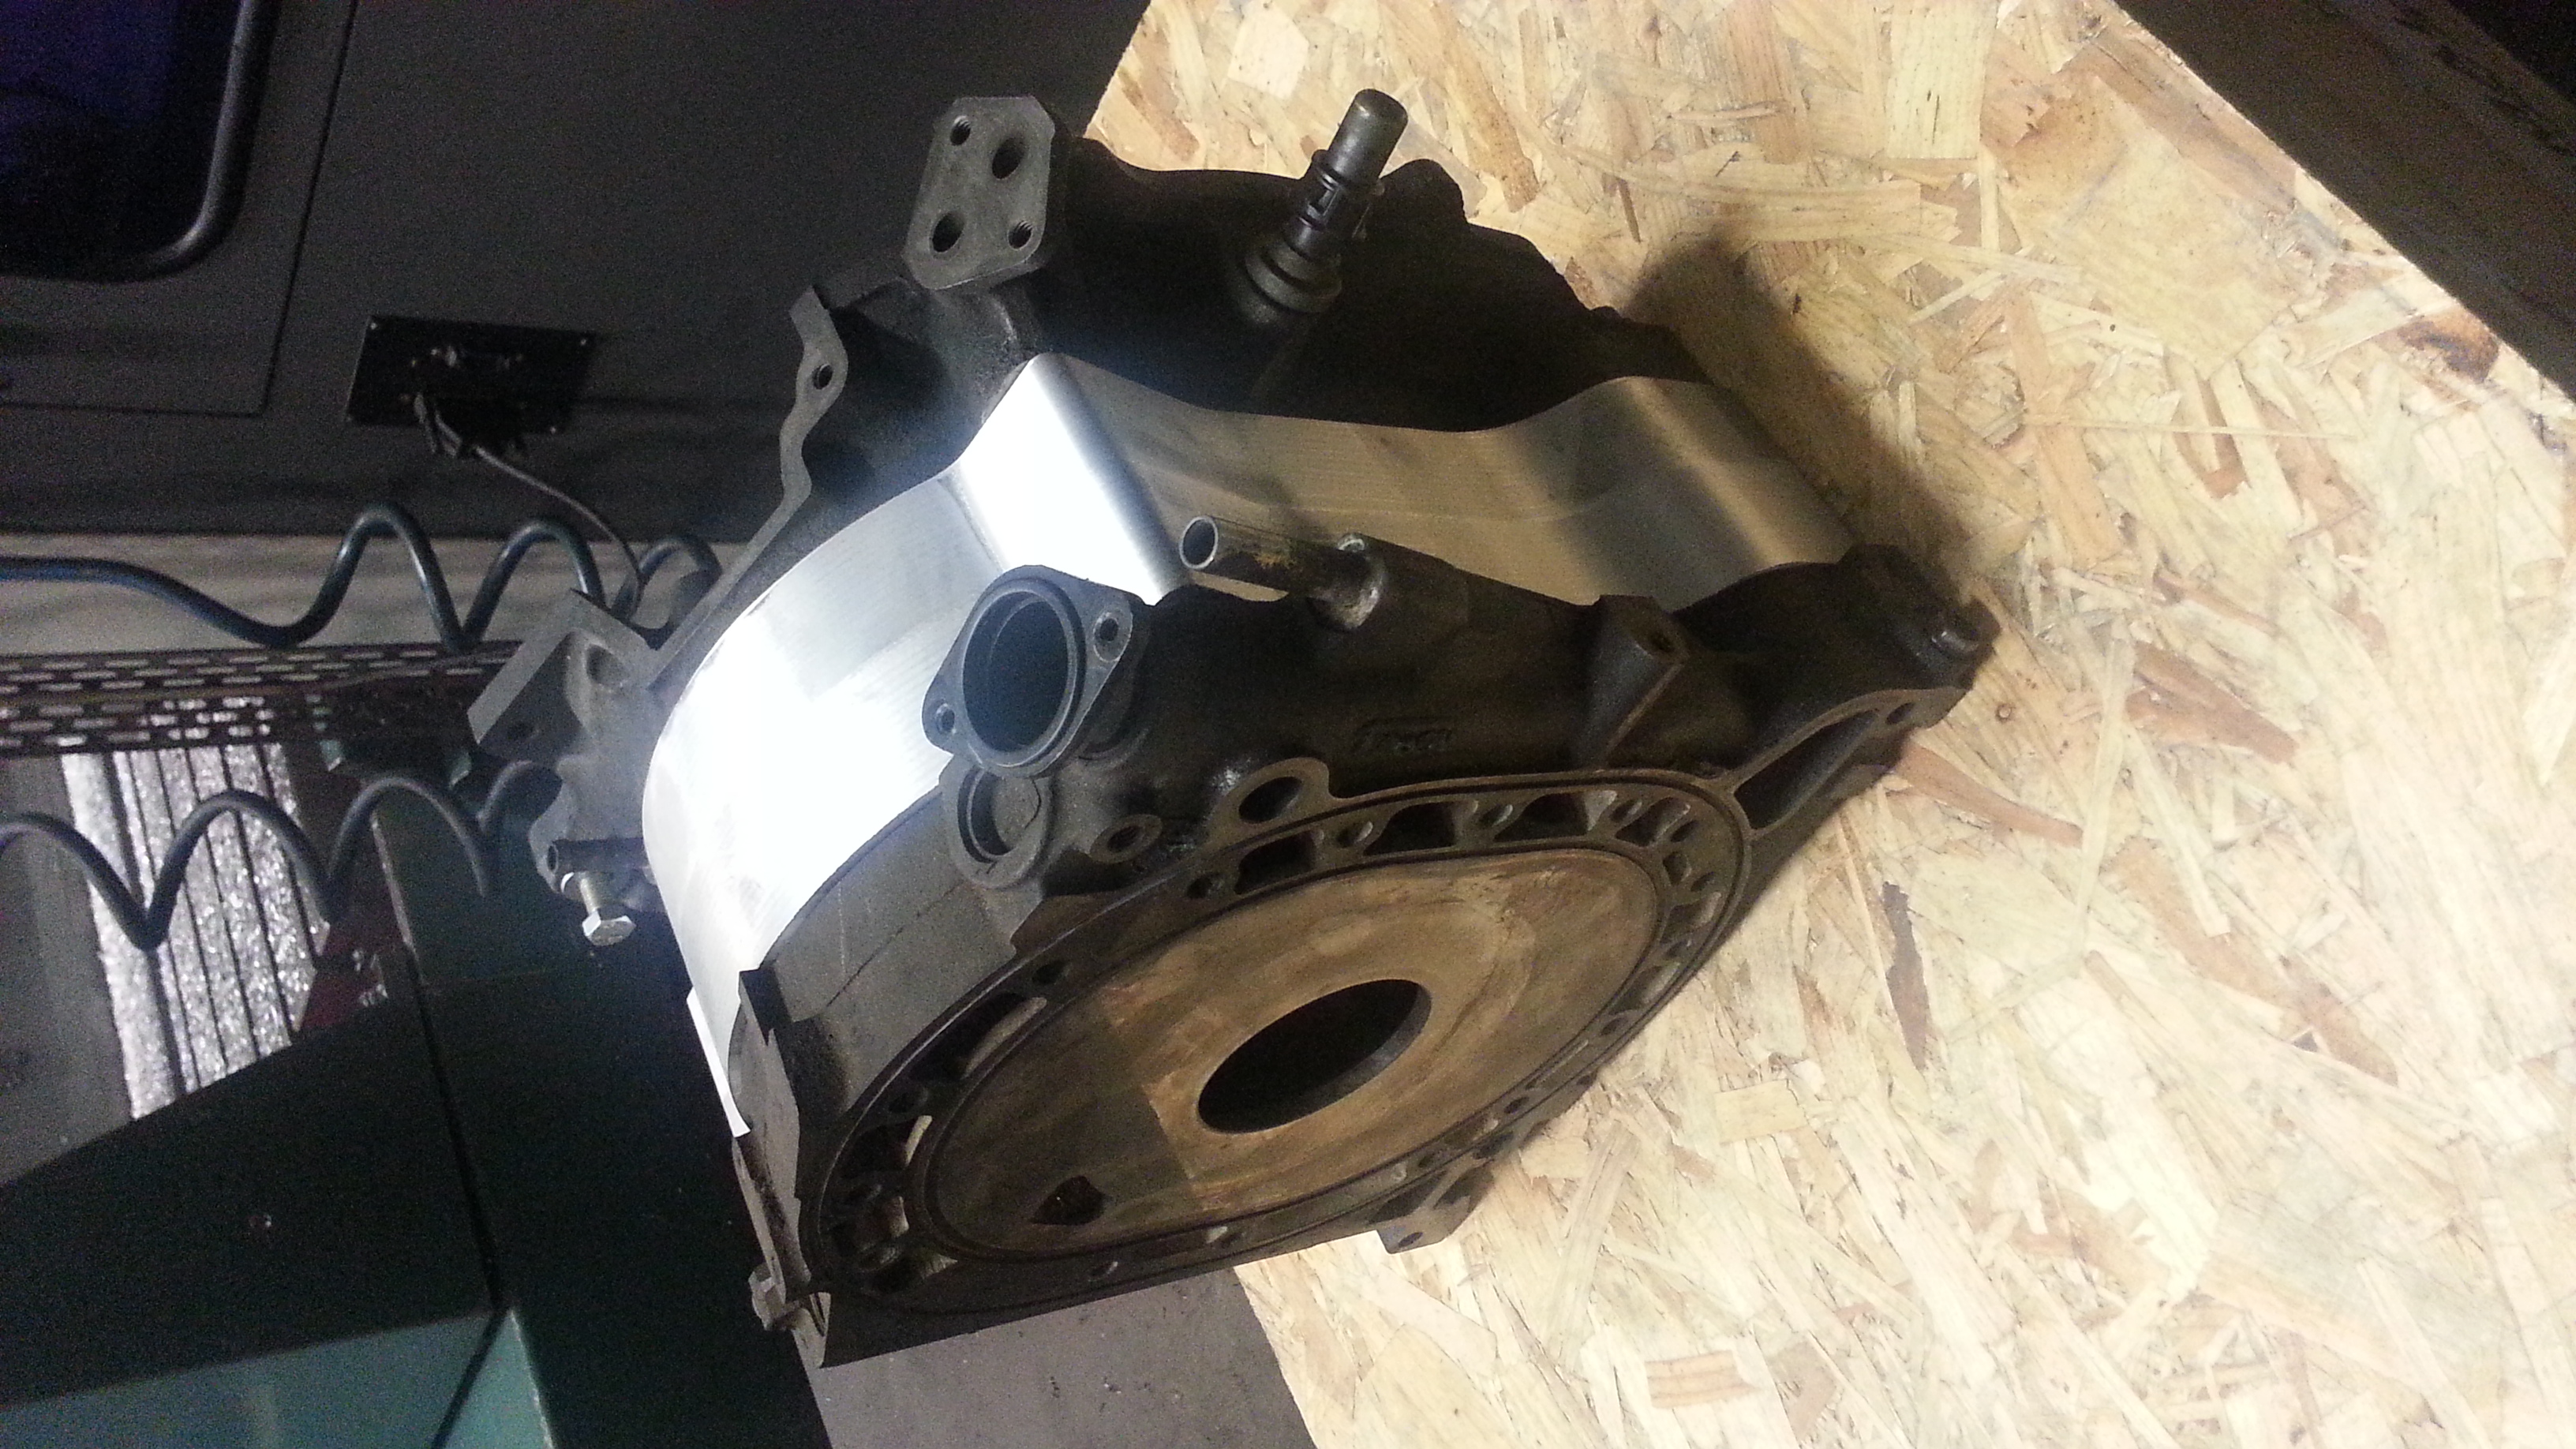
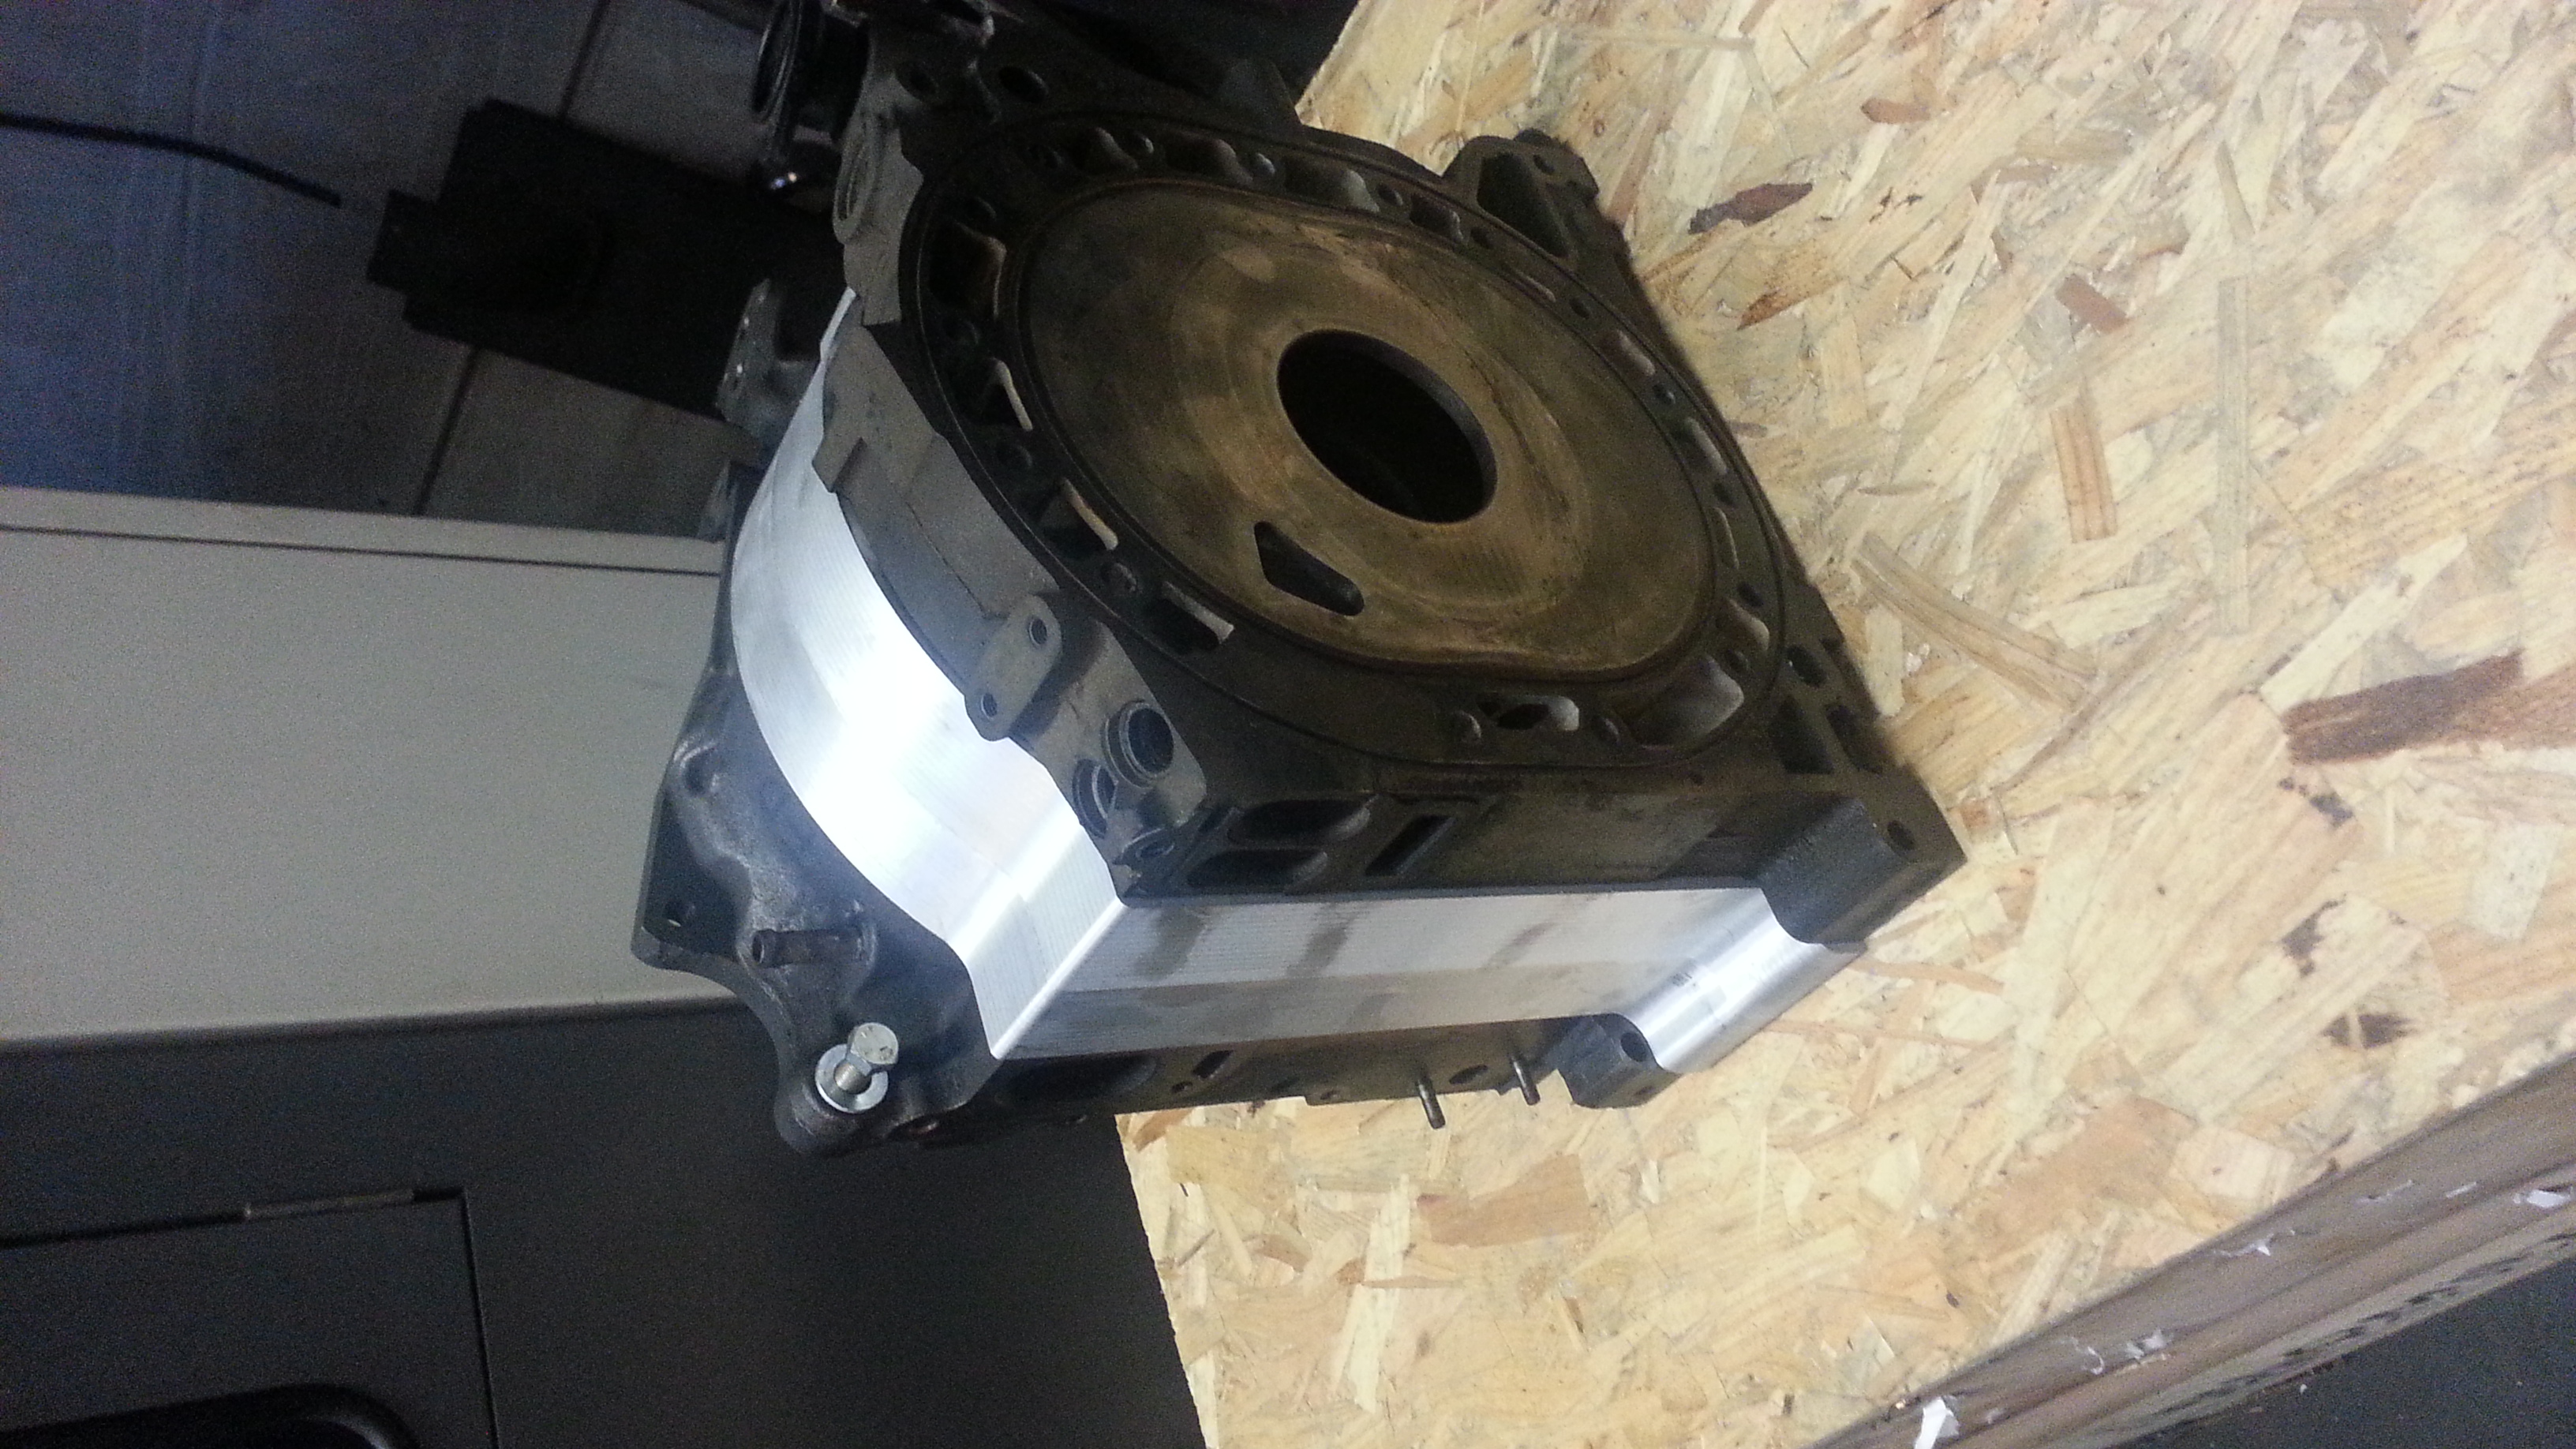
Today I've been working on the fixture to the new housings. It also fit stock housings and iron as well.

First up with dowels to match the machine, and countersinked bolts to be out of the way.
Name:  20130112_171033.jpg
Views: 600
Size:  2.20 MB

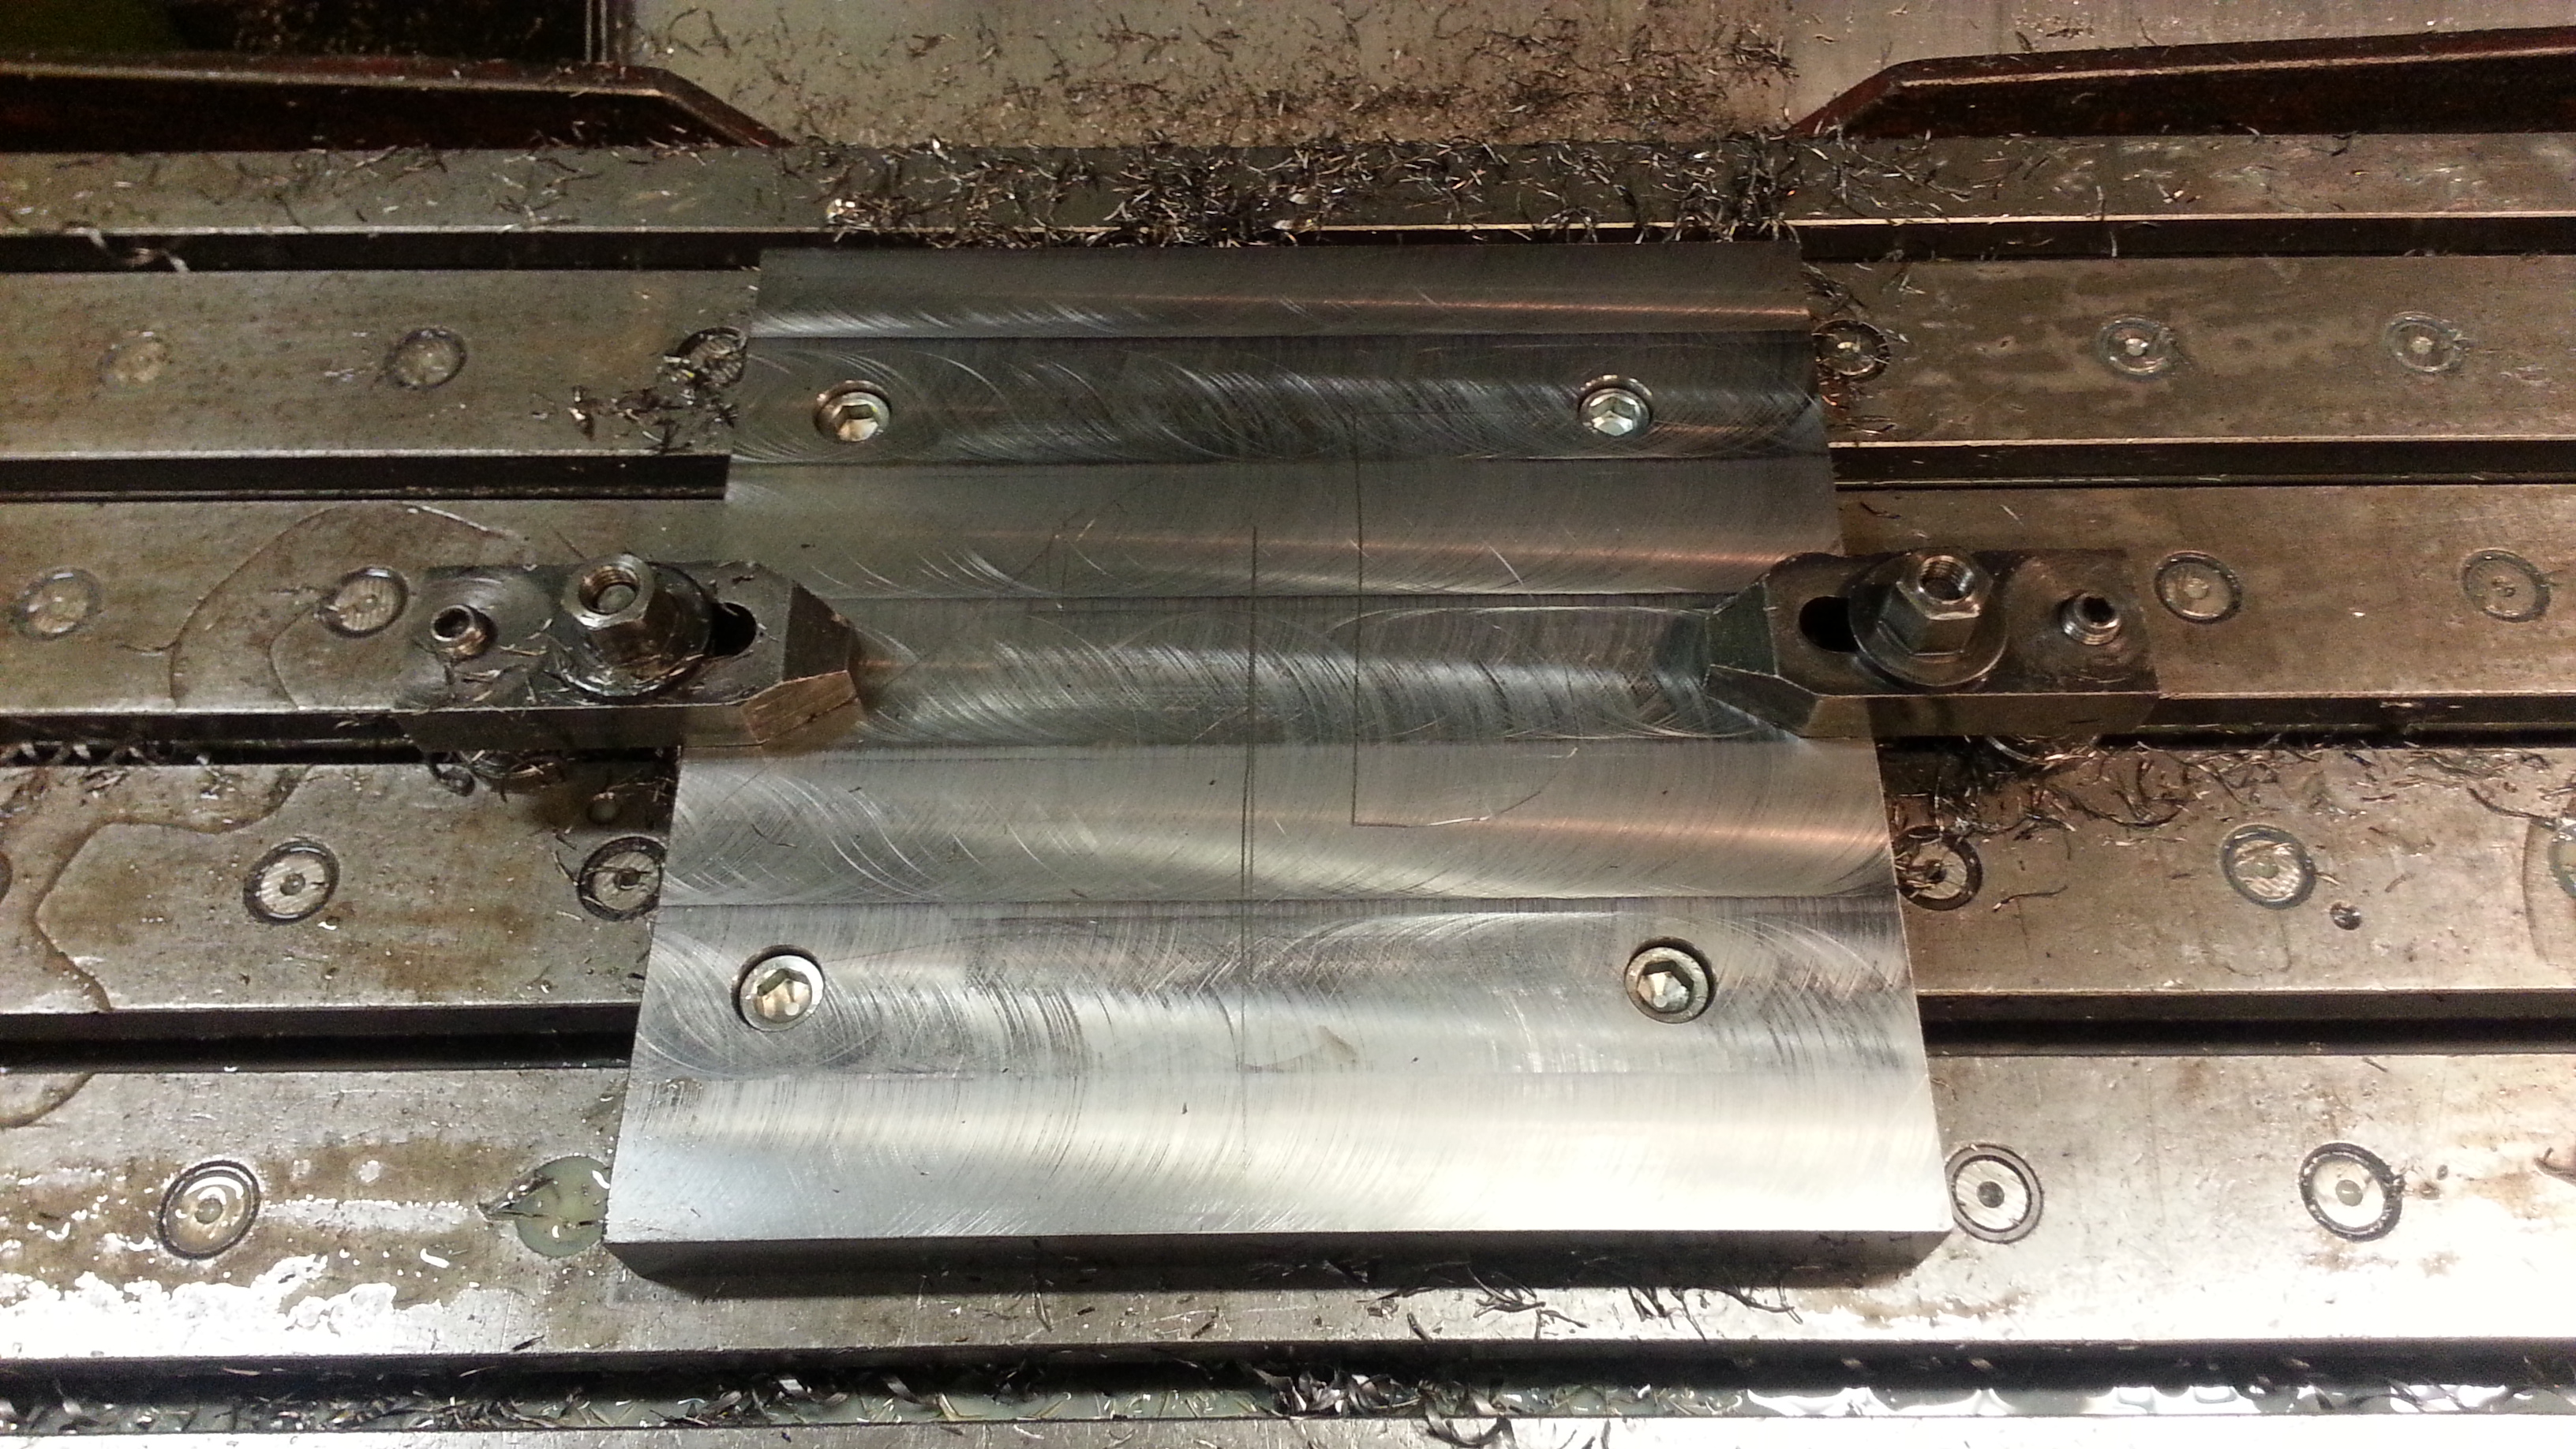
Testing with a stock housing to make sure I did it right.
Name:  20130112_173427.jpg
Views: 584
Size:  2.20 MB

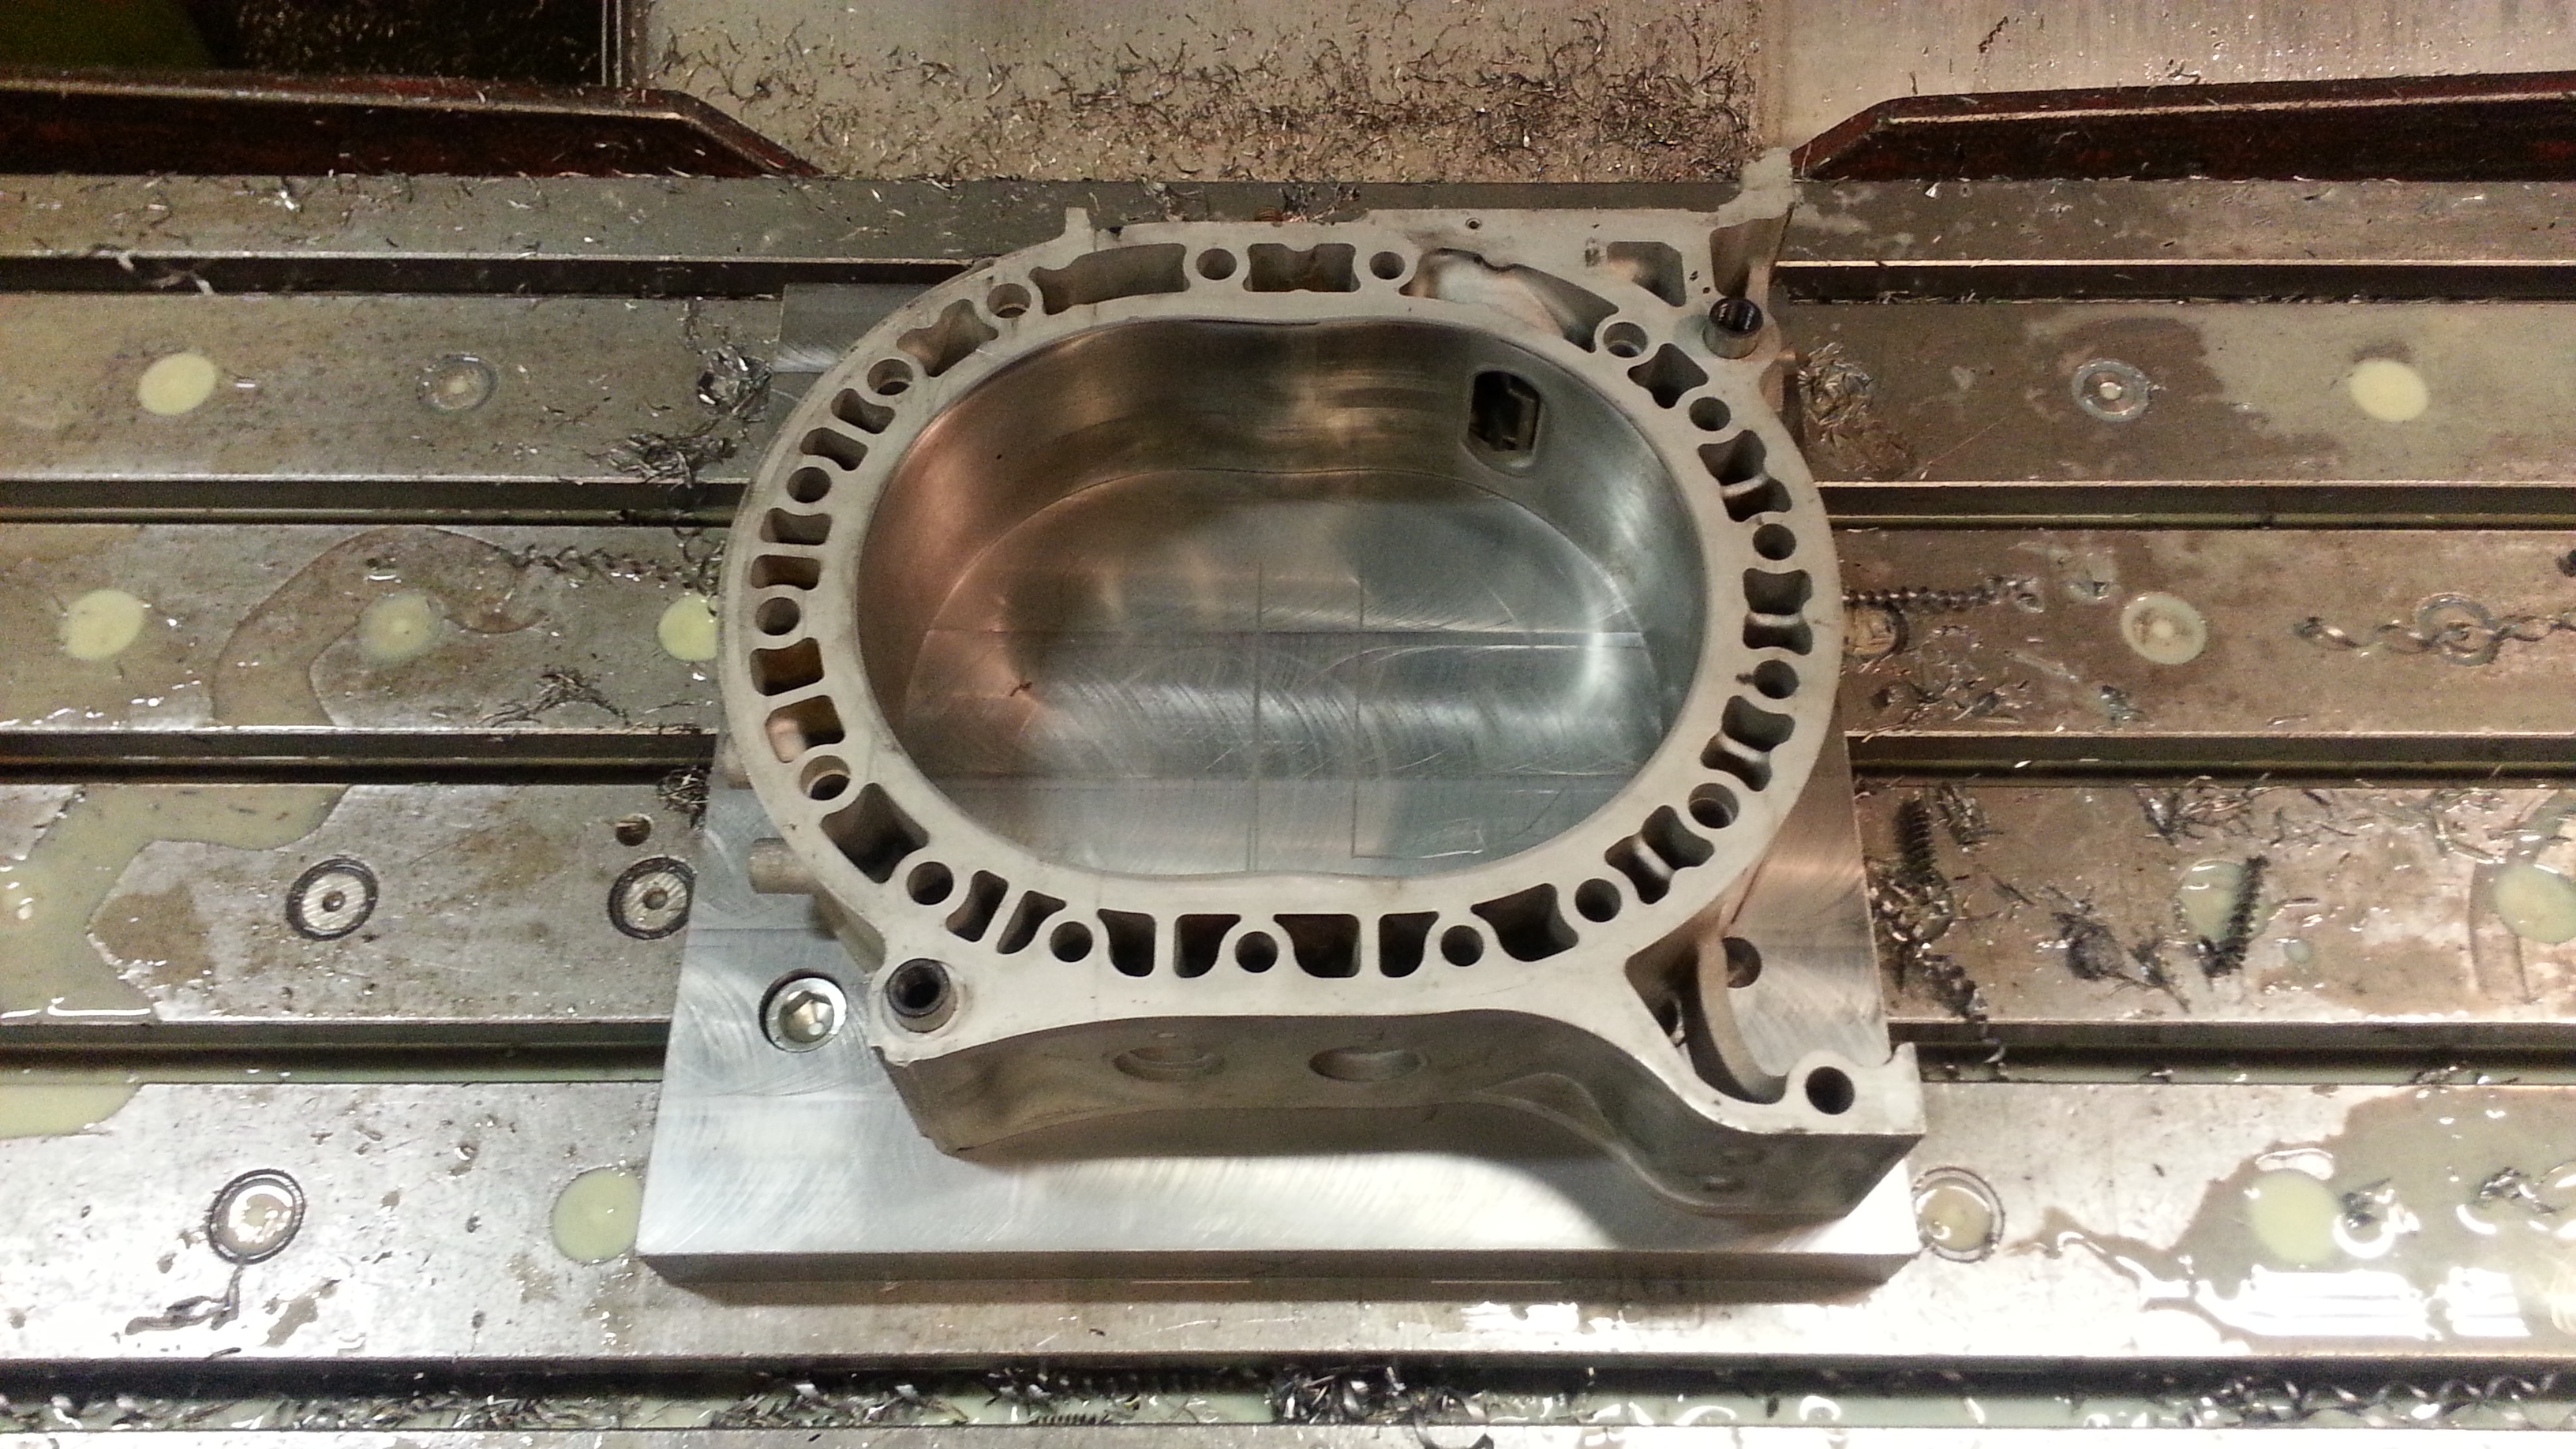
And one of the new ones, let the game begin!
Name:  20130112_184511.jpg
Views: 614
Size:  2.08 MB


Some motivation

Old 01-12-13, 06:22 PM
  #780  
Senior Member

 
damic's Avatar
 
Join Date: Aug 2008
Location: Belgium (2800)
Posts: 493
Received 0 Likes on 0 Posts
Originally Posted by JDriftM
I should have my direct injection 13b setup and running by June of this year. I will let you know how much we save on fuel consumption versus power gained with this setup. Should be interesting. I do like the custom cast housings.....would love to do this with DI.
You got a thread of that?
Old 01-12-13, 11:49 PM
  #781  
Progressive Rotorhead

iTrader: (9)
 
JDriftM's Avatar
 
Join Date: Jul 2003
Location: Cincinnati, OH
Posts: 622
Received 1 Like on 1 Post
Damic, not yet. I'm trying to see if it will work first before posting results....results usually help quiet the keyboard tuners.
Old 01-13-13, 01:06 AM
  #782  
Luis Rx3 Project

iTrader: (3)
 
chino_rx3's Avatar
 
Join Date: Jun 2007
Location: SARASOTA ,Florida
Posts: 1,314
Received 11 Likes on 11 Posts
Love that video
Old 01-13-13, 01:21 AM
  #783  
Senior Member

Thread Starter
 
tegheim's Avatar
 
Join Date: Nov 2003
Location: Sweden
Posts: 533
Likes: 0
Received 2 Likes on 1 Post
Originally Posted by JDriftM
Damic, not yet. I'm trying to see if it will work first before posting results....results usually help quiet the keyboard tuners.
Haha, lucky that I'm just a SolidWorks-tuner then
It will be fun to see how it works.

Jantore here on the forum has put a injector where the oil-injector used to be on his 4-rotor.
Old 01-13-13, 07:05 AM
  #784  
Senior Member

Thread Starter
 
tegheim's Avatar
 
Join Date: Nov 2003
Location: Sweden
Posts: 533
Likes: 0
Received 2 Likes on 1 Post
Some roughing done!
Looks like it suits! Dowels mounted.


Name:  20130113_134049.jpg
Views: 633
Size:  2.02 MB
Name:  20130113_134040.jpg
Views: 536
Size:  1.96 MB
Old 01-13-13, 09:55 AM
  #785  
Senior Member

Thread Starter
 
tegheim's Avatar
 
Join Date: Nov 2003
Location: Sweden
Posts: 533
Likes: 0
Received 2 Likes on 1 Post
Name:  20130113_153219.jpg
Views: 613
Size:  2.19 MB
Name:  20130113_153212.jpg
Views: 606
Size:  2.01 MB
Old 01-13-13, 07:54 PM
  #786  
Senior Member

iTrader: (2)
 
demongo's Avatar
 
Join Date: Jul 2011
Location: CA
Posts: 255
Received 1 Like on 1 Post
Originally Posted by tegheim

On your all-aluminum housing, it looks like you've started machining the epitochoroid?
Old 01-13-13, 11:53 PM
  #787  
Senior Member

Thread Starter
 
tegheim's Avatar
 
Join Date: Nov 2003
Location: Sweden
Posts: 533
Likes: 0
Received 2 Likes on 1 Post
Originally Posted by demongo
On your all-aluminum housing, it looks like you've started machining the epitochoroid?
Yes, the housings are 89mm thick at the moment, so I could resist to go to zero on both inner and outer contour, just to se the fitment to the irons, and to se If I got the combussion-area right. Everything seems to fit better than expected. I really pleased.
Now it't just to think it all over so I don't forget something important.

Nervous
Old 01-14-13, 12:35 AM
  #788  
Progressive Rotorhead

iTrader: (9)
 
JDriftM's Avatar
 
Join Date: Jul 2003
Location: Cincinnati, OH
Posts: 622
Received 1 Like on 1 Post
Originally Posted by tegheim
Haha, lucky that I'm just a SolidWorks-tuner then
It will be fun to see how it works.

Jantore here on the forum has put a injector where the oil-injector used to be on his 4-rotor.
Haha. You know My comment had no direction at you. I am highly jealous of your entire process.

More pics though!!
Old 01-15-13, 05:55 PM
  #789  
Full Member

iTrader: (4)
 
REDBULLSTX's Avatar
 
Join Date: Oct 2008
Location: Beaumont, TX
Posts: 210
Likes: 0
Received 2 Likes on 2 Posts
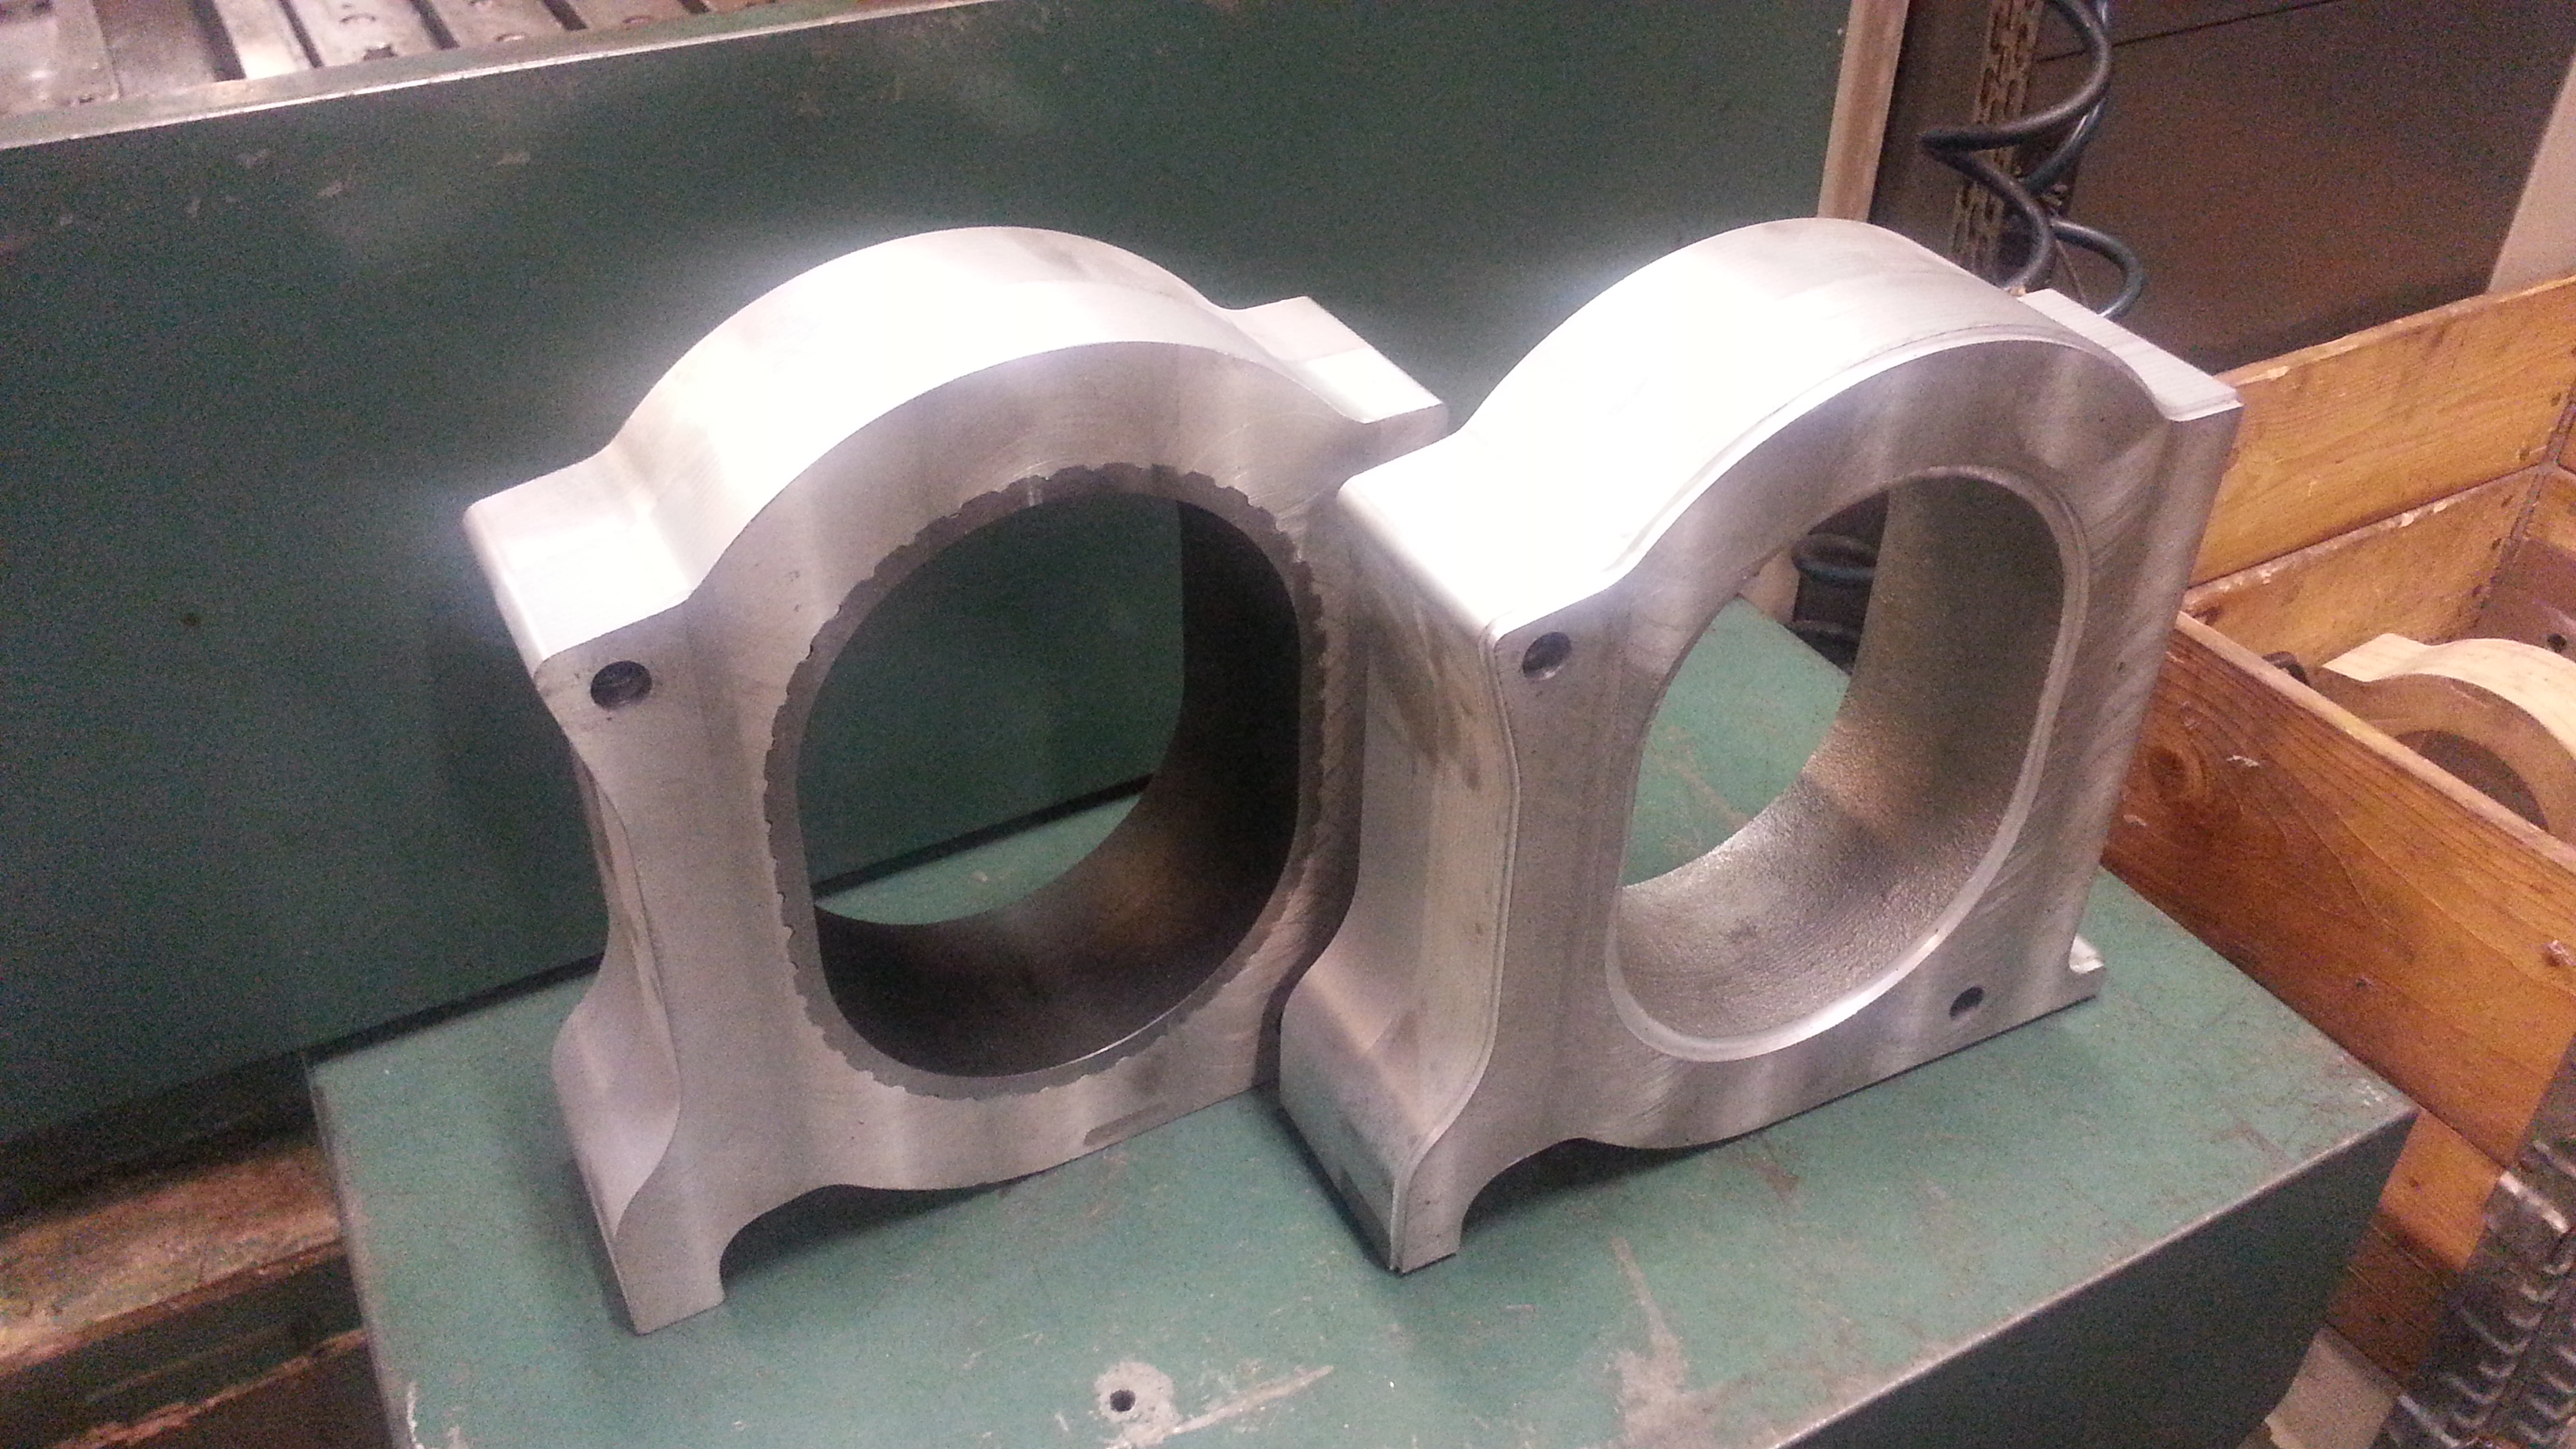
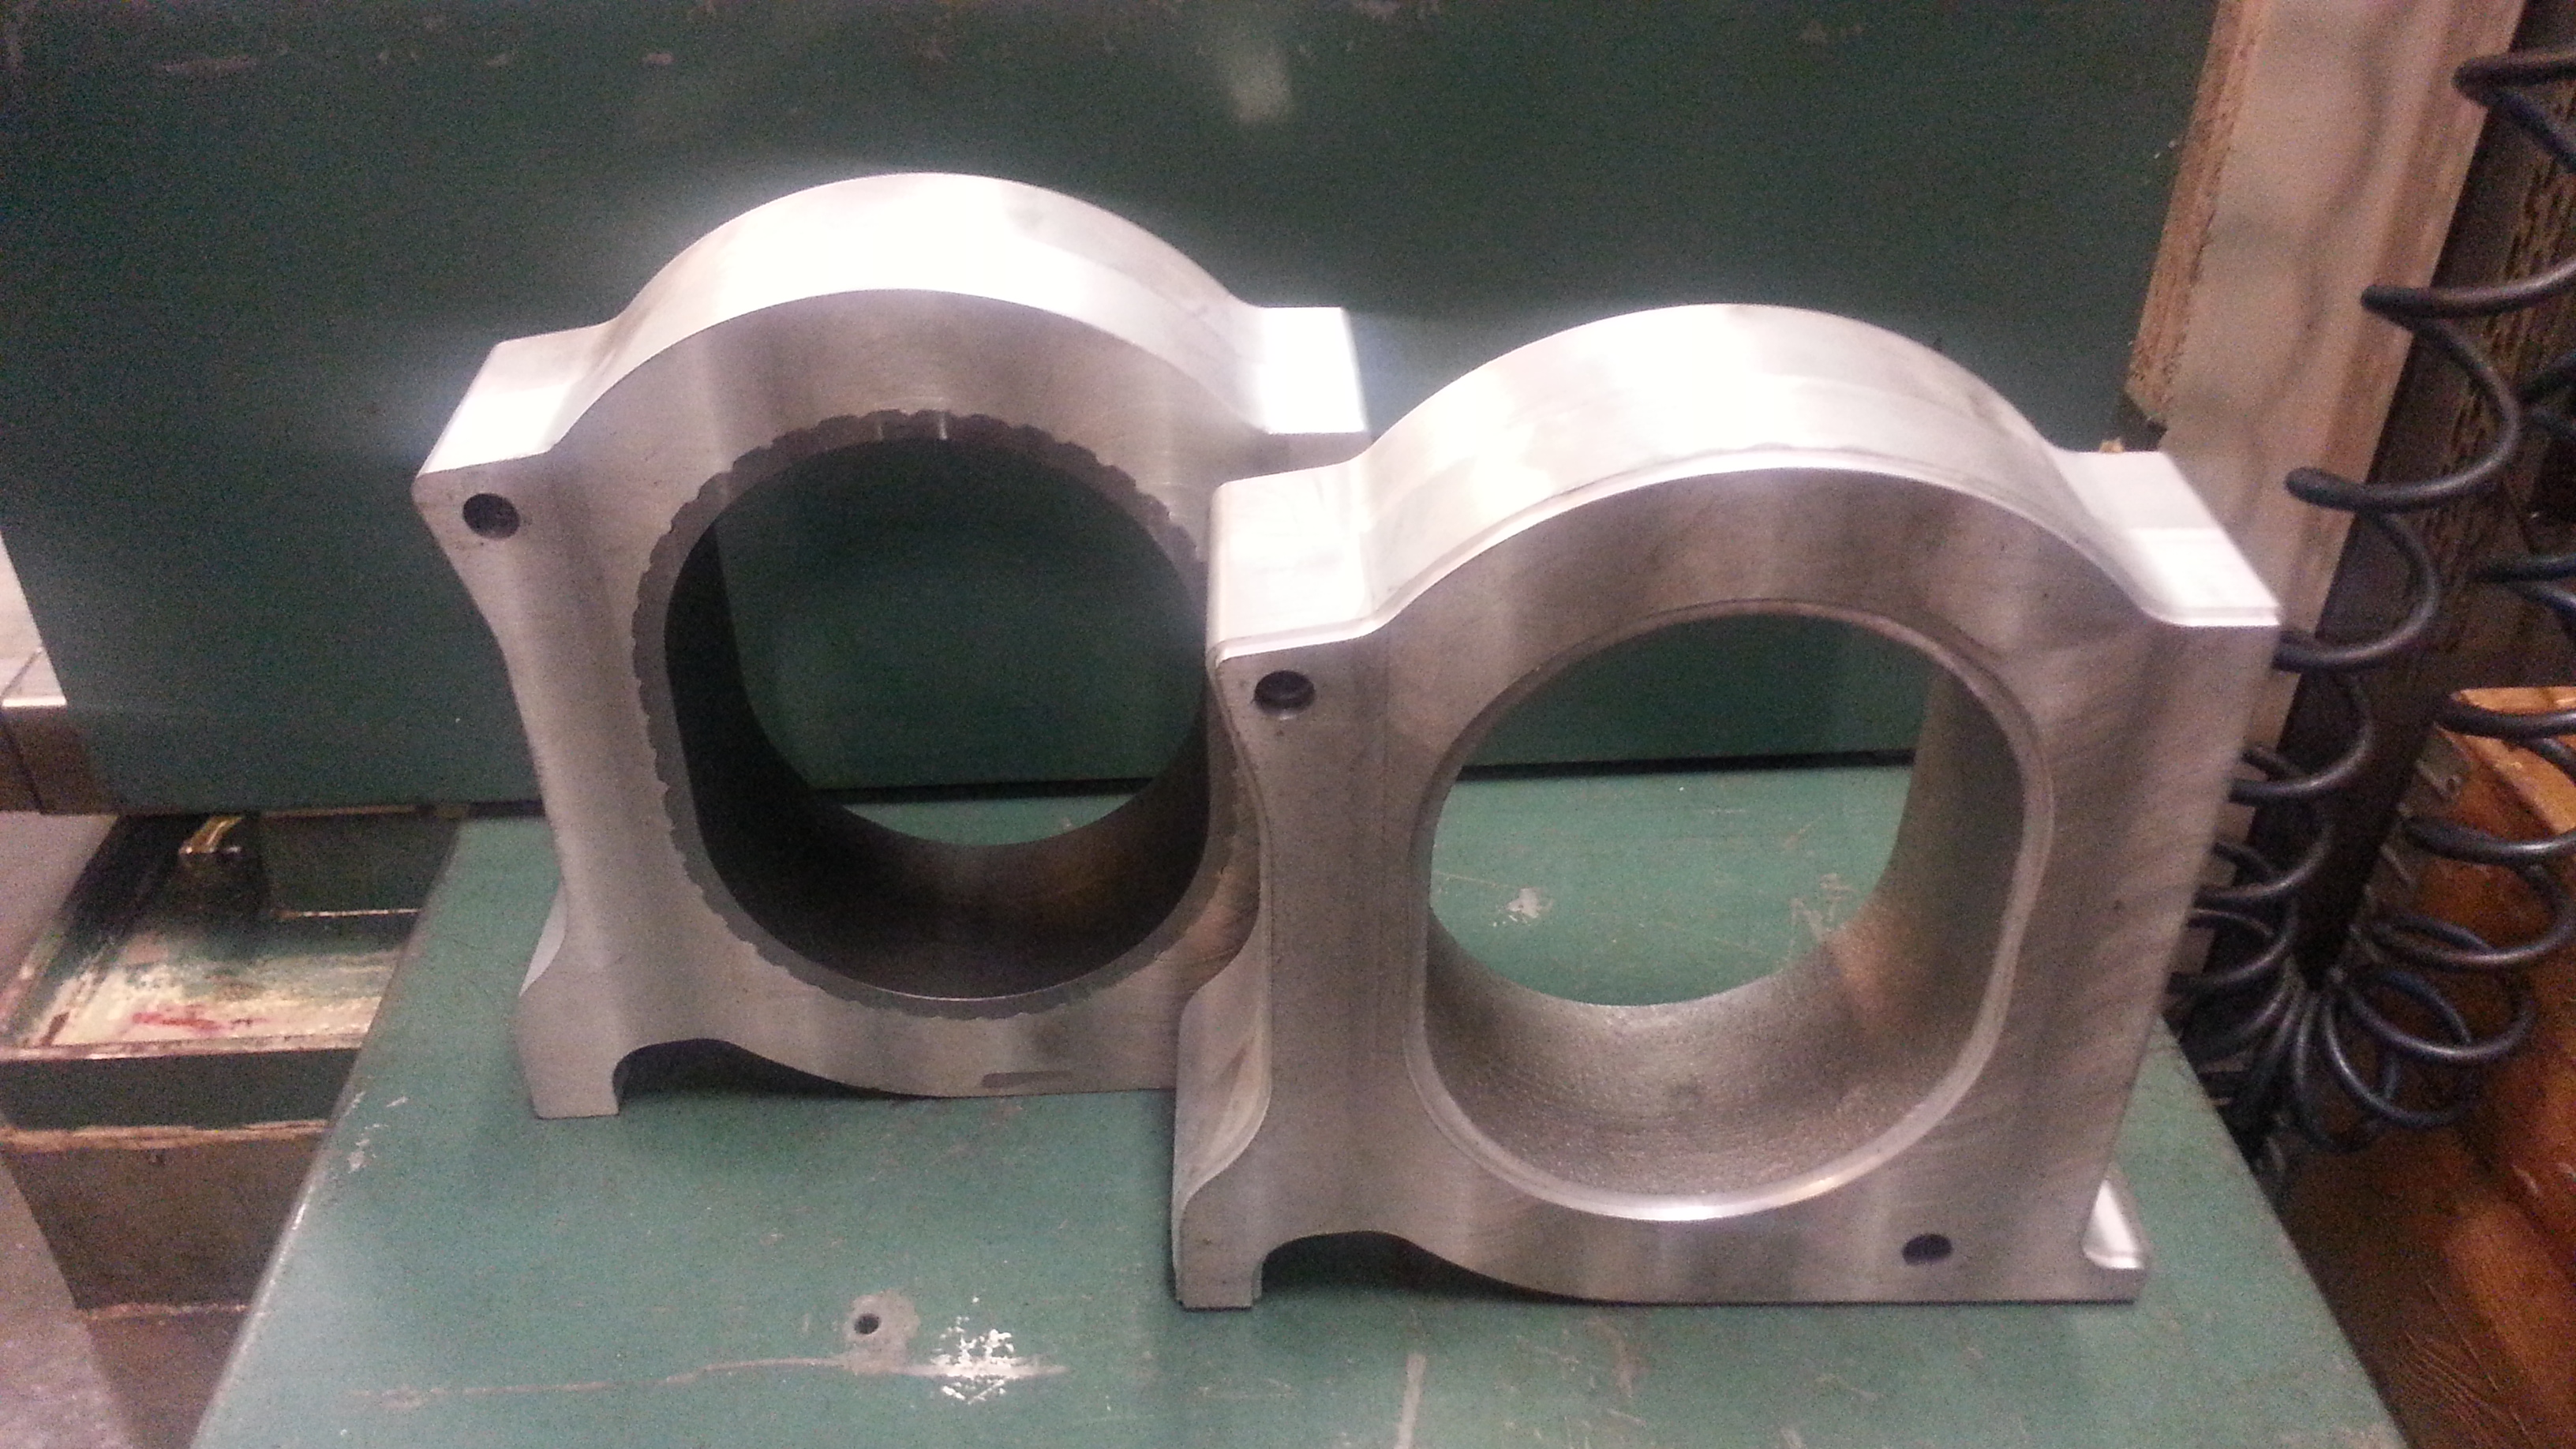
All i can say is WOW!!!! I just read through all 32 pages and this is just amazing. I love the housings! Will the inner liners be able to be pressed out? I have always had the idea of making replaceable housing liners. It would be the last set of housings you would ever need to buy....
Old 01-15-13, 11:57 PM
  #790  
Senior Member

Thread Starter
 
tegheim's Avatar
 
Join Date: Nov 2003
Location: Sweden
Posts: 533
Likes: 0
Received 2 Likes on 1 Post
No, the inner liners will not be able to replace. These are molded into the aluminium and hopefully will stick to the aluminium forever
Old 02-02-13, 06:49 AM
  #791  
Senior Member

Thread Starter
 
tegheim's Avatar
 
Join Date: Nov 2003
Location: Sweden
Posts: 533
Likes: 0
Received 2 Likes on 1 Post
Found a old picture of when we moved in to the new garage a few years ago. How will I be able to drive this?!

Name:  Lowrider-Tegheim_zpsf2632b35.png
Views: 519
Size:  288.2 KB
Old 02-16-13, 01:08 PM
  #792  
Senior Member

Thread Starter
 
tegheim's Avatar
 
Join Date: Nov 2003
Location: Sweden
Posts: 533
Likes: 0
Received 2 Likes on 1 Post
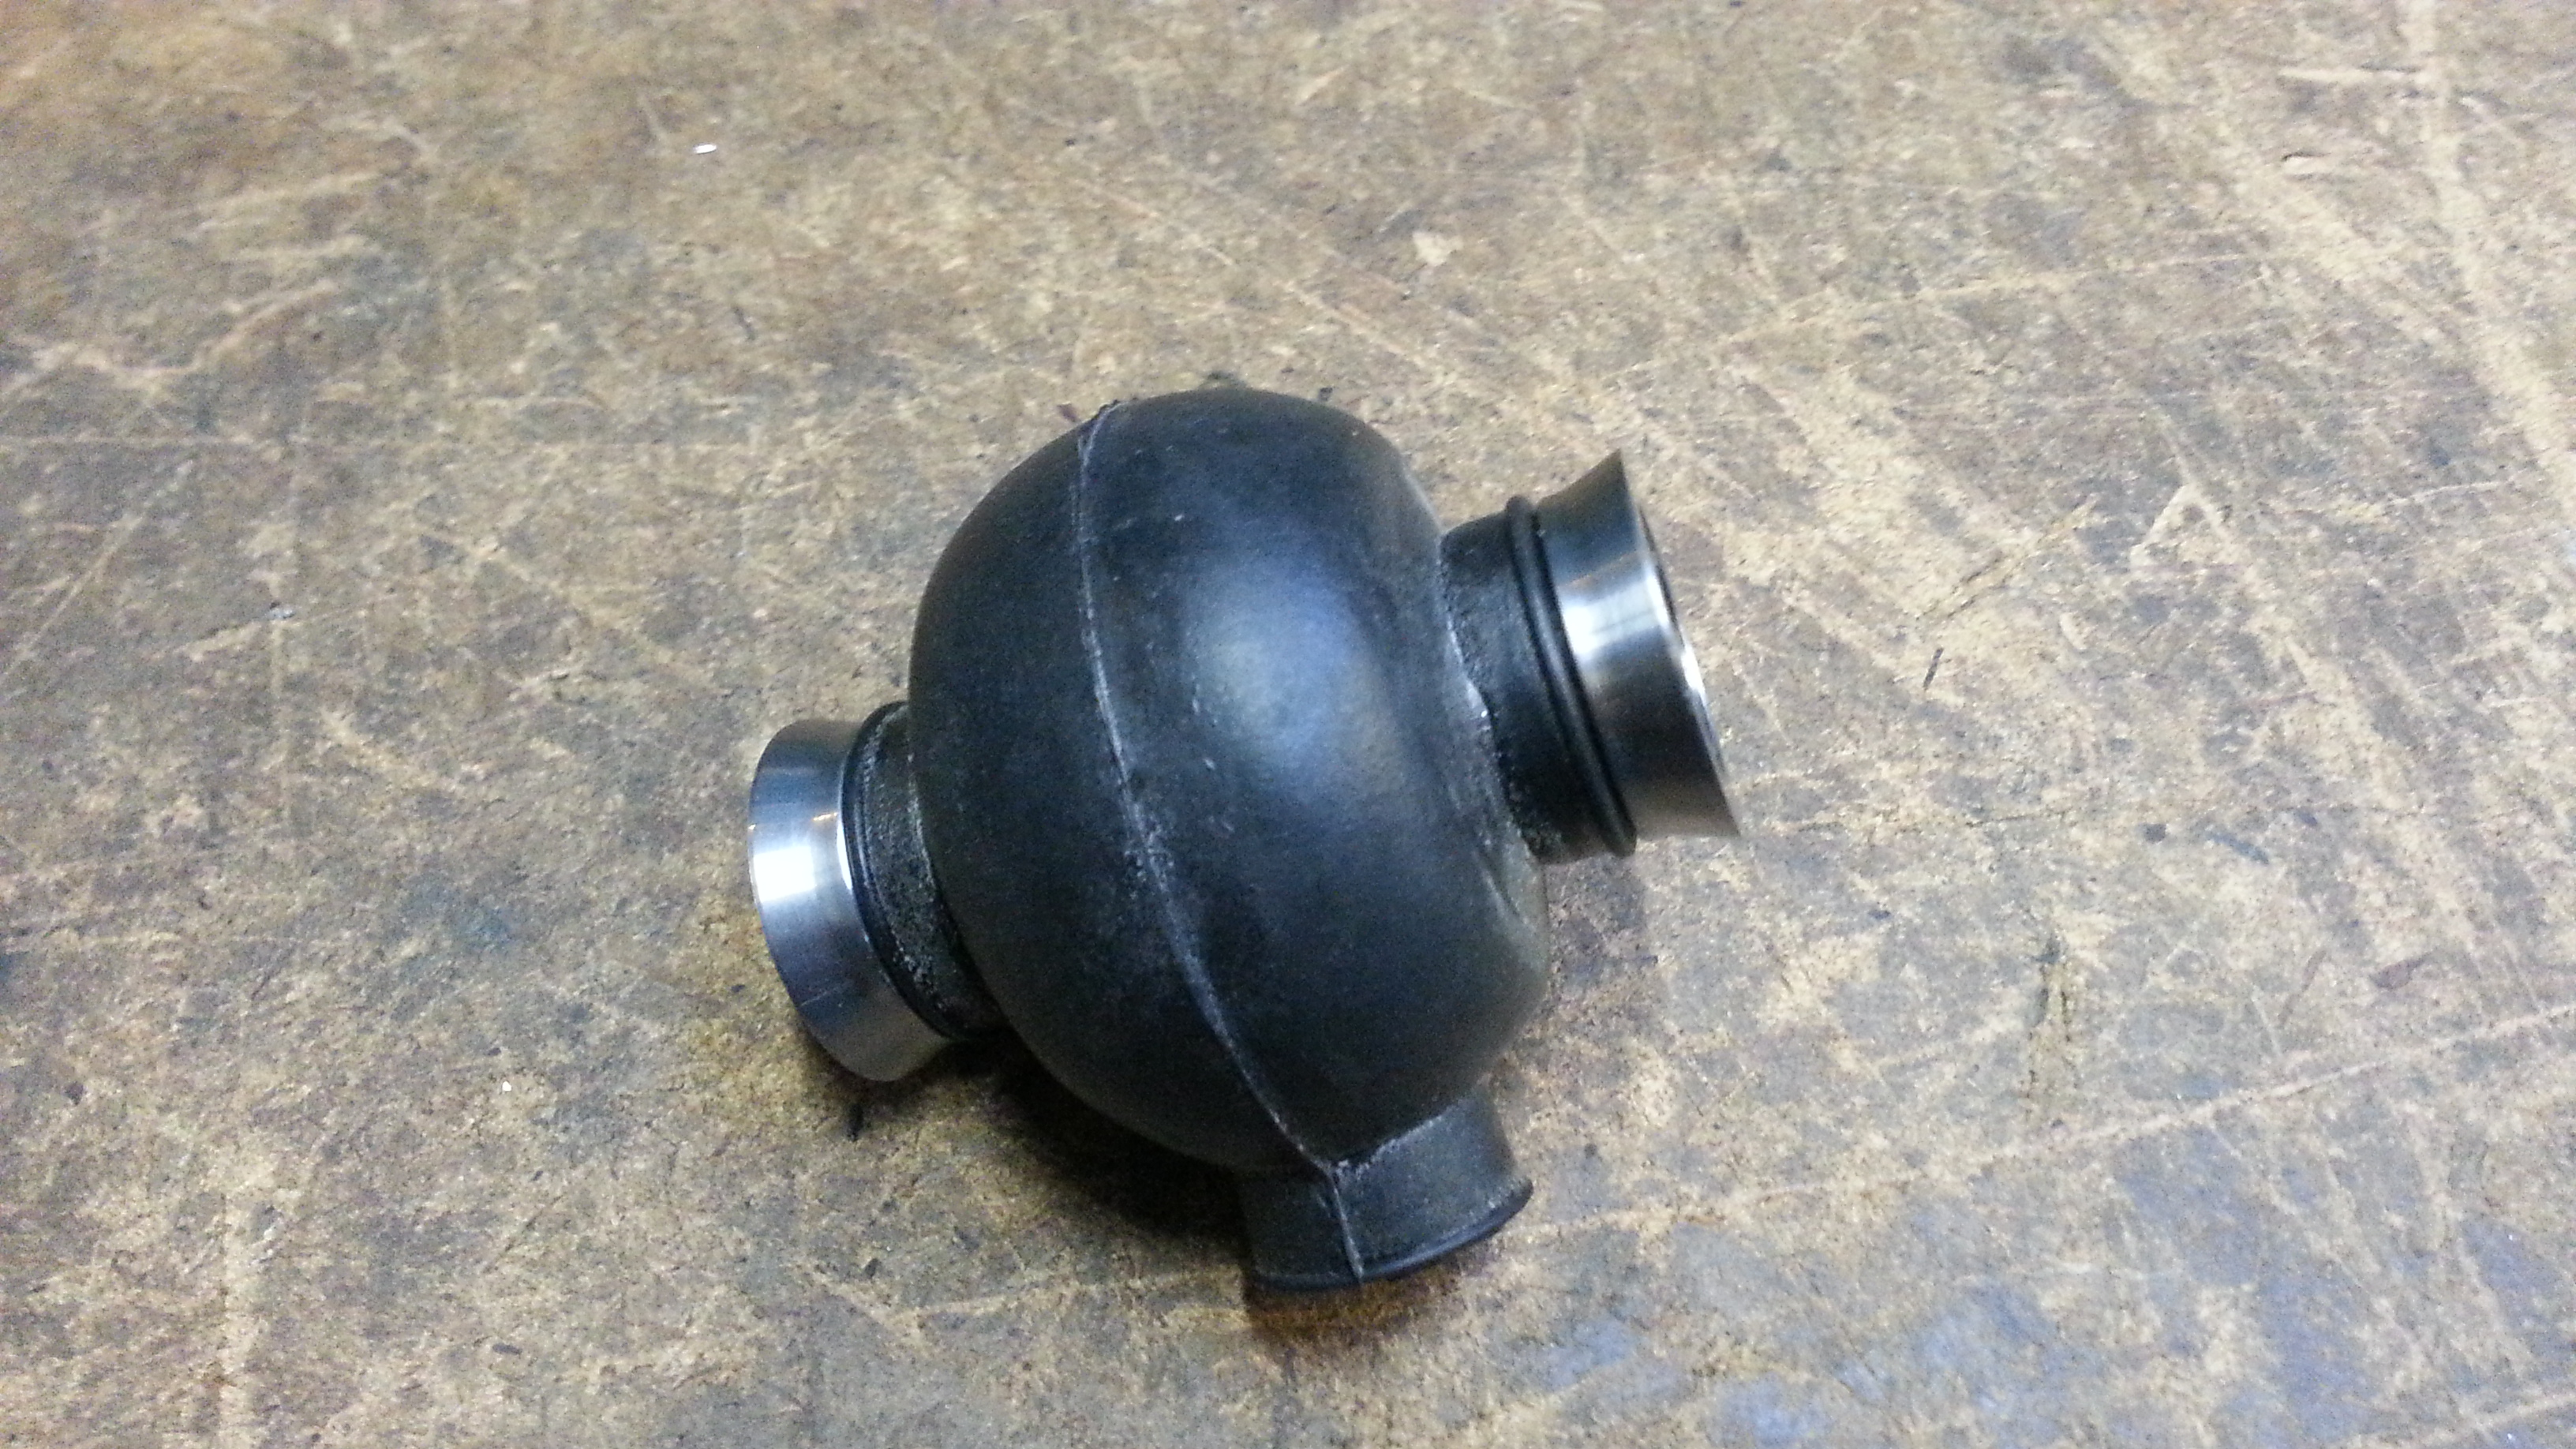
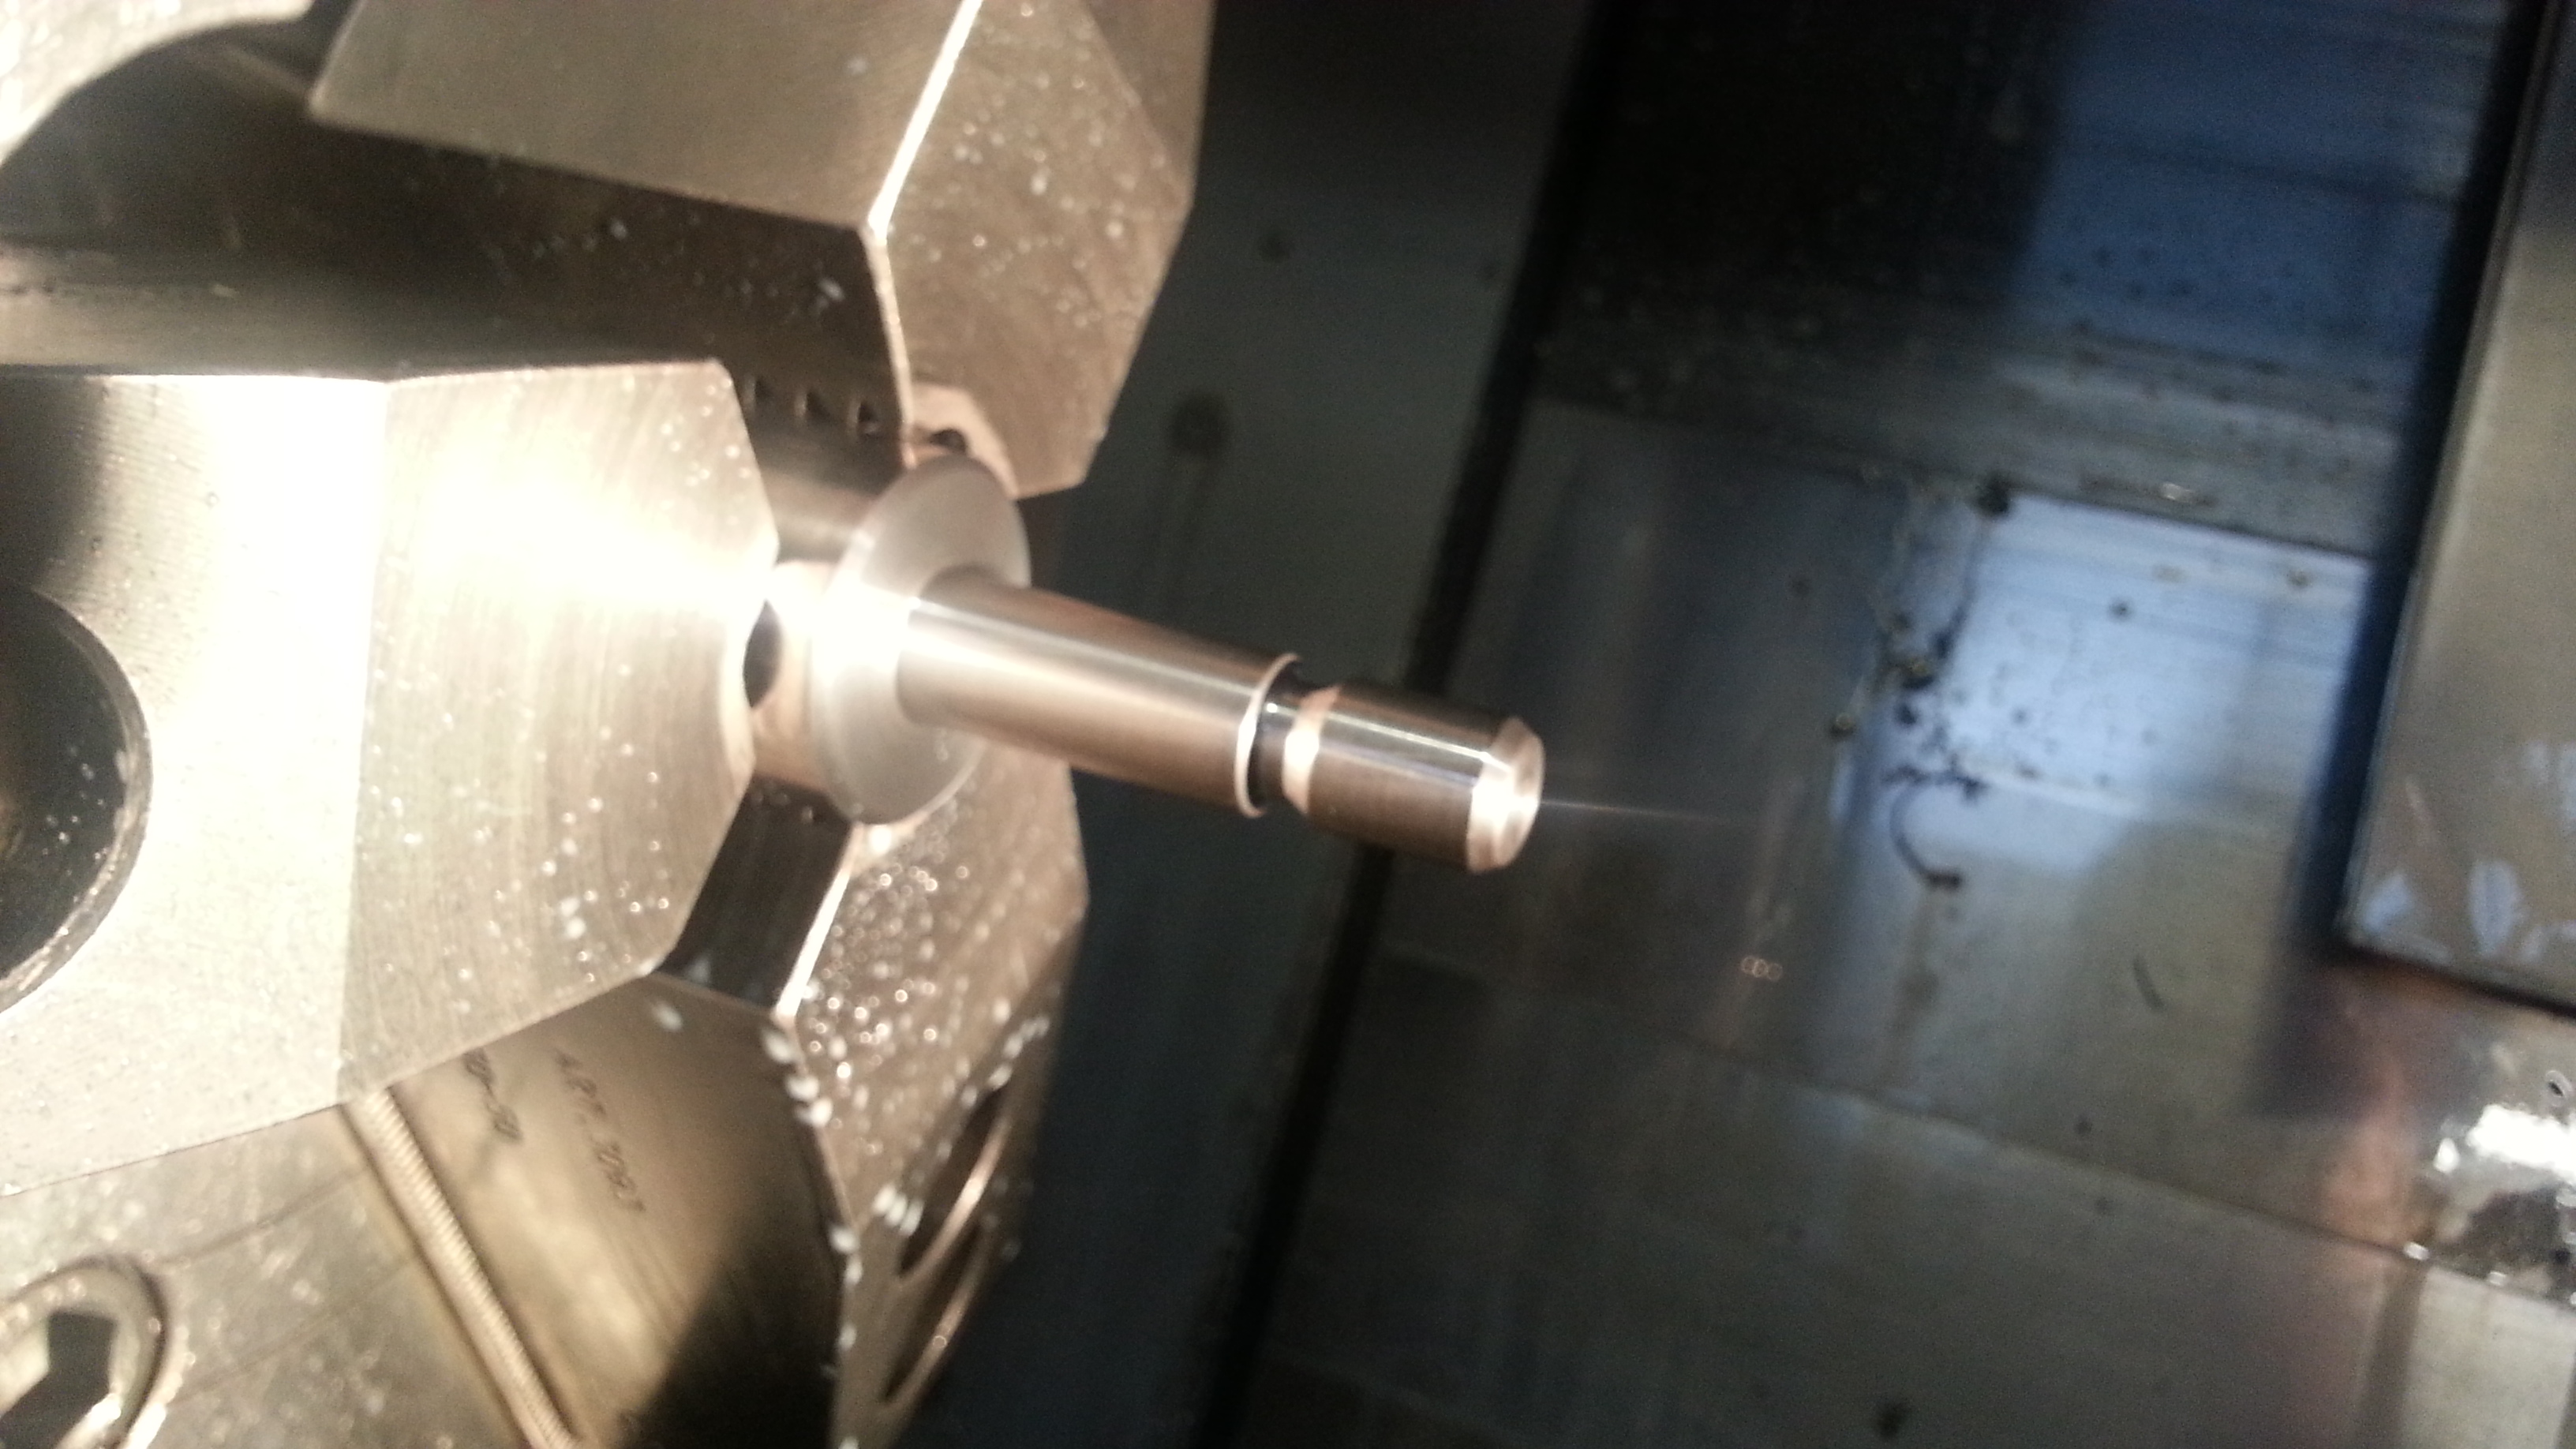
Today I've used the cnc-lathe again. Fun to learn, but very time consuming.

These are for the 4-link, and fit the RERS-4 rubber protection. I made these in stainless.
Name:  20130216_134528_zpsa9307795.jpg
Views: 602
Size:  2.47 MB
Name:  20130216_131055_zpsf5068cf1.jpg
Views: 618
Size:  2.16 MB

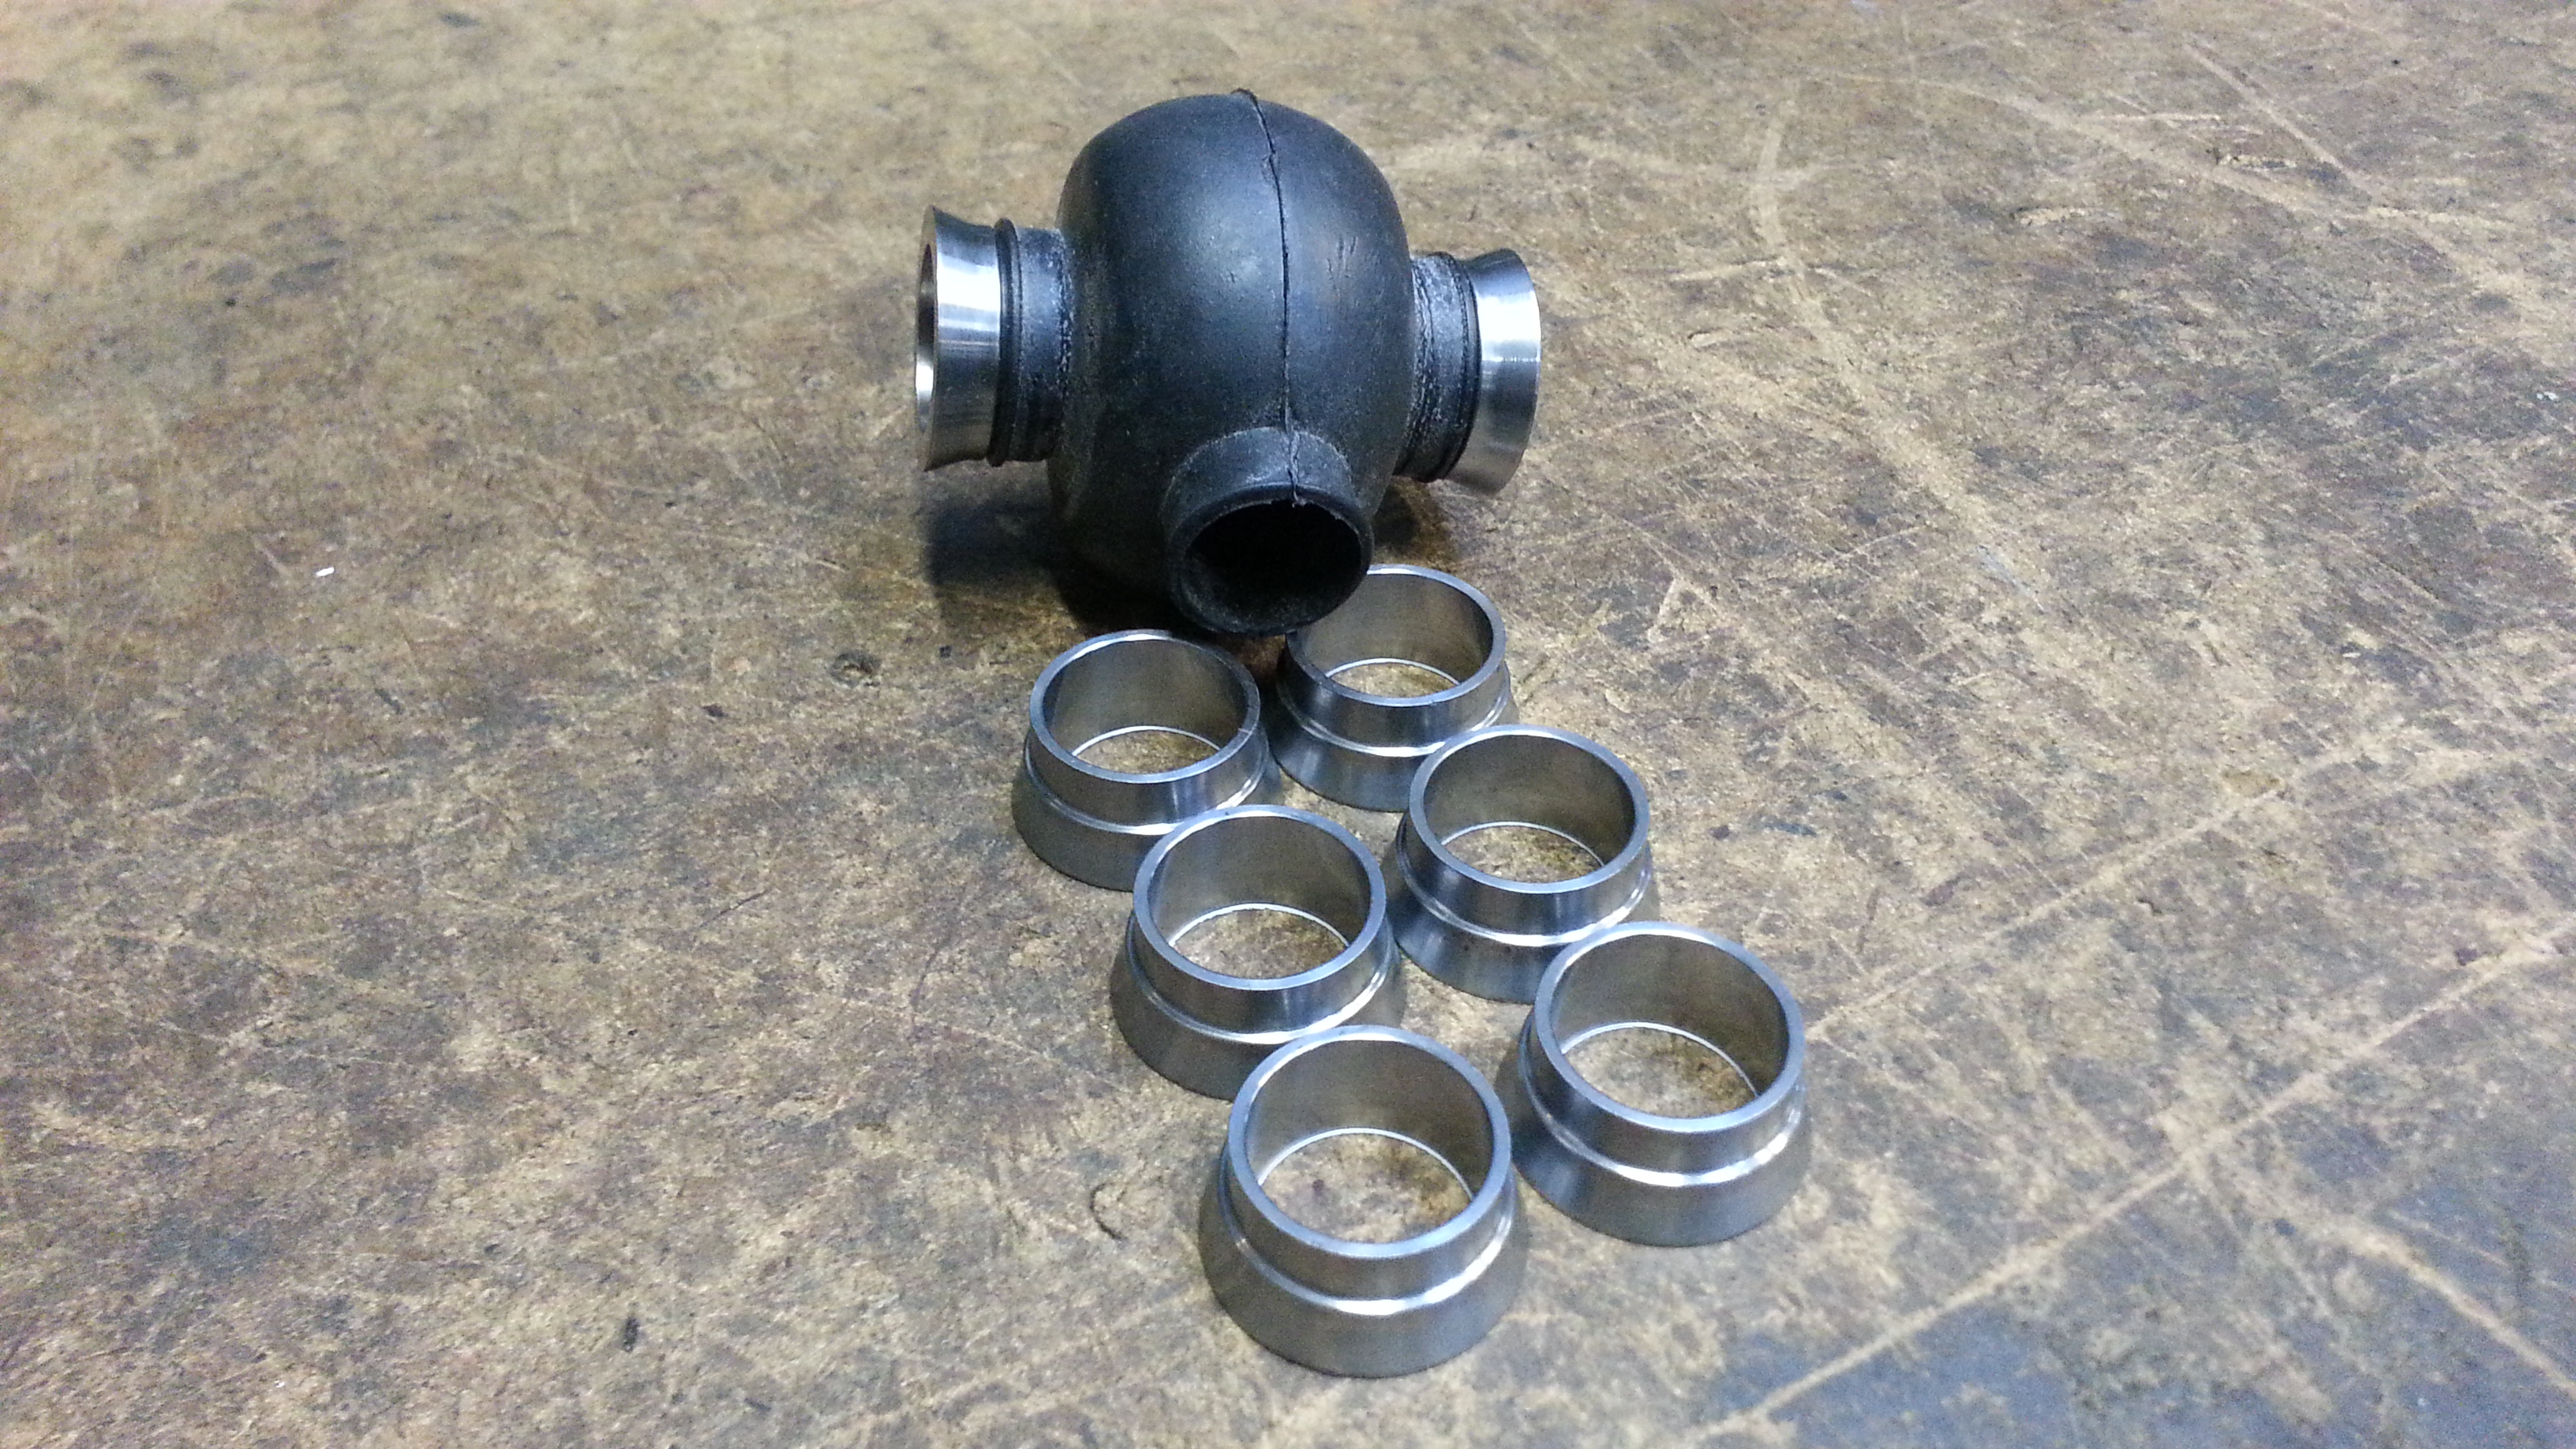
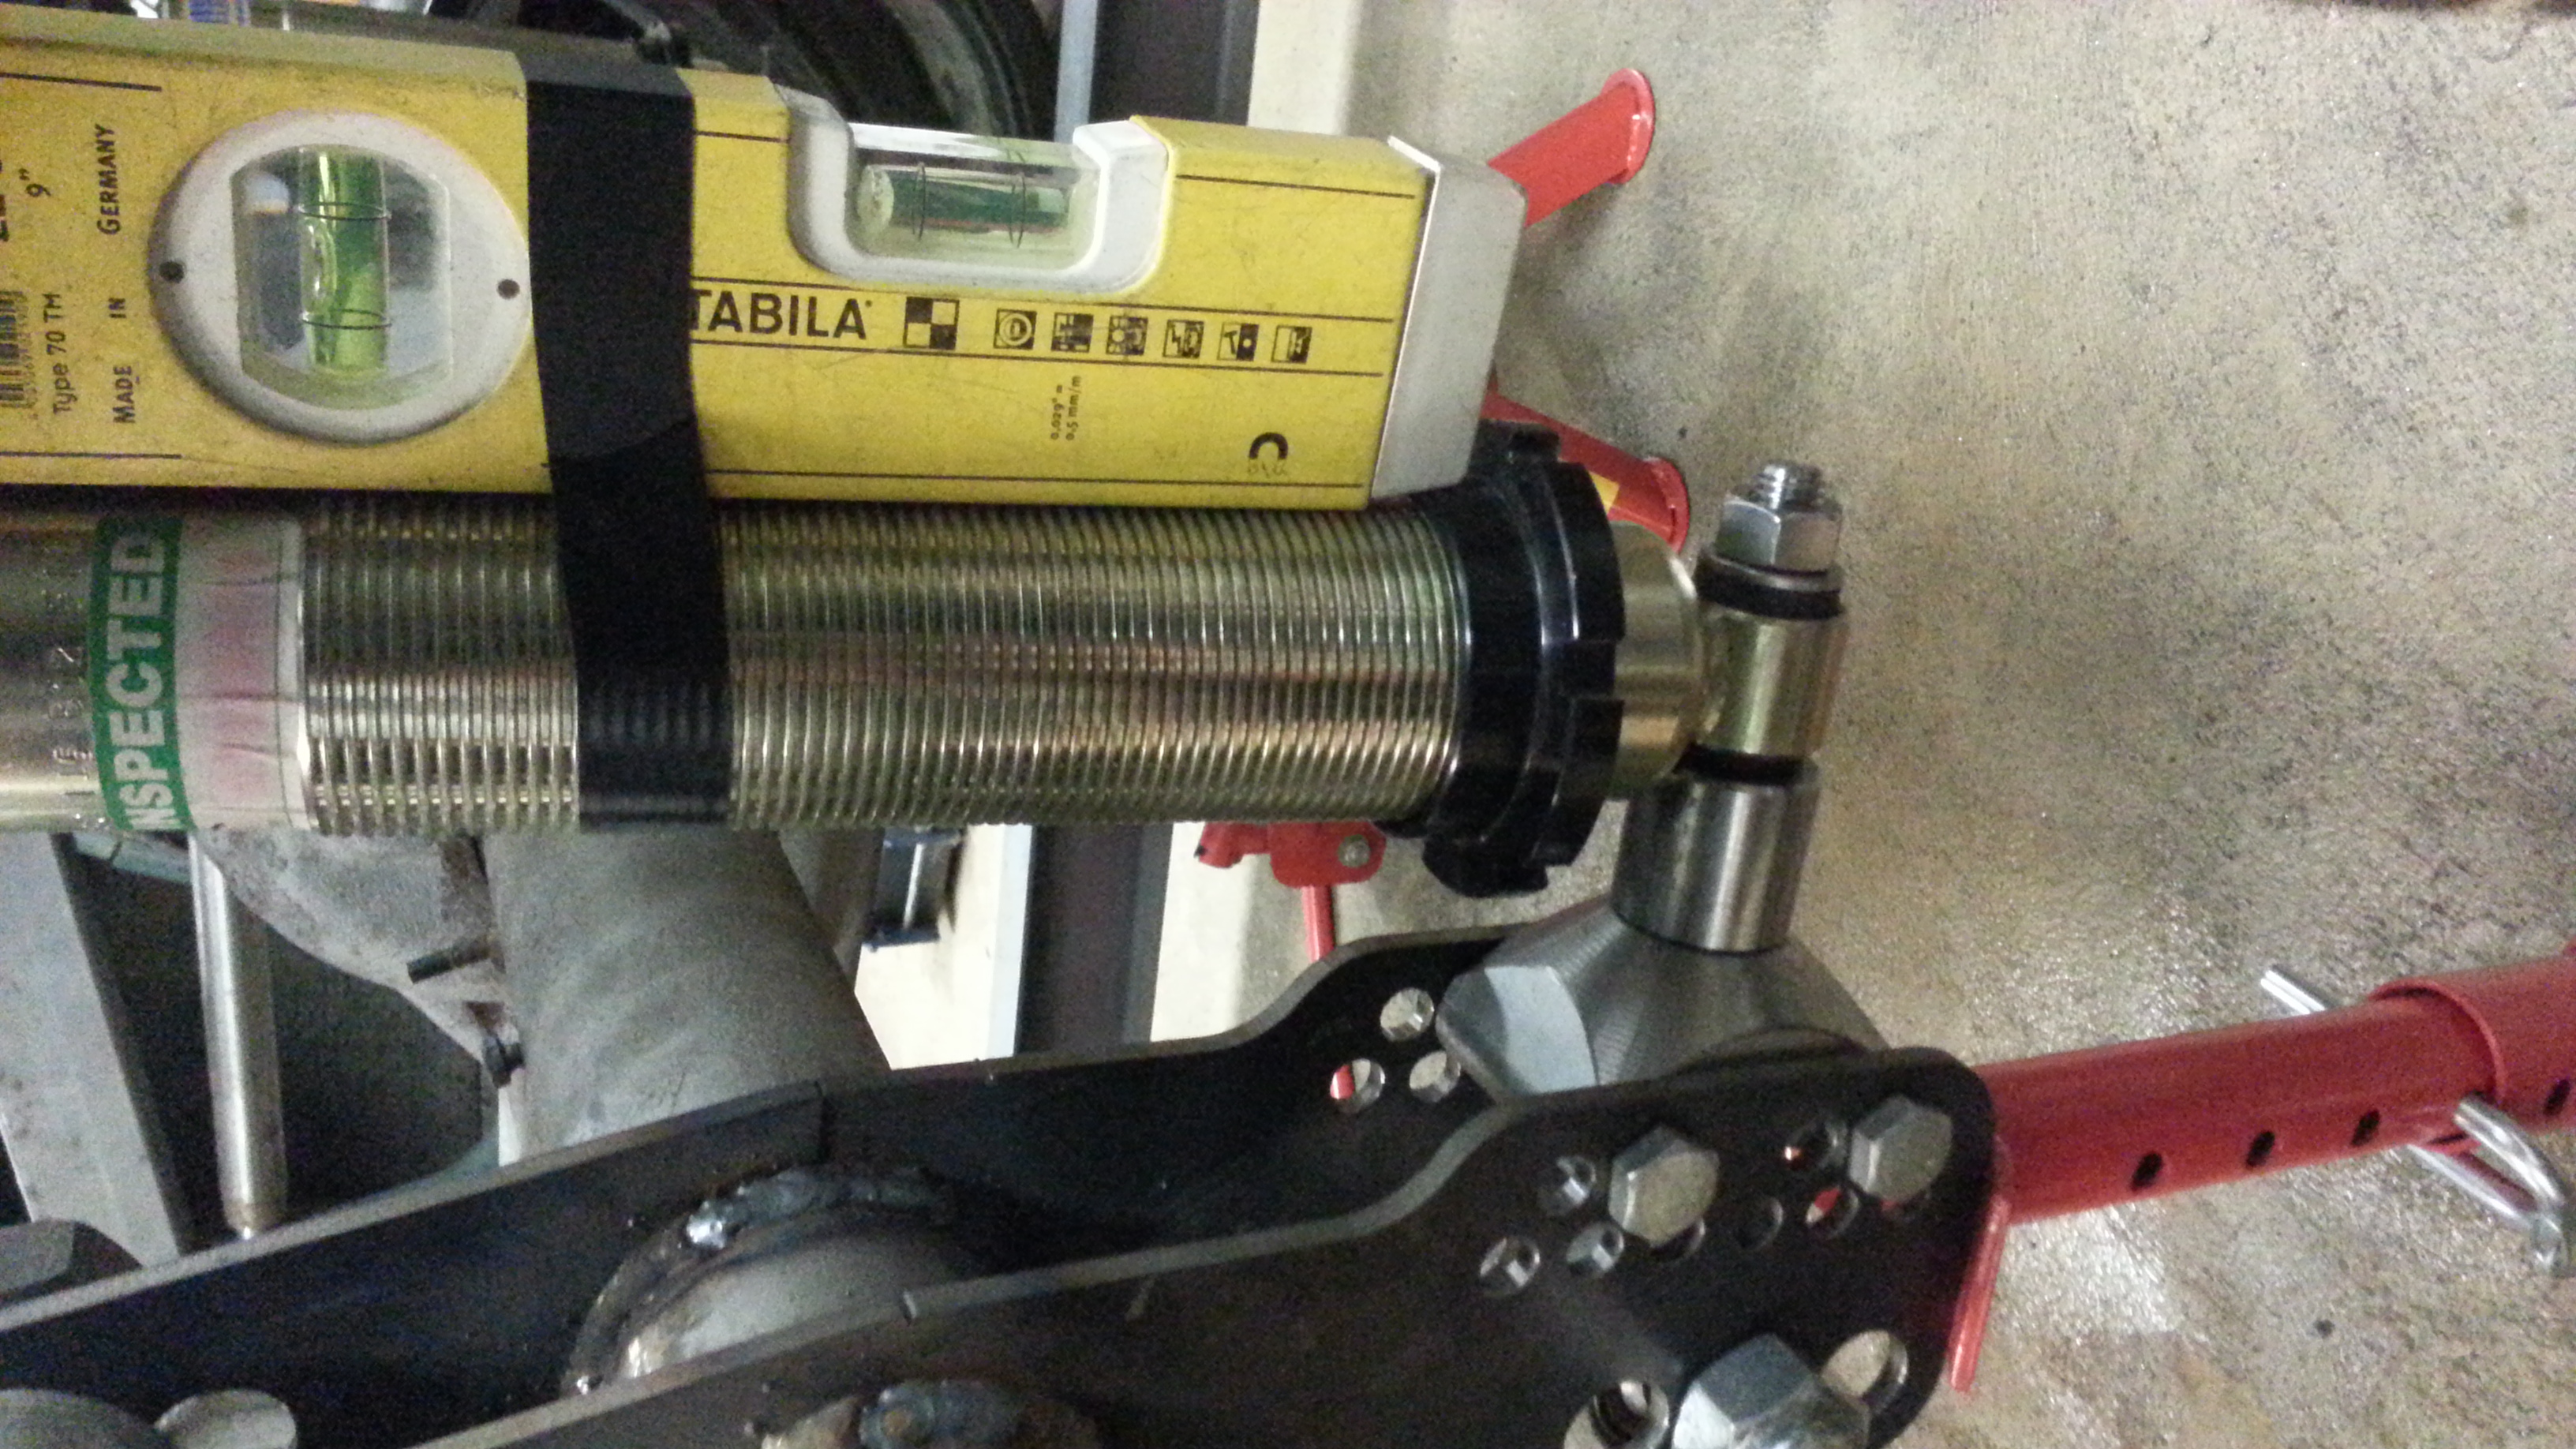
Then I also turned a new mount for the rear coilovers.
Really fun to turn threads in a cnc. They always look so good.

M12x1.75 at one end, Ø12.75mm for the coilover, and then M20x1.5 in the other end.
Name:  20130216_143440_zps069352b6.jpg
Views: 578
Size:  1.35 MB
Name:  20130216_152426_zps6d6495d9.jpg
Views: 576
Size:  2.14 MB
Name:  20130216_163416_zps85adecc1.jpg
Views: 593
Size:  2.26 MB
Name:  20130216_163404_zpsc83c9de4.jpg
Views: 565
Size:  2.33 MB

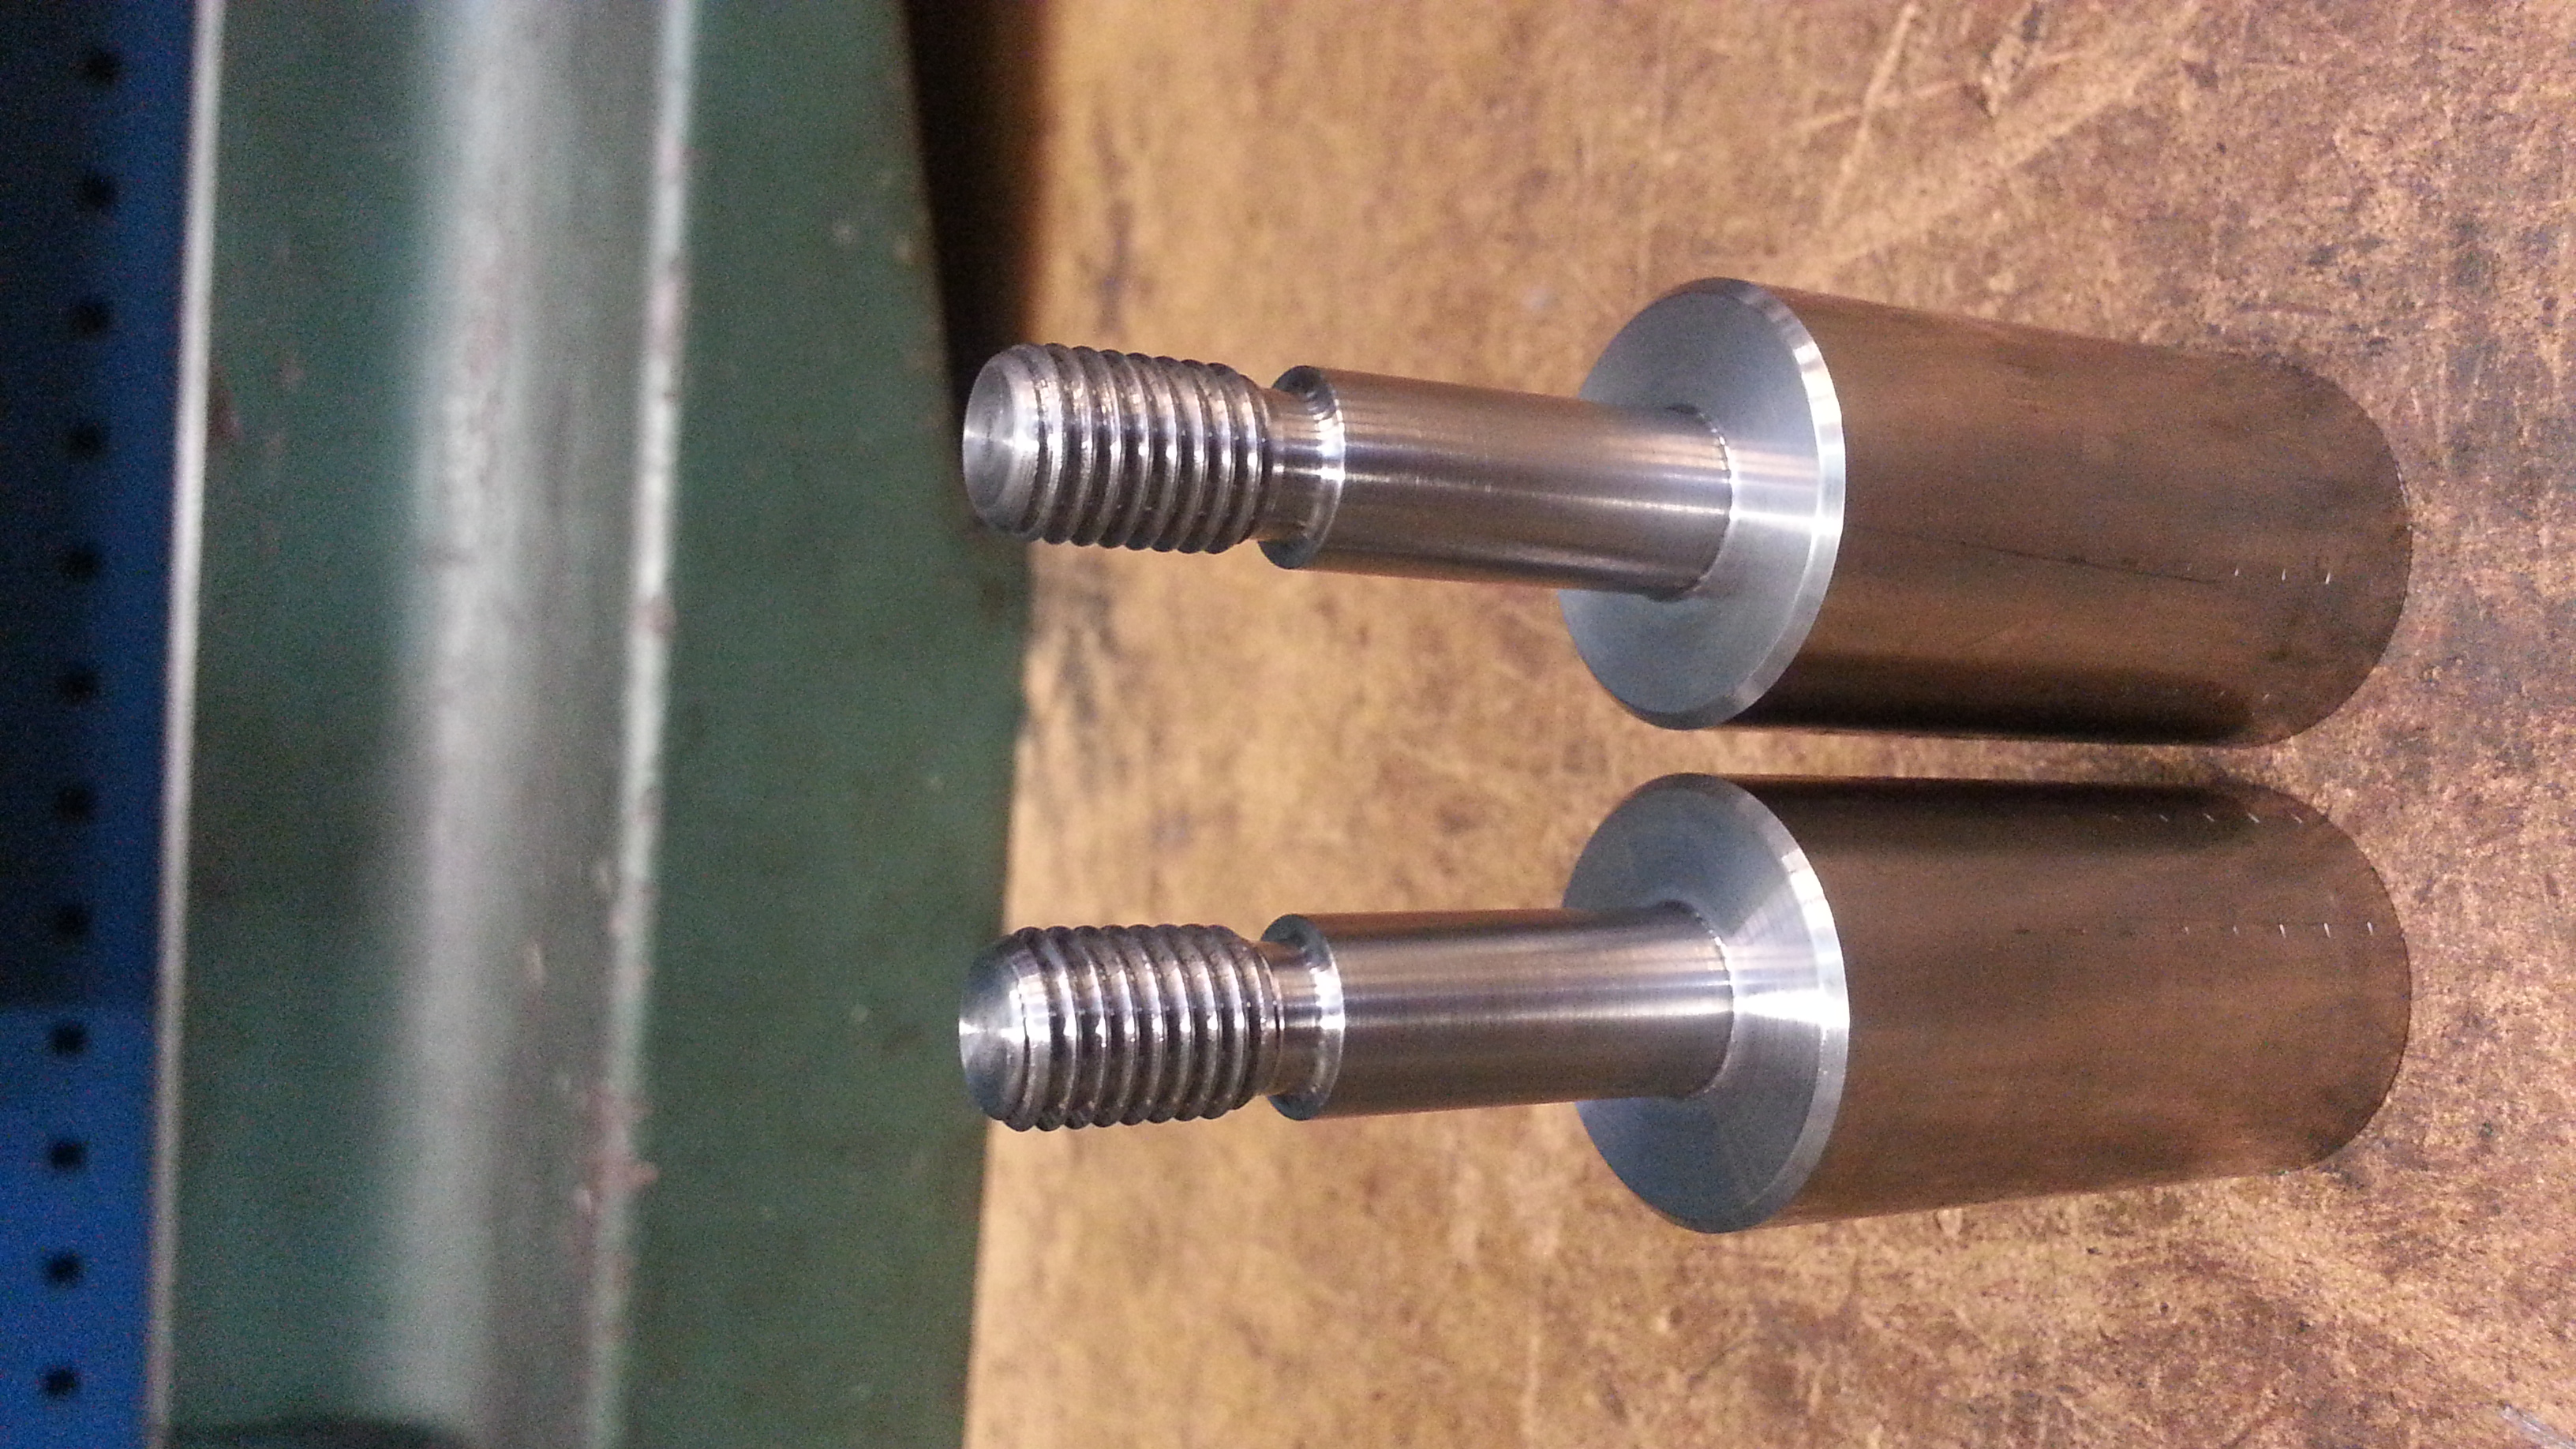
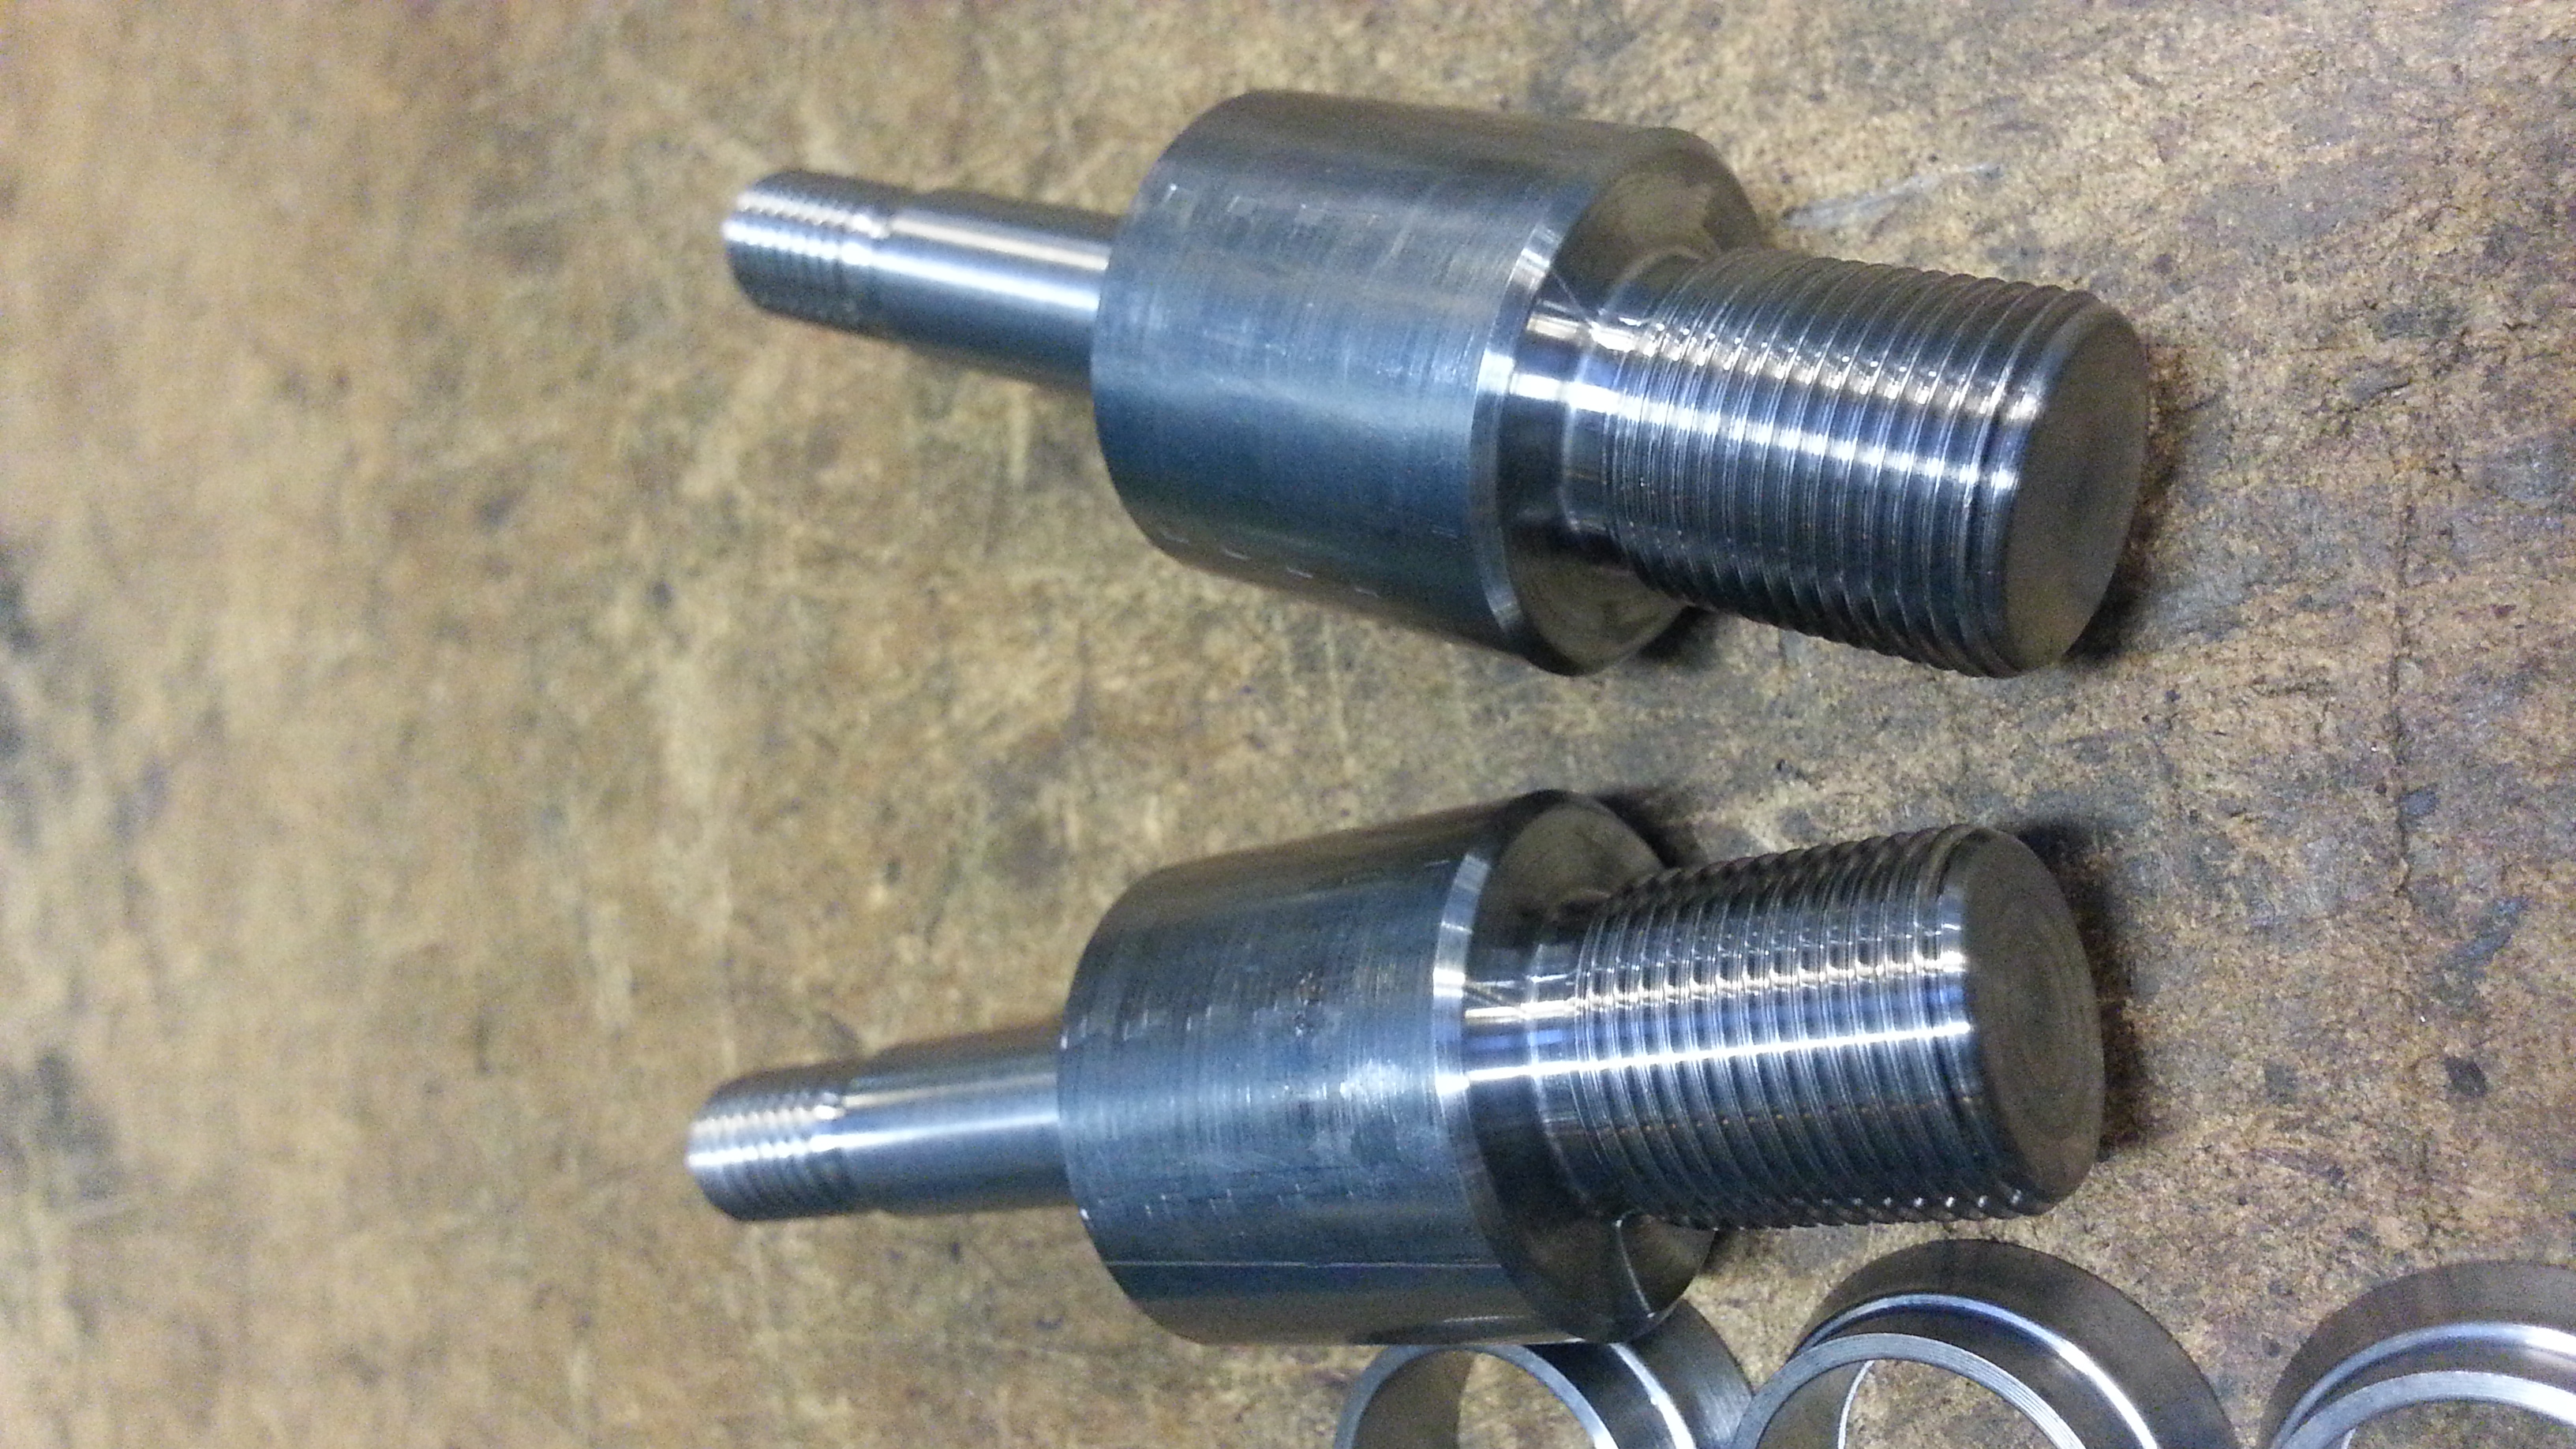
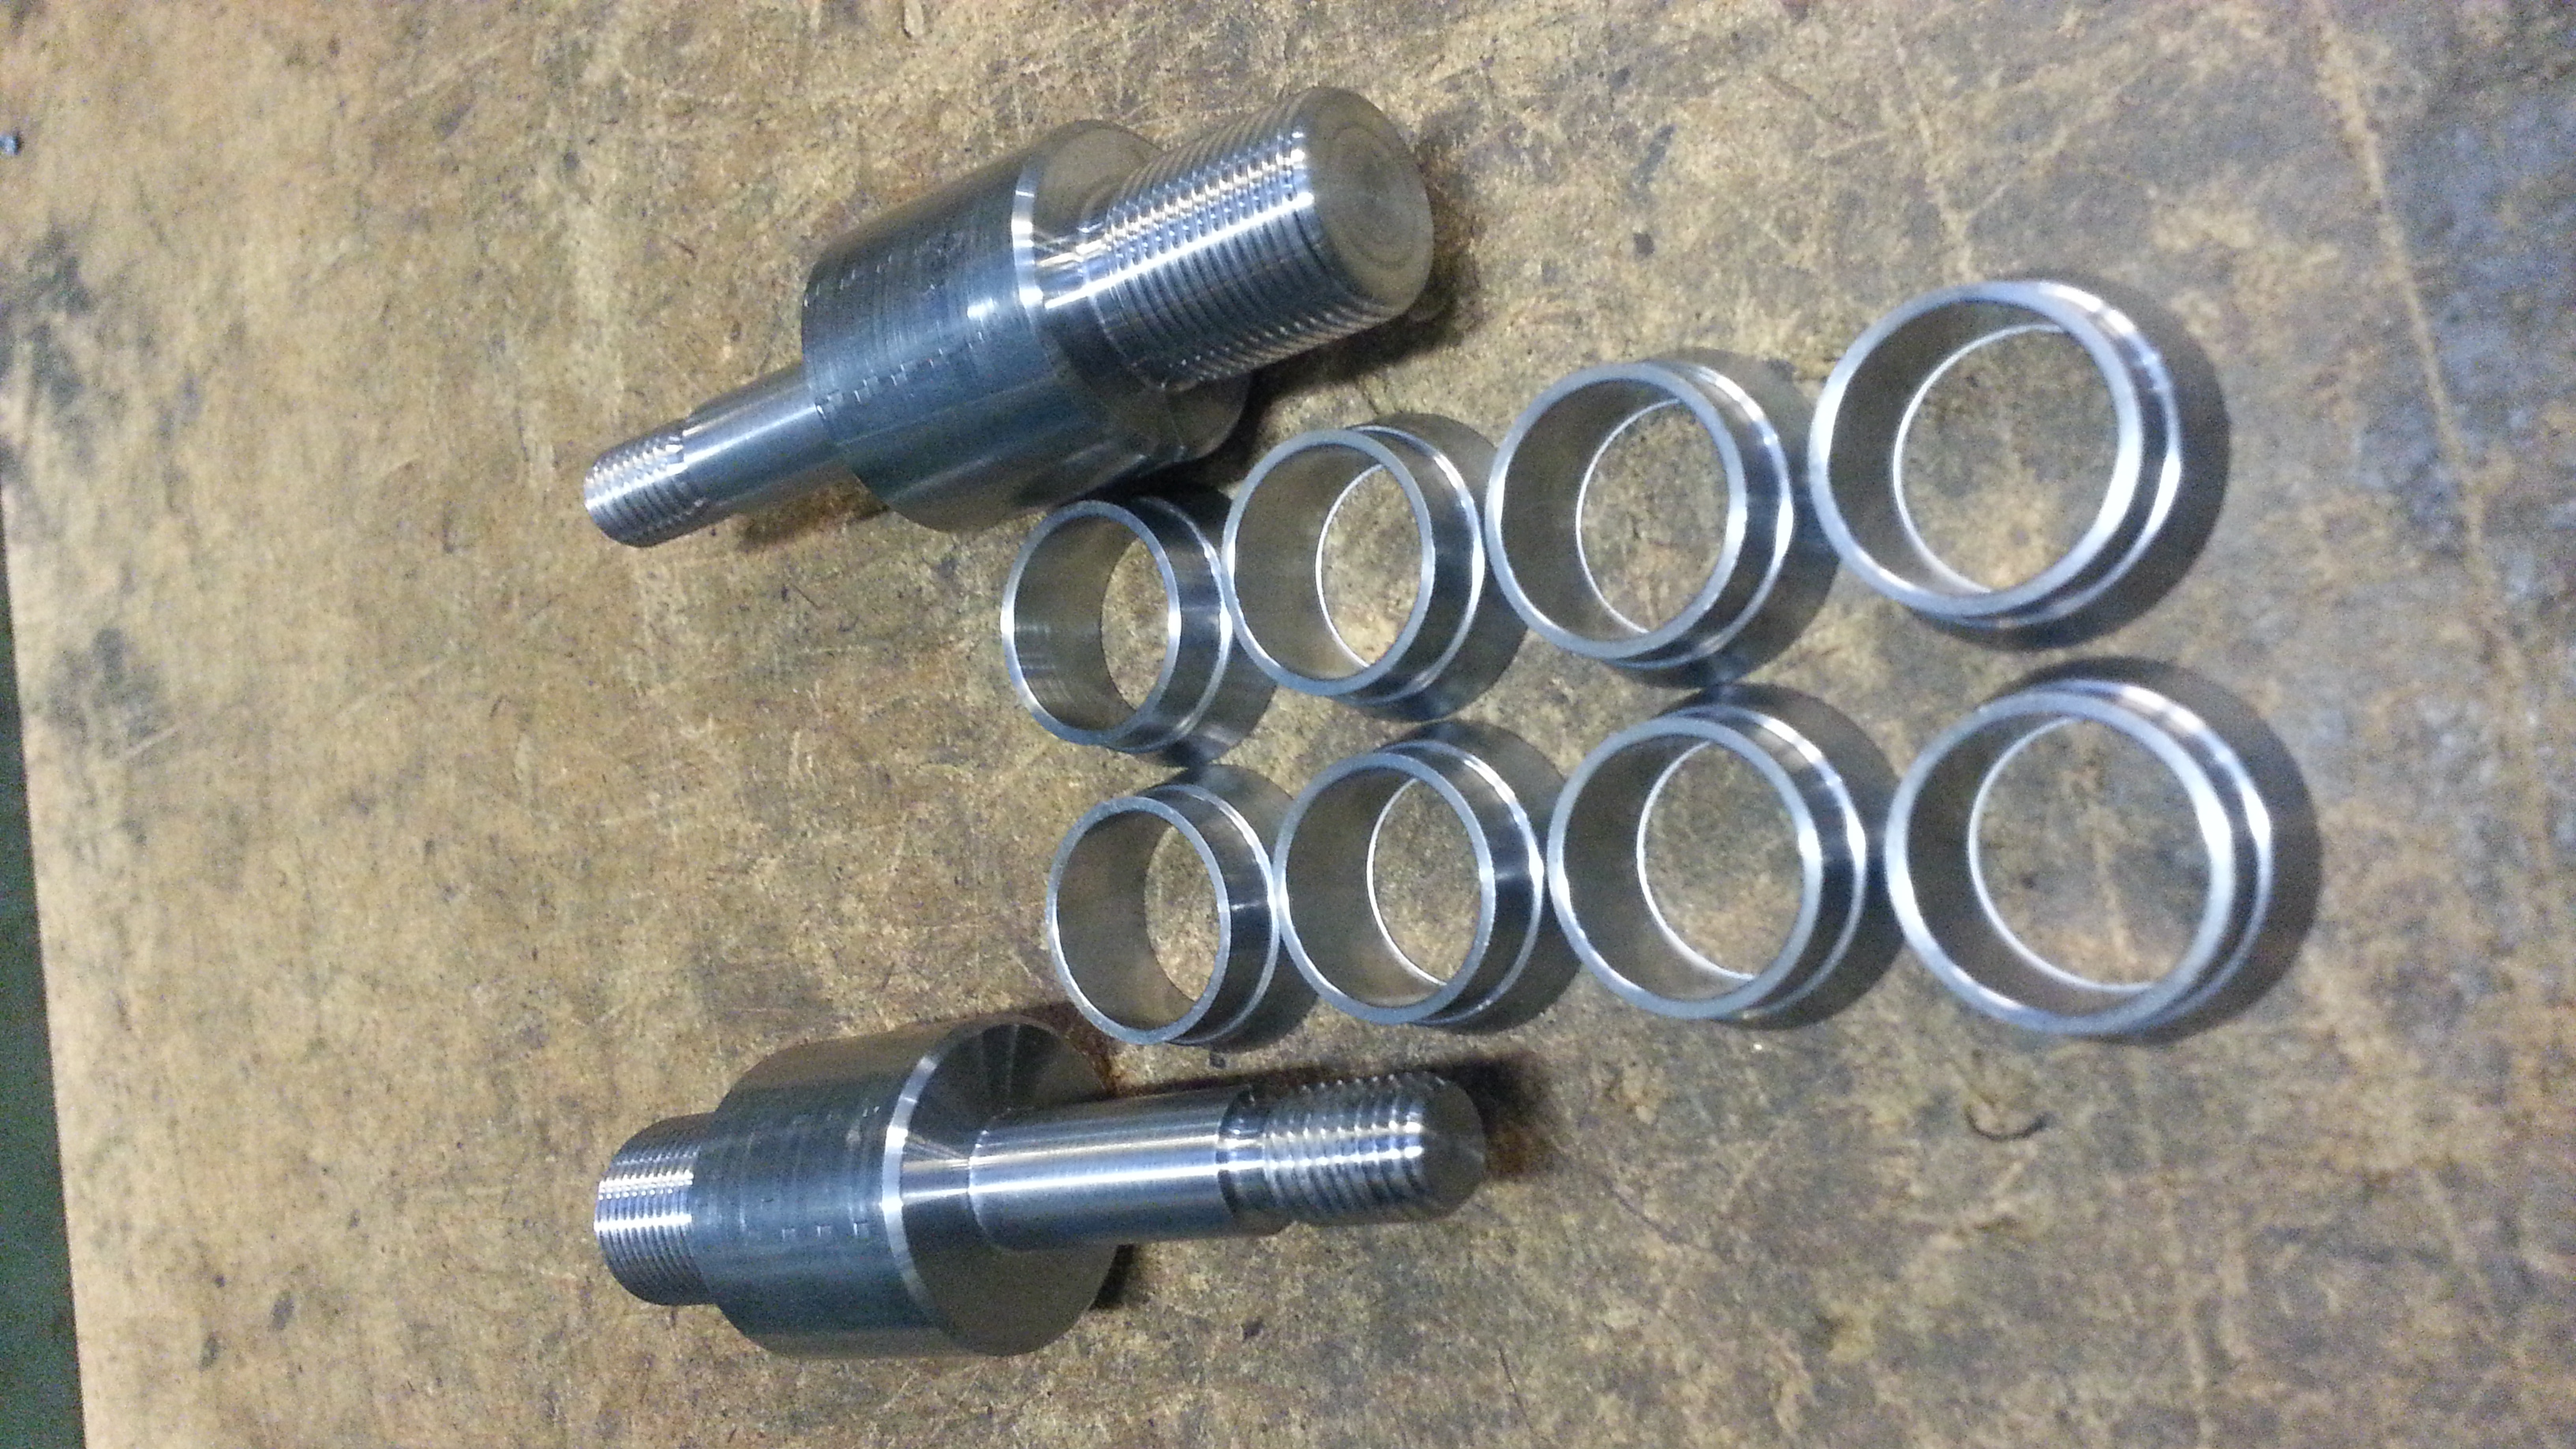
Ofcource I was at the garage to try them out!
Name:  20130216_173550_zps2be59842.jpg
Views: 534
Size:  1.96 MB
Name:  20130216_173840_zps5c933621.jpg
Views: 604
Size:  2.50 MB
Old 02-24-13, 02:46 AM
  #793  
Junior Member
 
Trundle's Avatar
 
Join Date: Jul 2011
Location: New Zealand
Posts: 8
Likes: 0
Received 0 Likes on 0 Posts
Thumbs up

This build thread is insaine , !
How about 3 spark plugs ,cooling grooves and maybe an aditional cooling port in the hot zone in the housing ,!
Old 03-01-13, 12:58 PM
  #794  
Senior Member

Thread Starter
 
tegheim's Avatar
 
Join Date: Nov 2003
Location: Sweden
Posts: 533
Likes: 0
Received 2 Likes on 1 Post
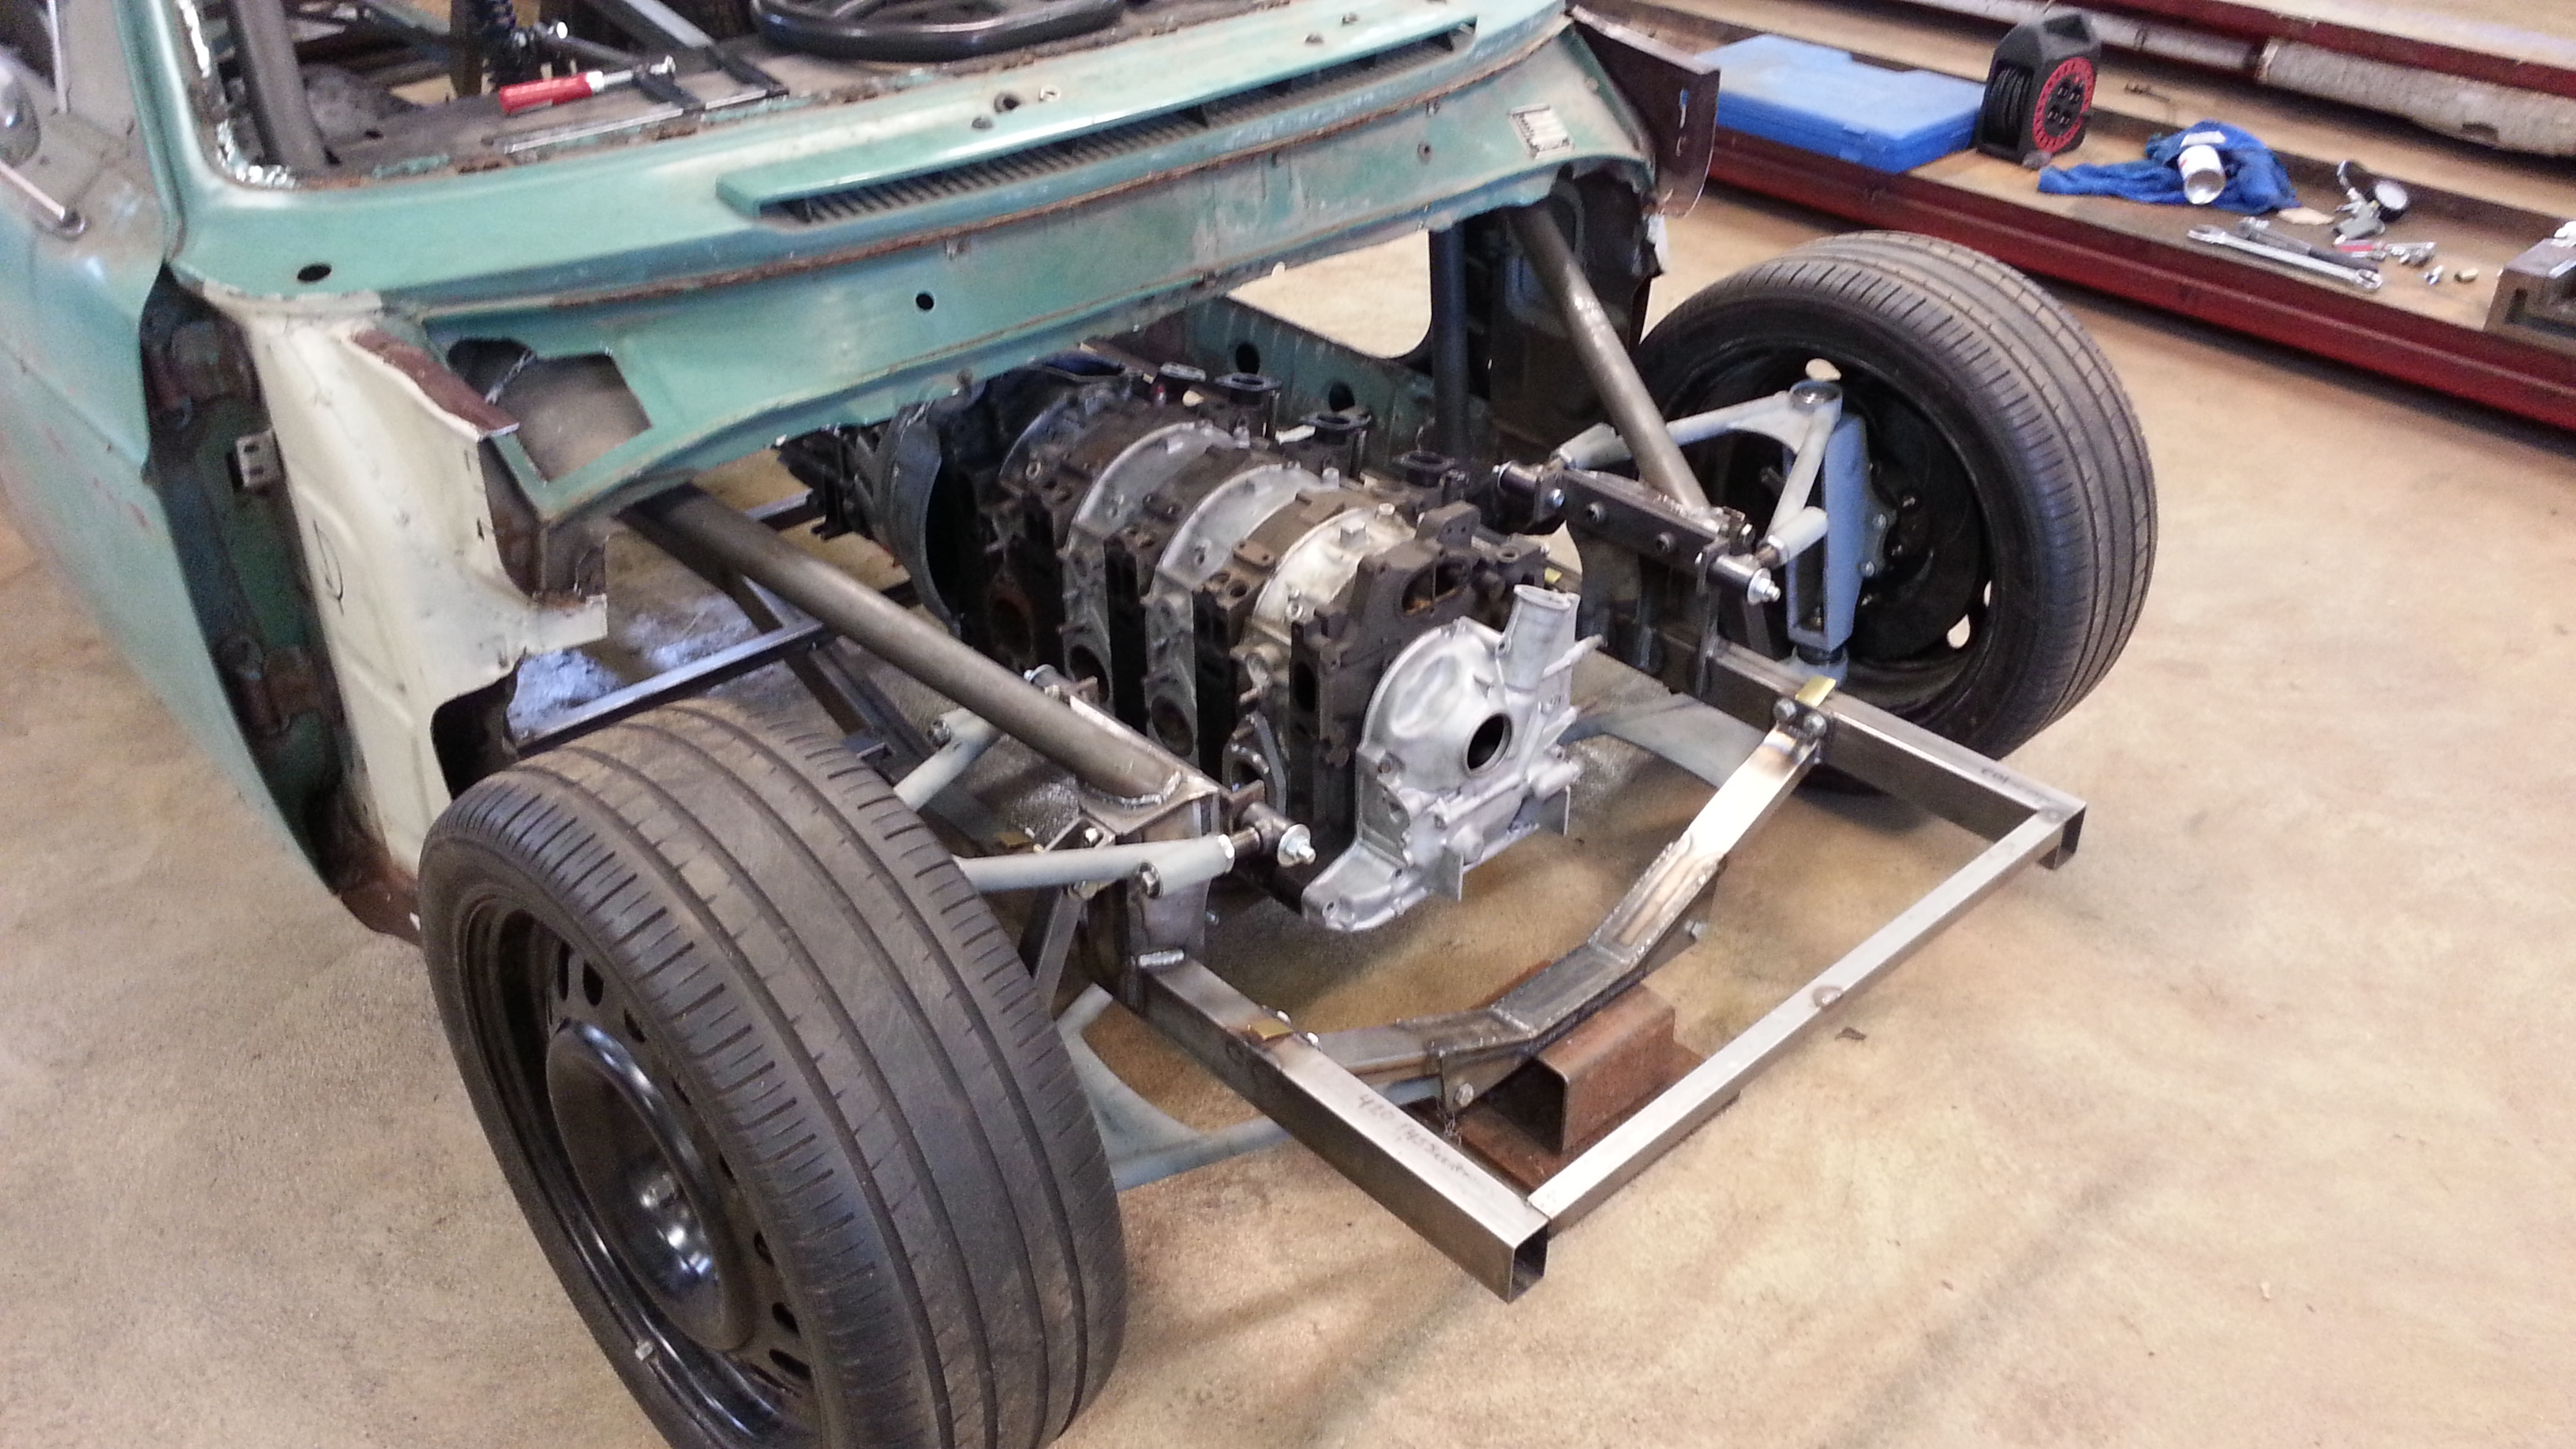
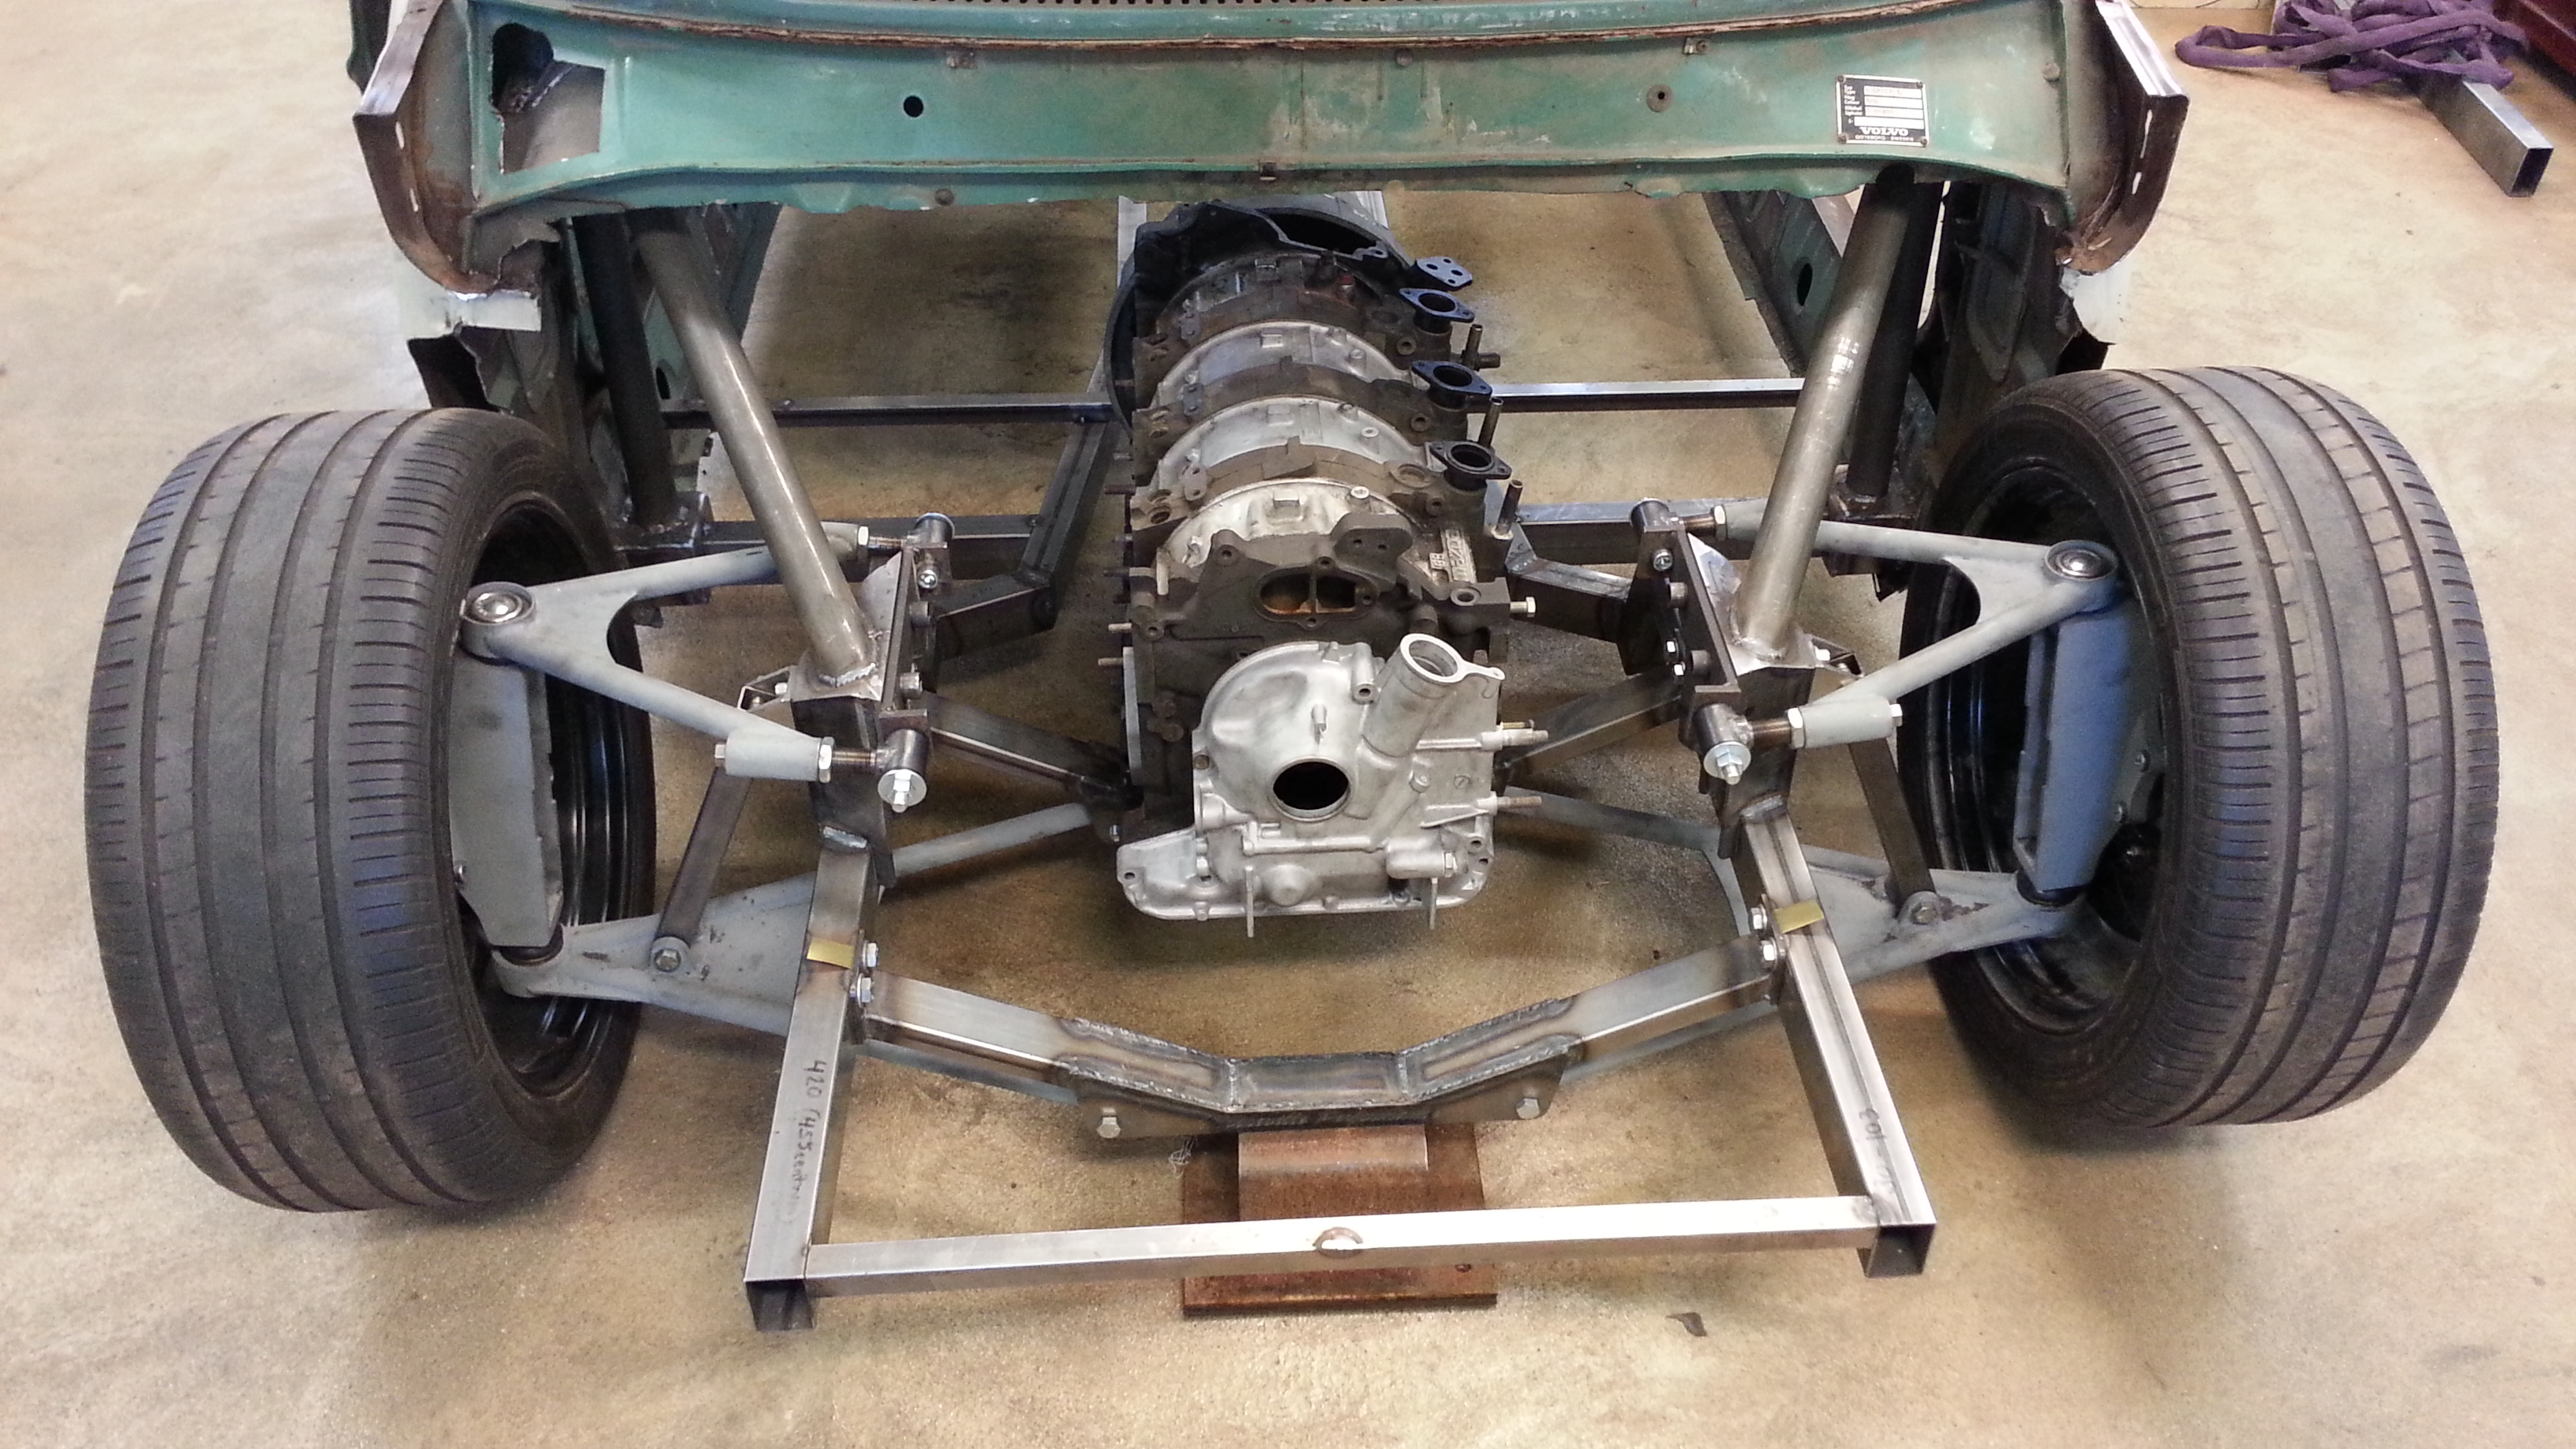
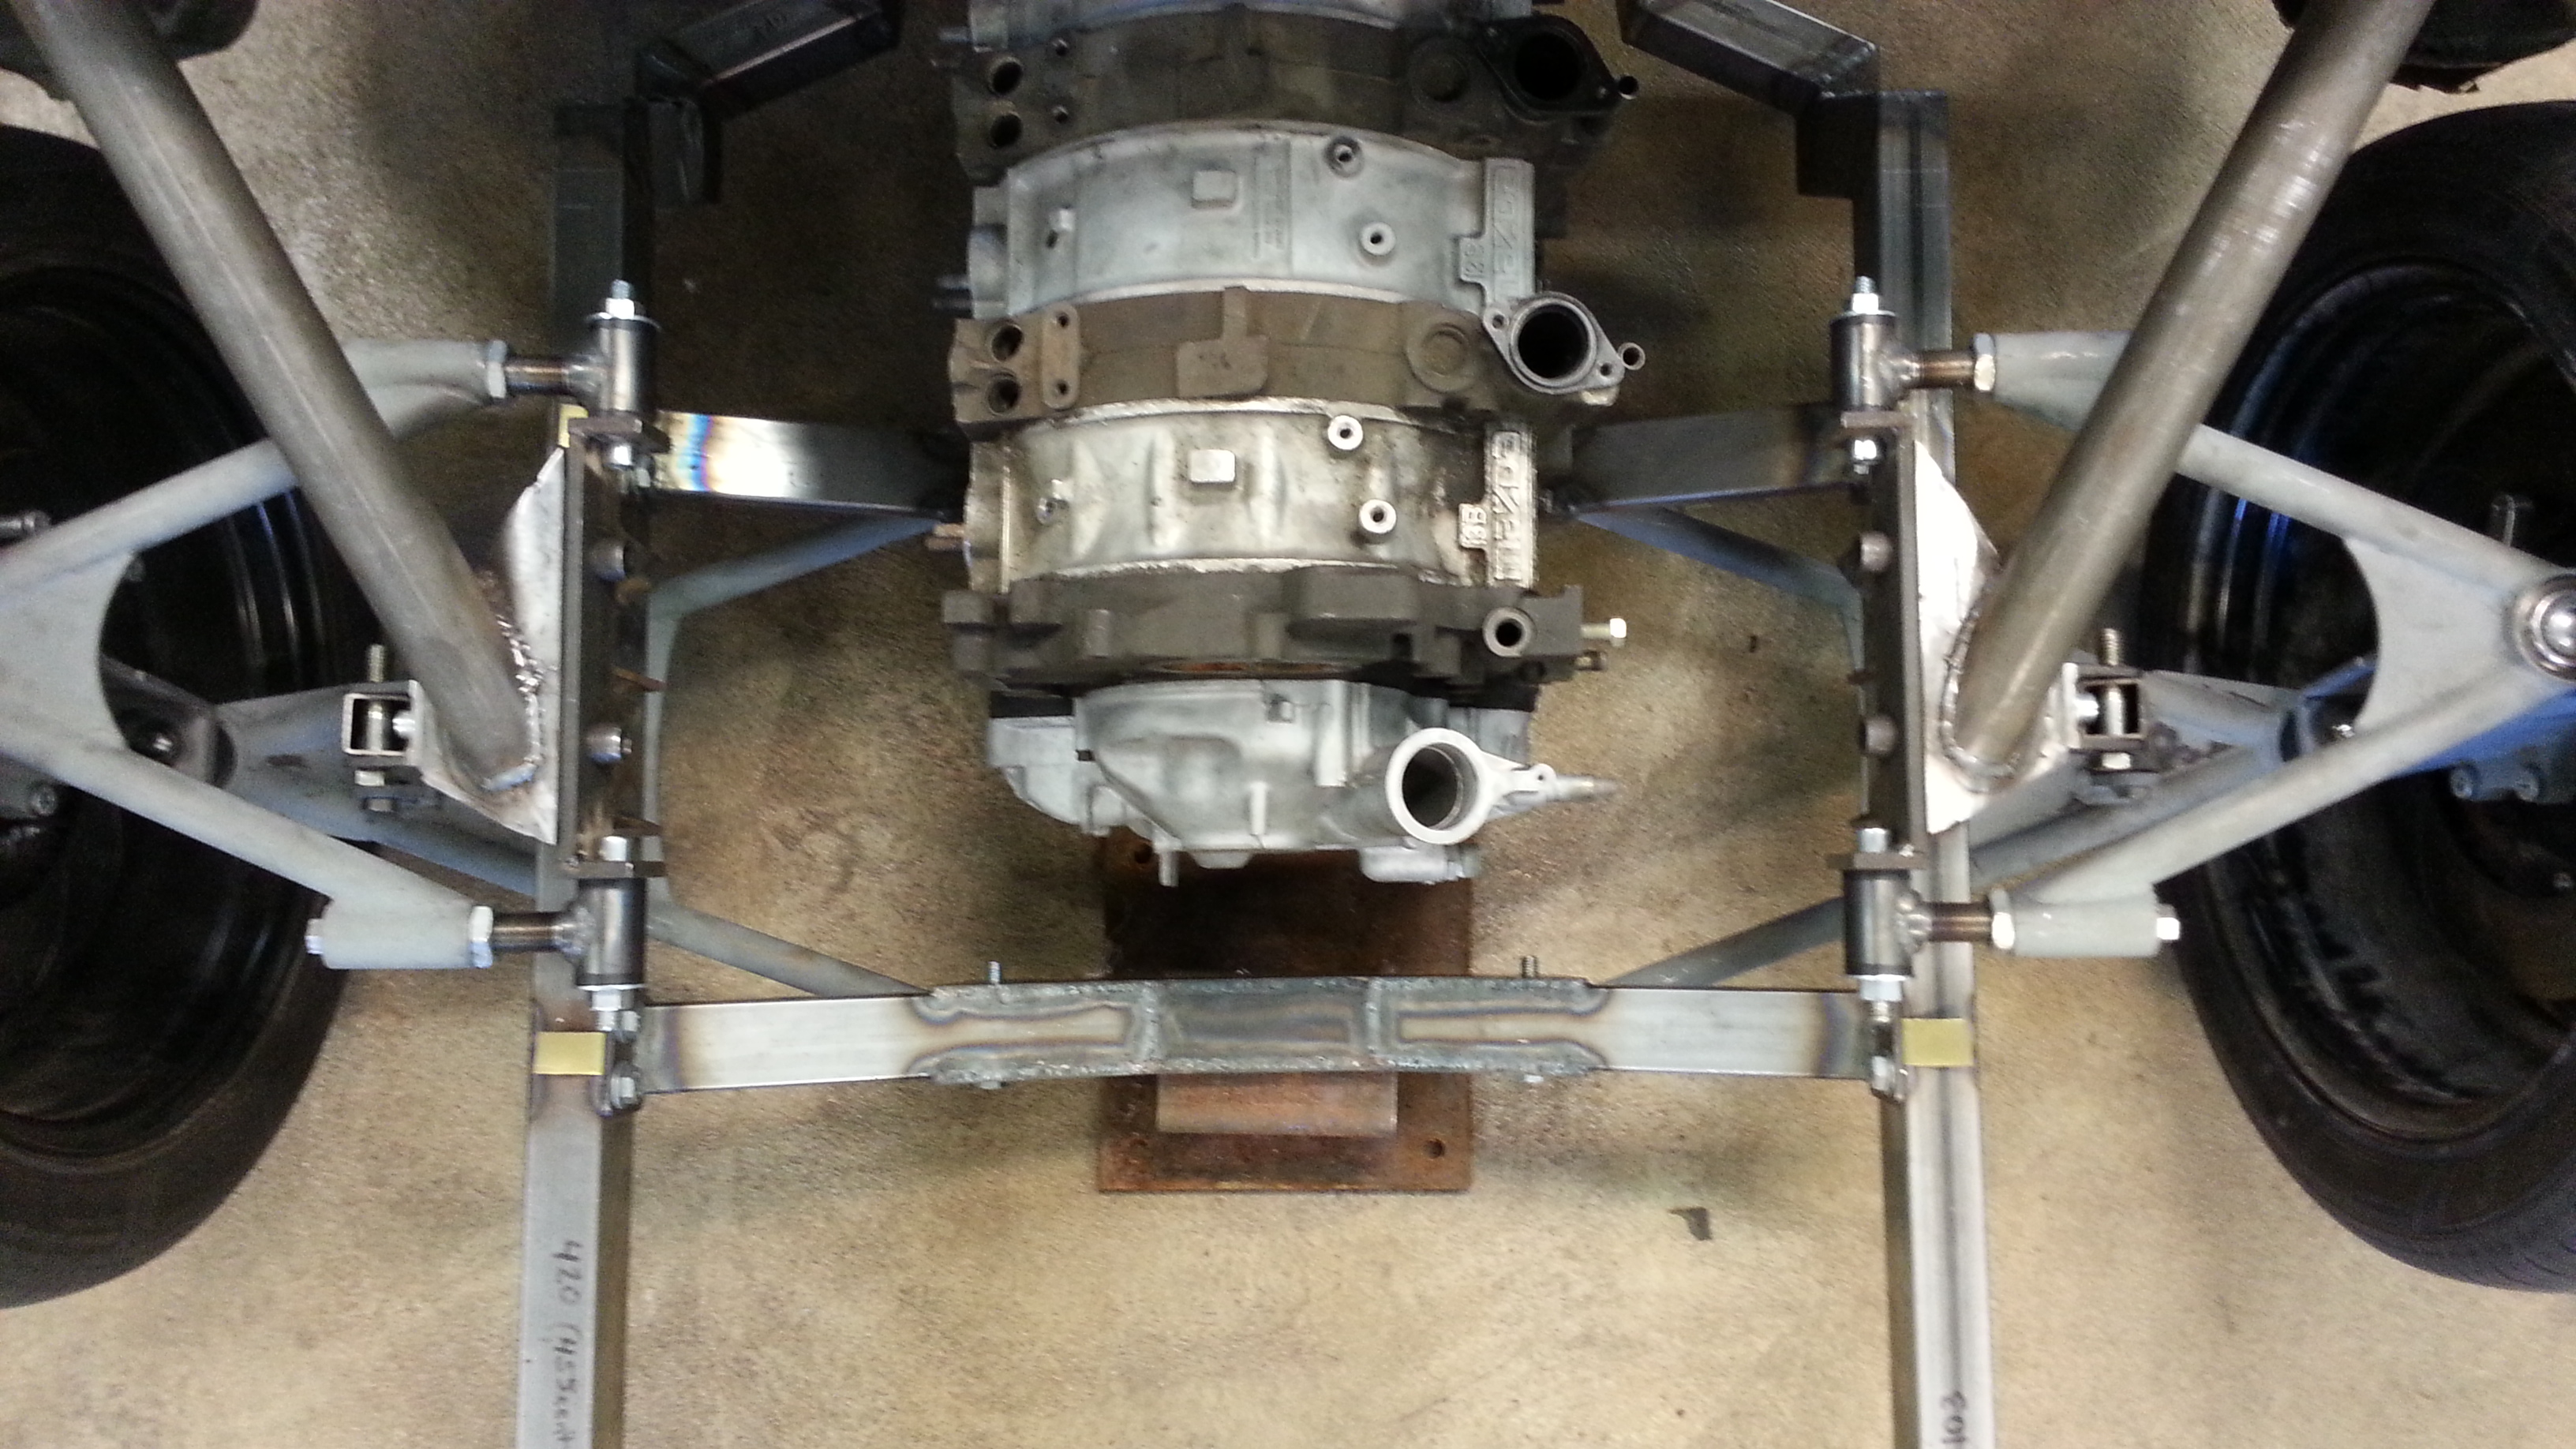
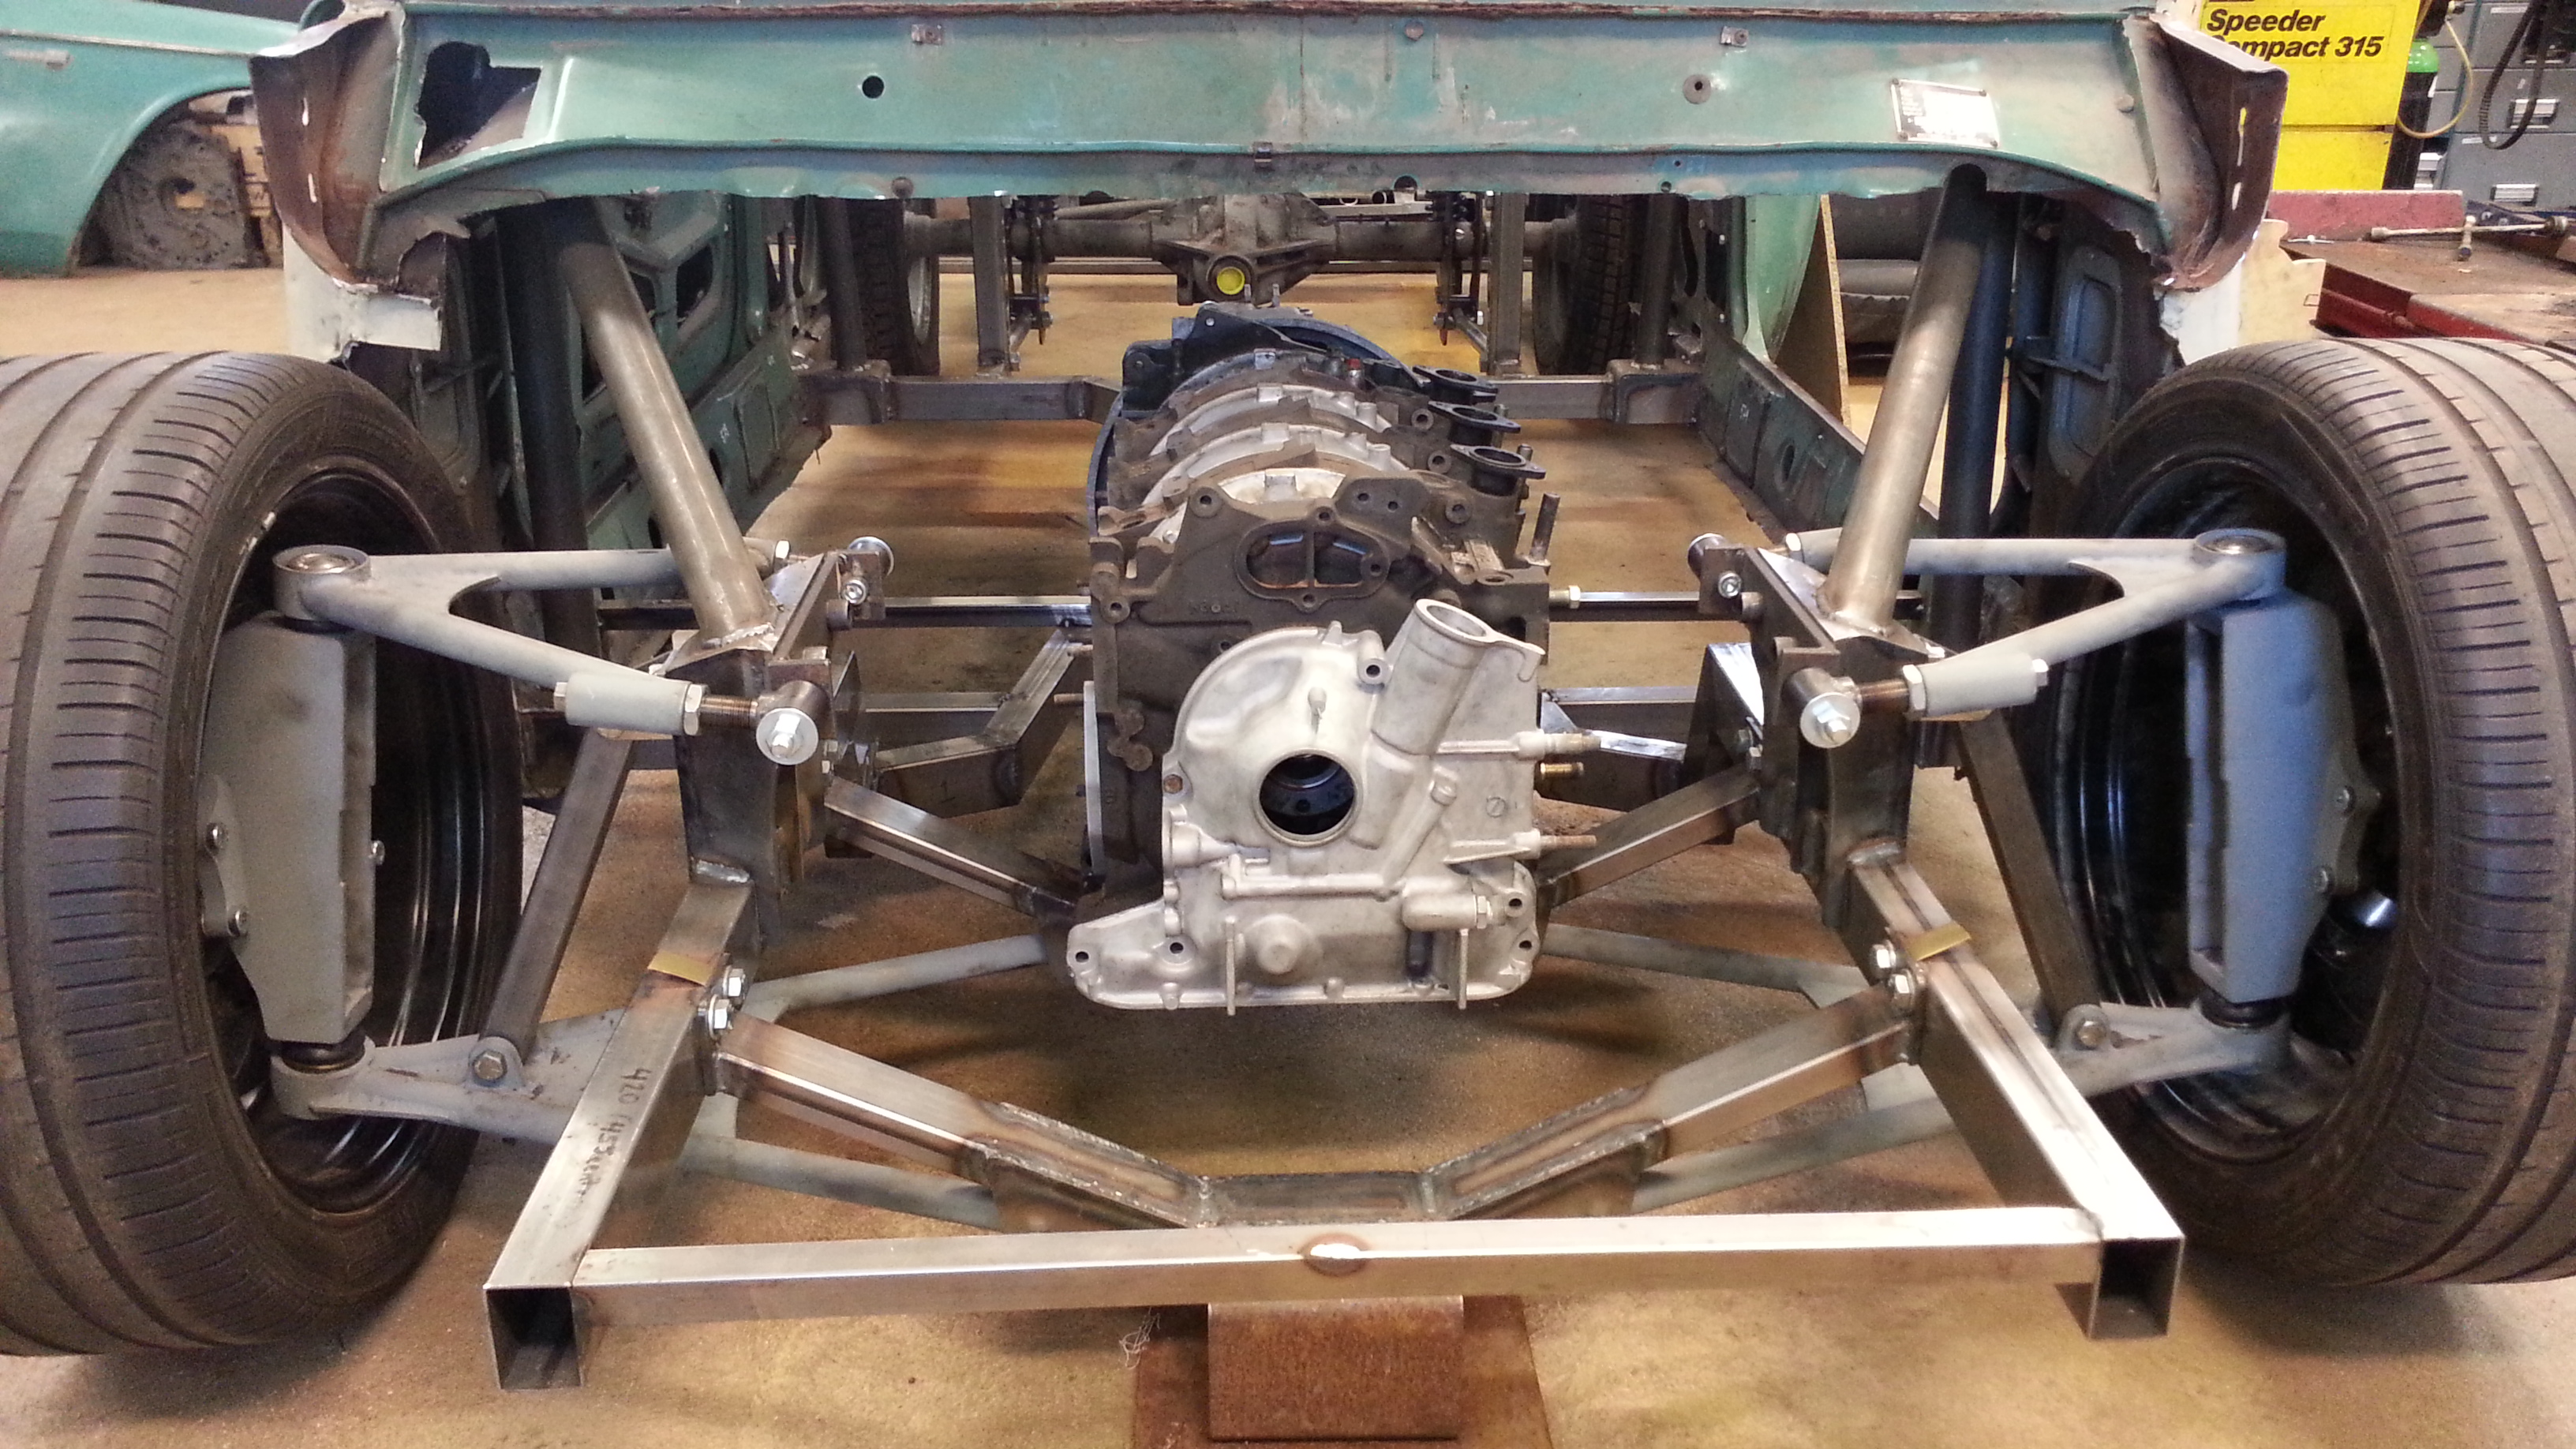
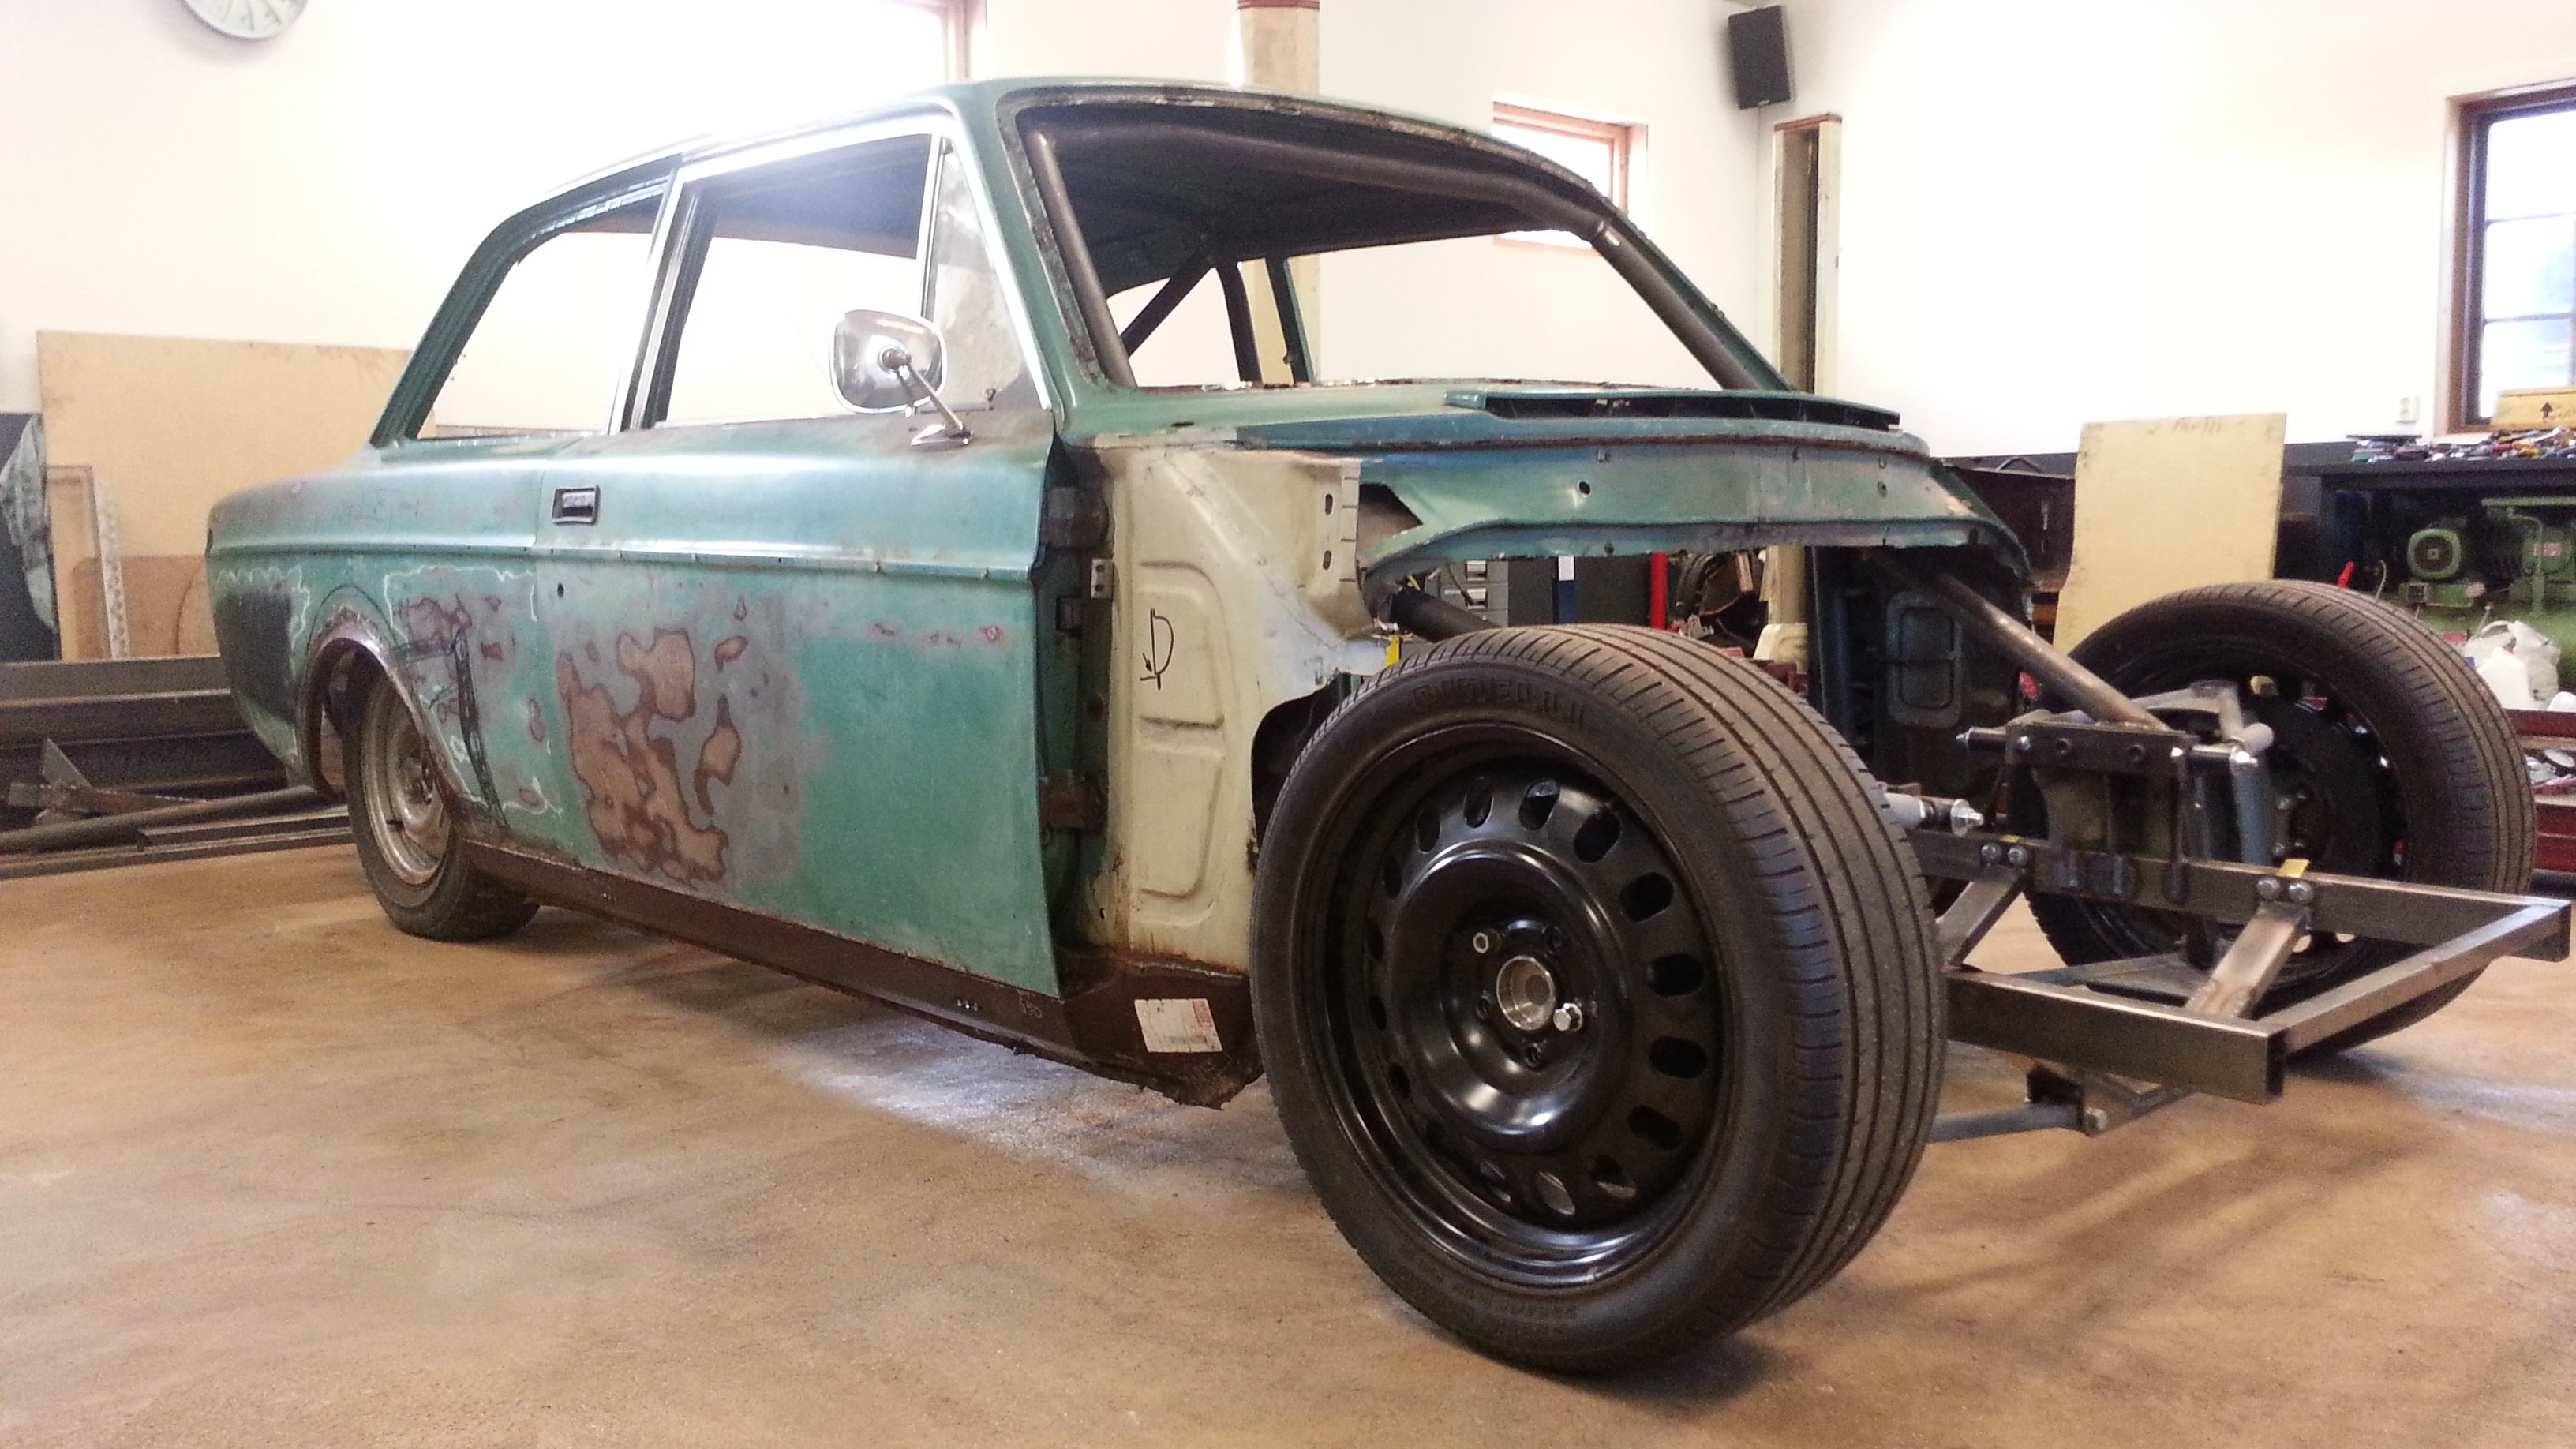
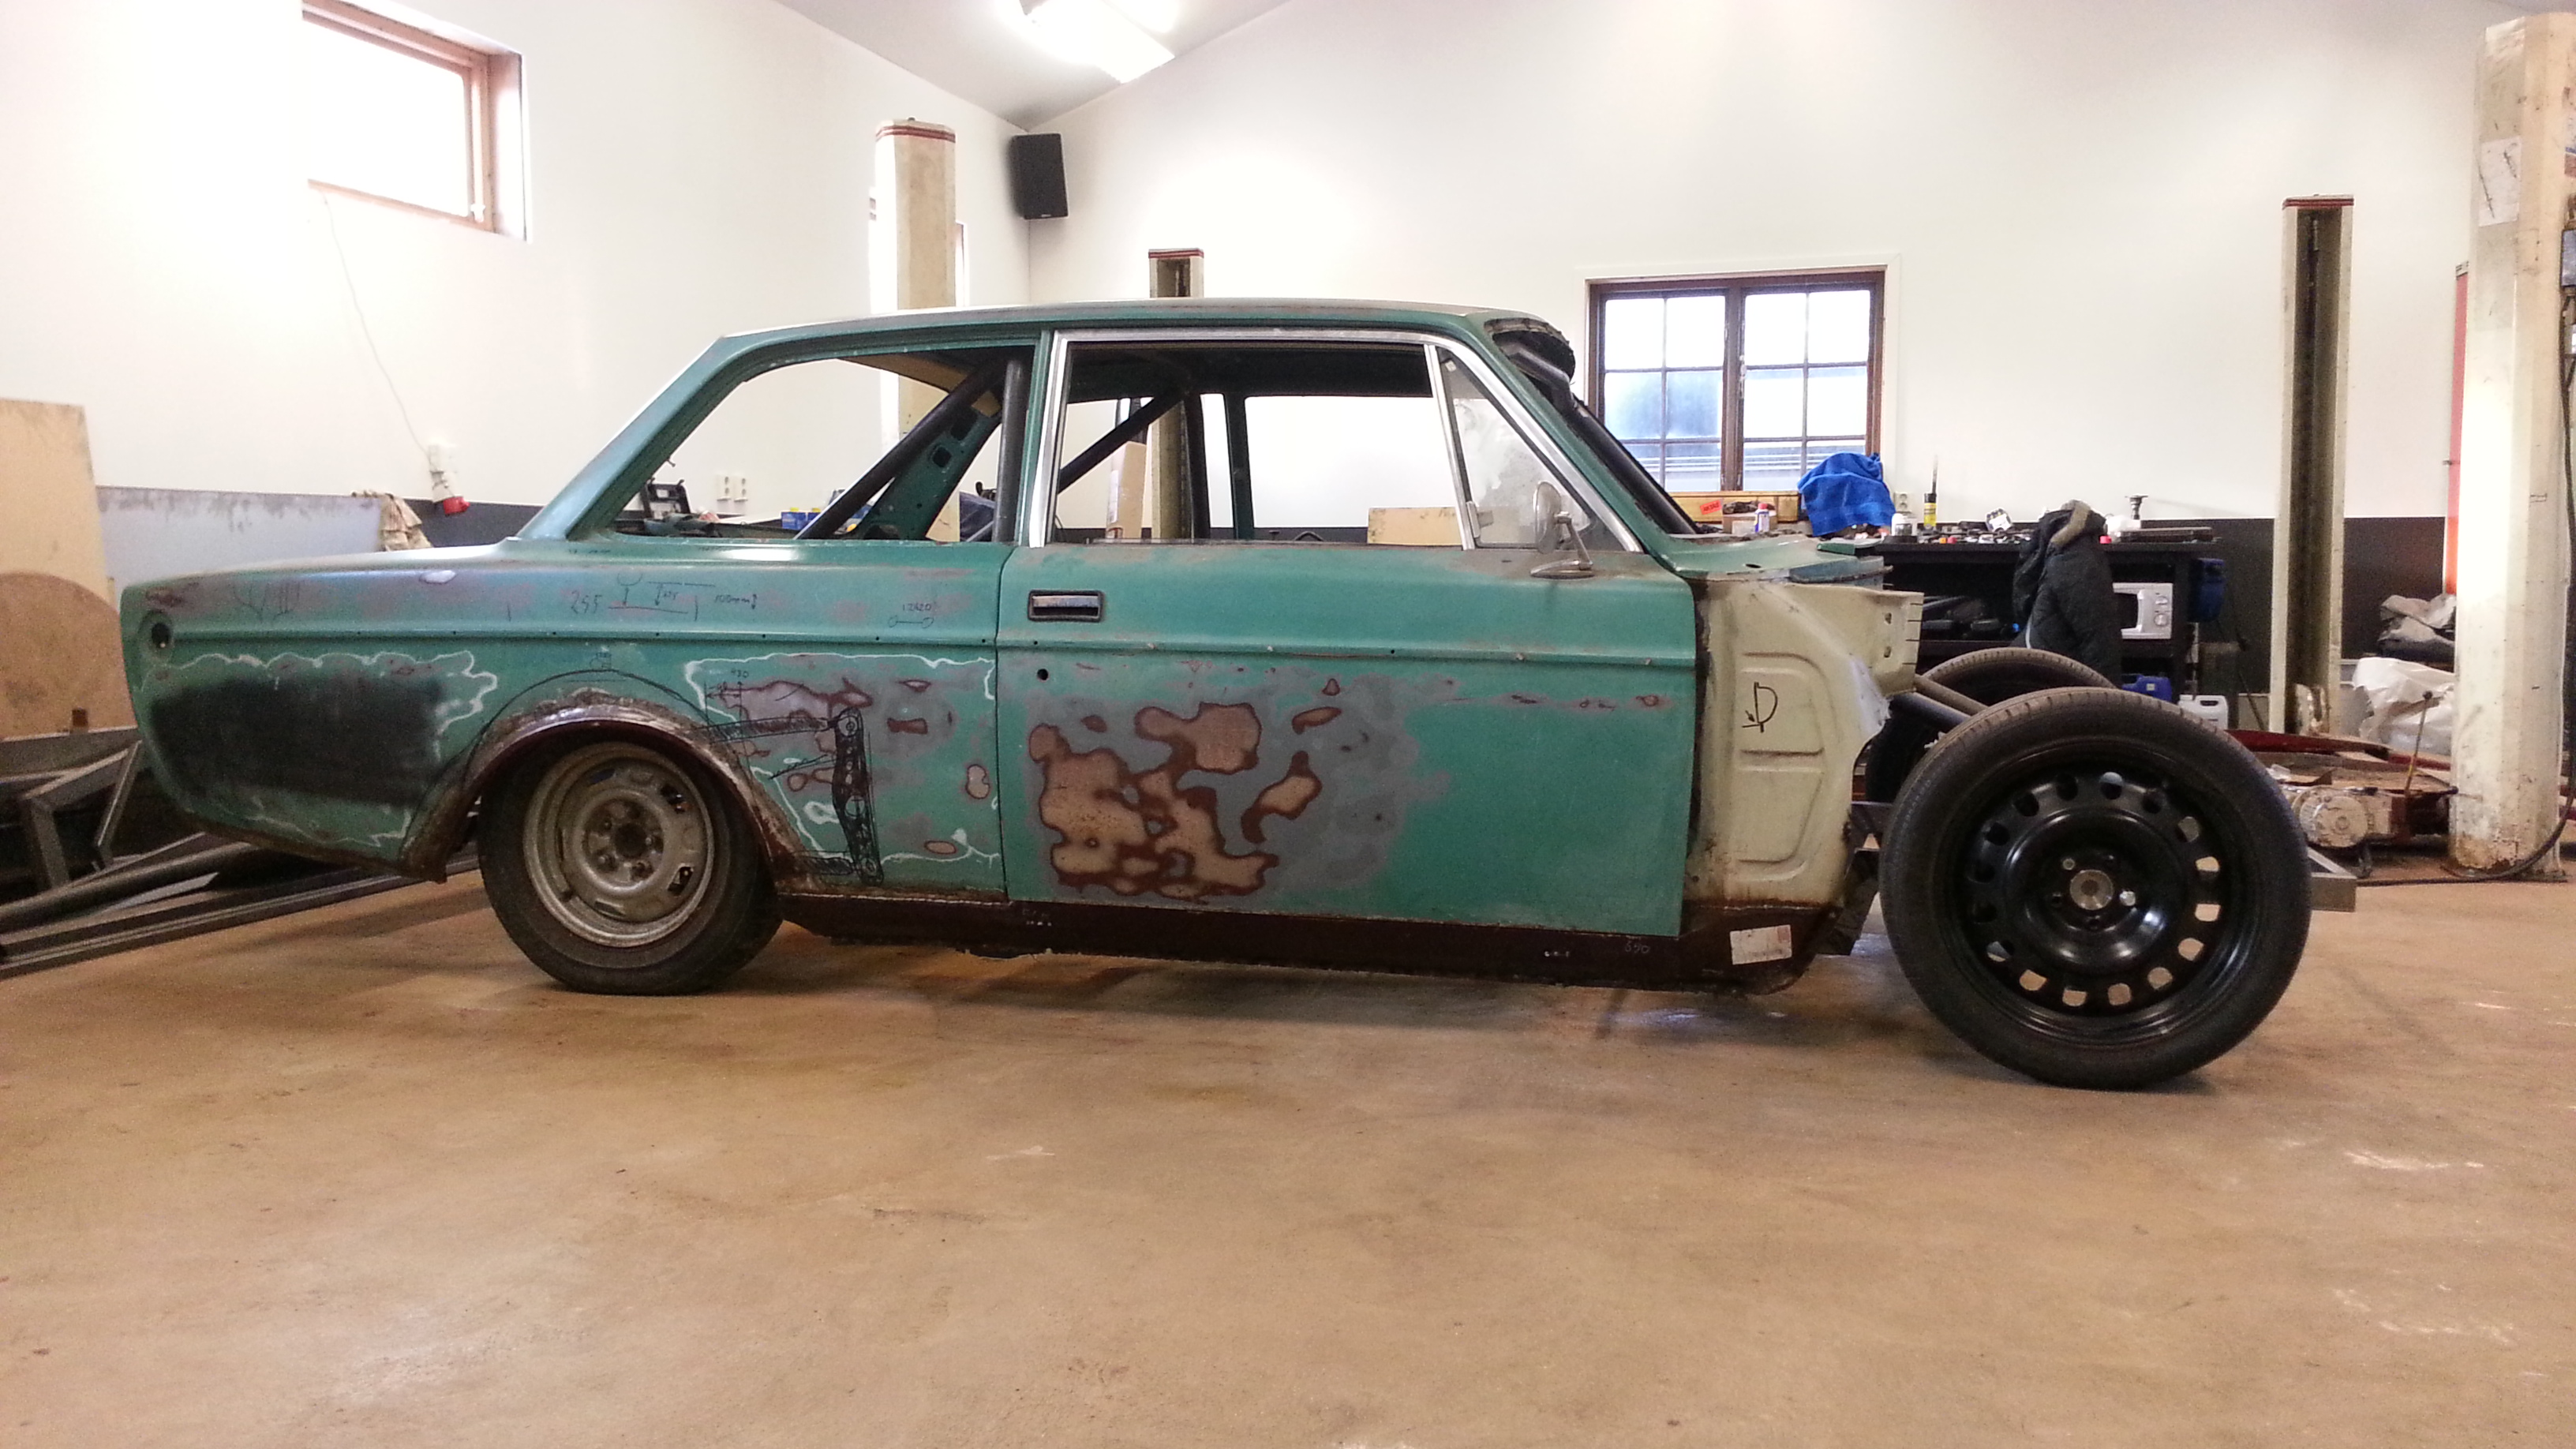
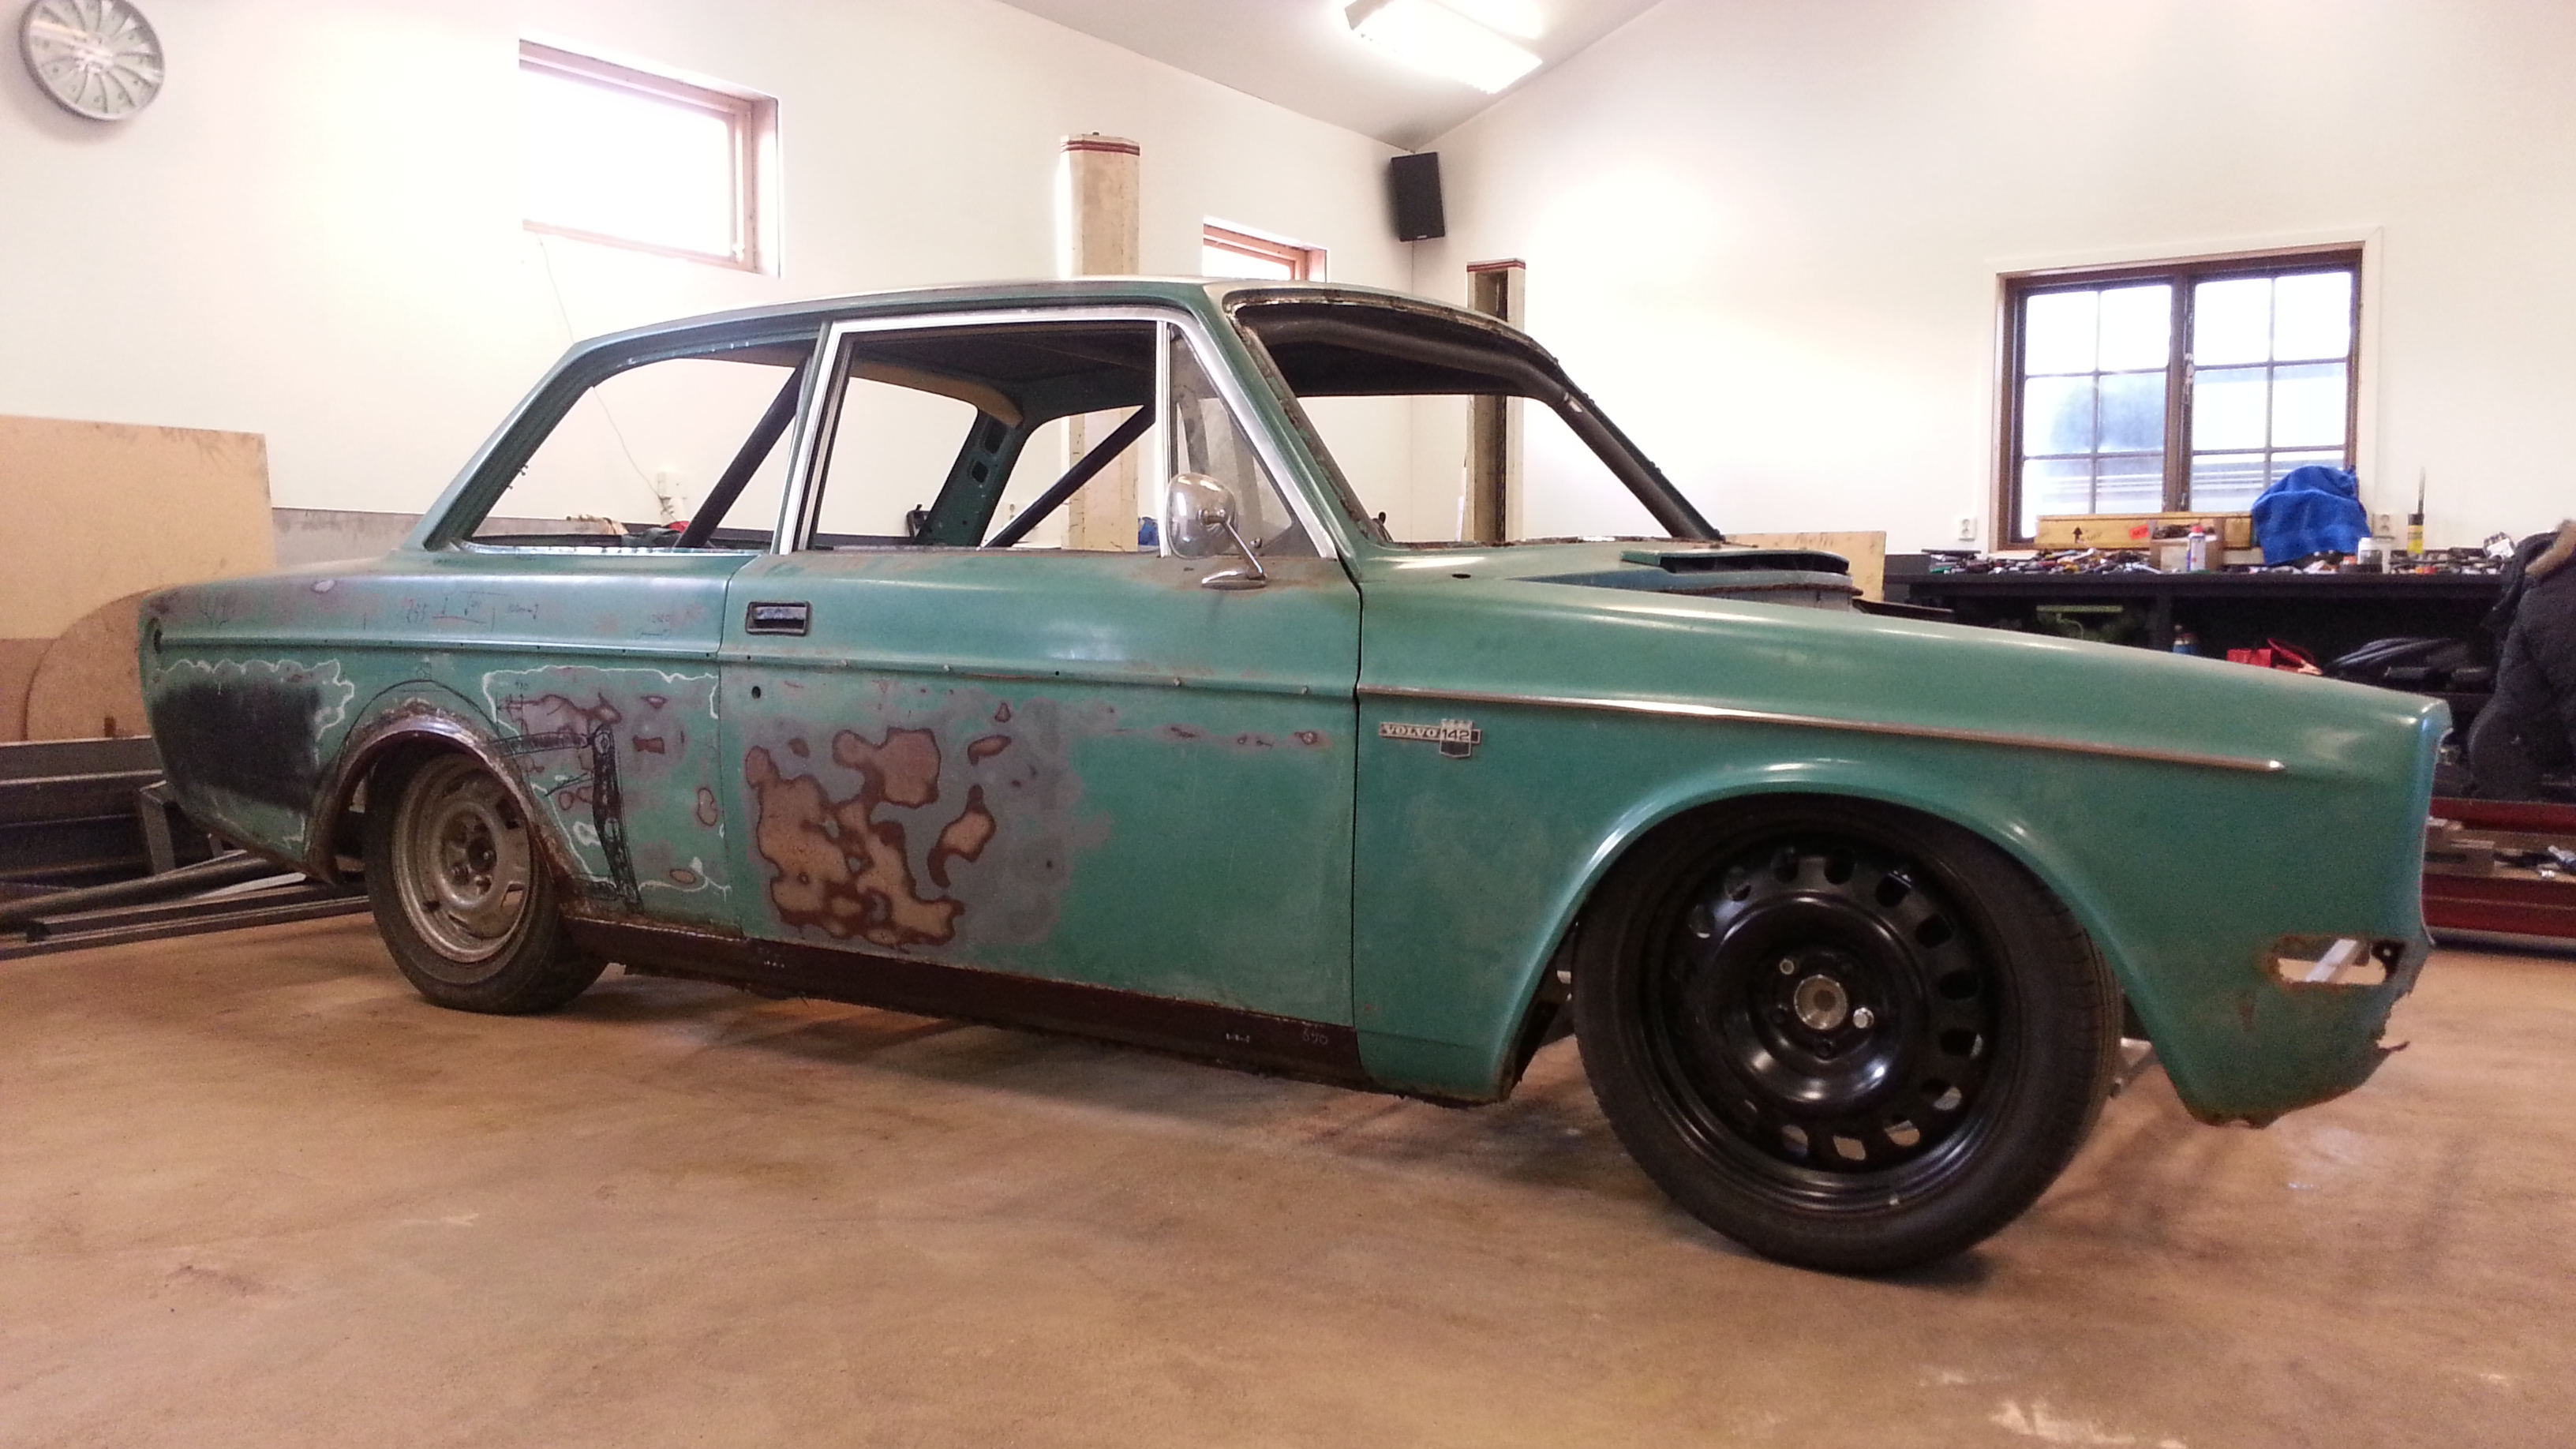
For you all, this isn't much, but for me, its epic...
After years in a fixture, now he is on his own wheels!
Low...

(My photobucket account will get going soon, they havn't seen my payment yet.)


Last photo in the fixture.
Name:  20130224_125049_zpsa0db6d99.jpg
Views: 574
Size:  1.61 MB

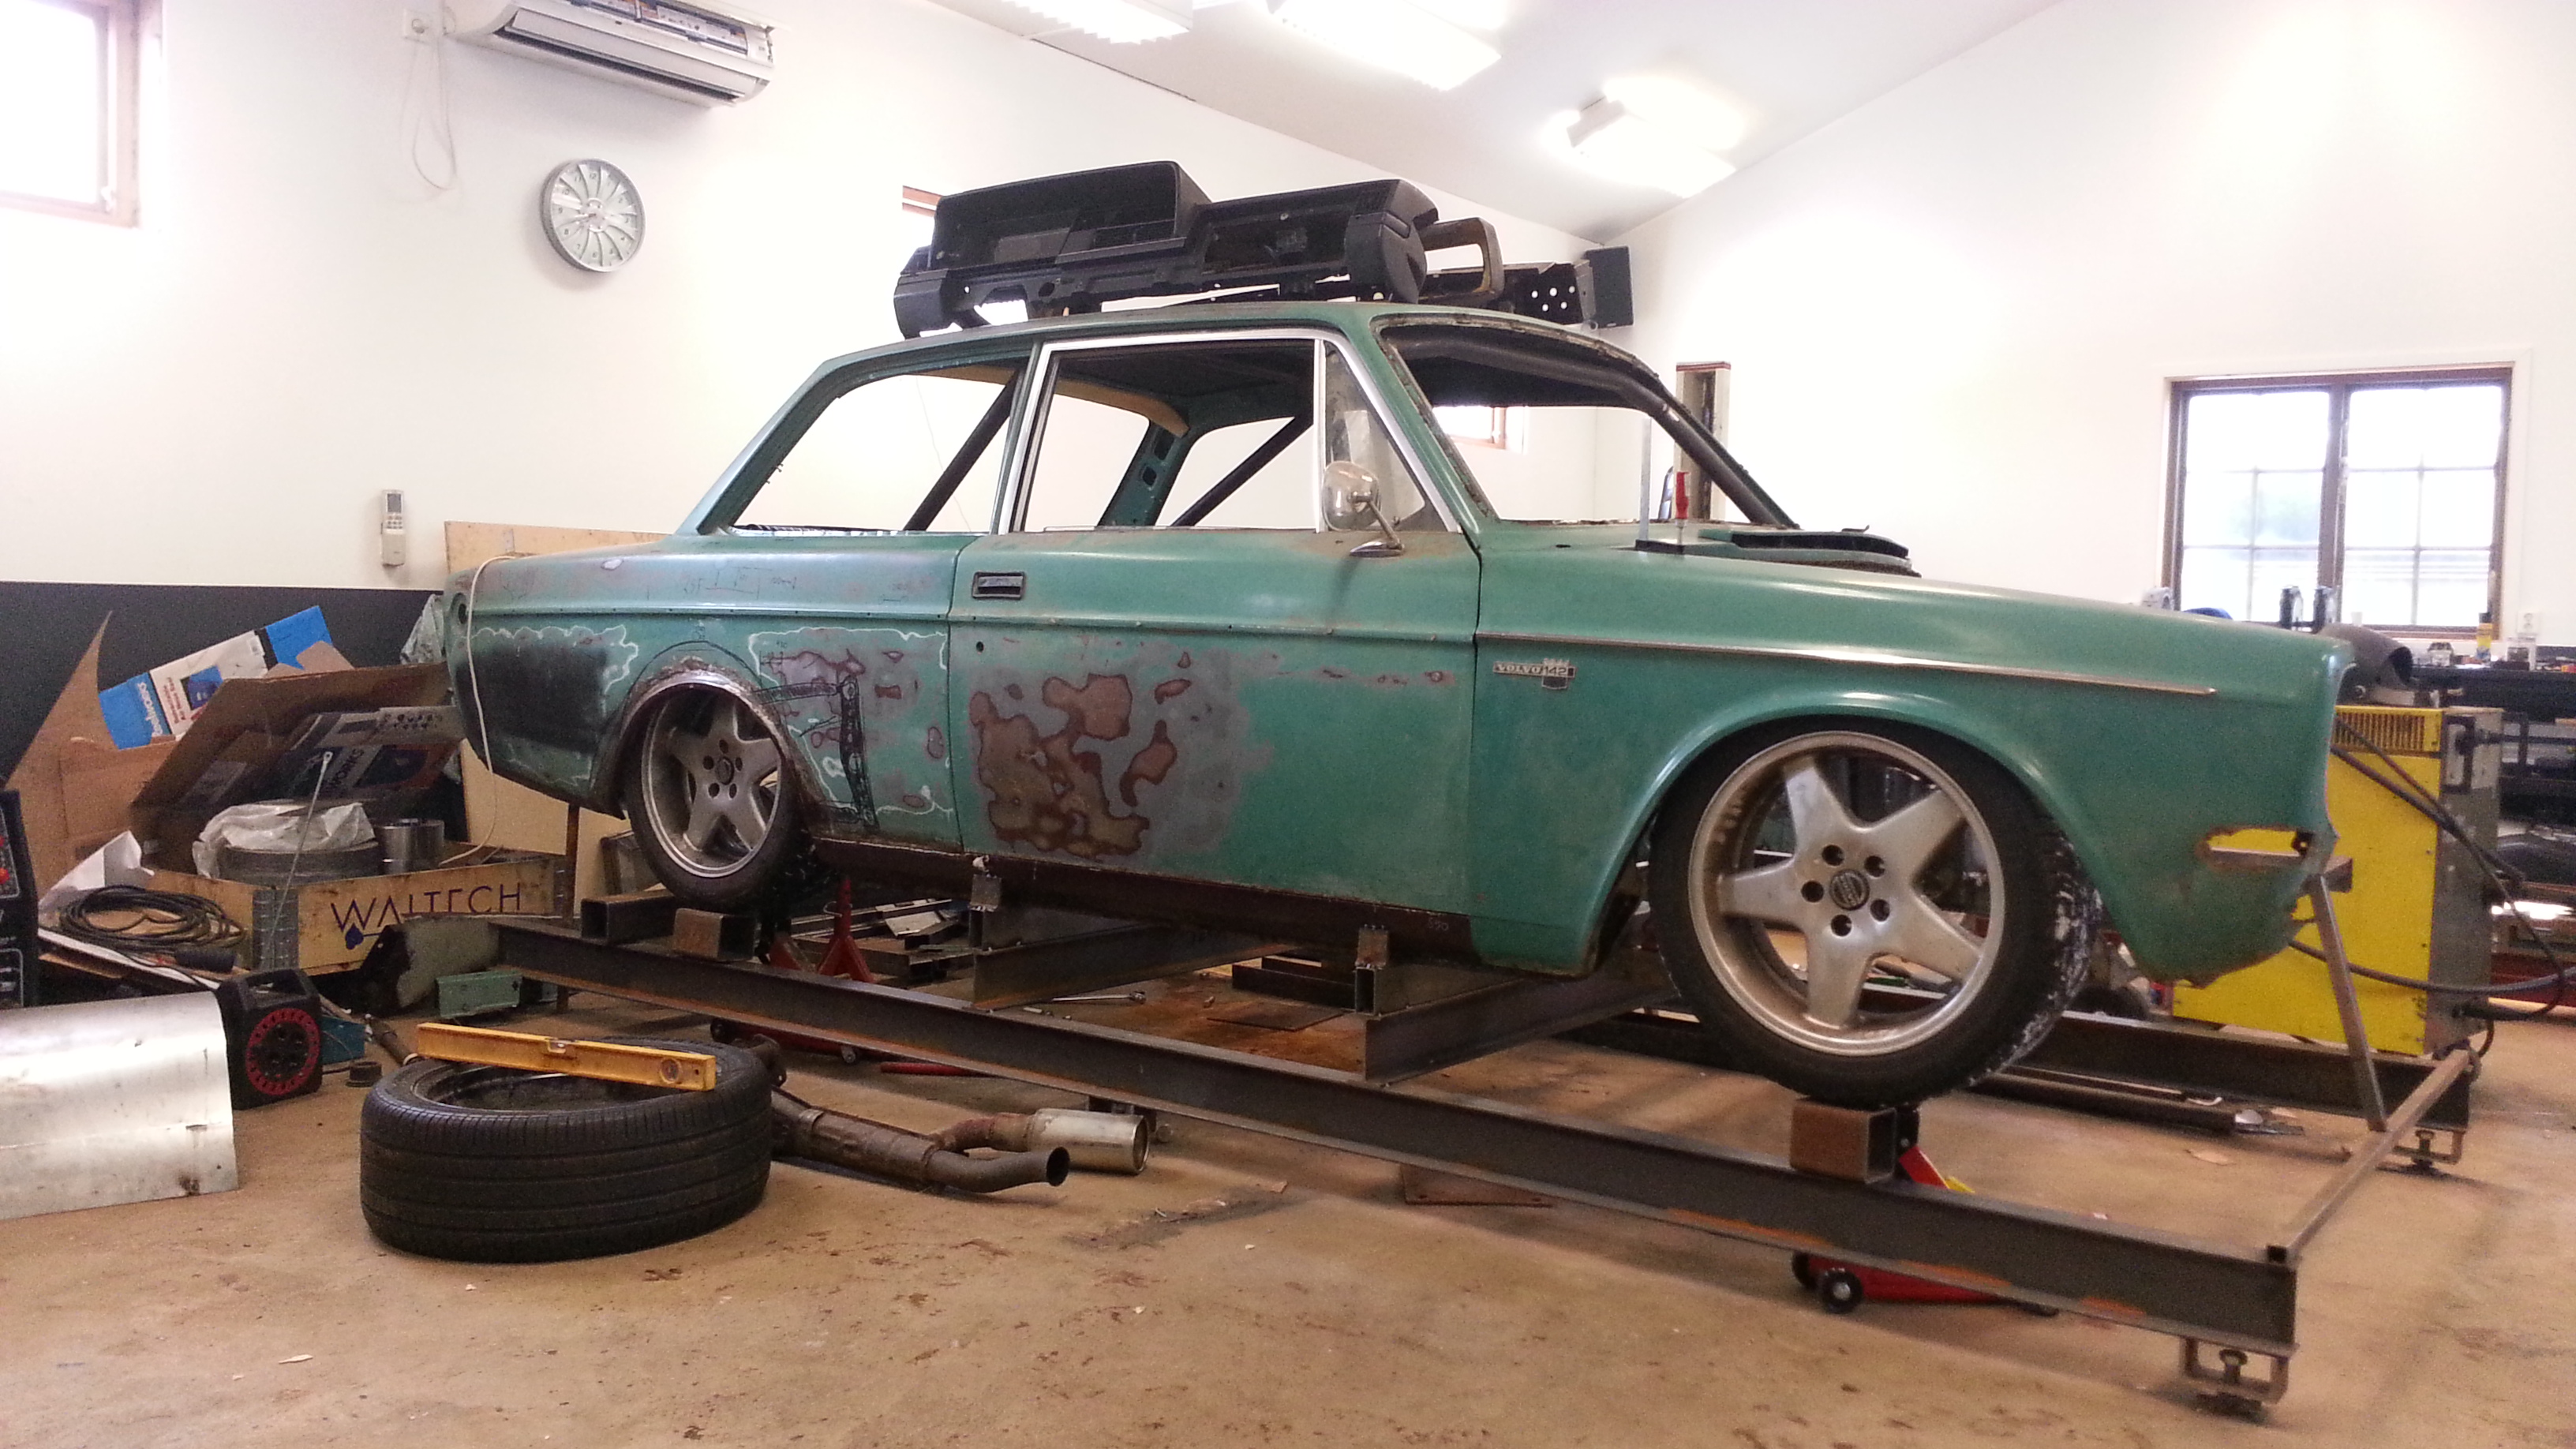
And now on it's own...
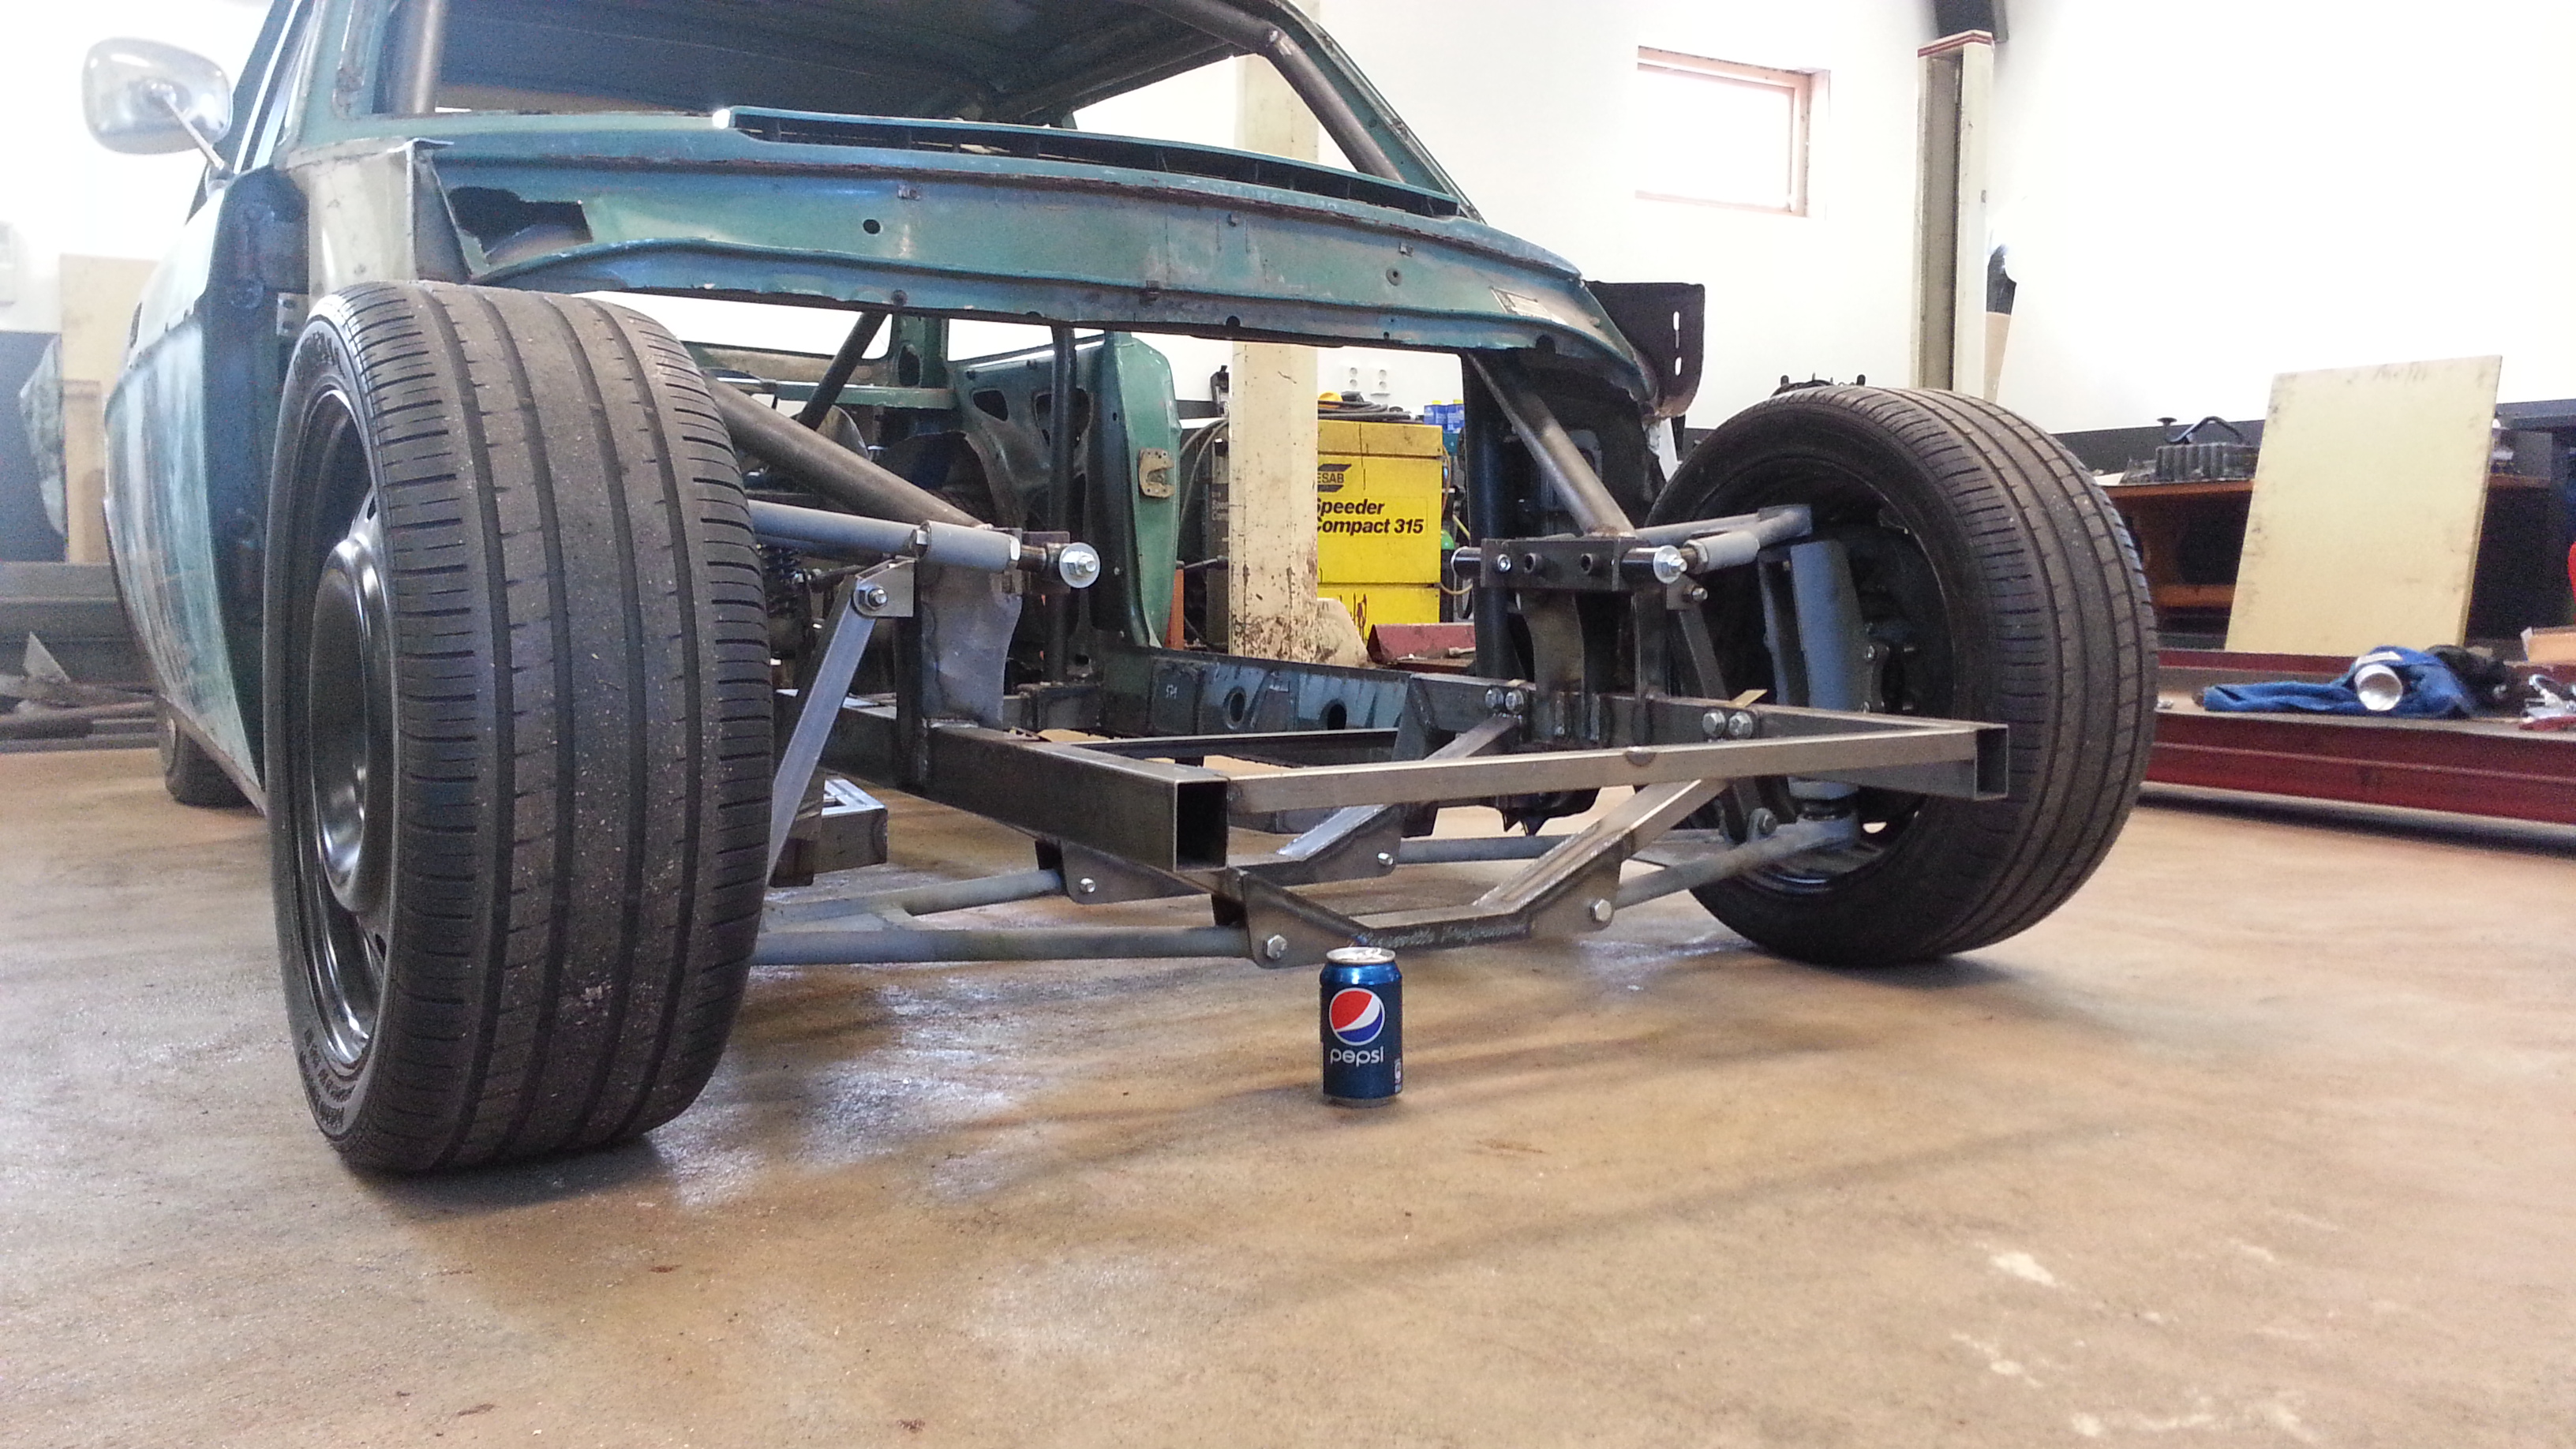
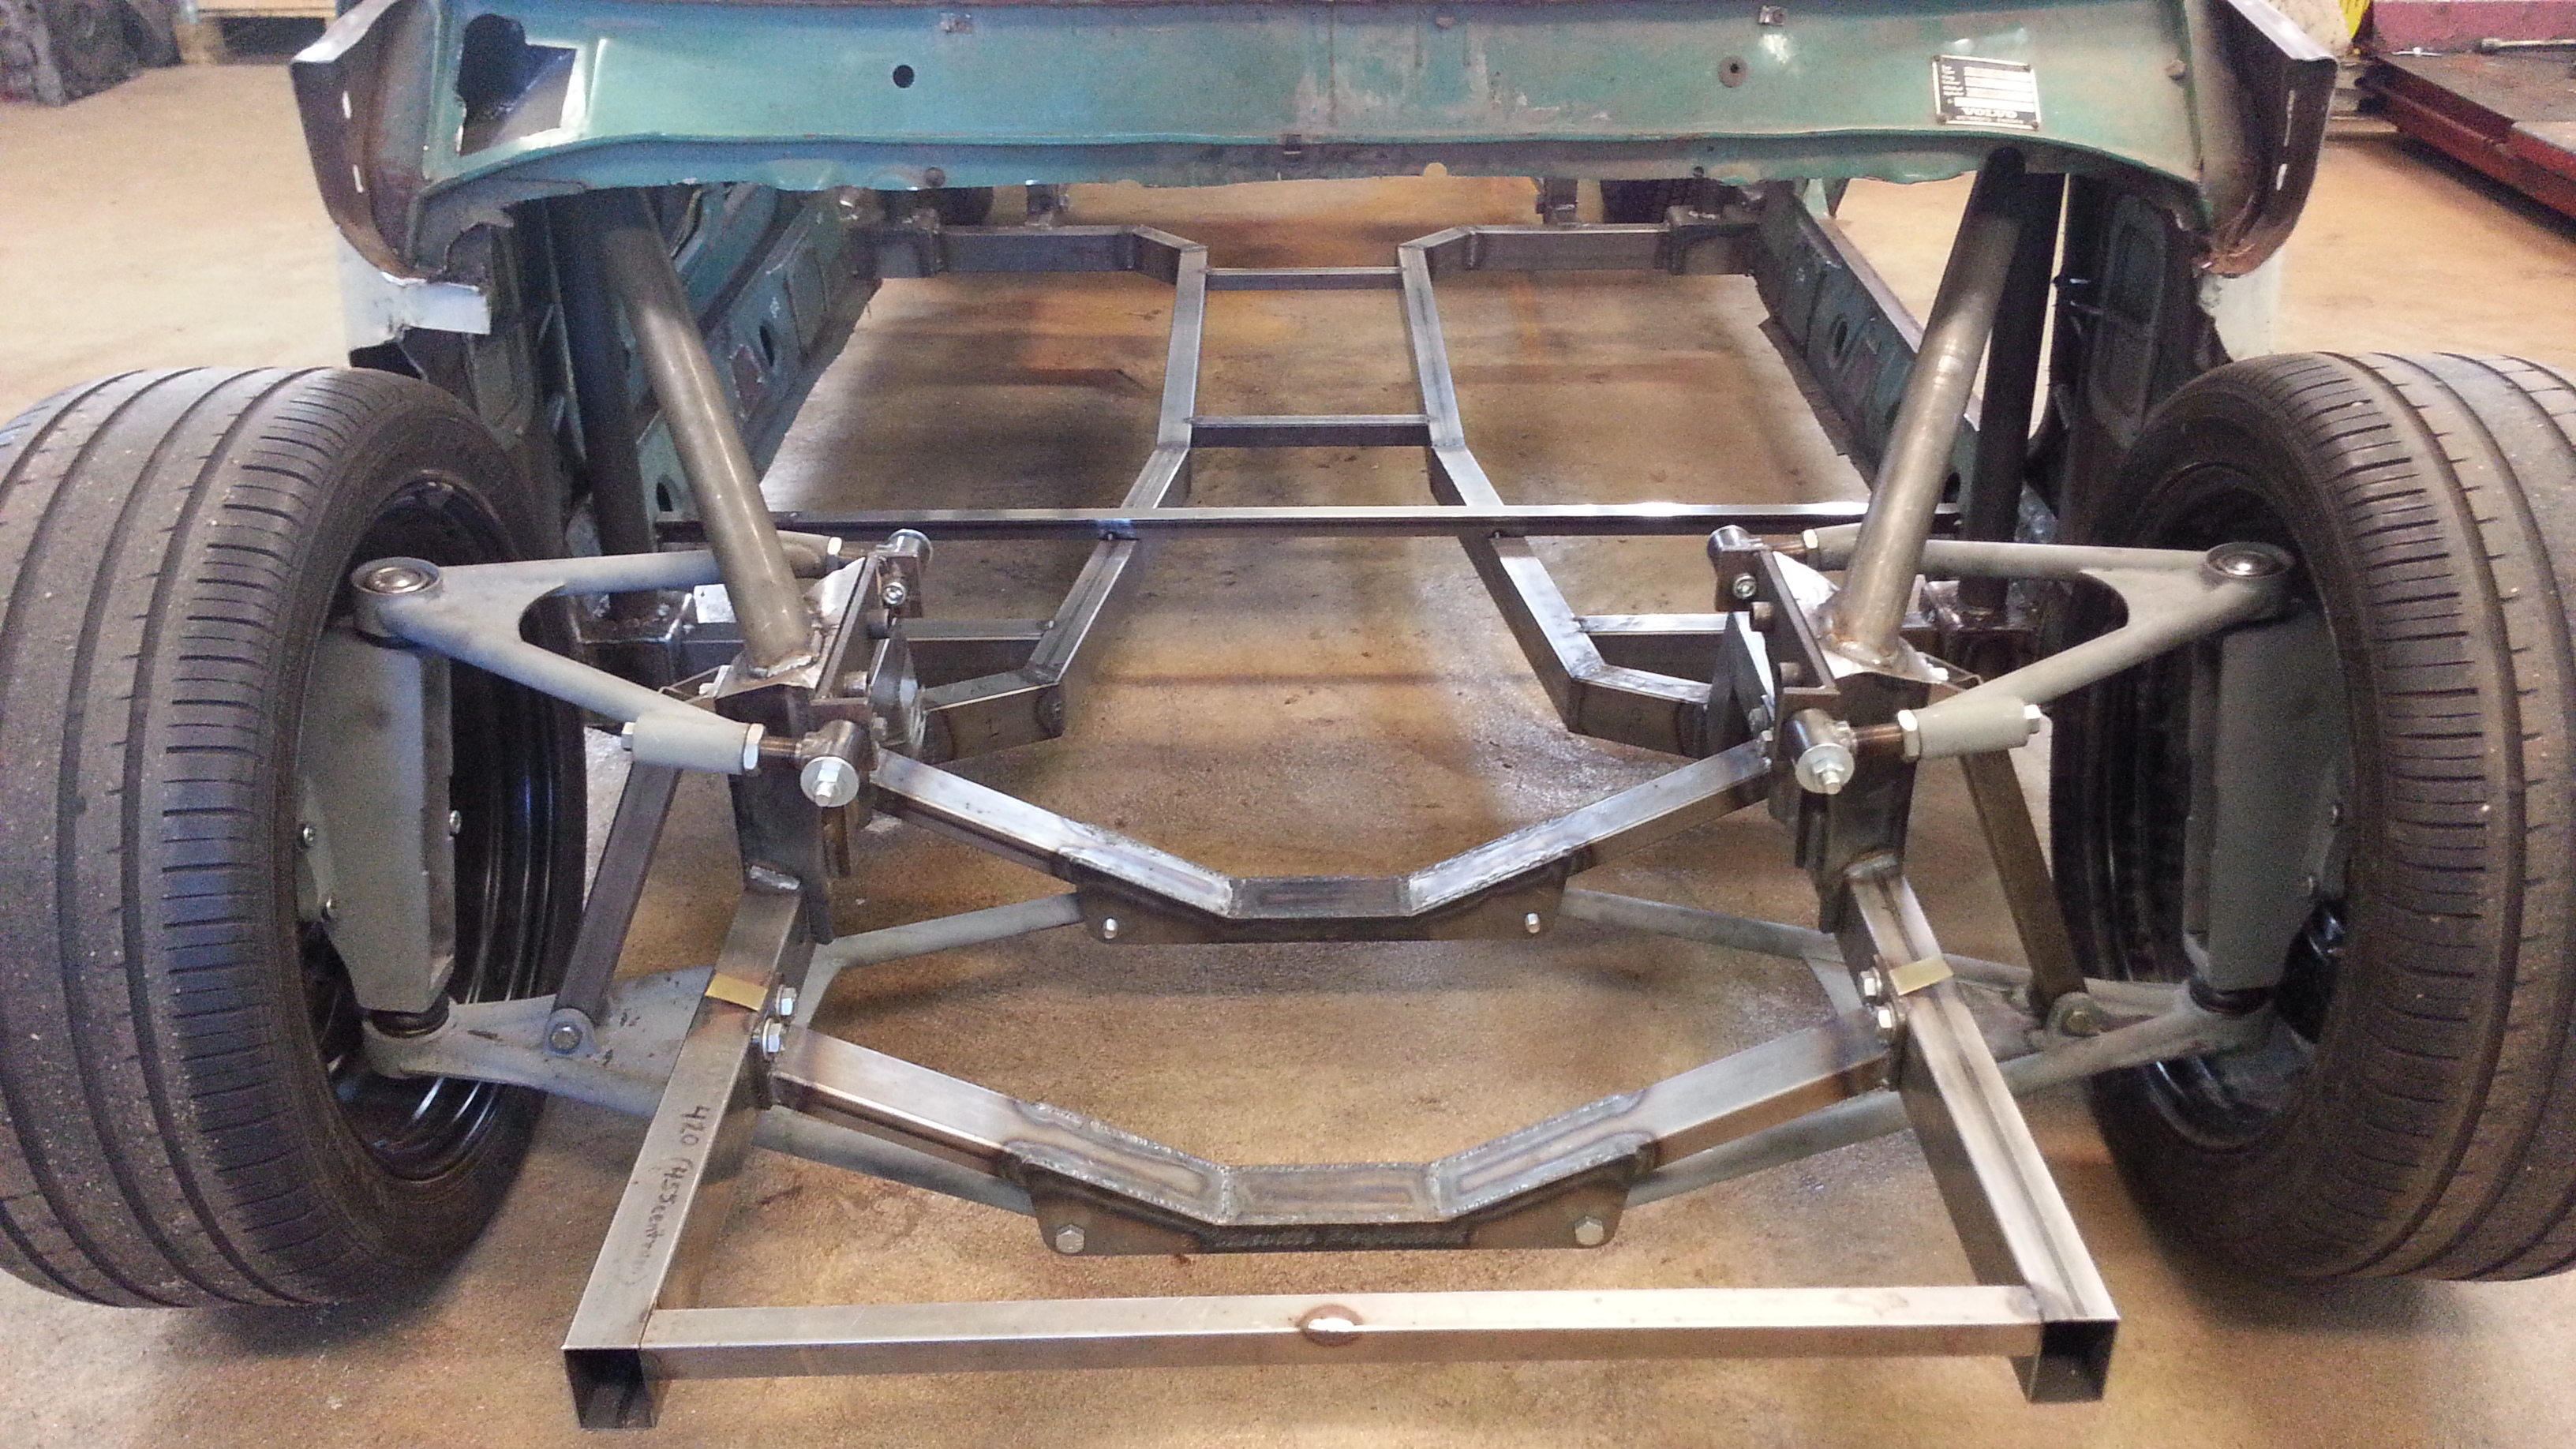
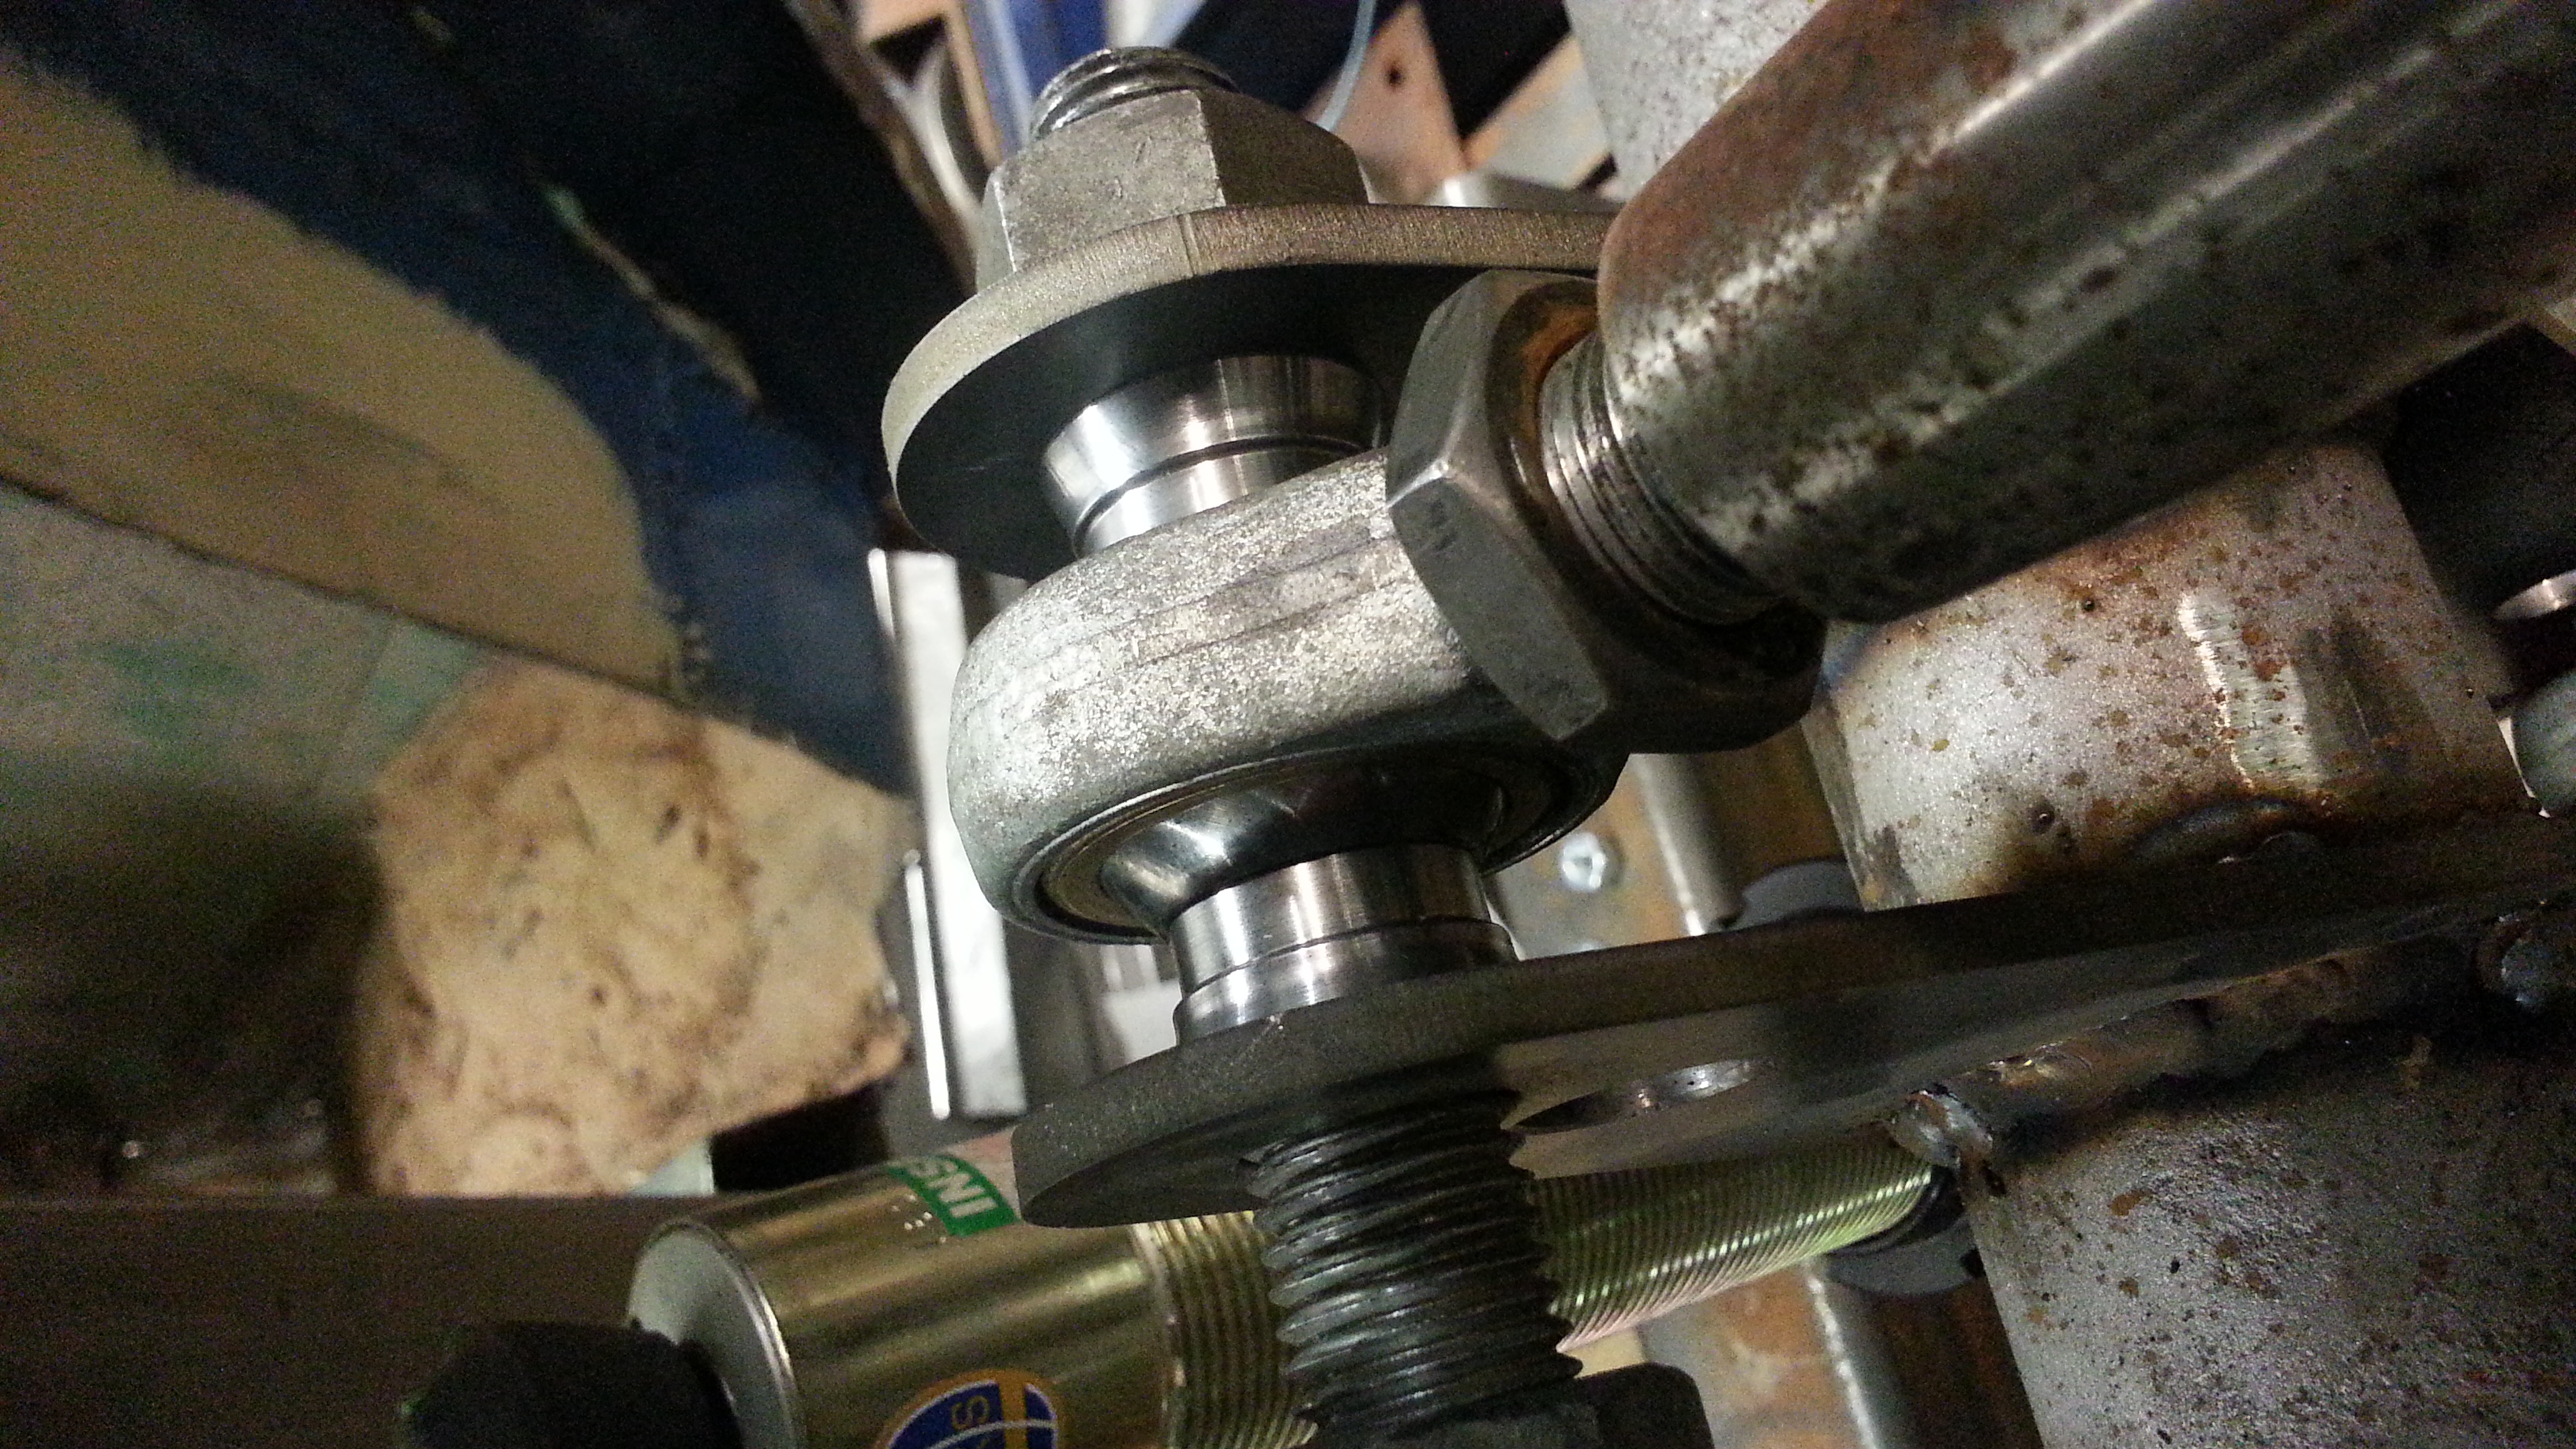
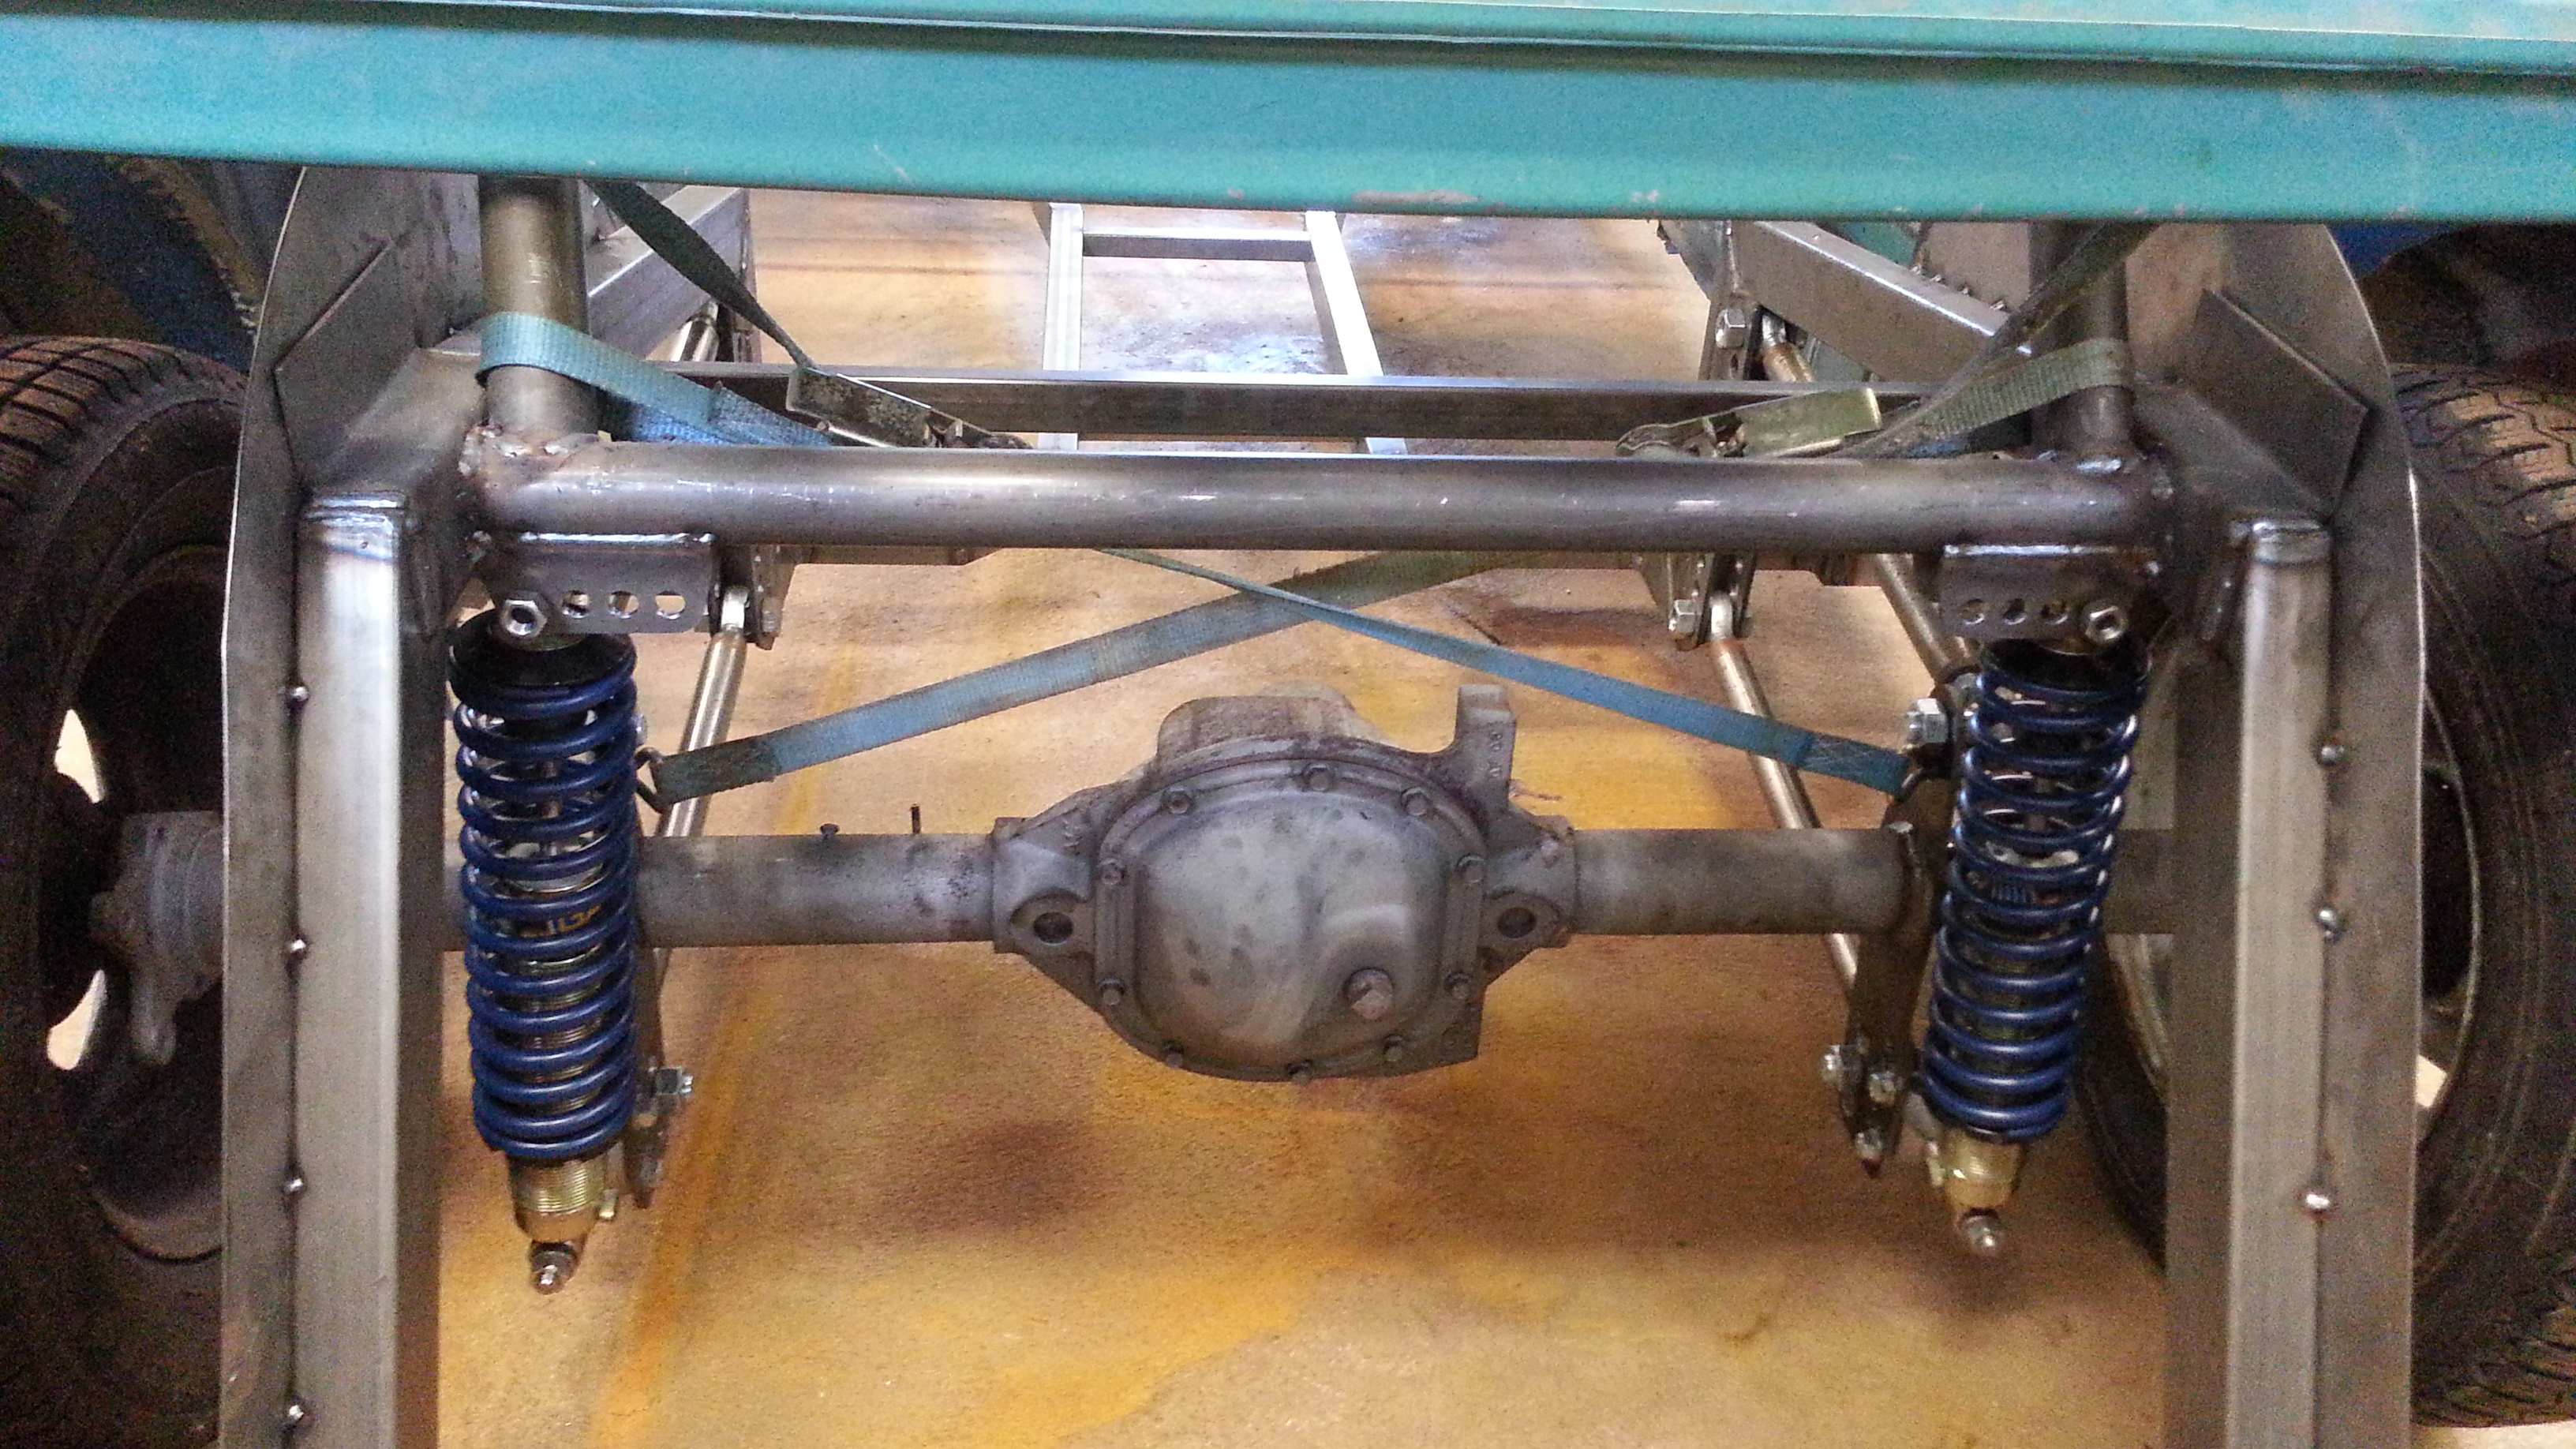
Name:  20130301_155740_zps9912fd67.jpg
Views: 559
Size:  1.88 MB
Name:  20130301_155835_zpsd88ef164.jpg
Views: 605
Size:  2.39 MB
Name:  20130301_155654_zps5b707ca2.jpg
Views: 549
Size:  1.65 MB
Name:  20130301_155632_zps8f211083.jpg
Views: 540
Size:  1.48 MB
Name:  20130301_155952_zps16839609.jpg
Views: 544
Size:  1.46 MB

Simple Watt-link
Name:  20130301_155805_zpsc05640e1.jpg
Views: 584
Size:  2.44 MB
Old 03-01-13, 11:11 PM
  #795  
kiwi from downunder..

iTrader: (4)
 
blwfly's Avatar
 
Join Date: Nov 2005
Location: springfield,oregon
Posts: 3,423
Received 5 Likes on 5 Posts
sweet.......
Old 03-02-13, 06:20 AM
  #796  
Senior Member

Thread Starter
 
tegheim's Avatar
 
Join Date: Nov 2003
Location: Sweden
Posts: 533
Likes: 0
Received 2 Likes on 1 Post
Have also bought me a set of rims that will come in handy in the future.
BBS 19x9.25" Centerlocked Magnesium.
Name:  IMG_3163_zps39da714e.jpg
Views: 511
Size:  184.4 KB
Old 03-02-13, 06:51 AM
  #797  
Senior Member

 
damic's Avatar
 
Join Date: Aug 2008
Location: Belgium (2800)
Posts: 493
Received 0 Likes on 0 Posts
That's lightweight :o
Old 03-09-13, 10:48 AM
  #798  
Senior Member

Thread Starter
 
tegheim's Avatar
 
Join Date: Nov 2003
Location: Sweden
Posts: 533
Likes: 0
Received 2 Likes on 1 Post
Name:  20130309_162445_zpsfce65581.jpg
Views: 561
Size:  1.86 MB

Name:  20130309_162454_zps3f5021b7.jpg
Views: 547
Size:  1.92 MB

Name:  20130309_162522_zps5d8271d2.jpg
Views: 545
Size:  1.77 MB

Name:  20130309_162459_zps19824637.jpg
Views: 576
Size:  2.02 MB
Old 03-10-13, 06:02 PM
  #799  
Junior Member
 
rag10's Avatar
 
Join Date: Mar 2013
Location: Santa Rosa,Ca.
Posts: 36
Likes: 0
Received 0 Likes on 0 Posts
This h
Old 03-10-13, 06:05 PM
  #800  
Junior Member
 
rag10's Avatar
 
Join Date: Mar 2013
Location: Santa Rosa,Ca.
Posts: 36
Likes: 0
Received 0 Likes on 0 Posts
This thread is so cool if I only had more tools !!!


Quick Reply: Tegheim - Home made 4 Rotor Wolvo project


All times are GMT -5. The time now is 09:30 AM.