Old School and Other Rotary Old School and Other Rotary Powered Vehicles including performance modifications and technical support

RX-8 13B-RE conversion!

Thread Tools
 
Search this Thread
 
Old Mar 30, 2012 | 09:16 AM
  #126  
ChrisRX8PR's Avatar
Thread Starter
Rotary Enthusiast
Tenured Member 10 Years
 
Joined: Oct 2007
Posts: 799
Likes: 3
From: Plymouth, MN
Originally Posted by cfamilyfix
Ok...at first when I was reading this thread it was looking like the average guy's RX8 conversion...then you busted out the CAD and water-jet cutting machine (don't know the real name...lol) and now I'm feeling ummm....betrayed lol. It doesn't mean I'm not in awe of the work...because I am...and I can't wait to see how this turns out!
Hehe...I am just the average guy...I just happen to work with these tools

Chris

p.s. its a milling machine
Reply
Old Mar 30, 2012 | 09:17 AM
  #127  
ChrisRX8PR's Avatar
Thread Starter
Rotary Enthusiast
Tenured Member 10 Years
 
Joined: Oct 2007
Posts: 799
Likes: 3
From: Plymouth, MN
Originally Posted by Havoc
where do you work mate ? I think you have some of my new favorite tools !!
I own a manufacturing facility, we machine medical and aerospace components...for the past year and a half I was so swamped with getting the business up and running that I hadn't touched any of the machines to do anything for me, this year will be different

Chris
Reply
Old Mar 30, 2012 | 09:18 AM
  #128  
ChrisRX8PR's Avatar
Thread Starter
Rotary Enthusiast
Tenured Member 10 Years
 
Joined: Oct 2007
Posts: 799
Likes: 3
From: Plymouth, MN
Quick update, my 3" couplers came in...

Cheers

Name:  IMAG0923.jpg
Views: 1496
Size:  123.4 KB
Reply
Old Mar 30, 2012 | 12:48 PM
  #129  
ChrisRX8PR's Avatar
Thread Starter
Rotary Enthusiast
Tenured Member 10 Years
 
Joined: Oct 2007
Posts: 799
Likes: 3
From: Plymouth, MN
Intercooler came in...not to big, not to small, just perfect for my goals without sacrificing spool...

Chris

Name:  IMAG0924.jpg
Views: 1504
Size:  105.2 KB
Reply
Old Mar 30, 2012 | 05:58 PM
  #130  
ChrisRX8PR's Avatar
Thread Starter
Rotary Enthusiast
Tenured Member 10 Years
 
Joined: Oct 2007
Posts: 799
Likes: 3
From: Plymouth, MN
Worked on the CAD/CAM for the pulley...will hopefully run it sometime this weekend...

Chris

Name:  IMAG0925.jpg
Views: 1478
Size:  125.4 KB

Name:  IMAG0926.jpg
Views: 1500
Size:  113.5 KB

Name:  IMAG0927.jpg
Views: 1486
Size:  135.2 KB

Name:  IMAG0928.jpg
Views: 1475
Size:  109.7 KB

Name:  IMAG0929.jpg
Views: 1489
Size:  94.9 KB

Name:  IMAG0930.jpg
Views: 1485
Size:  104.8 KB

Name:  IMAG0931.jpg
Views: 1499
Size:  100.7 KB

Name:  IMAG0932.jpg
Views: 1491
Size:  100.3 KB

Name:  IMAG0933.jpg
Views: 1477
Size:  113.0 KB

Name:  IMAG0934.jpg
Views: 1495
Size:  125.8 KB
Reply
Old Mar 30, 2012 | 09:11 PM
  #131  
estevan62274's Avatar
#garageguybuild
Veteran: Air Force
Tenured Member: 20 Years
Liked
Community Favorite
iTrader: (33)
 
Joined: May 2002
Posts: 3,451
Likes: 1,060
From: Space Coast, Florida
Talking

^ Nice man!


Make two of them, one for you and one for me..... please
Reply
Old Mar 31, 2012 | 10:35 AM
  #132  
ChrisRX8PR's Avatar
Thread Starter
Rotary Enthusiast
Tenured Member 10 Years
 
Joined: Oct 2007
Posts: 799
Likes: 3
From: Plymouth, MN
Originally Posted by estevan62274
^ Nice man!


Make two of them, one for you and one for me..... please
Hehe...I don't think it would work for your application, it probably won't spin fast enough. I made it bigger to reduce the speed of the Alternator because I will be running it off a bigger pulley on the crank.


Chris
Reply
Old Mar 31, 2012 | 01:16 PM
  #133  
ChrisRX8PR's Avatar
Thread Starter
Rotary Enthusiast
Tenured Member 10 Years
 
Joined: Oct 2007
Posts: 799
Likes: 3
From: Plymouth, MN
Originally Posted by estevan62274
^ Nice man!


Make two of them, one for you and one for me..... please
Its also only 4 ribs instead of the usual 5 because it will run off the front pulley which only has 4...

Chris
Reply
Old Mar 31, 2012 | 01:19 PM
  #134  
ChrisRX8PR's Avatar
Thread Starter
Rotary Enthusiast
Tenured Member 10 Years
 
Joined: Oct 2007
Posts: 799
Likes: 3
From: Plymouth, MN
Finished the Alternator Pulley today...its hard to photograph due to the reflection but its got tons of details and looks very good...

C

Name:  IMAG0936.jpg
Views: 1485
Size:  112.6 KB

Name:  IMAG0938.jpg
Views: 1472
Size:  92.5 KB

Name:  IMAG0939.jpg
Views: 1483
Size:  78.5 KB

Name:  IMAG0940.jpg
Views: 1488
Size:  98.3 KB

Name:  IMAG0941.jpg
Views: 1487
Size:  125.4 KB

Name:  IMAG0942.jpg
Views: 1474
Size:  95.3 KB
Reply
Old Mar 31, 2012 | 01:21 PM
  #135  
ChrisRX8PR's Avatar
Thread Starter
Rotary Enthusiast
Tenured Member 10 Years
 
Joined: Oct 2007
Posts: 799
Likes: 3
From: Plymouth, MN
Here it is next to the stock sized one...19% bigger and only 4 ribs...mission accomplished...

Name:  IMAG0943.jpg
Views: 1512
Size:  116.9 KB
Reply
Old Mar 31, 2012 | 01:39 PM
  #136  
speedrx8er's Avatar
Junior Member
 
Joined: Oct 2009
Posts: 23
Likes: 0
From: MN
Nice!!!! do you know when my special package is coming in?
Reply
Old Mar 31, 2012 | 08:27 PM
  #137  
estevan62274's Avatar
#garageguybuild
Veteran: Air Force
Tenured Member: 20 Years
Liked
Community Favorite
iTrader: (33)
 
Joined: May 2002
Posts: 3,451
Likes: 1,060
From: Space Coast, Florida
Thumbs up

Originally Posted by ChrisRX8PR
Its also only 4 ribs instead of the usual 5 because it will run off the front pulley which only has 4...

Chris
Oh well!

pulley came out great!

If you ever make any in the stock size with the rotor then count me in for one!
Reply
Old Mar 31, 2012 | 08:41 PM
  #138  
che'srx-7's Avatar
Senior Member
Tenured Member: 15 Years
Liked
Loved
iTrader: (5)
 
Joined: Aug 2010
Posts: 474
Likes: 2
From: Fayetteville, NC
great build bro!
Reply
Old Mar 31, 2012 | 09:15 PM
  #139  
ChrisRX8PR's Avatar
Thread Starter
Rotary Enthusiast
Tenured Member 10 Years
 
Joined: Oct 2007
Posts: 799
Likes: 3
From: Plymouth, MN
Originally Posted by estevan62274
Oh well!

pulley came out great!

If you ever make any in the stock size with the rotor then count me in for one!
Will do for sure!

C
Reply
Old Mar 31, 2012 | 11:16 PM
  #140  
Darkning's Avatar
Full Member
Tenured Member: 10 Years
Liked
Loved
Community Favorite
 
Joined: Feb 2012
Posts: 67
Likes: 13
From: Charlotte, NC
This is freaking beast.

Subscribed and watching with interest! Good luck with everything along the way!!!
Reply
Old Apr 1, 2012 | 01:08 PM
  #141  
ChrisRX8PR's Avatar
Thread Starter
Rotary Enthusiast
Tenured Member 10 Years
 
Joined: Oct 2007
Posts: 799
Likes: 3
From: Plymouth, MN
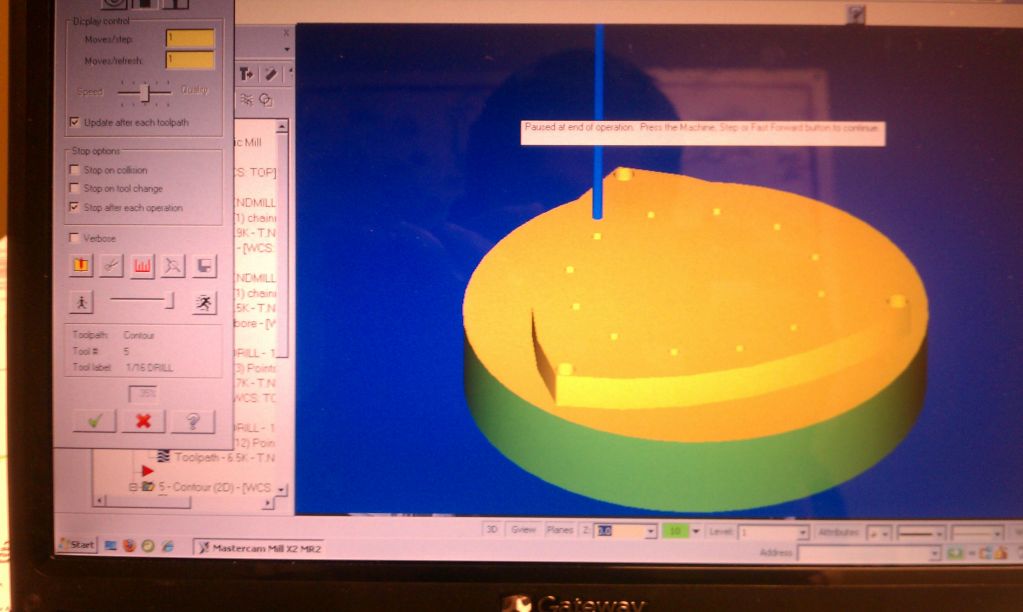
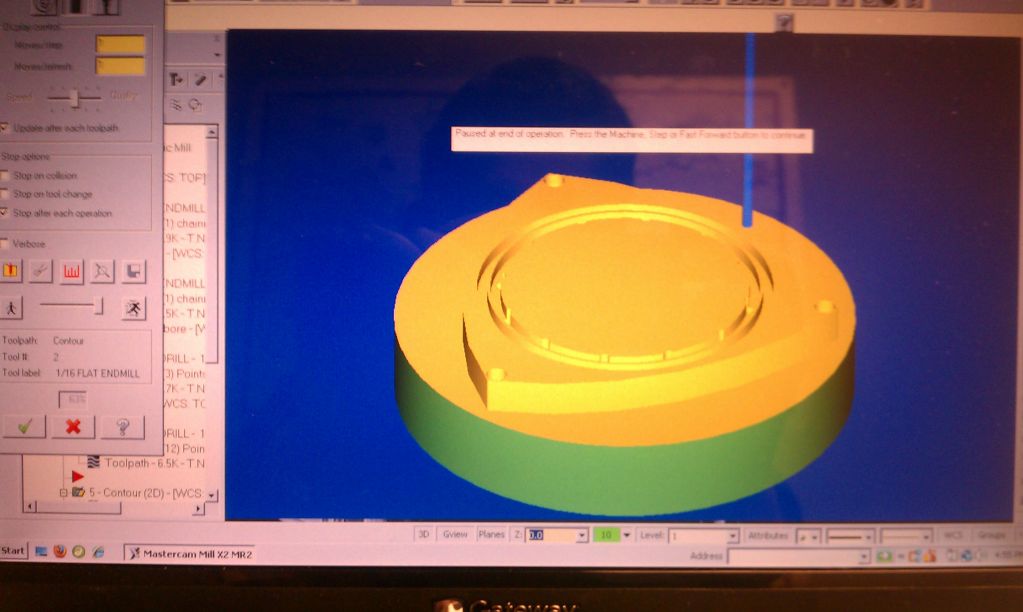
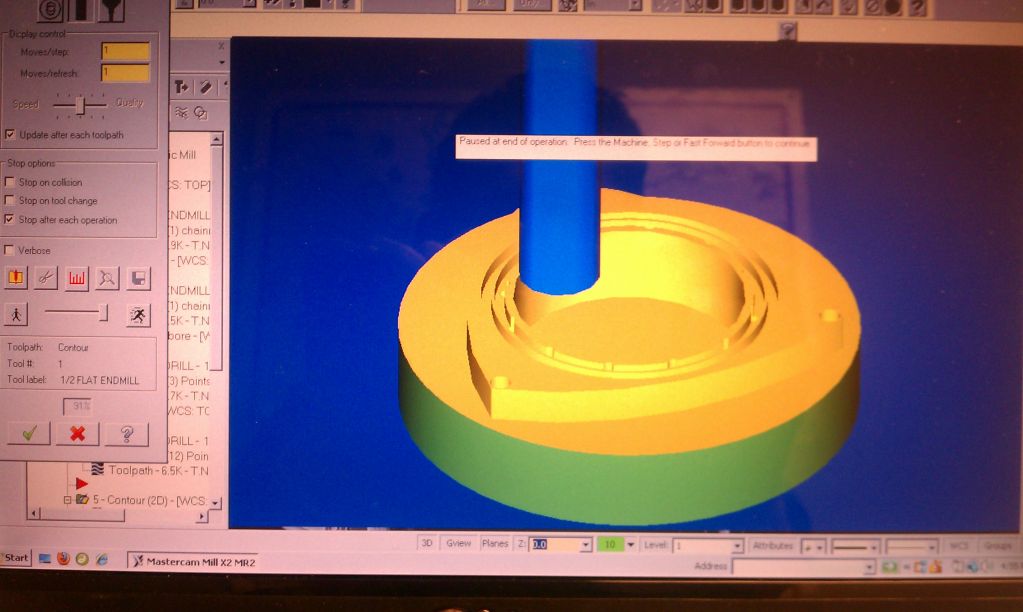
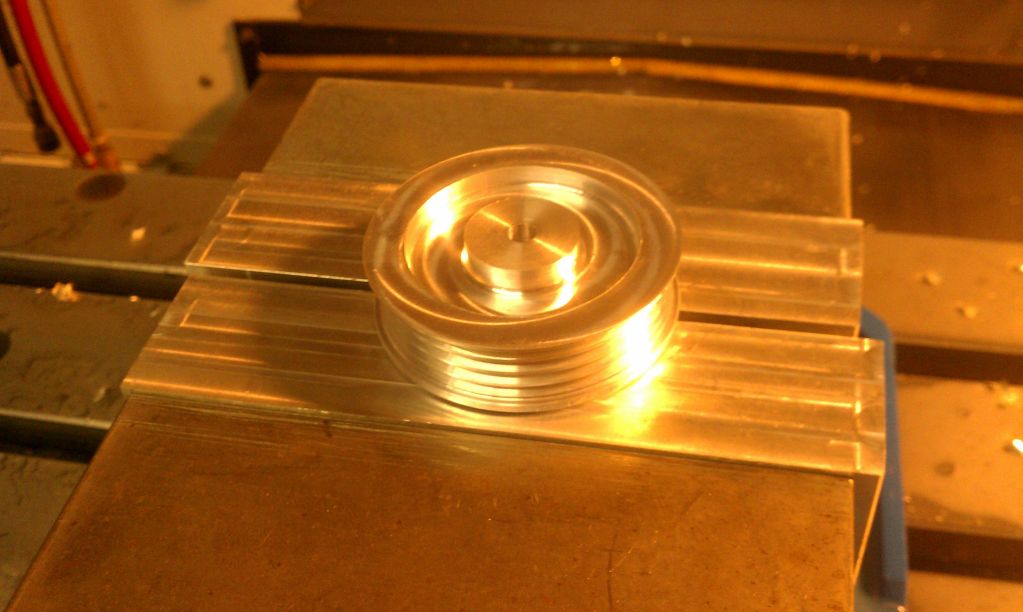
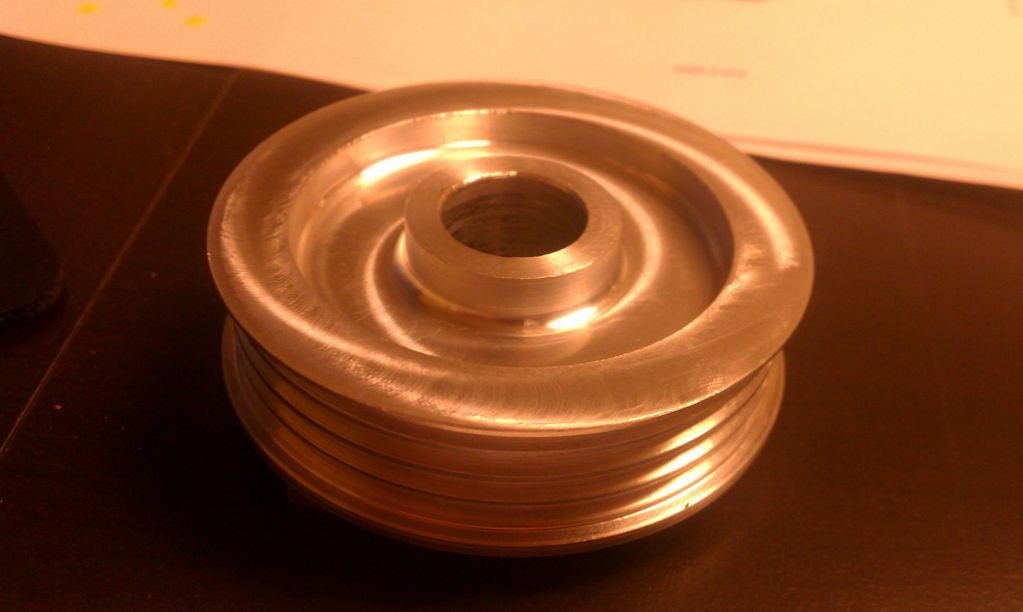
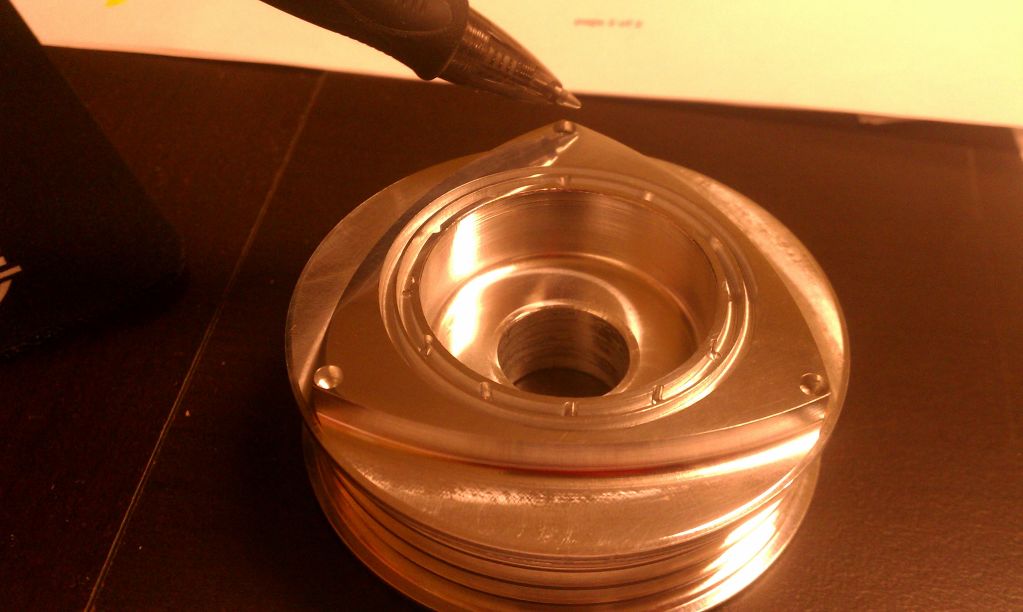
Decided to polish the face of the rotor on the pulley...the pics don't do it justice, had to put a pen in the picture for it to be noticed but it looks like a mirror in person. Has great contrast with the rest of the machined surfaces...

Chris

Name:  IMAG0944.jpg
Views: 1489
Size:  103.9 KB
Reply
Old Apr 2, 2012 | 06:31 PM
  #142  
ChrisRX8PR's Avatar
Thread Starter
Rotary Enthusiast
Tenured Member 10 Years
 
Joined: Oct 2007
Posts: 799
Likes: 3
From: Plymouth, MN
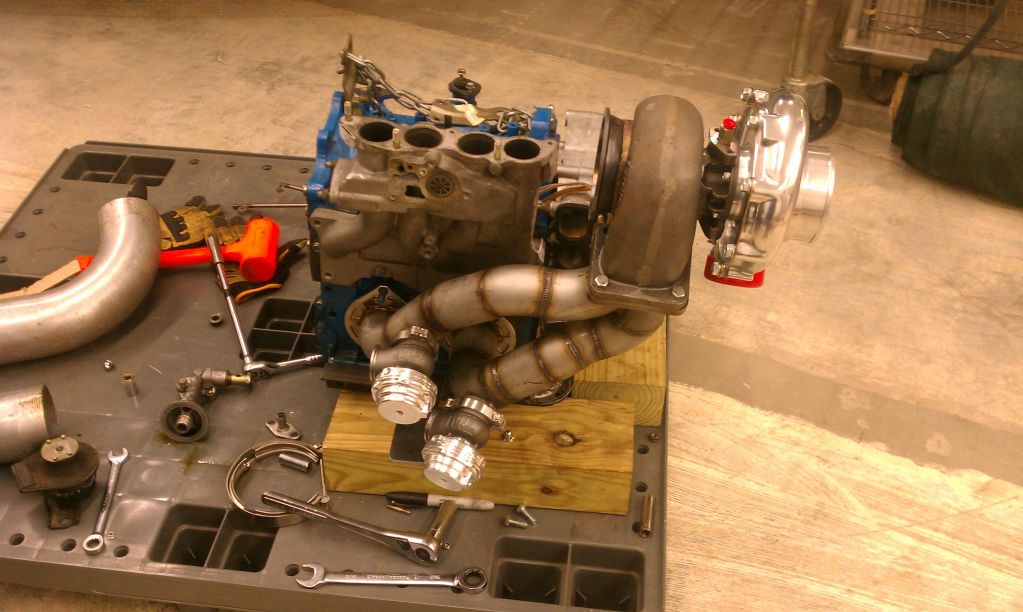
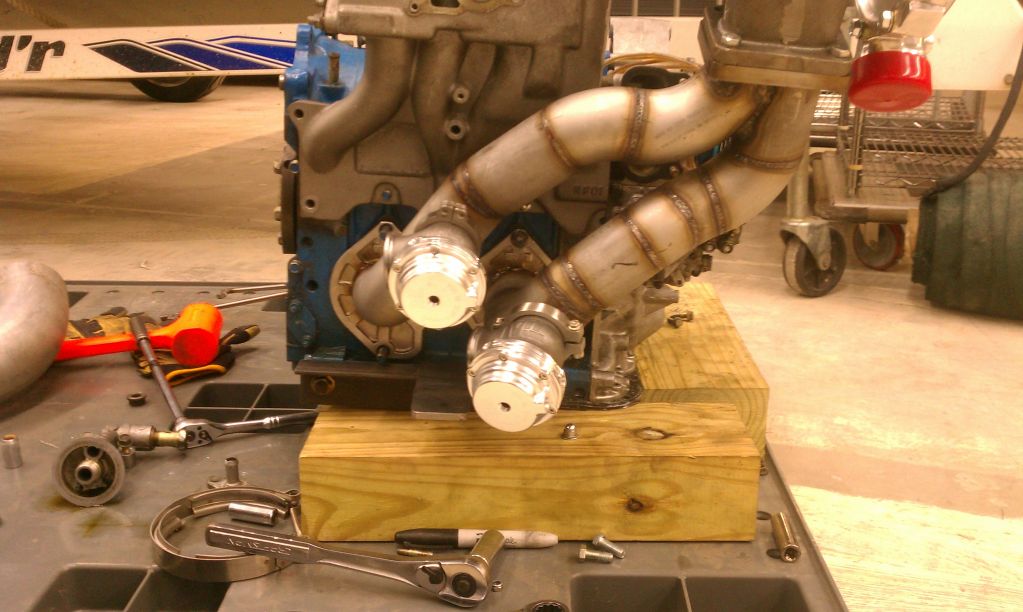
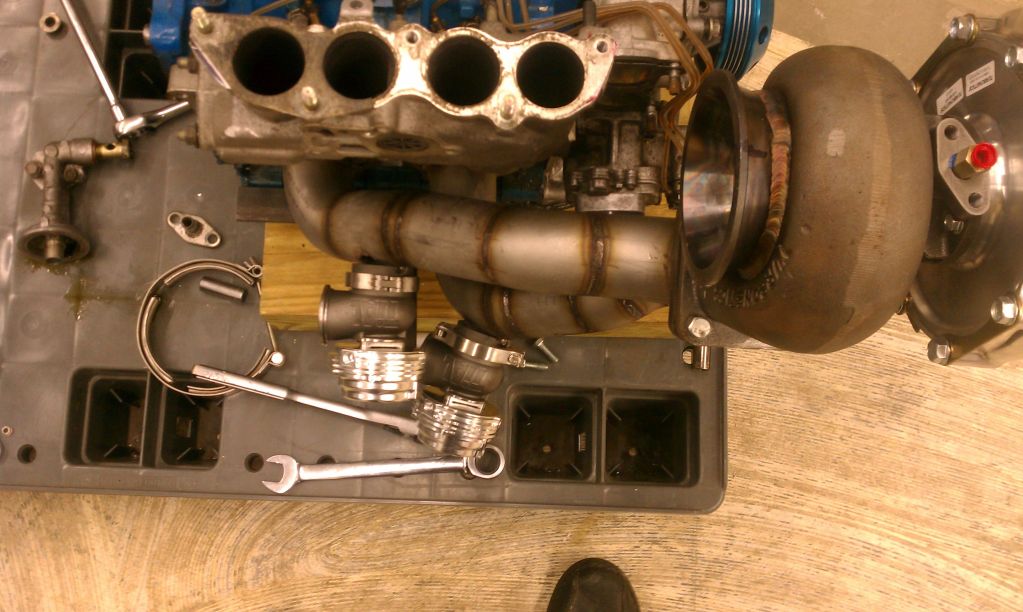
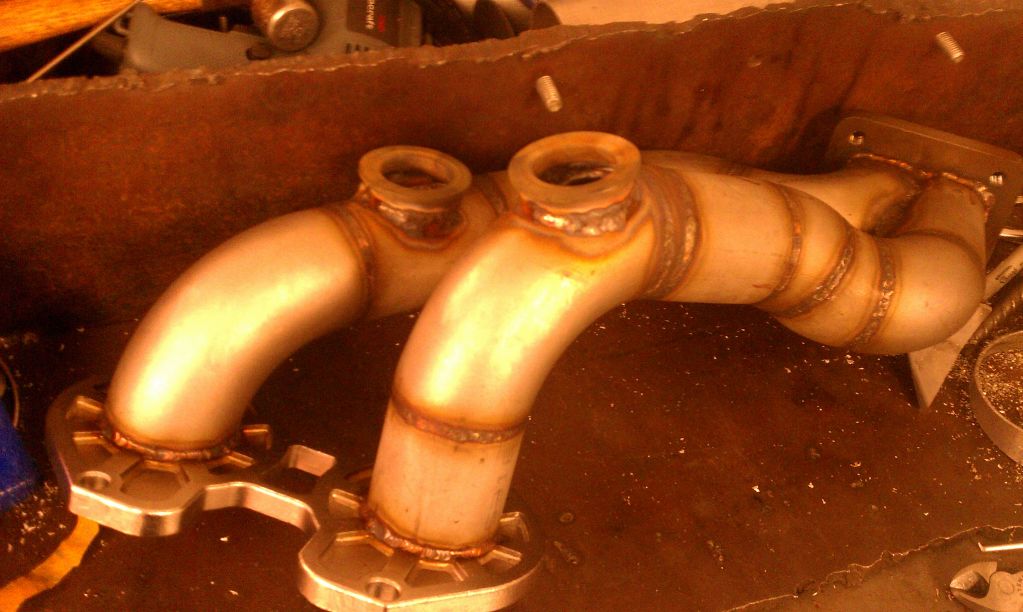
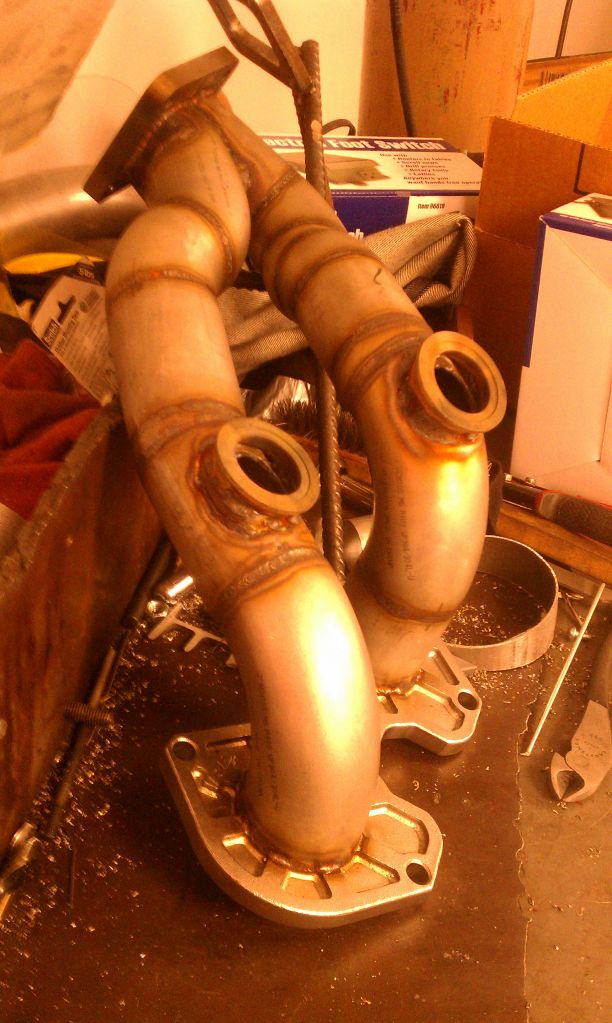
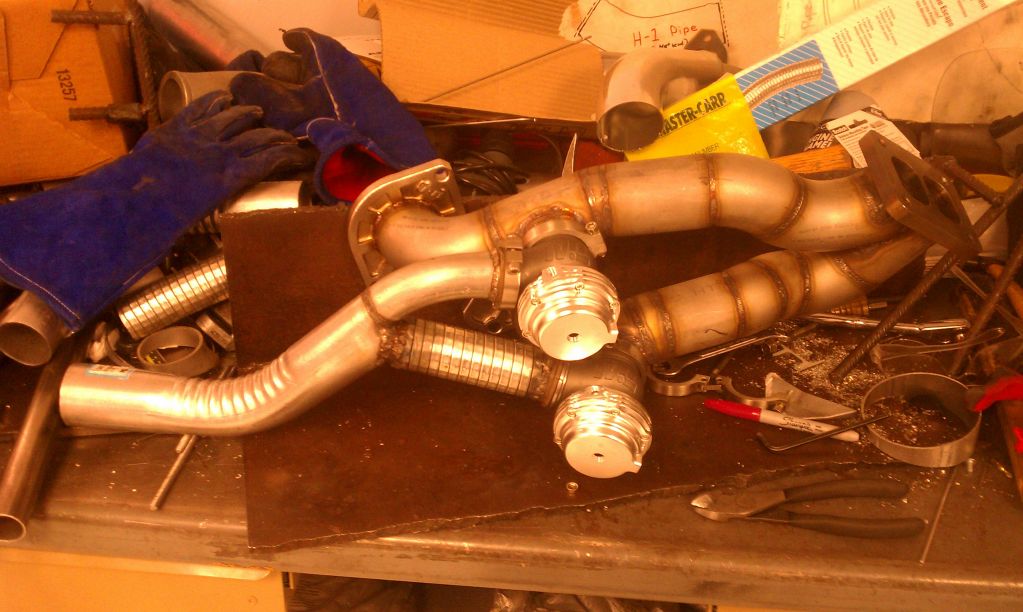
I finally got around to making the two holes for the Wastegates and tacking them on to check fitment. Now I need to verify everything fits in the engine bay and then pull everything out and finish welding the down pipe and the wastegate flanges.

Cheers!

Name:  IMAG0950.jpg
Views: 1517
Size:  158.3 KB

Name:  IMAG0951.jpg
Views: 1506
Size:  154.2 KB

Name:  IMAG0952.jpg
Views: 1496
Size:  105.6 KB

Name:  IMAG0953.jpg
Views: 1492
Size:  151.9 KB

Name:  IMAG0954.jpg
Views: 1481
Size:  144.0 KB
Reply
Old Apr 2, 2012 | 06:57 PM
  #143  
che'srx-7's Avatar
Senior Member
Tenured Member: 15 Years
Liked
Loved
iTrader: (5)
 
Joined: Aug 2010
Posts: 474
Likes: 2
From: Fayetteville, NC
pretty bro.
Reply
Old Apr 2, 2012 | 07:19 PM
  #144  
ChrisRX8PR's Avatar
Thread Starter
Rotary Enthusiast
Tenured Member 10 Years
 
Joined: Oct 2007
Posts: 799
Likes: 3
From: Plymouth, MN
Updated ToDo list:

Machine front cover (counterweight/alternator) - STARTED
Weld front cover
Front cover oil line
Machine front pulley spacer
Driver engine mount finish - STARTED
Pass engine mount finish - DONE
Finish LIM (cut, welding, holes etc) - STARTED

Make 2 extra injector Bungs for LIM (RX-8 Fuel rail has 4)
Drill UIM bolt hole - DONE
Make Throttle body adapter-DONE!

Oil filter Pedestal (machine, relocate, whatever)
Modify Water Pump Outlet - STARTED
Oil pan and pickup
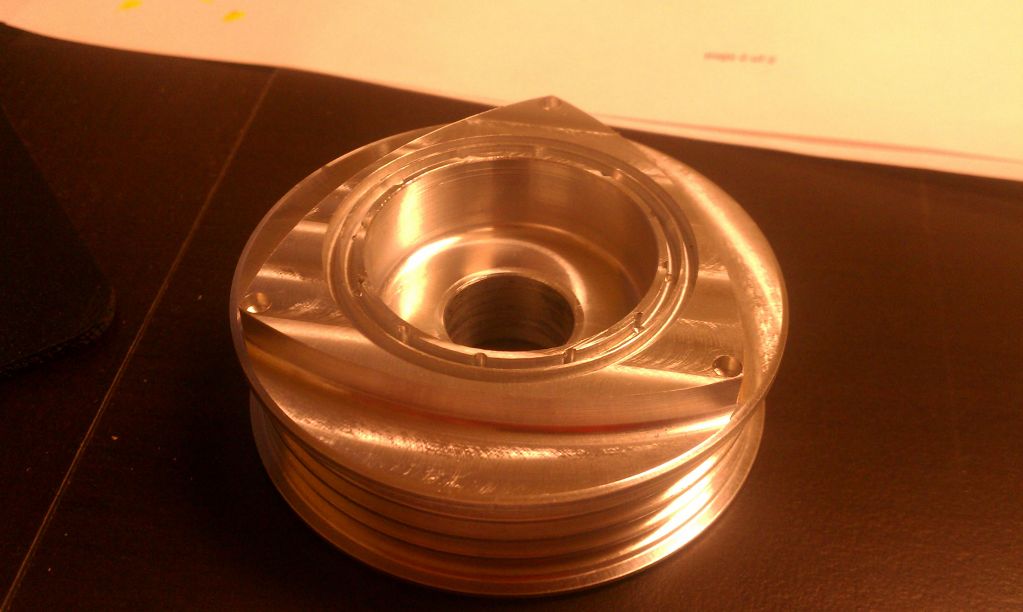
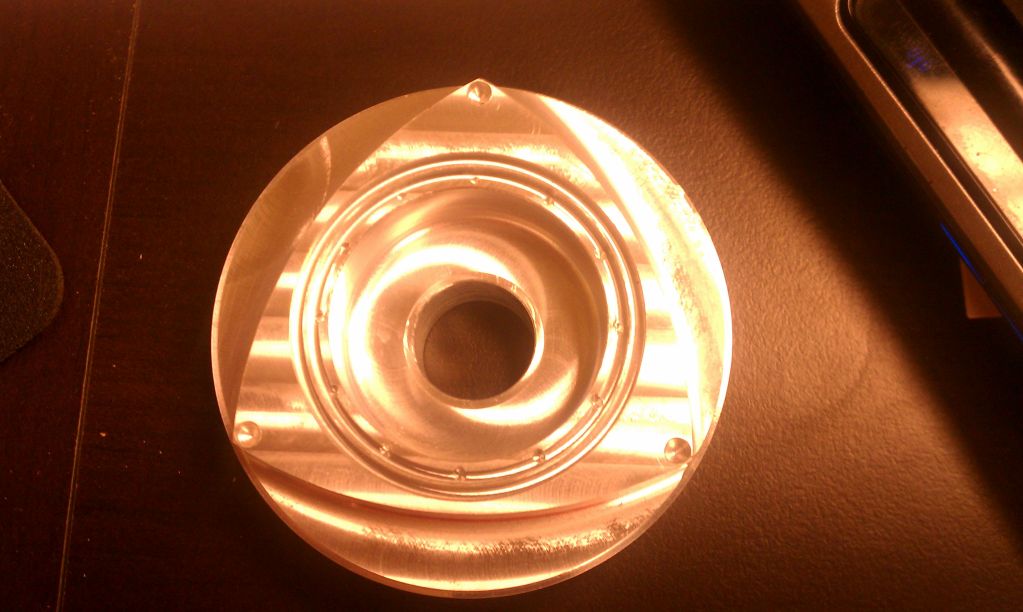
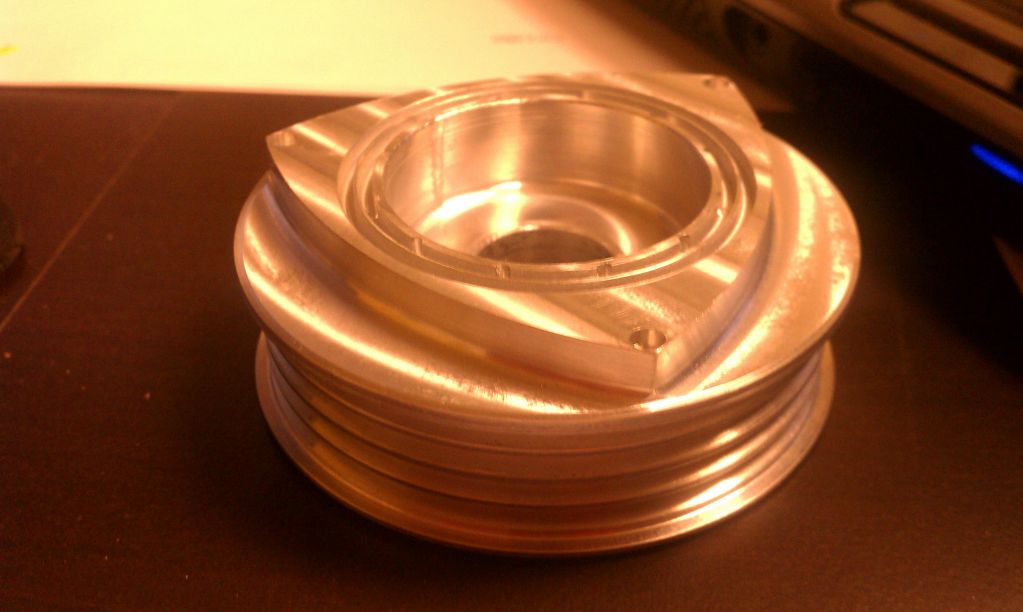
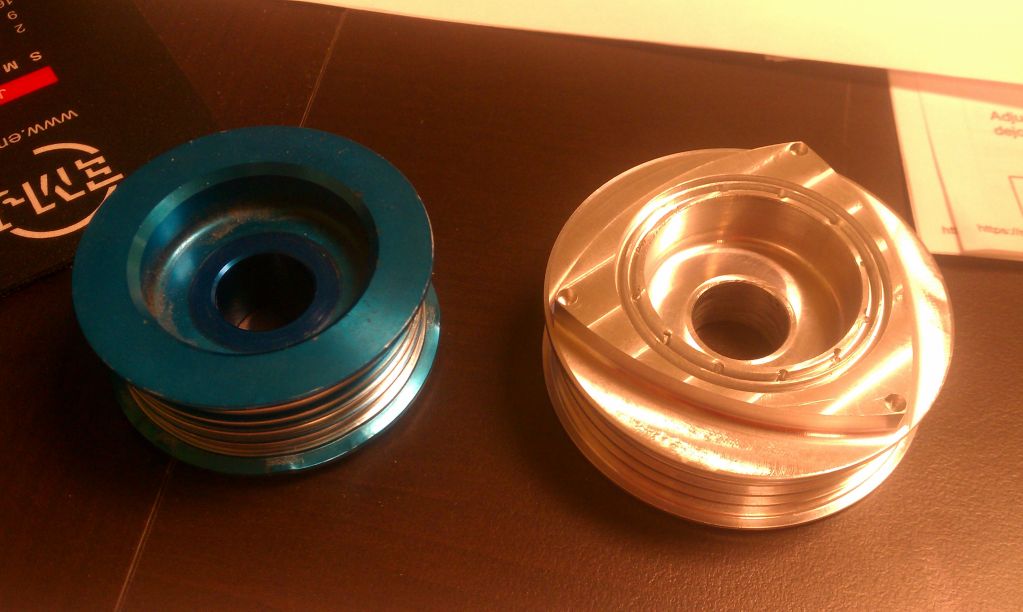
Make Alternator Pulley - DONE
Make Custom water pump Tensioner
Relocate OEM ECU to Firewall
Install Wastegates - STARTED
Make Downpipe - STARTED

Make Wastegate dump
Fuel rail mod
Make/Modify Fuel lines
Make Turbo Oil lines
Make Radiator cover plate
Water reservoir
Make radiator lines
Intercooler mount
Cut/Tack Intercooler piping
Weld Intercooler piping
Weld BOV
Replace exhaust sleeves
Machine engine for studs/Dowels
Make Ignition Bracket
Reply
Old Apr 2, 2012 | 07:19 PM
  #145  
ChrisRX8PR's Avatar
Thread Starter
Rotary Enthusiast
Tenured Member 10 Years
 
Joined: Oct 2007
Posts: 799
Likes: 3
From: Plymouth, MN
Originally Posted by che'srx-7
pretty bro.
Thanks!
Reply
Old Apr 2, 2012 | 09:12 PM
  #146  
prrex4ever's Avatar
Now What?
Tenured Member 10 Years
iTrader: (3)
 
Joined: Oct 2004
Posts: 2,394
Likes: 0
From: Texas
Awesome work! Good luck with your project.
Reply
Old Apr 3, 2012 | 07:09 PM
  #147  
ChrisRX8PR's Avatar
Thread Starter
Rotary Enthusiast
Tenured Member 10 Years
 
Joined: Oct 2007
Posts: 799
Likes: 3
From: Plymouth, MN
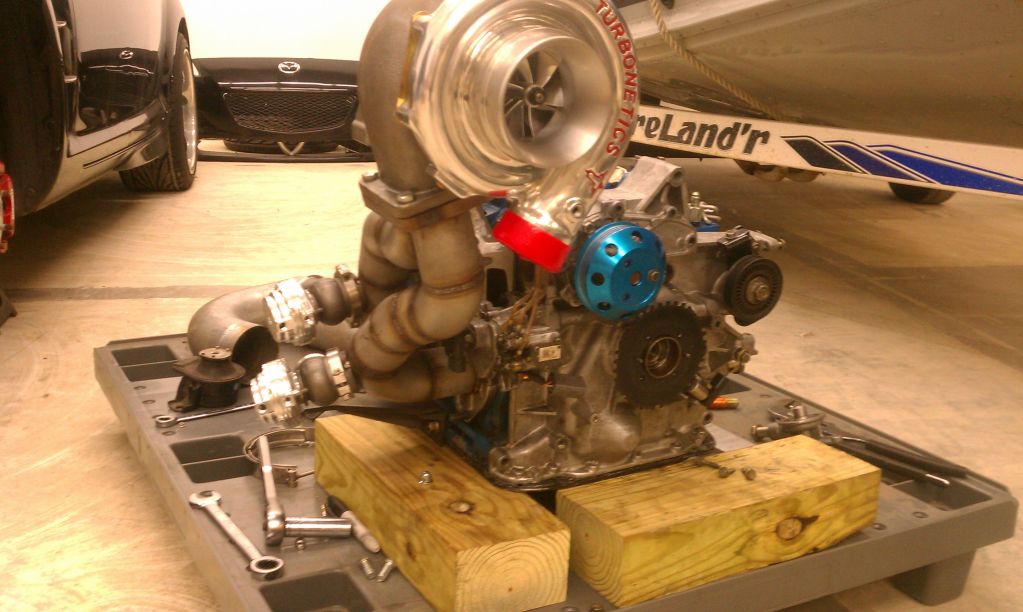
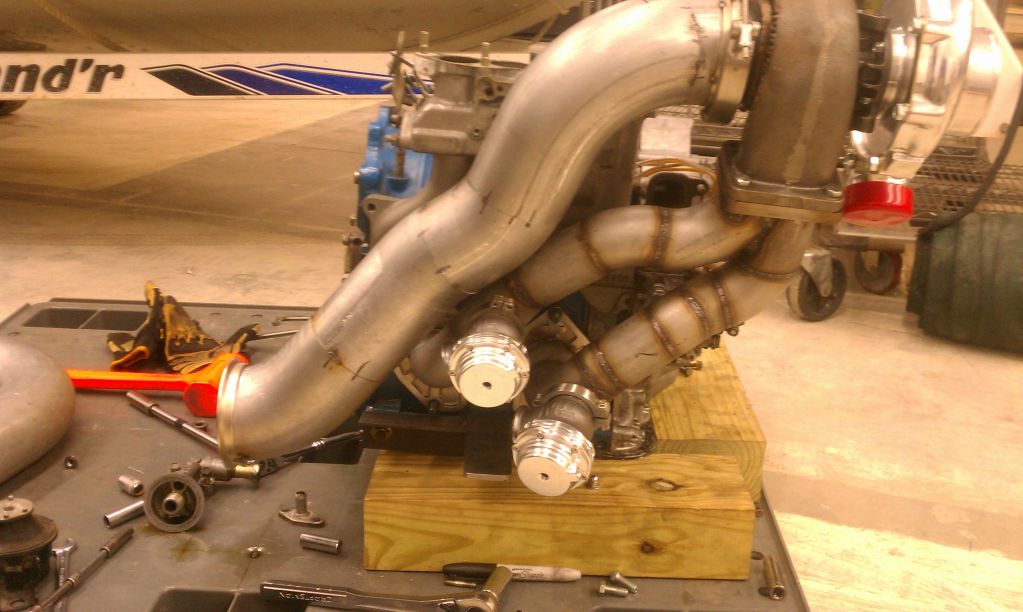
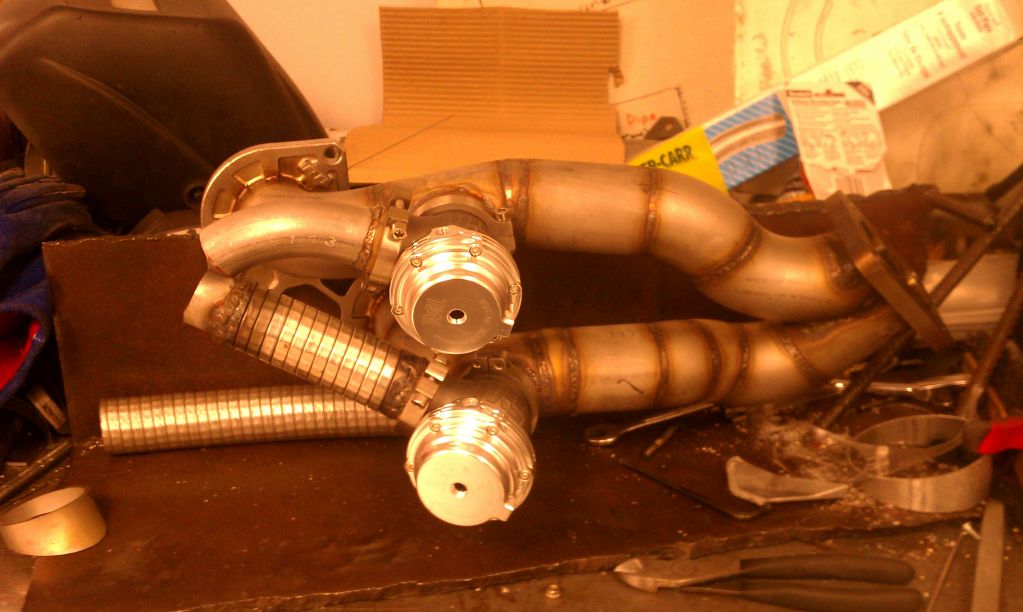
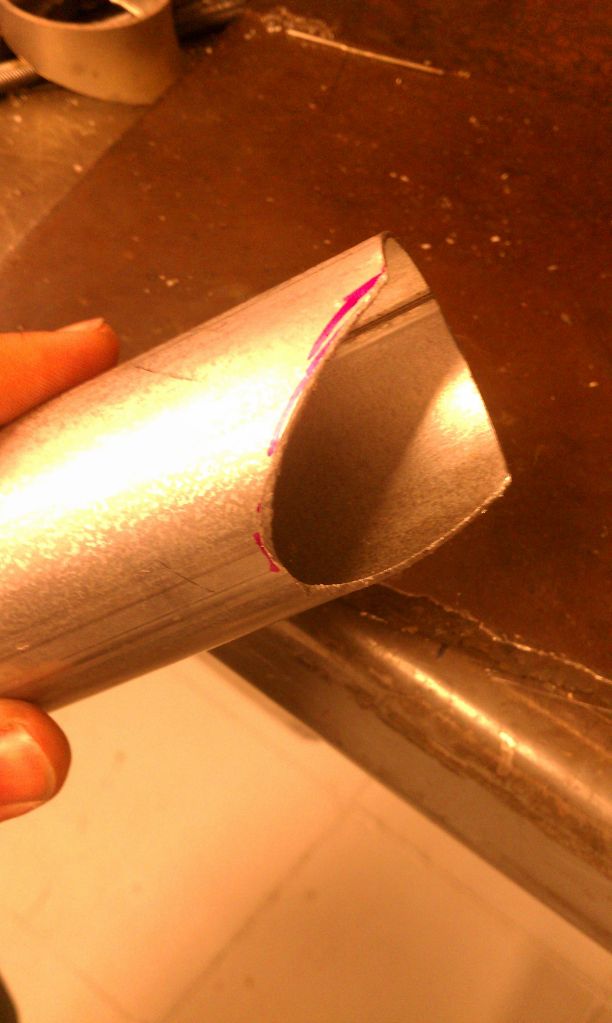
Threw everything back in the car to check for wastegate and downpipe fitment and found that the wastegates were fine but the downpipe would be a bit of a problem. Essentially, I got it in there but it would be so close to everything that it would be nothing to but headaches and vibrating noises so I made marks in the problem areas and I pulled the DP off and "compressed" some of the areas in my big vise. The result is at least 1/2" of clearance everywhere and not so much loss in flow

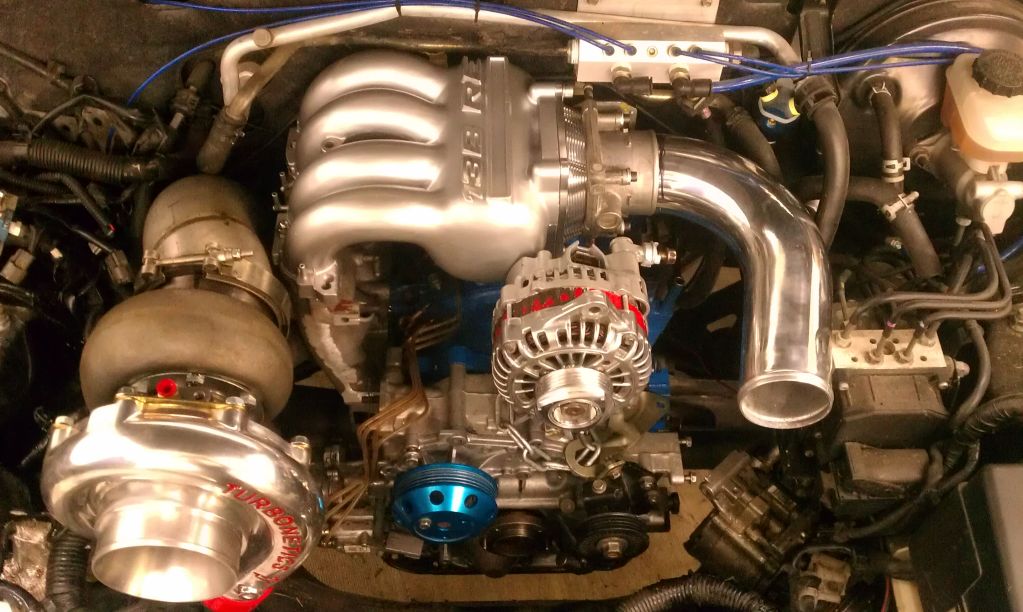
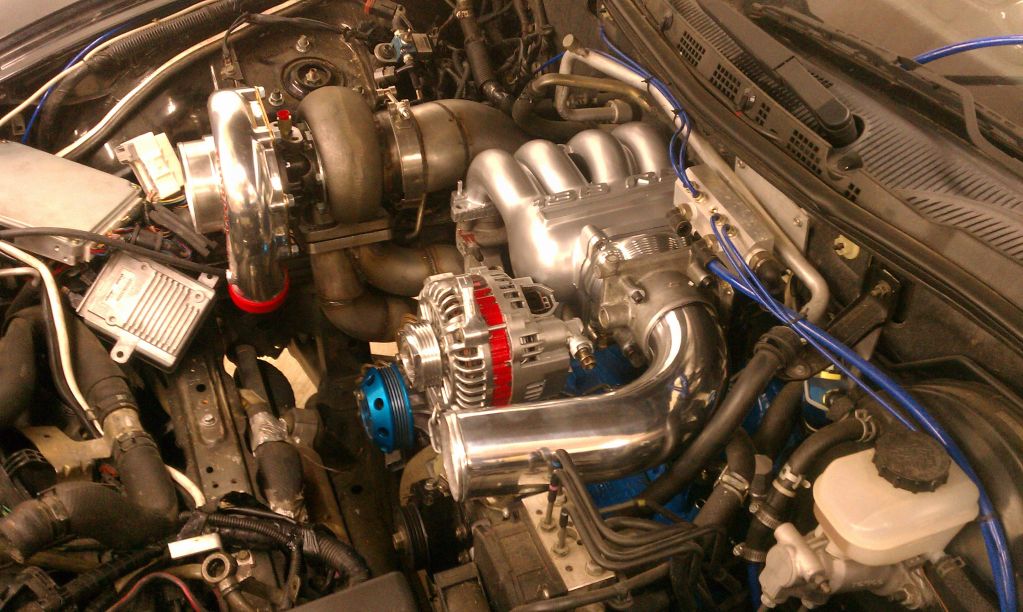
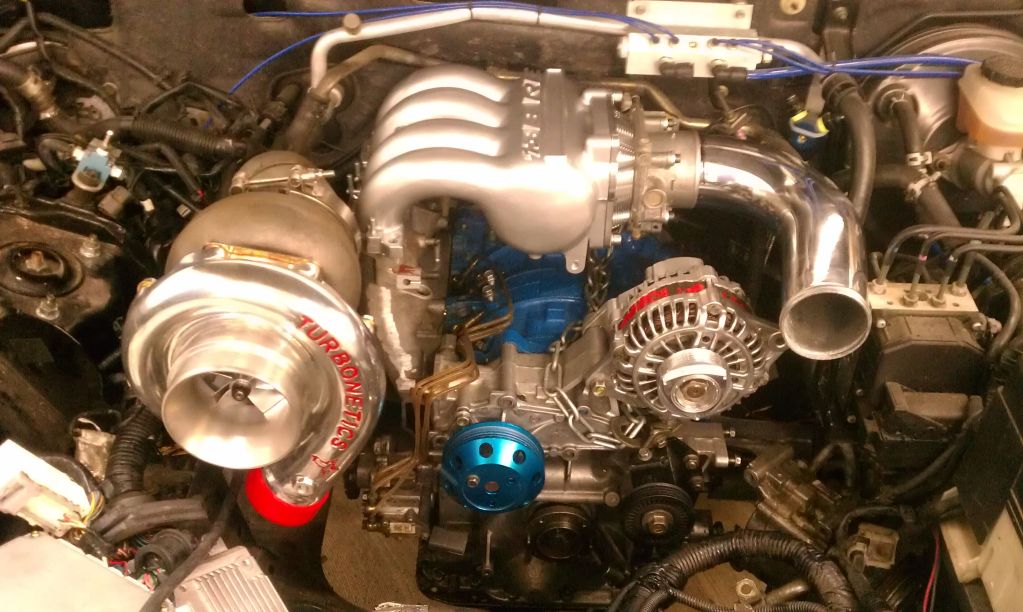
In the process I also noticed that moving the alternator forward to use the front pulley while keeping in its general oem location would cause the front belt to interfere with the waterpump pulley...this means I will probably have to throw the alternator over to the driver's side (as in the last picture) regardless of my desire to keep it in the middle of the engine.

Cheers!

Name:  IMAG0959.jpg
Views: 1489
Size:  118.6 KB

Name:  IMAG0960.jpg
Views: 1502
Size:  133.2 KB

Name:  IMAG0961.jpg
Views: 1485
Size:  118.3 KB
Reply
Old Apr 3, 2012 | 08:23 PM
  #148  
ChrisRX8PR's Avatar
Thread Starter
Rotary Enthusiast
Tenured Member 10 Years
 
Joined: Oct 2007
Posts: 799
Likes: 3
From: Plymouth, MN
Finished welding the wastegates onto the manifold...

C

Name:  IMAG0962.jpg
Views: 1488
Size:  141.0 KB

Name:  IMAG0963.jpg
Views: 1487
Size:  105.5 KB
Reply
Old Apr 5, 2012 | 08:20 PM
  #149  
ChrisRX8PR's Avatar
Thread Starter
Rotary Enthusiast
Tenured Member 10 Years
 
Joined: Oct 2007
Posts: 799
Likes: 3
From: Plymouth, MN
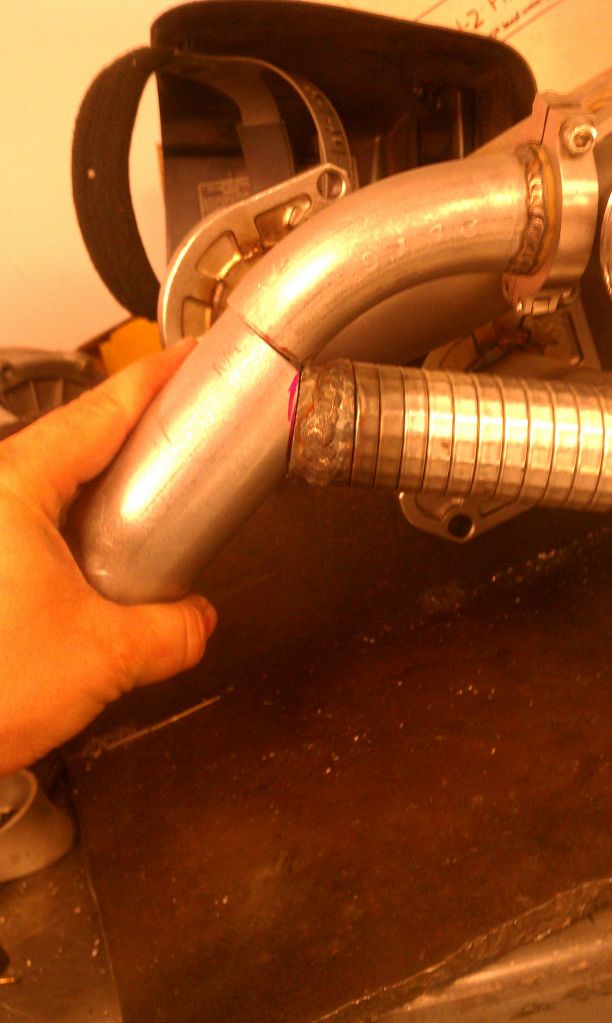
Worked on the wastegate Dump today...I still want to recirculate it back into the exhaust but for now will just dump it mid way. I am unsure if I will be able to package a reroute into the exhaust somewhere so this will work for now. I would like to add that that flex pipe, which is a necessary evil with this setup, is the hardest thing I have ever had to weld...it just wanted to melt away so the welds aren't pretty at all...Im just happy it sealed...lol I couldn't use a regular flexible section due to the available space.

Cheers!

Name:  IMAG0965.jpg
Views: 1478
Size:  136.5 KB

Name:  IMAG0966.jpg
Views: 1475
Size:  97.5 KB

Name:  IMAG0967.jpg
Views: 1490
Size:  111.9 KB

Name:  IMAG0971.jpg
Views: 1484
Size:  102.9 KB

Reply
Old Apr 6, 2012 | 11:01 AM
  #150  
speedrx8er's Avatar
Junior Member
 
Joined: Oct 2009
Posts: 23
Likes: 0
From: MN
look at that dent. Something for me to look forward to.
Reply


All times are GMT -5. The time now is 12:01 PM.