
RX-8 13B-RE conversion!


Thread Starter
Rotary Enthusiast
Joined: Oct 2007
Posts: 799
Likes: 3
From: Plymouth, MN
Questions on passing emissions test and the ECU used to control the RE? Are you doing two ECU's in your car? Are your mounts anything like these?
http://raceroots.com/index.php/produ...mount-set.html
Are all ancillary accessories working properly? Cruise, A/C, OMP, etc....
You're using RE front cover?
http://raceroots.com/index.php/produ...mount-set.html
Are all ancillary accessories working properly? Cruise, A/C, OMP, etc....
You're using RE front cover?
All ancillary accessories will work properly.
I am using the Renesis Front cover on the BRE engine.
Chris
Thread Starter
Rotary Enthusiast
Joined: Oct 2007
Posts: 799
Likes: 3
From: Plymouth, MN
Quick update...
Did a little bit of work this afternoon after the employees left. Mainly modifications to the front cover...enjoy
The marked area has to be lowered to clear the counterweight as explained by "Galdi" in PR...
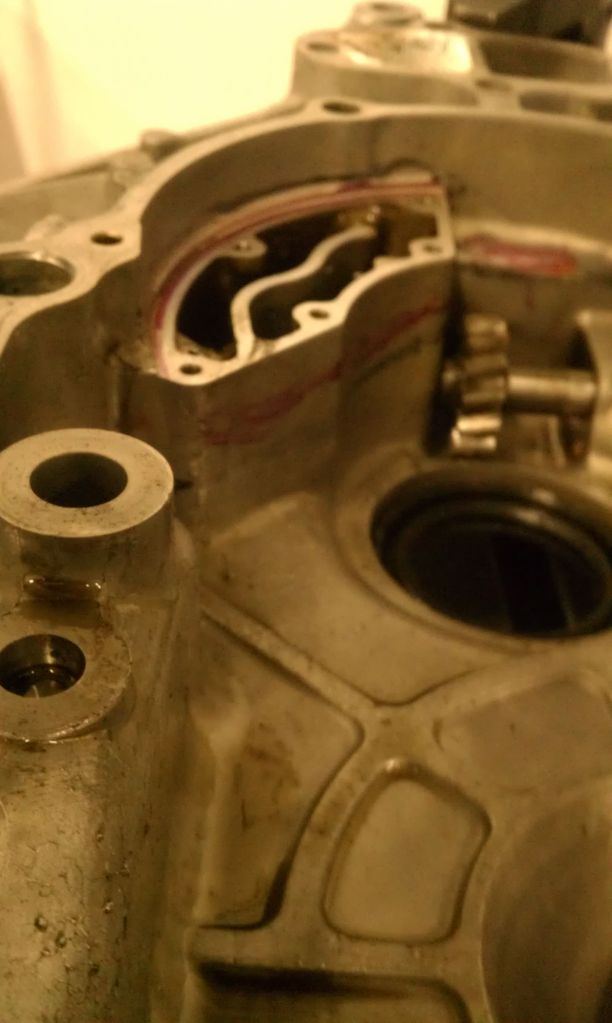
Another shot

Finished item...
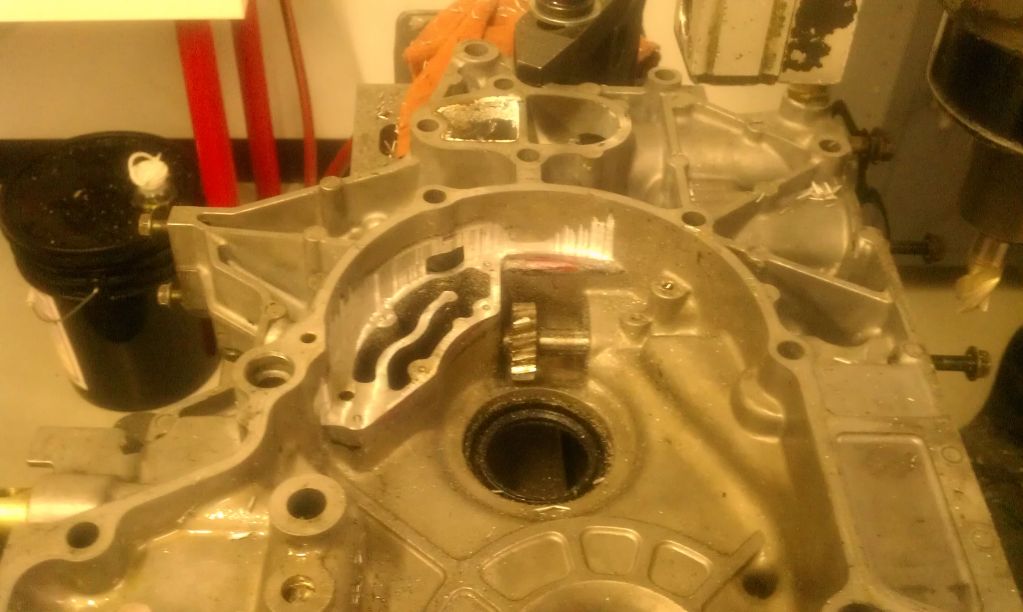
Another shot
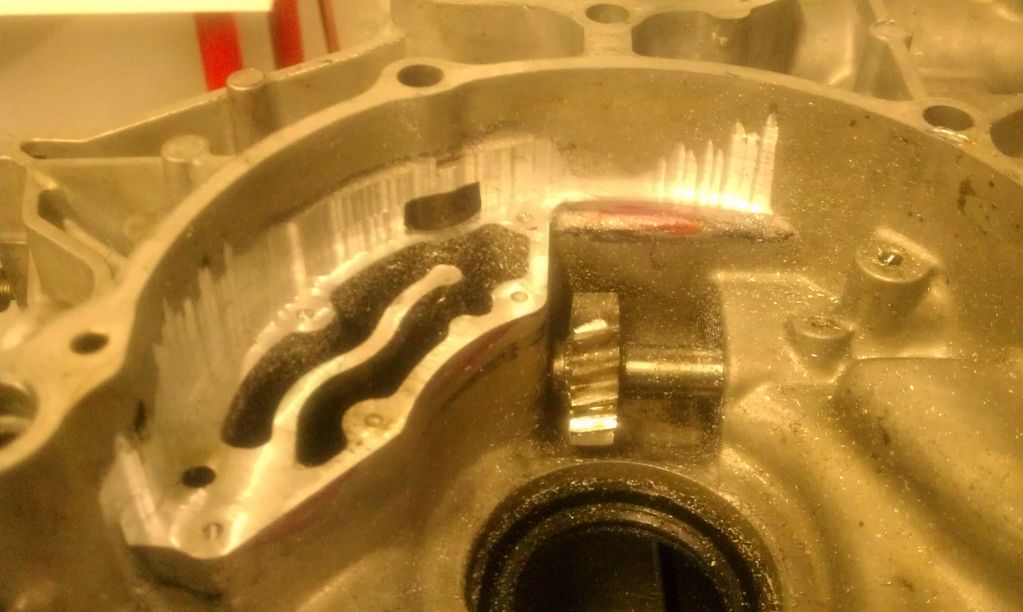
now we just need to weld shut the opening that happened as a result of the milling as well as one of the oil holes that are left behind...then a new oil line needs to be ran on the exterior of the front cover to bridge what was machined away...I will upload more pics as I get further along...
Chris
Did a little bit of work this afternoon after the employees left. Mainly modifications to the front cover...enjoy
The marked area has to be lowered to clear the counterweight as explained by "Galdi" in PR...
Another shot
Finished item...
Another shot
now we just need to weld shut the opening that happened as a result of the milling as well as one of the oil holes that are left behind...then a new oil line needs to be ran on the exterior of the front cover to bridge what was machined away...I will upload more pics as I get further along...
Chris
Thread Starter
Rotary Enthusiast
Joined: Oct 2007
Posts: 799
Likes: 3
From: Plymouth, MN
Figured id put together a list of things to do... I will edit it as I go. I I know it's a bit ambiguous but it makes sense to me 
Chris
To Do'sI (in no particular order)
Machine front cover
Weld front cover
Front cover oil line
Machine front pulley spacer
Driver engine mount
Pass engine mount
Finish LIM
Drill UIM bolt hole
Throttle body adapter
Oil pan and pickup
Alternator adapter
New belt
Split ecu harness
Plug and play harness
Manifold
Downpipe
Wastegate dump
Fuel rail mod
Fuel lines
Harness mod
Exhaust valve
Oil lines
Radiator cover plate
Water reservoir
Intercooler mount
Intercooler piping cut
Intercooler piping weld
Bov weld
Replace exhaust sleeves
Machine engine studs
Alternator adapter-???
Thread Starter
Rotary Enthusiast
Joined: Oct 2007
Posts: 799
Likes: 3
From: Plymouth, MN
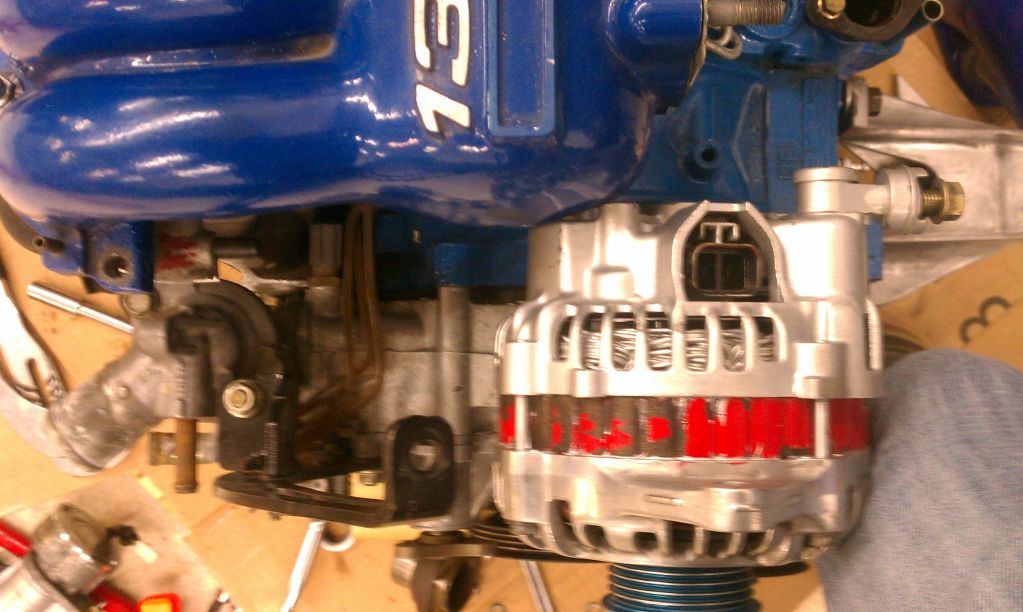
I wrote Alternator adapter because Im using the Renesis front cover with the 20B LIM and the back of the Renesis alternator appears as though it will hit the front of BRE UIM. This will either require some grinding of the back of the alternator or a slight shift/relocation to the drivers side for clearance.
Just trying to account for potentials. As I continue with the build some of these will hopefully not be needed.
Chris
Thread Starter
Rotary Enthusiast
Joined: Oct 2007
Posts: 799
Likes: 3
From: Plymouth, MN
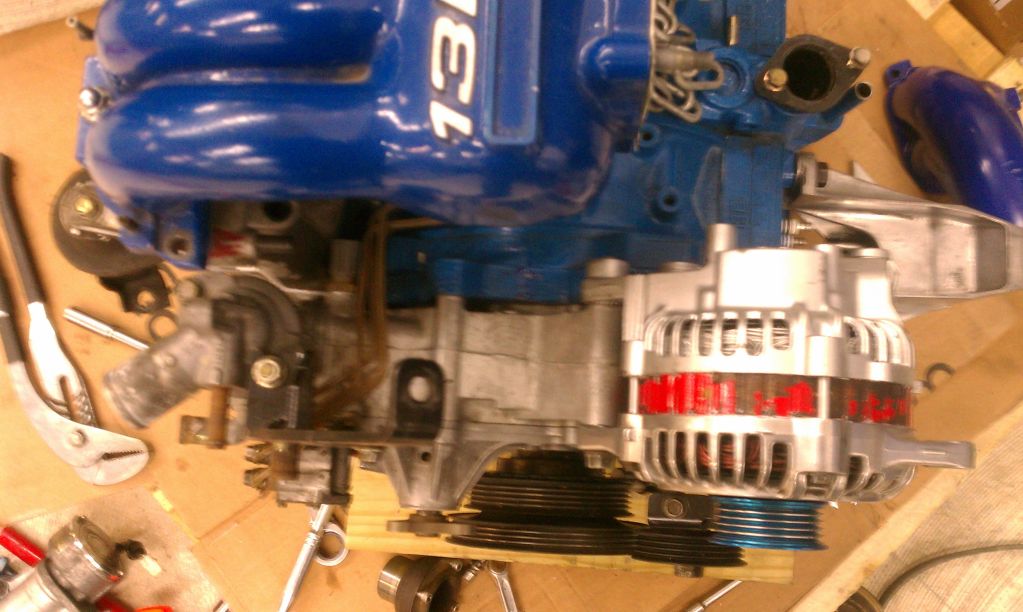
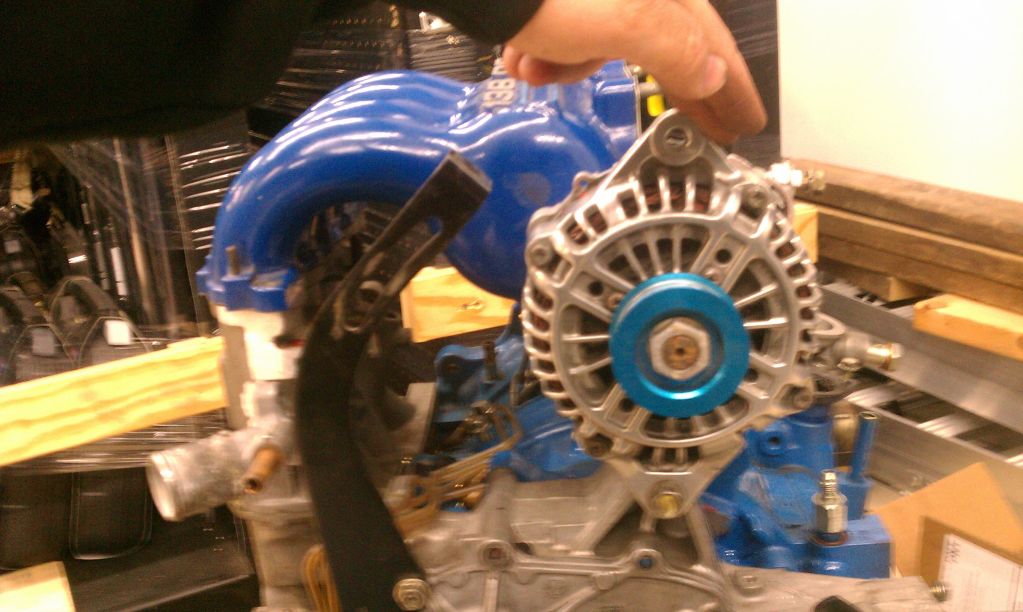
Finally got to try on the front cover and it clears all but 2 tiny spots where it touched...a little final grinding and it is finished as far as that is concerned. I dont think I will have issues routing the manifold to the turbo based on what I saw today, we'll see when I get it in the car for mockup and if needed I will build a custom engine mount similar to the Race Roots ones which will give me much more space
I took this opportunity to throw on the OMP, RX8 Waterpump outlet, intake manifolds and the RX-8 Alternator and was able to determine the Alternator issue. Unfortunately I bought this BRE from a forum member and it did not come with any accessories...the RX-8 Alt is also really jucy and I would like to keep it...soemthing will have to be made to be able to tighten the belt etc
Chris
Pics:
Front Cover on
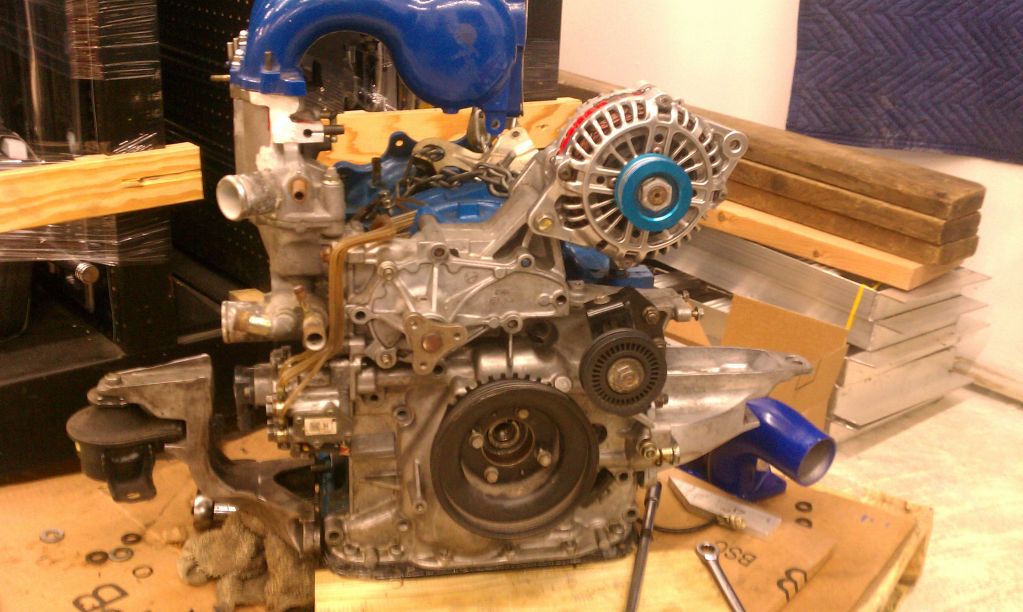
Top View

Too close
Interference
From the side where it hits
How much it is off from the OEM mount
I took this opportunity to throw on the OMP, RX8 Waterpump outlet, intake manifolds and the RX-8 Alternator and was able to determine the Alternator issue. Unfortunately I bought this BRE from a forum member and it did not come with any accessories...the RX-8 Alt is also really jucy and I would like to keep it...soemthing will have to be made to be able to tighten the belt etc
Chris
Pics:
Front Cover on
Top View
Too close
Interference
From the side where it hits
How much it is off from the OEM mount
It looks like the alternator fits if you install it first laying almost totally flat(not in the stock position) and then the uim instead of having the manifold on then sliding it into place-then you would have to make a new bracket.
Thread Starter
Rotary Enthusiast
Joined: Oct 2007
Posts: 799
Likes: 3
From: Plymouth, MN
Thanks for the idea.
Chris


^
The renesis is not that terrible of an engine in itself...I think its a situation where a misunderstood engine gets combined with a bunch of people that shouldn't own a rotary. Think of the majority of the people that own RX-7's and how different that is from the majority of people that own RX-8s. Mazda accomplished a goal, it wanted to sell the rotary to the masses and the RX-8 did just that...except that women that are used to a camry never check their oil and aren't expecting it to consume any and then they run it dry... people that are used to regular daily driver cars don't understand how important it is to warm up the engine..etc etc etc I could go on forever. The rotary engine is awesome but requires a degree of delicacy on part of the owner, everyone here knows that...most people that bought and RX-8 did not. What the renesis is Not is a run of the mill 4 cyl toyota engine...therefore it should be treated differently. I had plenty of fun with my renesis and accomplished a lot of firsts, first to 350, 400 and 500whp...first turbo bridgeport renesis...etc etc etc...Now I just want to go fast with no fuz and have nothing else to prove so Im swapping in an RE... originally I only pulled the Reni to swap in a 20B and then plans changed...otherwise I would've kept the Reni.
The renesis is not that terrible of an engine in itself...I think its a situation where a misunderstood engine gets combined with a bunch of people that shouldn't own a rotary. Think of the majority of the people that own RX-7's and how different that is from the majority of people that own RX-8s. Mazda accomplished a goal, it wanted to sell the rotary to the masses and the RX-8 did just that...except that women that are used to a camry never check their oil and aren't expecting it to consume any and then they run it dry... people that are used to regular daily driver cars don't understand how important it is to warm up the engine..etc etc etc I could go on forever. The rotary engine is awesome but requires a degree of delicacy on part of the owner, everyone here knows that...most people that bought and RX-8 did not. What the renesis is Not is a run of the mill 4 cyl toyota engine...therefore it should be treated differently. I had plenty of fun with my renesis and accomplished a lot of firsts, first to 350, 400 and 500whp...first turbo bridgeport renesis...etc etc etc...Now I just want to go fast with no fuz and have nothing else to prove so Im swapping in an RE... originally I only pulled the Reni to swap in a 20B and then plans changed...otherwise I would've kept the Reni.
Thread Starter
Rotary Enthusiast
Joined: Oct 2007
Posts: 799
Likes: 3
From: Plymouth, MN
Chris
Well, it looked like it would have fit, I guess you have some shaving/milling to do. I would have said to make an adapter to raise the uim but then it won't clear the firewall so that's a no go, damn renesis cover...
Thread Starter
Rotary Enthusiast
Joined: Oct 2007
Posts: 799
Likes: 3
From: Plymouth, MN
Chris
Thread Starter
Rotary Enthusiast
Joined: Oct 2007
Posts: 799
Likes: 3
From: Plymouth, MN
Today I worked on the Passenger Side mount...I decided to make a new one simply because I was not too happy with the available space in that area. It will still need a bit of triangulation(reinforcement) but I will do that later once I am sure it is where I need it to be.
I also dropped the engine in after throwing the mount off just so I could gauge the space around the engine and see if there would be any other areas of interference. I found that I will have to change the water pump/thermostat housing significantly to send the radiator hoses in different directions. I also found that the Cosmo oil filter pedestal hits the RX-8 clutch slave cylinder so I will have to do something for that as well...perhaps just make it remote while I'm at it.
Enjoy
Chris
Pass Engine Mount
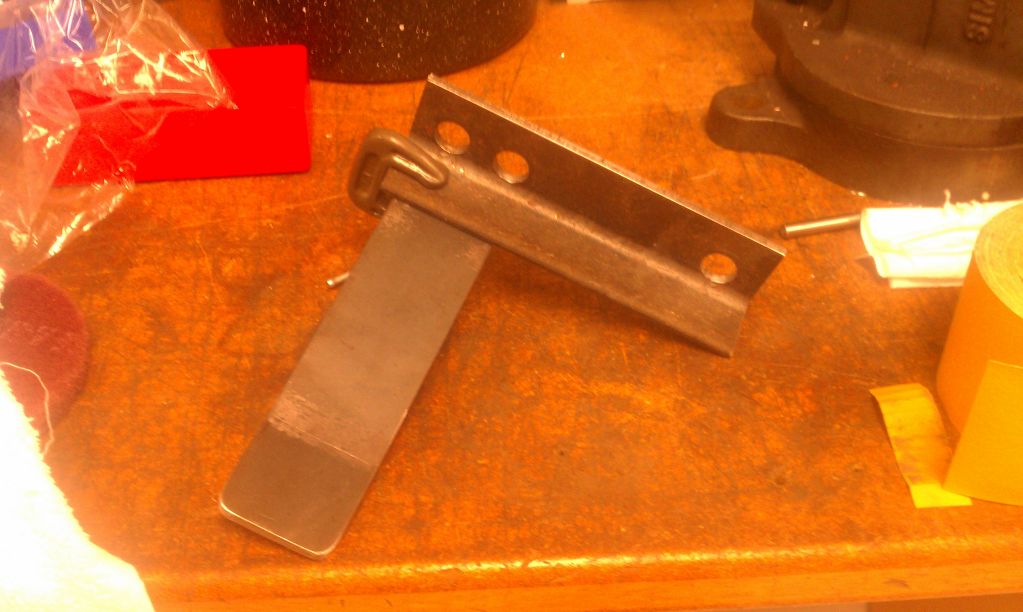
Different Shot
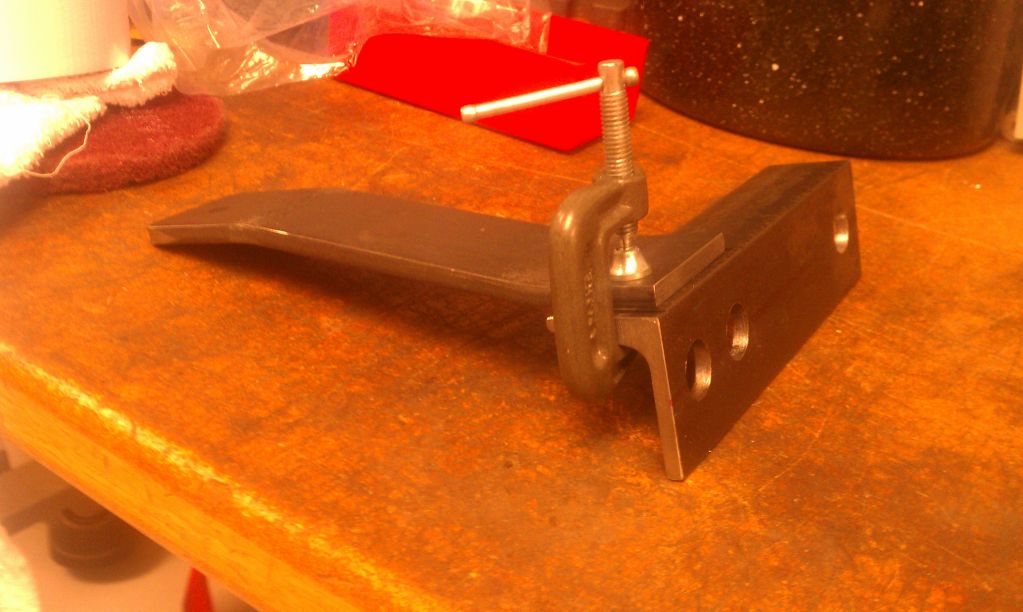
All Welded up
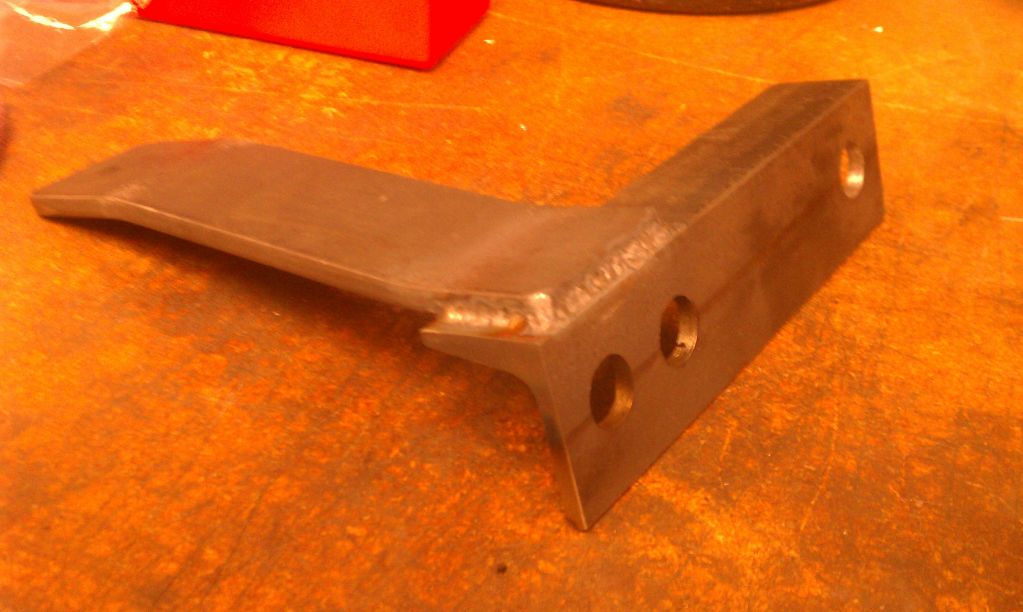
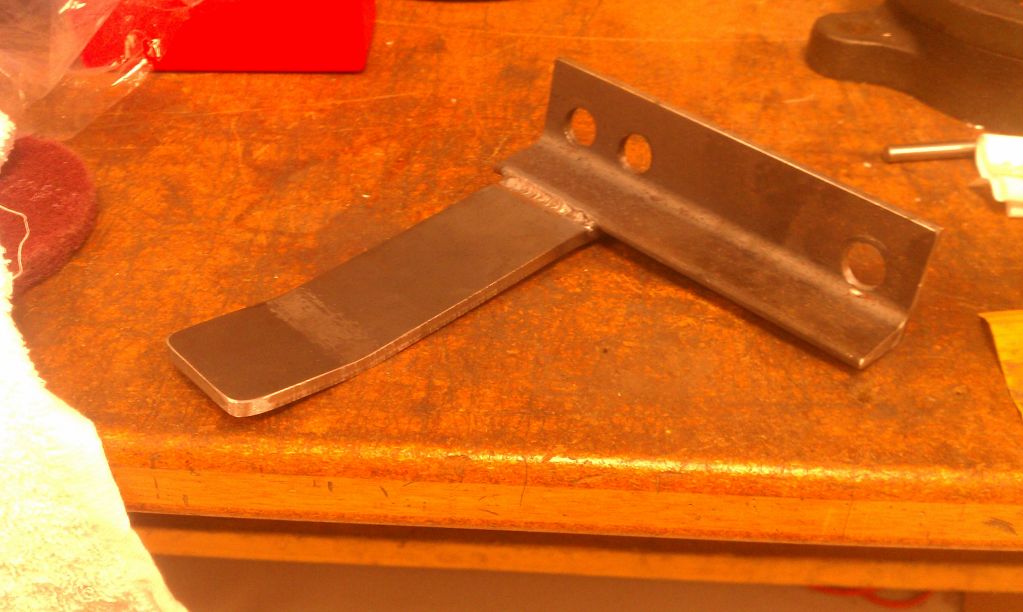
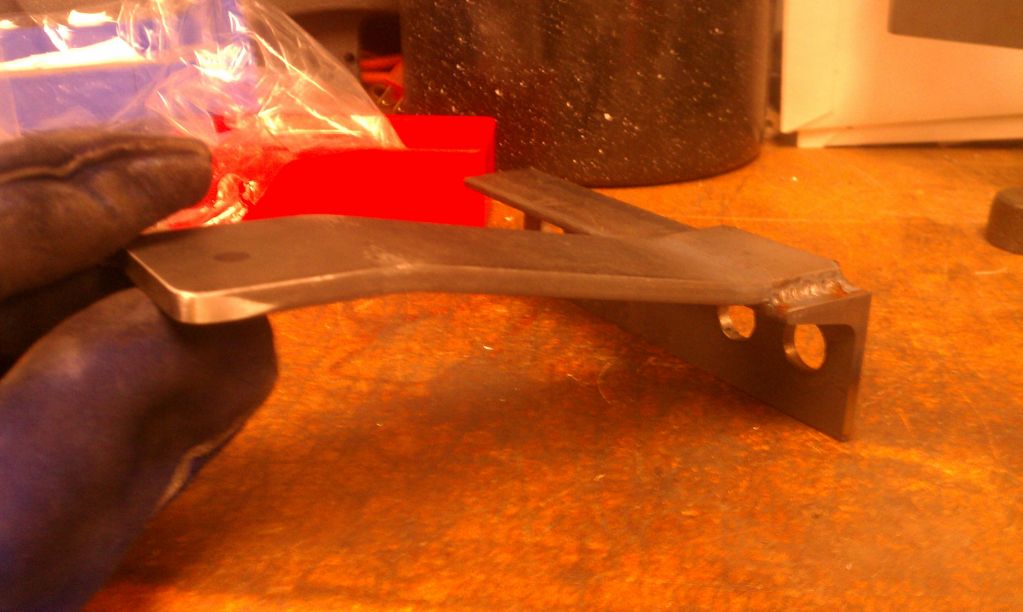
On the Engine
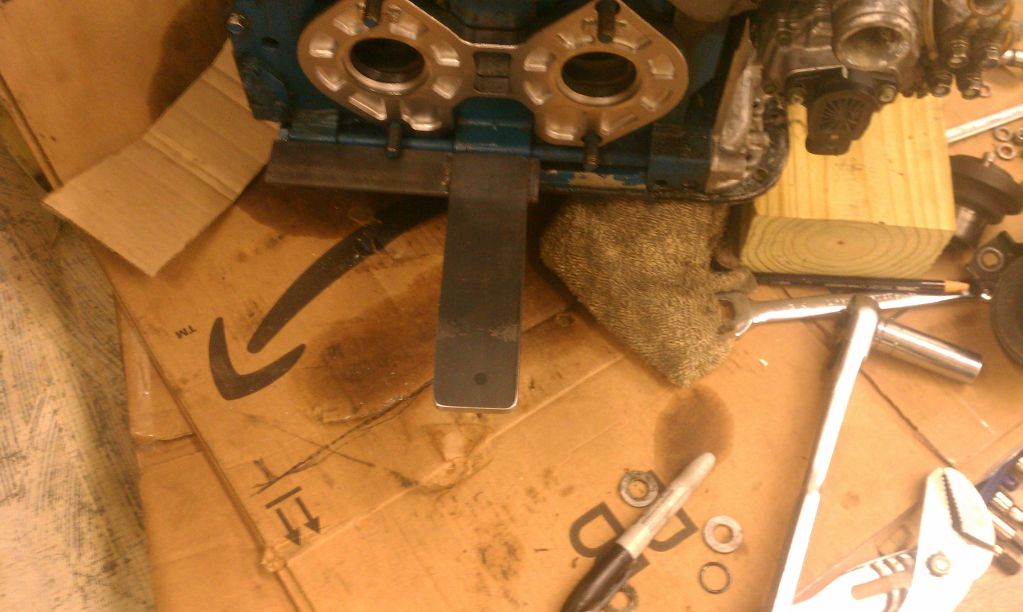
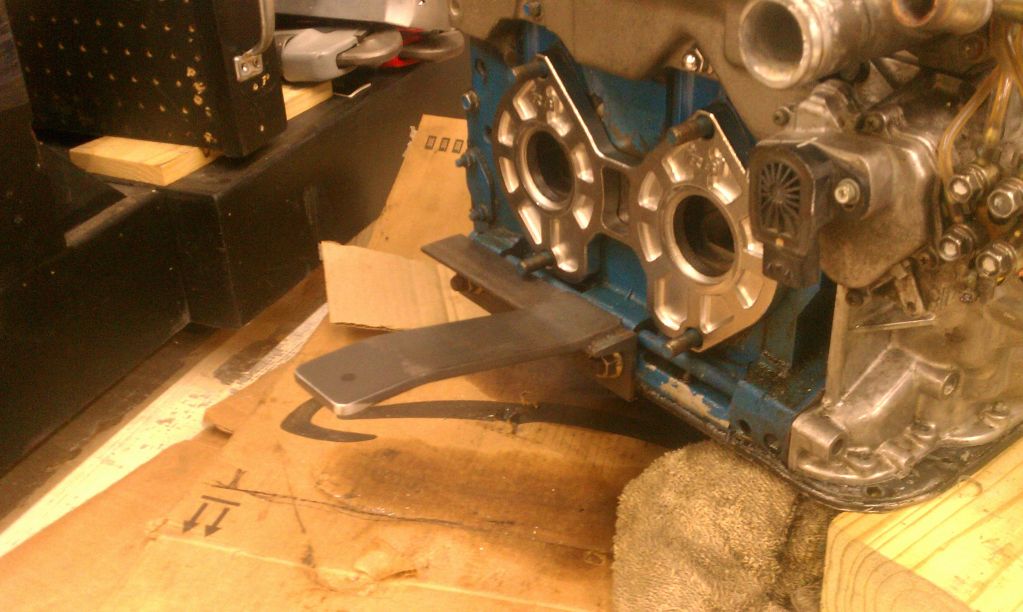
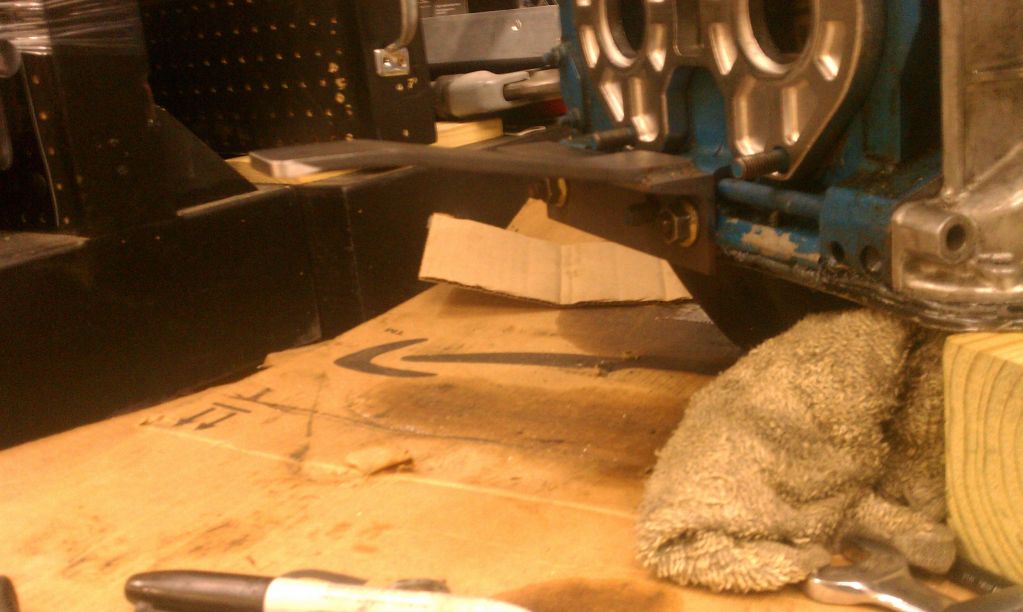
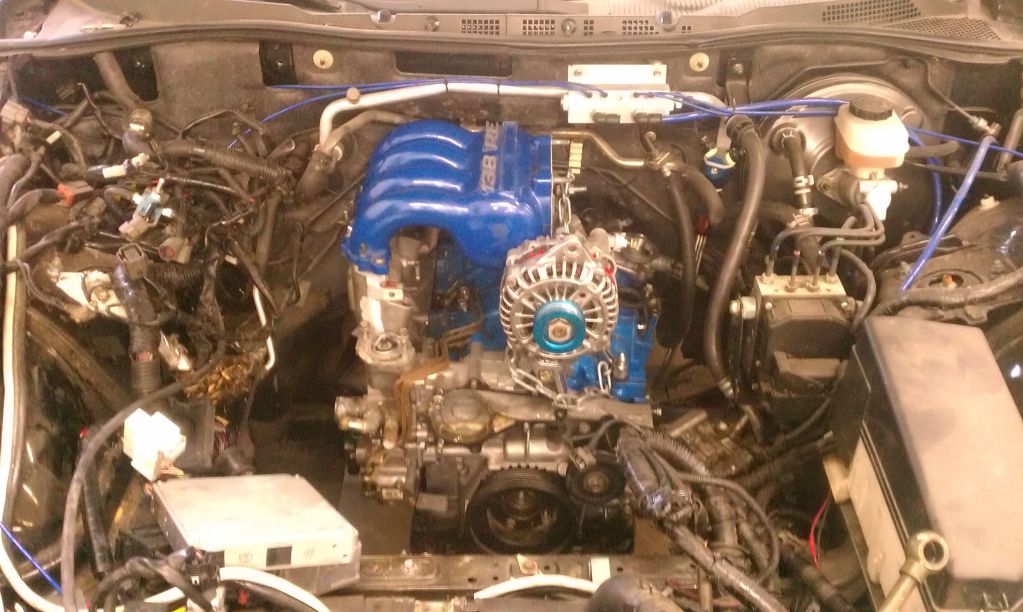
Engine in! LIM/UIM have absolutely no clearance problems...
I also dropped the engine in after throwing the mount off just so I could gauge the space around the engine and see if there would be any other areas of interference. I found that I will have to change the water pump/thermostat housing significantly to send the radiator hoses in different directions. I also found that the Cosmo oil filter pedestal hits the RX-8 clutch slave cylinder so I will have to do something for that as well...perhaps just make it remote while I'm at it.
Enjoy
Chris
Pass Engine Mount
Different Shot
All Welded up
On the Engine
Engine in! LIM/UIM have absolutely no clearance problems...
Thread Starter
Rotary Enthusiast
Joined: Oct 2007
Posts: 799
Likes: 3
From: Plymouth, MN
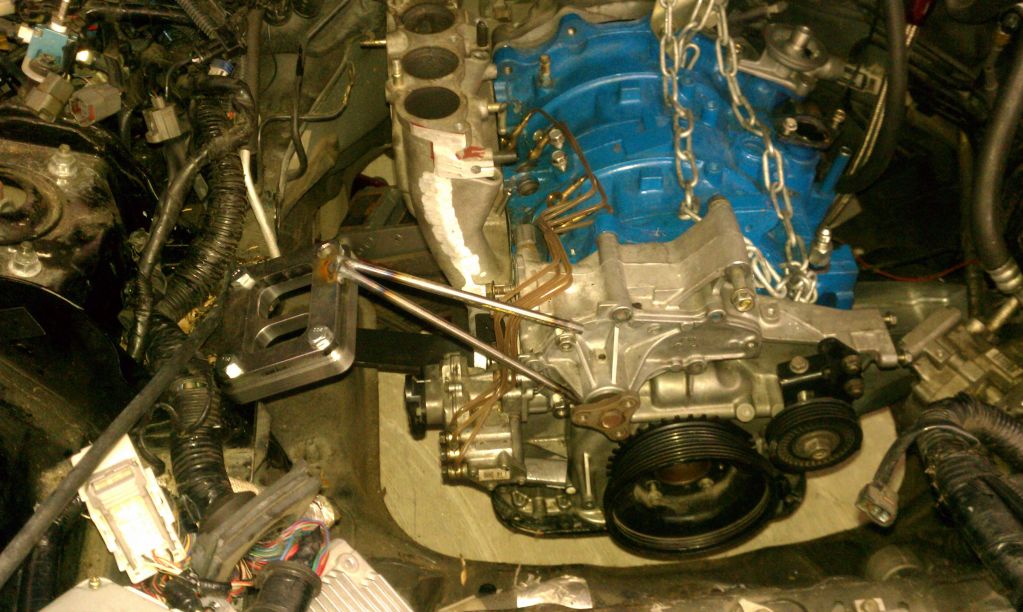
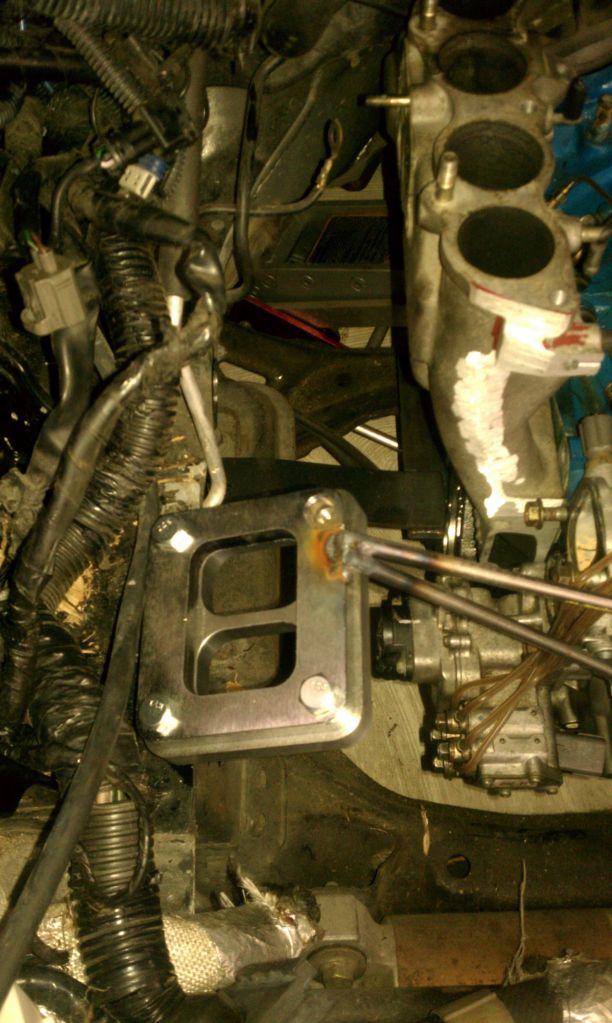
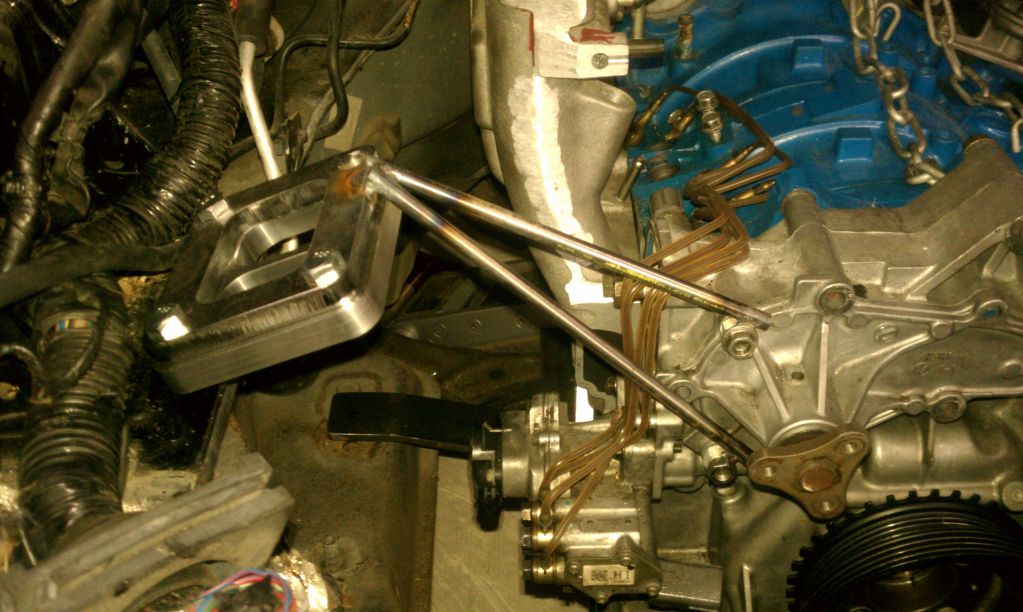
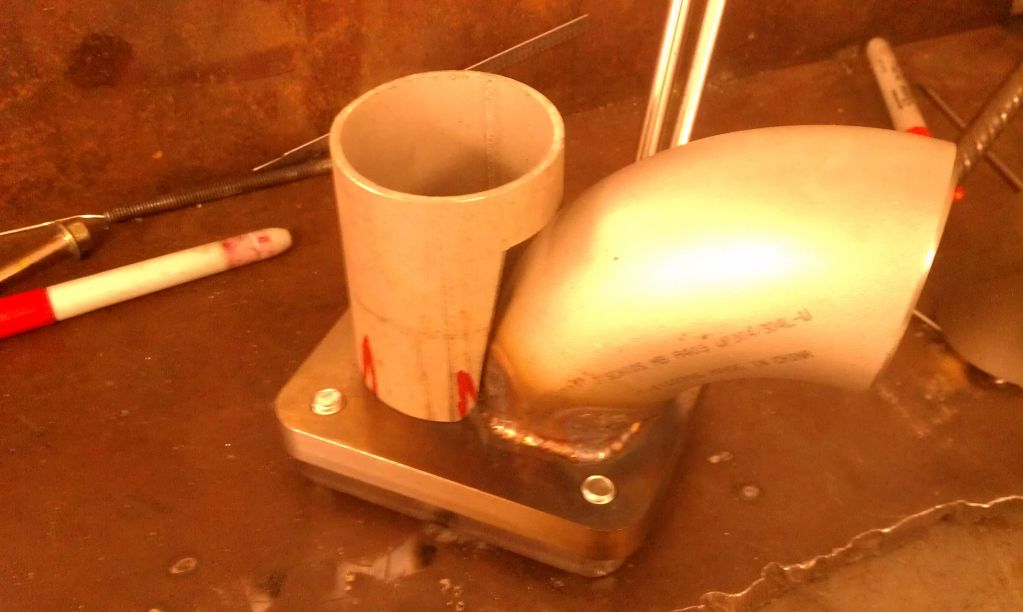
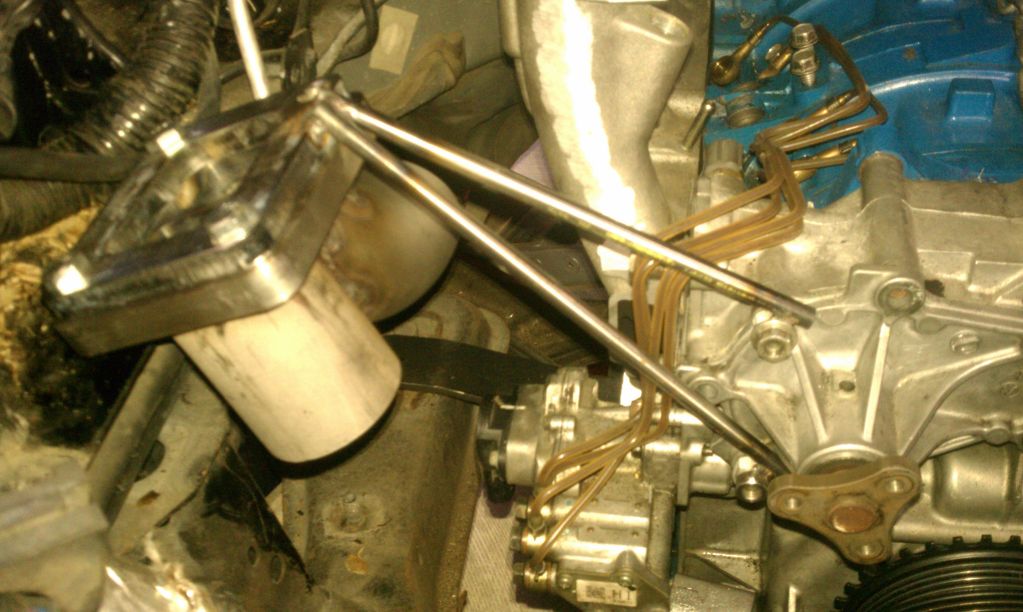
Not a big update but today I spent about 30min making a support for the T4 flange so that I can pull the engine and build the manifold around it. I just took two .25" SS rods I had from a bar end when running parts on the big lathe and I made two shafts, welded them to two large nuts that I could slide over the water pump studs and then located the flange where I want it so I could weld it in place. Now I have a jig of sorts.
Chris
Chris
Thread Starter
Rotary Enthusiast
Joined: Oct 2007
Posts: 799
Likes: 3
From: Plymouth, MN
Here is the updated list of todo's
C
Machine front cover
Weld front cover
Front cover oil line
Machine front pulley spacer
Driver engine mount finish
Pass engine mount finish
Finish LIM (welding, holes etc)
Drill UIM bolt hole
Throttle elbow adapter flange
RX-8 Throttle body flange
Weld RX-8 throttle to Cosmo Adapter Elbow
Oil filter Pedestal (machine, relocate, whatever)
Water Pump Outlet Flange
Oil pan and pickup
Alternator adapter
Split ecu harness
Make Plug and play harness
Make Manifold
Install Wastegates
Make Downpipe
Make Wastegate dump
Fuel rail mod
Make/Modify Fuel lines
Harness mod
Make Turbo Oil lines
Make Radiator cover plate
Water reservoir
Intercooler mount
Cut Intercooler piping
Weld Intercooler piping
Weld BOV
Replace exhaust sleeves
Machine engine for studs/Dowels
Make Ignition Bracket
Thread Starter
Rotary Enthusiast
Joined: Oct 2007
Posts: 799
Likes: 3
From: Plymouth, MN
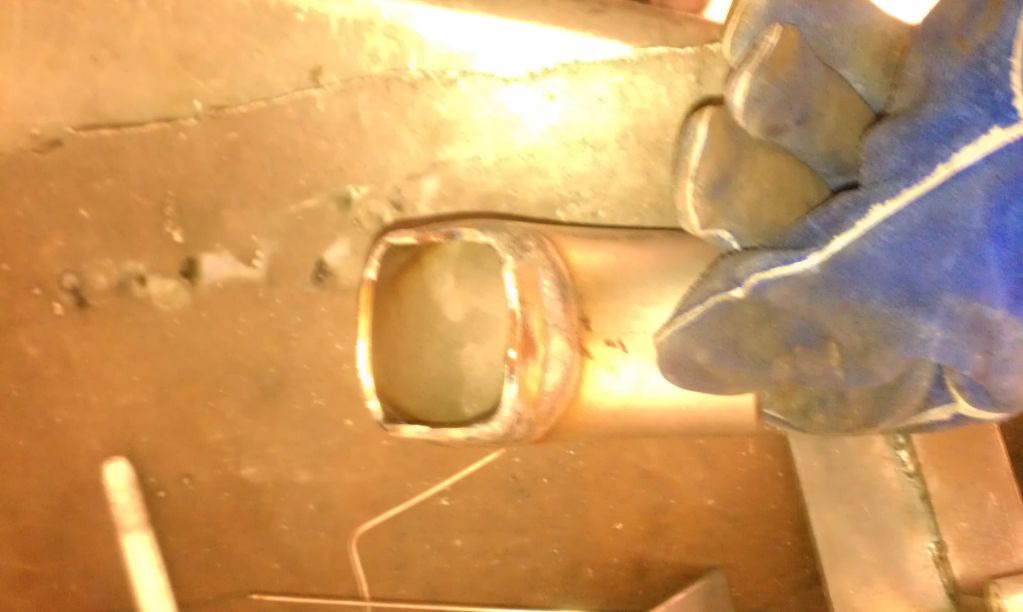
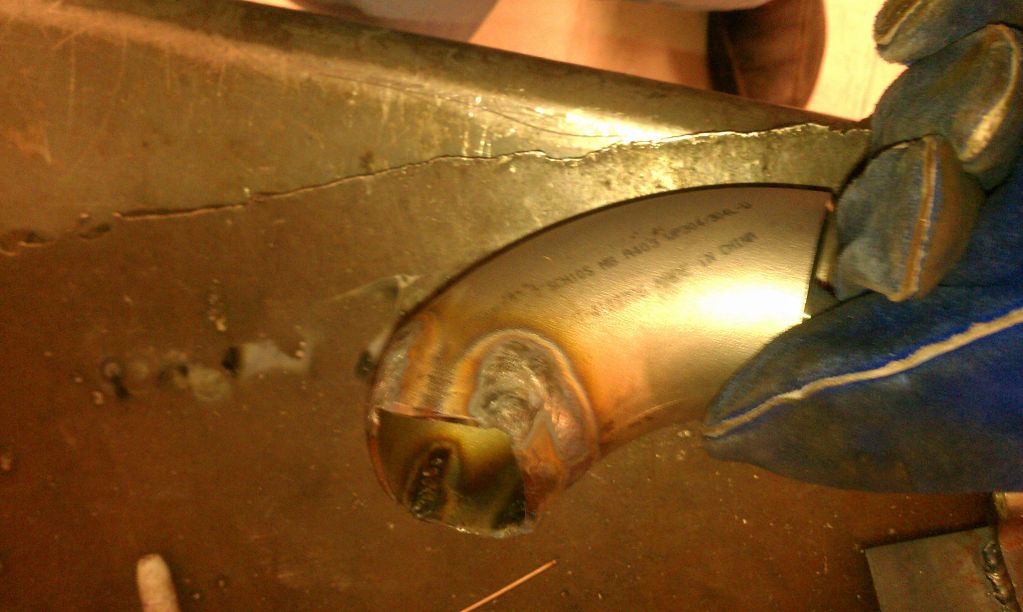
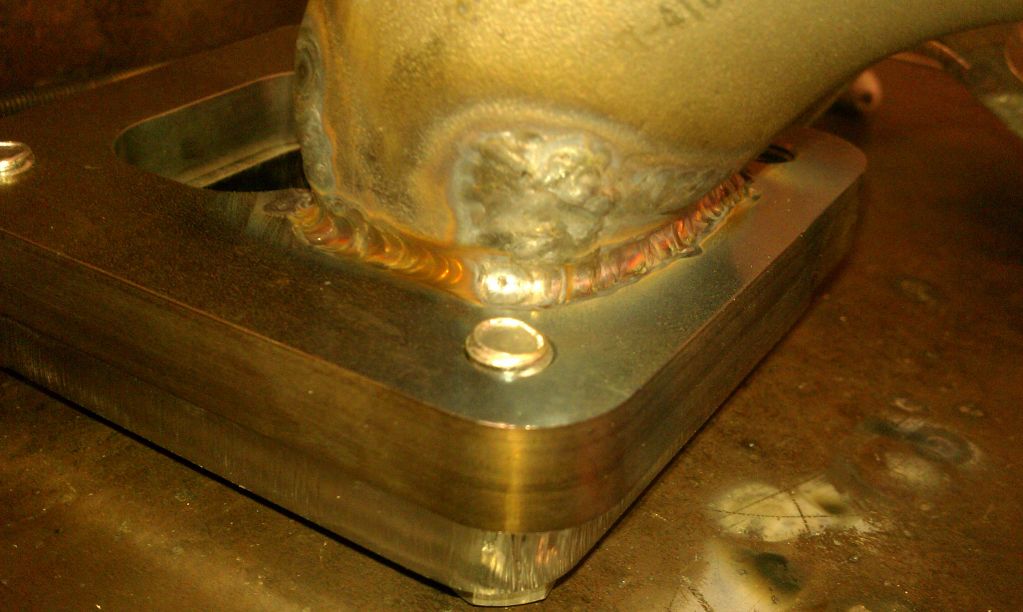
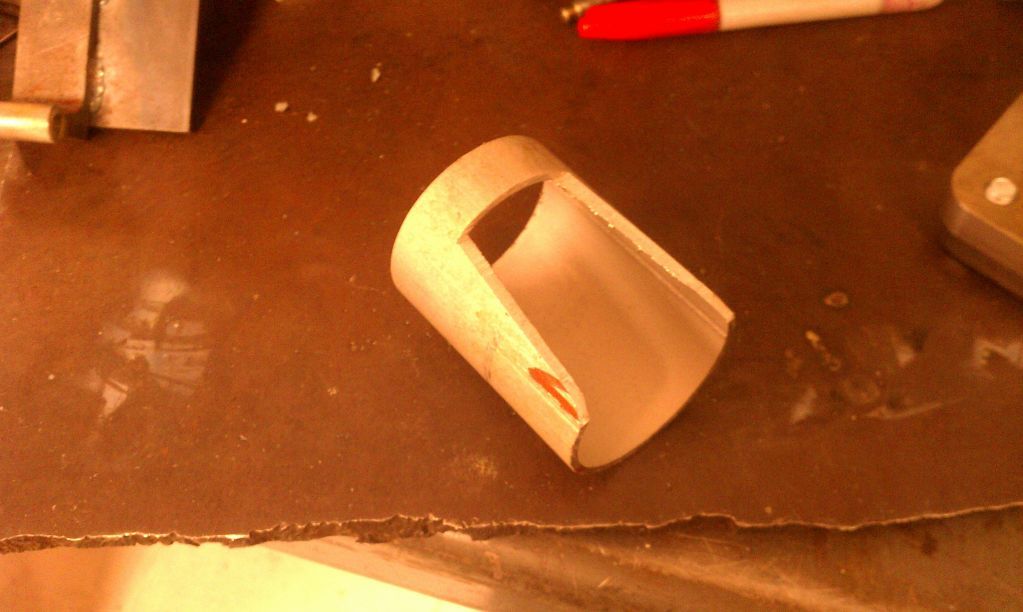
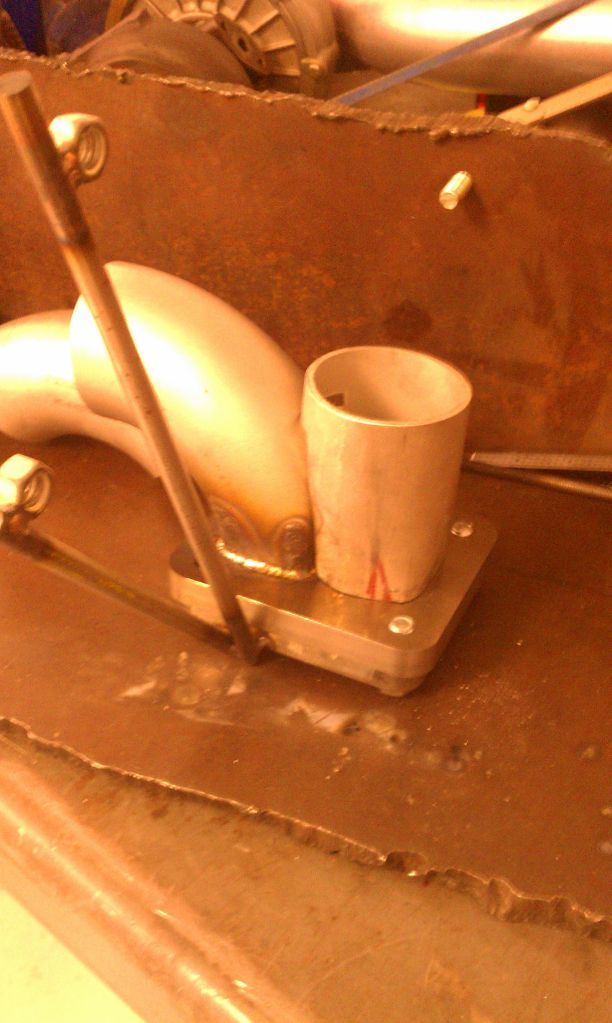
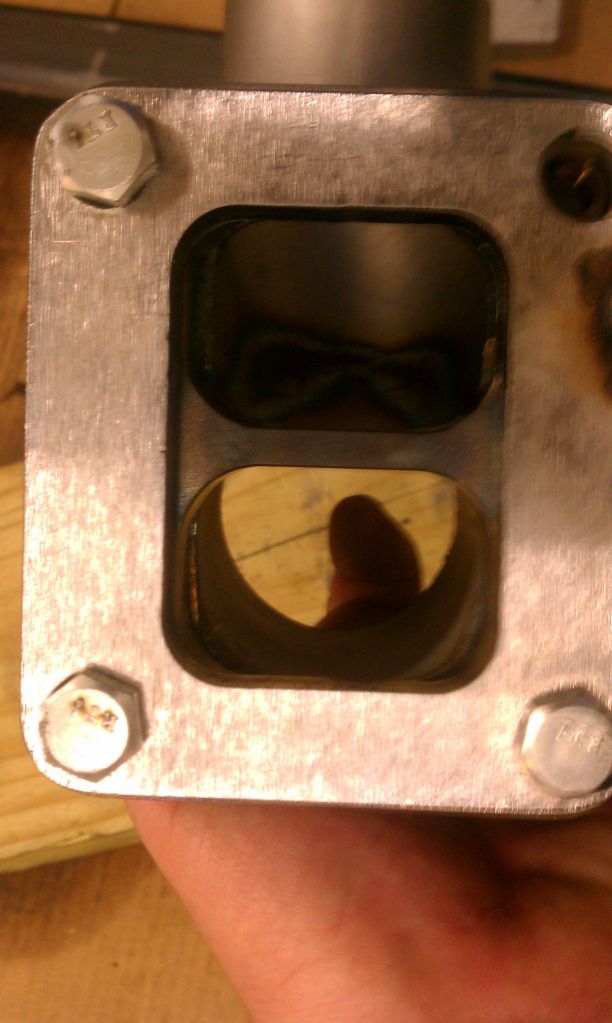
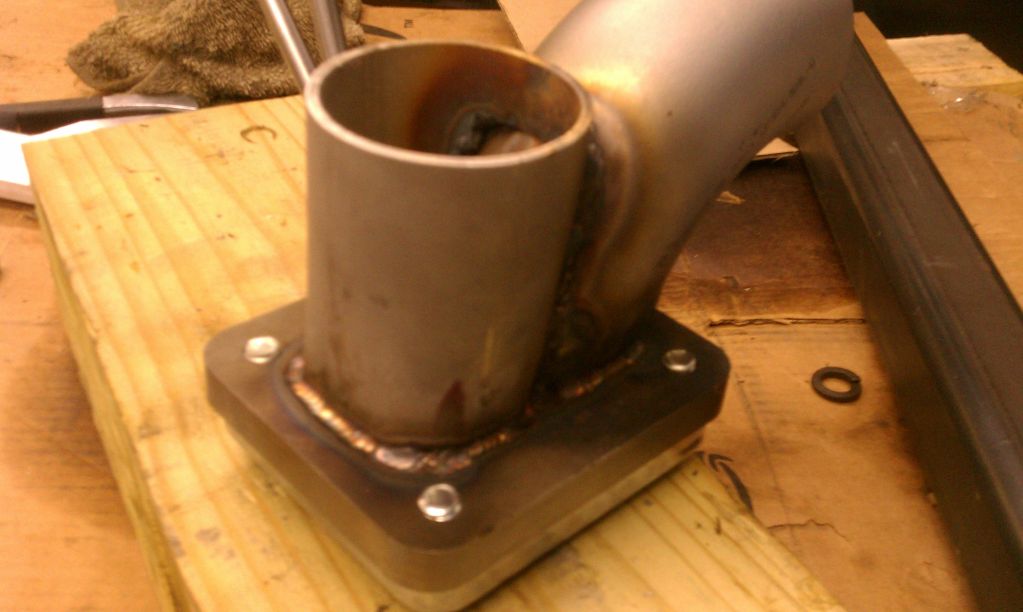
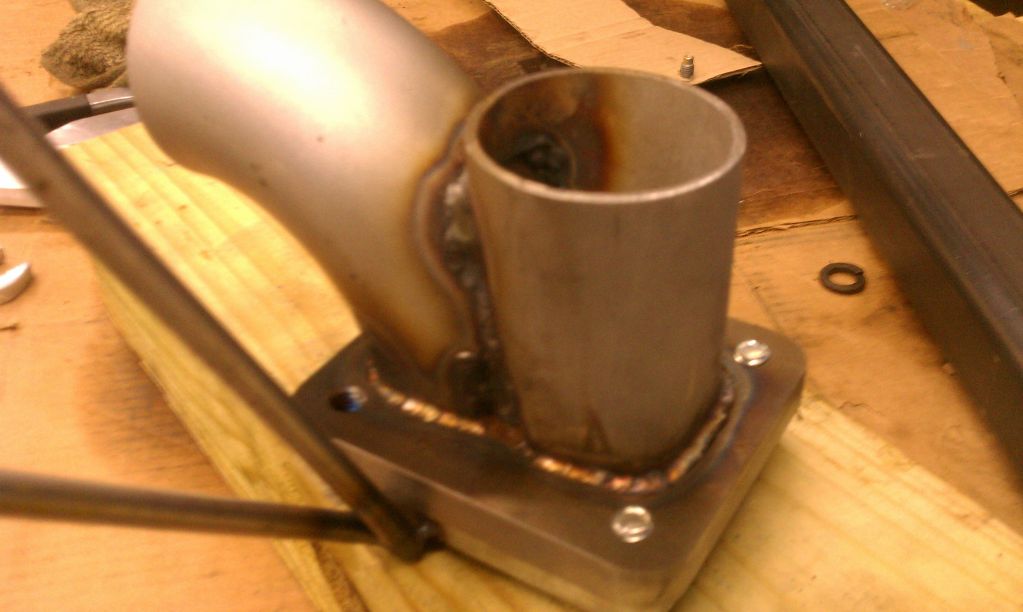
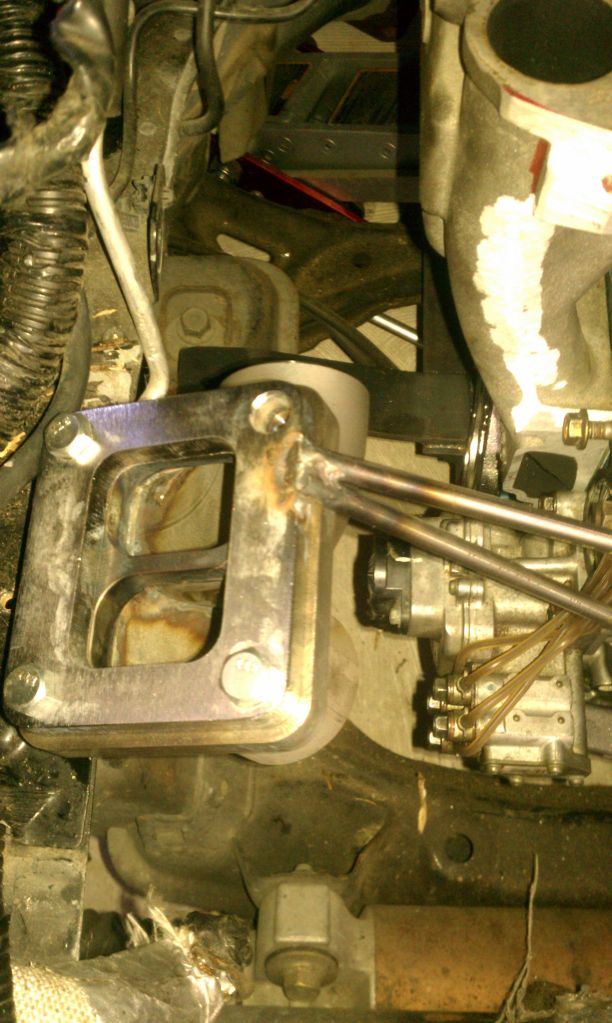
Worked on the Elbow transition for the rear manifold runner into the T4 Flange. four cuts, a vise, a hammer and some massaging made for a pretty nice transition...my heat was too high when I first started welding on it so the welds are dark but by the time I was attaching the elbow to the flange it got better. On the inside it is a very nice, smooth transition. Now I just have to lightly grind the inside where the elbow meets the flange to remove the slight overlap. Will work on the other side later today.
Cheers.
Chris
Cheers.
Chris
Thread Starter
Rotary Enthusiast
Joined: Oct 2007
Posts: 799
Likes: 3
From: Plymouth, MN
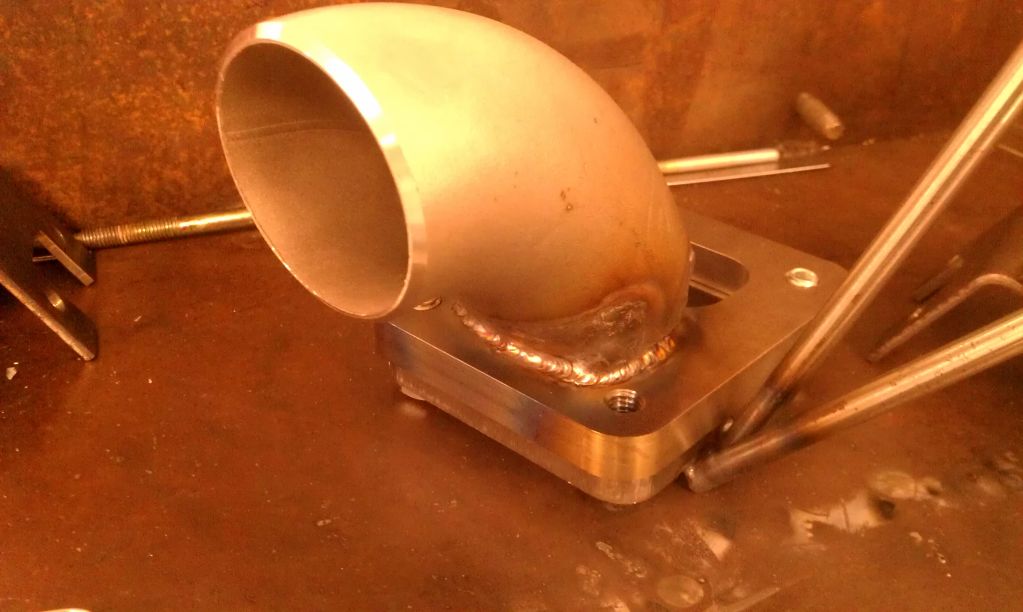
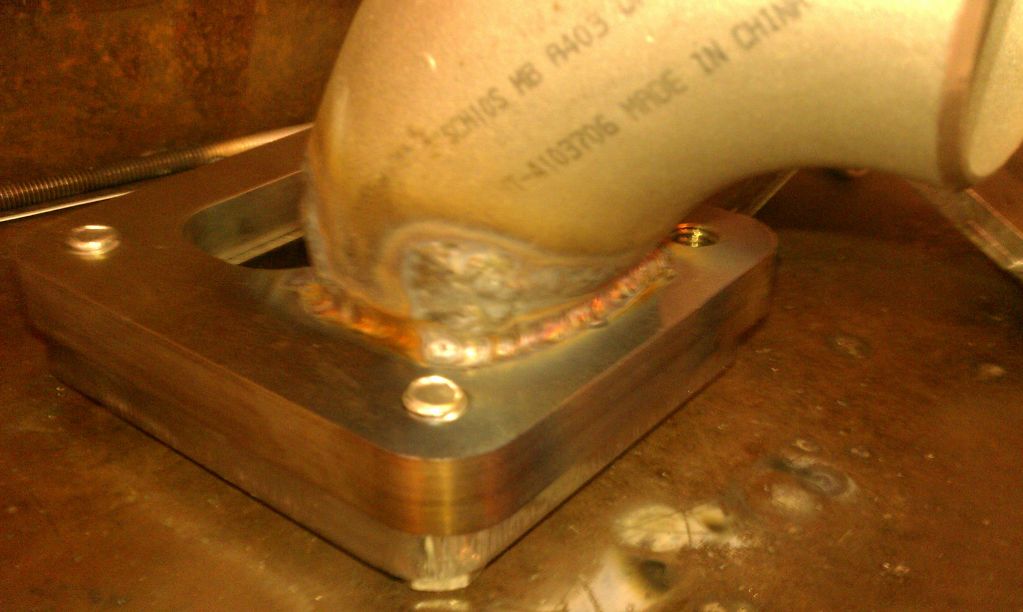
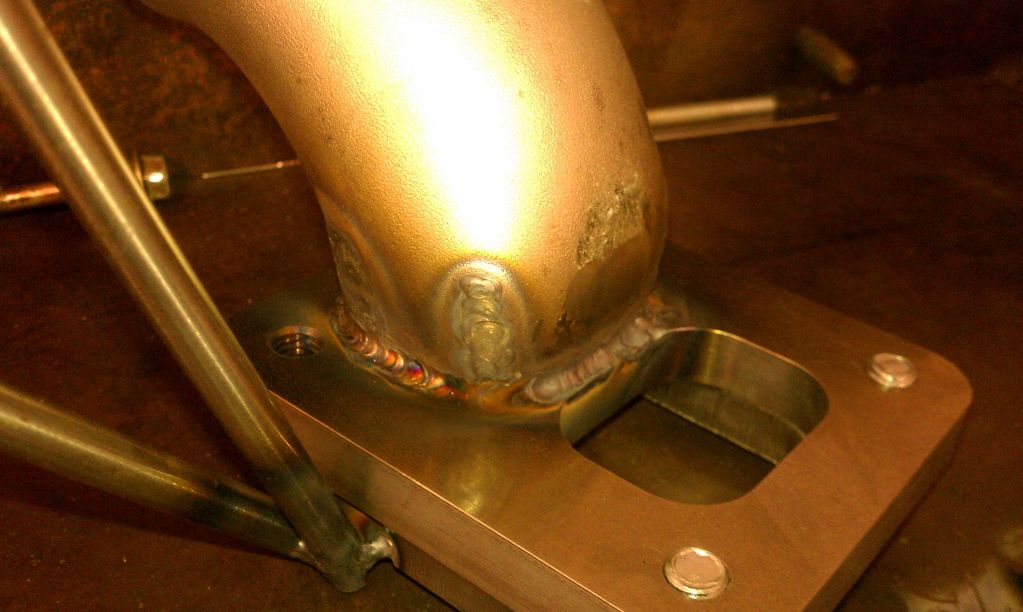
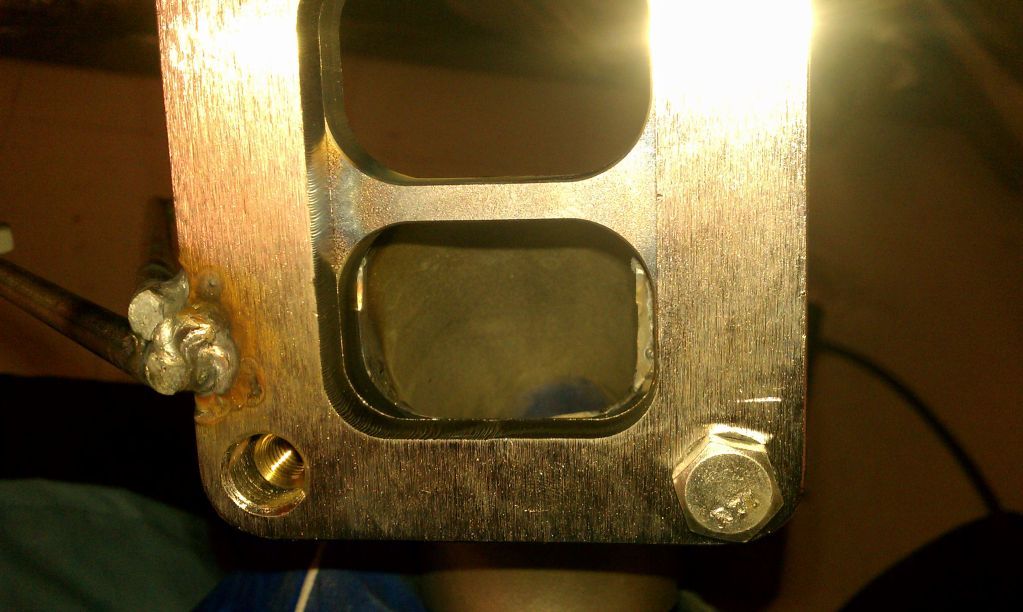
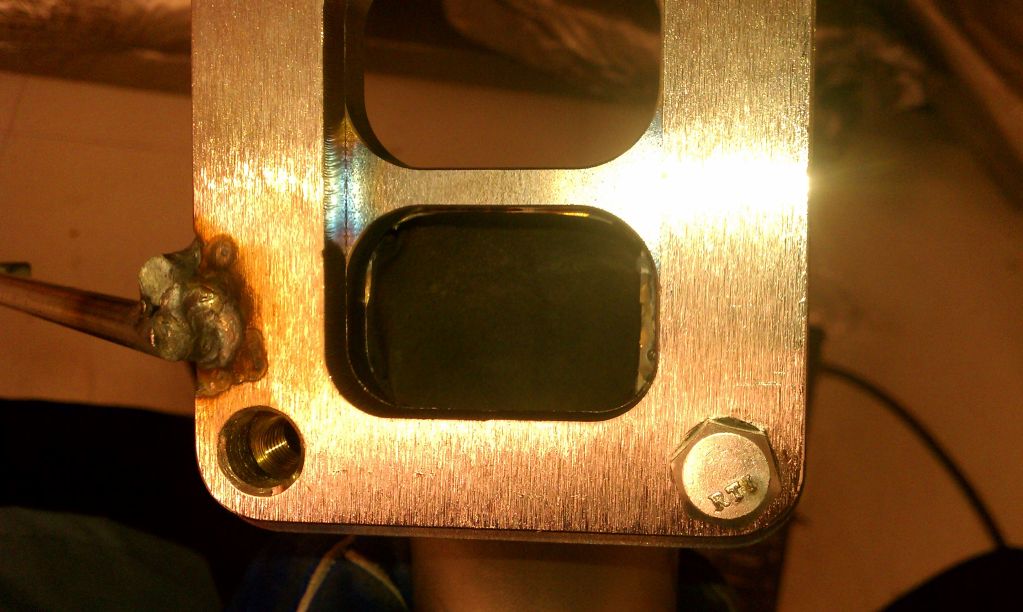
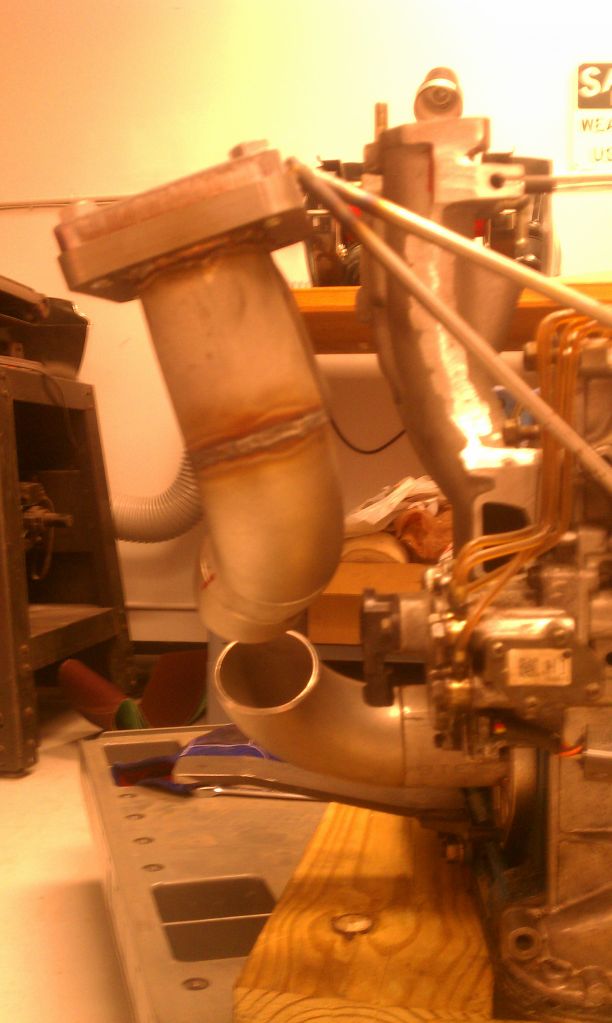
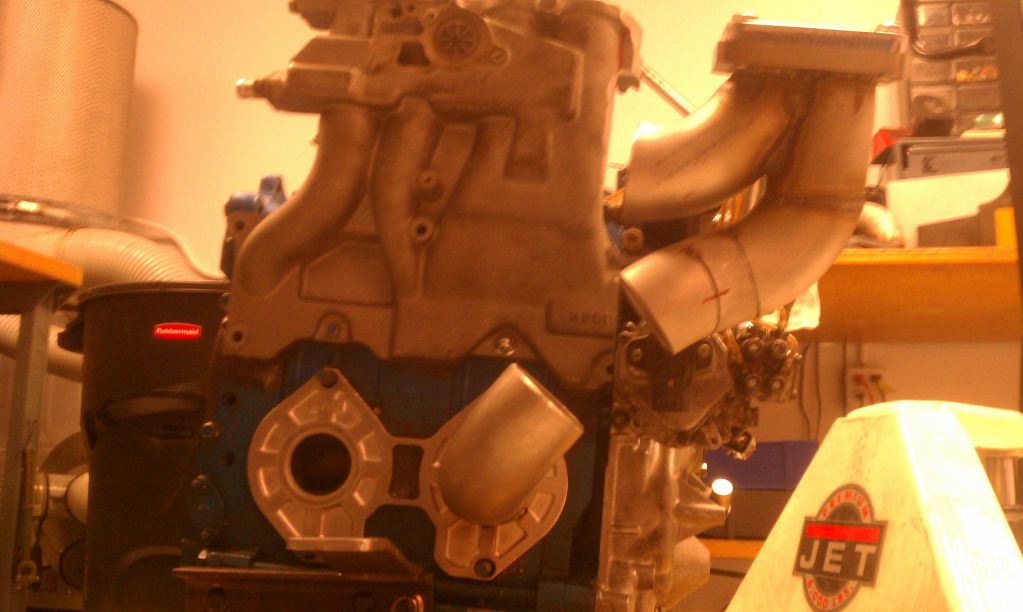
Finished the other side. Tried a different approach at a divided flange setup and it came out really good...you cant clearly see it in the pictures but the transition is perfect...just need to clean up the interior where it meets the Flange a bit to make sure there are no edges but that's it.
Chris
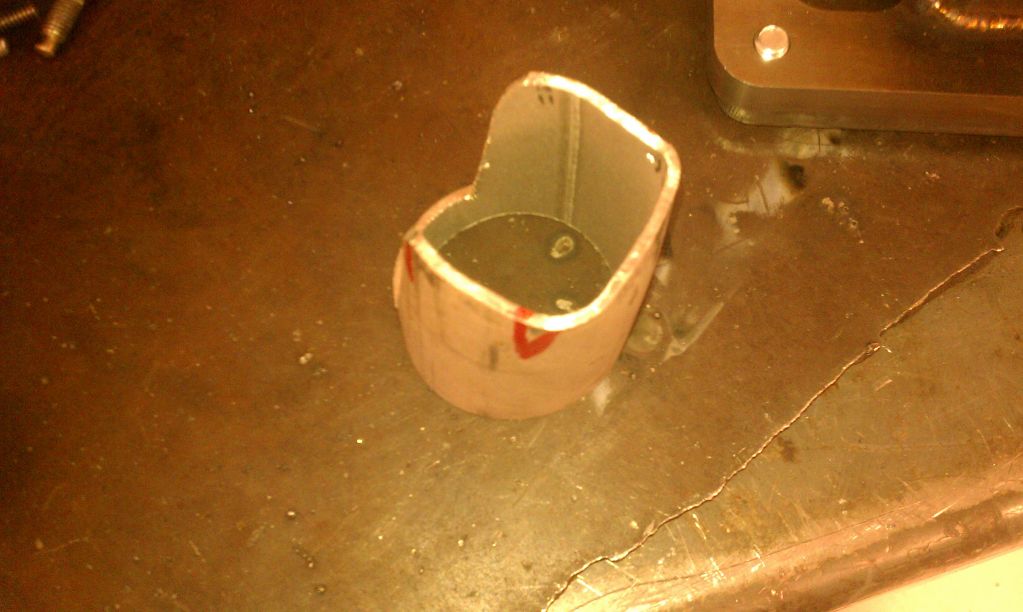

Chris


Thread Starter
Rotary Enthusiast
Joined: Oct 2007
Posts: 799
Likes: 3
From: Plymouth, MN
Chris
