Project OldTree: The 12 Days of Rotormas
 04-16-11, 03:51 AM
#101

Coming along nice man. Just a shame you have to drive the boat around lol.
One you get it done, you got to post a youtube video of it to share with everyone.
It would be bad ***
One you get it done, you got to post a youtube video of it to share with everyone.
It would be bad ***
 04-29-11, 03:02 AM
#102
Out of necessity, I've pulled the battery cables out of the car and cleaned them up. What brought this on was that I wanted to remove the only possible short in the electrical system: the old Alternator output cable
Anyone that's done this known how much of a PITA it is to de-loom them from the CAS cable & AT wiring. Totally wasn't fun pulling off electrical tape that's been baked in place since 1986.
While in the midst of it, I found a disturbing shortcut that Mazda took, something that anyone with basic electrical knowledge knows that you just don't do. The main line from the battery to the main fuse is a ring terminal and 6awg wire, with the alternator wire merging into it. That's fine and all, but under the layers of old electrical tape, what worries me is that it was STAPLED TOGETHER No wonder S4's have charging issues...
Since I'd already upgraded to a Taurus Alt and had a 4awg output cable, I snipped the old one off and bandaged the wound in fresh black tape with a band of red tape to ID it. Once it's light out, the freshly repaired battery cables are going back in, plus a secret mod for a downright clever underhood solution. Pics shall be uploaded as well
Okay, with foreplay done now, it's time to announce the next project after the 20b is running. As every FC owner knows, the harnesses in our cars can break just by looking at them, and trying to find connectors can be a real bitch too. So once the 20b is up and running, the next item on the agenda is...
THE CONNECTOR PROJECT
The goal is to identify each connector on the car and locate the original manufacturer and list part numbers (for the housings, pins and seals) so we can order them.
Most of all, I'd like to dedicate The Connector Project to our departed administrator Icemark. If it weren't for him, we wouldn't have a lot of the electrical info we do. Feels right to add to his legacy by giving back to the community's electrical needs.
For such a monumental project, I'd greatly appreciate the thread being stickied. In addition to this, I'd like to request some assistance from the community's more respected members and mods/admins in order to make the task more manageable by breaking the car's wiring down into the individual harnesses. Fortunately, Mazda decided to give a name to each connector pair to uniquely identify them. For example, FEM-01 and FEM-02 are where the Front Harness meets the Emission Harness.
And to anyone doing a build on their car, pictures of connectors would be immensely appreciated. Details and pic requests will follow in the thread.
Anyone that's done this known how much of a PITA it is to de-loom them from the CAS cable & AT wiring. Totally wasn't fun pulling off electrical tape that's been baked in place since 1986.
While in the midst of it, I found a disturbing shortcut that Mazda took, something that anyone with basic electrical knowledge knows that you just don't do. The main line from the battery to the main fuse is a ring terminal and 6awg wire, with the alternator wire merging into it. That's fine and all, but under the layers of old electrical tape, what worries me is that it was STAPLED TOGETHER
No wonder S4's have charging issues...Since I'd already upgraded to a Taurus Alt and had a 4awg output cable, I snipped the old one off and bandaged the wound in fresh black tape with a band of red tape to ID it. Once it's light out, the freshly repaired battery cables are going back in, plus a secret mod for a downright clever underhood solution. Pics shall be uploaded as well
Okay, with foreplay done now, it's time to announce the next project after the 20b is running. As every FC owner knows, the harnesses in our cars can break just by looking at them, and trying to find connectors can be a real bitch too. So once the 20b is up and running, the next item on the agenda is...
THE CONNECTOR PROJECT
The goal is to identify each connector on the car and locate the original manufacturer and list part numbers (for the housings, pins and seals) so we can order them.
Most of all, I'd like to dedicate The Connector Project to our departed administrator Icemark. If it weren't for him, we wouldn't have a lot of the electrical info we do. Feels right to add to his legacy by giving back to the community's electrical needs.
For such a monumental project, I'd greatly appreciate the thread being stickied. In addition to this, I'd like to request some assistance from the community's more respected members and mods/admins in order to make the task more manageable by breaking the car's wiring down into the individual harnesses. Fortunately, Mazda decided to give a name to each connector pair to uniquely identify them. For example, FEM-01 and FEM-02 are where the Front Harness meets the Emission Harness.
And to anyone doing a build on their car, pictures of connectors would be immensely appreciated. Details and pic requests will follow in the thread.
04-29-11, 06:59 PM
#103
Well the LS2 Truck Coils are now mounted under the UIM (insert grumbles here). Took a bit of daily reworking to get everything to play right together, especially around the middle rotor's coils
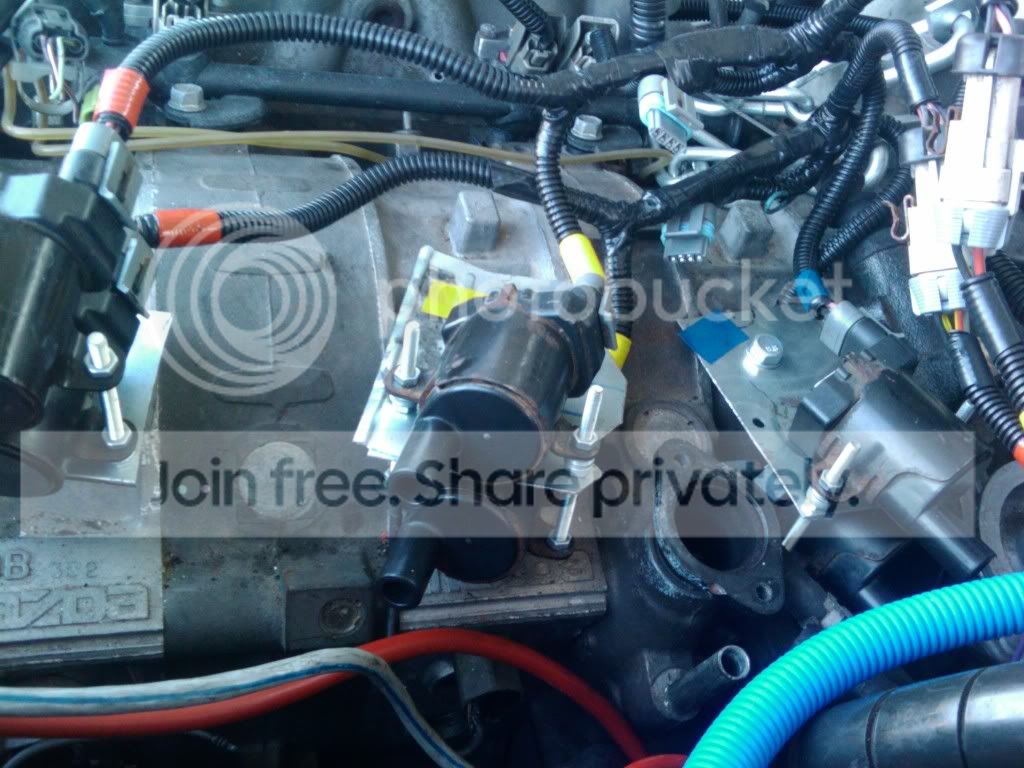
Get them too high up like the front rotor and it won't clear the throttle body. Too low and/or too far forward makes the upper coil hit the Oil Filler tube. Too far back and the connector won't go on. Was a real bitch to get right
Now here's the bit of brilliance I was toying with
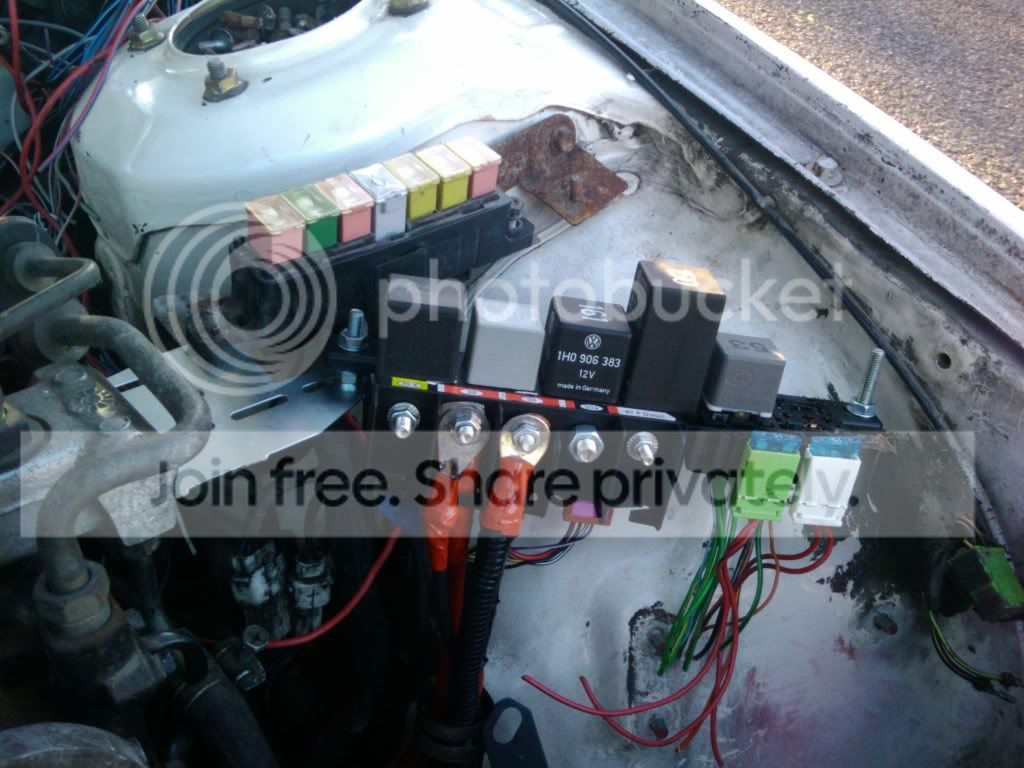
It's a Jetta/Golf MKIV Relay Panel, which will control the Taurus fan, Turbo Control System and still have a couple extra spots open. And to add insult to injury, it's now the underhood electrical distribution and jumpstart point for everything. They can be had on ebay for about $30, but I wasn't pleased with JUST that alone. So last week, me and 4 other guys all crammed into a civic to hit the boneyards in columbus and I pulled the aforementioned main panel, plus the 13-fold modular sub-panel, 3-fold underhood relay panel, and all the clip-on fuse brackets.
Volkswagen was really clever when designing the Jetta/Golf's relay panels. Every single one is a bosch-type relay, mounted on a socket with 9 pins and they can be moved around in the sub-panels however you want. Everything's modular and readily available from any VW parts place. The only possible hangup is that there's only one spot for a relay with 3/8" power pins in each of the sub-panels.
Total cost: $15 for all 3 panels, the relay sockets and 3 clip-on ATC blade fuse sockets.
Early on, I got an intake kit for a FD by shipping mixup. But it was a fortunate one as I ended up buying it from the person it was intended for And thanks to me being lazy and not cutting the extra off the upper relay bracket, I figured what the hell and set one of the supplied pipes on the bracket between the fuse panel and P/S pump. By sheer dumb luck, it cleared the hood and everything.
Today has been EPIC WIN
Get them too high up like the front rotor and it won't clear the throttle body. Too low and/or too far forward makes the upper coil hit the Oil Filler tube. Too far back and the connector won't go on. Was a real bitch to get right
Now here's the bit of brilliance I was toying with
It's a Jetta/Golf MKIV Relay Panel, which will control the Taurus fan, Turbo Control System and still have a couple extra spots open. And to add insult to injury, it's now the underhood electrical distribution and jumpstart point for everything. They can be had on ebay for about $30, but I wasn't pleased with JUST that alone. So last week, me and 4 other guys all crammed into a civic to hit the boneyards in columbus and I pulled the aforementioned main panel, plus the 13-fold modular sub-panel, 3-fold underhood relay panel, and all the clip-on fuse brackets.
Volkswagen was really clever when designing the Jetta/Golf's relay panels. Every single one is a bosch-type relay, mounted on a socket with 9 pins and they can be moved around in the sub-panels however you want. Everything's modular and readily available from any VW parts place. The only possible hangup is that there's only one spot for a relay with 3/8" power pins in each of the sub-panels.
Total cost: $15 for all 3 panels, the relay sockets and 3 clip-on ATC blade fuse sockets.
Early on, I got an intake kit for a FD by shipping mixup. But it was a fortunate one as I ended up buying it from the person it was intended for And thanks to me being lazy and not cutting the extra off the upper relay bracket, I figured what the hell and set one of the supplied pipes on the bracket between the fuse panel and P/S pump. By sheer dumb luck, it cleared the hood and everything.
Today has been EPIC WIN
Last edited by Akagis_white_comet; 08-20-12 at 06:06 PM. Reason: pics moved
04-29-11, 11:10 PM
#105
Moderator
iTrader: (3)
Join Date: Mar 2001
Location: https://www2.mazda.com/en/100th/
Posts: 30,832
Received 2,603 Likes
on
1,847 Posts
04-30-11, 10:42 PM
#107
Moderator
iTrader: (3)
Join Date: Mar 2001
Location: https://www2.mazda.com/en/100th/
Posts: 30,832
Received 2,603 Likes
on
1,847 Posts
05-10-11, 02:11 PM
#108
Wiring is 90% done now, all that remains is to wire up the injectors and TPS, and Tee-in the AVI inputs to the Oil Pressure Sender and A/C Relay (using a 12v to 5V reduction diode) and finish wiring up the OMP.
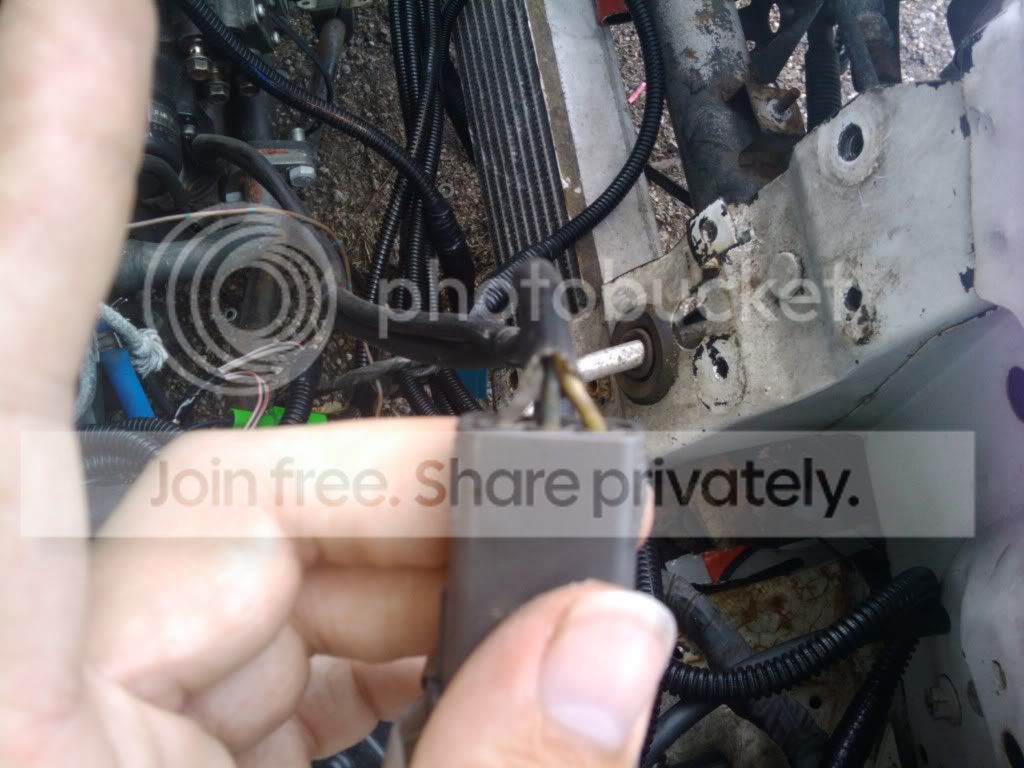
On a very cool note, anyone doing a 20b conversion on a FC is in luck. By tracing back the CAS cable, you'll find connector FE-04. Undo it there, and snip the shielding where it meets a Black/Red wire and remove the cable. You'll see this...

It has the same connector on both ends. So tag the CAS end, cut the cable in half and wire to the CAS wiring on the haltech. Use the remaining pigtail to drive the tachometer from the stock Trailing Coil connector (F-35)
I've run into a CRITICAL snag though: the Cosmo OMP has 9 Wires instead of 7. The diagrams I've found only account for 7 wires, not 9.
6-pin connector. When looking into the connector with the locking tab up, wires are Blue, Red, White on top row, Black, Red/White and Yellow on bottom row

3-pin connector. In same orientation as the 6-pin, wires are Black, Blue and Yellow
To anyone that has retained the stock Cosmo Please help...
On a very cool note, anyone doing a 20b conversion on a FC is in luck. By tracing back the CAS cable, you'll find connector FE-04. Undo it there, and snip the shielding where it meets a Black/Red wire and remove the cable. You'll see this...
It has the same connector on both ends. So tag the CAS end, cut the cable in half and wire to the CAS wiring on the haltech. Use the remaining pigtail to drive the tachometer from the stock Trailing Coil connector (F-35)
I've run into a CRITICAL snag though: the Cosmo OMP has 9 Wires instead of 7. The diagrams I've found only account for 7 wires, not 9.
6-pin connector. When looking into the connector with the locking tab up, wires are Blue, Red, White on top row, Black, Red/White and Yellow on bottom row
3-pin connector. In same orientation as the 6-pin, wires are Black, Blue and Yellow
To anyone that has retained the stock Cosmo Please help...
Last edited by Akagis_white_comet; 08-20-12 at 06:09 PM. Reason: Pics moved to 20B album
05-10-11, 05:05 PM
#109
Edit for last post:
NEVERMIND, I'm a dumbass and had the OMP diagram from KR2D all along
All that's left in wiring is to crimp on the injector & TPS wires to a subharness connector, then connect the oil pressure sender & a/c relay to AVIs and hook up the fuel pump. Tomorrow's set for the first boot-up in the car
And after that, it's all wrench work!!! This week's gonna be busy with finishing the oil cooler lines in AN10, finally putting the radiator in place and starting to fabricate the downpipe.
05-18-11, 03:26 PM
#110
One more snag along the way with the A/C condenser & Power Steering Lines. What purpose does this loop serve in the Power Steering system?? As far as I can tell, it goes from the P/S pump through the loop and then to the rack.
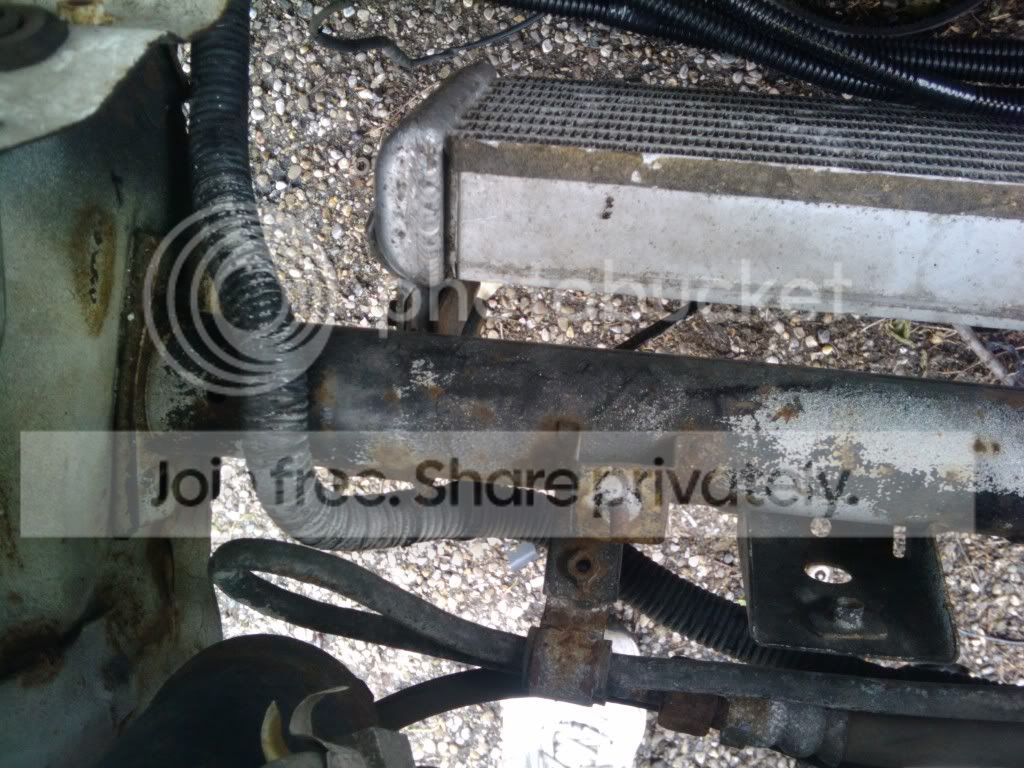
Lines are marked with a black zip-tie in this picture
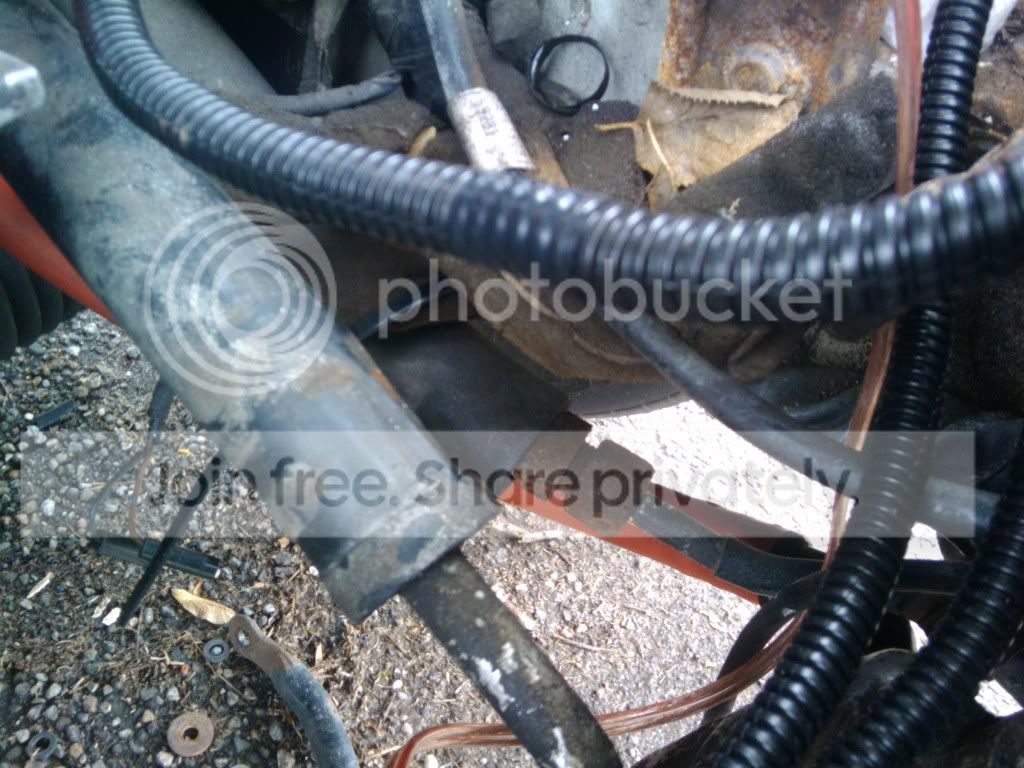
EDIT: Just found the answer thanks to Aaron Cake and this thread: https://www.rx7club.com/showthread.p...ring+line+loop
The loop in the Power Steering Line is to cool the fluid.
This pic of the A/C Condenser is oriented the same as it would be on the car. Driver's side (on right) is M18x1.5 (goes to compressor), Passenger side is smaller than M18x1.5 but larger than M14x1.5 (goes to drier). As I don't have a M16x1.5 thread adapter to check yet, could anyone with a clue please chime in?

Now onto the bigger fish. The Cosmo downpipe fits like a glove in the allotted space, but no one makes a flange for it to bolt up to the rest of the exhaust. Racing Beat has similar flanges for the FD, but the stud holes are too close together to fit. So I've sent off for a few quotes to have them laser cut.
In addition to this, if anyone has rebuilt their 20b recently, I'd like to ask a favor of you. I'm looking for the following gaskets, included with every rebuild kit and unused in single turbo and N/A 20B rebuilds
Manifold to Turbos' Gaskets (NF01-13-7100 and NF02-13-7100)
Turbos to Downpipe Gasket (NF01-13-491A)
Downpipe to Precat Gasket (NF01-40-3050)
If you have these, hook me up with a good price. I'll be most grateful.
Lines are marked with a black zip-tie in this picture
EDIT: Just found the answer thanks to Aaron Cake and this thread: https://www.rx7club.com/showthread.p...ring+line+loop
The loop in the Power Steering Line is to cool the fluid.
This pic of the A/C Condenser is oriented the same as it would be on the car. Driver's side (on right) is M18x1.5 (goes to compressor), Passenger side is smaller than M18x1.5 but larger than M14x1.5 (goes to drier). As I don't have a M16x1.5 thread adapter to check yet, could anyone with a clue please chime in?
Now onto the bigger fish. The Cosmo downpipe fits like a glove in the allotted space, but no one makes a flange for it to bolt up to the rest of the exhaust. Racing Beat has similar flanges for the FD, but the stud holes are too close together to fit. So I've sent off for a few quotes to have them laser cut.
In addition to this, if anyone has rebuilt their 20b recently, I'd like to ask a favor of you. I'm looking for the following gaskets, included with every rebuild kit and unused in single turbo and N/A 20B rebuilds
Manifold to Turbos' Gaskets (NF01-13-7100 and NF02-13-7100)
Turbos to Downpipe Gasket (NF01-13-491A)
Downpipe to Precat Gasket (NF01-40-3050)
If you have these, hook me up with a good price. I'll be most grateful.
Last edited by Akagis_white_comet; 08-20-12 at 06:12 PM. Reason: P/S answer found courtesy of Aaron Cake. Thanks Aaron!!!
05-19-11, 07:05 PM
#111
Moderator
iTrader: (3)
Join Date: Mar 2001
Location: https://www2.mazda.com/en/100th/
Posts: 30,832
Received 2,603 Likes
on
1,847 Posts
Now onto the bigger fish. The Cosmo downpipe fits like a glove in the allotted space, but no one makes a flange for it to bolt up to the rest of the exhaust. Racing Beat has similar flanges for the FD, but the stud holes are too close together to fit. So I've sent off for a few quotes to have them laser cut.
In addition to this, if anyone has rebuilt their 20b recently, I'd like to ask a favor of you. I'm looking for the following gaskets, included with every rebuild kit and unused in single turbo and N/A 20B rebuilds
Manifold to Turbos' Gaskets (NF01-13-7100 and NF02-13-7100)
Turbos to Downpipe Gasket (NF01-13-491A)
Downpipe to Precat Gasket (NF01-40-3050)
If you have these, hook me up with a good price. I'll be most grateful.
for the gaskets, just call mazda comp, its the cheapest/easiest way. they rules keep changing, but generally if you call and ask for a part that is NOT stock for a US production car, they can sell to you.
05-19-11, 08:26 PM
#112
Thanks for the input j9fd3s, but I've already tried dealing with Mazdaspeed once about the primary injector seals. Logan at Defined Autoworks just broke apart a 20b recently and is gonna hook me up on all the exhaust gaskets as soon as he finds them again. He's also gonna see what can be done about the flange too.
So with those attended to for the time being, my attention is on finding thread pitches for the A/C lines and Condenser in order to move the compressor forward to be re-mounted on the accessory bracket. It appears to be a metric fitting where the discharge hose meets the firewall hardline. A 22mm flare wrench fits on the firewall side of it, but the discharge hose side is much larger.
If anyone has information on the A/C system's thread pitches. please post a reply to "The Master List of FC Fluid Connection Thread Pitches (Sticky Please)" https://www.rx7club.com/showthread.p...=a%2Fc+fitting
05-20-11, 08:55 PM
#113
Two small updates. First off, the A/C compressor & drier are now out of the car, lines are rubber-banded off with plastic bags and awaiting relocation to behind the passenger side headlight. Turns out nearly every single fitting on the A/C system uses a 19mm flare wrench. Only exception aside from the monster 36mm one near the brake booster is the passenger side strut tower fitting, 19mm and 22mm. Too bad my HF set has them on the same wrench...
With those out of the way, and after pulling out the A/C subharness along with the relays (for relocation later), I've discovered that once the plastic ducting is out, there is a TON of space in front of the round reinforcement bar left un-utilized thanks to the horn mounts blocking it. So they met their end by hacksaw. With some more old computer case bits, some new temporary radiator brackets were fabbed up for the new reverse V-mount setup.

Taking a cue from Logan's setup on Chris W.'s GTUS, the radiator and condenser will be mounted together on a subframe made out of 1/8" angle iron. If the weather cooperates tomorrow, it'll be time to call up my buddy Todd, break out the arc welder and fab together the final version to house the radiator, A/C condenser and intercooler. Still haven't decided where to put the intercooler tho, pluses and minuses to each location. The main goal is to maximize airflow to the the radiator, so front-mounting the intercooler is a last resort.
For a typical V-mount setup, it has nice short pipes, but heatsoaks like crazy. Maybe since I'm doing everything backwards, the intercooler can go at the bottom in front of the oil cooler and ducted with it. Plumbing would be like a FMIC, but it'll have a steady stream of nice, chilly air at any given time without blocking the radiator...
RE-Amemiya didn't think of this??????
With those out of the way, and after pulling out the A/C subharness along with the relays (for relocation later), I've discovered that once the plastic ducting is out, there is a TON of space in front of the round reinforcement bar left un-utilized thanks to the horn mounts blocking it. So they met their end by hacksaw. With some more old computer case bits, some new temporary radiator brackets were fabbed up for the new reverse V-mount setup.
Taking a cue from Logan's setup on Chris W.'s GTUS, the radiator and condenser will be mounted together on a subframe made out of 1/8" angle iron. If the weather cooperates tomorrow, it'll be time to call up my buddy Todd, break out the arc welder and fab together the final version to house the radiator, A/C condenser and intercooler. Still haven't decided where to put the intercooler tho, pluses and minuses to each location. The main goal is to maximize airflow to the the radiator, so front-mounting the intercooler is a last resort.
For a typical V-mount setup, it has nice short pipes, but heatsoaks like crazy. Maybe since I'm doing everything backwards, the intercooler can go at the bottom in front of the oil cooler and ducted with it. Plumbing would be like a FMIC, but it'll have a steady stream of nice, chilly air at any given time without blocking the radiator...
RE-Amemiya didn't think of this??????
Last edited by Akagis_white_comet; 08-20-12 at 06:14 PM. Reason: pic moved
05-30-11, 08:57 PM
#114
:shocking: HELP!!! Save my 20B FC!!!! :shocking:
The City of Lancaster says that any car sitting for 72 hours, without plates, extensively damaged or otherwise not street legal is a nuisance junk car, even if parked on private property. They have declared my prized FC such as of the 28th. Now I need to move it by the June 7th or face it getting impounded by the police and "disposed of".
Translation: They want to CRUSH my FC!!!:shoc king:
Lynn Hanover on nopistons has graciously offered me space at his shop to finish the project, but I'll be broke till the 11th.
I've figured that it'll be about $150 to get my car up to his shop.
If ANYONE can spare some money to help me save my car, I will be most appreciative, credit will be given and special thanks will be mentioned when I start her up for the first time on camera. If anyone in the Columbus area has a truck and trailer and can help out, that would be even better
paypal is cd9asherwood@yahoo.com
thank you,
Travis Sherwood
Translation: They want to CRUSH my FC!!!
:shoc king:Lynn Hanover on nopistons has graciously offered me space at his shop to finish the project, but I'll be broke till the 11th.
I've figured that it'll be about $150 to get my car up to his shop.
If ANYONE can spare some money to help me save my car, I will be most appreciative, credit will be given and special thanks will be mentioned when I start her up for the first time on camera. If anyone in the Columbus area has a truck and trailer and can help out, that would be even better
paypal is cd9asherwood@yahoo.com
thank you,
Travis Sherwood
Last edited by Akagis_white_comet; 05-30-11 at 09:10 PM. Reason: added paypal addy for donations/loans to save my car
05-30-11, 09:51 PM
#115
If anyone could help him out it would be awesome, me and him have been friends for a few years. And he has it tough a lot of the time. He will call me whenever he makes an advancement with his FC and he is always excited and proud of his car. I would hate to see it be crushed. So if anyone can please help him out. God knows i'm trying to
05-31-11, 07:19 PM
#116
Wow, I never expected such a fast response to a plea for help in my hour of need. Here is what has happened since I asked for help last night:
Howru @ RCC donated $30 to the cause
lt1_fd3s @ RCC has offered to donate some money on payday as well. To return the gesture, I'm giving him a hand finding some FC parts for his friend. He's looking for brakes now and a couple other things later on. Most likely 4-piston brakes.
afpreppie04 has suggested his friend whom loves rotaries
Zarider is considering an adjustment to the deal we inked out for my old AT driveshaft. It was originally going to be $25 plus shipping ($20), but I'd just give it to him and pay for the shipping myself in return for lending a hand. Doesn't really matter if I make any money on the deal, as long as I can help someone out for helping me out. It's kind of the whole point of a car forum anyway.
Moldypoo has been spreading the word as well. In doing so, he came across someone who lives here in town and has seen me working on the car. That person's grandparents just died and they apparently had quite a bit of garage space.
Anyway, Lynn Hanover has suggested a better option than what I had in mind. If I pay for the tags for his trailer and help load/unload the car, he'll tow the car for free. Since this is better than AAA, the plan is to do this since it'll help out another rotorhead whom has been nothing but generous and helpful to anyone in the community that asks.
06-01-11, 07:46 PM
#117
So far, I've received $100 in financing to save my 20b
Zarider has spotted me $70, minus $2.91 for the paypal fee. Not an issue, but next time it'd probably be better if you mark it as a gift instead. I'll still be repaying you the full amount tho. Will be getting your driveshaft sent out as soon as the FedEx store opens tomorrow morning at 7:30am
Howru @ RCC contributed $30 to the cause.
All that's needed now is the cost of tags for Lynn's trailer and we're set. Once it's safely in his shop, the build will resume with the first order of business being a V-mount radiator setup.
You guys RAWK!!!
06-01-11, 09:40 PM
#118
EDIT TO PREVIOUS MESSAGE:
Just as I hit Post Reply, Beefhole contributed $13 to the relief fund
Total now is $113
As an added thank you, I am offering VIN Reports to everyone who has contributed to my build. These include all the options the car originally came with, trim level, paint and interior trim codes, seat code and so on. And with each report comes 5 part numbers of your choice. So if you want part numbers for Infini IV seats, a Spirit R steering wheel, the JC Cosmo's Car Control System or some other part that was exclusive to Japan, let me know and I'll find it. I have parts catalogs for every rotary vehicle made since 1983 for Japan, every USA-spec rotary since 1977, the R100, RX-2, RX-3, REPU and Cosmo 110S.
VIN reports are only available back to 1977 for USA-spec cars and 1983 for Japan-Spec cars.
06-06-11, 10:35 PM
#119
The car is safely in the shop now, saved from the douchebags at the city of lamecaster code enforcement. Took $60 to do in the end, and I owe it all to the generous folks whom offered their hard-earned cash to help me. Now that is out of the way, the show must go on. First order of business is a proper V-mount radiator/AC condenser/oil cooler/intercooler setup.
I'd like to mention that Lynn is selling his track FD. It's a full tube chassis car, 12a peripheral port with MSD ignition putting out 250hp@9200rpm and only weighing 1700lbs. Asking 10k for it. For more details, PM him on RCC
I'd like to mention that Lynn is selling his track FD. It's a full tube chassis car, 12a peripheral port with MSD ignition putting out 250hp@9200rpm and only weighing 1700lbs. Asking 10k for it. For more details, PM him on RCC
06-13-11, 05:15 AM
#120
Greetings all,
I know the last few updates have been VERY lackluster and boring. Now that the car is safely at the shop, things will get much more interesting.
A note to everyone who pitched in to save my car from the city: I know I said the 11th was when I got paid, this is true. The only issue was that the bank was closed before the mail arrived with my paycheck. As soon as they open in a few hours, I'll be heading there and repaying everyone, with my most heartfelt gratitude and thanks.
Okay, now to fun stuff. The car is getting a proper V-mount double pass radiator, either an Afco, Griffin or JEGS brand one. I've done some homework on it and haven't come to any conclusions yet on which brand is better or what size to get. So for the time being, i'm aiming to match the stock size (19"h x 26"w) and go thicker. If anyone has gone to a shorter radiator, please let me know with the dimensions/brand/part numbers as it'd make it that much easier to wiggle everything together.
 06-13-11, 10:39 AM
#122
Just paid everyone back who donated money to save my car, Paypal notices should be arriving today. And Beefhole, I considered it a loan from the very start. But if you're feeling generous, lemme know and I'll find something useful you could get me
 07-10-11, 08:06 PM
#125
In the search for the ultimate solution to keeping a 20B nice and chilly, the quest has been fraught with roadblock after roadblock, setback after setback, especially with the issue of a fan.
So this morning I googled about the Taurus fan and it led me to the Volvo 940's fan controller here: https://www.rx7club.com/2nd-generation-specific-1986-1992-17/ford-taurus-2-speed-fan-wiring-827375/
Since I've never seen a 940 in the junkyard, I copied the schematic (thanks Clokker) and beefed it up in the way Mazda would have done, and added a couple of my own touches to perfect it
The biggest bitch of all was squeezing it into the VW relay panel, the reason being is that the coils' pins are tied together in pairs inside the panel. #1 and #2 have pin 85 together, #2 and #3 have pin 86 and #3 and #4 have pin 85's together. Instead of cracking the panel open, trying to cut/rewire it internally and risk ruining it, what I did was get creative. Pretty sure I've outdone myself with this...

4 relays control the fan, one for Low speed, the other 3 being Hi-speed changeover (at a preset temperature like stock), A/C changeover (switches to hi-speed, the way Mazda would have done it). Both Low and High Speed have manual override switches, as do the turbos for Non-Sequential operation, with each switch being a normal SPST on the ground side of their individual circuits.
Because of VW tying the coil pins together, Relay Socket #2 isn't used for the fans, and ends up being a key-activated relay for any purpose. Mine's gonna use it as the positive jumpstart point since it has 3/8" power pins and can easily handle 70 amps going through it.
As for #3, it is only active when the Hi-Speed fan setting is on, and could easily be retrofitted with a third thermoswitch (12v+ this time) for a third stage of cooling such as a radiator water sprayer. And I still got the Cold Start Assist bottle too
The only thing I'm not 100% happy with on this is that it requires using S5 style thermoswitches that complete the circuit at their prescribed temperatures. S4 ones break circuits at 195 (automatic) & 207 (Turbo II)
In retrospect, a $13 relay panel, $20 E-fan, $3 worth of SPST switches and a piece of steel to make a switch panel. Toss in a Be Cool Dual Pass Radiator next weekend, some flat and angle iron and you've got the simplest, cheapest, cleanest, most efficient cooling system possible for under $300. Cheaper than a Koyo
So this morning I googled about the Taurus fan and it led me to the Volvo 940's fan controller here: https://www.rx7club.com/2nd-generation-specific-1986-1992-17/ford-taurus-2-speed-fan-wiring-827375/
Since I've never seen a 940 in the junkyard, I copied the schematic (thanks Clokker) and beefed it up in the way Mazda would have done, and added a couple of my own touches to perfect it
The biggest bitch of all was squeezing it into the VW relay panel, the reason being is that the coils' pins are tied together in pairs inside the panel. #1 and #2 have pin 85 together, #2 and #3 have pin 86 and #3 and #4 have pin 85's together. Instead of cracking the panel open, trying to cut/rewire it internally and risk ruining it, what I did was get creative. Pretty sure I've outdone myself with this...
4 relays control the fan, one for Low speed, the other 3 being Hi-speed changeover (at a preset temperature like stock), A/C changeover (switches to hi-speed, the way Mazda would have done it). Both Low and High Speed have manual override switches, as do the turbos for Non-Sequential operation, with each switch being a normal SPST on the ground side of their individual circuits.
Because of VW tying the coil pins together, Relay Socket #2 isn't used for the fans, and ends up being a key-activated relay for any purpose. Mine's gonna use it as the positive jumpstart point since it has 3/8" power pins and can easily handle 70 amps going through it.
As for #3, it is only active when the Hi-Speed fan setting is on, and could easily be retrofitted with a third thermoswitch (12v+ this time) for a third stage of cooling such as a radiator water sprayer. And I still got the Cold Start Assist bottle too
The only thing I'm not 100% happy with on this is that it requires using S5 style thermoswitches that complete the circuit at their prescribed temperatures. S4 ones break circuits at 195 (automatic) & 207 (Turbo II)
In retrospect, a $13 relay panel, $20 E-fan, $3 worth of SPST switches and a piece of steel to make a switch panel. Toss in a Be Cool Dual Pass Radiator next weekend, some flat and angle iron and you've got the simplest, cheapest, cleanest, most efficient cooling system possible for under $300. Cheaper than a Koyo
Last edited by Akagis_white_comet; 08-20-12 at 06:17 PM. Reason: moved pic