
Kilo Racing 3 Rotor FD Conversion


^ Doing very well. Car has been down for a few months while we install sponsorship parts. Trying to get the car together to do the Modified Magazine Tuner Shootout event in May.

So I thought I'd update this thread with the status of the build. In short, I've been in a holding pattern waiting on the resolution of my Haltech PS2000 wiring. Hasn't been a priority over the winter but the good news is it should be complete no later than next week. So, it's back on the road soon.
To recap, I picked up a bunch of sponsors and will soon be doing a more detailed writeup on that, but all the new parts have been installed. The Haltech PS2000 is in with the H6 ignitor, I installed the RE-MEDY water pump and my new Pettit polished pulleys as well as the Rotary Aviation OMP adapter and Mishimoto pre-mix reserve tank. While I was in the engine bay, had the front radiator plate repainted black and cleared. So, everything engine wise is pretty much ready to go. Am having the mechanic diagnose why coolant is getting pumped back into the reserve tank, even under no pressure. Steve Osley thinks the custom radiator filler neck is pitted and causing this, so we are going in this direction. Other than that, it's wrapping up the Haltech wiring and getting the car tuned.
On the exterior, I added on some gloss black Shine Auto GT side skirts to better tie in the beefy back end with the front. Thanks for the ideas Jason, and yes, they do make a really nice difference
Interior wise, ripped out the stock tan carpet and installed black. Took me all week to do this so you don't want me doing your carpet install but it sure looks nice now that it is done. Sparco sponsored me with a set of black EVO full bucket race seats and with modifications to them on the side bolsters and some rail adjustments to the Bride rails, they now fit nicely and allow me to sit comfortably with a helmet. Even modified my SakeBomb "replica" fire extinguisher passenger seat mount to fit with the Sparco seats so that looks nice as well. Di some rewiring while I had the dash out as the aftermarket stuff was crap and brought in a stereo expert to rewire my audio equipment as that was not good as well. Had the headliner replaced with with black Alcantara, redid the gauges in Black Cat white faces, and installed a full suite of Redline Goods leather pieces, including a pretty trick steering wheel wrap. Finally, had the door sills re-clear coats as well so they now look like new. Have some shots of some of this earlier in the thread but will take some nicer ones once I get the car back and cleaned up. All in all, pretty set now on the interior.
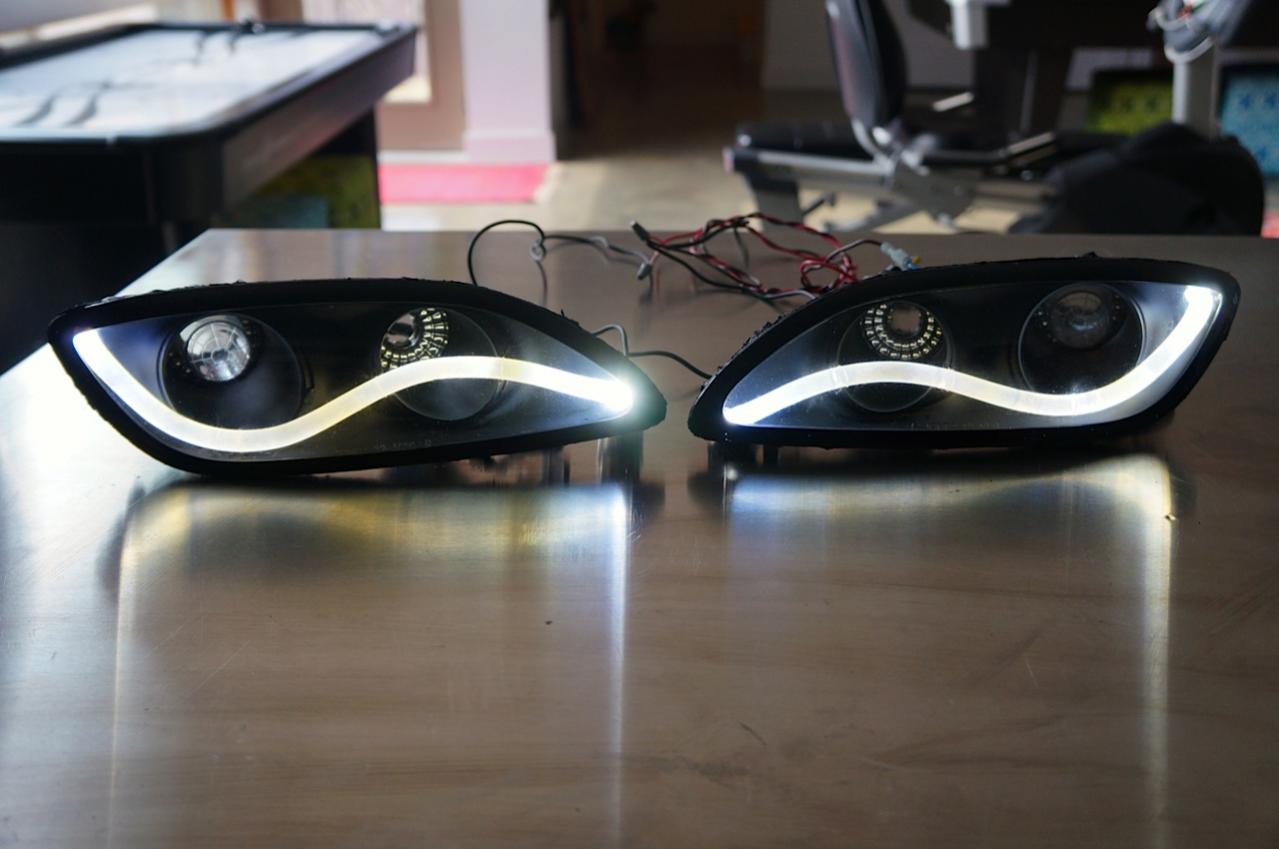
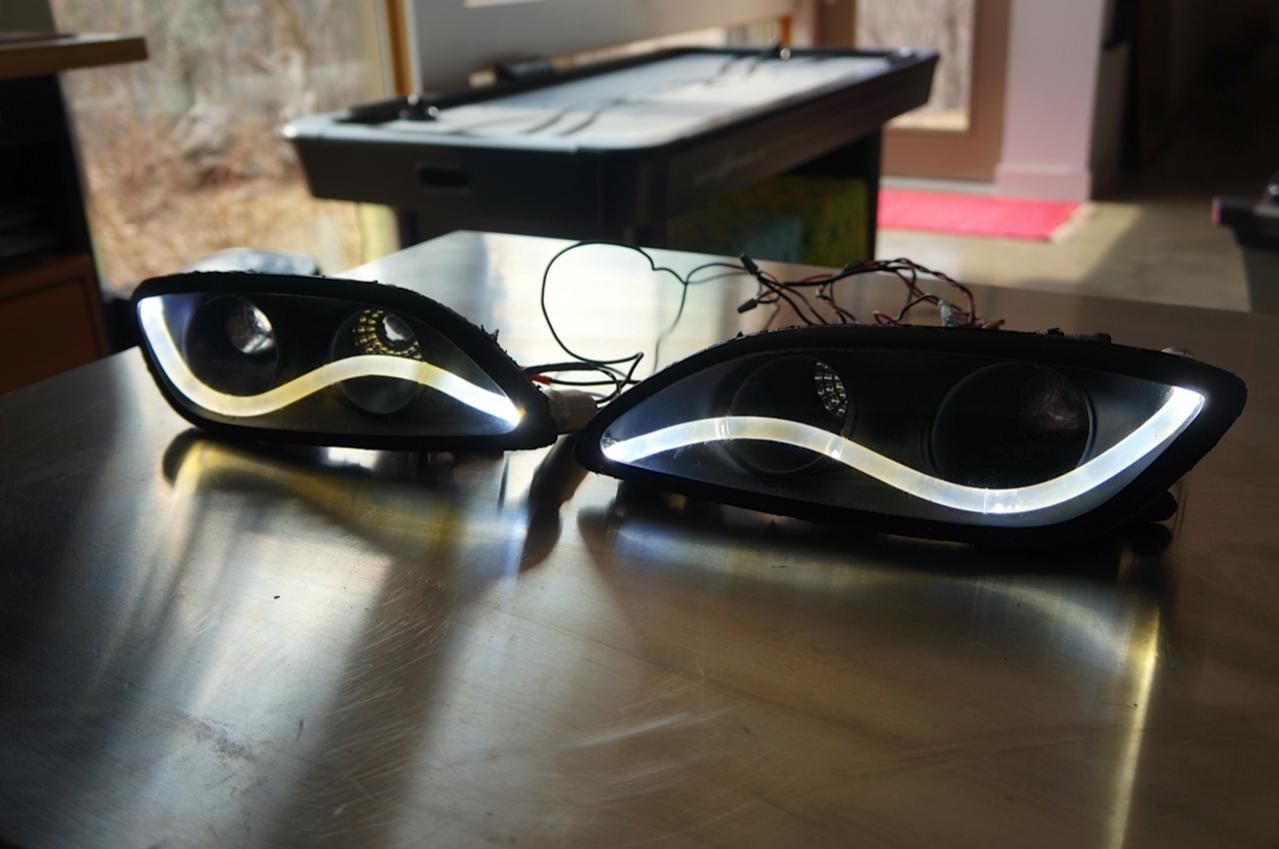
One final project. Always wanting to add more LEDs to the car (somewhat kidding here), I just completed an LED conversion to my front 99 spec turn signals. Have always like the use of LED "rods" on cars like BMW and now Audi, so I came up with my own version for the turn signals using side emitting fiber optic rod:
Shots of the turn signals
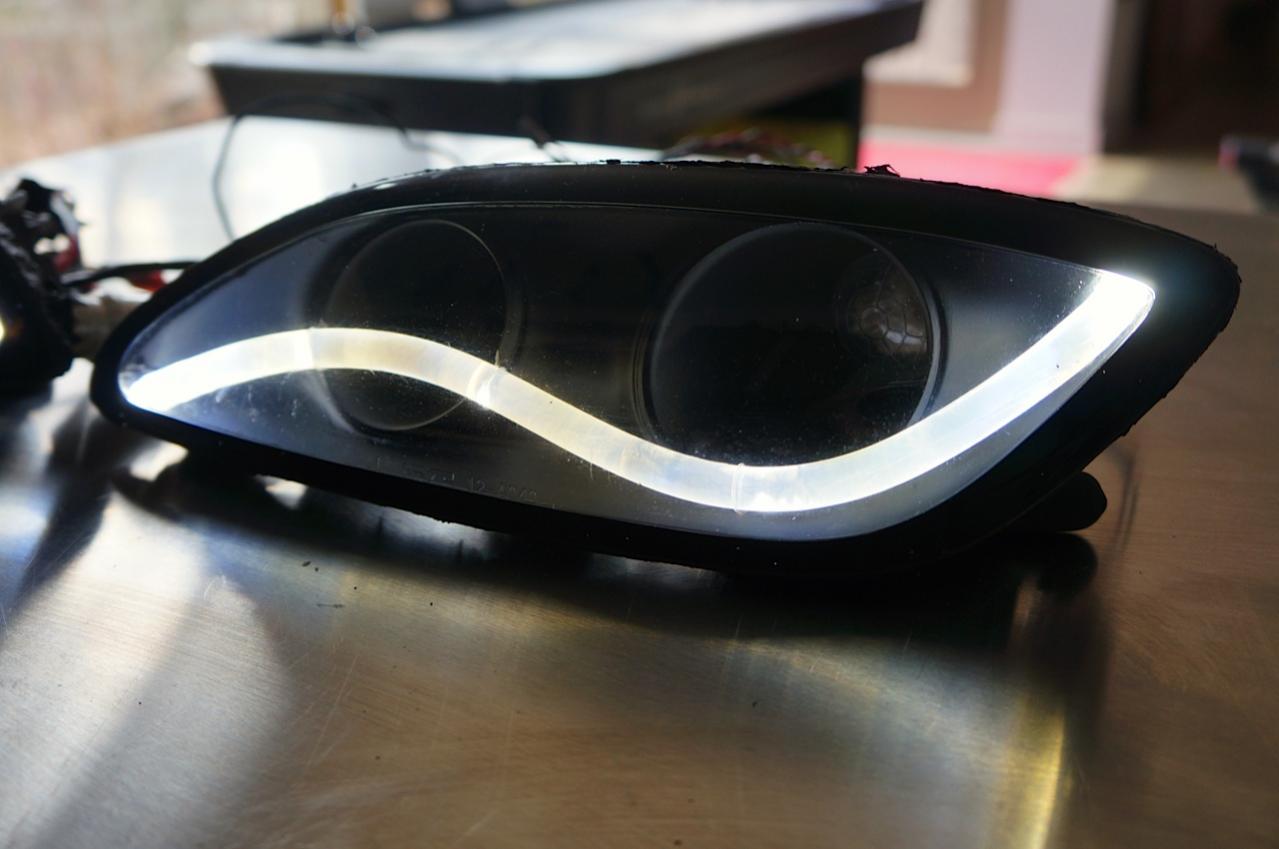
Driver side turn signal
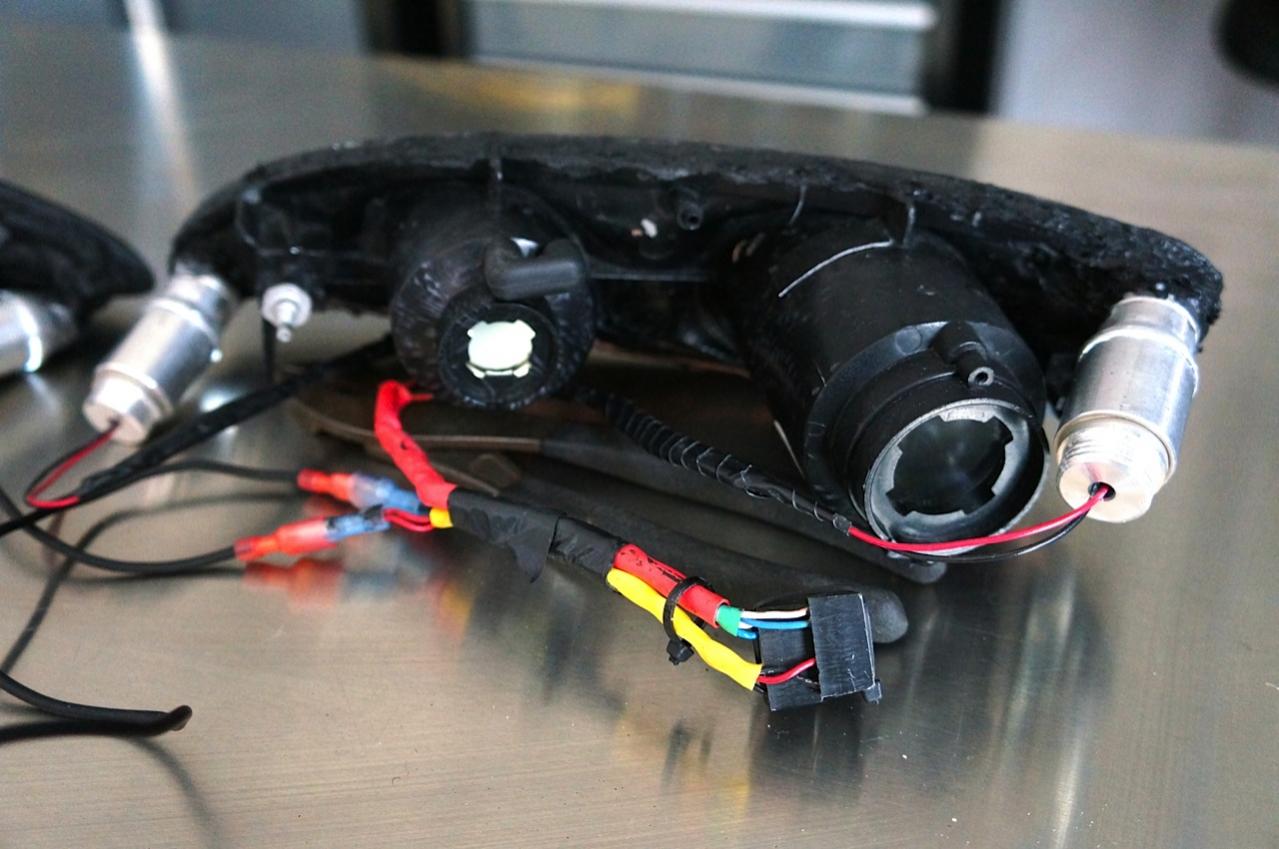
Wiring and Components
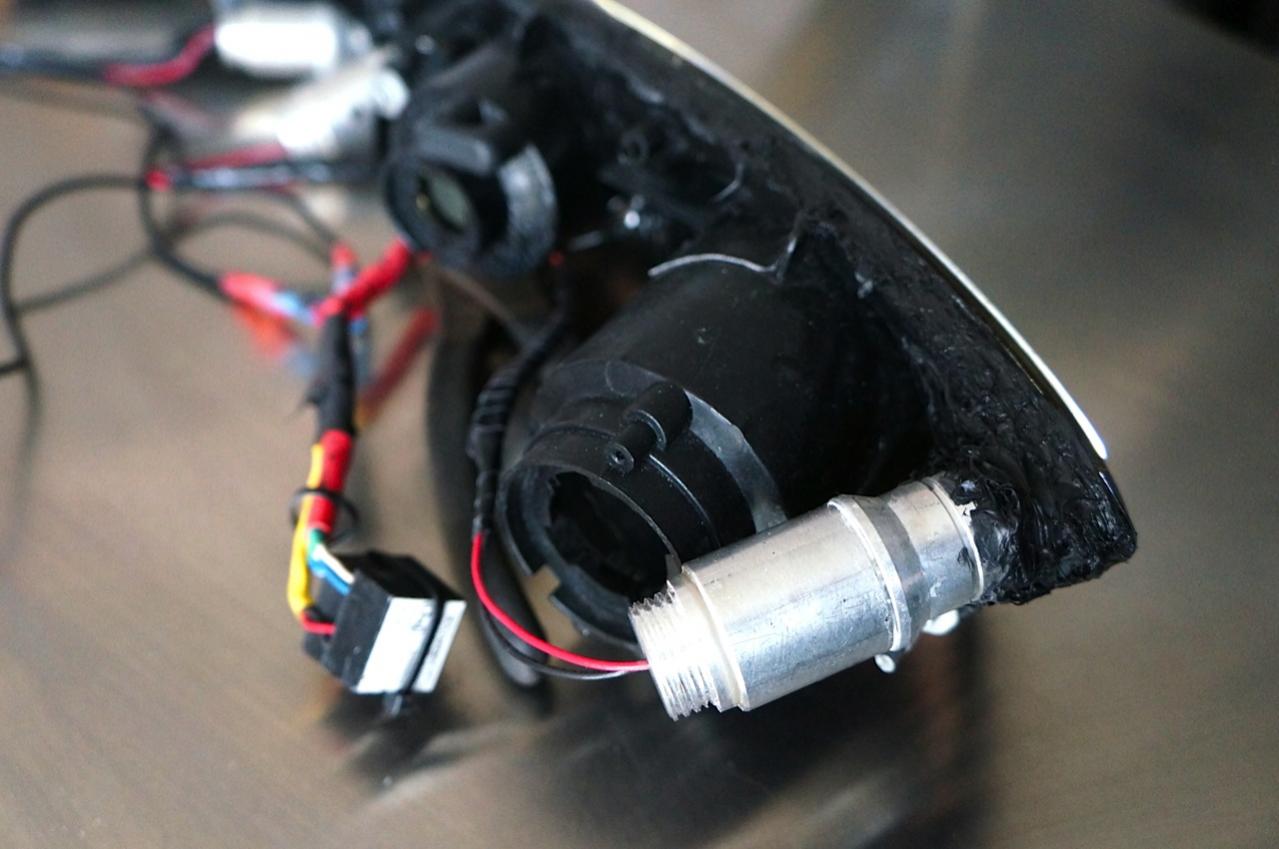
You may recall I previously had a bunch individual LEDs installed in the turn signals. Believing these to be "played out", I have now replaced these with the curvy LED units you see in the pics above.
I accomplished this by testing a bunch of acrylic and plastic rod materials, ultimately settling on the fiber optic rod for its superior light emitting capabilities. I then made a pattern for the fiber optic rods and used my heat gun to form the rods to the pattern. I built LED light emitters, with one for each end of the rod, or two per turn signal and then wired them up to two "Buck Puck" LED drivers. Installed all of this into the housings which I converted over from shiny black and chrome to matte black aka Herblenny's turn signals.
The most difficult aspect of the conversion was figuring out how to affix the LED rod units into the housings. After trying over a dozen glue and epoxy solutions, with even calling 3M for advice, I finally gave up on adhesives. Why? The fiber optics rod is coated in teflon and nothing will make this stick. And I mean nothing. So, the LED units are now affixed manually and that seems to be doing the job.
I'm still going to use the two stock lights, the one for the parking lights and the other for the turn signals. Of course, these are LED on mine as well. Trying to figure out how to add a relay into the sequence so when you turn on the turn signals, the fiber optic rod lights go out on that side of the car. One thing at a time. I've test fitted these and they look pretty cool and I'd show some shots installed, but the car is not here so I can't.
So, stuff is happening and I should be all sorted out in the next week or so. Once this is done, more pics and details.
To recap, I picked up a bunch of sponsors and will soon be doing a more detailed writeup on that, but all the new parts have been installed. The Haltech PS2000 is in with the H6 ignitor, I installed the RE-MEDY water pump and my new Pettit polished pulleys as well as the Rotary Aviation OMP adapter and Mishimoto pre-mix reserve tank. While I was in the engine bay, had the front radiator plate repainted black and cleared. So, everything engine wise is pretty much ready to go. Am having the mechanic diagnose why coolant is getting pumped back into the reserve tank, even under no pressure. Steve Osley thinks the custom radiator filler neck is pitted and causing this, so we are going in this direction. Other than that, it's wrapping up the Haltech wiring and getting the car tuned.
On the exterior, I added on some gloss black Shine Auto GT side skirts to better tie in the beefy back end with the front. Thanks for the ideas Jason, and yes, they do make a really nice difference
Interior wise, ripped out the stock tan carpet and installed black. Took me all week to do this so you don't want me doing your carpet install but it sure looks nice now that it is done. Sparco sponsored me with a set of black EVO full bucket race seats and with modifications to them on the side bolsters and some rail adjustments to the Bride rails, they now fit nicely and allow me to sit comfortably with a helmet. Even modified my SakeBomb "replica" fire extinguisher passenger seat mount to fit with the Sparco seats so that looks nice as well. Di some rewiring while I had the dash out as the aftermarket stuff was crap and brought in a stereo expert to rewire my audio equipment as that was not good as well. Had the headliner replaced with with black Alcantara, redid the gauges in Black Cat white faces, and installed a full suite of Redline Goods leather pieces, including a pretty trick steering wheel wrap. Finally, had the door sills re-clear coats as well so they now look like new. Have some shots of some of this earlier in the thread but will take some nicer ones once I get the car back and cleaned up. All in all, pretty set now on the interior.
One final project. Always wanting to add more LEDs to the car (somewhat kidding here), I just completed an LED conversion to my front 99 spec turn signals. Have always like the use of LED "rods" on cars like BMW and now Audi, so I came up with my own version for the turn signals using side emitting fiber optic rod:
Shots of the turn signals
Driver side turn signal
Wiring and Components
You may recall I previously had a bunch individual LEDs installed in the turn signals. Believing these to be "played out", I have now replaced these with the curvy LED units you see in the pics above.
I accomplished this by testing a bunch of acrylic and plastic rod materials, ultimately settling on the fiber optic rod for its superior light emitting capabilities. I then made a pattern for the fiber optic rods and used my heat gun to form the rods to the pattern. I built LED light emitters, with one for each end of the rod, or two per turn signal and then wired them up to two "Buck Puck" LED drivers. Installed all of this into the housings which I converted over from shiny black and chrome to matte black aka Herblenny's turn signals.
The most difficult aspect of the conversion was figuring out how to affix the LED rod units into the housings. After trying over a dozen glue and epoxy solutions, with even calling 3M for advice, I finally gave up on adhesives. Why? The fiber optics rod is coated in teflon and nothing will make this stick. And I mean nothing. So, the LED units are now affixed manually and that seems to be doing the job.
I'm still going to use the two stock lights, the one for the parking lights and the other for the turn signals. Of course, these are LED on mine as well. Trying to figure out how to add a relay into the sequence so when you turn on the turn signals, the fiber optic rod lights go out on that side of the car. One thing at a time. I've test fitted these and they look pretty cool and I'd show some shots installed, but the car is not here so I can't.
So, stuff is happening and I should be all sorted out in the next week or so. Once this is done, more pics and details.
Thanks they were a labor of love and at times, frustration. I started working on them over one year ago and my schedule has only permitted on and off tinkering but I am happy to have them done and can't wait to get them on the car.
I forgot to mention one of my tasks was to repair the test 99 spec housings. I used the ones I had previously modified for myLED strip inserts so I had to bondo and mold in a new bottom 1/3 of the housing. Haven't done much bondo work so this gave me a chance to play around and learn a little.
I might post up a DIY thread if anyone is interested.
David, almost 10 years you have been working this project now. I leave for 6 years and come back and you still have your sanity?
You gotta be a saint to be keeping this up! Lol
I don't know if I have the strength to go back 100 pages but what you are doing with the lights has a modern twist to them!
You gotta be a saint to be keeping this up! Lol
I don't know if I have the strength to go back 100 pages but what you are doing with the lights has a modern twist to them!
Hah, I am going crazy for sure
Will have a bunch of updates soon as a lot has gone on. Just need time to complete everything and then take some pics.
Stay tuned.
As for the lights, here is a pretty good pic of them at the recent DGRR event. Need to smooth out the hotspots to make the light more consistent but I like them:
Will have a bunch of updates soon as a lot has gone on. Just need time to complete everything and then take some pics.
Stay tuned.
As for the lights, here is a pretty good pic of them at the recent DGRR event. Need to smooth out the hotspots to make the light more consistent but I like them:
Cant remember if you said this or not, but is there a reason you didnt use the approach that BMW uses for the halo rings? those are just one long curve, with minimal/no "hot spots"
The CCFL stuff used by BMW is essentially a glass tube and I don't have a way of bending it to my shape. If I could, it would be a great way to go for the reasons stated. Now you've got me looking into having a set custom made
the newer ones (i thought) were LED shining through an acrylic rod. (B/c you can change the color, BMW guys change from yellowish (4300k) to a crisp white (6000k).)
^ Just can't see (pun intended) how those LEDs would be bright enough but I do like how he wrapped the ends to further direct the light and how he used reflective tape to drive the light outward.
It's similar to what I have already as I used better high powered LEDs in each end. Going to wrap them in reflective material and then cover in heat shrink to eliminate the hot spots. If needed, I will then cover the backs with reflective material although the side emitting fiber optics rod supposedly does this anyway. Thought about cutting in the grooves like he did but I was afraid this would not look smooth.
Great tips though so thanks

Joined: Mar 2001
Posts: 30,814
Likes: 655
From: FL-->NJ/NYC again!
David, after seeing the front marker lights at night time at DGRR I'm a fan of them. They came out pretty damn good, seems 'OEM-ish' a la Audi vs aftermarket add on. Props where they're due 
I didn't necessarily mean to use those LED's, I figured you would have some preferred ones. However some of his methods to reduce hotspot seems like they might be a good idea.

Thanks for the compliments. I've got some really nice additions added into the interior like a black carpeting, Redline goods leather, Sparco Evo seats, and white custom gauges. Just haven't had time to update the thread with good pics.
The car is going back to Kilo Racing in a week or two as it's way down on power and compression in the center housing is low. Spoke at length to Jesus Padilla on this and he has a pretty good idea what is going on here. I thought it might be the RA Super Seals eating the housings but his money is on something else. We will see when we pull out the engine to inspect. Going to be there for that so will know soon.
While we are doing this, I am going to make lemonade out or lemons so to speak and improve on what we've done in the engine bay. Thinking V mount as I am tired of chasing cooling temp issues and want to do some big time wire tucking in the engine bay as well as more permanent mounting for a lot of the add ons. I'll most likely also throw in a good paint job while the engine is out. Will still keep it black but want a nice deep feel to it. We will see.
Finally, working with Forgeline to improve the look of the wheels on the car, particularly the front. Want to go with a wide stance up front and run maybe a 275 up there. Forgeline is also giving me a less wide back rim that will allow me to run my 335's while also drop down to a 295 for the Modified Magazine Tuner Shootout next year.
Stay tuned, more to come.