
Kilo Racing 3 Rotor FD Conversion


Reminds me of an A1.

What are your plans for the rest of the housing? Signal one side of the rod & side lights the other?
Would Sparco allow you to recover the seats? The recovered stock seats looked class! Perhaps a similar cover on the sparcos?
What are your plans for the rest of the housing? Signal one side of the rod & side lights the other?
Would Sparco allow you to recover the seats? The recovered stock seats looked class! Perhaps a similar cover on the sparcos?
LED and Fiber Optic Lighting by Wiedamark - Fiber Optic Solid Core Side Glow
The fiber optic core seems to do the best job at transmitting and dispersing light over the poly and acrylic rods. I then made a metal rod form of the curve shape you see and "bent" the fiber optic core by using a heat gun to form the cable to the end shape. This is a bit trickier than it looks as the fiber optic cable is covered in a teflon shield so you have to be careful to not melt the shield. I am going to try to remove the shield to see of the fiber optic cable still works well and if so, take it off as its teflon and nothing sticks to it, making it a bitch to try to glue into place.
I then used a dremel to modify the housing to inset the fiber optic cable.
I have two LED light sources, one on each end, that are powered by narrow beam cool white XPG LEDs totaling around 400 lumens:
1-Up Advanced Lighting Kit - LED Supply.com
Ledsupply.com built these for me and I took them and modified them to attach to the fiber optics cable through the use of LED reflectors drilled out and installed backwards:
26.5mm*19.6mm Aluminum Textured/OP Reflector for Xenon Emitters - Worldwide Free Shipping - DX
The LED units are driven by 700mA drivers:
3023-D-E-700P Wired BuckPuck - LED Supply.com
Once modified, I attached the assembly to the housings by using steel hanging strap from Lowes.
That's pretty much it. Not too bad but not the average DIY project either.
I don't have any other plans right now for the rest of the housing. As it is now, the LED fiber optic rod will come on and stay on as a daytime running lamp and the other two lights (parking and turn signal) function as normal. What I'd like to figure out is to get the new LED DRLs to turn off when the blinkers are activated so I am going to look into that.
On the seats, I really like the way the OEM ones turned out recovered as well but with the new look and black carpet, the Sparco units look really nice so they will stay the way they are. This reminds me to post up the OEM ones for sale


^ too funny
As an update there isn't much of one. I'm waiting on getting on Steve's schedule to help diagnose the dash wiring issue and the AEM coils. Hopefully soon.
As an update there isn't much of one. I'm waiting on getting on Steve's schedule to help diagnose the dash wiring issue and the AEM coils. Hopefully soon.
?????????????
Joined: Sep 2003
Posts: 512
Likes: 1
From: Greece
Hey David,regarding the floor carpet,can you clarify what you mean
"OEM loom look"?Also do you happen to have their email?I searched the site but couldnt find anything.I want to know the shipping charges...
PS great job on the fiber optic rod.Me and a friend of mine are in the same boat,lets see who will make it better
"OEM loom look"?Also do you happen to have their email?I searched the site but couldnt find anything.I want to know the shipping charges...
PS great job on the fiber optic rod.Me and a friend of mine are in the same boat,lets see who will make it better
^ The carpet I ordered comes in a "cut pile". It is not the "closed loop" OEM style used in the FD. It is a thicker carpet style and to me, looks better than the OEM stuff. More rich and plush to the touch. On the downside, it will attract and hold more lint for sure.
For the OEM style loop product, you can order this:
Auto Interior and Upholstery Loop Carpet Samples
They state it comes on older cars and that may be, but it is also what is on our FDs. So, if you want the OEM style or loop product, you can order that instead of what I did. It is a $30 up charge.
I called auto-interior.com and they don't ship overseas which is a bummer. What I could do though is to have it shipped to me (or if you have a friend here in the US) and then ship it to you. The packages weighs around 32 lbs. so you could figure out how much shipping would be to you. I am in NC. So, if you wanted what I got, it cost me $211 total. If you want the loop style, that would be $30 more, or $241 plus whatever it cost to ship to you. PM if you are interested.
Thanks for the compliments on the fiber optic rod. I think it looks pretty cool and better than the individual LEDs. I've got one side complete and will post up pics of it installed. Waiting on Steve to solve the electrical issues before doing this. And if yours looks better, post up some pics or make a set for me
?????????????
Joined: Sep 2003
Posts: 512
Likes: 1
From: Greece
^ The carpet I ordered comes in a "cut pile". It is not the "closed loop" OEM style used in the FD. It is a thicker carpet style and to me, looks better than the OEM stuff. More rich and plush to the touch. On the downside, it will attract and hold more lint for sure.
For the OEM style loop product, you can order this:
Auto Interior and Upholstery Loop Carpet Samples
They state it comes on older cars and that may be, but it is also what is on our FDs. So, if you want the OEM style or loop product, you can order that instead of what I did. It is a $30 up charge.
I called auto-interior.com and they don't ship overseas which is a bummer. What I could do though is to have it shipped to me (or if you have a friend here in the US) and then ship it to you. The packages weighs around 32 lbs. so you could figure out how much shipping would be to you. I am in NC. So, if you wanted what I got, it cost me $211 total. If you want the loop style, that would be $30 more, or $241 plus whatever it cost to ship to you. PM if you are interested.
Thanks for the compliments on the fiber optic rod. I think it looks pretty cool and better than the individual LEDs. I've got one side complete and will post up pics of it installed. Waiting on Steve to solve the electrical issues before doing this. And if yours looks better, post up some pics or make a set for me
For the OEM style loop product, you can order this:
Auto Interior and Upholstery Loop Carpet Samples
They state it comes on older cars and that may be, but it is also what is on our FDs. So, if you want the OEM style or loop product, you can order that instead of what I did. It is a $30 up charge.
I called auto-interior.com and they don't ship overseas which is a bummer. What I could do though is to have it shipped to me (or if you have a friend here in the US) and then ship it to you. The packages weighs around 32 lbs. so you could figure out how much shipping would be to you. I am in NC. So, if you wanted what I got, it cost me $211 total. If you want the loop style, that would be $30 more, or $241 plus whatever it cost to ship to you. PM if you are interested.
Thanks for the compliments on the fiber optic rod. I think it looks pretty cool and better than the individual LEDs. I've got one side complete and will post up pics of it installed. Waiting on Steve to solve the electrical issues before doing this. And if yours looks better, post up some pics or make a set for me
Thanks for the reply and the offer,
I will think about it and let you know.I did a quick photoshop of what we are planning to do - have a look:
?????????????
Joined: Sep 2003
Posts: 512
Likes: 1
From: Greece
There will be a back plate between the clear plastic and the two circles in matt black,
very similar to the hid retrofit i did 5 years ago.What i dont know is of a 10-12 mm rod will fit there.I ordered some replica turnsignals to hack them and see.what size rod you used?
very similar to the hid retrofit i did 5 years ago.What i dont know is of a 10-12 mm rod will fit there.I ordered some replica turnsignals to hack them and see.what size rod you used?
^ That is pretty nice looking. I used the 10mm and think the 12 would be too big. Give the 10 a try and I think you will like it. Use the 3M silicone glue as the adhesive as the rod is teflon coated and nothing sticks to it.
What are you planning on using as your LED light source?
What are you planning on using as your LED light source?
?????????????
Joined: Sep 2003
Posts: 512
Likes: 1
From: Greece
We have ordered some 3mm -5mm leds for testing.( http://www.led1.de/shop/standard-led...end-ultrahell/ ).We will measure the candela for the front and the rear,So we
can decide which way to go.I did some more photoshop -if i am not "messing" your thread i can post a few pictures....
can decide which way to go.I did some more photoshop -if i am not "messing" your thread i can post a few pictures....

this is so freaking interesting david.
Do you have any pics of the setup outside the housing? I'm having a hard time understanding exactly what you did as far as components... I have a headlight design that i want to use a "light bar/beam" like the new mustangs but never figured out how to do it.. this could be a viable solution!
keep us posted!
We have ordered some 3mm -5mm leds for testing.( 5mm blitzende LED gnstig im LED1.de Online Shop ).We will measure the candela for the front and the rear,So we
can decide which way to go.I did some more photoshop -if i am not "messing" your thread i can post a few pictures....
can decide which way to go.I did some more photoshop -if i am not "messing" your thread i can post a few pictures....
For comparison, I used two 200 lumen LEDs, one on each end. That's 400 lumens total, or about 133 or your LEDs. In encourage you to think about putting a high powered LED at each end of the fiber optic rod. Think about building a min flashlight at each end that focuses all the light into the fiber optic rod and you will be more successful.
Also make sure you use "side emitting" fiber optic rod. There are two types of rod, one emits the light out of the side as the light travels thru it, and the other only emits light out of the ends. Obviously you want the stuff that emits out of the sides so the light shines fully.
Please do post up pics of what you'd got
this is so freaking interesting david.
Do you have any pics of the setup outside the housing? I'm having a hard time understanding exactly what you did as far as components... I have a headlight design that i want to use a "light bar/beam" like the new mustangs but never figured out how to do it.. this could be a viable solution!
keep us posted!
Do you have any pics of the setup outside the housing? I'm having a hard time understanding exactly what you did as far as components... I have a headlight design that i want to use a "light bar/beam" like the new mustangs but never figured out how to do it.. this could be a viable solution!
keep us posted!
I've been thinking about how I want the light to come on and turn off. I think I've got it figured out how to turn this on as a daytime running light (via an ignition source) and then temporarily turn it off (via a relay) while the turn signal is on. Check out how Audi does it and this is what I am after.

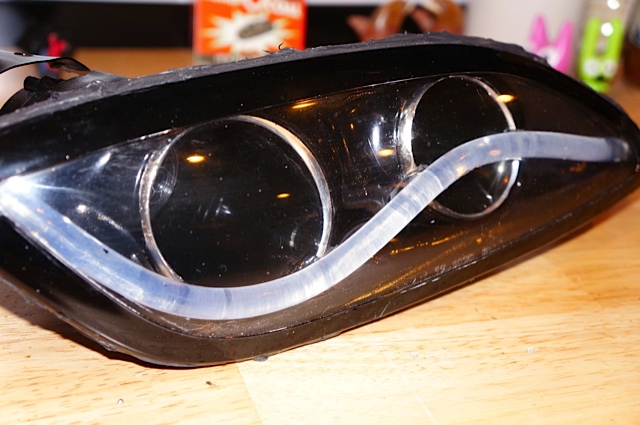
Okay so a few pics that should help illustrate how the mechanism works. I designed the curve of the fiber optics rod to match my design aesthetic. I did this by using a piece of welding rod and kept playing with it until I got the curve I desired.
I then took the straight fiber optics rod and heated it up with my heat gun until I was able to bend it to form to the shape of the welding rod. This was actually a little more difficult than I first thought as the rod comes coated with a teflon shield and I didn't want to ruin this so I took my time.
Once the fiber optics rod had its shape, I took my spare set of turn signals (have the OEM ones on the car for now until this works to my liking) and removed the lens, and then placed the fiber optics rod in place to determine where I needed to cut into the housing. I used my dremel to cut the housing material, pretty much in each of the round chrome light rings, until I could "inset" the fiber optics rod in place. Each end of the rod exits the housing where I designed and built two led "light emitters" and attached them to each end. You've got to focus and shoot the light into the rod in as tight a beam as possible so the majority of light makes it into the rod and then emanates out the "sides" of the fiber optics rod.
Once this was accomplished, I made brackets out of hanging strapping and screwed them to the backs of the housings. Wired them up using two LED 700mA drivers and I should be good to go. Going to test it first and then modify if needed before completing the other side.
Pics:
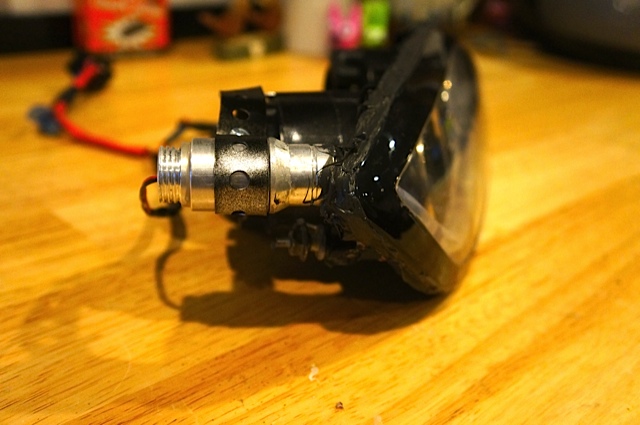
LED light emitter on one side. Note it is aimed straight into the fiber optics rod:
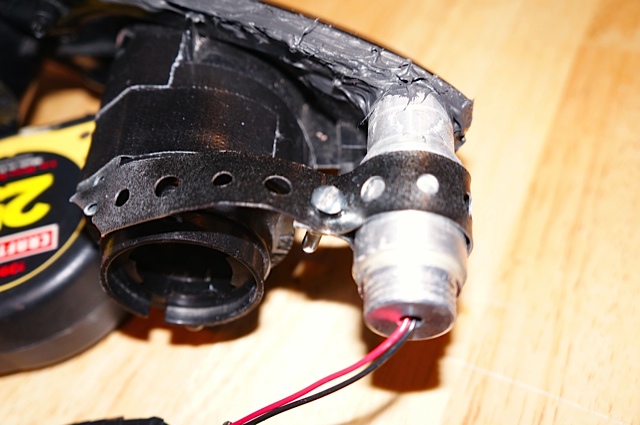
Top view of LED emitter and bracket made out strapping:
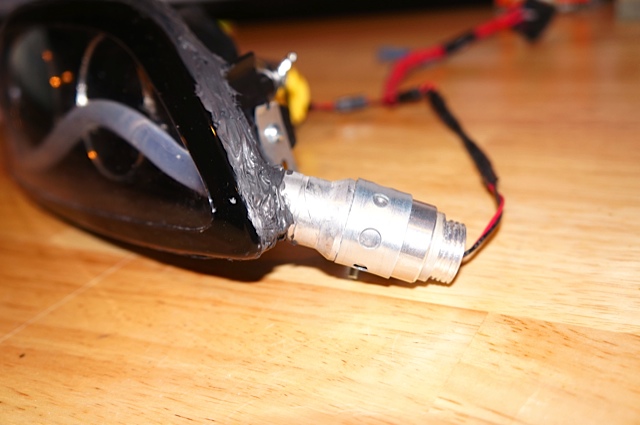
LED light emitter on other side. Because of the angle of the emitter I am going to have to cut into the bumper to inset the emitter. Not a big deal because the turn signal will cover this up:
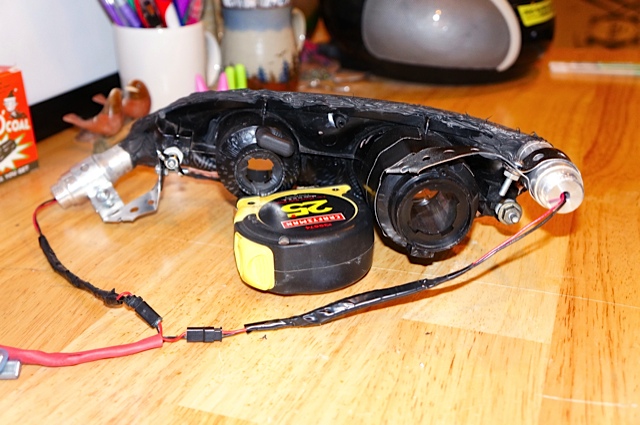
Back side of housing. Note the two LED drivers wired up. I am going to try to wire in a relay so the LED rod turns temporarily off when the turn signal comes on:
Shot of fiber optics rod inset and glued into the housing. Collin, I am going to redo what I have as the rod has separated partially from the housing. Doubt anyone will notice when it's on the car, but I am pretty **** about this stuff. The big issue I have had is the fiber optics rod has a teflon coating on it that make almost nothing stick to it. I really tried everything but recently called the manufacturer about the issue. They say the 3M brand of clear silicone adhesive will work so I am going to give this a shot. I've tried another silicone but they are adamant the 3M stuff will work:
So that's it. Going to look pretty trick if I can get it all together.
I then took the straight fiber optics rod and heated it up with my heat gun until I was able to bend it to form to the shape of the welding rod. This was actually a little more difficult than I first thought as the rod comes coated with a teflon shield and I didn't want to ruin this so I took my time.
Once the fiber optics rod had its shape, I took my spare set of turn signals (have the OEM ones on the car for now until this works to my liking) and removed the lens, and then placed the fiber optics rod in place to determine where I needed to cut into the housing. I used my dremel to cut the housing material, pretty much in each of the round chrome light rings, until I could "inset" the fiber optics rod in place. Each end of the rod exits the housing where I designed and built two led "light emitters" and attached them to each end. You've got to focus and shoot the light into the rod in as tight a beam as possible so the majority of light makes it into the rod and then emanates out the "sides" of the fiber optics rod.
Once this was accomplished, I made brackets out of hanging strapping and screwed them to the backs of the housings. Wired them up using two LED 700mA drivers and I should be good to go. Going to test it first and then modify if needed before completing the other side.
Pics:
LED light emitter on one side. Note it is aimed straight into the fiber optics rod:
Top view of LED emitter and bracket made out strapping:
LED light emitter on other side. Because of the angle of the emitter I am going to have to cut into the bumper to inset the emitter. Not a big deal because the turn signal will cover this up:
Back side of housing. Note the two LED drivers wired up. I am going to try to wire in a relay so the LED rod turns temporarily off when the turn signal comes on:
Shot of fiber optics rod inset and glued into the housing. Collin, I am going to redo what I have as the rod has separated partially from the housing. Doubt anyone will notice when it's on the car, but I am pretty **** about this stuff. The big issue I have had is the fiber optics rod has a teflon coating on it that make almost nothing stick to it. I really tried everything but recently called the manufacturer about the issue. They say the 3M brand of clear silicone adhesive will work so I am going to give this a shot. I've tried another silicone but they are adamant the 3M stuff will work:
So that's it. Going to look pretty trick if I can get it all together.
thats awesome david!!
Where is this part?
26.5mm*19.6mm Aluminum Textured/OP Reflector for Xenon Emitters - Worldwide Free Shipping - DX
is the cone opening facing the "advance lighting kit" par with the bushing connected to the fiber optic side?
This is really cool. I'm quiet fascinated by fiber optics as I was helping one of my professions with design a fiber optic chandelier for the W-hotel out in San Fran, Cali. its some sweet stuff!
^ That part is the "cap" for the LED light emitter unit. It affixes the light emitter to the fiber optics rod. I used it backwards (think of a flashlight reflector but turned around) so the small end faces out and the larger side is glued to the LED emitter. I drilled out the smaller end so it slid over the fiber optic rod to seal the light into the rod. Over the rod I used a rubber bushing to secure and seal the light even further.
Fiber optics is really cool and advancements like side emitting units and polycarbonate materials make it an attractive option for projects like this.
Fiber optics is really cool and advancements like side emitting units and polycarbonate materials make it an attractive option for projects like this.
?????????????
Joined: Sep 2003
Posts: 512
Likes: 1
From: Greece
I don't think those will work for you, they are not bright enough. Your LEDs are 15,000mcd. Assuming they have a beam angle of 30 degrees (and the tighter the beam angle the better for a fiber optic application), then one of your LEDs is equal to a little over 3 lumens.
For comparison, I used two 200 lumen LEDs, one on each end. That's 400 lumens total, or about 133 or your LEDs. In encourage you to think about putting a high powered LED at each end of the fiber optic rod. Think about building a min flashlight at each end that focuses all the light into the fiber optic rod and you will be more successful.
Also make sure you use "side emitting" fiber optic rod. There are two types of rod, one emits the light out of the side as the light travels thru it, and the other only emits light out of the ends. Obviously you want the stuff that emits out of the sides so the light shines fully.
Please do post up pics of what you'd got
Sure thing Benny. I'll take some later so you can visualize it better. It's much like putting a mini flashlight onto each end of the rod and turning them on.
I've been thinking about how I want the light to come on and turn off. I think I've got it figured out how to turn this on as a daytime running light (via an ignition source) and then temporarily turn it off (via a relay) while the turn signal is on. Check out how Audi does it and this is what I am after.
)says that we must give it a shot with these leds.I am pretty sure that we gonna end up using something like yours or some smd leds with heat shields.I am looking to find a used Audi headlight to crack it open and see what they have done but its difficult to find a used 2013 headlight with the "rod style lighting".Anyway,here are some gifs i made of what we might end up to:
I totally agree with you but my buddy(the electronics guru )says that we must give it a shot with these leds.I am pretty sure that we gonna end up using something like yours or some smd leds with heat shields.I am looking to find a used Audi headlight to crack it open and see what they have done but its difficult to find a used 2013 headlight with the "rod style lighting".Anyway,here are some gifs i made of what we might end up to:
)says that we must give it a shot with these leds.I am pretty sure that we gonna end up using something like yours or some smd leds with heat shields.I am looking to find a used Audi headlight to crack it open and see what they have done but its difficult to find a used 2013 headlight with the "rod style lighting".Anyway,here are some gifs i made of what we might end up to: