
RE-Speed steering kit! It's here!

Thread Starter
Joined: Sep 2005
Posts: 532
Likes: 1
From: Abilene, TX
RE-Speed steering kit! It's here!
Just got it from UPS today. Thank you billy! thank you very much!
I can't say enough about the quality of this kit. Honestly, very well made. I have bought many aftermarket motor mount kits, suspension pieces, bla bla bla over teh years and this is the finest I've received lately. Super nice kit with a good mix of steel, aluminium, and plated hardware. I am very happy.................here's a few pics of the stuff right after I opened everything.
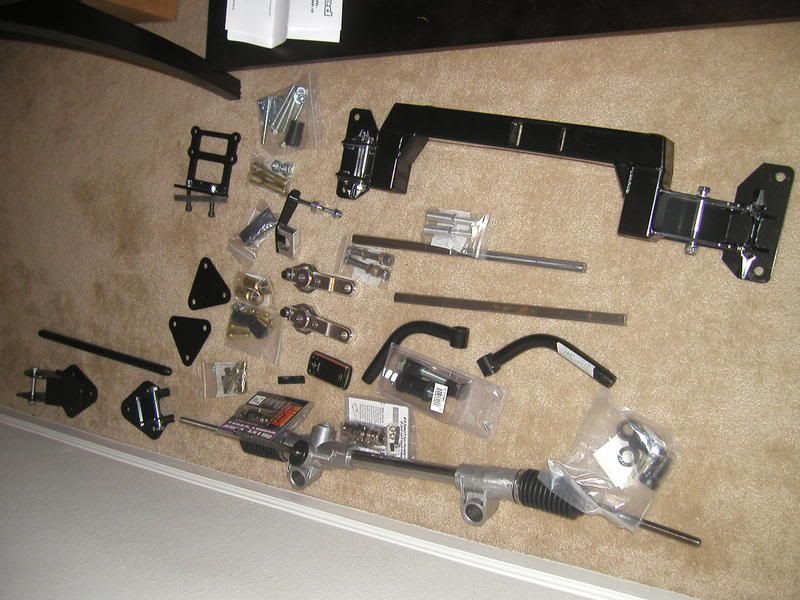
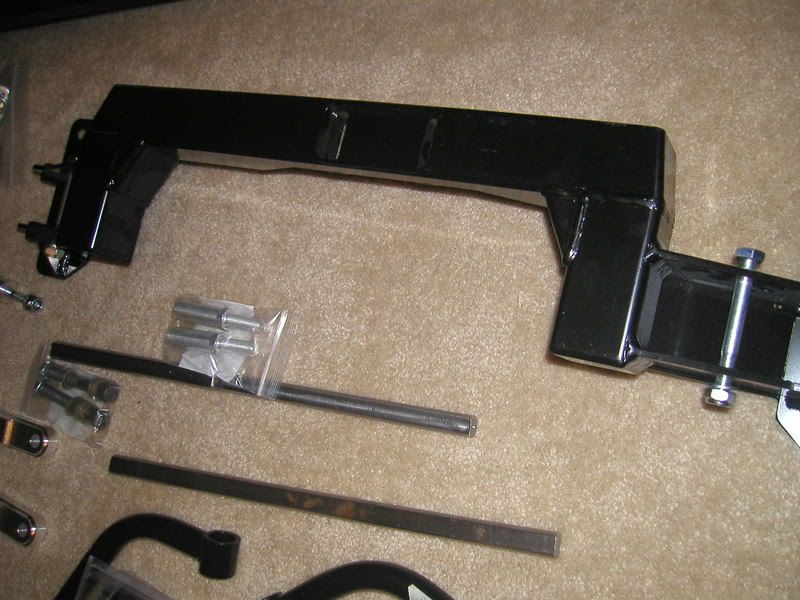
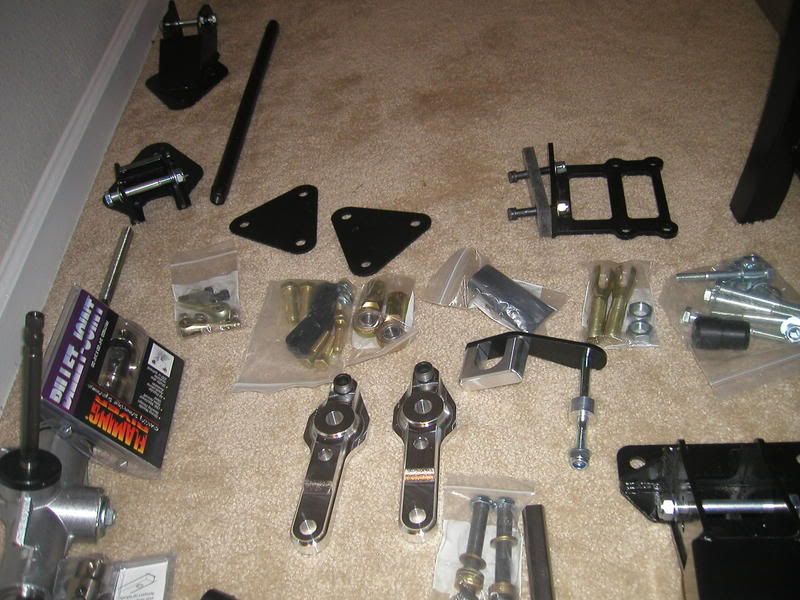
Sorry my stuff is black so it doesn't photograph very well but take my word for it. Very well made indeed. I will start installing this tomorrow. I am trying to decide if I want to do a step by step install with pics or not........hmmmm.......I'll see how it goes.
The kit doesn't come with the cell phone in the picture. Just in case anyone is crazy enough to wonder that. Or the razor blade.
I can't say enough about the quality of this kit. Honestly, very well made. I have bought many aftermarket motor mount kits, suspension pieces, bla bla bla over teh years and this is the finest I've received lately. Super nice kit with a good mix of steel, aluminium, and plated hardware. I am very happy.................here's a few pics of the stuff right after I opened everything.
Sorry my stuff is black so it doesn't photograph very well but take my word for it. Very well made indeed. I will start installing this tomorrow. I am trying to decide if I want to do a step by step install with pics or not........hmmmm.......I'll see how it goes.
The kit doesn't come with the cell phone in the picture. Just in case anyone is crazy enough to wonder that. Or the razor blade.
Last edited by Skidtron; Dec 20, 2007 at 12:59 AM.
Thread Starter
Joined: Sep 2005
Posts: 532
Likes: 1
From: Abilene, TX
I opted for the 15:1 steering ratio. It's the quicker one. The other option is a 20:1and if your referring to the brand it's a flaming river brand one. It's all on RE-Speed's website if you need to know which one exactly. The universal joints are also Flaming river brand.
Thread Starter
Joined: Sep 2005
Posts: 532
Likes: 1
From: Abilene, TX
I forgot to mention I also opted for the optional outer tie rod ends. They are heim joints instead of ball joints. The steering should be razor sharp when the car is all put back together. I can't wait till tomorrow.......it's like knowing your going to disneyland tomorrow when your a kid.
Thread Starter
Joined: Sep 2005
Posts: 532
Likes: 1
From: Abilene, TX
lol come on man it's more important than a turbo? What good is power without control. ha LOL next for me is to get the S5 drivetrain in and the RB exhaust. Then I'll leave it alone for a bit.......yeah right.
Trending Topics

Joined: May 2002
Posts: 5,972
Likes: 37
From: Ottawa, Soviet Canuckistan
I like the new steering arms. I noticed that they said they now include them on the website, but I hadn't seen them yet.
Heim joints instead of ball joints eh? Might as well opt for new tie rods too, if you're in for a penny, in for a pound. I *was* just going to re-use my tie rods since they have less than 10k km on them, but there's no point in cheaping out.
Jon
Heim joints instead of ball joints eh? Might as well opt for new tie rods too, if you're in for a penny, in for a pound. I *was* just going to re-use my tie rods since they have less than 10k km on them, but there's no point in cheaping out.
Jon
Ask me about my wankel
Joined: May 2006
Posts: 571
Likes: 0
From: Bay City, Michigan
Looks good. How much does that mounting brace weigh (looks light)?
Flaming River makes high end products (the company I work for supplies a lot of R&P and IG gears to them) you should be very happy with the product.
Flaming River makes high end products (the company I work for supplies a lot of R&P and IG gears to them) you should be very happy with the product.
Last edited by challer2000; Dec 20, 2007 at 07:33 AM.

Yea its a beautiful kit for sure. I was the second one to place an order back in August, installed it about a month ago, haven't driven on it yet, but the quality is great and steering feels good (granted Its not moving...  ) Good luck with the install!
) Good luck with the install!

yet another one ... see thats all we needed ... now billy get us a really good design on adjustable lower control arms ... I don't want to buy them from Racing beat. I'm trying to stay racing beat free 

Thread Starter
Joined: Sep 2005
Posts: 532
Likes: 1
From: Abilene, TX
I like the new steering arms. I noticed that they said they now include them on the website, but I hadn't seen them yet.
Heim joints instead of ball joints eh? Might as well opt for new tie rods too, if you're in for a penny, in for a pound. I *was* just going to re-use my tie rods since they have less than 10k km on them, but there's no point in cheaping out.
Jon
Heim joints instead of ball joints eh? Might as well opt for new tie rods too, if you're in for a penny, in for a pound. I *was* just going to re-use my tie rods since they have less than 10k km on them, but there's no point in cheaping out.
Jon
Hell no!, no touchy!
Thread Starter
Joined: Sep 2005
Posts: 532
Likes: 1
From: Abilene, TX
I deceided I'll do a blow by blow deal on here for you guys since a few of you seem very interested. Everyone should buy this kit it's very nice. I'm not much of a photographer so my pics my suck a bit, but I'll do the best I can. Maybe I can get my buddy to come over he has a really nice camera and has been doing photography stuff for a while. I'll see what I can come up with.
Thread Starter
Joined: Sep 2005
Posts: 532
Likes: 1
From: Abilene, TX
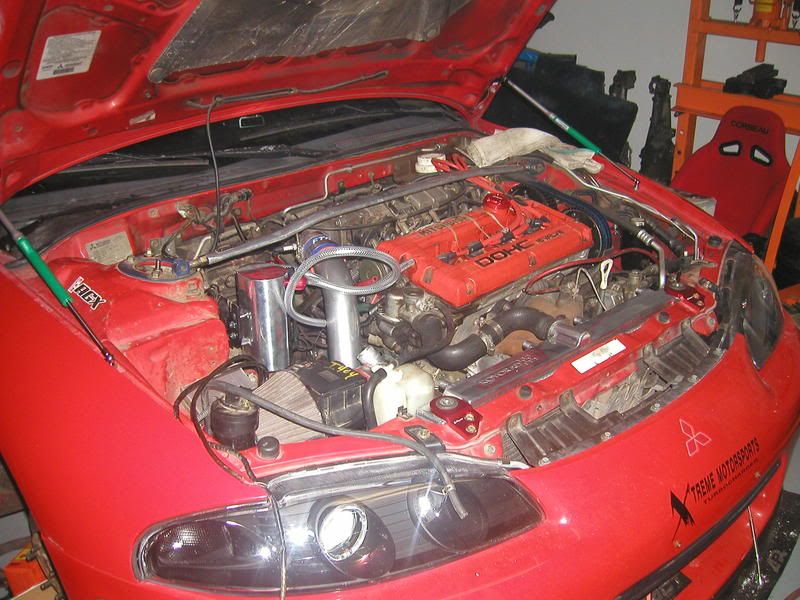
OK here goes. I didn't get too far today due to weather and frequent interruptions, But got some stuff done. i didn't follow the order of the directions sorry billy. Since the car is in the driveway I just did some of the stuff that would still allow me to put the car back on the ground as I don't like leaving my car jacked up over night outside. I think it makes it look worse than it really is when you work on cars. Just trying to respect the neighborhood I guess. First picture is of the reason my car is not in the garage where it belongs.
Stupid DSM! Milton I hate you right now.............
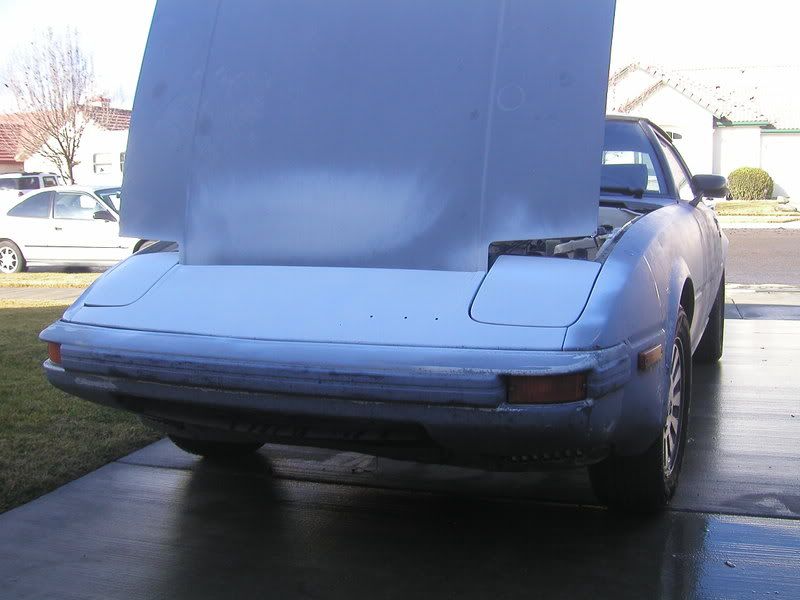
A picture of the front of my car. Yeah I know it needs to be painted save your finger tips
picture of the stock engine bay. Some stuff is still laying around in there as you can see

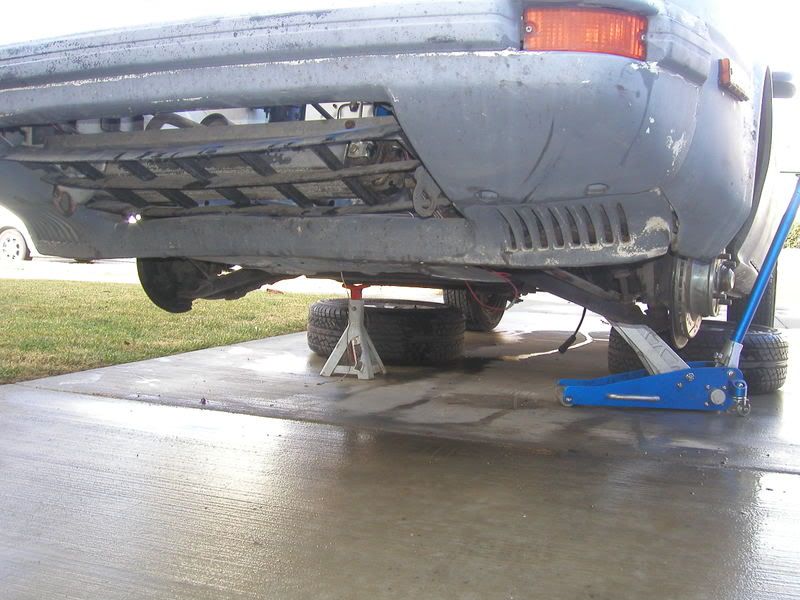
one of the car jacked up and the wheels off
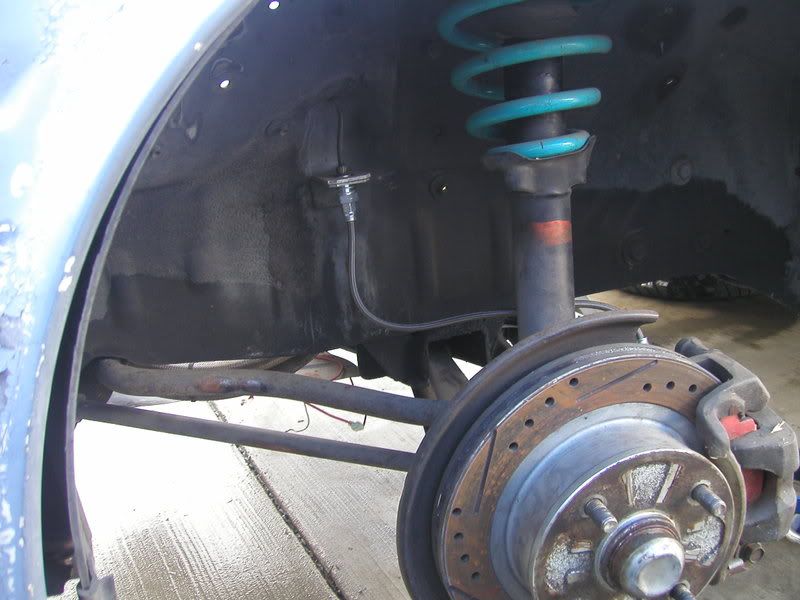
Picture of my stock stuff and the few modified parts on the car that already existed
Those are progress group springs (160# up front and 125# out back), tokico illuminas, Some slotted and drilled rotors (Which I hate but they were free from a friend so I'll use them till they crack), and ISC steelbraidedbrake lines for those who might be wondering
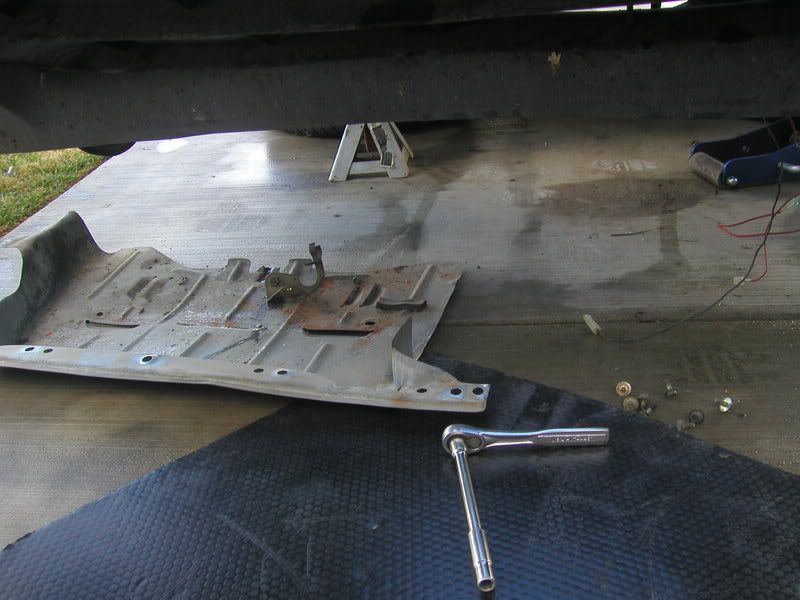
One of the undertray thing removed. I will be building a new one since the stock one won't fit right probably when I'm done
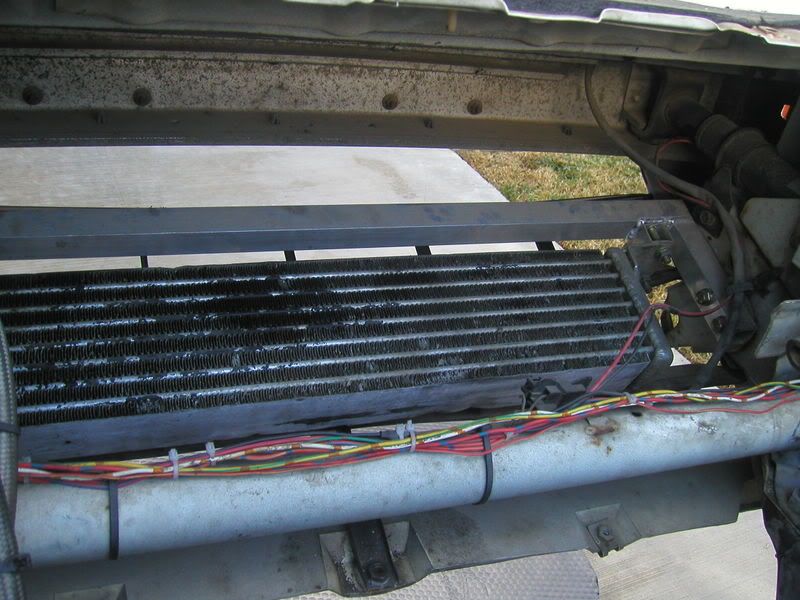
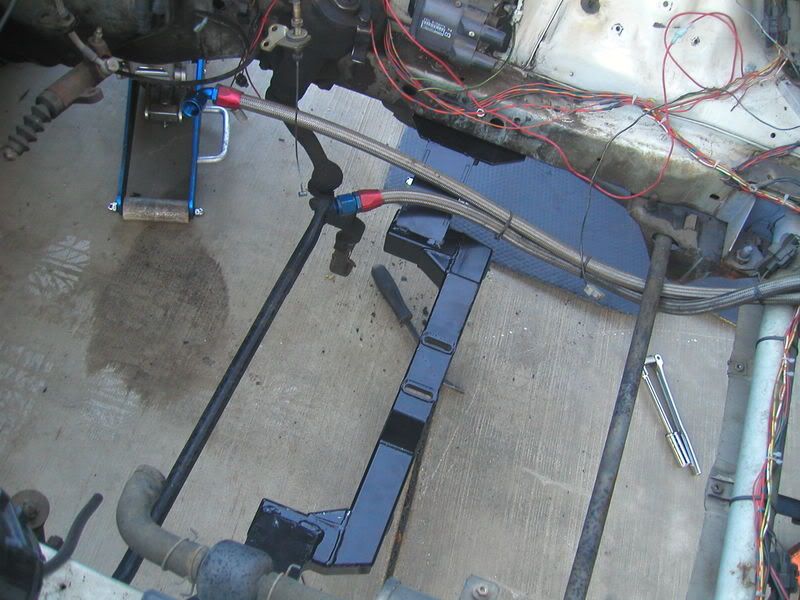
Figured I throw this one in. A picture of the oil cooler and bracket I made to mount it in the nose. The front of it is just behind the stock grill and at pretty much the same angle as the grill.
A picture from above of the dirty crappy crossmember
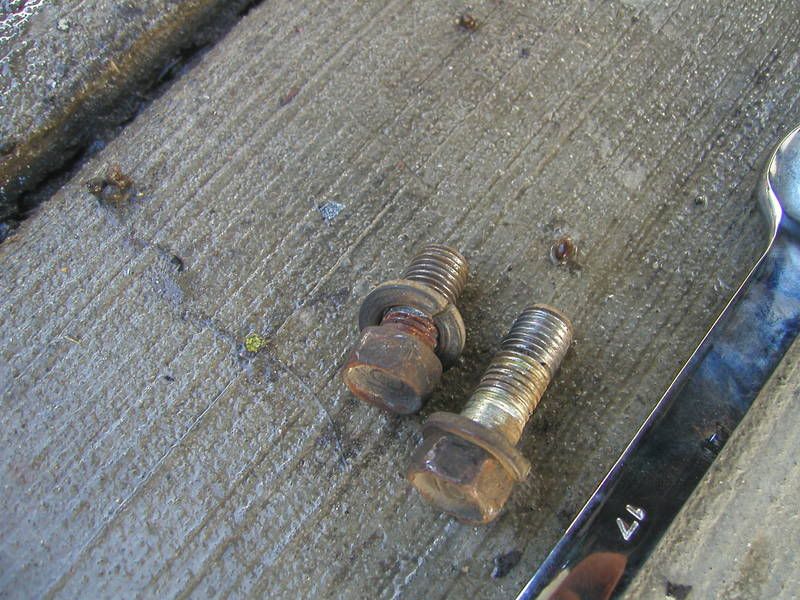
First thing I did was remove the front strut to steering arm bolts as you can see here
These are the bolts
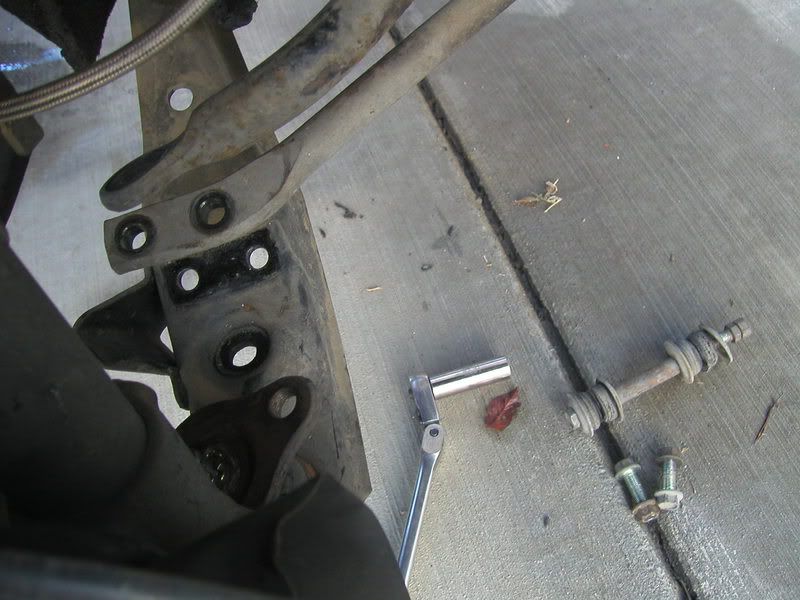
Next I removed the tension rod bolts and the swaybar endlink. Which will be getting replaced as you can see in the picture it is in excellent shape. Stock 1984! bad ***!
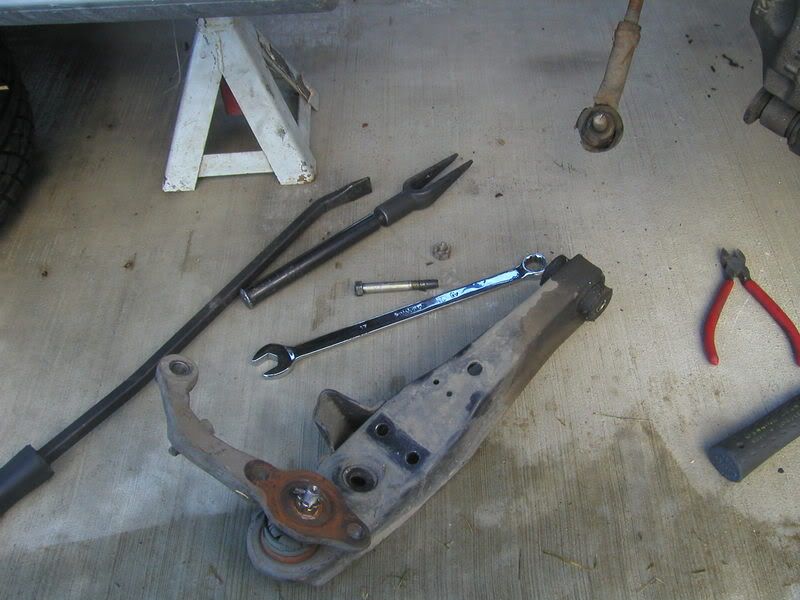
One of the lower control arm removed after unbolting the inner bolt and removing the nut and outer tie rod end from the steering arm. The worst part about this is the ball joints are bad on both side, well the boots are but they have like 200 miles on them at the most. I don't know what's up with that but I'm going to try to get some new ones again. Also I have the Energy Suspension bushing on the lower arm already. Obviously they will be reused since polyurathane pretty much lasts forever
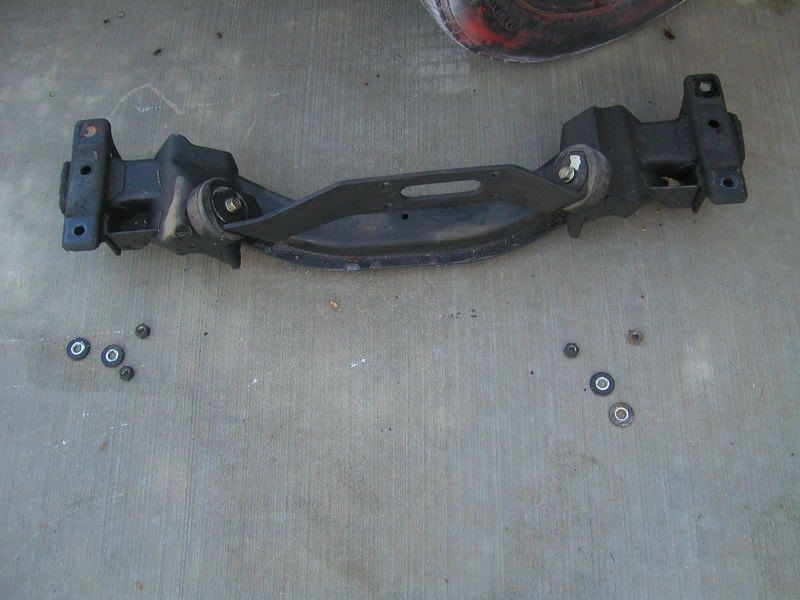
Next the four nuts that hold the crossmember on were removed and here it is in all it's glory. Nice and oily like most of yours I'm sure.
A picture of the old one next to the new one
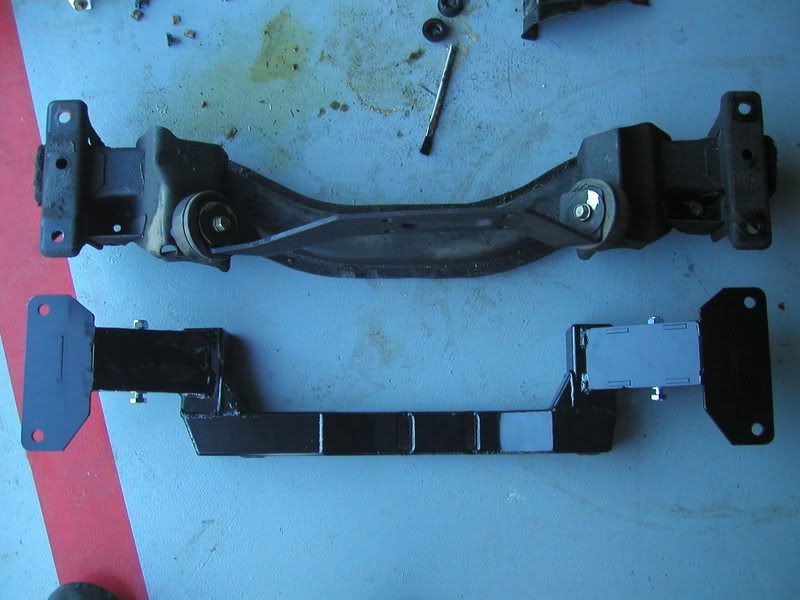
This picture was hard to take without someone to hold the crossmembers stacked up but you kinda get the idea of how much more clearance your given with the new crossmember. It's at least a half an inch but probably more like an inch.

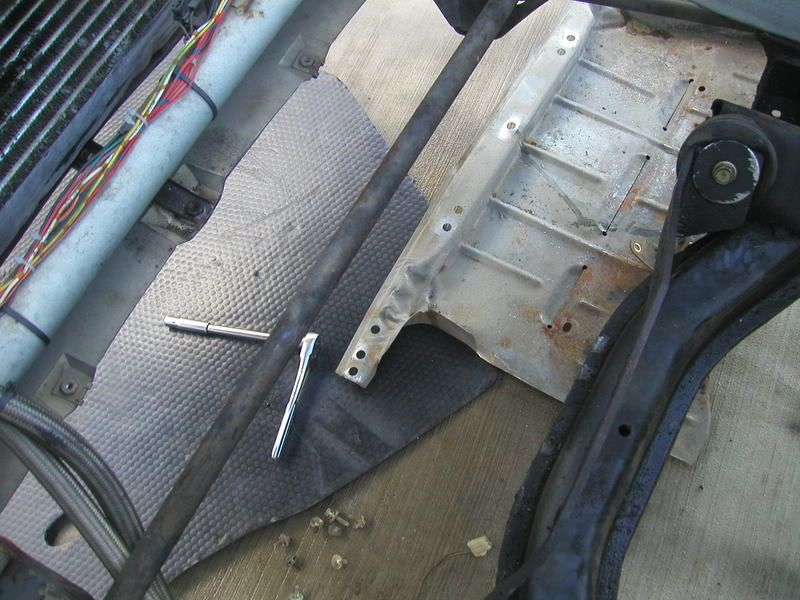
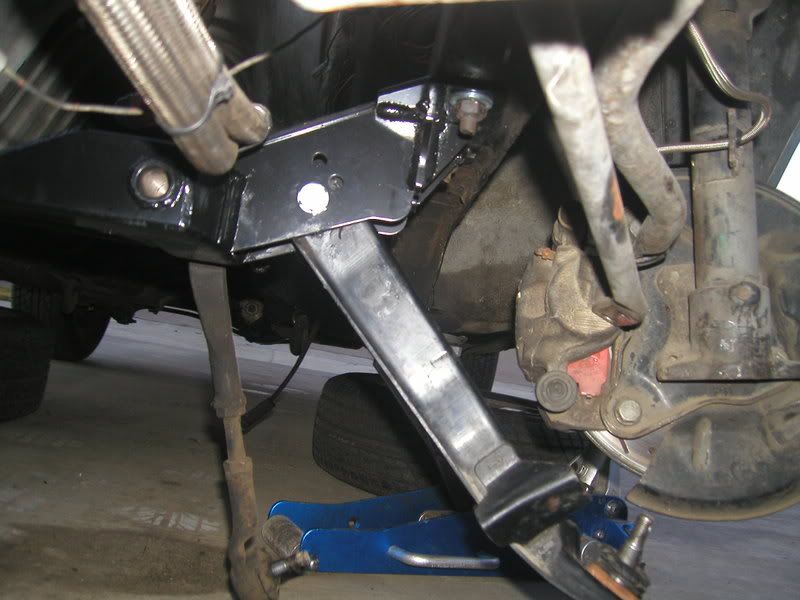
New one installed. I replace the washers with new ones and was going to replace the nuts as well but I thought i had the right thread pitch but realized I'm stupid and only had 1.50 thread pitch and they are 1.25. I'll have to go get some so everything is nice new and shiny.
Picture of the lower control arm installed. Yes I know it's on the wrong side you have to switch them. The energy suspension bushings didn't want to squeeze in there at first but after much struggling and a big plastic mallet they now reside in their new home.
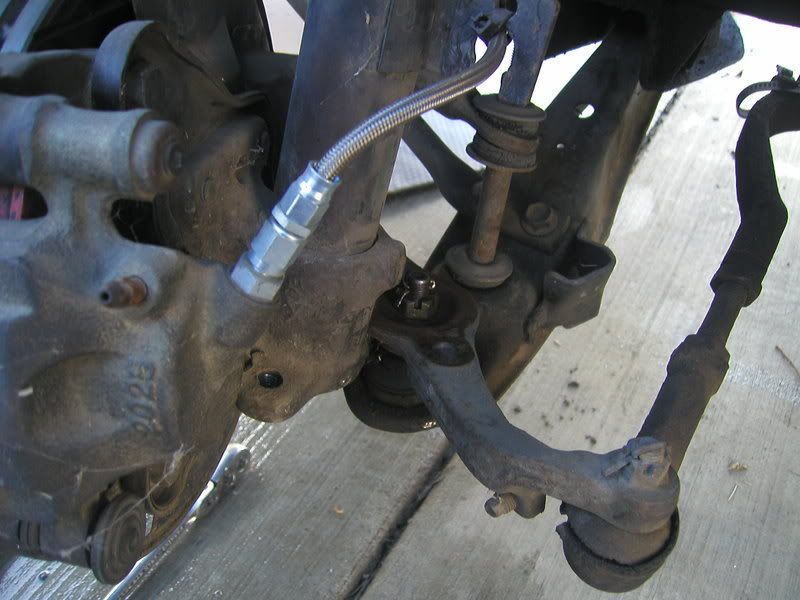
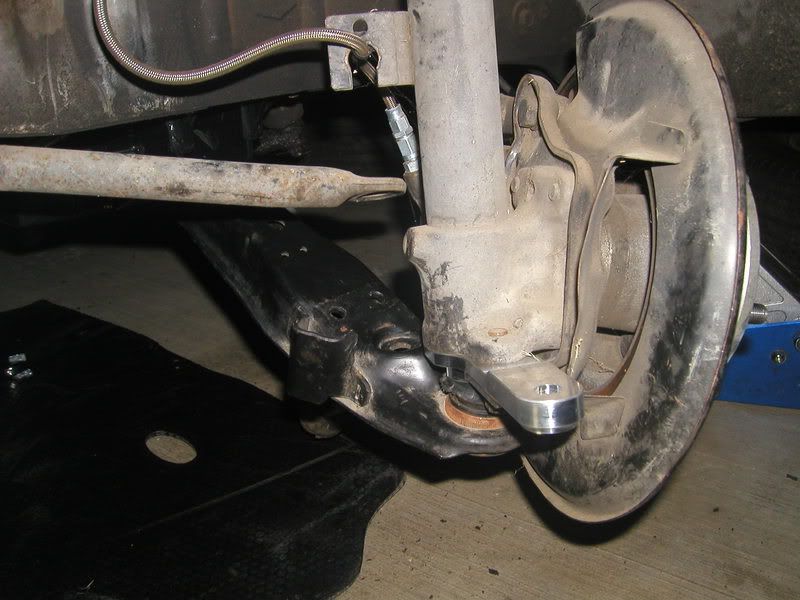
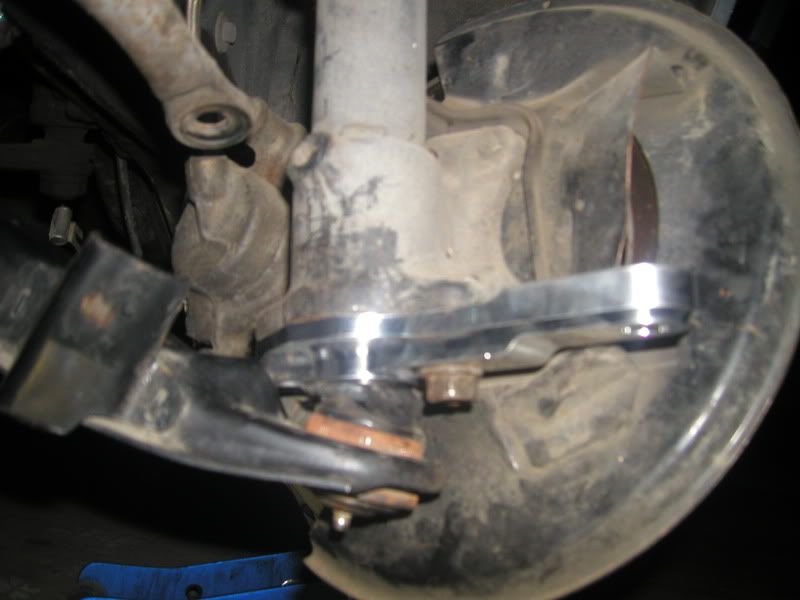
Picture of the new CNC'd aluminium steering arm installed. Yes no cotter pins it doesn't matter cause I will have to take them back apart to install new ball joints

One of the strut bolted back on to the steering arm. The rear bolt is new supplied with the kit. It is an allen head and is countersunk in the steering arm . I reused the other stock bolt for the front for now but it will get a new one right away.
A different angle of the steering arm assembly
Some things I like are how good everything fits and it is nice to have some clean stuff on my car. Hopefully I can keep it that way.
I tryed to measure the weight of the two subframes but my crappy bathroom scale wasn't working right. The old one is approx. 13-15 lbs and the new one is 14-17 lbs. My weight by myself fluctuated 5lbs up and down. I think it needs a new battery or it's too cold outside for the poor bastard to work. Hopefully the weather is nice tomorrow so I can make some more progress.
Stupid DSM! Milton I hate you right now.............
A picture of the front of my car. Yeah I know it needs to be painted save your finger tips
picture of the stock engine bay. Some stuff is still laying around in there as you can see
one of the car jacked up and the wheels off
Picture of my stock stuff and the few modified parts on the car that already existed
Those are progress group springs (160# up front and 125# out back), tokico illuminas, Some slotted and drilled rotors (Which I hate but they were free from a friend so I'll use them till they crack), and ISC steelbraidedbrake lines for those who might be wondering
One of the undertray thing removed. I will be building a new one since the stock one won't fit right probably when I'm done
Figured I throw this one in. A picture of the oil cooler and bracket I made to mount it in the nose. The front of it is just behind the stock grill and at pretty much the same angle as the grill.
A picture from above of the dirty crappy crossmember
First thing I did was remove the front strut to steering arm bolts as you can see here
These are the bolts
Next I removed the tension rod bolts and the swaybar endlink. Which will be getting replaced as you can see in the picture it is in excellent shape. Stock 1984! bad ***!
One of the lower control arm removed after unbolting the inner bolt and removing the nut and outer tie rod end from the steering arm. The worst part about this is the ball joints are bad on both side, well the boots are but they have like 200 miles on them at the most. I don't know what's up with that but I'm going to try to get some new ones again. Also I have the Energy Suspension bushing on the lower arm already. Obviously they will be reused since polyurathane pretty much lasts forever
Next the four nuts that hold the crossmember on were removed and here it is in all it's glory. Nice and oily like most of yours I'm sure.
A picture of the old one next to the new one
This picture was hard to take without someone to hold the crossmembers stacked up but you kinda get the idea of how much more clearance your given with the new crossmember. It's at least a half an inch but probably more like an inch.
New one installed. I replace the washers with new ones and was going to replace the nuts as well but I thought i had the right thread pitch but realized I'm stupid and only had 1.50 thread pitch and they are 1.25. I'll have to go get some so everything is nice new and shiny.
Picture of the lower control arm installed. Yes I know it's on the wrong side you have to switch them. The energy suspension bushings didn't want to squeeze in there at first but after much struggling and a big plastic mallet they now reside in their new home.
Picture of the new CNC'd aluminium steering arm installed. Yes no cotter pins it doesn't matter cause I will have to take them back apart to install new ball joints
One of the strut bolted back on to the steering arm. The rear bolt is new supplied with the kit. It is an allen head and is countersunk in the steering arm . I reused the other stock bolt for the front for now but it will get a new one right away.
A different angle of the steering arm assembly
Some things I like are how good everything fits and it is nice to have some clean stuff on my car. Hopefully I can keep it that way.
I tryed to measure the weight of the two subframes but my crappy bathroom scale wasn't working right. The old one is approx. 13-15 lbs and the new one is 14-17 lbs. My weight by myself fluctuated 5lbs up and down. I think it needs a new battery or it's too cold outside for the poor bastard to work. Hopefully the weather is nice tomorrow so I can make some more progress.

I need a new user title
Joined: Oct 2005
Posts: 2,646
Likes: 1
From: Yaizu, Japan
Well, the stock steering is good enough for now, but it definitely needs improvement. This is at the top of my list of planned suspension/steering upgrades.
Thread Starter
Joined: Sep 2005
Posts: 532
Likes: 1
From: Abilene, TX
4G63 would make for a very powerful cheap car though. 500 hp on a stock block wouldn't suck. Those are some tuff bastards. I thought about this at one time not for this car but thought about buying a car just for that and decided against it altogether. It just wouldn't be the same without AWD. Ya I know I could make it AWD in a RX don't get me started I already decided against it.
Jerk!
Now I'm thinking about it again.......