
RE-Speed steering kit! It's here!

djessence
Joined: Aug 2007
Posts: 2,063
Likes: 0
From: Alberta, Canada
Hey skid, was there a nylon nut on that steering column for the collapsible feature or is yours just completely f'd up. Since you have sweet pics, trying to get an idea of where it might be.
You got a sweet rack tho (lol) wish i had the money to pop one in my car
You got a sweet rack tho (lol) wish i had the money to pop one in my car
Thread Starter
Joined: Sep 2005
Posts: 532
Likes: 1
From: Abilene, TX
Nut. I don't think mine has it then. i saw no nuts besides mine that were getting broken the whole time I was trying to get that thing loose. Where was it on yours? I'll look again but If it was somewhere obvious I would have thought I would have seen it. Maybe I overlooked something. I doubt it though. The only place it could be is broken off somewhere. But nothing fell out of anywhere on disassembly. lol! I hate this thing man. But I'll get it off sooner or later. Even if it means chopping this thing open to see what's wrong with it. I'm going to maybe try a propane torch on it tomorrow and see if that does it. Maybe some plastic is melted down in between and holding it together somehow? Anything is possible at this point.
Joined: May 2002
Posts: 5,972
Likes: 37
From: Ottawa, Soviet Canuckistan
I found a steering shaft on ebay but I don't know the difference between an 84-85 "power steering" one and one without power steering
http://cgi.ebay.com/ebaymotors/Mazda...9538QQtcZphoto
Hopefully it helps
Jon
http://cgi.ebay.com/ebaymotors/Mazda...9538QQtcZphoto
Hopefully it helps
Jon
Mine got stuck too, I ended up heating the whole thing up with a torch (to melt the plastic that has now wedged itself in there) and it slid right apart. I had to get it damn hot though, a MAPP torch works just fine, just evenly heat the area and eventually it will slide apart....
Oh and that bracket on the steering column tube is to hold the plastic surround that goes around the ign switch and combo switch, I think they all have them, I had to remove that U-bracket, just took some extra measuring....
Good luck man, you'll get it!
Oh and that bracket on the steering column tube is to hold the plastic surround that goes around the ign switch and combo switch, I think they all have them, I had to remove that U-bracket, just took some extra measuring....
Good luck man, you'll get it!
Thread Starter
Joined: Sep 2005
Posts: 532
Likes: 1
From: Abilene, TX
I found a steering shaft on ebay but I don't know the difference between an 84-85 "power steering" one and one without power steering
http://cgi.ebay.com/ebaymotors/Mazda...9538QQtcZphoto
Hopefully it helps
Jon
http://cgi.ebay.com/ebaymotors/Mazda...9538QQtcZphoto
Hopefully it helps
Jon
I found a steering shaft on ebay but I don't know the difference between an 84-85 "power steering" one and one without power steering
http://cgi.ebay.com/ebaymotors/Mazda...9538QQtcZphoto
Hopefully it helps
Jon
http://cgi.ebay.com/ebaymotors/Mazda...9538QQtcZphoto
Hopefully it helps
Jon
Thread Starter
Joined: Sep 2005
Posts: 532
Likes: 1
From: Abilene, TX
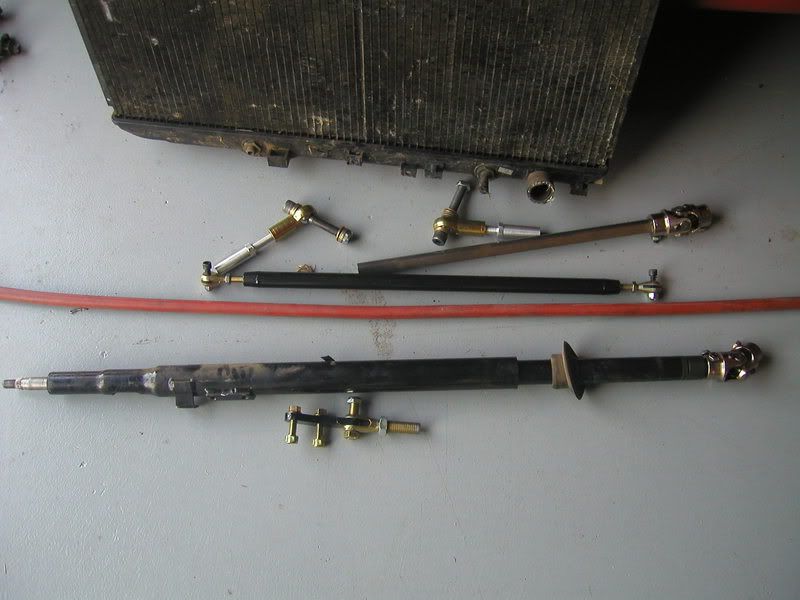
FINALLY! got that damn thing free. Here is the record of it:
Figured I'd get up today and get that bastard off no matter what. I did. I also figured I'd post these pics before I eat some lunch and stay in the house to warm up a bit. Here they are
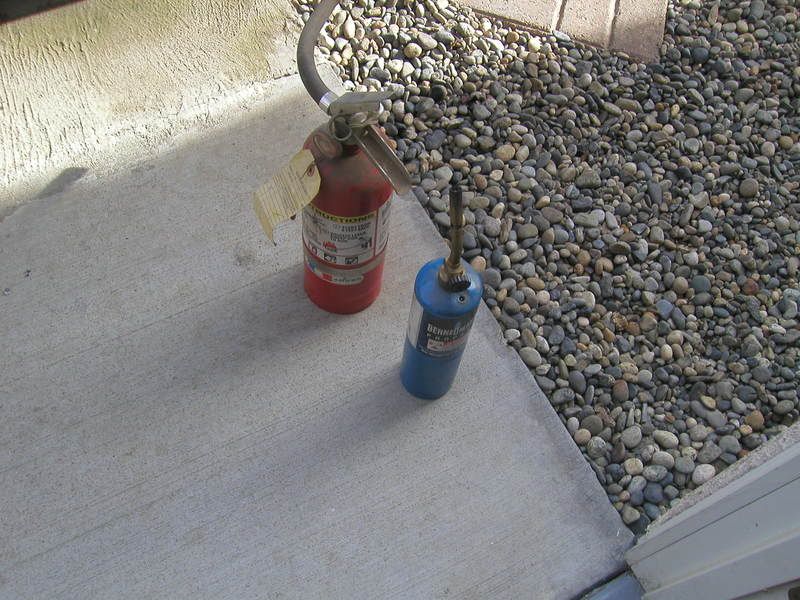
First off saftey first. I kept the extinguisher near since this thing was drenched in wd-40. There's the torch I used as well
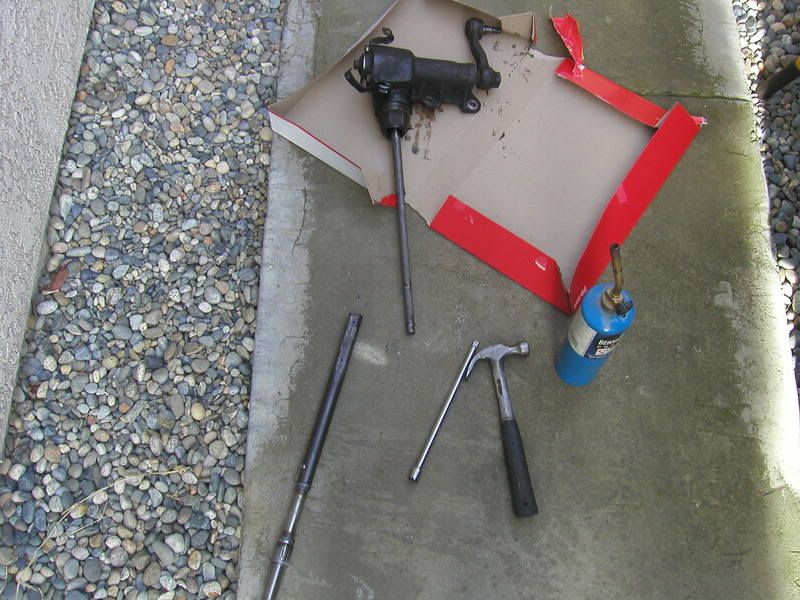
After about ten minutes of heating the tube and pulling and banging with that hammer and extension it came off. I think next time I'll use the torch right off the bat! That extension is ruined but it's a craftsman so I'll just go get a new one for free.
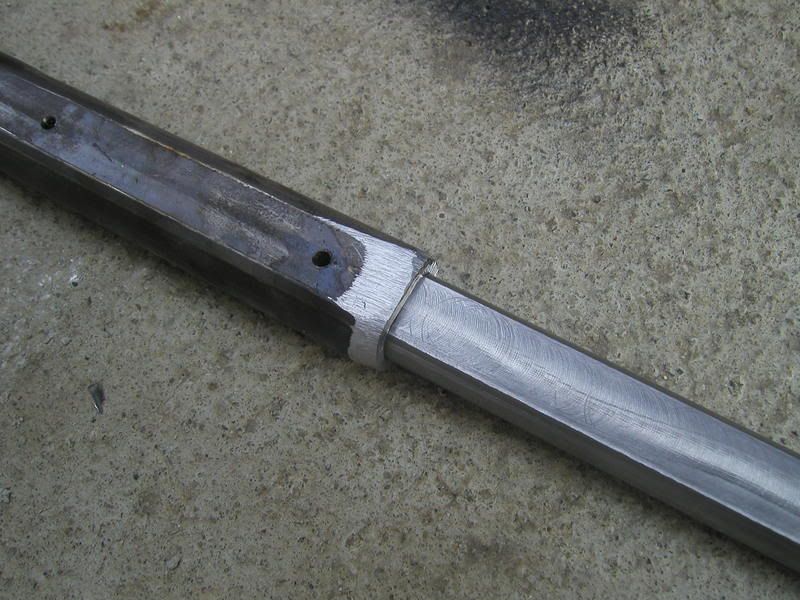
One view of the upper shaft after removal
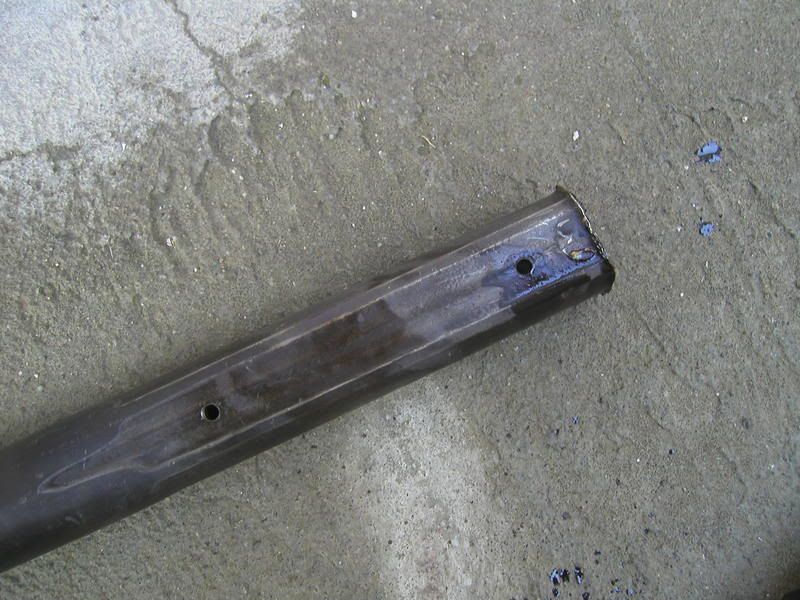
Another where you can see how bad I tore that thing up.
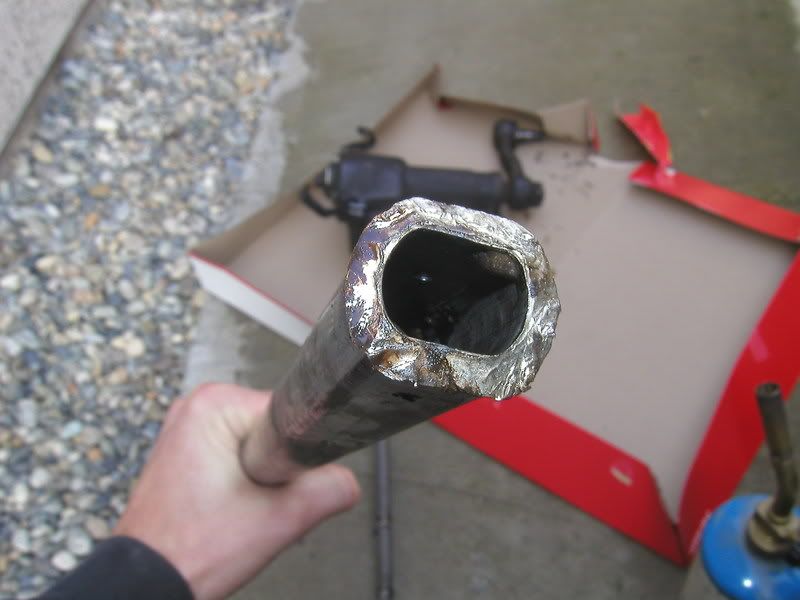
But nothing a grinder and file can't fix with some patience. Here;s one of the new lower steering shaft installed without the pins yet
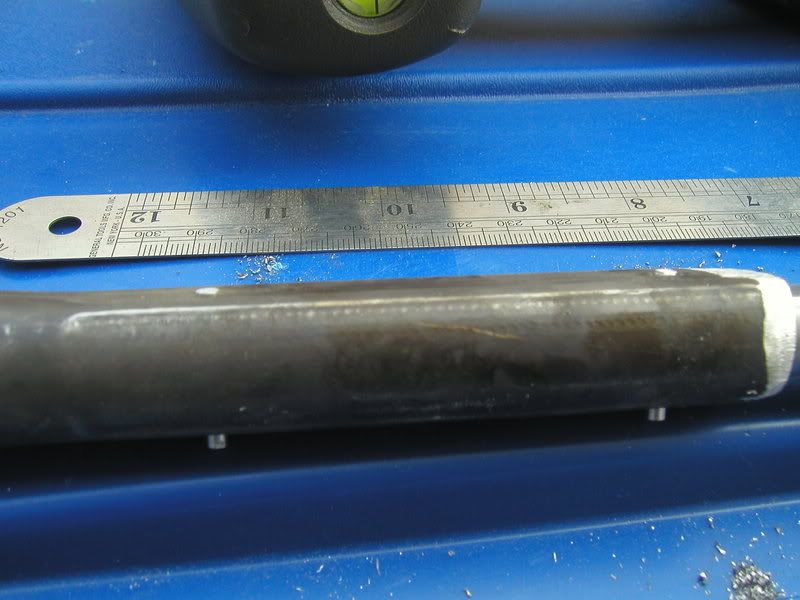
A side view of the shafts with the pins installed but not mushroomed yet. This stuff is cake. Just cut insert bang with hammer and the shafts are trapped together and you now have a collapsible column again.
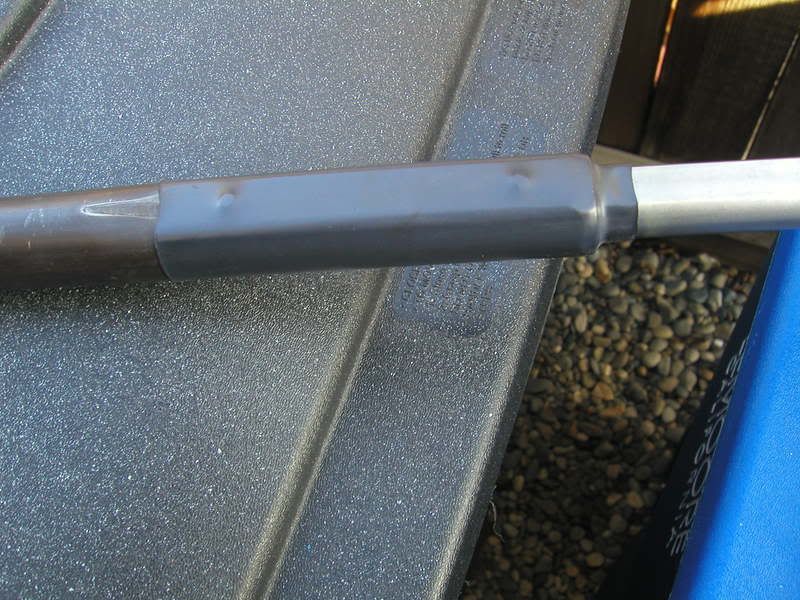
Picture of the assembly heatshrinked with the supplied piece.Looks good and is weathertight
This one might be a bit hard to see but with the assebly done you can see that billy's measurement is pretty precise. There is only about a 32nd of gap between the end of the steering rod and the end of the u-joint. NICE! This is not installed yet but I figured I'd check before putting it in the car. So I could fix anything that was wrong. That was easy nothing was wrong. I have at this point already set the length by pulling the upper shaft to length. Do you remember that 64mm sticking out? Well it's the same now just the ridiculous gear box is removed.
Figured I'd get up today and get that bastard off no matter what. I did. I also figured I'd post these pics before I eat some lunch and stay in the house to warm up a bit. Here they are
First off saftey first. I kept the extinguisher near since this thing was drenched in wd-40. There's the torch I used as well
After about ten minutes of heating the tube and pulling and banging with that hammer and extension it came off. I think next time I'll use the torch right off the bat! That extension is ruined but it's a craftsman so I'll just go get a new one for free.
One view of the upper shaft after removal
Another where you can see how bad I tore that thing up.
But nothing a grinder and file can't fix with some patience. Here;s one of the new lower steering shaft installed without the pins yet
A side view of the shafts with the pins installed but not mushroomed yet. This stuff is cake. Just cut insert bang with hammer and the shafts are trapped together and you now have a collapsible column again.
Picture of the assembly heatshrinked with the supplied piece.Looks good and is weathertight
This one might be a bit hard to see but with the assebly done you can see that billy's measurement is pretty precise. There is only about a 32nd of gap between the end of the steering rod and the end of the u-joint. NICE! This is not installed yet but I figured I'd check before putting it in the car. So I could fix anything that was wrong. That was easy nothing was wrong. I have at this point already set the length by pulling the upper shaft to length. Do you remember that 64mm sticking out? Well it's the same now just the ridiculous gear box is removed.
Thread Starter
Joined: Sep 2005
Posts: 532
Likes: 1
From: Abilene, TX
Alright after lunch i did a bit more then I got too cold so I'm back in the house. Here's one of the parts I have left to install up to this point.
One of the driver's side rear lower control arm mount loosely mounted. Yes I know I didn't paint the frame rail yet. I will but I'm thinking of having the car painted soon. Maybe If not i'll just unbolt this stuff and paint that part later.

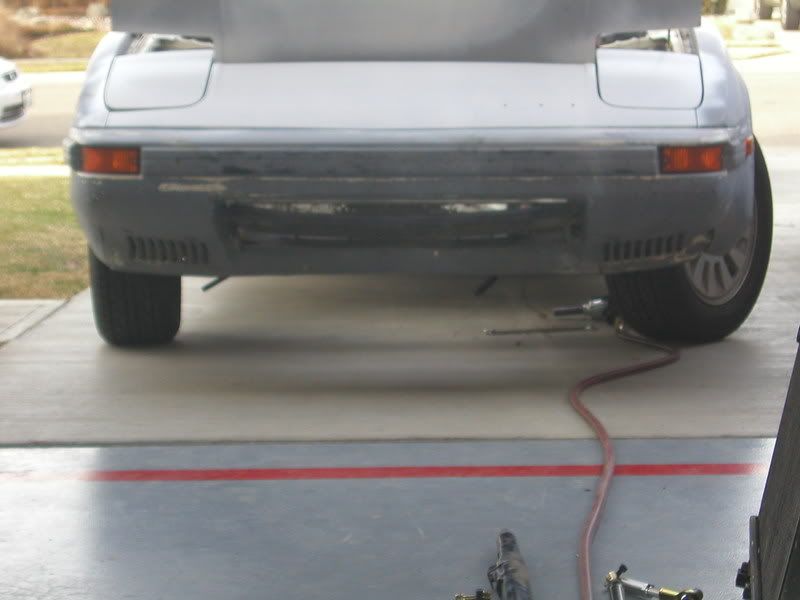
RX-7's got a broken leg...... I just thought this looked weird. With no steering it's funny how you can steer just one tire
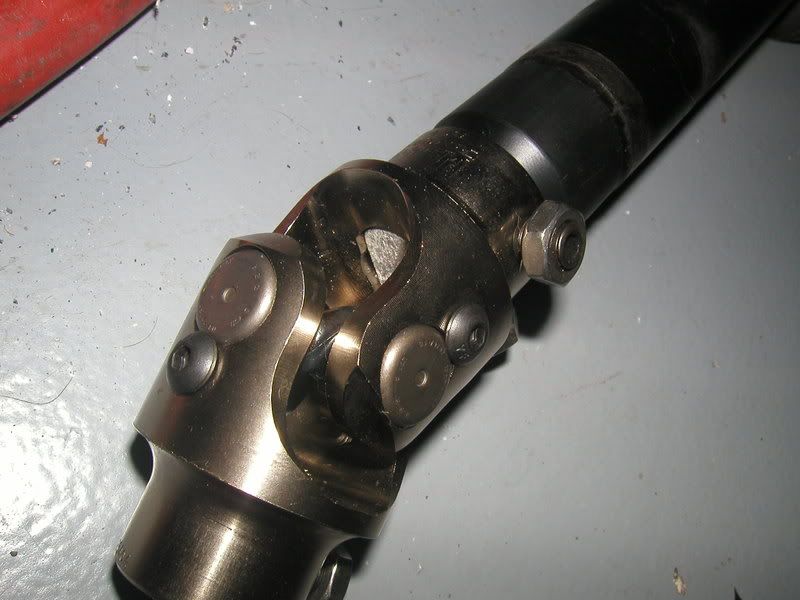
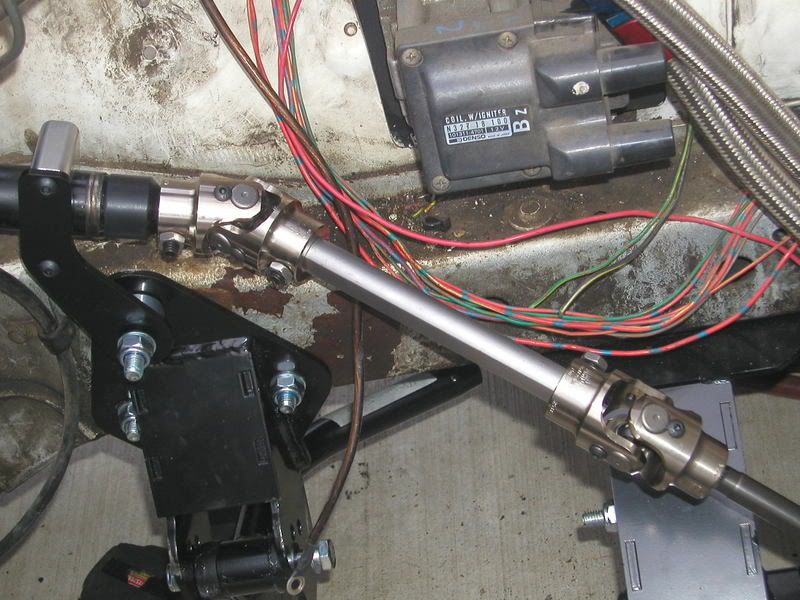
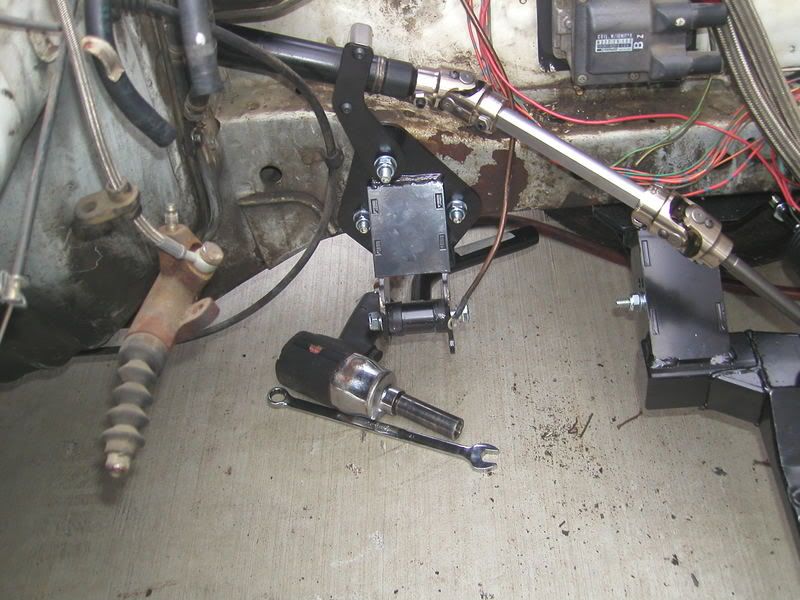
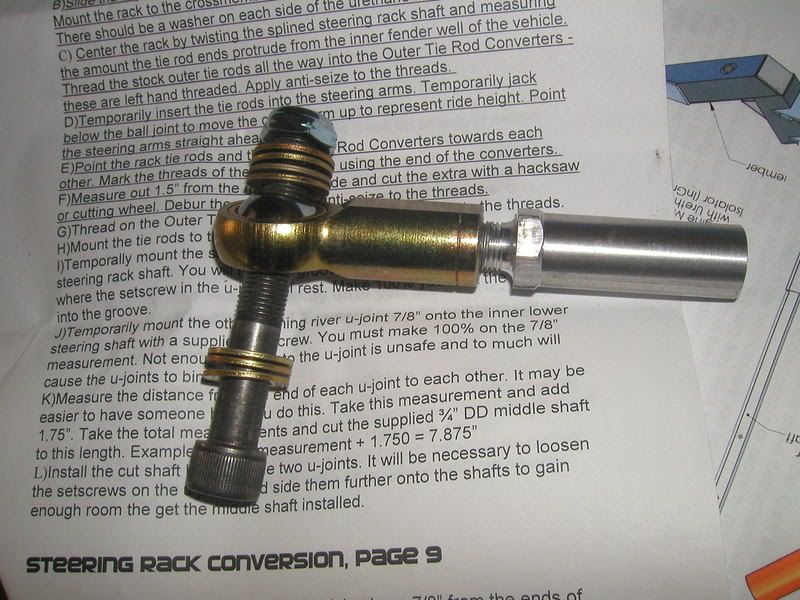
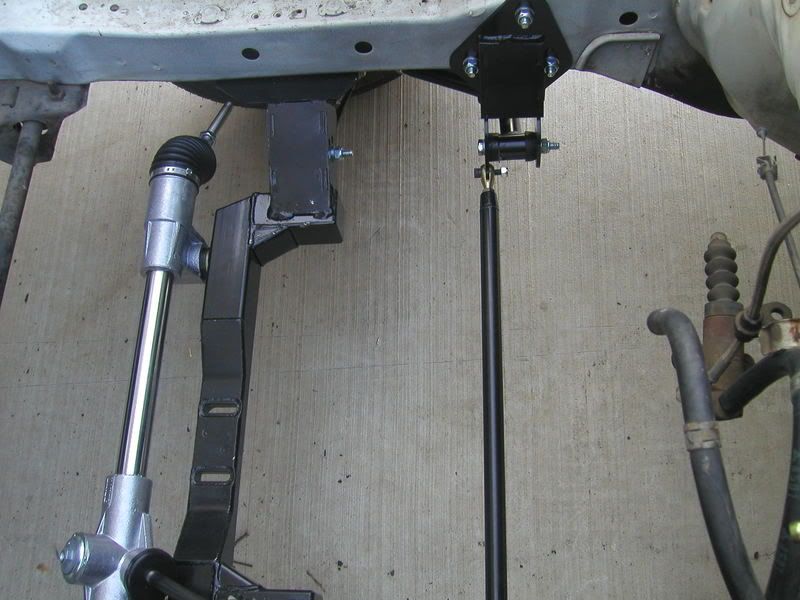
Here the steering u-joints installed and the center shaft has been measured and cut and installed already. This part is really easy and self explanitory.
Another shot of that side of the vehicle
I talked to Billy awhile back and I may have to remeasure when I'm done but I want to lower the steering wheel a bit since now things are mobile that weren't before. I'll probably move it down about an inch. I gotta wait till my driver's seat is installed though so I know how much leg room and stuff I need.
I've got a few more parts to install but not much left the driver's side rlca is not mounted to the lca and the tie rod ends are not done yet and whatelse..hmmmmmmmm.......oh the bar included in the kit that ties together the rear lca brackets together. I think that's it. Then going back over the whole thing and tightening, using loctite in the appropriate areas, and the like. I still need to get my swaybar links and bushings and do something about the ball joints on the lcas. I can't believe those boots are torn already that bugs me quite a bit. I feel like I pissed away the money. Does anyone know a place that replaces the ball loint with something better?
One of the driver's side rear lower control arm mount loosely mounted. Yes I know I didn't paint the frame rail yet. I will but I'm thinking of having the car painted soon. Maybe If not i'll just unbolt this stuff and paint that part later.
RX-7's got a broken leg...... I just thought this looked weird. With no steering it's funny how you can steer just one tire
Here the steering u-joints installed and the center shaft has been measured and cut and installed already. This part is really easy and self explanitory.
Another shot of that side of the vehicle
I talked to Billy awhile back and I may have to remeasure when I'm done but I want to lower the steering wheel a bit since now things are mobile that weren't before. I'll probably move it down about an inch. I gotta wait till my driver's seat is installed though so I know how much leg room and stuff I need.
I've got a few more parts to install but not much left the driver's side rlca is not mounted to the lca and the tie rod ends are not done yet and whatelse..hmmmmmmmm.......oh the bar included in the kit that ties together the rear lca brackets together. I think that's it. Then going back over the whole thing and tightening, using loctite in the appropriate areas, and the like. I still need to get my swaybar links and bushings and do something about the ball joints on the lcas. I can't believe those boots are torn already that bugs me quite a bit. I feel like I pissed away the money. Does anyone know a place that replaces the ball loint with something better?

Full Member
Joined: Nov 2006
Posts: 152
Likes: 0
From: san francisco
I just ordered mine the other day. I've been watching your install, what if any special tools were needed other than the torch? When you said measured and cut is what I 'm referring to.
I want to be ready as possible. I went ahead and ordered the sway bars also. I was going to take the rb sways from my gf's -se I gave to her for her b-day but coming up with another ( you don't really need that ) story was kinda bad during the holidays. I opted for the black too, no bling for me.
I want to be ready as possible. I went ahead and ordered the sway bars also. I was going to take the rb sways from my gf's -se I gave to her for her b-day but coming up with another ( you don't really need that ) story was kinda bad during the holidays. I opted for the black too, no bling for me.

Full Member
Joined: Aug 2006
Posts: 197
Likes: 4
From: Chicago
Damn this is a fun thread. I felt your pain on getting the shaft apart. There has to be a new form classification for mechanic rage created. Last weekend I had an episode of mechanic rage so bad I had thoughts of destroying my entire garage! Stupid question: Will this setup require a power steering pump?
Joined: Feb 2006
Posts: 3,162
Likes: 1
From: London, Ontario, Canada
Does this kit come with new mounts for the sway bar? They originally mount to the tension rod mounts, but since those aren't being used anymore do they get replaced or stay on the car?
Thread Starter
Joined: Sep 2005
Posts: 532
Likes: 1
From: Abilene, TX
I just ordered mine the other day. I've been watching your install, what if any special tools were needed other than the torch? When you said measured and cut is what I 'm referring to.
I want to be ready as possible. I went ahead and ordered the sway bars also. I was going to take the rb sways from my gf's -se I gave to her for her b-day but coming up with another ( you don't really need that ) story was kinda bad during the holidays. I opted for the black too, no bling for me.
I want to be ready as possible. I went ahead and ordered the sway bars also. I was going to take the rb sways from my gf's -se I gave to her for her b-day but coming up with another ( you don't really need that ) story was kinda bad during the holidays. I opted for the black too, no bling for me.
I really didn't think of this part of the work if I use anything unordinary I'll post a pic of it so you guys know what it looks like
Thread Starter
Joined: Sep 2005
Posts: 532
Likes: 1
From: Abilene, TX
Thread Starter
Joined: Sep 2005
Posts: 532
Likes: 1
From: Abilene, TX
Yeah the torch is a MUST in my opinion. If I would have heated it up in the beginning it would have been not even close to as hard to get apart. I only had to hit it like four times after it was nice and hot. Gotta love big leather gloves to when you can just hold pipin hot steel and not feel it. Tools really are the reason why we are better than other mammals. They just belong on our dinner plates. lol
Thread Starter
Joined: Sep 2005
Posts: 532
Likes: 1
From: Abilene, TX
I'm still trying to decide but I'll probably end up building G-Force engineering's front and rear adjustable bars like on my friend's car. They aren't the best looking but they are the best working bars possible.
Bongolio
Joined: Nov 2004
Posts: 1,556
Likes: 1
From: visalia,california
Hell im trying to smog this beast right now..lol Its a bitch!
Thread Starter
Joined: Sep 2005
Posts: 532
Likes: 1
From: Abilene, TX
I used to have a gutted out drag FC3s..I actually used to go to hanford all the time for the car meets on the weekends. Now i have a FB that im working on! Ive never met mike,but there is an FD and a t2 guy here in visalia running around! Actually there used to be an ls1 powered FD in woodlake too.
Hell im trying to smog this beast right now..lol Its a bitch!
Hell im trying to smog this beast right now..lol Its a bitch!
Last edited by Skidtron; Dec 29, 2007 at 07:52 PM.
Thread Starter
Joined: Sep 2005
Posts: 532
Likes: 1
From: Abilene, TX
Some more pics of the progress today. Not much progress since a old friend of mine just showed up out of nowhere so we were hanging out pretty much the whole rest of the day.
One of the driver's side control arms uncompleted
One of it assembled. It's just like the passenger side
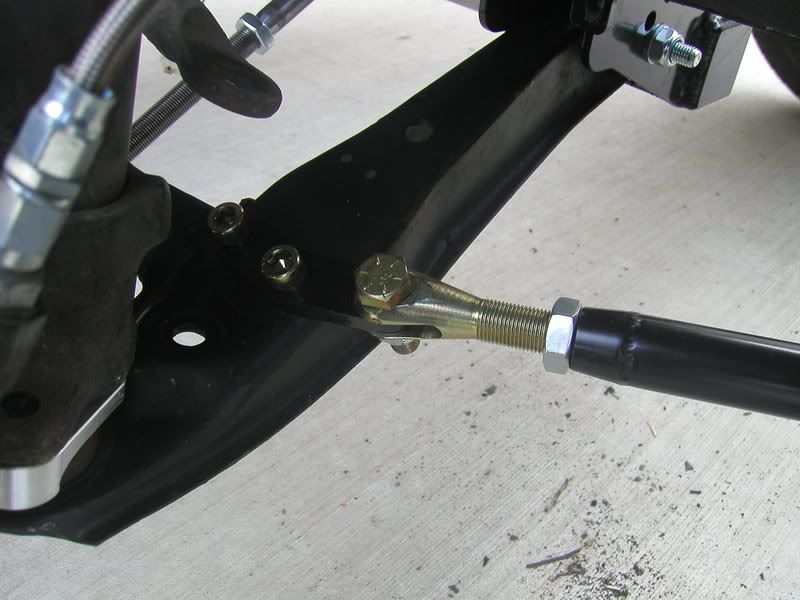
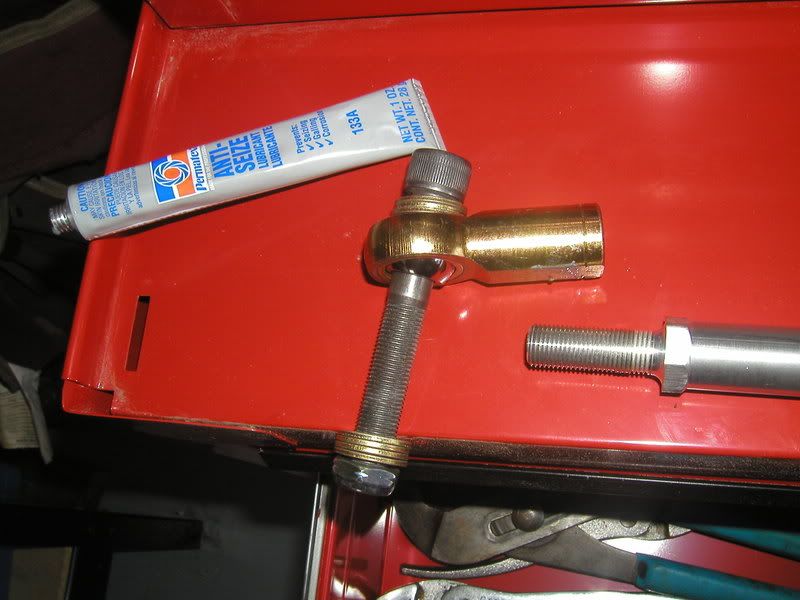
The outer tie rod ends being assembled. The hiem has a thread adapter that screws down into it and in the picture you can see the anti-sieze compound I used so it doesn't get stuck later. Especially since the heim is steel and the adapter is aluminium. I didn't do anything else with these today. You just bottom the adapter out in the heim. Very easy.
An assembled one. Pay no mind to the washers at this point since the amount for proper operation has not been determined yet.
And finally one of the tie bar that comes with the kit that ties the two rlca brackets together. I installd this just for the pic then took it out again. It may interfere with my setup. Not sure yet so I'm just leaving it off and out of the way for now.
Good stuff. I think all I have to do now is the tie rod ends and a crap load of measuring so I do it right. Everything looks good so far I have had no problems with any of it except the afore mentioned steering shaft assembly. The assembly steers very very smoothly thus far. The only difference will be that it will be just a bit harder to steer with the wheels and tires on and some weight on the front end of course. I'm just very pleased with the smoothness. There is not even a hit of binding throughout it's travel. Good stuff!
One of the driver's side control arms uncompleted
One of it assembled. It's just like the passenger side
The outer tie rod ends being assembled. The hiem has a thread adapter that screws down into it and in the picture you can see the anti-sieze compound I used so it doesn't get stuck later. Especially since the heim is steel and the adapter is aluminium. I didn't do anything else with these today. You just bottom the adapter out in the heim. Very easy.
An assembled one. Pay no mind to the washers at this point since the amount for proper operation has not been determined yet.
And finally one of the tie bar that comes with the kit that ties the two rlca brackets together. I installd this just for the pic then took it out again. It may interfere with my setup. Not sure yet so I'm just leaving it off and out of the way for now.
Good stuff. I think all I have to do now is the tie rod ends and a crap load of measuring so I do it right. Everything looks good so far I have had no problems with any of it except the afore mentioned steering shaft assembly. The assembly steers very very smoothly thus far. The only difference will be that it will be just a bit harder to steer with the wheels and tires on and some weight on the front end of course. I'm just very pleased with the smoothness. There is not even a hit of binding throughout it's travel. Good stuff!
Thread Starter
Joined: Sep 2005
Posts: 532
Likes: 1
From: Abilene, TX
Do you have RHD Mustangs where you live? If so then you can buy the kit. There is no reason it won't work on the other side. The only thing I can think of is a minor modification to the rear lower control arm brackets. The rack is a fox body mustang rack. That's not hard to come by unless they did not have mustangs where you live. I don't know why you would think it wouldn't work on your car.
No the mounts for the tension rods stay there just the rods and bushings are removed. I kinda thought it would be cool if Billy could make new mounts as most people's probably look like mine which are pretty tired and worn out. Rusty too! New mounts that only hold the sway bar and are as much out of the way as possible would be cool.
I'm still trying to decide but I'll probably end up building G-Force engineering's front and rear adjustable bars like on my friend's car. They aren't the best looking but they are the best working bars possible.
I'm still trying to decide but I'll probably end up building G-Force engineering's front and rear adjustable bars like on my friend's car. They aren't the best looking but they are the best working bars possible.
I was kind of hoping something would be made to replace those tension rod brakcets too, they are big, heavy, rusty and just un-needed. Since no such things exists right now I ended up cutting all the extra crap off mine, leaving a more or less flat piece that will bolt to the body and hold the sway bar on. I'll post pics of what I did if anyone cares. I also sandblasted them when done, came out pretty good.
Joined: Oct 2003
Posts: 3,438
Likes: 6
From: Outskirts of Road Atlanta
I don't think it's unreasonable to think that your steering columns might be considerably different, as well as the support point for the column, not to mention routing and clearance issues with the exhaust. While it might be second-nature to guys in RHD markets, it's not something we're used to having to deal with in the states. It's definitely not something you'd want to ship for the first time and expect it to all bolt up.
Besides that, the steering system is rather important as vehicle safety goes. You'd be asking re-speed to take a big risk.
