
RE-Speed steering kit! It's here!

Thread Starter
Joined: Sep 2005
Posts: 532
Likes: 1
From: Abilene, TX
Heat the steering shaft when you go to seperate it so it will be insanely easy. Everything else is just nuts and bolts. Make sure you use anti sieze wear needed and loctite where needed. Replace any stock nuts and bolts that you are going to reuse since our cars are old do it a favor and replace all that stuff. Clean everything up as well. Mine still has a lot of cleaning to do but I'll wait till just before I reassemble the car

Thread Starter
Joined: Sep 2005
Posts: 532
Likes: 1
From: Abilene, TX
Not yet as I don't know the final location height of the steering wheel. So i may need to make the intermediate steering bar longer or shorter depending. The piece I cut there is to put the steering wheel in the stock location. I am awaiting the seat rail for my Corbeau so then I can position the steering wheel. I think it will be lowered about an inch. Then I will cut another longer piece. Luckily Billy gives you more than you need so it's no big deal. Then once it's all set in stone I'll drill the divets for the U-joints. As I'm sure you noticed there are no cotter pins added anywhere yet as i know I will be dissasembling a large portion of the kit when we make the new mount brckets for the chassis to fit the S5 drivetrain. If you just doing a stock application it's a piece of cake. There is just changes I want to make for my personal needs/wants that make it take way longer. Mostly just awaiting the welder to have time. I already know how we are going to build the mounts and the banzai poly FC mounts are on their way to my house already. Should be a pretty nice car when it gets put back together. Well except the lack of a paint job anyways. That's next. Then I have to take everything out all over again as I'm going to get the bay painted as well. It's a big mission but I like wasting my money on my car so it's cool.
The one thing I'd like to point out/somthing i'd do different on the next install is to drill that small dimple on the lower steering shaft before you put the actual column in the car. It was kind of awkward to do that once the column was in the car especially with the engine in there....
Good luck with your FC engine mounting system, I just finished sandblasting/painting my setup, I'll probably be posting pics of that, along with the modded sway bar brackets, and trans mount tonight, I'll post a link to my thread when I do.
Good luck with your FC engine mounting system, I just finished sandblasting/painting my setup, I'll probably be posting pics of that, along with the modded sway bar brackets, and trans mount tonight, I'll post a link to my thread when I do.

Full Member
Joined: Nov 2006
Posts: 152
Likes: 0
From: san francisco
Got mine in last week and have been mocking/hooking it up as well. On my setup I've run into a couple problems but getting through them is the fun part.
Skidtron I could not see a picture of your steering shaft coming through the firewall. How centered in the hole is it? I attached a pic of mine because its pretty close. Also how did you get the gold clevis bar in the strut arm it feels like I'm going to break it.. last pic?
I was able to get the shifter almost in the stock location with the Turbo II parts, but my black magic elec fan needs about an inch to fit. I'm thinking of using a slimline elec fan could anyone recommend a good one that might fit?
This kit is the **** I have to give it to billy, The only problem I can see is finding an alignment shop that knows what to do with it... I almost want to finish it and give it a show car feel with mirrors and lights on the floor with one wheel off so you can check out respeed, But I love oversteer to much.
Skidtron I can't wait to see how you mount the motor I took the easy way out and used a gsl-se front cover plumed in front for oil return. And anyone thinking about clearance with a conversion its no problem but don't even think about a/c or is that just me?
Last edited by RickRx; Feb 19, 2008 at 12:38 PM. Reason: picture adding
The steering column should be centered like stock. Call/email billy its possible that you got the small aluminum spacer for the 79-81 style colum which is different....
As for the rear control arms gold clevis, that thing is a bitch and half to get on, it takes a lot of muscle, but it'll go on, as much as I hate to hit nice new parts with a hammer, but I had to smack that thing around a bit to get it together....
AC isn't gonna fit withouth modifying the AC bracket extensively... And I had the same problem with the Fan my black magic fan was too big, had to get a skinny one off ebay, haven't driven the car yet so not sure if its up to the task yet or not....

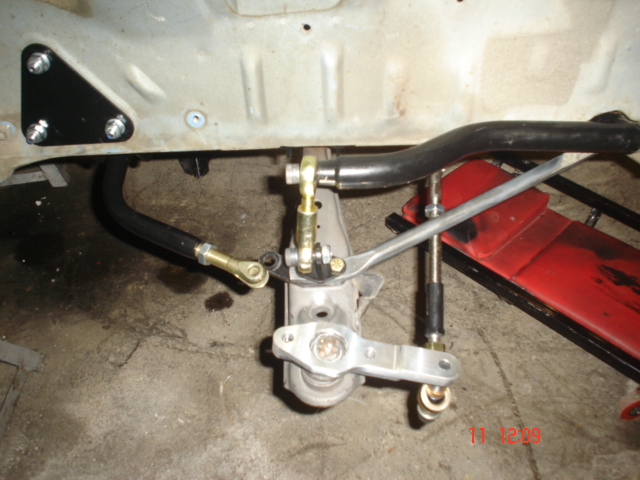
You will want to remove the tension rods that go to the front. This will allow the control arm to pivot a bit to help get the gold clevis on. The powder coat is what hangs it up most of the time.
You only leave the tension rod on until you get the gold clevis adjusted. Take the "3 hole" bracket off the control arm and temp bolt it to the two holes on the stay rod. Then adjust the gold clevis in or out to center the hole in the clevis to the last hole in the "3 hole" bracket. Then remove the bolts from the "3 hole" bracket to the stay rod and toss the stay rod. Put the "3 hole" bracket back on the control arms.
Also, we spoke about the centering of the steering shaft. It will not be 100% centered but it should not be touching the side of the chassis.
Check the thickness of the aluminum round spacer. Should be .750" for SA cars and .600" for FB cars.
-billy
Joined: May 2002
Posts: 5,972
Likes: 37
From: Ottawa, Soviet Canuckistan
Lookin' good guys! 
I can't wait. I'm practically drooling looking at these pics. The ReSpeed kit is the first thing I'm going to buy if/when trochoid ever pays me back.
Jon
I can't wait. I'm practically drooling looking at these pics. The ReSpeed kit is the first thing I'm going to buy if/when trochoid ever pays me back.
Jon


Hey skidtron, posted a few pics of what I've been working on, including the modded trans mount, and sway bar brackets... The pics are in my build thread:
https://www.rx7club.com/1st-generation-specific-1979-1985-18/project-83-s-restoration-t2-swap-update-624258/page6/
Take a look at the rest of it if you wanna see the rest of the build/resto
https://www.rx7club.com/1st-generation-specific-1979-1985-18/project-83-s-restoration-t2-swap-update-624258/page6/
Take a look at the rest of it if you wanna see the rest of the build/resto
Joined: Feb 2006
Posts: 3,162
Likes: 1
From: London, Ontario, Canada
Damnit, now I'm really pissed off that I didn't get much work over Christmas. The plan was to buy this kit before DGRR but now it has to wait until afterwards. Keep up the good work guys, I know I'm going to need this thread in a few months.
Full Member
Joined: Nov 2006
Posts: 152
Likes: 0
From: san francisco
Will do I really did not want to shave the aluminum, I do not have a steady hand but will measure it. I have a 82 but looking to use the 84-85 steering mounting points since I have a se dash and the points don't match..
I will try the method billy mentioned for the clevis deal atleast I know I won't break it. The rod was removed when I tried to put it on after talking to billy so disregard that pic above. I've heman broke things you could not imagine lol.
Thanks for all the help I'm just more of a visual person and for some reason I feel apart of a 1st gen new coming. Keep it up everyone also we should post our finished products in a thread so others can see the glory in having a steerable 1st gen.
Last edited by RickRx; Feb 20, 2008 at 10:50 AM. Reason: no pic
If you break that cleavis you are putting WAY too much stress on it haha. I think Billy is right, its the powercoatings thickness that makes it so hard to put together. I had to take mine back apart a few times to get everything set up right and it was easier than initially....
Thread Starter
Joined: Sep 2005
Posts: 532
Likes: 1
From: Abilene, TX
Got mine in last week and have been mocking/hooking it up as well. On my setup I've run into a couple problems but getting through them is the fun part.
Skidtron I could not see a picture of your steering shaft coming through the firewall. How centered in the hole is it? I attached a pic of mine because its pretty close. Also how did you get the gold clevis bar in the strut arm it feels like I'm going to break it.. last pic?
"Mine is similar, Billy assured me it's fine and if you look at it minus the firewall portion it is a bit closer to the driver's side than you might think even stock. I often wondered why my steering wheel seemed to be angled ever so slightly to the driver's side after seeing a couple other FB's I noticed it's the same on all of them. Your good except you need to plug the hole up of course"
I was able to get the shifter almost in the stock location with the Turbo II parts, but my black magic elec fan needs about an inch to fit. I'm thinking of using a slimline elec fan could anyone recommend a good one that might fit?
"put the fan on the front of the radiator"
This kit is the **** I have to give it to billy, The only problem I can see is finding an alignment shop that knows what to do with it... I almost want to finish it and give it a show car feel with mirrors and lights on the floor with one wheel off so you can check out respeed, But I love oversteer to much.
"I'm taking mine to a shop that specializes in race car alignments. The funny thing is it only costs $40 more than a regular shitty alignment at Sears"
Skidtron I can't wait to see how you mount the motor I took the easy way out and used a gsl-se front cover plumed in front for oil return. And anyone thinking about clearance with a conversion its no problem but don't even think about a/c or is that just me?
Trust me I thought about doing that too hell I even bought a whole GSL-SE to steal the parts from for $500 but the mounts will be better. Not to mention I can give back to the community. I will be sending them to Billy when they are done so he can check them out. He's probably going to do a mock up in a spare chassis. Maybe he will powder coat them the same color as my crossmember for me as a present for the gift of already engineered mounts he can copy and sell. HINT! HINT! Billy. I'm just kidding but I will probably pay you to do it if nothing else."
Thread Starter
Joined: Sep 2005
Posts: 532
Likes: 1
From: Abilene, TX
Hey skidtron, posted a few pics of what I've been working on, including the modded trans mount, and sway bar brackets... The pics are in my build thread:
https://www.rx7club.com/showthread.php?t=624258&page=6
Take a look at the rest of it if you wanna see the rest of the build/resto
https://www.rx7club.com/showthread.php?t=624258&page=6
Take a look at the rest of it if you wanna see the rest of the build/resto
Your motor mount brackets look similar to what I have in mind. A bit hard to tell in the picture though. My banzai racing poly engine isolators came today. They are the same hieght as the stock FC one's so I'll use them to make the chassis side brackets. Should be soon. I'm dying here. Good thing I've been busy with a customers car or I'd be going crazy being this close and having nothing to do. I really wish I could finish the wiring without the motor in but i want the lengths of everything perfect so it's too much work to hang the motor off the lift and all that just to do the wiring.
Thread Starter
Joined: Sep 2005
Posts: 532
Likes: 1
From: Abilene, TX
If you break that cleavis you are putting WAY too much stress on it haha. I think Billy is right, its the powercoatings thickness that makes it so hard to put together. I had to take mine back apart a few times to get everything set up right and it was easier than initially....
Agreed, the control arm can move pretty easily, after doing it a few times (i had to take my control arms back out a few times) it gets much easier, only took a few minutes a side to reinstall them yesterday.
I'm interested to see what you come up with for the engine mounts, I emailed billy with pics to see what he thinks, but no response yet. I have a brand new set of FB rubber mounts, so I might adapt them to work with mysetup, rather than buying FC mounts and have these go to waste, not sure yet. At this point I'm waiting for some money to get an oil pan gasket, and some other little things to put the FC pan and front cover back on....
I'll post pics once its all done, I know its hard to tell what's up with my motor mount setup in that pic
Full Member
Joined: Nov 2006
Posts: 152
Likes: 0
From: san francisco
Thanks I got one side on thats better than nothing just have to cut the tie rod ends...
Am I the only one using billy's mounts for the motor? Whats the reason for altering it to 2nd gen? I can see for s5 omp but to add to the community, You guys are good. I figure it must be a reason billy did not put both or maybe billy can elaborate?
To me its like buying a pair of nikes and trying to turn the swoosh into the puma logo?
Believe me I would love to have the ***** to spend 1100 and redo it? please set me straight mine is to beat up on not dd maybe the reason I just don't want the motor to fall out you guys might know something I don't..
Also waiting on a micrometer my friend has to get the exact measurement of the aluminum spacer..
They are doing this to mount a 2nd generation style engine into a first gen chassis.
You can use a penny to see how thick the aluminum spacer is. A penny is 3/4" diameter. There is only 1/8" thickness difference from one spacer to the other. I do not see it making that big of a difference. It may have more to do with the mounting under the dash.
Let me know if it is the thick one and I will gladly send you the correct spacer.
-billy
Thanks I got one side on thats better than nothing just have to cut the tie rod ends...
Am I the only one using billy's mounts for the motor? Whats the reason for altering it to 2nd gen? I can see for s5 omp but to add to the community, You guys are good. I figure it must be a reason billy did not put both or maybe billy can elaborate?
To me its like buying a pair of nikes and trying to turn the swoosh into the puma logo?
Believe me I would love to have the ***** to spend 1100 and redo it? please set me straight mine is to beat up on not dd maybe the reason I just don't want the motor to fall out you guys might know something I don't..
Also waiting on a micrometer my friend has to get the exact measurement of the aluminum spacer..
Am I the only one using billy's mounts for the motor? Whats the reason for altering it to 2nd gen? I can see for s5 omp but to add to the community, You guys are good. I figure it must be a reason billy did not put both or maybe billy can elaborate?
To me its like buying a pair of nikes and trying to turn the swoosh into the puma logo?
Believe me I would love to have the ***** to spend 1100 and redo it? please set me straight mine is to beat up on not dd maybe the reason I just don't want the motor to fall out you guys might know something I don't..
Also waiting on a micrometer my friend has to get the exact measurement of the aluminum spacer..
If it weren't for that damn electronic OMP I would certainly just keep it the way it was.....
From looking at the pictures, Am I correct that we will have to locate and drill our own holes for the motor mounts if we want to retain the 12a front cover, with this rack and steering kit?
Correct me if Im wrong, but I dont see how else it will connect to the subframe.
Thanks!
Correct me if Im wrong, but I dont see how else it will connect to the subframe.
Thanks!
-billy