
EASY 2nd gen direct fire install - 20 minutes


The coil pack I picked up (from a forum member, Mike Harrington, $25 shipped) has the resistor on the (+) or "tan" lead, not the (-) or "black" lead, so I think I've got it right. This is what mine looks like:
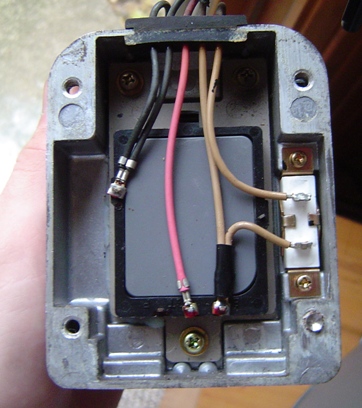
The red wire coming from the FB coil's (+) connects to the tan wire in the white connector, which connects with the (+) pole on the 2nd gen coil. Not bad for a dyslexic, huh?
Now if I could just figure out that trailing to leading switch with the trailing plug wires????
The red wire coming from the FB coil's (+) connects to the tan wire in the white connector, which connects with the (+) pole on the 2nd gen coil. Not bad for a dyslexic, huh?
Now if I could just figure out that trailing to leading switch with the trailing plug wires????
13B N/A POWA!
Joined: Apr 2002
Posts: 1,013
Likes: 0
From: Everywhere, WRLD
The coil pack I picked up (from a forum member, Mike Harrington, $25 shipped) has the resistor on the (+) or "tan" lead, not the (-) or "black" lead, so I think I've got it right. This is what mine looks like:
The red wire coming from the FB coil's (+) connects to the tan wire in the white connector, which connects with the (+) pole on the 2nd gen coil. Not bad for a dyslexic, huh?
Now if I could just figure out that trailing to leading switch with the trailing plug wires????
The red wire coming from the FB coil's (+) connects to the tan wire in the white connector, which connects with the (+) pole on the 2nd gen coil. Not bad for a dyslexic, huh?
Now if I could just figure out that trailing to leading switch with the trailing plug wires????
K
Here's a cool video I took after I installed the 2GDF, cleaned things up a bit and forgot to put the distributor cap and button back in before moving it in the driveway:
http://youtube.com/watch?v=kwKlbX0DSRk
I've got another one with the trailing ignition hooked up coming soon, real sweet.
Ray
http://youtube.com/watch?v=kwKlbX0DSRk
I've got another one with the trailing ignition hooked up coming soon, real sweet.
Ray
13B N/A POWA!
Joined: Apr 2002
Posts: 1,013
Likes: 0
From: Everywhere, WRLD
Here's a cool video I took after I installed the 2GDF, cleaned things up a bit and forgot to put the distributor cap and button back in before moving it in the driveway:
http://youtube.com/watch?v=kwKlbX0DSRk
I've got another one with the trailing ignition hooked up coming soon, real sweet.
Ray
http://youtube.com/watch?v=kwKlbX0DSRk
I've got another one with the trailing ignition hooked up coming soon, real sweet.
Ray
Thanks again,
K
The yellow wire from the (-) pole on the FC coil is inserted using a male connector into the female connector for the (-) pole on the stock leading coil. Just pull off the dirty white stock (-) connector and slip in the male connector on the (-) yellow wire. You can see the dirty white stock (-) coil connector with the male end of the yellow wire inserted in this picture:

I didn't do anything to the insides of the FC coil, I just hooked it up. The FC coil pack and ignitor housing still have the ignitor and all wires intact, including the white plastic connector.
Here's the procedure:
1. Screw your 2nd gen coil pack to the strut tower.
2. Remove the (-) connector from you stock leading coil and connect this to the (-) pole on the 2nd gen coil with the yellow connector wire (or the color of your choice).
3. Run a red wire from the (+) pole on the stock coil to the white plastic connector on the 2nd gen coil, inserting it into the fitting with the tan wire.
4. You're done, fire it up.
Here's a picture of the finished job, cleaned up and everything:

Here's a video of the 2nd gen install with the trailing ignition hooked up:
http://www.youtube.com/watch?v=n3Va3xwWzVQ
It's idling around 4-500 without skipping a beat, the car never ran so smoothly. Now we'll see about gas mileage.
I didn't do anything to the insides of the FC coil, I just hooked it up. The FC coil pack and ignitor housing still have the ignitor and all wires intact, including the white plastic connector.
Here's the procedure:
1. Screw your 2nd gen coil pack to the strut tower.
2. Remove the (-) connector from you stock leading coil and connect this to the (-) pole on the 2nd gen coil with the yellow connector wire (or the color of your choice).
3. Run a red wire from the (+) pole on the stock coil to the white plastic connector on the 2nd gen coil, inserting it into the fitting with the tan wire.
4. You're done, fire it up.
Here's a picture of the finished job, cleaned up and everything:
Here's a video of the 2nd gen install with the trailing ignition hooked up:
http://www.youtube.com/watch?v=n3Va3xwWzVQ
It's idling around 4-500 without skipping a beat, the car never ran so smoothly. Now we'll see about gas mileage.
Last edited by ray green; Sep 30, 2007 at 10:41 PM.
Lives on the Forum
Joined: Jun 2004
Posts: 11,359
Likes: 14
From: Grand Rapids Michigan
Ray, you see where you've got one wire tied into the white plug on the 2nd gen coil pack? Well, you can take that wire and run it straight to the post on the coil. There's no need to run the power through the 2nd gen ignitor wiring at all. This way, you totally eliminate the need for the ignitor and housing. As far as mounting, there's a million different ways to do it so just do what works for you. If you want to keep the housing to aid in mounting then that's fine too, but I like the simpler look of just the coil pack myself. 
I see what you're saying Ken, eliminating the housing would take it to another level of simplicity and it might even look a little neater, although I kind of like the looks of the whole unit, it puts the coils out there where they can get some air. But like I said, I see your point and I will probably do it this way on my silver 85 GSL.
But here are the main concerns about getting rid of the ignitor housing:
1. I understand that eliminating the ballast resistor can make your ignitor burn out faster.
2. Mounting couldn't be easier with the housing intact, one 10 mm bolt to a preexisting threaded hole and a second self tapping screw - only one hole in the chassis. It looks to me like you would have to drill four holes to mount just the coils. No cutting, splicing or rearranging wires on the stock harness or the 2nd ge coil pack.
3. As I mentioned above and in the earlier post, it looks like the ignitor housing is designed to be a heat sink, projecting the coils into the air and transmitting heat through the cast aluminum base into the chassis. I imagine that cooling is good for coils.
4. This method is extremely simple and easily reversible - in fact if you ever had trouble with the 2nd gen coil you could revert back to the1st gen ignition in just a few minutes with a pair of pliers. I'm having a hard time visualizing as simple an install with just the coil pack - got pictures?
I'm not taking credit here, the method is posted on the forum by others in various forms. But I did have to dig and process for a few days to finally figure out that this simple installation is the way to go(thanks mainly to Glazed Ham - Jamie). In my opinion most of the other descriptions are unclear and involve lots of destructive and unnecessary work.
I am going to drive it this week, if it passes the road test I will post a simple set of instructions with pictures. I am sure this will save several folks lots of time. Also that will allow plenty of time for folks to point out possible problems with doing it this way.
Oh yeah, did I mention it's lots of fun to do and drive and very satisfying?!
Ray
Lives on the Forum
Joined: Jun 2004
Posts: 11,359
Likes: 14
From: Grand Rapids Michigan
The supposition that the elimination of the ballast resistor would result in loss of the ignitor was contested from the beginning. Some claimed that it would happen, while others stated that they had run without it for a long time with no adverse effects.
For the longest time, I used the resistor just to be on the safe side. However, the last time I hooked this up on my car (after loosing another coil pack with my TT unit), I forgot all about that implied risk, so I set it up without the resistor. This was last fall, and I've driven and raced the car for the entire year without any issues. So, you could say that I'm now siding with those who say that the resistor is not needed...
As far as the ignitor housing adding to the cooling of the coil, well the way it looks to me is that there is almost no contact between the coil and the housing. The only contact is through the screws that mount it. I can't imagine that there's a whole lot of heat transfer going on there.
I'll go out on a limb and suggest that the ballast resistor is only needed if using a J-109 or the stock 2nd gen ignitor. If using an MSD or a GM HEI, the ballast reistor is not needed. What do you guys think?
Also, I need to do something about the electrical of the S Model because it was all weird before. Hooking up trailing would cause it to run on one rotor. At least the tach would work. I don't know what was going on.
Since I need to tear into it anyway, I think I should do a direct fire upgrade. Now which should I do? DLIDFIS or 2GCDFIS? I have enough parts for either system, including a GM HEI.
No MSD box with J-109, use the resistor.
MSD box, junk the resistor and the J-109.


Joined: May 2002
Posts: 5,972
Likes: 37
From: Ottawa, Soviet Canuckistan
woah... hold a sec... 4 rotor AND Mazda Factory Race PP ?
That's just an intake and 10mm per rotor housing short of the LeMans motor
And a 12a-based 4-rotor is a beast I'd love to see!
Jon
That's just an intake and 10mm per rotor housing short of the LeMans motor
And a 12a-based 4-rotor is a beast I'd love to see!
Jon
It's all in the ghetto 4 rotor thread. I've been debating the ignition that would go in it. I have two 2nd gen leading coils and two GM HEIs just sitting here. That would work perfectly on the 4 rotor (each 180� pair of rotors would get a coil). Or I could use the coils and ignitors on two other projects. I just don't know what to do.
Ken I have a bunch of extra J-109's so just for you I will install the 2GDF on my silver 85 GSL according to your suggestions and see what happens. But I suspect you are completely right (except about drilling all those holes in the chasis, but I'll find a way to make it look good).
Here's the real news about the install on the white 84 GSL. I drove the car in to work today, 55 miles of smooth highway pleasure. It runs like a new car. Starts up instantly when cold and idles without a miss at 400 rpm when warm (I'll turn the idle up a bit after I finish appreciating that smooth 400 rpm idle). You never hear it skip a beat, what a differnce from the stock set up.
Combined with my reinstalled rat's nest I'm looking for another 4 mpg in gas mileage, might even reach the 400 mile per tank target.
Now about the plug wires that fire the trailing plugs, why doesn't it make any difference whether you connect to the leading or trailing connectors on the cap? I don't see any significant difference in driveway performance, but haven't tried it both ways out on the road yet.
I have the trailing plug wires and coil wire plugged into their normal spots because (A) it works fine and (B) the timing light picked up the marks this way but couldn't find them when I had the wires hooked to the leading positions on the cap. This is what it looks like with the trailing to trailing hook up:
So if it doesn't make any difference, why not?. Can anyone explain in layman's terms?
Thanks!
Ray
I suggest moving the trailing wires because there is a carbon button and only one gap to jump. Just study the cap and rotor and see how the wider leading section of the rotor can actually allow a better spark in that the spark doesn't have to jump off the edge of the rotor tips, as it does on thr trailing part. The rotor and cap electrodes are all lined up. There is no 15 or whatever degree offset like most people expect.
Of course the edge jumping is not a concern for those of us who run 8 or 10 degree splits, but for those with the stock 15 or 20 degree split, the edge jumping can become aparant. Just take a look at the wear marks (burns) on the rotor and you will see where the sparks jump. See how the leading part of the rotor is wider? See how the trailing spark can jump well within the outer edges of the leading part, but would jump off the edge of the trailing part?
I'm not sure I can explain it any better. Just keep in mind the leading part of the cap and rotor is a better circuit, better suited to a large split than the trailing section ever was. Strange, I know.
Cool. Hey I like the look of that 2nd gen coil hanging off the strut tower. Maybe I will go with 2GCDFIS in the S model. lol gotta get it running first. Time to install the RB exhaust and a tall style radiator. Then solve the one rotor problem whenever the trailing (and tach) is hooked up, and also the starter run-on problem.
Full Member
Joined: Aug 2007
Posts: 135
Likes: 0
From: In my garage
Stupid question but do you use the leading fc coil or the trailing? Also I have an accel coil laying around would eliminating the stock coils for this upgrade with that accel coil help? Thanks 
Jeff, I looked into the dizzy cap and then inserted the rotor button and turned it around - the lights came on, the leading and trailing line up at the same time, clever design! So it makes sense to connect the trailing plug wires to the leading connectors on the dizzy cap for the reasons you point out, only one gap and better split, thanks for making this make sense.
13B SA22, you want the leading coil pack, as I understand it they are the same for all FCs so the year doesn't matter. They are abundantly available in the 2nd gen parts section of the forum and ebay, usually about $25 shipped. Not sure why the trailing ones don't work but now I'm curious. Maybe they do?
It's still early, only 110 miles on the car today, but it looks like I'm getting much better gas mileage (25+ I'm guessing) and that wasn't taking it easy, which is hard with the car flying like it is.
This 2GDF is the best thing I ever did to a 7, except maybe the race pipe.
Senior Member

Joined: Sep 2007
Posts: 425
Likes: 4
From: UK
Jeff, I looked into the dizzy cap and then inserted the rotor button and turned it around - the lights came on, the leading and trailing line up at the same time, clever design! So it makes sense to connect the trailing plug wires to the leading connectors on the dizzy cap for the reasons you point out, only one gap and better split, thanks for making this make sense.
Originally Posted by ray green
This 2GDF is the best thing I ever did to a 7, except maybe the race pipe.
Lives on the Forum
Joined: Jun 2004
Posts: 11,359
Likes: 14
From: Grand Rapids Michigan
I'll go out on a limb and suggest that the ballast resistor is only needed if using a J-109 or the stock 2nd gen ignitor. If using an MSD or a GM HEI, the ballast reistor is not needed. What do you guys think?
Also, I need to do something about the electrical of the S Model because it was all weird before. Hooking up trailing would cause it to run on one rotor. At least the tach would work. I don't know what was going on.
Since I need to tear into it anyway, I think I should do a direct fire upgrade. Now which should I do? DLIDFIS or 2GCDFIS? I have enough parts for either system, including a GM HEI.
Also, I need to do something about the electrical of the S Model because it was all weird before. Hooking up trailing would cause it to run on one rotor. At least the tach would work. I don't know what was going on.
Since I need to tear into it anyway, I think I should do a direct fire upgrade. Now which should I do? DLIDFIS or 2GCDFIS? I have enough parts for either system, including a GM HEI.