
EASY 2nd gen direct fire install - 20 minutes

Joined: May 2004
Posts: 1,366
Likes: 10
From: Drifting a Roundabout near you!
Sorry for being such a dufus but I need you to explain what you mean by inline?
-negative to negative, a loop from the -neg FC coil post through the ballast resistor and back to the -neg FC coil post?
-negative to negative, a loop from the -neg FC coil post through the ballast resistor and back to the -neg FC coil post?
I looked more closely at my coil and saw that the + side has the ballast resistor. To hook it up to a J-109, I'd probably do something like this.
I'd leave the ballast resistor in its home of course. The exploded view is merely for illustration purposes.
I'd leave the ballast resistor in its home of course. The exploded view is merely for illustration purposes.
Joined: May 2004
Posts: 1,366
Likes: 10
From: Drifting a Roundabout near you!
Thanks Jeff, that was the missing part of the puzzle, Chris I think had his inline with the -negative if I read his install correctly, my coil had the ballast inline with the +positive side(yellow wire instead of the black Chris had). I will give this a try and report back.
Thanks again for the drawing(they help so much when it comes to wiring)
Thanks again for the drawing(they help so much when it comes to wiring)
Thanks for the positive feedback! I tried to make the basic components recognizable. I even included the Mitsubishi three diamond thingie.  I'm sure that little ignitor image will come in handy many more times, as will the 2nd gen leading coil, to a lesser extent. I could actually update my DLIDFIS diagram with the ignitor image if I wanted to.
Go ahead and try the ballast resistor on each coil terminal and let us know if one way has any more power than the other. Logically, it probably won't make a difference, but at this point, you might as well give it a try. Thanks!
I'm sure that little ignitor image will come in handy many more times, as will the 2nd gen leading coil, to a lesser extent. I could actually update my DLIDFIS diagram with the ignitor image if I wanted to. Go ahead and try the ballast resistor on each coil terminal and let us know if one way has any more power than the other. Logically, it probably won't make a difference, but at this point, you might as well give it a try. Thanks!
Joined: May 2004
Posts: 1,366
Likes: 10
From: Drifting a Roundabout near you!
Ok, I got the Ballast resistor connected on the -negative side, between the FC coil and the Ignitor. I noticed that the idle was better and it seemed to run quite well. The butt dyno thinks I gained some grunt and pull when I mash it down to the floor, no hesitating...still back fires....that's just my style of driving I think.
Thanks again to Chris for the idea and Jeff for the follow up tech drawings!
Thanks again to Chris for the idea and Jeff for the follow up tech drawings!
Awesome! Another late leading igniton system runs!!
By the way, I use late leading as a blanket term to describe any leading ignition system that fires the leading plug once at TDC/0� and then again 180� later. It can be used to describe any number of rotors (such as for my 20B or my planned single rotor project). This gets me away from all the self-limiting acronyms such as DLIDFIS, TLIDFIS, 2GCDFIS, SRLDFIS, SLIDFIS, MSD-DFIS, well, you get the idea.
It's a term I borrowed from the R26B's late trailing ignition system where it fires all threeplugs per rotor face at the same time. The third spark plug, located above the normal trailing plug, fires into the trailing edge of the rotor face as it is compressing the incoming air fuel mixture. Late leading, on the other hand, fires into the trailing edge of the rotor face as it's expanding right before the exhaust port opens (it can fire quite a bit before the exhaust port opens if advance is set high enough).
As for how the obvious differences differ from each other, and what it all means in the end, I'm not fully sure at this time. All I know right now is taking advantage of the leading plug's larger hole to put spark into the trailing edge of the rotor face seems like a somewhat better idea than having a tiny, extra hole in the compression area of the rotor housing. Mazda found that this extra hole allowed enough blowby to no give an increase in HP. So even with the extra spark, it only improved gas mileage a bit. Of course for a long race such as Le Mans, fuel mileage is very important. If you have any questions about the R26B's late leading stuff, be sure to ask Evil Aviator.
Hook it to your trailing coil output.
Make sure to hook it to the coil to cap wire and see if your timing light continues to not work. There may be a problem with your timing light's timing circuitry which causes it to not flash with double the amount of sparks going to it.
My old timing light died so I've got a friend's here. His timing circuits are painfully slow and it skips several sparks in a row. It makes me think I have a misfire even though I don't. I need a new timing light.

SE Lover
Joined: Mar 2001
Posts: 41
Likes: 0
From: Calgary, Alberta, Canada
trailing
I installed 2nd gen direct fire on the weekend. Today I was setting my timing, I had no problem setting the leading, but when I went to adjust the trailing it did not matter how much I adjusted it there was no change.
Any Ideas
85 GSL-SE
Any Ideas
85 GSL-SE
gonzz, you'll need to confirm the leading coil works in some other way. Try pulling a spark plug wire off the coil and hold it near one of the strut studs. Then crank the engine and see if a spark jumps.
stobrien, remove the cap, rotor and metal cover. Locate the trailing pickup by either following the wires from the back of the trailing ignitor, or by following the little connecting piece of metal from the trailing vacuum diaphram over to the pickup. Next, loosen both screws and then push and pull on the diaphram canister thing and confirm that the pickup rotates slightly by a few degrees either direction. If it does, you're good. If it doesn't, you'll need to work it free because the grease may have hardened over the years.
Are you trying to set trailing for a 10� split? I don't have access to a GSL-SE anymore, but if I did, I'd at least try it. All my older carbed 4 port 13Bs have a 10� split. It seems to work ok. Infact, two of them actually have GSL-SE dizzies to take advantage of the slightly higher total mechanical advance they can provide.
I can't think of anything else off the top of my head.
Rotary Enthusiast
Joined: Dec 2004
Posts: 1,025
Likes: 0
From: Campbell, CA
Sorry to bring an old thread back up, but can anyone eleborate on step 9? To move the dizzy for the trailing into the leading? I have everything else done, just not sure what i need to do for step 9?
Thanks,
Alvin
Thanks,
Alvin
Pull the coil and plug wires from the trailing part of the cap and move them to the leading part. Very easy and straight forward.
I'm glad somebody brought this thread back up because I'd like to let everyone know they should keep the 2nd gen ignitor. There is a way to trigger it from your J-109 with a transistor circuit. It's a whole lot more powerful. I'm going to look into how to do it after I finish my current projects. Please everyone, keep your 2nd gen ignitors intact. Don't even remove them from the base. Simply bypass it for now since the ballast resistor is required for the J-109, and all that.
Anyone is welcome to attemp the transistor trick. I don't know enough about it to even attempt to explain how it works other than it allows the J-109 with its variable reluctance sensing and dwell capability to control the 'dumb' 2nd gen leading ignitor, which lacks the ability to correctly read the output of the 1st gen style pickup (VR sensor). The 2nd gen stuff was designed to trigger from a 5 volt square wave from an ECU. I've compared them while bench testing with my MegaSquirt, and the difference was shocking.
Rotary Enthusiast
Joined: Dec 2004
Posts: 1,025
Likes: 0
From: Campbell, CA
Thanks jeff, but just to clarify, to t1 would to to l1, and t2 to l2? Also, would you mind telling me why? wouldn't this cause the the trailing plugs to fire when normally the leading plugs would fire?
Thanks,
Alvin
Thanks,
Alvin
RTFFAQ
Joined: Jun 2003
Posts: 1,049
Likes: 0
From: Olathe, KS USA
Originally Posted by Jeff20B
I'm glad somebody brought this thread back up because I'd like to let everyone know they should keep the 2nd gen ignitor. There is a way to trigger it from your J-109 with a transistor circuit. It's a whole lot more powerful. I'm going to look into how to do it after I finish my current projects. Please everyone, keep your 2nd gen ignitors intact. Don't even remove them from the base. Simply bypass it for now since the ballast resistor is required for the J-109, and all that.
Zyrano, to answer your first question, yes T1 to L1 etc. Now you need to do something for me. Take some time, sit down and study the cap and rotor. Your other questions will be answered when you start to understand how it all works. Believe me, I get asked this all the time. Once you can visualise how it works, you'll see why I recommend swapping positions on the cap.
slash, good thing. Fellow forum user 83turbo originally presented the idea and Ididn't quite follow him. Well, I've built a MegaSquirt since then and gained a basic understanding of transistor circuits and stuff. I can kind of understand how it would work, but I'd need to spend some time figuring out the ins and outs, which I can't do at this point. He recommended using a PNP tansistor and I happen to have a supply of NPN, so although the difference is slight, it still adds complication. I'm sure I'll be able to figure it out eventually.
Like I said, you guys can take on the transistor trick if you want. I may not even use it because I was originally going to trigger my 2nd gen coil assembly from a MegaSquirt in spark-only mode for my planned carbed supercharged 13B project to take advantage of the adjustable advance/retard with vacuum/boost, but if I don't, I'll certainly want to trigger the 2nd gen ignitor with a J-109. If I were to do it today, I'd simply trigger the 2nd gen ignitor with a J-109 because the MS doesn't have full trailing support yet. It's partial, and there is already a 6x6 table for split, but it's very new at this point. Then again, trailing doesn't do anything for power so I'll just worry about it when the time comes.
slash, good thing.
Fellow forum user 83turbo originally presented the idea and Ididn't quite follow him. Well, I've built a MegaSquirt since then and gained a basic understanding of transistor circuits and stuff. I can kind of understand how it would work, but I'd need to spend some time figuring out the ins and outs, which I can't do at this point. He recommended using a PNP tansistor and I happen to have a supply of NPN, so although the difference is slight, it still adds complication. I'm sure I'll be able to figure it out eventually.Like I said, you guys can take on the transistor trick if you want.
I may not even use it because I was originally going to trigger my 2nd gen coil assembly from a MegaSquirt in spark-only mode for my planned carbed supercharged 13B project to take advantage of the adjustable advance/retard with vacuum/boost, but if I don't, I'll certainly want to trigger the 2nd gen ignitor with a J-109. If I were to do it today, I'd simply trigger the 2nd gen ignitor with a J-109 because the MS doesn't have full trailing support yet. It's partial, and there is already a 6x6 table for split, but it's very new at this point. Then again, trailing doesn't do anything for power so I'll just worry about it when the time comes.
Thread Starter
Ride 'n Style
Joined: Dec 2002
Posts: 1,929
Likes: 0
From: Spokane, WA
dang, this thread got huge... haven't been on the 1st gen section in a while!
I keep getting PM's on this. (don't worry, I don't mind at all.)
The main confusion seems to be on the wiring. Maybe I can explain how to do this a bit better. Ignore all color references.
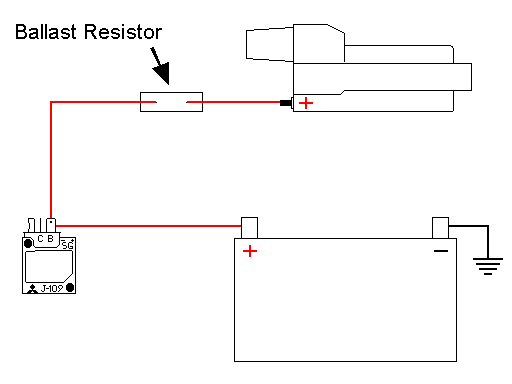
Take the wire going from the positive connection on the stock coil and run it to the positive terminal of the 2nd gen coil.
Take the wire going to the negative side of the stock coil and run it to one wire coming off the ballast resistor inside the coil pack. Then run the other wire coming off the other side of the resistor to the negative side of the coil.
I didn't really read too much into using the 2nd gen ignitor. The whole purpose of this setup was to be quick and easy with more power and better fuel economy. I know most of us on here aren't electrical geniuses like Jeff20B. Take it or leave it. This was my contribution to the quick and easy mods to the -7.
Sorry about the pictures. the site I had them hosted on got kinda pissed that I linked them.
I keep getting PM's on this. (don't worry, I don't mind at all.)
The main confusion seems to be on the wiring. Maybe I can explain how to do this a bit better. Ignore all color references.
Take the wire going from the positive connection on the stock coil and run it to the positive terminal of the 2nd gen coil.
Take the wire going to the negative side of the stock coil and run it to one wire coming off the ballast resistor inside the coil pack. Then run the other wire coming off the other side of the resistor to the negative side of the coil.
I didn't really read too much into using the 2nd gen ignitor. The whole purpose of this setup was to be quick and easy with more power and better fuel economy. I know most of us on here aren't electrical geniuses like Jeff20B. Take it or leave it. This was my contribution to the quick and easy mods to the -7.
Sorry about the pictures. the site I had them hosted on got kinda pissed that I linked them.
Last edited by Metallic_rock; Mar 30, 2005 at 02:39 PM.
I just add info whenever it seems appropriate.
I don't really use 'late leading' much anymore because too many people were getting confused, thinking it was trailing or something. Dual leading sparks still works since it can describe either a direct fired leading ignition system like 2GCDFIS/DLIDFIS etc, or on an odd number of rotor because it can also describe two leading sparks per rotor face, regardless of rotor count. For instance, I could use that term to describe the way I'd run a single rotor engine if its leading plug sparks twice per rotor face (you know the DLIDFIS style 0� and 180� sparks). Atkins does it a bit differently; they remove two teeth from the reluctor and the leading ignitor goes to a coil and then to the leading plug, and the trailing ignitor goes to another coil and then to the trailing plug. This is possible only because they shave two teeth from the reluctor 180� apart. Mine would have an intact 4 tooth reluctor triggering a leading ignitor and then a shaved reluctor mounted above with a relocated pickup triggering another ignitor for trailing (leading would spark twice per rotor face and trailing would spark once just like DLIDFIS). If I used an aftermarket tach, it'd be hooked to the leading coil since it's still outputing a common 4 cylinder signal (two pulses per revolution). If you got an Atkins engine, you'd need a multiplier circuit or a tach that could handle a count of 2 cylinders or something.
You know, info like that.
Oh yeah, this was supposed to the an easy 20 minute install, hehe. Tell you what; let's recommend that they go ahead and hook up the J-109 to the coil with the ballast resistor in the circuit, and also to keep their 2nd gen ignitor for the day they may want to upgrade. That way it'll be an easy 20 minute install, and then when they're feeling more confident at some point in the future, they could attempt the transistor trick. Sound good?
Thread Starter
Ride 'n Style
Joined: Dec 2002
Posts: 1,929
Likes: 0
From: Spokane, WA
Originally Posted by Jeff20B
Oh yeah, this was supposed to the an easy 20 minute install, hehe. Tell you what; let's recommend that they go ahead and hook up the J-109 to the coil with the ballast resistor in the circuit, and also to keep their 2nd gen ignitor for the day they may want to upgrade. That way it'll be an easy 20 minute install, and then when they're feeling more confident at some point in the future, they could attempt the transistor trick. Sound good?
yeah as soon as you figure out the things i would need let me know and i will try it out for you.. i am just now finishing up the install .. i need to pic up some wire tomorrow..
Joined: May 2002
Posts: 5,972
Likes: 37
From: Ottawa, Soviet Canuckistan
I'm thinking that while this thread has a whole bunch of great info, I think someone needs to come up with a good write-up/tutorial with pictures like the Emissions tutorial that Rx7Carl and Pratch did.
I'm going to have to read this thread again, but Jeff are you basically saying that for now people should not do this, until you figure some stuff out? I'm definitely interested in hooking up a 2nd Gen coil and getting more power out of my ignition... I'll either do this or DLIDFIS.... what's your call?
Jon
I'm still debating whether to use a MegaSquirt on my SC project or simply trigger my 2nd gen coil assembly from a J-109. I guess it'll depend on how much time and money I have when the time comes. I could also always do the transistor trick first and then go with a Megasquirt later.
vipernicus42, it's your project. If you choose to do 2GCDFIS, keep the ignitor intact. Otherwise go DLIDFIS since it'll produce more power in the mean time.
vipernicus42, it's your project. If you choose to do 2GCDFIS, keep the ignitor intact. Otherwise go DLIDFIS since it'll produce more power in the mean time.