
Boost prep a Nikki (how to)

Thread Starter
Joined: Aug 2001
Posts: 15,725
Likes: 91
From: Near Seattle
Boost prep a Nikki (how to)
The thread you've all been waiting for!
No more guessing! No more speculation! Just stuff that works!
Of course your mileage may vary, so don't be afraid to try a different approach if you disagree with anything you see here.
Standard disclaimer: First and foremost you have to be willing to ruin your carb and your engine. This isn't likely a good first project for a noob, unless you're ambitious. A turbo swap isn't usually for the faint of heart. There's always a risk.
This thread is all about what I did on my carbs and what worked. You have the freedom to do whatever you want, so it's on your shoulders if your engine or carb gets broken while following my advice or anyone elses.
Before we begin, do yourself a favor. Get an 81-85 carb if you don't already have one. I tried boosting two 79 carbs and they both leaked out of the secondary side above the base plate due to some casting warpage. Gasket thickness didn't make a difference. Same goes for the accel pump housing. They all seem weaker on the 79-80 carbs for some reason. The 81-85 castings are less likely to warp. Of course you could have your 79 fly-cut like the Holley guys have to do, but who does that?
Don't pay attention to the air horn size differences from SA to FB. The smaller 81-85 doesn't cause problems.
First strip the carb until it has a simplified choke as described here and there on the forum. Also remove the other not needed stuff all around it like the altitude compensator etc. If you struggle here, might as well stop and put in one hundred hours of searching and reading going back at least ten years (but I'd start looking in 2001 first) before you go further. This thread isn't about holding your hand. It's about the hard core boost prepping process to get fast results, and I don't have that many pictures so it's good to know what I'm talking about while you read. Walk before you run, right?
Get a hygrade rebuild kit from Rockauto. The $30 universal one that has the long travel accel pump diaphram and the two types of top gaskets.
Buy a .045" drill bit as it will come in handy. This is the 118 drill bit I refer to all the time.
Be sure to photo document the process and start a thread so we can help you. I probably should have, but I didn't. Water under the bridge...
Now on to boost prepping.
Outside of the carb:
Remove the choke flap valve and rod.
Remove the secondary vacuum box from the side of the carb.
Remove and cut off the complicated choke bracket so it acts as a simple spacer under the throttle return spring bracket. This lets you use all three screws at stock length. Don't be like this guy having to use two washers up under one of the top screws and not able to use a 3rd screw down on the side. (not my pic so click to see it)
https://www.rx7club.com/attachments/...nfold-yaw1.jpg
Came from this thread: https://www.rx7club.com/nw-sale-want.../#post11883712
Keep the fast idle linkage. I do. It comes in handy when you have to step out right after starting a cold engine and not need to keep your foot on the pedal. Standard Sterling cold start procedure applies where you tap the pedal a couple of times, let off, then crank until it fires up, then keep it running with your foot for a few seconds until it settles down. Then set the fast idle with the choke ****. This is the only order that works. Don't pull the **** before you start it because it won't start (there is no choke flap valve anymore, remember?).
Keep the emergency return spring because it stabilizes the shaft according to some folks. I keep it.
Remove the dash pot. No need without a cat. Replace the screws in the throttle cable bracket with shorter ones to make up the difference.
Take the throttle cable "lever" or linkage assembly apart while maintaning their order and delete the hot start assist and cruise control if your car no longer has them. None of mine do. I cut off the hot start assist but keep the large washer section so it is still there to keep the fast idle linkage aligned; you'll see. The cruise control can go with no worries.
Cap off all nipples with a short piece of vacuum hose and a small piece of something shoved into the end. Then add zip ties if you wish. I don't pull the nipples and fill the holes like some do because that's too much work and too likely to fail/leak.
Remove the banjo bolts above each needle and seat. Pull out the strainers and aluminum crush washers. Rebend the fuel rail tubes if necessary so the banjo bolts goes back in without trouble. Add new crush washers but don't reinstall the strainers as they are restrictive. If they get clogged, that's no good for boost. Get a good fuel filter in front of your fuel pump. You'll have the top off the carb periodically for tuning anyway so check for rust chips or other debris. I can't tell you how many times I've thanked the rotary gods I removed my strainers and found all sorts of wonderment down in the bowls.
Remove the float bowl vent solenoid. The 81-82 style is easy. Take out three screws and replace with an aluminum plate of the same thicness (so the stock screws can be reused) and a gasket that comes in the rebuild kit. If 83-85, It needs you to take a dremel stone and grind off the nylon plunger seal thing that prevents it from coming out - or try to cut through the steel but there is no room to work. Then you can unscrew the hex head solenoid, pull the shaft and reinstall the solenoid. No need for the spring or the wire so they can be deleted. Others have pulled the brass fitting it threads into, but that seems like a lot of work. This thing must go because the float bowls have to receive a boost reference from the carb hat, and this is the only practical way to do it. Others have conjectured about adding a fitting above each float bowl through the top of the air horn. That's a lot of work and is not necessary, but it shows they were thinking along the right lines.
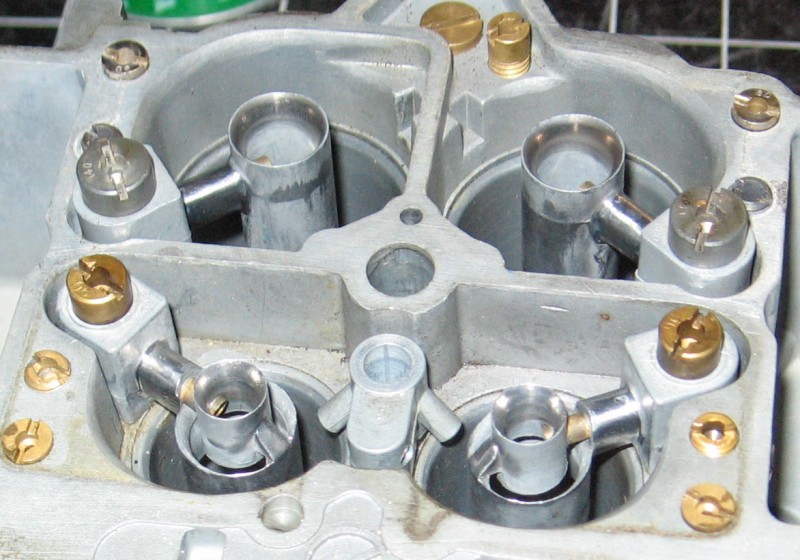
Moving onto the inside of the carb:
Now take off all the parts like the site glass windows, jet plug bolts, jets, accel pump housing and old leathery diaphram and spring, the 30 stamped brass jet bolt thing above the accel pump, the little brass weight and check ball, then all the air bleeds and accel pump banjo bolt with its larger brass weight and check ball. Also take out the power valve/richer solenoid stuff so the main body is completely stripped for cleaning/degreasing.
High power option:
This next part is if you're interested in hogging your carb out, which, in my opinion, is an absolute must if you like things like low end torque. Also you can perform the booster support cut and aerofoil shape mod at this time.
First pull the OMP nipple tubes and set them aside. I use an old chuck from a drill press because it has three gripping "fingers" that can grab the barbed end and carefully twist and pull them out. I know some use a vicegrip for this, but bending/crushing is possible.
Then use an old secondary main air bleed you don't care about, thread into the sec booster first, grip it with a vice grip and start gently twisting and pulling up straight. Rotate it slightly back and forth and eventually it will come out. Then grab a primary air bleed you don't care about and so on. Pulling secondaries first makes life easier. You'll see.
Now grab a thick washer (around 1/8" will do) of the EXACT size as the OD of your primary venturis. Hold it in a bolt with a nut on each side tightened with two wrenches. Then I like to warm up the carb's main body while I grab a can of that electronics duster canned air stuff. Grab a couple of 1x1 or whatever handy wood pieces you have. Set the carb on them so at least one of the venturis has a clear path to the ground so it can be tapped out. Turn the can upside down and start spraying until the venturi is cold (icy). Sometimes it will fall out. But you usually have to tap it out with the washer+bolt. Be careful! How many spare carbs and extra venturis do you have just lying around if you screw up?
Find a bigger washer if you choose to hog out your secondaries as well. I'd advise against this because out of all the boost prepped carb threads I've read, not one person did hogged out secondaries and to the best of my knowledge no one hogged their primaries either. But I can say from my own experiences, hogged primaries are the way to go. Mod your secondaries at your own risk and you're on your own for tuning.
With the venturis out of the carb, make sure all the parts are out. Take off the floats, rods and needles from the top but you can leave the seats and fuel rails/banjo bolts on. You should leave the FBVS out for this cleaning step as well as I'm sure there will be nylon and metal debris everywhere. All gaskets should also be removed and scraped off where necessary.
It's time to use some degreaser or carb cleaner (or that nasty carb dip which I've only had to use one one Nikki, ever!). Wash all three main parts of the carb and any hardware if it's dirty. Then dry everything thoroughly with compressed air and don't lose any small stuff. This step should not require any further explanation.
Now hog out your venturis keeping a smooth straight taper from the small end to big. My recent findings suggest that 25.6mm is too big as it introduced a lean glitch at about 1500rpm.* However my other carb at 25.4mm doesn't have the glitch. Looking at RB's old catalog from the 80s, they suggest .98" which is 24.9mm. Yaw hogged his carbs out to 24mm. Sterling and Carl did theirs at 22mm. Do yourselves a favor and keep the size between 24.0 and 24.9mm, especially if you have a stock ported 12A, but I'd think a stockport would do better with 24mm and a streetport shouldn't need any larger than 24.9mm. I've done all my testing on a 74 ported R5 13B, so my air requirements are going to be a bit more than yours, and the above suggestions are my best educated guess for a 12A. Use your judgement and do another 100 hours of reading if you don't feel confident about which size to go with yet. Just know that the 22mm Sterling carbs have less low end torque than the 24mm Yaw carbs, from what I've read on the forum. The smallest I'd run these days on my 13B is 24.7mm on a small runner NO manifold which flows about the same as a 79 12A manifold. Your research could turn up some other info I haven't read yet.
*The Racing Nikki I refer to now and then has 26mm venturis (not cut by me) and its off-idle glitch is awful. Not a fun carb to drive on the street, even though it has a lot of power. Probably why it's a racing carb. Well, I know how to fix it for the street now!
Grab some washers in various sizes and some bolts with nuts. I like 21mm, 22m and on up to 24.7 or whatever size I'm going for. If you don't have the exact size, you can "interpolate" or whatever. I use these as ID guides to keep both venturis the same size at the same position/depth.
I use a die grinder for the bulk of material removal, then a dremel with a sanding drum (coarse then fine) for final shaping. This step can take days. Well, just hours, unless you're new. Then a final polishing can be done. I don't go overboard. Just dremel's version of a scotchbrite pad on a stick is good enough. I've tried the common beige and black ones. The black is what I've used recently and works great. A little texture is left over. Not sure if this is better than a mirror polish, but I'm inclined to think, yes. Laminar flow or something may apply to venturis? Anyone know?
Warm up the carb main body and freeze the venturis. Get the little notch aligned with the hole in the main body. I hole it with a needlenose. Tap them home until at the same depth as stock. Maybe take a pic or two before you begin all this so you know? Like 1mm below the surface or so. Look at it from the bottom too. Make sure it is not too low. I also use some blue loctite here if the boosters end up kinda loose after they've reached the same temp as the main body. The metal is just zink or pot metal so it's not like the best material for perfect dimensional stability in the first place. Rememebr the venturis will remain cooler than the main body of the carb due tot he venturis effect, or at least it makes sense that they would, so a little something in there, and I mean a little! goes a long way. Just take it slow and pay attention to what you're doing.
Cut the booster support arms off and smooth the remaining arm into a pointy aerofoil or airfoil shape underneath and a round smooth top. I do this with small hand files. A hack saw is used to chop off the support first, then a lot of filing. Get ready for sore fingertips unless you can figure out a better technique than I did. It takes a lot time but is worth it. Sterling would then polish his. I kinda polish mine. Not for looks for but flow. If it feels smooth to you, the air will think it's smooth too.
Sterling told me about this next part. Take a tool used for tapping in small wood finishing nails and a little parafin wax used for canning or candle making. Wax the tool on the tapered end (I'm starting to sound like Mr Cake). Tap the tapered end into the booster fittings so they expand a very tiny amount. Don't go overboard. Tap and test in the carb several times until you develop a feel for how much force to use. I like to use the junk air bleeds to tap the boosters back in the carb after the venturis go back in.
If you want to use the canned air stuff to cool the boosters down before they go in, it's what I use. Keep them aligned as perfectly centered as possible. There is no support arm to do this job for you anymore. If they end up too tight, and can't be moved, you expanded them too far. Oops. I'm not sure what to tell you other than maybe heat up the carb body and freeze the booster and try like the dickens to get it back out? Don't heat the carb hotter than it would experience in an engine bay. Don't use a torch either as that is too much heat in too small an area, plus it makes a watery mess. I'm sure you'll figure it out.
Time to drill stuff:
Use your .045" or 118 drill bit to drill these parts: accel pump banjo bolt, accel pump nozzles, primary fuel jets, secondary slow air bleed nickel plated 60s. Actually drill out the tiny jet at the bottom of the accel pump banjo bolt completely with a bigger drill bit if you want to. I do. This will let enough volume through for both nozzles at .045". Do not drill as large as Sterling suggests at .050". If my 13B is ok at .045", I think your 12A will be too.
Cut a new thick base plate gasket for secondary fuel leak prevention as the new one in the kit is paper-thin. Wait, it is paper. Anyway, yes, even FB carbs will leak a little here. It takes time and effort to cut a gasket, but you have a nice fresh aftermarket gasket to copy. You won't need all the little holes. Just study and punch only the holes you need. I won't hold your hand here. If in doubt, punch them all out. You just risk more leaks is all.
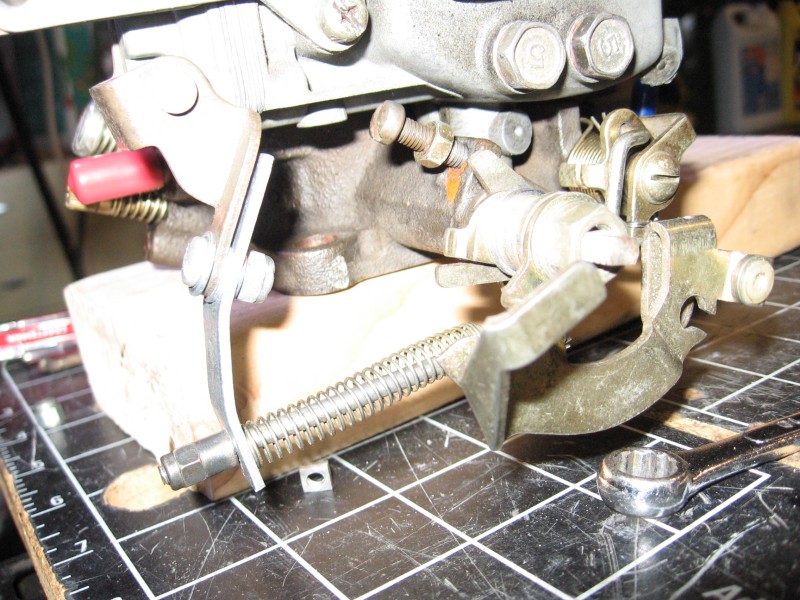
Weld or wire tie the secondary linkage to make mechanical secondaries. I welded all of my boost prepped carbs for longevity, and the simple fact it might be harder to open them under boost (observe the slight secondary butterfly offset that keeps them closed under vacuum and presumably under boost). I felt welding was the safer option, but of course it is less reversible than a simple wiring job.
Now it's time to put this thing back together:
Plunk the main body back onto the base plate. Thick gasket, 10mm head bolts etc.
Fill the secondary vacuum booster hole with quicksteel.
Tap in the OMP nipples with a small hammer and use a box cutter razor blade as a spacer against the boosters. Don't do what Yaw does and only install them a little ways in. This leads to inferior oiling and makes a big oily mess up there. This is not the way the factory does it. They have them right up against the boosters for good reason. If you're worried about the nipples being a restriction, don't be. With hogged venturis, there is plenty of room for air to get past them.
Install the 118 drilled nickel plated 60s and the long air bleeds stamped 45 in the primary side. The reason to do this is two-fold. To recalibrate the idle and transition circuit to work better with hogged venturis, and to get rid of the secondary glitch/hiccup/stumble/delay everyone complains about when going to mech secondaries, which you must do with boost.
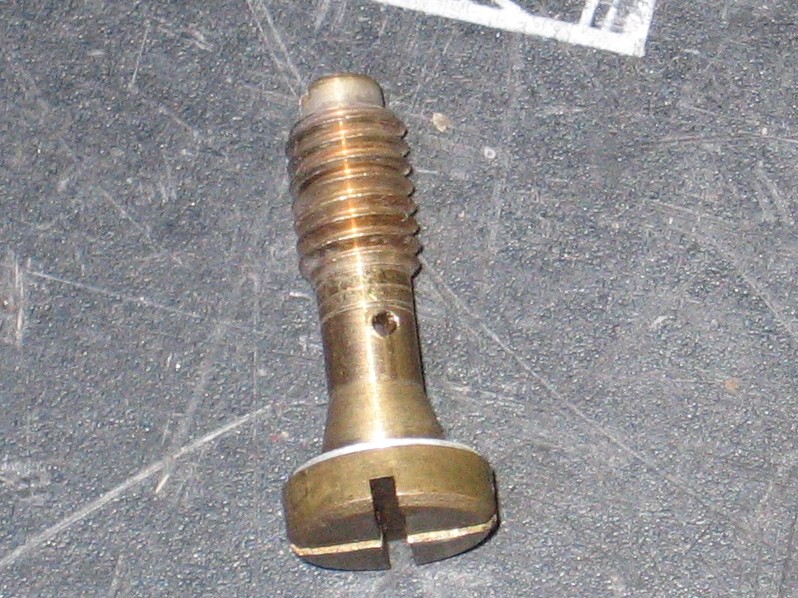
Drop in a checkball and the big brass weight into the accel pump hole. Install the drilled accel pump banjo bolt and nozzle with a new gasket from the kit (or use the old one - whatever you want to use here as the new ones are sometimes cut funny).
Pic of drilled banjo bolt:
Install the primary 60 or 70 main air bleeds the 81-85 carbs come stock with. If you're doing a 79 carb, they came with 90. It can work as I've tried them, but I like the smaller sizes better as they give somewhat better tip-in.
Just a placeholder pic to show an earlier setup with the solder filled slow air bleeds but before the modded secondary main air bleeds were swapped in:

Machine your secondary main air bleeds to accept fuel jets drilled with the 118 or .045" drill bit, or Holley air bleeds at 45. This further reduces or eliminates the secondary hiccup, as too much air is the enemy here, and stock 140 air bleeds are just too big for boost in my experience. You can use a bench grinder to trim the surface height down so the jets will fit a little lower under the air horn. Then cut a new slot to use the same big screwdriver you use for the needle and seats. Then you can drill and tap for the thread pitch* Mazda used on their fuel jets, or the imperial size* Holley used. Either one should be ok. I actually used both; one was a bottoming or blind hole tap while the other had an easy start taper, and the drill bit that came with imperial tapping kit is just a touch smaller than the drill bit recommended for metric. Better safe than sorry. Don't drill too deep as you can end up going all the way through, or the emulsion tube breaks off.
*I'll look up the actual thread pitches later as I don't have them in front of me, but it's not hard for you to figure it out if you're going to do this sort of mod so I don't need to hold your hand. All I had to go on was the fact that Sterling did this mod, so I figured the steps out on my own.
Install your modded secondary main air bleeds and a set of drilled stock 92 jets at 118 or .045", or your Holley 45 air bleeds. Note: 45 or 118 is a good place to start. It's good to have smaller and larger air bleeds on hand for tuning purposes to get rid of the common secondary hiccup but this should be about 90% tuned right out of the box and should reduce the unpleasant delay to a mere minor anoyance or eliminate it entirely.
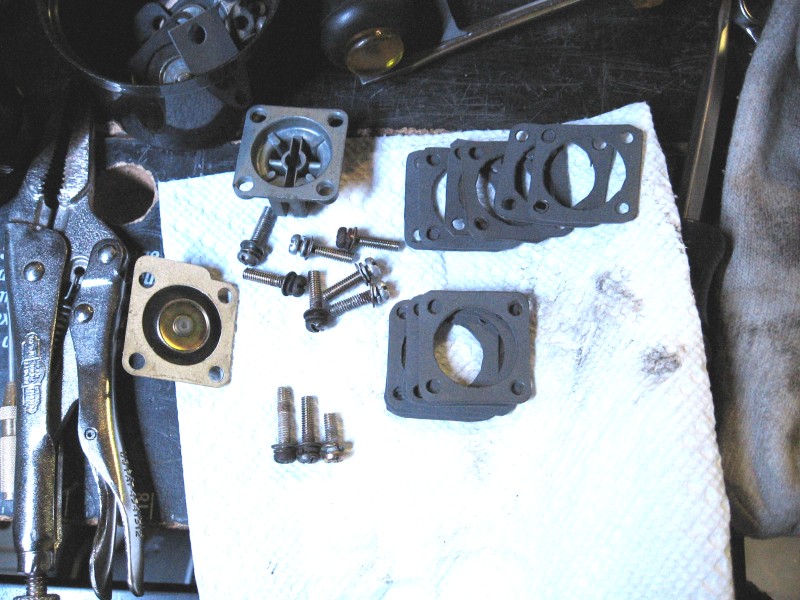
Do the Sterling accel pump mod: cut 6 (six) gaskets, stretch spring, make a steel bracket; hole spacing 1 1/8", get longer screws, clearance one of the rivits on the throttle cable bracket. The info is here on this forum explained in greater detail by Sterling.
I have a few pics of some early experimental accel pump work on a 79 carb.

Reinstall a check ball and the thin brass weight in the hole in the accel pump diaphram housing section of the carb. Then wrap the 30 stamped brass screw/jet thing with some teflon tape and screw it in with the same force you used to remove it. Don't over tighten.
Wow, this is getting long. I'll sum up the easy stuff.
Altitude compensator block off plate 1/4" aluminum. A gasket that comes in engine rebuild kits works. Aluminum should be same thickness as flange so original screws can be reused. Or block off the holes your own way.
Get a small torch and some solder. Fill the primary short slow air bleeds and secondary long slow air bleeds with solder. If you don't recall which is which, refer to your pictures. Just a quick note: you're looking for the short brass ones with 150 to 190 stamped on them (usually 170 for FB carbs), and the long ones don't have any numbers at the top. Fill these with solder and install in the secondary side.
If your carb had a richer solenoid or power valve, there were some additional brass fittings on the main body at the secondary side at the top, and one big solenoid fitting down below. Sterling said to reinstal all the brass fittings but you can delete the big solenoid and just fill the gaping hole with quicksteel. It's what I did and it works.
If your carb had the weird spring loaded rods extending from the air horn down into the float bowls at a pair of 40 brass jet-like fittings, I don't know what you can do about those. Time to experiment?
Double check your work before the top goes back in. Depending on your original gasket's condition, either reuse it or throw a new gasket on.
But before you do, you can swap in some new needles and seats, or just new needles if your seats won't budge or they appear to be in good shape. Use a really wide screwdriver. Either way, it will take some break-in time so they can "burnish". I tend to speed up the process by blowing some compessed air into the fuel inlet and letting them bounce carefully for a while. The float heights shouldn't need any adjustment.
Then install the screws, brackets, return springs etc. Pretty easy stuff at this point.
That about does it for the carb.
Just a note: I don't believe in thinning my throttle shafts because I don't believe in this particular mod. It is too easy to screw up, they become very fragile and require a stopper of some kind(?). With boost, I want it as sturdy as po0ssible. Stock shafts don't seem like they are a restriction at all, so they stay stock on all my carb builds. You can ruin yours if you want to.
Hopefully this posts ok. We don't have an edit button anymore.
No more guessing! No more speculation! Just stuff that works!
Of course your mileage may vary, so don't be afraid to try a different approach if you disagree with anything you see here.
Standard disclaimer: First and foremost you have to be willing to ruin your carb and your engine. This isn't likely a good first project for a noob, unless you're ambitious. A turbo swap isn't usually for the faint of heart. There's always a risk.
This thread is all about what I did on my carbs and what worked. You have the freedom to do whatever you want, so it's on your shoulders if your engine or carb gets broken while following my advice or anyone elses.
Before we begin, do yourself a favor. Get an 81-85 carb if you don't already have one. I tried boosting two 79 carbs and they both leaked out of the secondary side above the base plate due to some casting warpage. Gasket thickness didn't make a difference. Same goes for the accel pump housing. They all seem weaker on the 79-80 carbs for some reason. The 81-85 castings are less likely to warp. Of course you could have your 79 fly-cut like the Holley guys have to do, but who does that?
Don't pay attention to the air horn size differences from SA to FB. The smaller 81-85 doesn't cause problems.
First strip the carb until it has a simplified choke as described here and there on the forum. Also remove the other not needed stuff all around it like the altitude compensator etc. If you struggle here, might as well stop and put in one hundred hours of searching and reading going back at least ten years (but I'd start looking in 2001 first) before you go further. This thread isn't about holding your hand. It's about the hard core boost prepping process to get fast results, and I don't have that many pictures so it's good to know what I'm talking about while you read. Walk before you run, right?
Get a hygrade rebuild kit from Rockauto. The $30 universal one that has the long travel accel pump diaphram and the two types of top gaskets.
Buy a .045" drill bit as it will come in handy. This is the 118 drill bit I refer to all the time.
Be sure to photo document the process and start a thread so we can help you. I probably should have, but I didn't. Water under the bridge...
Now on to boost prepping.
Outside of the carb:
Remove the choke flap valve and rod.
Remove the secondary vacuum box from the side of the carb.
Remove and cut off the complicated choke bracket so it acts as a simple spacer under the throttle return spring bracket. This lets you use all three screws at stock length. Don't be like this guy having to use two washers up under one of the top screws and not able to use a 3rd screw down on the side. (not my pic so click to see it)
https://www.rx7club.com/attachments/...nfold-yaw1.jpg
Came from this thread: https://www.rx7club.com/nw-sale-want.../#post11883712
Keep the fast idle linkage. I do. It comes in handy when you have to step out right after starting a cold engine and not need to keep your foot on the pedal. Standard Sterling cold start procedure applies where you tap the pedal a couple of times, let off, then crank until it fires up, then keep it running with your foot for a few seconds until it settles down. Then set the fast idle with the choke ****. This is the only order that works. Don't pull the **** before you start it because it won't start (there is no choke flap valve anymore, remember?).
Keep the emergency return spring because it stabilizes the shaft according to some folks. I keep it.
Remove the dash pot. No need without a cat. Replace the screws in the throttle cable bracket with shorter ones to make up the difference.
Take the throttle cable "lever" or linkage assembly apart while maintaning their order and delete the hot start assist and cruise control if your car no longer has them. None of mine do. I cut off the hot start assist but keep the large washer section so it is still there to keep the fast idle linkage aligned; you'll see. The cruise control can go with no worries.
Cap off all nipples with a short piece of vacuum hose and a small piece of something shoved into the end. Then add zip ties if you wish. I don't pull the nipples and fill the holes like some do because that's too much work and too likely to fail/leak.
Remove the banjo bolts above each needle and seat. Pull out the strainers and aluminum crush washers. Rebend the fuel rail tubes if necessary so the banjo bolts goes back in without trouble. Add new crush washers but don't reinstall the strainers as they are restrictive. If they get clogged, that's no good for boost. Get a good fuel filter in front of your fuel pump. You'll have the top off the carb periodically for tuning anyway so check for rust chips or other debris. I can't tell you how many times I've thanked the rotary gods I removed my strainers and found all sorts of wonderment down in the bowls.
Remove the float bowl vent solenoid. The 81-82 style is easy. Take out three screws and replace with an aluminum plate of the same thicness (so the stock screws can be reused) and a gasket that comes in the rebuild kit. If 83-85, It needs you to take a dremel stone and grind off the nylon plunger seal thing that prevents it from coming out - or try to cut through the steel but there is no room to work. Then you can unscrew the hex head solenoid, pull the shaft and reinstall the solenoid. No need for the spring or the wire so they can be deleted. Others have pulled the brass fitting it threads into, but that seems like a lot of work. This thing must go because the float bowls have to receive a boost reference from the carb hat, and this is the only practical way to do it. Others have conjectured about adding a fitting above each float bowl through the top of the air horn. That's a lot of work and is not necessary, but it shows they were thinking along the right lines.
Moving onto the inside of the carb:
Now take off all the parts like the site glass windows, jet plug bolts, jets, accel pump housing and old leathery diaphram and spring, the 30 stamped brass jet bolt thing above the accel pump, the little brass weight and check ball, then all the air bleeds and accel pump banjo bolt with its larger brass weight and check ball. Also take out the power valve/richer solenoid stuff so the main body is completely stripped for cleaning/degreasing.
High power option:
This next part is if you're interested in hogging your carb out, which, in my opinion, is an absolute must if you like things like low end torque. Also you can perform the booster support cut and aerofoil shape mod at this time.
First pull the OMP nipple tubes and set them aside. I use an old chuck from a drill press because it has three gripping "fingers" that can grab the barbed end and carefully twist and pull them out. I know some use a vicegrip for this, but bending/crushing is possible.
Then use an old secondary main air bleed you don't care about, thread into the sec booster first, grip it with a vice grip and start gently twisting and pulling up straight. Rotate it slightly back and forth and eventually it will come out. Then grab a primary air bleed you don't care about and so on. Pulling secondaries first makes life easier. You'll see.
Now grab a thick washer (around 1/8" will do) of the EXACT size as the OD of your primary venturis. Hold it in a bolt with a nut on each side tightened with two wrenches. Then I like to warm up the carb's main body while I grab a can of that electronics duster canned air stuff. Grab a couple of 1x1 or whatever handy wood pieces you have. Set the carb on them so at least one of the venturis has a clear path to the ground so it can be tapped out. Turn the can upside down and start spraying until the venturi is cold (icy). Sometimes it will fall out. But you usually have to tap it out with the washer+bolt. Be careful! How many spare carbs and extra venturis do you have just lying around if you screw up?
Find a bigger washer if you choose to hog out your secondaries as well. I'd advise against this because out of all the boost prepped carb threads I've read, not one person did hogged out secondaries and to the best of my knowledge no one hogged their primaries either. But I can say from my own experiences, hogged primaries are the way to go. Mod your secondaries at your own risk and you're on your own for tuning.
With the venturis out of the carb, make sure all the parts are out. Take off the floats, rods and needles from the top but you can leave the seats and fuel rails/banjo bolts on. You should leave the FBVS out for this cleaning step as well as I'm sure there will be nylon and metal debris everywhere. All gaskets should also be removed and scraped off where necessary.
It's time to use some degreaser or carb cleaner (or that nasty carb dip which I've only had to use one one Nikki, ever!). Wash all three main parts of the carb and any hardware if it's dirty. Then dry everything thoroughly with compressed air and don't lose any small stuff. This step should not require any further explanation.
Now hog out your venturis keeping a smooth straight taper from the small end to big. My recent findings suggest that 25.6mm is too big as it introduced a lean glitch at about 1500rpm.* However my other carb at 25.4mm doesn't have the glitch. Looking at RB's old catalog from the 80s, they suggest .98" which is 24.9mm. Yaw hogged his carbs out to 24mm. Sterling and Carl did theirs at 22mm. Do yourselves a favor and keep the size between 24.0 and 24.9mm, especially if you have a stock ported 12A, but I'd think a stockport would do better with 24mm and a streetport shouldn't need any larger than 24.9mm. I've done all my testing on a 74 ported R5 13B, so my air requirements are going to be a bit more than yours, and the above suggestions are my best educated guess for a 12A. Use your judgement and do another 100 hours of reading if you don't feel confident about which size to go with yet. Just know that the 22mm Sterling carbs have less low end torque than the 24mm Yaw carbs, from what I've read on the forum. The smallest I'd run these days on my 13B is 24.7mm on a small runner NO manifold which flows about the same as a 79 12A manifold. Your research could turn up some other info I haven't read yet.
*The Racing Nikki I refer to now and then has 26mm venturis (not cut by me) and its off-idle glitch is awful. Not a fun carb to drive on the street, even though it has a lot of power. Probably why it's a racing carb. Well, I know how to fix it for the street now!
Grab some washers in various sizes and some bolts with nuts. I like 21mm, 22m and on up to 24.7 or whatever size I'm going for. If you don't have the exact size, you can "interpolate" or whatever. I use these as ID guides to keep both venturis the same size at the same position/depth.
I use a die grinder for the bulk of material removal, then a dremel with a sanding drum (coarse then fine) for final shaping. This step can take days. Well, just hours, unless you're new. Then a final polishing can be done. I don't go overboard. Just dremel's version of a scotchbrite pad on a stick is good enough. I've tried the common beige and black ones. The black is what I've used recently and works great. A little texture is left over. Not sure if this is better than a mirror polish, but I'm inclined to think, yes. Laminar flow or something may apply to venturis? Anyone know?
Warm up the carb main body and freeze the venturis. Get the little notch aligned with the hole in the main body. I hole it with a needlenose. Tap them home until at the same depth as stock. Maybe take a pic or two before you begin all this so you know? Like 1mm below the surface or so. Look at it from the bottom too. Make sure it is not too low. I also use some blue loctite here if the boosters end up kinda loose after they've reached the same temp as the main body. The metal is just zink or pot metal so it's not like the best material for perfect dimensional stability in the first place. Rememebr the venturis will remain cooler than the main body of the carb due tot he venturis effect, or at least it makes sense that they would, so a little something in there, and I mean a little! goes a long way. Just take it slow and pay attention to what you're doing.
Cut the booster support arms off and smooth the remaining arm into a pointy aerofoil or airfoil shape underneath and a round smooth top. I do this with small hand files. A hack saw is used to chop off the support first, then a lot of filing. Get ready for sore fingertips unless you can figure out a better technique than I did. It takes a lot time but is worth it. Sterling would then polish his. I kinda polish mine. Not for looks for but flow. If it feels smooth to you, the air will think it's smooth too.
Sterling told me about this next part. Take a tool used for tapping in small wood finishing nails and a little parafin wax used for canning or candle making. Wax the tool on the tapered end (I'm starting to sound like Mr Cake). Tap the tapered end into the booster fittings so they expand a very tiny amount. Don't go overboard. Tap and test in the carb several times until you develop a feel for how much force to use. I like to use the junk air bleeds to tap the boosters back in the carb after the venturis go back in.
If you want to use the canned air stuff to cool the boosters down before they go in, it's what I use. Keep them aligned as perfectly centered as possible. There is no support arm to do this job for you anymore. If they end up too tight, and can't be moved, you expanded them too far. Oops. I'm not sure what to tell you other than maybe heat up the carb body and freeze the booster and try like the dickens to get it back out? Don't heat the carb hotter than it would experience in an engine bay. Don't use a torch either as that is too much heat in too small an area, plus it makes a watery mess. I'm sure you'll figure it out.
Time to drill stuff:
Use your .045" or 118 drill bit to drill these parts: accel pump banjo bolt, accel pump nozzles, primary fuel jets, secondary slow air bleed nickel plated 60s. Actually drill out the tiny jet at the bottom of the accel pump banjo bolt completely with a bigger drill bit if you want to. I do. This will let enough volume through for both nozzles at .045". Do not drill as large as Sterling suggests at .050". If my 13B is ok at .045", I think your 12A will be too.
Cut a new thick base plate gasket for secondary fuel leak prevention as the new one in the kit is paper-thin. Wait, it is paper.
Anyway, yes, even FB carbs will leak a little here. It takes time and effort to cut a gasket, but you have a nice fresh aftermarket gasket to copy. You won't need all the little holes. Just study and punch only the holes you need. I won't hold your hand here. If in doubt, punch them all out. You just risk more leaks is all.Weld or wire tie the secondary linkage to make mechanical secondaries. I welded all of my boost prepped carbs for longevity, and the simple fact it might be harder to open them under boost (observe the slight secondary butterfly offset that keeps them closed under vacuum and presumably under boost). I felt welding was the safer option, but of course it is less reversible than a simple wiring job.
Now it's time to put this thing back together:
Plunk the main body back onto the base plate. Thick gasket, 10mm head bolts etc.
Fill the secondary vacuum booster hole with quicksteel.
Tap in the OMP nipples with a small hammer and use a box cutter razor blade as a spacer against the boosters. Don't do what Yaw does and only install them a little ways in. This leads to inferior oiling and makes a big oily mess up there. This is not the way the factory does it. They have them right up against the boosters for good reason. If you're worried about the nipples being a restriction, don't be. With hogged venturis, there is plenty of room for air to get past them.
Install the 118 drilled nickel plated 60s and the long air bleeds stamped 45 in the primary side. The reason to do this is two-fold. To recalibrate the idle and transition circuit to work better with hogged venturis, and to get rid of the secondary glitch/hiccup/stumble/delay everyone complains about when going to mech secondaries, which you must do with boost.
Drop in a checkball and the big brass weight into the accel pump hole. Install the drilled accel pump banjo bolt and nozzle with a new gasket from the kit (or use the old one - whatever you want to use here as the new ones are sometimes cut funny).
Pic of drilled banjo bolt:
Install the primary 60 or 70 main air bleeds the 81-85 carbs come stock with. If you're doing a 79 carb, they came with 90. It can work as I've tried them, but I like the smaller sizes better as they give somewhat better tip-in.
Just a placeholder pic to show an earlier setup with the solder filled slow air bleeds but before the modded secondary main air bleeds were swapped in:
Machine your secondary main air bleeds to accept fuel jets drilled with the 118 or .045" drill bit, or Holley air bleeds at 45. This further reduces or eliminates the secondary hiccup, as too much air is the enemy here, and stock 140 air bleeds are just too big for boost in my experience. You can use a bench grinder to trim the surface height down so the jets will fit a little lower under the air horn. Then cut a new slot to use the same big screwdriver you use for the needle and seats. Then you can drill and tap for the thread pitch* Mazda used on their fuel jets, or the imperial size* Holley used. Either one should be ok. I actually used both; one was a bottoming or blind hole tap while the other had an easy start taper, and the drill bit that came with imperial tapping kit is just a touch smaller than the drill bit recommended for metric. Better safe than sorry. Don't drill too deep as you can end up going all the way through, or the emulsion tube breaks off.
*I'll look up the actual thread pitches later as I don't have them in front of me, but it's not hard for you to figure it out if you're going to do this sort of mod so I don't need to hold your hand. All I had to go on was the fact that Sterling did this mod, so I figured the steps out on my own.
Install your modded secondary main air bleeds and a set of drilled stock 92 jets at 118 or .045", or your Holley 45 air bleeds. Note: 45 or 118 is a good place to start. It's good to have smaller and larger air bleeds on hand for tuning purposes to get rid of the common secondary hiccup but this should be about 90% tuned right out of the box and should reduce the unpleasant delay to a mere minor anoyance or eliminate it entirely.
Do the Sterling accel pump mod: cut 6 (six) gaskets, stretch spring, make a steel bracket; hole spacing 1 1/8", get longer screws, clearance one of the rivits on the throttle cable bracket. The info is here on this forum explained in greater detail by Sterling.
I have a few pics of some early experimental accel pump work on a 79 carb.
Reinstall a check ball and the thin brass weight in the hole in the accel pump diaphram housing section of the carb. Then wrap the 30 stamped brass screw/jet thing with some teflon tape and screw it in with the same force you used to remove it. Don't over tighten.
Wow, this is getting long. I'll sum up the easy stuff.
Altitude compensator block off plate 1/4" aluminum. A gasket that comes in engine rebuild kits works. Aluminum should be same thickness as flange so original screws can be reused. Or block off the holes your own way.
Get a small torch and some solder. Fill the primary short slow air bleeds and secondary long slow air bleeds with solder. If you don't recall which is which, refer to your pictures. Just a quick note: you're looking for the short brass ones with 150 to 190 stamped on them (usually 170 for FB carbs), and the long ones don't have any numbers at the top. Fill these with solder and install in the secondary side.
If your carb had a richer solenoid or power valve, there were some additional brass fittings on the main body at the secondary side at the top, and one big solenoid fitting down below. Sterling said to reinstal all the brass fittings but you can delete the big solenoid and just fill the gaping hole with quicksteel. It's what I did and it works.
If your carb had the weird spring loaded rods extending from the air horn down into the float bowls at a pair of 40 brass jet-like fittings, I don't know what you can do about those. Time to experiment?
Double check your work before the top goes back in. Depending on your original gasket's condition, either reuse it or throw a new gasket on.
But before you do, you can swap in some new needles and seats, or just new needles if your seats won't budge or they appear to be in good shape. Use a really wide screwdriver. Either way, it will take some break-in time so they can "burnish". I tend to speed up the process by blowing some compessed air into the fuel inlet and letting them bounce carefully for a while. The float heights shouldn't need any adjustment.
Then install the screws, brackets, return springs etc. Pretty easy stuff at this point.
That about does it for the carb.
Just a note: I don't believe in thinning my throttle shafts because I don't believe in this particular mod. It is too easy to screw up, they become very fragile and require a stopper of some kind(?). With boost, I want it as sturdy as po0ssible. Stock shafts don't seem like they are a restriction at all, so they stay stock on all my carb builds. You can ruin yours if you want to.
Hopefully this posts ok. We don't have an edit button anymore.
Thread Starter
Joined: Aug 2001
Posts: 15,725
Likes: 91
From: Near Seattle
Just a quick list for tuning a 24mm venturi carb for boost:
Primary side:
120 primary fuel jets or drilled 118
70 primary main air bleeds
nickel plated 60s from the secondary side and drill them to 118 (.045") then swap them to the primary side
Leave the long slow air bleeds alone
Secondary side
150 secondary fuel jets
modded secondary main air bleeds to accept drilled 118 jets or 45 air bleeds
fill the brass primary slow air bleeds with solder and swap into secondary holes
fill the long sec slow bleeds with solder as well
Sound good? If you mod your carb the way I do, this should put you into the 80% tuned ballpark right out of the box. I wish I would have known half this stuff a year ago.
Lolicon*** of RX-7 World
Joined: Nov 2012
Posts: 312
Likes: 0
From: Idaho
Read most of it so far seems a bit out of my skills range since this is my first carb but its not completely I will finish reading more when I'm at work tonight and probably do some extra research.
I might have to find me an extra carb for this kind of need the car going before I do any boost prepping as it is. Very informative and helpful Thank you for writing this all up it will keep me from doing it my way that I had planned. >_<
I might have to find me an extra carb for this kind of need the car going before I do any boost prepping as it is. Very informative and helpful Thank you for writing this all up it will keep me from doing it my way that I had planned. >_<


If you want the venturies to go in like butter.... freeze them an hour before installation. I put mine in the freezer and when I slid them in the body they almost fell in place. No pushing or hammering required.
Thread Starter
Joined: Aug 2001
Posts: 15,725
Likes: 91
From: Near Seattle
Glad I could help. 
Another interested party suggested I should write up a brief NA tuning list for those who still want to hog out their carbs but may not be in a position to run boost just yet. I thought of two possible lists.
List one:
If you're literally just starting out, one option would be to follow Paul Yaw's tuning document that Slammed_GSL posted recently in his FS thread.

For a quick SAE imperial to metric conversion, since I tend to think in metric because our carbs are metric, I'm going to recreate the list with metric conversions for quick reference (my comments and metric conversion in parenthesis).
Primary Venturi: 24mm
Secondary Venturi: 28mm stock
Secondary Spring: Holley white (what?)
Primary Fuel Jet: 57 (144)
Primary Air Bleed: 45 (114)
Secondary Fuel Jet: 59 (150 rounded up)
Secondary Air Bleed: 73 (185)
Idle Air Bleed: Stock (I think he means slow air bleeds)
Idle Fuel Jet: Stock (ditto)
Calibration: 0-1000 feet alt. stock port
Fuel Pressure: 2� PSI
Suggested Ign. Timing: 24L 18T
Seat Orifice: .087" (220)
Primary Emulsion Tube: 8 row
Secondary Emulsion Tube: 5 row
Accelerator Pump Jet: stock
Airflow: 423cfm @ 1-5" Hg
Transition Air Bleed: stock (again this must mean slow air bleeds)
Yaw's accel pump and slow air bleeds are stock, and his carb has a vacuum secondary diaphram housing still in place. It all makes sense that the primary fuel jets and air bleeds would have to be big compared to the jets and bleeds I'd use in a boost prepped but NA tuned carb with mechanical secondaries. It seems my carb might have better part throttle cruise gas mileage, and more amazing secondaries than one of Yaw's, but still have as much tip-in or more. His air bleeds are also insanely huge compared to what I've learned about the right sizes to use etc.
Now check out my recommended jet and air bleed sizes for a carb with the same 24mm venturis, but also boost prepped following my recommendations.
List two:
Primary side:
130 primary fuel jets or Holley 51 air bleeds
70 primary main air bleeds
nickel plated 60s from the secondary side and drill them to 118 (.045") then swap them to the primary side
Leave the long slow air bleeds alone
Secondary side:
160 stock secondary fuel jets
140 stock secondary main air bleeds
This next part is optional as I had no problem with any secondary delays while NA when I did the Sterling accel pump mod and the secondary slow air bleeds were not filled with solder yet. Of course my carb needed two sets of nickel plated 60s (stockers in the secondary side and ones drilled to 118 in the primary side). I realize this might not be feasible if you only have one carb available. I had a few spares to source parts from so it was no problem for me to borrow a few parts here and there.
Or you could do the same as a boost tune such as:
fill the brass primary slow air bleeds with solder and swap into secondary holes
fill the long sec slow bleeds with solder as well
However I don't know how rich that will make your secondaries run as I have not tested solder filled slow bleeds for NA use yet.
Or just fill the short brass primaries but leave the long ones open if you have no spare nickel plated 60s. Or any other combination.
Anyway, did that answer your question?
Another interested party suggested I should write up a brief NA tuning list for those who still want to hog out their carbs but may not be in a position to run boost just yet. I thought of two possible lists.
List one:
If you're literally just starting out, one option would be to follow Paul Yaw's tuning document that Slammed_GSL posted recently in his FS thread.
For a quick SAE imperial to metric conversion, since I tend to think in metric because our carbs are metric, I'm going to recreate the list with metric conversions for quick reference (my comments and metric conversion in parenthesis).
Primary Venturi: 24mm
Secondary Venturi: 28mm stock
Secondary Spring: Holley white (what?)
Primary Fuel Jet: 57 (144)
Primary Air Bleed: 45 (114)
Secondary Fuel Jet: 59 (150 rounded up)
Secondary Air Bleed: 73 (185)
Idle Air Bleed: Stock (I think he means slow air bleeds)
Idle Fuel Jet: Stock (ditto)
Calibration: 0-1000 feet alt. stock port
Fuel Pressure: 2� PSI
Suggested Ign. Timing: 24L 18T
Seat Orifice: .087" (220)
Primary Emulsion Tube: 8 row
Secondary Emulsion Tube: 5 row
Accelerator Pump Jet: stock
Airflow: 423cfm @ 1-5" Hg
Transition Air Bleed: stock (again this must mean slow air bleeds)
Yaw's accel pump and slow air bleeds are stock, and his carb has a vacuum secondary diaphram housing still in place. It all makes sense that the primary fuel jets and air bleeds would have to be big compared to the jets and bleeds I'd use in a boost prepped but NA tuned carb with mechanical secondaries. It seems my carb might have better part throttle cruise gas mileage, and more amazing secondaries than one of Yaw's, but still have as much tip-in or more. His air bleeds are also insanely huge compared to what I've learned about the right sizes to use etc.
Now check out my recommended jet and air bleed sizes for a carb with the same 24mm venturis, but also boost prepped following my recommendations.
List two:
Primary side:
130 primary fuel jets or Holley 51 air bleeds
70 primary main air bleeds
nickel plated 60s from the secondary side and drill them to 118 (.045") then swap them to the primary side
Leave the long slow air bleeds alone
Secondary side:
160 stock secondary fuel jets
140 stock secondary main air bleeds
This next part is optional as I had no problem with any secondary delays while NA when I did the Sterling accel pump mod and the secondary slow air bleeds were not filled with solder yet. Of course my carb needed two sets of nickel plated 60s (stockers in the secondary side and ones drilled to 118 in the primary side). I realize this might not be feasible if you only have one carb available. I had a few spares to source parts from so it was no problem for me to borrow a few parts here and there.
Or you could do the same as a boost tune such as:
fill the brass primary slow air bleeds with solder and swap into secondary holes
fill the long sec slow bleeds with solder as well
However I don't know how rich that will make your secondaries run as I have not tested solder filled slow bleeds for NA use yet.
Or just fill the short brass primaries but leave the long ones open if you have no spare nickel plated 60s. Or any other combination.
Anyway, did that answer your question?
Lolicon*** of RX-7 World
Joined: Nov 2012
Posts: 312
Likes: 0
From: Idaho
Well that makes me wanna do N/A tuning long before I even set a turbo in my engine bay.
Would like to see how much power I could make without turbo guess I should source a few stock nikkis out so I can try this.
Would like to see how much power I could make without turbo guess I should source a few stock nikkis out so I can try this.
Nice writeup! This is an area that needed attention. I had a very hard time digging up info on boost prepping when I started my project.
I think I've run into the baseplate leakage you described in your first post. I've noticed a nice coating of oily gas on the sides of the carb, concentrated around the baseplate. It clearly isn't holding a seal under boost, even just 5 PSI. So I guess the S3 carbs aren't immune either. I'm going to pull it and try a thin coating of RTV on both sides and see if that helps.
I think I've run into the baseplate leakage you described in your first post. I've noticed a nice coating of oily gas on the sides of the carb, concentrated around the baseplate. It clearly isn't holding a seal under boost, even just 5 PSI. So I guess the S3 carbs aren't immune either. I'm going to pull it and try a thin coating of RTV on both sides and see if that helps.
Trending Topics
Thread Starter
Joined: Aug 2001
Posts: 15,725
Likes: 91
From: Near Seattle
plentymoon, yeah go NA first like I did. It's the best way to get a handle on what's involved with making the Nikki do what you want it to do before you venture into dangerous territory (boost)that could pop the engine. NA is pretty safe over a really wide air/fuel range. Get yourself a wideband and learn what the numbers mean etc.
LizardFC, I agree this area was sorely lacking in any real hardcore info that wasn't posted either by incompetent noobs just grasping at straws, or it was over 10 years old and pretty outdated, or they got the carbs to work with boost after a fashion, but they later moved over to EFI for some reason, thus abandoning any of us who actually want to stick with carbs. And so on.
As for me, I set out to prove the Nikki is the right choice for boost because we all know it's already the right choice for a rotary. It just needed a little recalibration to run boost, is all. That's where the real research was needed.
Having tried it both ways; EFI and carbs now, carbs are so much easier and rewarding to work with I simply can't imagine going back to EFI at this point. It's not worth the headaches. One clogged injector or one little air bubble and POP! There goes your engine. I'm not interested in running those kinds of risks.
Another thing I noticed is no one out there ever enlarged their venturis making their posted info not really very valuable to me or to anyone else who likes low end torque, claiming you gotta leave your primaries alone. Yeah, right. Or they recommend grossly oversized secondary jets which turned out to not work in my setup at all. Made me question things for a while. Kinda sucks when your confidence in your own findings is brought into question, you know?
I needed to basically start over from scratch; to ignore all the flub on the forum* and set out on my own, doing my own testing and tuning and recording and reporting my results, so that's what I did, and it paid off after a year of work. I wasn't going to give up and abandon carbs to go EFI like several others did, even during the most frustrating times when the secondary delay was 2 seconds long and the carb would flood even while driving mildly in vacuum. That really sucked! I took a couple breaks from turbos but I stuck with it! I came up with various fixes and work-arounds that worked! And now my setup runs and drives better than a factory S4 NA EFI install, and I couldn't be prouder. Probably why I decided to post this how-to thread today once I got a bit of time, to share my findings before any of it slipped my mind.
*Don't get me wrong, I wouldnt be here if I didn't get some recent help from the forum as well. It was new info not found in searches about the size of your fuel feed and return lines, and whether to make the air bleeds smaller in boost, to help speed up fuel delivery, which is what it turns out was causing the secondary delay. Each time I'd make the air bleeds smaller, the delay would be reduced until now it's just a little hiccup with the carb being tuned about 90% so far.
The owner of the S4 NA EFI install could be heard saying phrases like "love that torque!", "I miss turbos" or my favorite "I'm impressed by how much smoother this drives than mine, it's less jerky" and I said "yeah but you gotta keep your foot on it when it's cold" To which he replied "but if the payoff was this good, I'd put up with it." So there you have it from a former carb driver to an EFI convert questioning his life choices.
LizardFC, I think you need to make a thick gasket. Don't bother with RTV. The 81-85 carbs do get a little moist there with thin gaskets but when I switched to the thick gasket paper from the auto parts store, the blue paper, no more leaks! Not even moist! It withstands oil and fuel fine after a couple hundred miles or so checkup.
LizardFC, I agree this area was sorely lacking in any real hardcore info that wasn't posted either by incompetent noobs just grasping at straws, or it was over 10 years old and pretty outdated, or they got the carbs to work with boost after a fashion, but they later moved over to EFI for some reason, thus abandoning any of us who actually want to stick with carbs. And so on.
As for me, I set out to prove the Nikki is the right choice for boost because we all know it's already the right choice for a rotary.
It just needed a little recalibration to run boost, is all. That's where the real research was needed.Having tried it both ways; EFI and carbs now, carbs are so much easier and rewarding to work with I simply can't imagine going back to EFI at this point. It's not worth the headaches. One clogged injector or one little air bubble and POP! There goes your engine. I'm not interested in running those kinds of risks.
Another thing I noticed is no one out there ever enlarged their venturis making their posted info not really very valuable to me or to anyone else who likes low end torque, claiming you gotta leave your primaries alone. Yeah, right. Or they recommend grossly oversized secondary jets which turned out to not work in my setup at all. Made me question things for a while. Kinda sucks when your confidence in your own findings is brought into question, you know?
I needed to basically start over from scratch; to ignore all the flub on the forum* and set out on my own, doing my own testing and tuning and recording and reporting my results, so that's what I did, and it paid off after a year of work. I wasn't going to give up and abandon carbs to go EFI like several others did, even during the most frustrating times when the secondary delay was 2 seconds long and the carb would flood even while driving mildly in vacuum. That really sucked! I took a couple breaks from turbos but I stuck with it! I came up with various fixes and work-arounds that worked! And now my setup runs and drives better than a factory S4 NA EFI install, and I couldn't be prouder. Probably why I decided to post this how-to thread today once I got a bit of time, to share my findings before any of it slipped my mind.
*Don't get me wrong, I wouldnt be here if I didn't get some recent help from the forum as well. It was new info not found in searches about the size of your fuel feed and return lines, and whether to make the air bleeds smaller in boost, to help speed up fuel delivery, which is what it turns out was causing the secondary delay. Each time I'd make the air bleeds smaller, the delay would be reduced until now it's just a little hiccup with the carb being tuned about 90% so far.
The owner of the S4 NA EFI install could be heard saying phrases like "love that torque!", "I miss turbos" or my favorite "I'm impressed by how much smoother this drives than mine, it's less jerky" and I said "yeah but you gotta keep your foot on it when it's cold" To which he replied "but if the payoff was this good, I'd put up with it." So there you have it from a former carb driver to an EFI convert questioning his life choices.
LizardFC, I think you need to make a thick gasket. Don't bother with RTV. The 81-85 carbs do get a little moist there with thin gaskets but when I switched to the thick gasket paper from the auto parts store, the blue paper, no more leaks! Not even moist! It withstands oil and fuel fine after a couple hundred miles or so checkup.
Lolicon*** of RX-7 World
Joined: Nov 2012
Posts: 312
Likes: 0
From: Idaho
[QUOTE="Jeff20B;11885000"]plentymoon, yeah go NA first like I did. It's the best way to get a handle on what's involved with making the Nikki do what you want it to do before you venture into dangerous territory (boost)that could pop the engine. NA is pretty safe over a really wide air/fuel range. Get yourself a wideband and learn what the numbers mean etc.]
Yeah sounds like a better plan right now I don't need to find myself looking for mote 12a engine parts by that time I would be thourghly convinced to do a 13b if I only got 3k miles out of a fresh build broke in the build low boost on it and be driving one day and kaboom goes my engine. I would feel bad if I had to do this again way to soon and I can already hear what my wife would say.
Yeah sounds like a better plan right now I don't need to find myself looking for mote 12a engine parts by that time I would be thourghly convinced to do a 13b if I only got 3k miles out of a fresh build broke in the build low boost on it and be driving one day and kaboom goes my engine. I would feel bad if I had to do this again way to soon and I can already hear what my wife would say.
Thread Starter
Joined: Aug 2001
Posts: 15,725
Likes: 91
From: Near Seattle
Originally Posted by wankel=awesome
Where do you get the accel pump gaskets?
"Get a hygrade rebuild kit from Rockauto. The $30 universal one that has the long travel accel pump diaphram and the two types of top gaskets."
If it was any more clear I would have needed to post a link. Well, ok here you go. 1981 MAZDA RX-7 Carburetor Repair Kit
Oh I see what's going on. When I posted the pic above of the 79 carb that was getting an experimental accel pump mod (my first one) with the gaskets and the different length screws, that is a short travel diaphram from an FB carb that was new enough to try. The results were a bit lacking, but it was my frist try back in '12. I can see how it might be confusing. As I said I don't have any pictures of the boost prepping process so I had to dig deep to find anything. Hmm, maybe I'll get some pics of the tools and things I used later if I think about it.
Thread Starter
Joined: Aug 2001
Posts: 15,725
Likes: 91
From: Near Seattle
plentymoon, when you say 13B, what are you talking about? If it's from an FC you're on your own for modifying an intake manifold that will work with a Nikki. The results might suck like the ratty manifold you saw on the white and silver 6 port I did mid summer last year. That manifold has all 6 ports open all the time and loses low end torque. The high end from 4k to 7k is incredible though, but my whole point of doing hogged out Nikkis is to get better low end torque which is something Sterling didn't understand back in the day, so I'm aiming to correct the misinformation and set things right.
Another option, which I still would not recommend, would be a T2 shortblock with a 12A manifold welded to a T2 flange. At least this is a 4 port and would flow more correctly, but it still has a much thicker flange than you'd want if fitting a turbo in there. You also have the small primary ports in the EFI engines which hurt flow above 4k or so.
The best 13B choice is one you build using 12A Y or R5 plates and 13B old school or GSL-SE rotor housings. Then whatever rotating assembly you want. That's what I did. I used an S4 NA assembly in mine for better low end torque, but because it is 9.4:1 CR, I have to be careful and can't boost very high. Karack said 14 PSI max on pump gas. I have no plans of ever going above 14psi but my stock FC turbo starts to superheat the air at 12psi or so I've been told. It currently is creeping to about 7k on my full 3" exhaust with a stock wastegate.
After having said all that, you still need an intake manifold. Mazda made a few back in the 70s that can be drilled and tapped for the Nikki stud pattern and the ACV area can be machined away to fit an S5 turbo if you also add a 7/16" or 1/2" steel spacer between the turbo and exhaust manifold. But then the turbo sticks out too far so you need FD exhaust studs swapped into the manifold and you definitely need a MOOG idler arm to clear the wastegate lever. There is a pic in the brown car's build thread showing it hitting the stock idler arm.
Good luck finding one of these manfiolds! And I'm not able to sell you mine.
I think youy're better off sticking with a 12A and developing it NA and then with boost the same way I developed the 13B. Everything will be easier for you because the Nikki is a small carb and will require less work to make it flow best on the engine it was intended for in the first place. Plus if you get a stock S4 or S5 turbo, they are more properly sized for a 12A and are considered too small for a 13B these days. However with the closer secondary runner spacing in the intake manifold, the turbo won't nestle right up close to the engine like it can with the runner spacing of a 13B, so you may have to come up with a custom exhaust manifold like most others do to move the turbo up and away from the engine. It's simple with only two pipes that feed the turbo, not requiring a separate wastegate as it's all internal. You'll need to do some searching for turbo placement ideas. Again this thread wasn't about holding anyone's hand through this process. I just have some free time to type stuff right now.
Thread Starter
Joined: Aug 2001
Posts: 15,725
Likes: 91
From: Near Seattle
You have to cut them out by hand. Thought I mentioned that already. Glad you brought it to my attention. It shows I need to add links where appropriate for additional info.
I did a quick search and found where a guy is asking about the Sterling accel pump "trick" as he called it. https://www.rx7club.com/1st-generati...estion-348545/
And the original thread he and I referenced. Might as well get it straight from the original source. https://www.rx7club.com/1st-gen-arch...ki-mods-62678/
And this thread is important for everyone to read as it covers the basics. https://www.rx7club.com/1st-gen-arch...g-tips-238032/
Sterling mentions things that might not occur to you but are very important. Even down to his white formica workbench! I used a white melamine board on my workbench for my first Nikki rebuild all the way back in late '04. Worked great.
And one more thing. I mentioned it above but I'll say it again. Where Sterling recommends drilling the strip of steel for the accel pump extension to 1 1/4" apart, I found it works better to drill them 1 1/8". This applies to all FB (81-85) carbs. wankel=awesome, since your carb is a '76, it should have a similar geometry to a 79-80, which works fine to drill at Sterling's recomended 1 1/4" as that's what I've found worked best on both my 79 carbs. Of course you can experiment with different hole spacings and find what works best for you. Sterling covers what to aim for with this mod ie how long it should squirt (duration) and volume.
Lolicon*** of RX-7 World
Joined: Nov 2012
Posts: 312
Likes: 0
From: Idaho
Umm yeah was kinda hinting at a 13b swap if I ever got discouraged. I can actually get 13b block for about $400 but it's at the parts yard outside of my town and I'm pretty sure it's not in great shape but could probably still need fixed in fact the whole car is straight and almost no rust but they would sell me and my buddies the car for $1200 I even have spare stock wheels from my old 2nd gen oh well one of these days I will have the money to save the motor and trans and rear diff one at a time and try to fix up an old gsl-se model.
Thread Starter
Joined: Aug 2001
Posts: 15,725
Likes: 91
From: Near Seattle
Something I said to wankel=awesome made me realize there is a fundamental difference in my tuning philosophy compared to Yaw, Sterling, and even Dave ******* who orignally built the Racing Nikki, which is a 79 that got hogged out bigger than any other Nikki I've ever seen.
All of these carb builders share some common traits in their tuning philosophy.
1) they all keep the slow air bleeds stock
2) they all hog out at least the primary venturis
3) they install fuel jets that in my opinion are too big and masks an underlying problem
4) they install air bleeds that are too big which further masks an underlying problem
5) with the exception of Sterling, they leave the accel pump stock and either have a secondary bog when they open with mechanical secondaries (Dave *******), or they leave the vacuum secondary actuator box hooked up and just run them like stock (Yaw on at least one of his carbs recently listed for sale posted above)
I've read personal accounts on this forum of when people got their Sterling carbs, and they didn't run right out of the box! I can attest to the Racing Nikki not being driveable the first time I tried it, but the idle circuit and accel pump worked (tried driving around the block like that anyway - was educational to say the least). I'd think the only carb builder who could build a carb that would work out of the box was Yaw, but that is only because he cheated.
What do I mean "cheated"? I'm talking about something I noticed with the Racing Nikki's and Yaw's tuning where they use really huge jets and really huge air bleeds. It gets past an idle problem these carbs have that only Sterling sort of touched on but never did anything much beyond just swapping a set of spare nickel plated 60s into the primary slow air bleed holes. He said it made the idle really rich but "solved" the idle problems that particular carb was having.
Yeah, solved, right. This tells me they all lack a basic fundamental understanding of an often overlooked part of the carb. The idle and "transition" circuit. Why else would they all leave them stock even though they've just hogged out the venturis and changed the air bleeds and fuel jets to compensate? It took me a while to get this, as it's kind of fringe stuff, so it's understandable they might never have even thought about it. Kudos to Sterling for at least thinking outside the box.
Before I understood it, at first I took what I learned about large primary jets and large primary main air bleeds from the Racing Nikki attempted to size them appropriately for my carb at 24.9mm. In my case 140 jets and 90 air bleeds are what I started with. This combo ran great right when I first got the carb running NA with no wideband. When I tried 130s the idle got a little weird but still drivable. When I tried my drilled 118 jets, the idle sucked and it wasn't really drivable anymore. I didn't fully understand what was going on so I put the carb back to 140 and 90 until I went boosted a month or two later. This was when things started to get serious.
First of all, the 140s made the wideband read 10.0 at part throttle cruise! This was simply way too rich! So I swapped to the 130s and it only went to 10.1. Ok, some slight progress. At least the idle was still ok. So then I tried the drilled 118s again and the idle went down the crapper. However the part throttle cruise was around 13 to 14 which is a major improvement.
Hmm, what was going on here? Why do the smaller jets work at one RPM range but fail at idle? I thought idle needed less fuel, not more? Then the thing Sterling said about the nickel plated 60s being able to solve and idle issue popped up so I drilled them out to 118 because I had a few spare sets and nothing to lose. I figured 118 was a nice middle of the road mod because I can always swap in some undrilled 60s if needed, and you never want to change air bleeds or jets by too many numbers at any one time. It's best to try it in smaller increments. Actually, I did that already. The carb came stock with 170 or 180 slows so I swapped in a set of 150s from an SA carb right from the start but it made little difference, so I felt it ok to drop down to 118 in one step.
It worked!
Suddenly the mixture screw did something when I turned it! I was able to get the engine back to 12.2 on the wideband where it likes to idle best, but it didn't affect the part throttle cruise to any extent either. Success!
Then later when I did some more NA testing, I discovered that it usually wants about ten numbers richer than a boost tune. I added an O2 bung to my NA exhaust and found that the 130s from before actually were ok to use now, and the idle was still decent. This of course flies in the face of what the more accomplished carb builders would do.
Think about it; my carb has 24.9mm venturis while Yaw has 24mm and Dave ******* has 26mm. My carb wants 130 jets while Yaw's wants 144 and Dave's wants 155. My carb wants 70 air bleeds while Yaw's had 114 and Dave's had at least 100 (they were drilled so not sure). Are you seeing a pattern here? Sterling's carbs were based primarily on Yaw's so his tuning philosophy would be similar to Yaw's, I'm sure. I know for a fact this style of tuning would never work with boost.
Now this thread from 2004 makes sense why he couldn't get a boost prepped Sterling carb going. https://www.rx7club.com/1st-generati...update-328276/ Give it a read and try not to yell at your computer just out of frustration at the lack of competence from both sides.
Cliff notes: a very enthusiastic but inexperienced guy gets the very first boost prepped carb from Carl and Sterling. Fast forward past lots frustrated posts and ultimately the thread fails to a deliver. Rather, Carl and Sterling failed to deliver a functional running turbo prepped carb so Robert had to step in. It was the carb brothers' first time so we should cut them some slack. But notice there haven't been any other boost prepped Carl or Sterling carbs since then. None that I'm aware of anyway.
It all makes so much more sense now. If I had known then what I know now I would have stepped into that thread and given them pretty much what I've given you all in this thread. The what where why and how.
All of these carb builders share some common traits in their tuning philosophy.
1) they all keep the slow air bleeds stock
2) they all hog out at least the primary venturis
3) they install fuel jets that in my opinion are too big and masks an underlying problem
4) they install air bleeds that are too big which further masks an underlying problem
5) with the exception of Sterling, they leave the accel pump stock and either have a secondary bog when they open with mechanical secondaries (Dave *******), or they leave the vacuum secondary actuator box hooked up and just run them like stock (Yaw on at least one of his carbs recently listed for sale posted above)
I've read personal accounts on this forum of when people got their Sterling carbs, and they didn't run right out of the box! I can attest to the Racing Nikki not being driveable the first time I tried it, but the idle circuit and accel pump worked (tried driving around the block like that anyway - was educational to say the least). I'd think the only carb builder who could build a carb that would work out of the box was Yaw, but that is only because he cheated.
What do I mean "cheated"? I'm talking about something I noticed with the Racing Nikki's and Yaw's tuning where they use really huge jets and really huge air bleeds. It gets past an idle problem these carbs have that only Sterling sort of touched on but never did anything much beyond just swapping a set of spare nickel plated 60s into the primary slow air bleed holes. He said it made the idle really rich but "solved" the idle problems that particular carb was having.
Yeah, solved, right. This tells me they all lack a basic fundamental understanding of an often overlooked part of the carb. The idle and "transition" circuit. Why else would they all leave them stock even though they've just hogged out the venturis and changed the air bleeds and fuel jets to compensate? It took me a while to get this, as it's kind of fringe stuff, so it's understandable they might never have even thought about it. Kudos to Sterling for at least thinking outside the box.
Before I understood it, at first I took what I learned about large primary jets and large primary main air bleeds from the Racing Nikki attempted to size them appropriately for my carb at 24.9mm. In my case 140 jets and 90 air bleeds are what I started with. This combo ran great right when I first got the carb running NA with no wideband. When I tried 130s the idle got a little weird but still drivable. When I tried my drilled 118 jets, the idle sucked and it wasn't really drivable anymore. I didn't fully understand what was going on so I put the carb back to 140 and 90 until I went boosted a month or two later. This was when things started to get serious.
First of all, the 140s made the wideband read 10.0 at part throttle cruise! This was simply way too rich! So I swapped to the 130s and it only went to 10.1. Ok, some slight progress. At least the idle was still ok. So then I tried the drilled 118s again and the idle went down the crapper. However the part throttle cruise was around 13 to 14 which is a major improvement.
Hmm, what was going on here? Why do the smaller jets work at one RPM range but fail at idle? I thought idle needed less fuel, not more? Then the thing Sterling said about the nickel plated 60s being able to solve and idle issue popped up so I drilled them out to 118 because I had a few spare sets and nothing to lose. I figured 118 was a nice middle of the road mod because I can always swap in some undrilled 60s if needed, and you never want to change air bleeds or jets by too many numbers at any one time. It's best to try it in smaller increments. Actually, I did that already. The carb came stock with 170 or 180 slows so I swapped in a set of 150s from an SA carb right from the start but it made little difference, so I felt it ok to drop down to 118 in one step.
It worked!
Suddenly the mixture screw did something when I turned it! I was able to get the engine back to 12.2 on the wideband where it likes to idle best, but it didn't affect the part throttle cruise to any extent either. Success!
Then later when I did some more NA testing, I discovered that it usually wants about ten numbers richer than a boost tune. I added an O2 bung to my NA exhaust and found that the 130s from before actually were ok to use now, and the idle was still decent. This of course flies in the face of what the more accomplished carb builders would do.
Think about it; my carb has 24.9mm venturis while Yaw has 24mm and Dave ******* has 26mm. My carb wants 130 jets while Yaw's wants 144 and Dave's wants 155. My carb wants 70 air bleeds while Yaw's had 114 and Dave's had at least 100 (they were drilled so not sure). Are you seeing a pattern here? Sterling's carbs were based primarily on Yaw's so his tuning philosophy would be similar to Yaw's, I'm sure. I know for a fact this style of tuning would never work with boost.
Now this thread from 2004 makes sense why he couldn't get a boost prepped Sterling carb going. https://www.rx7club.com/1st-generati...update-328276/ Give it a read and try not to yell at your computer just out of frustration at the lack of competence from both sides.
Cliff notes: a very enthusiastic but inexperienced guy gets the very first boost prepped carb from Carl and Sterling. Fast forward past lots frustrated posts and ultimately the thread fails to a deliver. Rather, Carl and Sterling failed to deliver a functional running turbo prepped carb so Robert had to step in. It was the carb brothers'
first time so we should cut them some slack. But notice there haven't been any other boost prepped Carl or Sterling carbs since then. None that I'm aware of anyway.It all makes so much more sense now. If I had known then what I know now I would have stepped into that thread and given them pretty much what I've given you all in this thread. The what where why and how.
Thread Starter
Joined: Aug 2001
Posts: 15,725
Likes: 91
From: Near Seattle
I had some time to snap a bunch of pics today of the tools and parts I use to hog out and boost prep a Nikki.
Thread tap sizes are 10-32 NF and a matching NO.21 drill bit. Also a metric 5mm x .08 to allow stock jets to be used as air bleeds. One of is a bottoming tap.
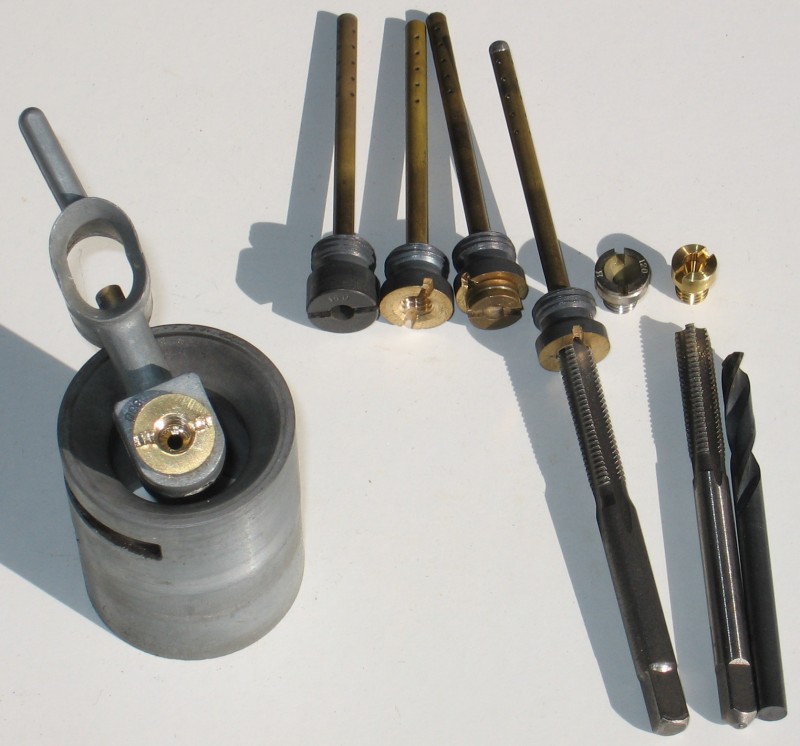
Becasue I don't own a JDM screwdriver, I need to use a flathead impact to get the difficult screws out of an umolested Nikki. Once freed up, the US-spec philips works fine to spin them out. A short needlenose also comes in handy.
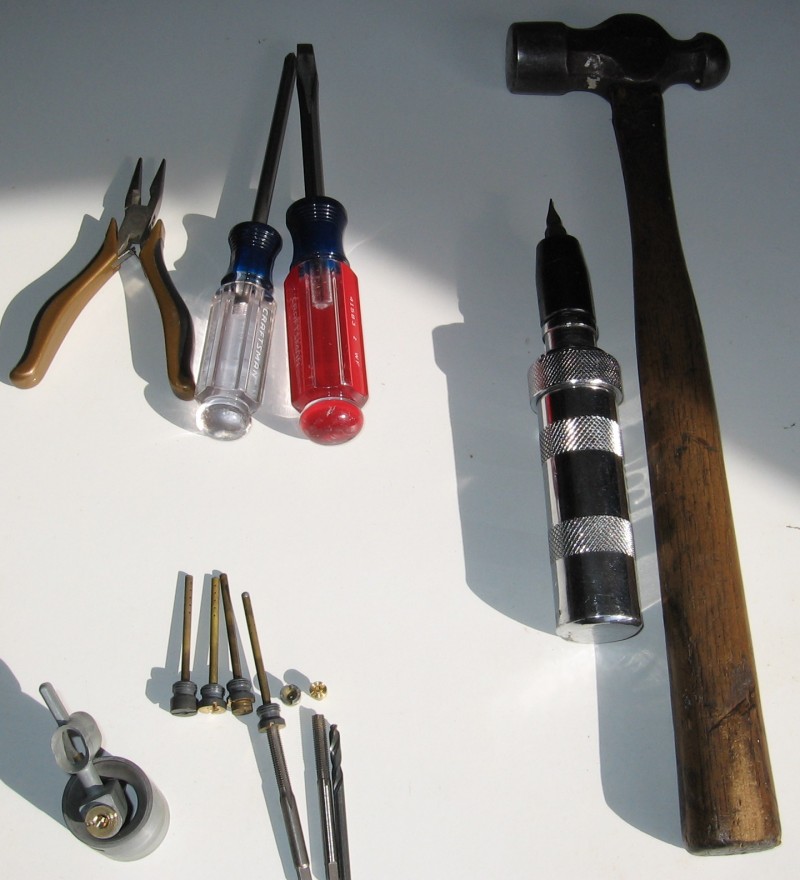
All the bits I use when hogging out venturis. The fluffy looking bit in the dremel is what I use to "polish" them. It just gets rid of scratches and makes the surface even, but not really polished.
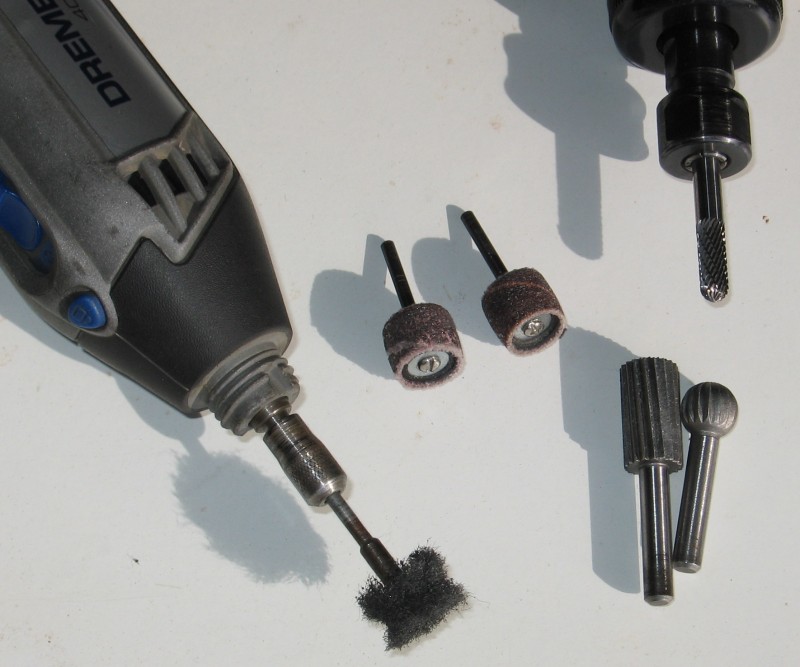
A ziptie is how I keep the linkage in order.
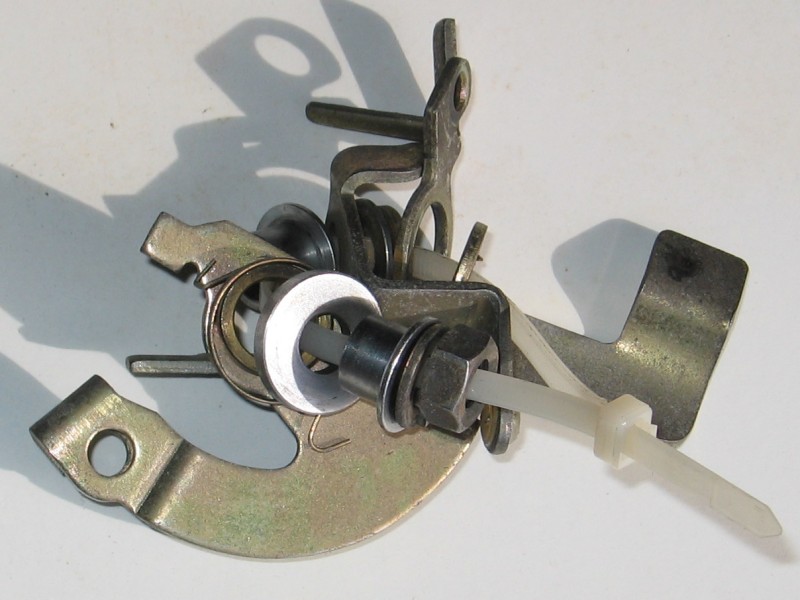
An assortment of ID depth guides to keep the venturis' cuts even. The big one on the left is the install and removal tool.
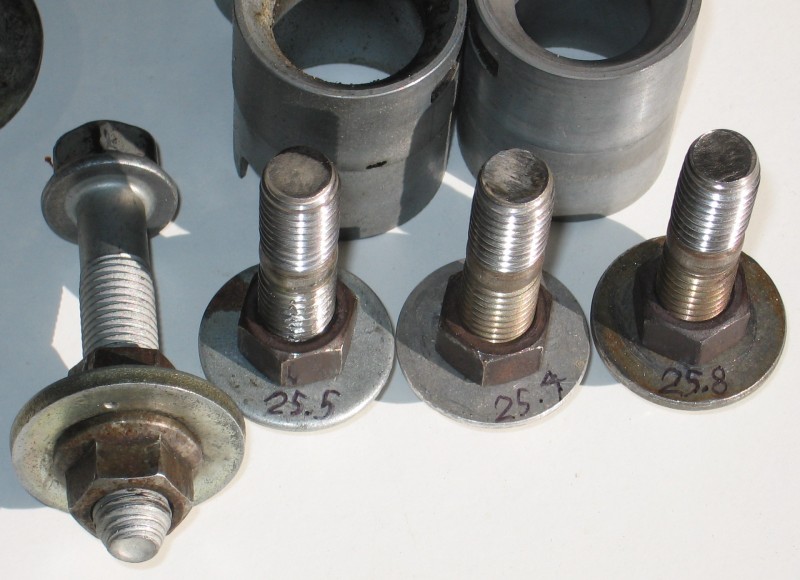
Thread tap sizes are 10-32 NF and a matching NO.21 drill bit. Also a metric 5mm x .08 to allow stock jets to be used as air bleeds. One of is a bottoming tap.
Becasue I don't own a JDM screwdriver, I need to use a flathead impact to get the difficult screws out of an umolested Nikki. Once freed up, the US-spec philips works fine to spin them out. A short needlenose also comes in handy.
All the bits I use when hogging out venturis. The fluffy looking bit in the dremel is what I use to "polish" them. It just gets rid of scratches and makes the surface even, but not really polished.
A ziptie is how I keep the linkage in order.
An assortment of ID depth guides to keep the venturis' cuts even. The big one on the left is the install and removal tool.
Thread Starter
Joined: Aug 2001
Posts: 15,725
Likes: 91
From: Near Seattle
The gasket on the left comes in a 12A gasket set from Mazdatrix. I don't know why it isn't included in a regular carb rebuild kit. Oh well. 1/4" aluminum plate so the stock screws can be reused.
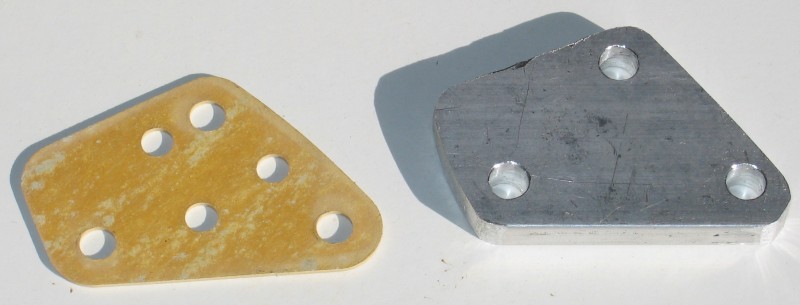
I took an old dull 1" hole saw, ground teeth down, inside was ground out until the edge was sharp, deepwell socket as something to hit with a hammer, and some scrap 1/4" aluminum plate to protect the sharpened edge. This allows mass production of accel pump spacer gaskets. I wonder if Sterling ever took things this far?
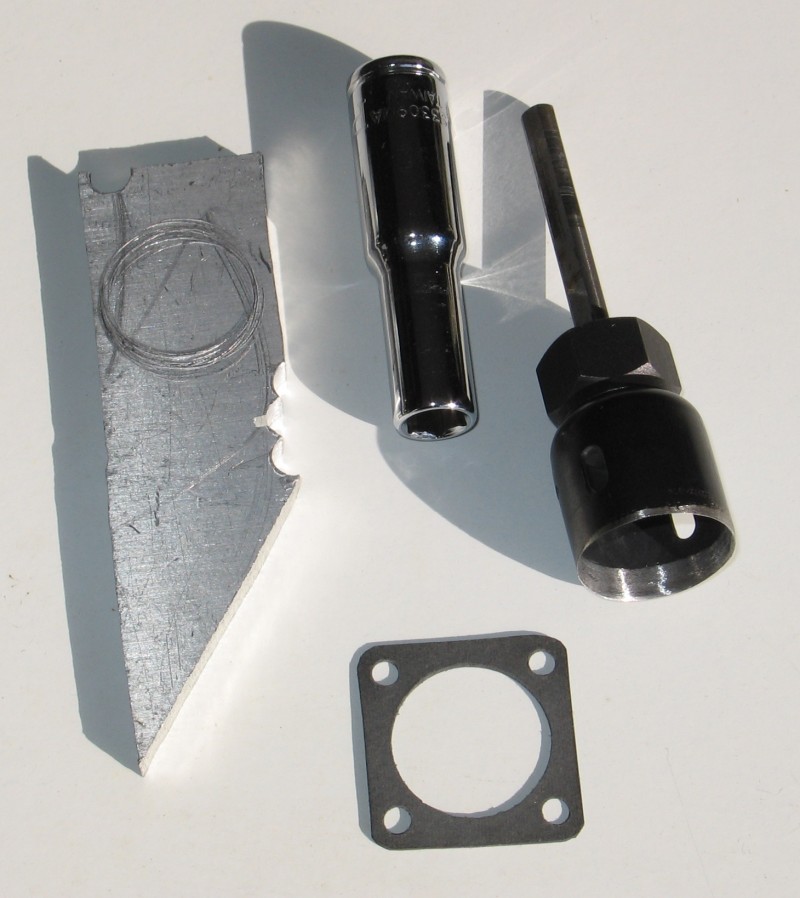
And the screw holes are punched out with one of these (can't recall which worked better).
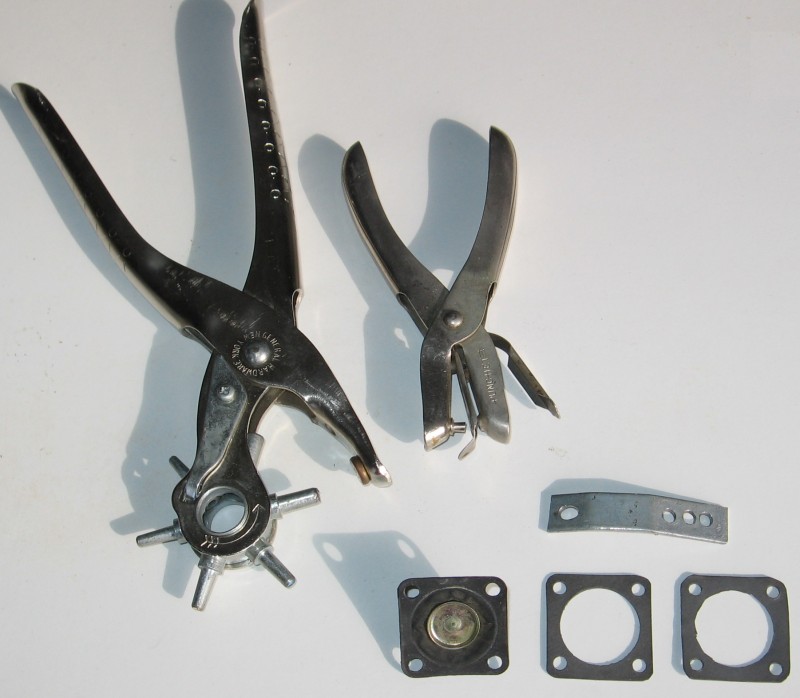
And there is the experimental extension piece seen in the 79 carb pictured above. Note the two gaskets. Guess which was cut by hand vs the punched one.
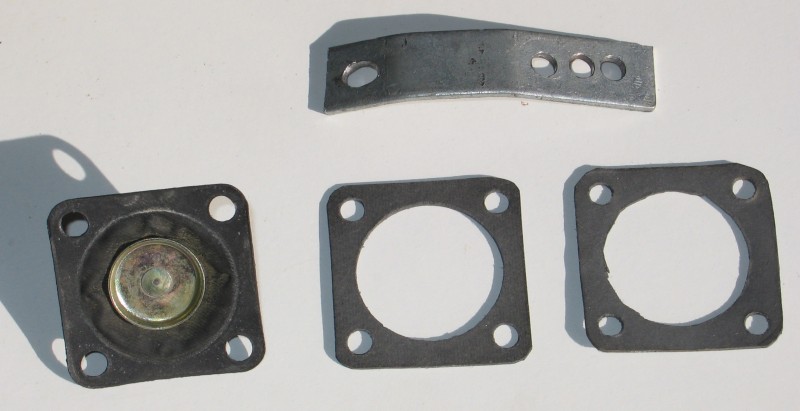
Here is the wood finishing nail punch and some wax, ready for action!
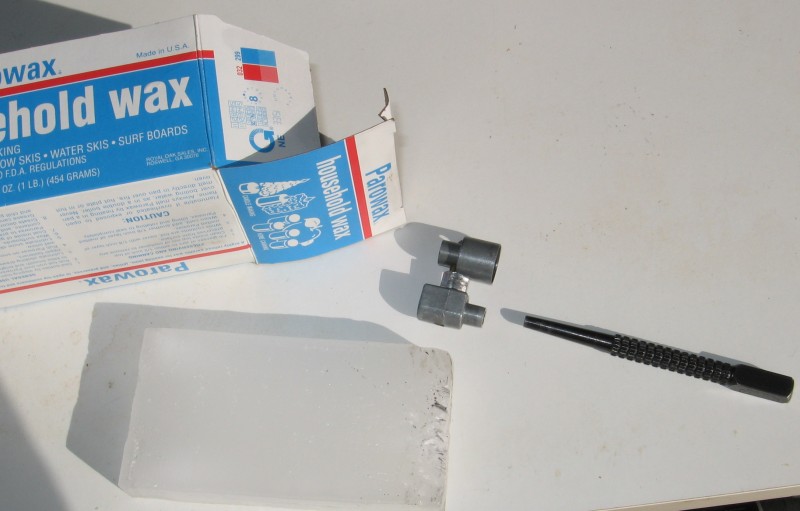
I took an old dull 1" hole saw, ground teeth down, inside was ground out until the edge was sharp, deepwell socket as something to hit with a hammer, and some scrap 1/4" aluminum plate to protect the sharpened edge. This allows mass production of accel pump spacer gaskets. I wonder if Sterling ever took things this far?
And the screw holes are punched out with one of these (can't recall which worked better).
And there is the experimental extension piece seen in the 79 carb pictured above. Note the two gaskets. Guess which was cut by hand vs the punched one.
Here is the wood finishing nail punch and some wax, ready for action!
Thread Starter
Joined: Aug 2001
Posts: 15,725
Likes: 91
From: Near Seattle
Some of that canned air stuff used as a freezing agent to make big things go in small holes.
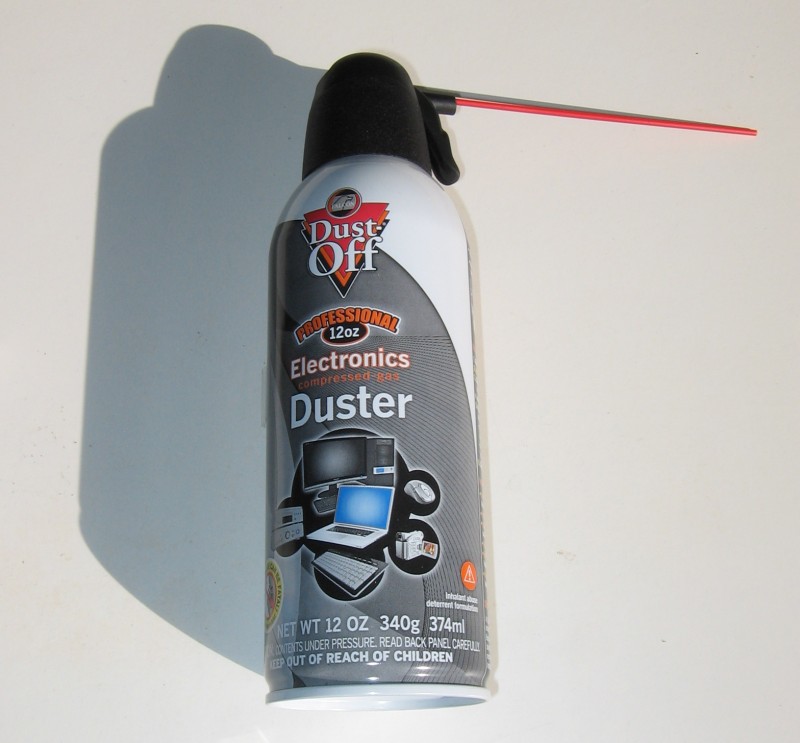
Notice the clearancing on the rivit (shiny). Necessary when doing the accel pump mod.
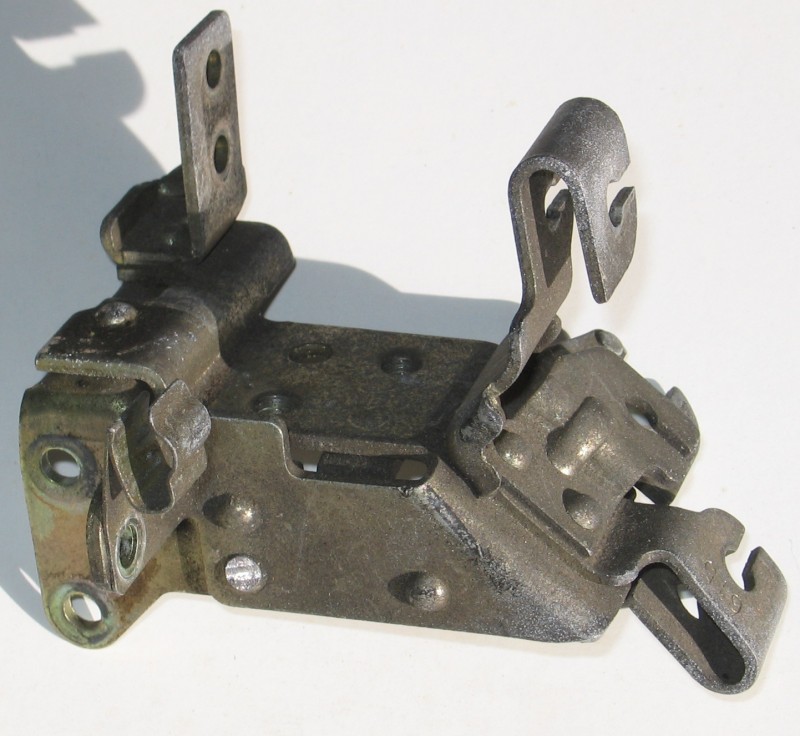
Here is a decent example of a boost prepped but NA tuned Nikki like what you're all asking about. It even has an SA throttle cable bracket and custom choke cable holder for old school.
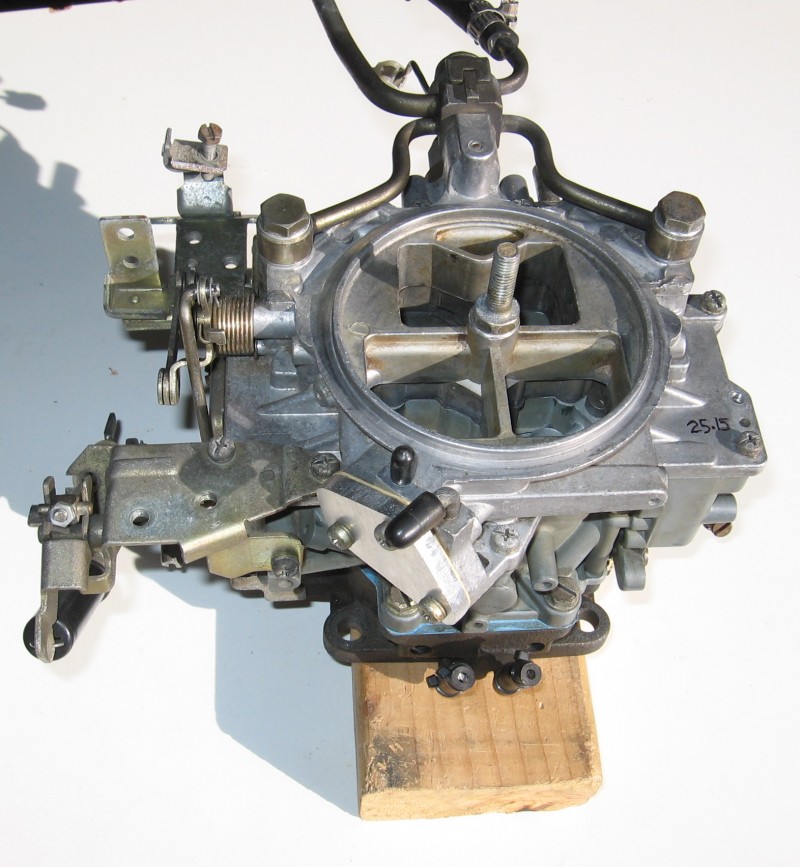
A look at the accel pump extension piece.

This is how your carbs should look with the OMP nipples up close to the boosters.
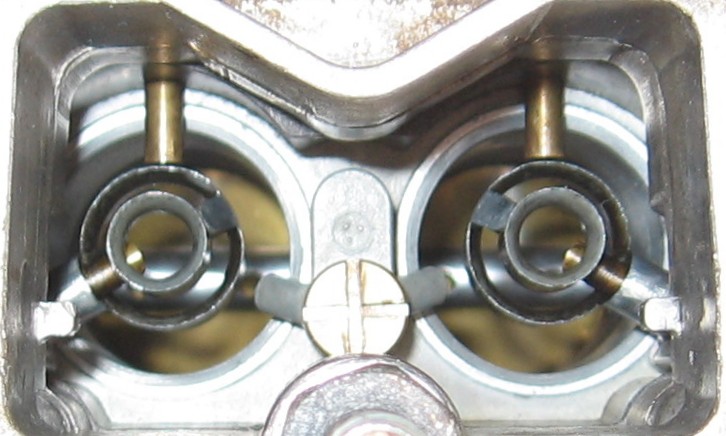
Assorted brass fittings for the Mallory 4309.
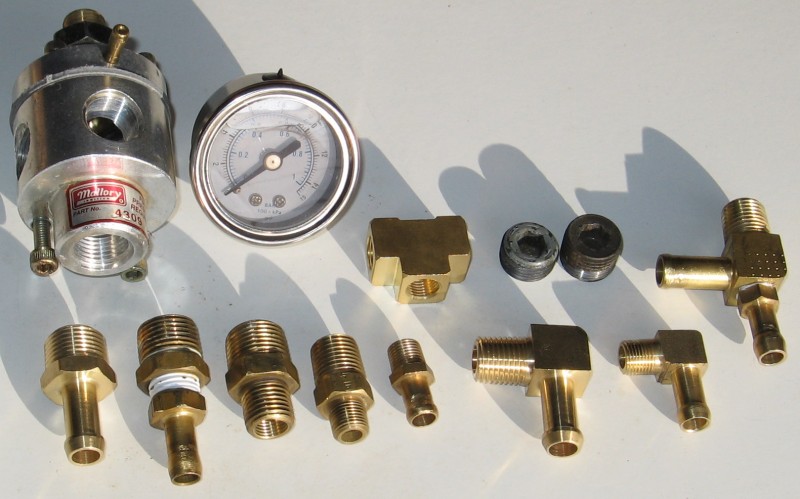
Notice the clearancing on the rivit (shiny). Necessary when doing the accel pump mod.
Here is a decent example of a boost prepped but NA tuned Nikki like what you're all asking about. It even has an SA throttle cable bracket and custom choke cable holder for old school.
A look at the accel pump extension piece.
This is how your carbs should look with the OMP nipples up close to the boosters.
Assorted brass fittings for the Mallory 4309.
Thread Starter
Joined: Aug 2001
Posts: 15,725
Likes: 91
From: Near Seattle
The MSD 2225 fuel pump. This is proven to be the ideal fuel pump for a blow through Nikki when used with a Mallory 4309 and a proper 5/16" send and 3/8" return.
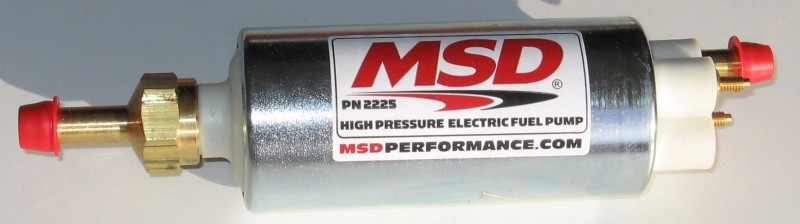
Just another angle showing the accel pump extension bracket. Notice the quicksteel in the float bowl vent tube. This prevents boost leaks.
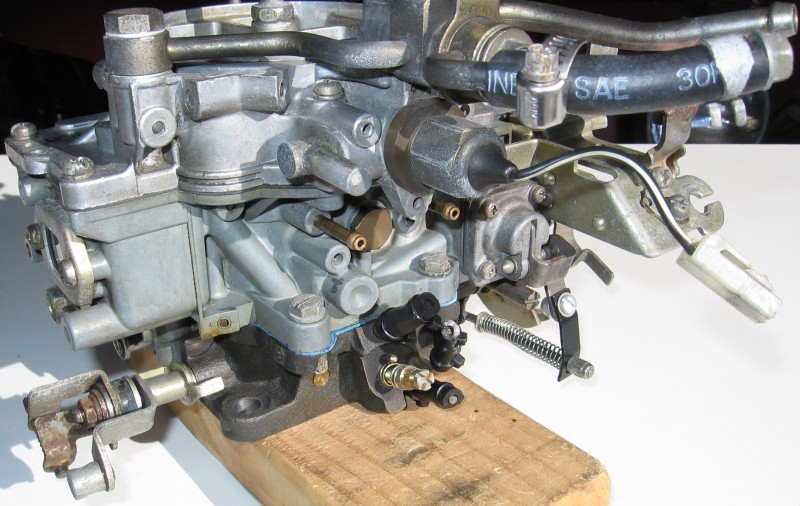
Plenty of quicksteel in the vacuum secondary hole. Not interested in having any boost leaks out of this thing either. Also filled the richer solenoid hole as recommended by Sterling.
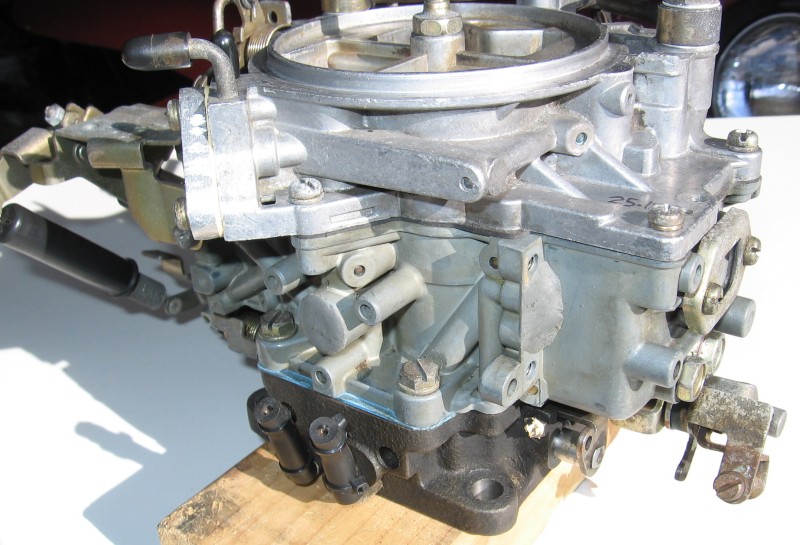
Be sure to keep this small piece that fits under the throttle return bracket after cutting it off the choke bracket. This keeps alignment and length accurate with the three screws as alluded to above (something Yaw apparently didn't do, or it got lost at some point).
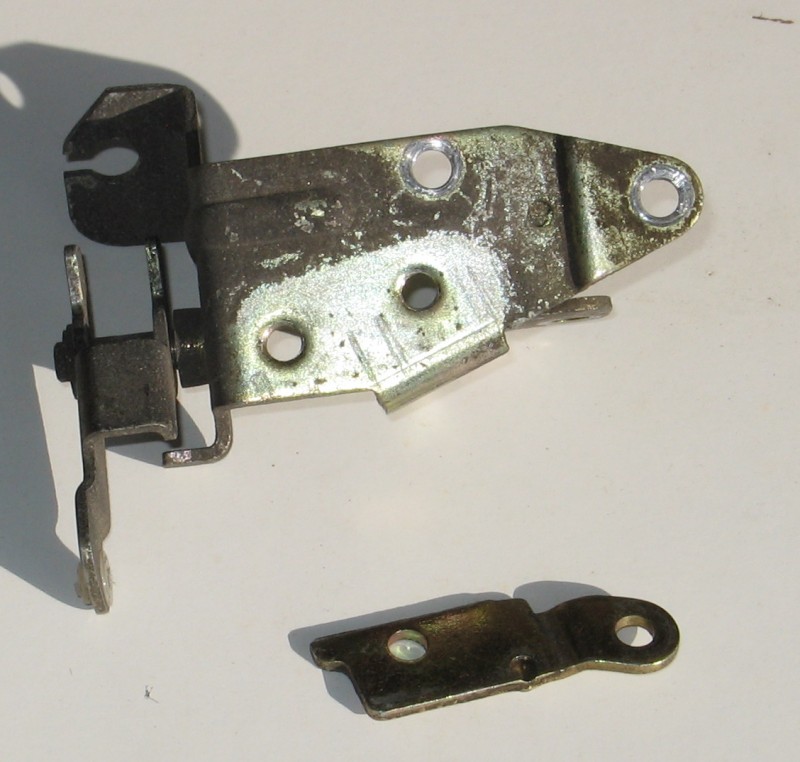
Just another angle showing the accel pump extension bracket. Notice the quicksteel in the float bowl vent tube. This prevents boost leaks.
Plenty of quicksteel in the vacuum secondary hole. Not interested in having any boost leaks out of this thing either. Also filled the richer solenoid hole as recommended by Sterling.
Be sure to keep this small piece that fits under the throttle return bracket after cutting it off the choke bracket. This keeps alignment and length accurate with the three screws as alluded to above (something Yaw apparently didn't do, or it got lost at some point).
Shoot. I just cut out 6 accelerator pump gaskets, not but 5 min. ago. Wish I had seen this first.
Eh, they look good enough.
I am thinking about it more and I want to know why. The diaphragm is gonna move x amount of distance regardless of how far away from the carb body it is. It shouldn't make a difference in volume of gas it shoots. How does moving it help?
Eh, they look good enough.
I am thinking about it more and I want to know why. The diaphragm is gonna move x amount of distance regardless of how far away from the carb body it is. It shouldn't make a difference in volume of gas it shoots. How does moving it help?
carb whisperer
Joined: Jan 2008
Posts: 1,485
Likes: 4
From: Greenfield, Ohio
Shoot. I just cut out 6 accelerator pump gaskets, not but 5 min. ago. Wish I had seen this first.
Eh, they look good enough.
I am thinking about it more and I want to know why. The diaphragm is gonna move x amount of distance regardless of how far away from the carb body it is. It shouldn't make a difference in volume of gas it shoots. How does moving it help?
Eh, they look good enough.
I am thinking about it more and I want to know why. The diaphragm is gonna move x amount of distance regardless of how far away from the carb body it is. It shouldn't make a difference in volume of gas it shoots. How does moving it help?
Moving it further out is just giving it more area of reservoir to pump. So, (not actual numbers) 22 cc---->28cc