
Boost prep a Nikki (how to)

Thread Starter
Joined: Aug 2001
Posts: 15,725
Likes: 91
From: Near Seattle
Prevent accel pump housing warpage.
Originally Posted by wankel=awesome
Yep, it warped. I have a late model one to try. Thats
today's project.
today's project.
paper gaskets. You gotta cut two in different thicknesses. Measure a stack of
three gaskets and two gaskets. Choose metal of these thicknesses and cut them
out in the accel pump diaphram pattern.
Now cut out only one gasket in paper and place it on the carb main body. Then
the 2 gasket-thick spacer, then the accel pump diaphram. Next place the 3
gasket-thick spacer on the accel pump diaphram and lastly the housing. Don't
forget the lightly stretched spring!
This is virtually uncompressible and should never warp the housing. The only
parts that will get squeezed are the single paper gasket and the accel pump's
built in gasket. It should easily prevent leaks and last forever.
So who wants to machine several sets of two thickness spacers out of aluminum
for a group buy?

I'd make some myself by hand but all of my carbs are doing ok accept for the 79-
80 hybrid that has its orignal SA housing which is warped but not leaking. I was
super-careful.

Last edited by Jeff20B; Apr 9, 2015 at 10:58 PM.
Thread Starter
Joined: Aug 2001
Posts: 15,725
Likes: 91
From: Near Seattle
Originally Posted by t_g_farrell
Wow! Great info here in here on nikkis whether its boosted
or not.
or not.
doing NA before going turbo. It's a good way to get to know your carb before
you do anything too elaborate. Jet changes, air bleed changes etc are good to
learn how to do now while NA because a turbo demands tuning. And it's really
not that hard once you understand the basics like what the engine wants vs
what the forums/tune sheets are telling you.
For example my big boost prepped carb (25.6mm) wants a slightly richer part
throttle cruise at around 12 AFR than wankel=awesome's due to how the engine
runs now vs back when it was a bit leaner and just didn't want to run very well
for me. These days it's more powerful and runs better than it ever has. It even
surprised me again (in a good way) and started trying to break them loose in
2nd gear going up my steep test hill on primaries only. Primaries! The carb was
not floored, but I was!
There is still room to tune this thing as well. It currently has factory 130s which
are closer to about 1.27mm or 1.28mm so I think a set of Weber jets at 1.25mm
would be the next step. Maybe get me to 12.9 to 13.1 AFR. Might be a perfect
tune for this carb!
Last edited by Jeff20B; Apr 9, 2015 at 10:58 PM.
carb whisperer
Joined: Jan 2008
Posts: 1,485
Likes: 4
From: Greenfield, Ohio
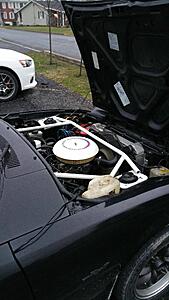
Looks pretty good in there, doesnt it?
I made 2 metal plates, not of aluminum but of steel. To my surprise the damn thing still leaks from there. Im starting to think my gasket paper is junk.
Tomorrow ill make new ones, and again, paint them with Shellac. (it never leaks)
Btw, thats the high flow paper element: Wix #46018. It fits well.

I made 2 metal plates, not of aluminum but of steel. To my surprise the damn thing still leaks from there. Im starting to think my gasket paper is junk.
Tomorrow ill make new ones, and again, paint them with Shellac. (it never leaks)
Btw, thats the high flow paper element: Wix #46018. It fits well.
Last edited by wankel=awesome; Apr 9, 2015 at 06:38 PM.
carb whisperer
Joined: Jan 2008
Posts: 1,485
Likes: 4
From: Greenfield, Ohio
Shellac "Indian Head" confirmed for godlike sealer. (again)
No more leak, but now I have a bit of debris holding the rotor 2 float bowl and causing mild flooding. I'll have that fixed in a jiffy.
This carb is amazing! When my 20mm freeze plugs get here ill be pulling the mani and porting it a bit and replacing all the bolts with new 13mm clamping head bolts.
I have already done about 300 miles on the carb, and every little tweak it just gets better!
Tomorrow morning I have a 2 hour drive to test it for MPG's, i'll report back with those #'s.
Thread Starter
Joined: Aug 2001
Posts: 15,725
Likes: 91
From: Near Seattle
Ah, the leak is stopped. Cool!
That's good to know about the filter. I know the K&N E-2700 fits the RB spun aluminum
assembly.
I found out something new about 84-85 carbs yesterday. I finally got around to taking off the
seats on two of mine and found a long weird strainer filter attached to the top. Mazda was
really adamant about keeping the tiniest particles out of their carbs with the 91 fuel jets. But
with boost you need as much fuel flow as possible so I swapped in some new seats from the
Hygrade kits as usual. Not because they flow any better but because the original seats get
damaged during removal (had to use a vice grip hit with a hammer because the screw slots got
stripped even with a properly sized screwdriver due to insanely tight factory seats).
Result: There wasn't enough float drop at first. Turns out the spring loaded pins are pretty tall
and only let the needles drop out of the seats less than 1mm. That is way too short. So I looked up
what Yaw recommends. He says the needle, not including the spring loaded pin, should
protrude .110" below seat. .110" = #35 or 7/64 drill bit. That is what I aimed for and bent the
float drop tang until I got .110" of protrusion.
The result: The carb floods itself instantly. However once you get the engine idling, the fuel level
is happily in the middle of the windows at 2.5psi. So you know the stock float level adjustment
tang (not the drop adjustment tang), and the needle & seat are all working well together.
But when you turn off the fuel pump to let the carb use up all of its fuel while idling, then turn
the pump back on, fuel rushes in and floods the carb again.
My thoughts: I think the Yaw recommended .110" protrusion is way too much. It causes the
needle to drop down too far and get kind of wedged or crooked/off center in the bore and
prevents the rubber tip from going back up into the hole correctly. This leads to the obvious
flooding.
My solution: I think I'll look at some of the other carbs around here and measure their needle
protrusion to see what is ideal. Maybe come up with a new recomendation that won't lead to
aggresive flooding but still flow plenty for a turbo.
Hmm, .110" is 2.79mm. Half of that is 1.4mm. I think I'll aim for 1.4mm of needle protrusion next.
wankel=awesome, how much float drop or needle protrusion do you use?
Last edited by Jeff20B; Apr 10, 2015 at 11:49 AM.
carb whisperer
Joined: Jan 2008
Posts: 1,485
Likes: 4
From: Greenfield, Ohio
Whatever was factory for 1976. I copied them exactly with the new ones. I also used a nylon brush on a dremel tool at high speed against the seat and the needle before install just until the teflon on the needle didnt feel so hard.
they are brand new and I think this method avoided the "break in" period for them.
Fixed the flooding rear bowl btw, was some teflon tape from my FPR fittings...
they are brand new and I think this method avoided the "break in" period for them.
Fixed the flooding rear bowl btw, was some teflon tape from my FPR fittings...
Thread Starter
Joined: Aug 2001
Posts: 15,725
Likes: 91
From: Near Seattle
Thanks. Yeah I didn't burnish the needles or anything. I think I'll do that. And I'll use the factory recomendation of 2" of float drop and not worry so much about needle protrusion. As long as it doesn't go off-center when the float is all the way down, it should come back up straight and work. I'll let you know how it goes.
I've found things like teflon tape, a small piece of rubber fuel line and a rust chip or two causing flooding.
I've found things like teflon tape, a small piece of rubber fuel line and a rust chip or two causing flooding.
carb whisperer
Joined: Jan 2008
Posts: 1,485
Likes: 4
From: Greenfield, Ohio
On the holley, when I first got it from Racing Beat, My rotor 1 needle on the first start had tiny metal shavings on it. This was never explained, and blamed on my fuel pump however. 
Thread Starter
Joined: Aug 2001
Posts: 15,725
Likes: 91
From: Near Seattle
Scary.
So I just took a quick measurement of two other carb tops around here. Both are
at or super close to factory spec for float drop of 2" +/- .02" (just eyeballing it
with a ruler). They even have a slight bit of needle drop of about 1mm or so.
This is already more drop than the air horn from yesterday that had no needle
drop on one side and less than 1mm on the other. I'm not sure why it was like
that from the factory. Could be why this carb took a long time to fill the bowls.
That and the filter strainers, I'm sure.
I'm going to test these two air horns on the carb today and see how long it
takes to fill the bowls and whether they want to flood. Also gonna tweak any of
them that aren't in the middle of the windows. These settings should stay
true/accurate when they go on their specific carbs.
Last edited by Jeff20B; Apr 10, 2015 at 07:28 PM.
Thread Starter
Joined: Aug 2001
Posts: 15,725
Likes: 91
From: Near Seattle
Float drop success!
While correcting the float drop tangs today, I notice the needles were getting hung up on the
concentric machining rings/grooves inside the aftermarket seats. Curious, I grabbed a stock
removed seat from yesterday and noticed it's WAY SMOOTHER and even a smaller ID which
keeps the needle much more centered and less likely to get crooked and stuck in a downward position.
Really?
So I grabbed a large screwdriver, removed the aftermarket seats from all three carbs with
great prejudice, then grabbed the set of OEM seats, took off the plastic filter/strainer things,
and resintalled with new aluminum crush washers.
Result: the carb that was giving me all kinds of flooding issues yesterday evening, worked
almost perfectly as soon as it got gas in it today. It needed a little bit of coaxing, as a fresh
setup always does, then after a few minutes of run time, it filled perfectly right to the middle
of the windows!
I'm sure it will need several more dry fills to deem this carb a success, but man what a great
improvment considering how terrible it was before, and it fills extremely fast now, without the
strainer things! There is a lot more debris in the float bowls, but I think a large metal EFI rated
filter after the pump but before the mallory should take care of that. Maybe. Will the fuel pump
respond right with a bit restriction like that? Gotta test it I guess. That will be next on the list.
The other two carbs were pretty good but one will need some final float tweaks to get it just
right, which I'll do once the first carb is complete.
Turns out the float drop was about 52mm on the two factory sets. Spec is 51 +/- .5mm so I set
the first carb to 51.5mm. Seemed to work!
concentric machining rings/grooves inside the aftermarket seats. Curious, I grabbed a stock
removed seat from yesterday and noticed it's WAY SMOOTHER and even a smaller ID which
keeps the needle much more centered and less likely to get crooked and stuck in a downward position.
Really?
So I grabbed a large screwdriver, removed the aftermarket seats from all three carbs with
great prejudice, then grabbed the set of OEM seats, took off the plastic filter/strainer things,
and resintalled with new aluminum crush washers.
Result: the carb that was giving me all kinds of flooding issues yesterday evening, worked
almost perfectly as soon as it got gas in it today. It needed a little bit of coaxing, as a fresh
setup always does, then after a few minutes of run time, it filled perfectly right to the middle
of the windows!
I'm sure it will need several more dry fills to deem this carb a success, but man what a great
improvment considering how terrible it was before, and it fills extremely fast now, without the
strainer things! There is a lot more debris in the float bowls, but I think a large metal EFI rated
filter after the pump but before the mallory should take care of that. Maybe. Will the fuel pump
respond right with a bit restriction like that? Gotta test it I guess. That will be next on the list.
The other two carbs were pretty good but one will need some final float tweaks to get it just
right, which I'll do once the first carb is complete.
Turns out the float drop was about 52mm on the two factory sets. Spec is 51 +/- .5mm so I set
the first carb to 51.5mm.
Seemed to work!
Last edited by Jeff20B; Apr 10, 2015 at 07:39 PM.
Thread Starter
Joined: Aug 2001
Posts: 15,725
Likes: 91
From: Near Seattle
So I found a set of OEM brand new seats in a long forgotten bag of goodies. They had the
brass wire mesh strainers on them, superglued on. I thought about leaving them, but I need to
be able to see how much debris is accumulating in the float bowls to check on gas tank health,
so I removed the strainers. You guys can do whatever you want to do; removing them for this
carb made sense to me.
Then I checked float height and obviously drop was correct as it is unaffected, but float height
was off by about 1mm so I gave one of the a little tweak. Now they're about even. I also blew
in some compressed are to sort of let them self-burnish (bounce upside down). This mimics
about a hundred empty fills of the carb.
I still can't get over how much smoother and I guess tighter yet still loose enough the OEM
seats are compared to any aftermarket ones which are ridged and really sloppy leading to all
kinds of potential flooding issues. Perhaps Vipernicus' second Sterling's horrible flooding
nightmares were all because of aftermarket seats. I'd believe it at this point.
So that makes four rebuilt carbs here with OEM seats. I don't expect any flooding now.
Speaking of flooding, I think I figured out part of my flooding issue. It is the secondary siphon
effect from having solder filled secondary slow air bleeds. I recall the vast majority of my
flooding issues started after I started experimenting with delay reduction ideas, the major
one being solder filled slows. So I prepared several sets, and went on to have pretty major
flooding basically after every time I'd floor it. Some carbs were worse than others. I blamed the
fuel system which was obviously at fault, and once it was corrected, a lot of the problems
subsided, but some are still there; just more tolerable. And I understand some of this is inherant
to any boost prepped carb etc.
But I need a set of open long slows so I heated up a set and let the solder run out. It took a
little coaxing, but it eventually all came out, or it's good enough for the type of testing I do.
It's my hope that eventually I can leave a set of solder filled long slows in the brown car's carb,
which will get over the stupid leaky brake booster until I can get around to changing it, but I'll
swap in a set of stock nickel plated 60s to help break the siphon effect but it hopefully won't be
enough air to cause a delay. I'll then be able to futher tune the secondary main air bleeds and
fuel jets like normal.
Note: you guys with healthy brake boosters probably won't need to do this. However if you
experience a secondary delay, you may need to fill your long slows with solder.

Yeah that using compressed air to bounce the needles can save you a lot of work. You can see
right away if they are sticking becaue of excess play. Mush easier than dealing with flooding and
pulling the top off to fix it in the car.
right away if they are sticking becaue of excess play. Mush easier than dealing with flooding and
pulling the top off to fix it in the car.
Thread Starter
Joined: Aug 2001
Posts: 15,725
Likes: 91
From: Near Seattle
The current tune is:
pri air: 70
pri fuel: 128
sec air: 91
sec fuel: 137
sec slows: filled with solder
The secondary delay is gone! And it's not coming back.
How did I solve the sec delay? With science! Well, kind of. It was a combination of reducing
secondary air bleeds until it was gone, and adding a one way valve. Then reducing the
secondary fuel jet a bit further to try to match the small air bleeds.
First I figured I could lessen the chance of a secondary siphon by resintalling some nickel plated
60s. It worked, but the delay was back. I also swapped in some 100 air bleeds and upped fuel
jets to 150. I was hoping the one way valve would take care of everything. Nope, it doesn't
work that way. Plus there is already a one way valve over at the brake booster inside the hose.
It's small and plastic, but it's there.
The reason adding a second one way valve right at the intake manifold worked for me last
week was because it prevented the entire steel hardline leading over to the brake booster from
needing to be pressurized every time you spool the turbo. This worked perfectly but now my
secondaries needed to be tuned.
So getting back to the secondary tune, the 60s, 100s and 150s didn't work. The delay was
about 1/8 to 1/4 second.
I swapped back to solder filled brass short slows, so now we're 0, 100 and 150. The delay was
1/10 to 1/8. Getting better!
Then I decided to make a bold move and skip a few sizes and simply drop the air bleeds back
down to 91 like I had last week. Obviously the fuel jets now need to be smaller. I had a set of
custom drilled 137s so I gave them a shot. Now we're 0, 91 and 137.
The result is no more delay! It's gone! By moving this many numbers with no in betweens, I'm
compensating for more weather conditions than if I had only gone to 95 air bleeds and 145 jets.
That combo might have had no delay on cold days but could have been there on warm days,
and with warmer weather coming up, it made sense.
I do have a minimal secondary siphon, but it only happens when you boost for a second and let
off. All the fuel has so place to go accept into the carb. Not really a problem though. Who
boosts for one second anyway? lol It's just for testing purposes in 1st gear, where it always
used to have a delay. Not anymore.
For normal driving, the secondary siphon won't even be noticed. And obviously you guys' carbs
will need different tuning parts because every car is different. I'm just showing you all that even
my leaky brake booster can be compensated for with some dedication and the right tuning
parts. I'm guessing your setups won't need such small secondary air bleeds.
pri air: 70
pri fuel: 128
sec air: 91
sec fuel: 137
sec slows: filled with solder
The secondary delay is gone!
And it's not coming back.How did I solve the sec delay? With science! Well, kind of. It was a combination of reducing
secondary air bleeds until it was gone, and adding a one way valve. Then reducing the
secondary fuel jet a bit further to try to match the small air bleeds.
First I figured I could lessen the chance of a secondary siphon by resintalling some nickel plated
60s. It worked, but the delay was back. I also swapped in some 100 air bleeds and upped fuel
jets to 150. I was hoping the one way valve would take care of everything. Nope, it doesn't
work that way. Plus there is already a one way valve over at the brake booster inside the hose.
It's small and plastic, but it's there.
The reason adding a second one way valve right at the intake manifold worked for me last
week was because it prevented the entire steel hardline leading over to the brake booster from
needing to be pressurized every time you spool the turbo. This worked perfectly but now my
secondaries needed to be tuned.
So getting back to the secondary tune, the 60s, 100s and 150s didn't work. The delay was
about 1/8 to 1/4 second.
I swapped back to solder filled brass short slows, so now we're 0, 100 and 150. The delay was
1/10 to 1/8. Getting better!
Then I decided to make a bold move and skip a few sizes and simply drop the air bleeds back
down to 91 like I had last week. Obviously the fuel jets now need to be smaller. I had a set of
custom drilled 137s so I gave them a shot. Now we're 0, 91 and 137.
The result is no more delay! It's gone! By moving this many numbers with no in betweens, I'm
compensating for more weather conditions than if I had only gone to 95 air bleeds and 145 jets.
That combo might have had no delay on cold days but could have been there on warm days,
and with warmer weather coming up, it made sense.
I do have a minimal secondary siphon, but it only happens when you boost for a second and let
off. All the fuel has so place to go accept into the carb. Not really a problem though. Who
boosts for one second anyway? lol It's just for testing purposes in 1st gear, where it always
used to have a delay. Not anymore.
For normal driving, the secondary siphon won't even be noticed. And obviously you guys' carbs
will need different tuning parts because every car is different. I'm just showing you all that even
my leaky brake booster can be compensated for with some dedication and the right tuning
parts. I'm guessing your setups won't need such small secondary air bleeds.
carb whisperer
Joined: Jan 2008
Posts: 1,485
Likes: 4
From: Greenfield, Ohio
Mines actually been running flawlessly since the last I touched it. It smells rich at idle, but if you take away any fuel it starts to miss. Its totally happy the way its tuned.
Plus, im getting 19 mpg average, which is pretty darned good the way Ive been driving it.
Plus, im getting 19 mpg average, which is pretty darned good the way Ive been driving it.
Thread Starter
Joined: Aug 2001
Posts: 15,725
Likes: 91
From: Near Seattle
wankel=awesome, that's great your carb is working as well as it is. Do you still have the 170
jets in your secondaries? Aren't those kinda big? Or just right?
Now I have a question about my secondaries. A while back you suggested to keep making the air
bleeds smaller until there is no more delay, then jet like a blank slate. I'm there now. 1st or 2nd
gear right after a shift used to always have a delay because it needed to fill the brake booster
hardline with positive pressure, otherwise there was always a short delay. Adding the one way
valve solved half of this problem. Then making the air bleeds progressively smaller solved the
other half. Now it's my understanding that I need to keep changing jets until I get to the right
AFR.
I did a little reading and it seems most prefer from 11.0:1 to 11.5:1. This is ideal for power.
However because my setup is still 10.0, I'm aparently leaving a lot of power on the table. Lean
is mean, as they say. Would you suggest trying progressivly smaller jets until I get to 11.0 to
11.5?
My main concern is my jets are already the smallest secondaries I've ever tried at 1.37mm
(drilled with a micro drill bit that is listed as 1.35mm but measures out at 1.37mm). Am I to
believe I need to go even smaller?
I don't even know if I'm in the ballpark yet. The wideband won't read any richer than 10.0. The
previous jets I tried were 1.42mm so I've only dropped them by 5 numbers to get to 1.37, and
I'm still too rich for the wideband. What if I dropped them another 5 numbers to 1.32mm or
there abouts? Have you or anyone else ever heard of needing such tiny secondary jets? Is it
because my air bleeds are so small that the boosters are sucking much harder on the jets
than they would have otherwise? Am I understanding this right?
Thread Starter
Joined: Aug 2001
Posts: 15,725
Likes: 91
From: Near Seattle
Sounds good.
I went ahead and drilled a set of old 106 Hitachi jets to 131 (this is the next step
down from 137 in my micro bit set). I'll try these 131s in a freshly boost prepped
81-82 Nikki.
I'm now on a quest to get off of the 10.0 rich end of the wideband's scale. Even
a 10.1 would be an improvement.
I went ahead and drilled a set of old 106 Hitachi jets to 131 (this is the next step
down from 137 in my micro bit set). I'll try these 131s in a freshly boost prepped
81-82 Nikki.
I'm now on a quest to get off of the 10.0 rich end of the wideband's scale. Even
a 10.1 would be an improvement.
Thread Starter
Joined: Aug 2001
Posts: 15,725
Likes: 91
From: Near Seattle
Just a quick update of how awesome these carbs are.
I did a production run of 20 accel pump gaskets. I had the time and needed to
make a set of 6, so I used up all the fuel resistant gasket paper I had lying
around. That's three sets of 6 and two spares. They looked like those
marshmallow peeps before I cut them out. You know how they're stuck together
in the package.
Also welded the secondary linkage. I don't trust a wire tie under boost.
This carb didn't have OMP nipples because the guy who stripped it deleted them.
Lame. So I got rid of the epoxy and tapped a set it. Also located a set of correct
length small screws for the accel pump.
These carbs just get better and better the more you work on them. I like them
so much I'm going to convert all my rotaries to Nikki power!
I did a production run of 20 accel pump gaskets. I had the time and needed to
make a set of 6, so I used up all the fuel resistant gasket paper I had lying
around.
That's three sets of 6 and two spares. They looked like those marshmallow peeps before I cut them out. You know how they're stuck together
in the package.
Also welded the secondary linkage. I don't trust a wire tie under boost.
This carb didn't have OMP nipples because the guy who stripped it deleted them.
Lame. So I got rid of the epoxy and tapped a set it. Also located a set of correct
length small screws for the accel pump.
These carbs just get better and better the more you work on them. I like them
so much I'm going to convert all my rotaries to Nikki power!
Thread Starter
Joined: Aug 2001
Posts: 15,725
Likes: 91
From: Near Seattle
Find someone who can weld aluminum, or do it yourself. Take an S4 or S5 LIM, chop off the
flange, weld it on one of your spare 12A manifolds. I have two of these and they work, for the
most part.
One was an original 6 port 12A that they hogged out so all 6 ports flow all the time. It doesn't
have much low end but the secondaries are frightening.
The other was a 79 manifold welded to an S4 NA flange. It has better low end but not as good
of high end because it was not runner matched.
I'd say do a hybrid of these. Runner match but don't hog it out. Best of both worlds.
Too bad you don't have access to an actual 6 port Nikki as it had a very different layout that I'm
going to examine more closely now that i have some slow air bleed experience.
carb whisperer
Joined: Jan 2008
Posts: 1,485
Likes: 4
From: Greenfield, Ohio
Find someone who can weld aluminum, or do it yourself. Take an S4 or S5 LIM, chop off the
flange, weld it on one of your spare 12A manifolds. I have two of these and they work, for the
most part.
One was an original 6 port 12A that they hogged out so all 6 ports flow all the time. It doesn't
have much low end but the secondaries are frightening.
The other was a 79 manifold welded to an S4 NA flange. It has better low end but not as good
of high end because it was not runner matched.
I'd say do a hybrid of these. Runner match but don't hog it out. Best of both worlds.
Too bad you don't have access to an actual 6 port Nikki as it had a very different layout that I'm
going to examine more closely now that i have some slow air bleed experience.
flange, weld it on one of your spare 12A manifolds. I have two of these and they work, for the
most part.
One was an original 6 port 12A that they hogged out so all 6 ports flow all the time. It doesn't
have much low end but the secondaries are frightening.
The other was a 79 manifold welded to an S4 NA flange. It has better low end but not as good
of high end because it was not runner matched.
I'd say do a hybrid of these. Runner match but don't hog it out. Best of both worlds.
Too bad you don't have access to an actual 6 port Nikki as it had a very different layout that I'm
going to examine more closely now that i have some slow air bleed experience.
I was going to try one of these JW Performance 97001, JW Performance Mazda Rotary Intakes | JW Performance
And cut the top off of it and shorten it a few inches. Then cut the carb flange off of a nikki manifold and weld it on top. The intake is CNC ported and matched for a 6 port, and has a very heavy flange for boost
It also clears an s4 turbo...
Thread Starter
Joined: Aug 2001
Posts: 15,725
Likes: 91
From: Near Seattle
I have a JW manifold for an FD engine. It is very tall and would need several
inches chopped to fit a Nikki.
Wow, yours fits an S4 turbo? I tried my S5 and it wasn't even close to fitting with
the FD version. I was thinking if my JW was modified to fit a Nikki, I could install it
in the GLC where turbo fitment would have to be custom anyway, so no fitment
issues to worry about.