What did you do to your FB today?
 01-25-13, 03:13 PM
#2076
Moderator
iTrader: (3)
Join Date: Mar 2001
Location: https://www2.mazda.com/en/100th/
Posts: 30,900
Received 2,643 Likes
on
1,872 Posts
i'd measure some, but i need to order em too!
 01-25-13, 06:06 PM
#2077
Isn't that a bit cliche though?
I mean everyone with a rotary car has a rotor symbol somewhere on the car.
That and if it's a custom decal I have to pay a custom price according to the guy. Whatever that means.
I'm going to pull the trigger of Type 2.
I'll have the Modern Mazda instead of the vintage Mazda written on it.
I mean everyone with a rotary car has a rotor symbol somewhere on the car.
That and if it's a custom decal I have to pay a custom price according to the guy. Whatever that means.
I'm going to pull the trigger of Type 2.
I'll have the Modern Mazda instead of the vintage Mazda written on it.
For example, my engine doesn't say "Mazda" on the housings. It says "Toyo Kogyo."
FBs may need the modern logo, but I think the SA is sort of one foot in either realm. I like the old school "M" logo stickers as well, actually.
Eh, the modern logo will look fine, really - it's whats on the original waffles, and the "plus" wheels, after all.


 01-26-13, 06:09 PM
#2079
On the 85 GSL EV I replaced the long headlight rod on both sides and then readjusted everything. They work properly again! Went for a 22 mile drive. I think the nylon bushing fails when it drys out and the headlight is miss adjusted so that it is not resting on the stop but is instead hanging from the rod. I was hoping I could take the remaining ones off and reuse them after boiling to put the water back into the nylon. But both were already split, they just hadn't fallen off the rod yet.
On the 85 GSL-SE I got the bottom oil line to the cooler off the car completely but the other line is much more difficult to get to. I am going to have to see if I can find a procedure. There just isn't any room to get a wrench in there at the front of the motor. Maybe there is something in the archives here.
On the 85 GSL-SE I got the bottom oil line to the cooler off the car completely but the other line is much more difficult to get to. I am going to have to see if I can find a procedure. There just isn't any room to get a wrench in there at the front of the motor. Maybe there is something in the archives here.
01-26-13, 06:41 PM
#2080
On the 85 GSL-SE I got the bottom oil line to the cooler off the car completely but the other line is much more difficult to get to. I am going to have to see if I can find a procedure. There just isn't any room to get a wrench in there at the front of the motor. Maybe there is something in the archives here.
Not done to MY RX7 but....
I finished raping the FB in the junk yard today. Not much left out there; just the body and fenders.
Transmission, engine, carbs, doors, hood, and other nick nacs from the front end are gone. And it only took a week
 01-27-13, 11:32 AM
#2083
I thought of this approach, problem is I don't own a cherry picker so I would need to borrow one again. And it looks almost as tight getting the motor mount nuts off. I don't think you can remove it from the bottom.
I have another idea. Hacksaw off the hose as close to the fitting as possible and slip a 26mm box end wrench or deep well socket over the fitting. It looks like there is room for that.
The layout chosen was not the best from a maintenance standpoint but then when they originally built it they probably didn't think the hoses would wear out. And besides, all that maint stuff happens somewhere else.
01-27-13, 06:01 PM
#2084
On 85 SE I continued to try to remove the top line to the oil cooler. Still no joy. I was going to try to slip the box end over the hose onto the fitting but the hose crimp is too large. The hacksaw approach is looking better all the time. Or maybe even the backhoe approach. Removed the fan to make a little more room. Now I think I should probably replace the belts. The original hoses had some foam around them in the places where it was possible they could rub on something. I found a suitable replacement at the hardware store and was able to get it on the new hoses.
On the EV I drove to the hardware store to shop for the above mentioned foam pieces. When I got back I decided it was a shame to waste the day so I replaced the front turn signals with LED's out in the driveway. I've had the LED's for a while but you need to install a load resistor on the turn signal line or the car thinks there is no bulb and flashes fast. So power savings only when the running lights are on, not when the signal is blinking. But then you don't run the blinkers all that often. Saved about 2 amps when the running lights are on. And that took me up to sunset when it started to feel cold out.
On the EV I drove to the hardware store to shop for the above mentioned foam pieces. When I got back I decided it was a shame to waste the day so I replaced the front turn signals with LED's out in the driveway. I've had the LED's for a while but you need to install a load resistor on the turn signal line or the car thinks there is no bulb and flashes fast. So power savings only when the running lights are on, not when the signal is blinking. But then you don't run the blinkers all that often. Saved about 2 amps when the running lights are on. And that took me up to sunset when it started to feel cold out.
01-27-13, 06:01 PM
#2085
love the braaaap
I actually got a chance to work on my 79 today, first time in 2 months due to work. Had the engine out already back in November and now finally getting time to clean things up in the engine bay. Got most of the grime off where I could. Not going for a complete strip and repaint or anything like that so the wiring and major components remained in place. Surprising just how much of it you can get clean when you use a toothbrush though.
Next project, clean the battery and rad supports and repaint them, then onto steering box removal so I can disassemble to hopefully figure out why the adjuster is seized up, then adjust the play out of it.
Next project, clean the battery and rad supports and repaint them, then onto steering box removal so I can disassemble to hopefully figure out why the adjuster is seized up, then adjust the play out of it.
01-28-13, 02:38 AM
#2087
Full Member

Join Date: Aug 2009
Location: Albuquerque NM
Posts: 79
Likes: 0
Received 0 Likes
on
0 Posts
I'm starting to get super discouraged  . With my job cuttin me down to 10 hours a week, I just haven't had the money to throw to her let alone paying my bills on time. It's been sitting for a couple months now and I am just getting sad and frustrated that I can't put work in on it :'(.
. With my job cuttin me down to 10 hours a week, I just haven't had the money to throw to her let alone paying my bills on time. It's been sitting for a couple months now and I am just getting sad and frustrated that I can't put work in on it :'(.
01-28-13, 10:48 AM
#2088
Apparently the fuel door was not the primary source of the noise; it's still there!
Checked the spare and the jack, both locked down tight; Might have been the jack handle &/or lug wrench, so I took them out & will retest tonight.
Sound seems to occur primarily when hitting a bump or hole with only one rear wheel; so that there's a difference in axle movement left & right.
I guess I better get up under the rear & check out my sway bar attachments & rear links, too. It's strange, though, because the noise seems to come from higher up in the cabin than that.
Mysteries, bleah.
01-28-13, 11:46 AM
#2089
Waffles - hmmm good
iTrader: (1)
Apparently the fuel door was not the primary source of the noise; it's still there!
Checked the spare and the jack, both locked down tight; Might have been the jack handle &/or lug wrench, so I took them out & will retest tonight.
Sound seems to occur primarily when hitting a bump or hole with only one rear wheel; so that there's a difference in axle movement left & right.
I guess I better get up under the rear & check out my sway bar attachments & rear links, too. It's strange, though, because the noise seems to come from higher up in the cabin than that.
Mysteries, bleah.
Checked the spare and the jack, both locked down tight; Might have been the jack handle &/or lug wrench, so I took them out & will retest tonight.
Sound seems to occur primarily when hitting a bump or hole with only one rear wheel; so that there's a difference in axle movement left & right.
I guess I better get up under the rear & check out my sway bar attachments & rear links, too. It's strange, though, because the noise seems to come from higher up in the cabin than that.
Mysteries, bleah.
above the rear axle and hits shields and things. Makes some noise and only when
that side is pushed up by hitting a bump with the RR wheel.
01-28-13, 08:53 PM
#2090
I spent an hour under the car inspecting exhaust hangers (fine) and all the suspension bolts and bushings (likewise fine).
The front runner is now my hatch seal, which is 1) original to the car, and 2) is squashed completely flat (as in, no loft, and more or less displaced outward) at the corners and showing signs of deterioration.
Which would mean my first instinct, where it sounded like the hatch was not latched, would be more or less vindicated.
$130 from Black Dragon... I hesitate to even check what OEM would cost, if they even still sell them.
I'm going to pack some EPP packing material under the hatch & test it again, but I'm about 97% sure I've got the right ID this time. The noise is just so distinctive.

 01-28-13, 11:18 PM
#2095
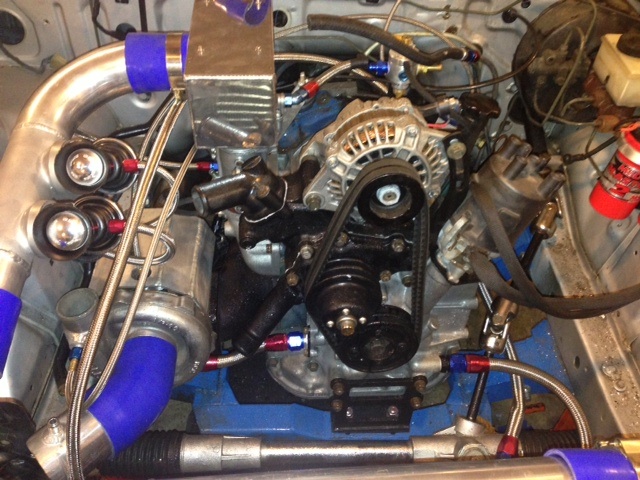
Nice  Im liking the engine bay
ill get some more pics of the bracket tmw, I left my unheated workshop as soon as the welding was done (not fun working with bare hands and thick metal in 20 degree temps, after a while the hands stop functioning ) Ill head back out tmw to trim some of the extra meat off it
Lol, its just some of my "Y" irons and old housings I was playing around with. It would be awesome if it was a short crank 20b tho
Im liking the engine bayill get some more pics of the bracket tmw, I left my unheated workshop as soon as the welding was done (not fun working with bare hands and thick metal in 20 degree temps, after a while the hands stop functioning
) Ill head back out tmw to trim some of the extra meat off itLol, its just some of my "Y" irons and old housings I was playing around with. It would be awesome if it was a short crank 20b tho
01-29-13, 12:13 AM
#2096
decided what i'm going to blow my tax return on...
RX7 1975-1985: Suspension Packages: Suspension Package - 79-85 RX-7 -
that plus some much needed shocks, and possibly tie rods, and the car should be planted, hopefully...
RX7 1975-1985: Suspension Packages: Suspension Package - 79-85 RX-7 -
that plus some much needed shocks, and possibly tie rods, and the car should be planted, hopefully...
 01-29-13, 03:09 PM
#2100
That'd be a good bet, except that I just replaced all of them about 10 months ago.
I spent an hour under the car inspecting exhaust hangers (fine) and all the suspension bolts and bushings (likewise fine).
The front runner is now my hatch seal, which is 1) original to the car, and 2) is squashed completely flat (as in, no loft, and more or less displaced outward) at the corners and showing signs of deterioration.
Which would mean my first instinct, where it sounded like the hatch was not latched, would be more or less vindicated.
$130 from Black Dragon... I hesitate to even check what OEM would cost, if they even still sell them.
I'm going to pack some EPP packing material under the hatch & test it again, but I'm about 97% sure I've got the right ID this time. The noise is just so distinctive.
Mazdatrix has them for $103. If you get the part number and buy it from yourcarpart.com it'd probably be even cheaper...
