What did you do to your FB today?
 04-07-14, 07:31 PM
#4576
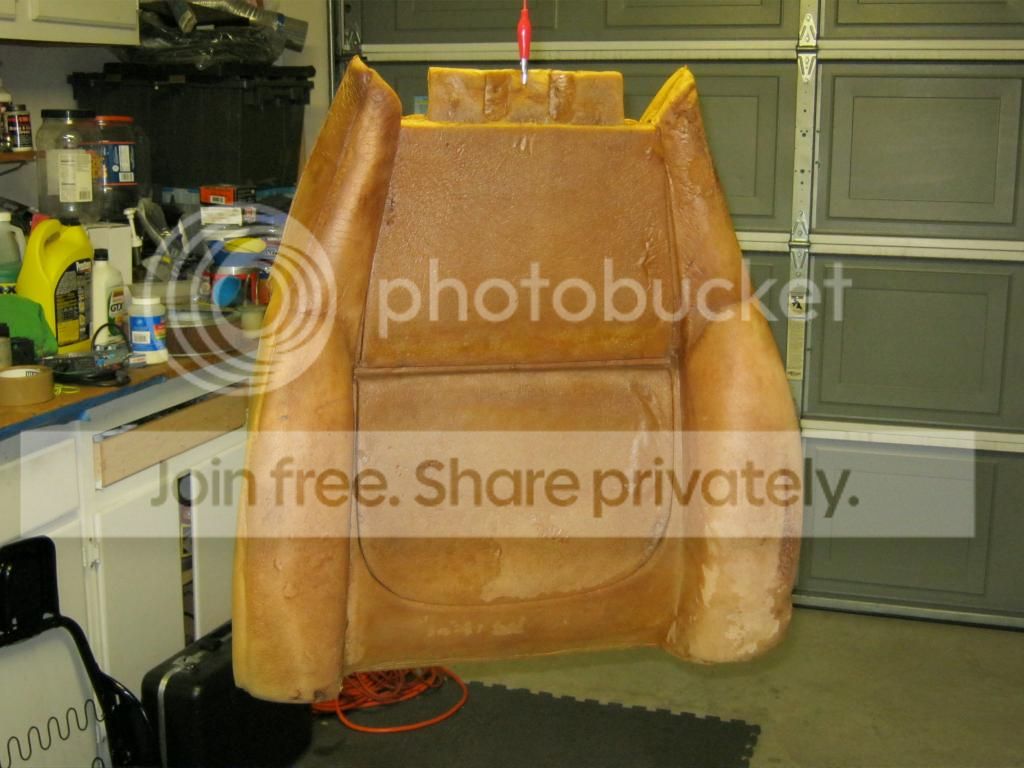
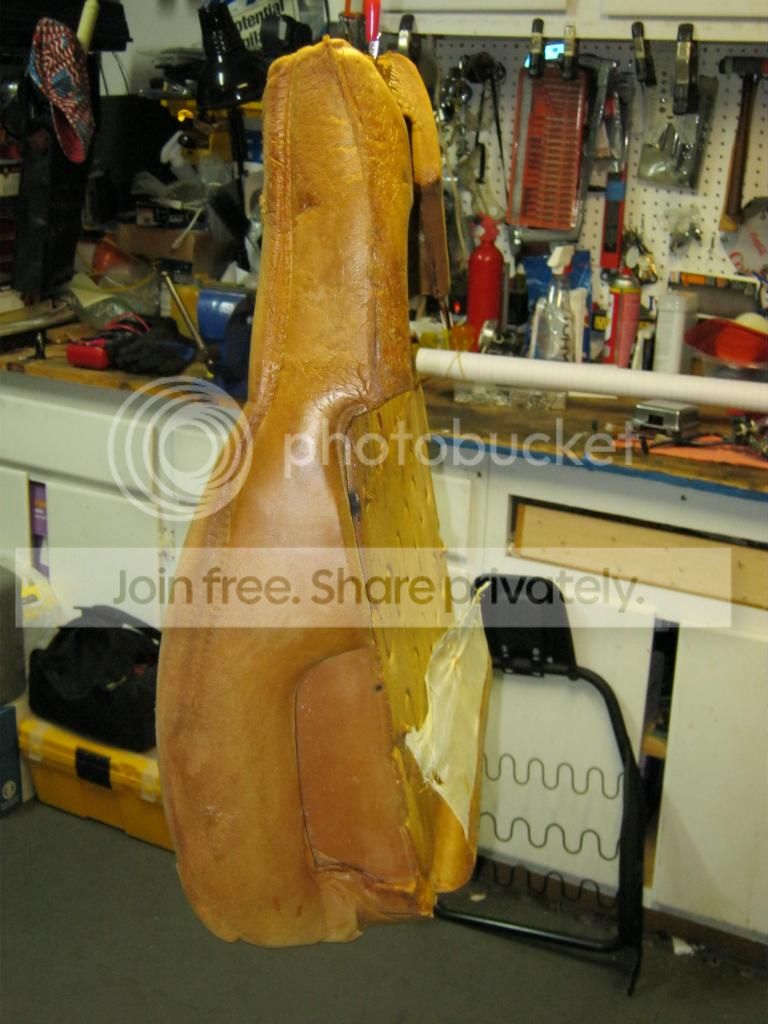
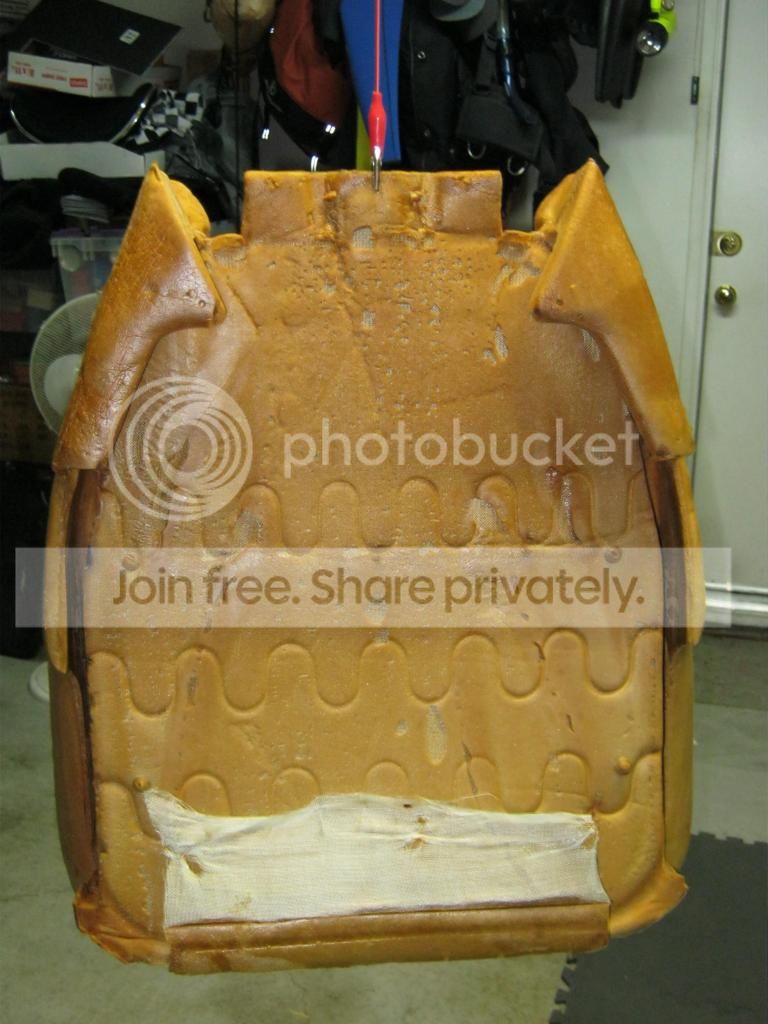
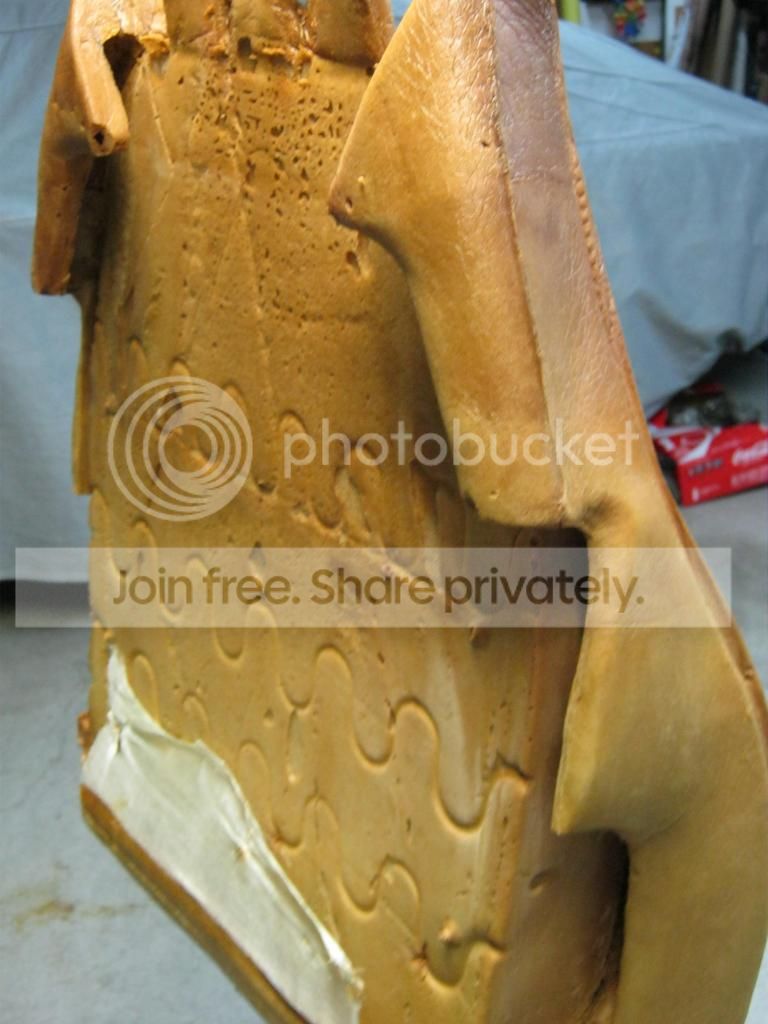
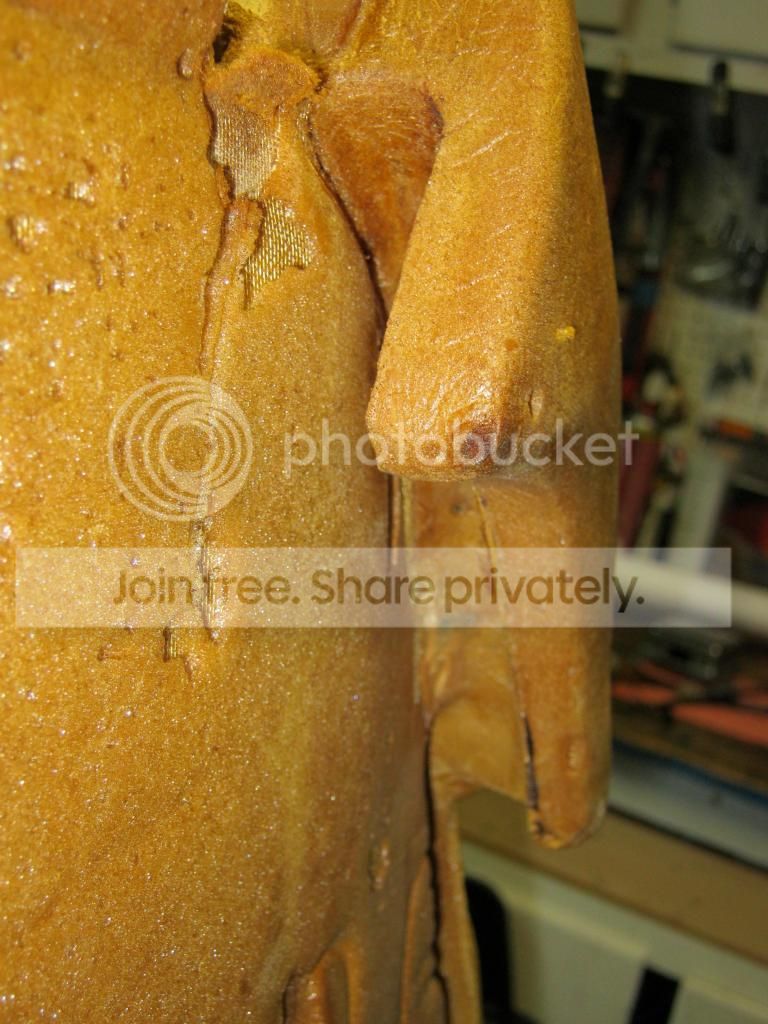
Yes, it's a very complex, partly hollow, 3d shape. I'll post some pix later tonight.
The one from the 'other' seat is pretty completely thrashed, not even repairable. It's the test subject for materials compatibility.
My concern is that, as the cushion is open-cell foam, if there's any absorption of the material the foam will mechanically lock to the mold material and that's all she wrote.
Doug, if you have a piece of small-cell open-surface foam (from an old cushion, etc) laying around the house and can try a little bit of that product out on it next time you're mixing some up, I'd be much obliged. I'd hate to order a full package and end up being unable to use it.
You guys are helping a lot - keep those suggestions coming!
Today, I bought a fistful of metric stainless hardware from which to make a recloseable mod for my ICU cover... as the tabs that hold it closed will not take any more bending without shearing off.
Pix:

 04-07-14, 10:38 PM
#4578
Divin',
Doug has an interesting idea with the silicone, but I think your fears are valid...silicone is designed to pick up minute details...details as subtle as a finger print. The relatively long cure time will give the silicone ample time to lock into the cells and ruin the whole thing. However...
There are thickening agents for mold rubbers that can work...Microspheres, Cab-o-sil, etc. When I made molds, I would paint silicone skins onto the piece to be molded...maybe 3 or 4 coats. Then I would start using a thickening agent in my subsequent batches of silicone, which kept the silicone from running off the mold. Very handy stuff. If you add too much thickening agent, however, it'll be too pasty. The trick is to get the right mixture. There are also fast-cure silicones (15 minute pot life, 2 hour de-mold). Combining these two with your silicone in the right amounts, you might be able to paint a skin on the foam that doesn't seep in and lock.
It is best to test this on a piece of unwanted foam first. Go to pick n pull and find a beat up piece of upholstery (a rear seat, arm rest, etc, which will be light and easy to work with), and get a quart can of silicone, a jar of cab-o-sil and some brushes and experiment. Once you get the mixture right, you'll have an idea if it's practical to do. You wouldn't even have to paint the silcone on all in one session...mix up smaller batches and do sections at a time. As Doug stated earlier, the beauty of silicone is that it sticks to nothing but itself, so that will work in your favor.
fm
04-08-14, 11:50 AM
#4579
Moderator
iTrader: (3)
Join Date: Mar 2001
Location: https://www2.mazda.com/en/100th/
Posts: 30,829
Received 2,597 Likes
on
1,845 Posts
just put the seat cover on the frame and then inject foam?
my friend was playing with some 3d scanning app that basically works from pictures. so like if you took a couple pictures of the foam in front of a ruler it can render it in CAD, in theory i have an app on my phone that does this, and then you can just email the file to somewhere, and then the foam shows up in the mail...
my friend was playing with some 3d scanning app that basically works from pictures. so like if you took a couple pictures of the foam in front of a ruler it can render it in CAD, in theory i have an app on my phone that does this, and then you can just email the file to somewhere, and then the foam shows up in the mail...
04-08-14, 02:45 PM
#4580
Just to see what I have as alternatives, I talked to two car-specific upholstery guys at lunch today. Was worth the trip just to look in their shops - some mighty fine old rods getting worked on in there.
First guy suggested finding a more-recent car with similar seats and using a bun from a junker as a base to build up a replacement by cutting or adding foam. He said he'd want about $100 to reproduce the good one I have in that fashion if I left it with him, but that time would depend on finding a proper core. Same cost if he was able to find me a "good-enough-to-use" original Mazda piece.
The second said he could build/cut me a brand new one from raw foam in about four hours' time, at a cost of about $170-200 a unit, complete with cloth reinforcing to prevent "side-support breakdown". He said it would not be absolutely identical as it wouldn't be injection molded, but that once under the covers it'd look right & outlast the car.
They both looked at me as if I had two heads when I suggested a mold-cast solution.
I'm also going to price out the foam required to make one myself via the cut&build method, just so I know what my options are.
I was hoping to have the new interior done in time for WHIV late next month, but that's looking iffy now.
04-08-14, 05:45 PM
#4581
Divin',
Doug has an interesting idea with the silicone, but I think your fears are valid...silicone is designed to pick up minute details...details as subtle as a finger print. The relatively long cure time will give the silicone ample time to lock into the cells and ruin the whole thing. However...
Doug has an interesting idea with the silicone, but I think your fears are valid...silicone is designed to pick up minute details...details as subtle as a finger print. The relatively long cure time will give the silicone ample time to lock into the cells and ruin the whole thing. However...
04-09-14, 10:59 AM
#4583
Moderator
iTrader: (3)
Join Date: Mar 2001
Location: https://www2.mazda.com/en/100th/
Posts: 30,829
Received 2,597 Likes
on
1,845 Posts
and actually plan B, might be to get a pair of miata seats, in black, they very much look like SA seats
*they probably aren't, when we toured the volvo factory they had a big box of seats that had just come in from the vendor
04-09-14, 03:07 PM
#4586
My wife bought me 2 RX-7s
Join Date: Aug 2001
Location: Saskatoon, Saskatchewan, Canada
Posts: 2,328
Likes: 0
Received 2 Likes
on
2 Posts
What did I do this week?
-Installed a Bonez cat-delete pipe
-removed air pump, anti-afterburn valve and rats nest. Disabled ACV.
-Installed new-to-me door cards
-New hatch lift struts
-Took out terrible custom stereo, working on installing stock radio.
It was a good week. And it's only Wednesday.
-Installed a Bonez cat-delete pipe
-removed air pump, anti-afterburn valve and rats nest. Disabled ACV.
-Installed new-to-me door cards
-New hatch lift struts
-Took out terrible custom stereo, working on installing stock radio.
It was a good week. And it's only Wednesday.
04-09-14, 04:28 PM
#4587

Just to see what I have as alternatives, I talked to two car-specific upholstery guys at lunch today. Was worth the trip just to look in their shops - some mighty fine old rods getting worked on in there.
First guy suggested finding a more-recent car with similar seats and using a bun from a junker as a base to build up a replacement by cutting or adding foam. He said he'd want about $100 to reproduce the good one I have in that fashion if I left it with him, but that time would depend on finding a proper core. Same cost if he was able to find me a "good-enough-to-use" original Mazda piece.
The second said he could build/cut me a brand new one from raw foam in about four hours' time, at a cost of about $170-200 a unit, complete with cloth reinforcing to prevent "side-support breakdown". He said it would not be absolutely identical as it wouldn't be injection molded, but that once under the covers it'd look right & outlast the car.
They both looked at me as if I had two heads when I suggested a mold-cast solution.
I'm also going to price out the foam required to make one myself via the cut&build method, just so I know what my options are.
I was hoping to have the new interior done in time for WHIV late next month, but that's looking iffy now.
First guy suggested finding a more-recent car with similar seats and using a bun from a junker as a base to build up a replacement by cutting or adding foam. He said he'd want about $100 to reproduce the good one I have in that fashion if I left it with him, but that time would depend on finding a proper core. Same cost if he was able to find me a "good-enough-to-use" original Mazda piece.
The second said he could build/cut me a brand new one from raw foam in about four hours' time, at a cost of about $170-200 a unit, complete with cloth reinforcing to prevent "side-support breakdown". He said it would not be absolutely identical as it wouldn't be injection molded, but that once under the covers it'd look right & outlast the car.
They both looked at me as if I had two heads when I suggested a mold-cast solution.
I'm also going to price out the foam required to make one myself via the cut&build method, just so I know what my options are.
I was hoping to have the new interior done in time for WHIV late next month, but that's looking iffy now.
04-09-14, 06:48 PM
#4588
Cool idea (bwahahahha, sorry couldn't resist) but I don't have a freezer anywhere near big enough even if I emptied it - - and it was 96 degrees here today, so I'd have to work pretty fast indeed.
Definitely an out-of-the-box thought, though. Thumbs up for that!
Yeah, the whole point of this process is to restore some SA-original highbacks into the car, with updated fabrics reflecting my decidedly weird tastes in color.
If it was just a matter of looking for a swap, I'd just reupholster my FB seats again.
Definitely an out-of-the-box thought, though. Thumbs up for that!
If it was just a matter of looking for a swap, I'd just reupholster my FB seats again.
04-10-14, 01:36 PM
#4590
The past couple of nights, I pulled apart my 45 DCOE. The accelerator pump was still sticking and I decided to check the throttle shaft bearings to see if the leathers were perished. I bought sealed bearings to replace the old ones, obviating the need for leather seals all together.
After mangling the throttle shaft and plates by trying to remove the stupid roll pin from the throttle return cam and old-as dirt plate screws from the shaft, I placed an order for a new throttle shaft and butterflies. :/
Once I got the throttle shaft off, I noticed that the leather seals weren't perished. They were non-existent. Whoever took this carb apart before me didn't bother to replace the leather seals, so that likely could have an effect on my idle as well has hard starting.
Last night, I decided to pull the start assist mech (pseudo-choke) off and have a look at that. Turns out that one of the 2 little pistons that are supposed to go up and down (allowing more fuel to go in when the "choke" is pulled and shutting off the extra fuel when the choke is disengaged) was stuck in the up position. This, presumably, would result in more fuel than is needed constantly flowing during idle, which would also explain why I can't get my idle down to under 1500. I cleaned the pistons and the housings they go in and got that working smoothly again. Also replaced the accelerator pump control rod, and that now moves smoothly.
When my new throttle shaft and butterflies come in, I'll reassemble the carb and put her back on and see how she fires and idles. I have high hopes.
fm
04-11-14, 12:55 AM
#4591
More getting schooled by a carb. I got the new throttle shaft and plates in. The throttle shaft didn't have the hole for the return spring/accelerator pump cam so I had to drill my own. I was warned of this by Pierce. Of course, the hole I drilled was slightly off and the stupid cam wouldn't open the accelerator pump. I had to take everything back apart and redrill the hole. Luckily I was off enough that I had room to do it. It would have sucked to have to have dropped another $45 for a new throttle shaft.
Got everything pretty much back together on the carb...throttle plates, bearings, and such. Noticed that the throttle cam linkage was worn and will need to be replaced. Great. The new return spring was better, but still not enough to close the butterflies completely. Ended up taking the bracket for the auxiliary return spring and bending it up. Now the throttle plates SNAP shut!
Ordering another throttle cam from Pierce before I put the carb back on the car. Might get this done on Saturday if I get my order in early enough.
fm
04-11-14, 03:21 PM
#4592
Lost last night to a sudden issue on the daily: the Z started throwing codes while commuting to work. Turned out to be one of the two cam position sensors. Diagnosed at lunchtime thanks to Mrs. DD running my code scanner out to me at the office, then picked up the part on the way home and installed last night, after a brief search for it on the engine. Much better.
I'm thinking this foam-casting project may be a bridge too far at this point; it's intriguing but it's eating a ton of time I just don't have at this point, and it's starting to look like it will cost more to accomplish than just getting an insert cut, too.
I may go with a cut insert and re-address sometime in the future. Will decide this weekend.
Tonight: how to properly re-fasten an ICU cover on which the cover-mount tabs all broke off when opened (without making it permanently sealed).
& more prep before I can open that big-*** box from Racing Beat.
04-11-14, 11:17 PM
#4593
Moderator
iTrader: (3)
Join Date: Mar 2001
Location: https://www2.mazda.com/en/100th/
Posts: 30,829
Received 2,597 Likes
on
1,845 Posts
that was my next idea! build a time machine! go back in time, and watch how they made the foam, and then come back and duplicate!
04-11-14, 11:20 PM
#4594
Moderator
iTrader: (3)
Join Date: Mar 2001
Location: https://www2.mazda.com/en/100th/
Posts: 30,829
Received 2,597 Likes
on
1,845 Posts
More getting schooled by a carb. I got the new throttle shaft and plates in. The throttle shaft didn't have the hole for the return spring/accelerator pump cam so I had to drill my own. I was warned of this by Pierce. Of course, the hole I drilled was slightly off and the stupid cam wouldn't open the accelerator pump. I had to take everything back apart and redrill the hole. Luckily I was off enough that I had room to do it. It would have sucked to have to have dropped another $45 for a new throttle shaft.
Got everything pretty much back together on the carb...throttle plates, bearings, and such. Noticed that the throttle cam linkage was worn and will need to be replaced. Great. The new return spring was better, but still not enough to close the butterflies completely. Ended up taking the bracket for the auxiliary return spring and bending it up. Now the throttle plates SNAP shut!
Ordering another throttle cam from Pierce before I put the carb back on the car. Might get this done on Saturday if I get my order in early enough.
fm
Got everything pretty much back together on the carb...throttle plates, bearings, and such. Noticed that the throttle cam linkage was worn and will need to be replaced. Great. The new return spring was better, but still not enough to close the butterflies completely. Ended up taking the bracket for the auxiliary return spring and bending it up. Now the throttle plates SNAP shut!
Ordering another throttle cam from Pierce before I put the carb back on the car. Might get this done on Saturday if I get my order in early enough.
fm
04-12-14, 12:56 AM
#4595
He'll get it, don't worry. Just got to get it in working order.
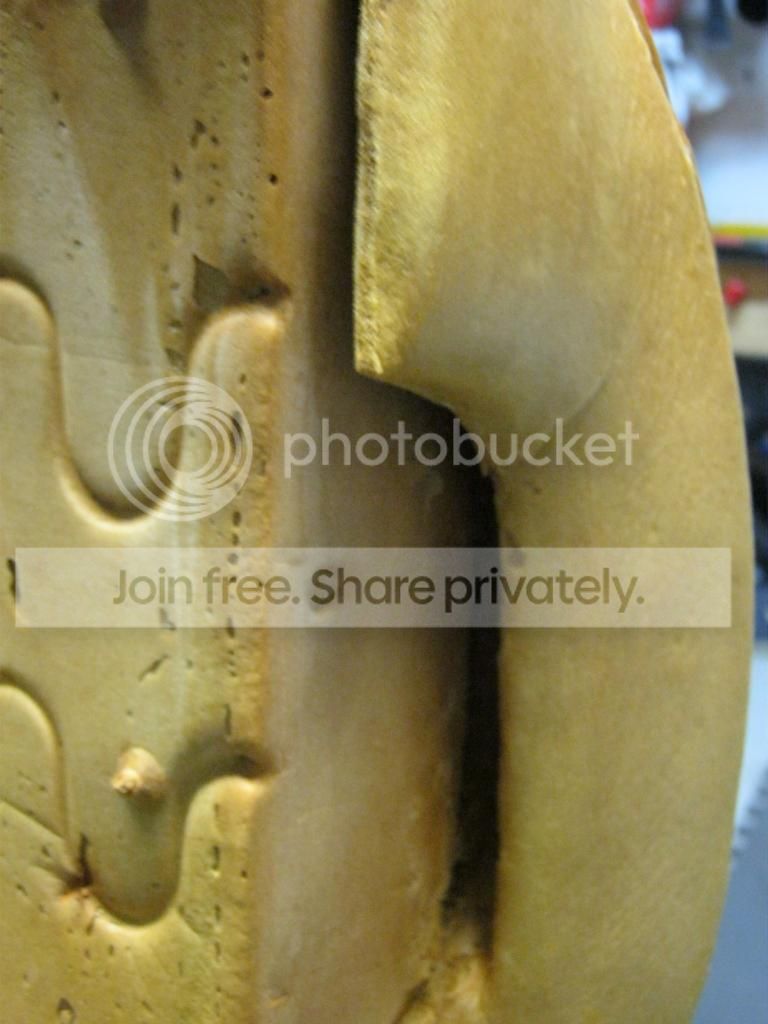
Got the carb back on the intake manifold. Awaiting 2 water o-rings from Atkins and a new throttle lever from Pierce, both expected to arrive tomorrow. Also picking up another goodie from Motion Industries in Salinas.
Took a good look at the two throttle shaft bearings this evening. This is why I replaced them with sealed bearings:


fm
Got the carb back on the intake manifold. Awaiting 2 water o-rings from Atkins and a new throttle lever from Pierce, both expected to arrive tomorrow. Also picking up another goodie from Motion Industries in Salinas.
Took a good look at the two throttle shaft bearings this evening. This is why I replaced them with sealed bearings:
fm
 04-12-14, 09:00 PM
#4598
Bubble Gum's Good
iTrader: (1)
Join Date: May 2005
Location: Norfolk, VA
Posts: 625
Likes: 0
Received 0 Likes
on
0 Posts
I dropped the tank, cleaned it up. Inside looked good so no need to get it cleaned out. While I was there I pulled all the fuel lines for replacement. Got the grime off all the little shields and stuff, scraped rhem and painted them looking much cleaner dowm there.
04-12-14, 09:02 PM
#4599
Finished tearing down the seat lower assemblies. Got some foam to fix but not too bad; mainly decay of the high-density inserts in the outer side bolsters.
Disassembled one of the door panels I got from Ms DIY. documenting as I went. Pattern-making next.
Stripped, polished, drilled, and clearcoated the cover for the ICU so that it can be a removable service cover instead of a crimped-closed unit.
Disassembled one of the door panels I got from Ms DIY. documenting as I went. Pattern-making next.
Stripped, polished, drilled, and clearcoated the cover for the ICU so that it can be a removable service cover instead of a crimped-closed unit.


