Rising from the Ashes... (Pics be warned!)


 04-22-09, 12:04 AM
#127
Wrkn Toyota, Rootn Wankel
Thread Starter
Join Date: Sep 2007
Location: "Haystack" Hayward, CA
Posts: 1,642
Likes: 0
Received 1 Like
on
1 Post
Okay guys, I didn't have enough time to load pictures tonight so that will have to wait until tomorrow.
But I have the block assembled! mostly...
As for the 12A, yes it is still available, PMed you about it.
But I have the block assembled! mostly...
As for the 12A, yes it is still available, PMed you about it.
04-22-09, 12:39 PM
#128
Wrkn Toyota, Rootn Wankel
Thread Starter
Join Date: Sep 2007
Location: "Haystack" Hayward, CA
Posts: 1,642
Likes: 0
Received 1 Like
on
1 Post
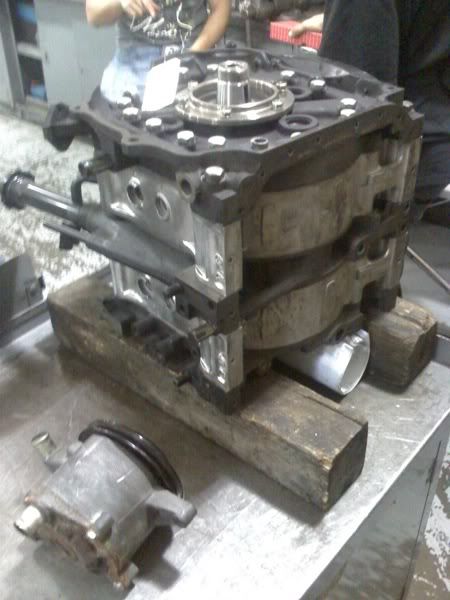
As promised, here's the progress on the 13B as of Tuesday night, I got quite a bit done and I am rather happy with myself. That said I also took plenty of pictures of the components and am going to do a small write up on how to assemble the rotor. 
Here's the work bench I have setup, you can call the parts I am using and the lapping stone I use for grinding the side seals to fit, there is a small puddle of assembly oil on a clean spot on the table to dip and lubricate parts with.

First off, you can see the bearing and oil control rings have already been installed, the oil rings are rather simple to place in. The new seals and springs are color coded, white is the front of the rotor and blue is the rear. (i.e. for the front rotor the whit painted springs go on the side with the stationary gear teeth and the blue go on the other side) The bearing was pressed in using transmission drivers as I did not have the factory drivers, but it worked just as well. Lubricate the rubber seal and press it snugly into the C section of the metal control ring, then place the control ring with the indented side down (there are two small cuts out of one side of the metal rings) and firmly press them in place. Using the old control rings helps a ton IMO, all you want to do is to seat the ring firmly into the groove, you should barely see the black o-ring if at all when you are finished and when you apply firm pressure the seal should spring back up.
The next piece I put in was the corner springs and the corner seals, as you can see the Atkins Solid Corner seals are one piece construction and remember that the dished side faces out from the rotor. The 1993+ Corner seals are much stronger and retain their "springiness" better than the wire style from when I pulled apart my engine.

I lightly oiled the corner seals and slipped them into the holes, lining up the opening with the apex groove and then gently pressed the corner seal into the hole. I firmly pressed the seal down to see if it sprang back up, about half the corner seals did not spring back up at first so I used a small flat head screwdriver to gently turn the seal side ways and lightly tapped it out of the hole using the apex groove. I used a small Exacto knife, the kind you would see for sculpting or fine cutting, (small aluminum rod with a fine blade on the end) to scrape the inside of the corner seal hole, it turned out that there was a lot of soot and residue that I had missed when cleaning the rotor. After cleaning the holes again, and then re lubing the parts, the seals sat snugly in place and had the desired spring to them.
Now lets move on to the side seals, this is by far the most painstaking process and very easy to mess up. I found that using the lapping stone with a little bit of oil was enough to grind the seals to where I wanted them. First I slipped the seal in the groove lightly, just enough so I could see how much I needed to grind off. I then used the lapping stone to grind one end of the seal (preferably the side that is square at the end) to the length I wanted and then I matched the angled cut on the other end of the seal. After placing the springs in the groove and the seals on top I found that I had the same issue I had with the corner seals and so I once again used the Exacto knife to gently clean the grooves out (Lots of gunk in those grooves so I would recommend you do this as part of the cleaning process.) and then placed the seals in place, once again you are looking for them to spring back up when you touch them and no bind.
Now here is the fun part! The Apex Seals, these little buggers come in many flavors and styles and the particular ones I got with my kit were OEM steel 2mm seals that were 2 piece rather than the 3 piece that came stock with my motor. The only difference is that the 3 piece is split laterally so that when the rotor moves in the housing the two halves will better seal the chamber, or at least that is the theory in the training manual.

I found it rather easy to slip this into the grooves and hold the at about 45 degrees and them slip the springs in before pressing them into the groove. Once again, any binding is not desirable and could mean that the groove is dirty and needs to be cleaned or damaged. I decided to stay with how the pictures in the FSM looked and made sure my corner pieces would always face the side that was open, rather than putting them in first and not seeing if they seated properly. I found that black electrical tape works as a good substitute in lieu of the factory Apex Spring Retaining Tool, its not very sticky but strong enough to hold the seals in place when stuck onto itself and easy to remove while in the housing.
Slowly slip the compressed rotor into the housing, over the bearing face on the Eccentric Shaft and rotor the shaft and rotor so that one of the apex seals is at the 12,3,6, or 9'oclock position as per the FSM. Then remove your tape and make sure the seals are fitting properly and not crooked or anything else. I found that when the rotor was in the housing already and the seals let to expand, the corner seals simply pressed in and did not pop out and cause any problems for me. I them used the included Hylomar to tack the water seals in the grooves and slipped the Rear Side Plate over the Eccentric Shaft and firmly pressed it in place, double check all your seals when doing this as it is possible for them to come loose and become pinched between the housing and plate which will cause problems down the road.
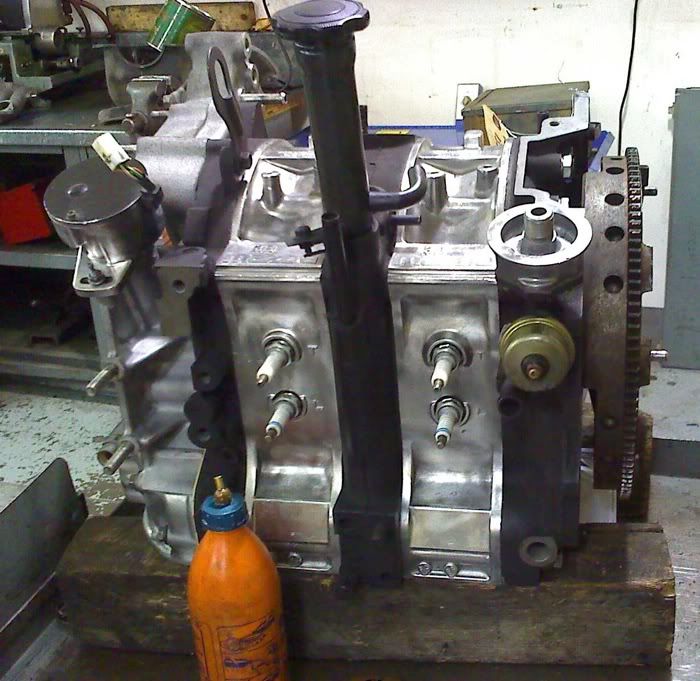
This is how it looks right now, I need to torque the tension bolts and stationary gear down and install the seal and then the flywheel and the rest will be close to any other engine assembly.
And that's my story and I'm sticking to it!
Here's the work bench I have setup, you can call the parts I am using and the lapping stone I use for grinding the side seals to fit, there is a small puddle of assembly oil on a clean spot on the table to dip and lubricate parts with.
First off, you can see the bearing and oil control rings have already been installed, the oil rings are rather simple to place in. The new seals and springs are color coded, white is the front of the rotor and blue is the rear. (i.e. for the front rotor the whit painted springs go on the side with the stationary gear teeth and the blue go on the other side) The bearing was pressed in using transmission drivers as I did not have the factory drivers, but it worked just as well. Lubricate the rubber seal and press it snugly into the C section of the metal control ring, then place the control ring with the indented side down (there are two small cuts out of one side of the metal rings) and firmly press them in place. Using the old control rings helps a ton IMO, all you want to do is to seat the ring firmly into the groove, you should barely see the black o-ring if at all when you are finished and when you apply firm pressure the seal should spring back up.
The next piece I put in was the corner springs and the corner seals, as you can see the Atkins Solid Corner seals are one piece construction and remember that the dished side faces out from the rotor. The 1993+ Corner seals are much stronger and retain their "springiness" better than the wire style from when I pulled apart my engine.
I lightly oiled the corner seals and slipped them into the holes, lining up the opening with the apex groove and then gently pressed the corner seal into the hole. I firmly pressed the seal down to see if it sprang back up, about half the corner seals did not spring back up at first so I used a small flat head screwdriver to gently turn the seal side ways and lightly tapped it out of the hole using the apex groove. I used a small Exacto knife, the kind you would see for sculpting or fine cutting, (small aluminum rod with a fine blade on the end) to scrape the inside of the corner seal hole, it turned out that there was a lot of soot and residue that I had missed when cleaning the rotor. After cleaning the holes again, and then re lubing the parts, the seals sat snugly in place and had the desired spring to them.
Now lets move on to the side seals, this is by far the most painstaking process and very easy to mess up. I found that using the lapping stone with a little bit of oil was enough to grind the seals to where I wanted them. First I slipped the seal in the groove lightly, just enough so I could see how much I needed to grind off. I then used the lapping stone to grind one end of the seal (preferably the side that is square at the end) to the length I wanted and then I matched the angled cut on the other end of the seal. After placing the springs in the groove and the seals on top I found that I had the same issue I had with the corner seals and so I once again used the Exacto knife to gently clean the grooves out (Lots of gunk in those grooves so I would recommend you do this as part of the cleaning process.) and then placed the seals in place, once again you are looking for them to spring back up when you touch them and no bind.
Now here is the fun part! The Apex Seals, these little buggers come in many flavors and styles and the particular ones I got with my kit were OEM steel 2mm seals that were 2 piece rather than the 3 piece that came stock with my motor. The only difference is that the 3 piece is split laterally so that when the rotor moves in the housing the two halves will better seal the chamber, or at least that is the theory in the training manual.
I found it rather easy to slip this into the grooves and hold the at about 45 degrees and them slip the springs in before pressing them into the groove. Once again, any binding is not desirable and could mean that the groove is dirty and needs to be cleaned or damaged. I decided to stay with how the pictures in the FSM looked and made sure my corner pieces would always face the side that was open, rather than putting them in first and not seeing if they seated properly. I found that black electrical tape works as a good substitute in lieu of the factory Apex Spring Retaining Tool, its not very sticky but strong enough to hold the seals in place when stuck onto itself and easy to remove while in the housing.
Slowly slip the compressed rotor into the housing, over the bearing face on the Eccentric Shaft and rotor the shaft and rotor so that one of the apex seals is at the 12,3,6, or 9'oclock position as per the FSM. Then remove your tape and make sure the seals are fitting properly and not crooked or anything else. I found that when the rotor was in the housing already and the seals let to expand, the corner seals simply pressed in and did not pop out and cause any problems for me. I them used the included Hylomar to tack the water seals in the grooves and slipped the Rear Side Plate over the Eccentric Shaft and firmly pressed it in place, double check all your seals when doing this as it is possible for them to come loose and become pinched between the housing and plate which will cause problems down the road.
This is how it looks right now, I need to torque the tension bolts and stationary gear down and install the seal and then the flywheel and the rest will be close to any other engine assembly.
And that's my story and I'm sticking to it!
04-24-09, 05:48 PM
#129
Wrkn Toyota, Rootn Wankel
Thread Starter
Join Date: Sep 2007
Location: "Haystack" Hayward, CA
Posts: 1,642
Likes: 0
Received 1 Like
on
1 Post
Just a small update.
I got the flywheel on, the front cover (Yes I made sure to bolt the cover on vertically as to avoid crushing the torrington bearings.)), and some small things. Its starting to come together and I'm getting pretty excited.
I also got the watts links off and pressed the bearing out of them, the problem is that I still have a lot of rubber bonded to the links, so most likely come Monday I will just borrow our cutting torch at school and cook the bastards out.
I still am intimidated by the giant box of wires in the back of my truck and haven't started cutting them up just yet, though Sunday I will probably start on it, I hope.
Other than that there hasn't been much else done to the car, sorry no pictures this time. I was so excited and into rebuilding the engine I forgot to take a break and snap some shots.
I got the flywheel on, the front cover (Yes I made sure to bolt the cover on vertically as to avoid crushing the torrington bearings.
)), and some small things. Its starting to come together and I'm getting pretty excited.I also got the watts links off and pressed the bearing out of them, the problem is that I still have a lot of rubber bonded to the links, so most likely come Monday I will just borrow our cutting torch at school and cook the bastards out.
I still am intimidated by the giant box of wires in the back of my truck and haven't started cutting them up just yet, though Sunday I will probably start on it, I hope.
Other than that there hasn't been much else done to the car, sorry no pictures this time. I was so excited and into rebuilding the engine I forgot to take a break and snap some shots.
04-27-09, 04:17 PM
#130
Wrkn Toyota, Rootn Wankel
Thread Starter
Join Date: Sep 2007
Location: "Haystack" Hayward, CA
Posts: 1,642
Likes: 0
Received 1 Like
on
1 Post
I just want to say that cutting up an entire harness to delete things like A/C, P/S, and all the other 2nd gen crap I don't need is a bitch...

 04-29-09, 12:57 PM
#133
Wrkn Toyota, Rootn Wankel
Thread Starter
Join Date: Sep 2007
Location: "Haystack" Hayward, CA
Posts: 1,642
Likes: 0
Received 1 Like
on
1 Post
Alright guys, not much in the way of engine work lately, I'm STILL scraping the gaskets off the intake manifolds and trying to debate how to clean them up with the least amount of dissasembly. That and I am starting to run thin on the greenbacks until my next paycheck.
Anyways here's some pictures of the lovely engine without the VHT FlameProof ClearCoat (I haven't decided at what stage of the rebuild I should clear coat it)
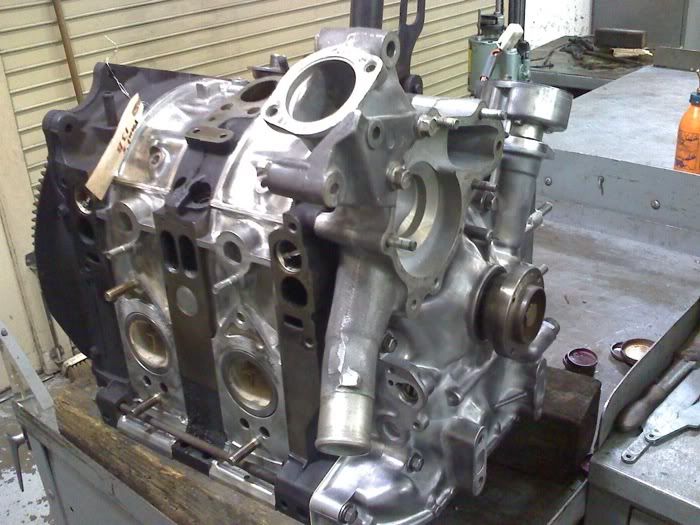
Shiny!
Anyways here's some pictures of the lovely engine without the VHT FlameProof ClearCoat (I haven't decided at what stage of the rebuild I should clear coat it)
Shiny!
04-30-09, 02:50 PM
#134
Moderator
iTrader: (3)
Join Date: Mar 2001
Location: https://www2.mazda.com/en/100th/
Posts: 30,900
Received 2,643 Likes
on
1,872 Posts
looks nice! clear it now
05-01-09, 04:04 PM
#136
Moderator
iTrader: (3)
Join Date: Mar 2001
Location: https://www2.mazda.com/en/100th/
Posts: 30,900
Received 2,643 Likes
on
1,872 Posts
just one other hint, if you want to drive the car this decade leave the main wiring harness alone, the 8 wires you take out dont weigh anything
05-01-09, 10:28 PM
#137
Wrkn Toyota, Rootn Wankel
Thread Starter
Join Date: Sep 2007
Location: "Haystack" Hayward, CA
Posts: 1,642
Likes: 0
Received 1 Like
on
1 Post
And I don't want to swap out the entire wiring harness on the GSL-SE to fit the S4 engine in. So what I did was rip out an ENTIRE FC wiring harness with all the modules connected; now I am going through that harness and trimming it so I have ONLY the wiring to run the S4 engine. I then plan on snipping some of the orginal engine stuff out of th GSL-SE so that if I ever plan on switching to another engine, the wiring harness has basically 2 sides to it, all the other crap and the egine side.
I don't know if that made any sense at all...
 05-21-09, 06:38 PM
#138
Wrkn Toyota, Rootn Wankel
Thread Starter
Join Date: Sep 2007
Location: "Haystack" Hayward, CA
Posts: 1,642
Likes: 0
Received 1 Like
on
1 Post
Okay, quick update...
The engine is almost done, just needs vacuum hosing a new solenoid for the EVAP and maybe a header. The shell is now a rolling chassis and should be moved in front of my house by the end of this weekend.
IMPORTANT NOTE- The 12A engine, left over parts, and remaining shell will be scrapped by the end of this weekend, so if you want something (glass, engine, misc parts, ect.) PM me by Sunday and I see if we can set something up. After Sunday its all getting recycled.
05-22-09, 10:08 AM
#140
Wrkn Toyota, Rootn Wankel
Thread Starter
Join Date: Sep 2007
Location: "Haystack" Hayward, CA
Posts: 1,642
Likes: 0
Received 1 Like
on
1 Post
I will write up a better update post when I get home, I am at work right now and didn't get the chance to offload my cellphone's pictures.
05-22-09, 11:27 AM
#141
Smoov-e "Dick Like Mine"
iTrader: (2)
Join Date: Sep 2004
Location: Nor Cal assassin
Posts: 542
Likes: 0
Received 0 Likes
on
0 Posts
Its the same dude. even though its a 6 port from an Fc. It should all bolt up just fine.
The engine from the Se n FC 6 port are almost exactly the same
Correct me if im wrong.
The engine from the Se n FC 6 port are almost exactly the same
Correct me if im wrong.
05-22-09, 12:36 PM
#143
Moderator
iTrader: (3)
Join Date: Mar 2001
Location: https://www2.mazda.com/en/100th/
Posts: 30,900
Received 2,643 Likes
on
1,872 Posts
05-22-09, 12:45 PM
#144
Smoov-e "Dick Like Mine"
iTrader: (2)
Join Date: Sep 2004
Location: Nor Cal assassin
Posts: 542
Likes: 0
Received 0 Likes
on
0 Posts
But this is a whole exhaust system for a 13b in a first gen. Theres no other kits that going to bolt up unless ur going to go all custom. Ur adding 2 parts that aren't supposed to match.
05-22-09, 09:59 PM
#146
Moderator
iTrader: (3)
Join Date: Mar 2001
Location: https://www2.mazda.com/en/100th/
Posts: 30,900
Received 2,643 Likes
on
1,872 Posts
Well you see the thing is that when I got the car it was missing the ECU because the Mack's bro used it for his 13B swap on his FB.
And I don't want to swap out the entire wiring harness on the GSL-SE to fit the S4 engine in. So what I did was rip out an ENTIRE FC wiring harness with all the modules connected; now I am going through that harness and trimming it so I have ONLY the wiring to run the S4 engine. I then plan on snipping some of the orginal engine stuff out of th GSL-SE so that if I ever plan on switching to another engine, the wiring harness has basically 2 sides to it, all the other crap and the egine side.
I don't know if that made any sense at all...
05-23-09, 12:00 AM
#147
Wrkn Toyota, Rootn Wankel
Thread Starter
Join Date: Sep 2007
Location: "Haystack" Hayward, CA
Posts: 1,642
Likes: 0
Received 1 Like
on
1 Post
Righto then! As I promised here's a more detailed breakdown of what I have done so far.
My buddy and I finally got the rear end in, along with the fuel line routing, minus one line which I will deal with later. We also managed to do a good job on ripping off the transmission off the old 12A and I bolted that up to the finished engine. I still need to get an EGR gasket, and siicone vacuum hosing. but that's about it.
I haven't finished the wiring harness yet, though I have been flipping through FSM wiring diagrams and marking up stuff to keep and not to keep, I just need to sit down and actually draw up a 'custom' wiring diagram for the engine harness. In any case, as I said before by Sunday we are moving the now rolling chassis to my house where I hope to get her running at least.
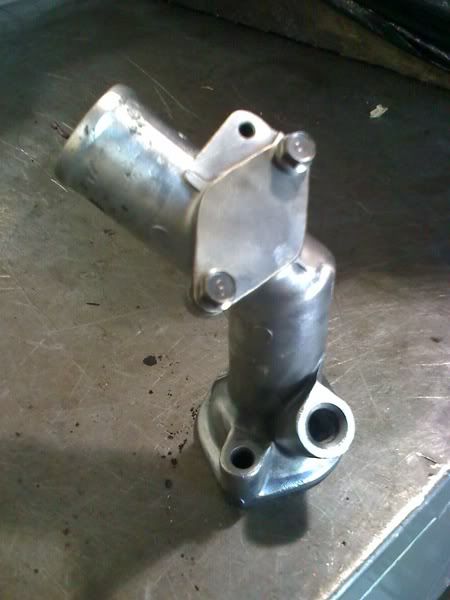
This is a picture of the lovely 1/8" Custom Stainless Steel Radiator Cap Block-Off Plate I made for my thermostat housing.
This is the rolling chassis! It's actually rolling on four wheels now! Can you believe it!?
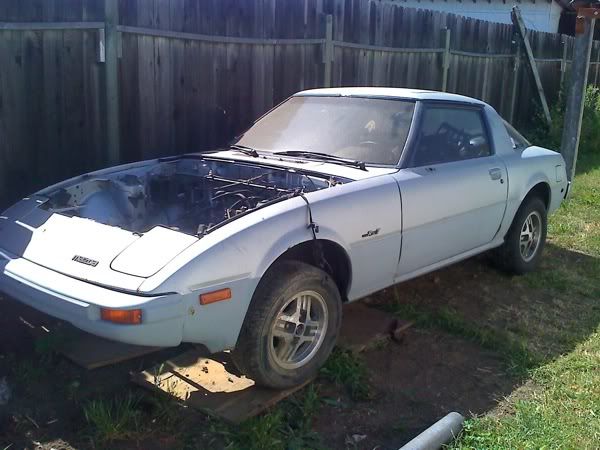
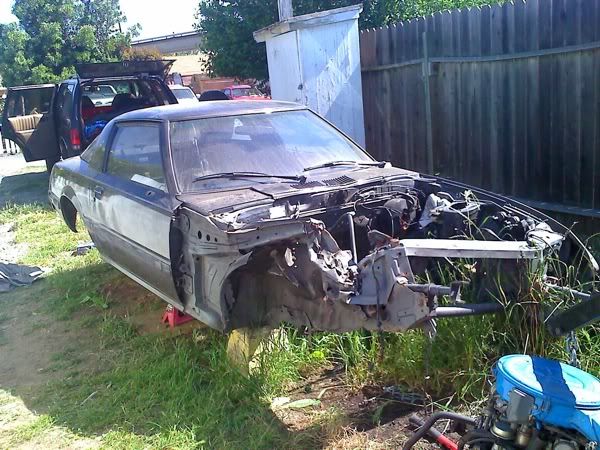
What's left of the original car, may her soul live on in her new body.
My buddy and I finally got the rear end in, along with the fuel line routing, minus one line which I will deal with later. We also managed to do a good job on ripping off the transmission off the old 12A and I bolted that up to the finished engine. I still need to get an EGR gasket, and siicone vacuum hosing. but that's about it.
I haven't finished the wiring harness yet, though I have been flipping through FSM wiring diagrams and marking up stuff to keep and not to keep, I just need to sit down and actually draw up a 'custom' wiring diagram for the engine harness. In any case, as I said before by Sunday we are moving the now rolling chassis to my house where I hope to get her running at least.
This is a picture of the lovely 1/8" Custom Stainless Steel Radiator Cap Block-Off Plate I made for my thermostat housing.
This is the rolling chassis! It's actually rolling on four wheels now! Can you believe it!?
What's left of the original car, may her soul live on in her new body.
05-27-09, 11:16 PM
#148
Wrkn Toyota, Rootn Wankel
Thread Starter
Join Date: Sep 2007
Location: "Haystack" Hayward, CA
Posts: 1,642
Likes: 0
Received 1 Like
on
1 Post
So I was looking at a few things after we got the car moved out in front of the house and I was wondering, what the 6 Port assembly uses to trigger the 5th and 6th ports open...
05-29-09, 05:21 PM
#149
Wrkn Toyota, Rootn Wankel
Thread Starter
Join Date: Sep 2007
Location: "Haystack" Hayward, CA
Posts: 1,642
Likes: 0
Received 1 Like
on
1 Post
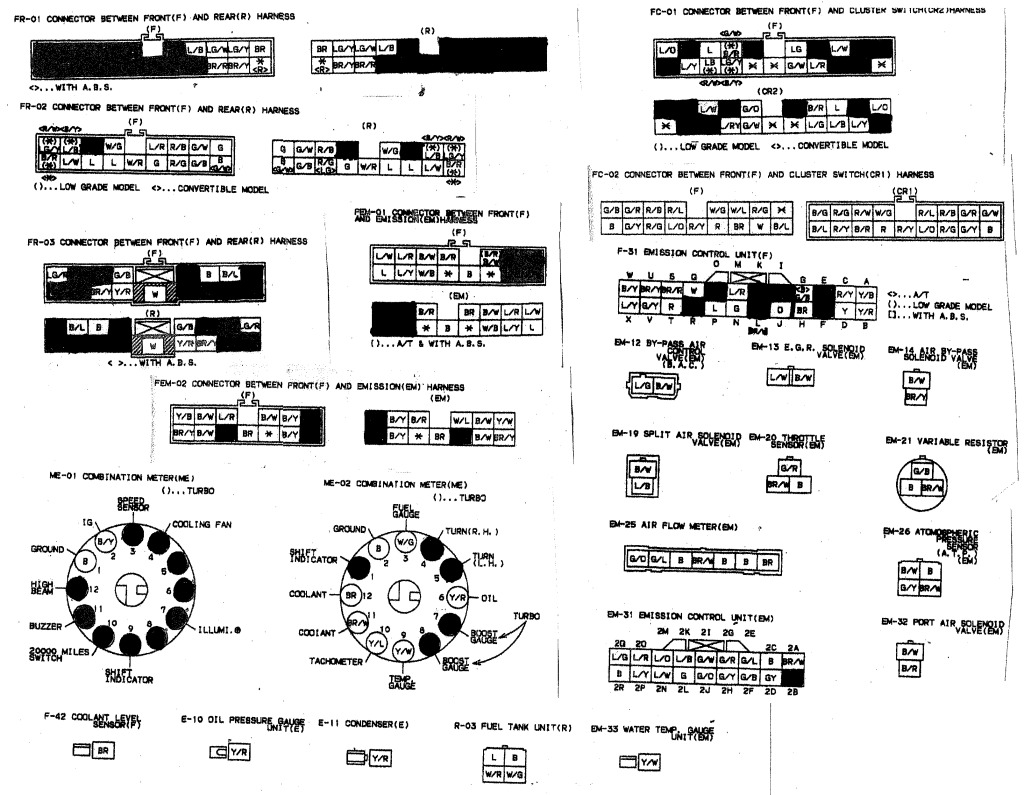
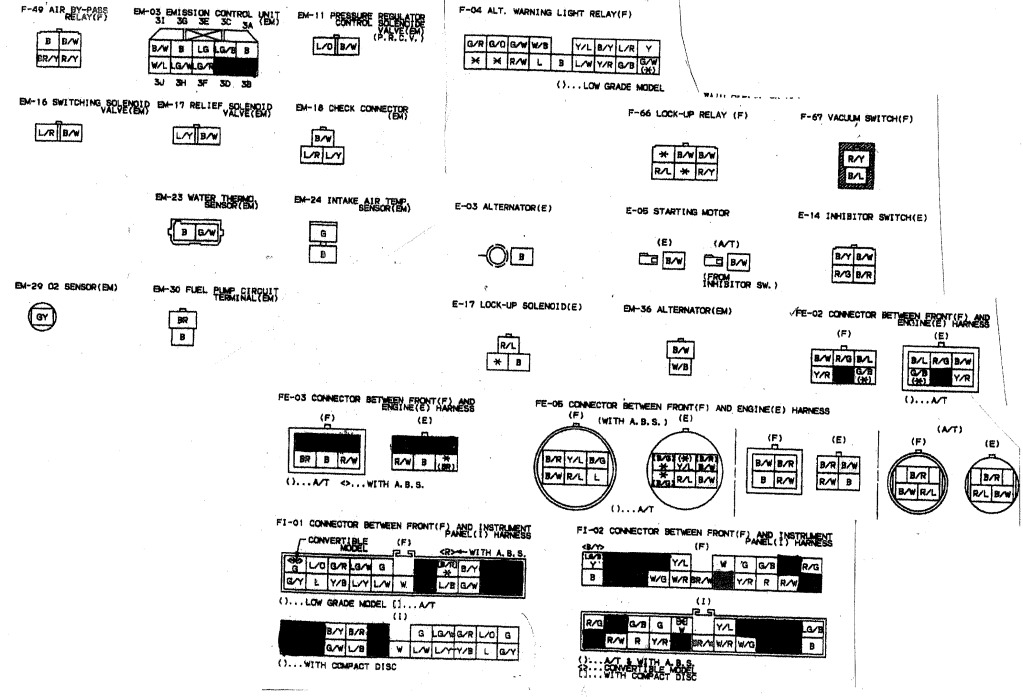
So after a **** load of weeks going through the FSM wiring diagram and marking **** off and so on...
I have what looks like the wiring diagram that I was looking for. I am doing a connector view because its much easier for me to deal with rather than drawing up all the lines and such.
In any case, these should be the bare minimum amount of wires to run the engine with emissions:
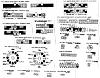
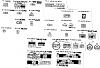
I have what looks like the wiring diagram that I was looking for. I am doing a connector view because its much easier for me to deal with rather than drawing up all the lines and such.
In any case, these should be the bare minimum amount of wires to run the engine with emissions:
 06-08-09, 05:24 PM
#150
Wrkn Toyota, Rootn Wankel
Thread Starter
Join Date: Sep 2007
Location: "Haystack" Hayward, CA
Posts: 1,642
Likes: 0
Received 1 Like
on
1 Post
Update on the care, the wiring is turning out to be a nightmare more so than before. The FSM I am using seems to be about 90% accurate to what the 2nd gen wiring harness I have is like, but its that other 10% that's driving me nuts... I may have to start over and draw up a new harness wire by wire...
Anyone know who sells nice complete engine/emission FC Harnesses :3
Anyone know who sells nice complete engine/emission FC Harnesses :3