
Project Resurrection: Running Log

Thread Starter
Joined: Jun 2008
Posts: 8,376
Likes: 28
From: Chino Hills, CA
Project Resurrection: Running Log
Okay, you lot have inspired me to get my beloved '80 SA back on the road & past smog, so I can drive it to SevenStock this year. And possibly sell it (that's what I'm telling the wife, anyway).
The car was last driven in March of 2005, when it failed it's smog-check rather decisively (high HC's, slightly elevated CO; O2 was high). Since I had a newer car as my daily driver, it sort of got shoved into the back of the garage and neglected for the last few years, just getting started now and then. Mostly, then.
The engine had only a few thousand miles on a very careful and complete re-build, and I'm certain that it was simply running way too rich. Which of course points to the carb, for which I've now ordered a rebuild kit. I've also got to repair a fracture in the stock (and complex) heat-exchanger/exhuast headpipe.
Just for ***** and giggles, I figured I'd go ahead and chronicle the resurrection here, so that y'all can offer advice and snide comments as events warrant.
Day 1: Having completed a week's prep, consisting mainly of cleaning up the workbench and toolbox to servicable shape, charging up the fully-depleted battery, ordering a carb rebuild kit, and having acquired a set of tire skates that let me shove the car around the garage conveniently, I set out to begin work.
Since the carb kit has not yet arrived, I figured I'd spend tonite doing some basic checks and see if she'd light off. First time I've tried starting it in, oh, perhaps a year. Hey, I've been busy.
Battery in, key in, turn to on. Fuel pump is clattering merrily away in the rear, so I gave it a few seconds to fill the bowls. I notice that the factory-original analog clock is still working. Cool.
Start cranking. Turning well, sounds normal; I can hear her breatheing... but she's not lighting off.
Wait a bit longer with the pump running, try it again. Still no iggy.
I popped the air cleaner, and took a look at the front bowl window. I don't see no gas in there. Rear one's very hard to see even with a mirror and a flashlight, but it looks empty as well. I don't notice much fuel smell, either, and after that much cranking, I should.
Rummaging in the tool box, I find my fuel pressure gauge... but I can't find the appropriate adapter. Grrr. I pull the feed line, and there's a little gas in there. I don't have a convenient container to do a pump volume test with, seeing as all the preparatory garage cleaning disposed of them. Grrr.
Tighen the lines back up, and hit the ignition to see if I can see the bowls fill, or feel pressure in the hose.
Hmmm... fuel gauge is flat on empty.
3 YEARS since running??
do any storage/prep for long sleep? Like drain tank, carb, etc.??
Change fuel filter!!
(frankly, after sitting collecting condensation/water for three years - change ALL fluids!!)
Hope it goes well-

Stu Aull
80GS
Alaska
do any storage/prep for long sleep? Like drain tank, carb, etc.??
Change fuel filter!!
(frankly, after sitting collecting condensation/water for three years - change ALL fluids!!)
Hope it goes well-
Stu Aull
80GS
Alaska
Thread Starter
Joined: Jun 2008
Posts: 8,376
Likes: 28
From: Chino Hills, CA
Day 2: Carb rebuild kit arrived from Black Dragon - - and it included new float needles and seats, which made it a good deal for $27 delivered. The notation in the catalog that it "does not include metering needle" had me worried.
Also acquired new fuel filter ($3), some new fuel line, and a fresh bucket of parts dip. And a set of adapters for my fuel pressure gauge.
Thread Starter
Joined: Jun 2008
Posts: 8,376
Likes: 28
From: Chino Hills, CA
Day 3: The plot thickens!
Conducted fuel pump volume and pressure tests... fuel came out! So, I'm apparently not out of fuel, after all.
Volume was more than adequate, and pressure was only slightly below spec: 3.25psi.
Surely, this should be enough to fill the carb bowls after a minute or more of pumping, but they remain dry as a bone on both sides.
I checked the fuel hoses for blockage, but found nothing.
Since at this point I'm looking at a carb rebuild anyway, I went ahead and pulled the carb, and got it on the bench. I'm looking forward to seeing what the hell's going on in the fuel inlets.
I need to pull the exhaust headpipe too, but that will have to wait for another day.
Too old to act my age
Joined: Feb 2005
Posts: 3,164
Likes: 0
From: Tulsa, Ok.
I'm betting that either the fuel inlet tube is blocked, or the needle/seat assemblies are corroded to the point that fuel cannot flow thru.
Either way, a carb rebuild is really in order, so you're on the right path.
Either way, a carb rebuild is really in order, so you're on the right path.
Thread Starter
Joined: Jun 2008
Posts: 8,376
Likes: 28
From: Chino Hills, CA
Yeah, my money's on the needles, too, though I can't come up with a reasonable argument yet why they would be stuck closed, rather than open. The evap system should have drained the bowls over a fairly short period of time (weeks, for sure), which would have let the needles drop. But we'll know for sure when I crack the air horn off, probably later tonite.
I'm pretty sure the needles I put in last time had the spring retainers on them that pull them out when the floats drop, but it's been so long I don't recall for sure.
I'm pretty sure the needles I put in last time had the spring retainers on them that pull them out when the floats drop, but it's been so long I don't recall for sure.
Thread Starter
Joined: Jun 2008
Posts: 8,376
Likes: 28
From: Chino Hills, CA
Day Four:
It wasn't until around 8pm Sunday night that I finally got a chance to work into the disassembly for 90 minutes or so.
The findings:
1) The fuel inlet tube was full of free-flowing liquid gasoline, both sides
2) The inlet screens were wet, and appeared clear to a naked-eye inspection
3) The float bowls were basicially bone dry; there is a thin layer of very sticky brown goo on the bottom of one bowl, and a thicker layer on the bottom of the other, but clearly only a drip or two of liquid gasoline had gotten into the bowls from my recent restart attempts. That explains the non-start.
4) The previous set of float needles did NOT have the spring extractors on them, though they were grooved for them. this means that either a) the carb rebuild kit I got for the last rebuild (6 years ago?) did not include them, or b) they were included but I did not install them. My money's on a), as I'm pretty diligent about using new parts when provided.
5) The weird thing is, the needles were not "stuck" in their bores, nor were they corroded at all - - bright and clean, and the rubber tips only very slightly compressed from contact with the seats... which means they were closed, but I don't get why fuel pressure did not open them. Letting the floats hang did not appear to make the needles want to drop of their own accord.
I suppose it's possible that 3.25psi fuel pressure is just below the critical line needed to unseat sticky needles; the fuel orifices are very small, far smaller than a square inch, so there's likely only a few hundreths of a pound of fuel pressure actually exerted on the needles. After all, it's a pretty small amount of flotation that closes them, even against a brand new pump's pressure.
So, it looks like a carb rebuild is just what the doctor ordered. The power valves are mired in that gooey crap, and I'm sure there's going to be endless joy getting everything sparkly clean.
Interesting side note; my carb (1980 Cal MT spec) has two additional fuel inlet screens, which fit on top the inlet of the float needle seats. They're very small, about the size of the eraser in a mechanical pencil, and capped on one end.
They don't appear anywhere in the Nikki Carburetor Manual as separate parts. They're also apparently not part of the rebuild kit.
They are in a spare carb I have (a 79, I think), too. How odd they don't appear on the diagram.
Trending Topics
Thread Starter
Joined: Jun 2008
Posts: 8,376
Likes: 28
From: Chino Hills, CA
Day Five:
Teardown continued, but only for about half an hour - - late work. Will start dipping parts tomorrow, and will decide whether or not to strip and re-paint the vacuum and bracket parts soon.
Teardown continued, but only for about half an hour - - late work. Will start dipping parts tomorrow, and will decide whether or not to strip and re-paint the vacuum and bracket parts soon.
Thread Starter
Joined: Jun 2008
Posts: 8,376
Likes: 28
From: Chino Hills, CA
Day Six:
Finally, finally had a free evening to get this moving.
Teardown is complete, except for one part: the Power Valve Solenoid.
How I'd like to get my hands round the neck of the wiseass engineer who thought it would be cute to make it impossible to get off without a special 14mm wrench that can't be more than about 3mm thick.
Couldn't make the entire body a 19mm bolt like the richer solenoid... oh, no, that would be too easy and make too much sense. Instead, let's make the body round and out of thin sheet so nobody dares grab it with pliers or a pipe wrench, and then put a little skinny nutlike flange on the front that no proper wrench can reach.
Then, for extra points, let's make it mount to a land on the throttle body with extrusions halfway round.
Grr.
Went thru fits getting the two check ***** out of their bores on the main body, too... the gooey evaporated gasoline resin was having a fine time bonding the ***** to their seats. tried vacuum, tried penetrating oil, tried medium air pressure (couldn't get a good seal, & didn't want to shoot the thing across the room).
What finally worked was letting a little penetrating oil soak into the bore for a few minutes, then shoving the ball around with the magnetized ice pick I keep around for killing martians. Did the trick nicely.
So, once I can find a be-damned 14mm wrench stamped from sheetmetal, I should be ready to start cleaning.
Thread Starter
Joined: Jun 2008
Posts: 8,376
Likes: 28
From: Chino Hills, CA
Hey, working late in a well-lit garage with the door open, you gotta be ready for those occasional martian invasions, especially here in the Granola state. Magnetic icepicks are to martians as silver bullets are to werewolves.
And don't ge me started on dear Governor Ahnalt changing our smog law from "over 30 years old is exempt" to "anything newer than 1976 will never be exempt."
Get your *** to Mars, Ahnalt.
And don't ge me started on dear Governor Ahnalt changing our smog law from "over 30 years old is exempt" to "anything newer than 1976 will never be exempt."
Get your *** to Mars, Ahnalt.
Too old to act my age
Joined: Feb 2005
Posts: 3,164
Likes: 0
From: Tulsa, Ok.
Ah yes, that wonderful "Governator" you have. Thank god he cannot run for President, seeing as he was not born as a US citizen. Even being married to a Kennedy, he cannot serve in the white house.
I wasn't aware of any recent martian invasions. The last one was repelled by country music........
I wasn't aware of any recent martian invasions. The last one was repelled by country music........
Thread Starter
Joined: Jun 2008
Posts: 8,376
Likes: 28
From: Chino Hills, CA
Day Seven:
After a fruitless search for anyone who actually stocks thin wrenches in the area, I decided to go to Sears and see what I could find.
I bought a Craftsman Strap-Wrench. 5 bucks, I figured was worth a shot so long as I was careful.
The cheap piece of crap broke on my first attempt. Turns out this "Craftsman" tool was made in the UK. Well, at least it has a lifetime warranty, so I can get another worthless piece of crap by returning the broken one. Man, I remember when Craftsman tools were bulletproof... and US made.
I did, however, finally get the power valve solenoid off. I used a pair of RG59 connector crimpers, which basically amount to a very thin pair of pliers with special cutouts in the blades. Grabbed that idiotic nut flange perfectly, and one grunt later, off she came.
Spent the rest of the evening spraying, dipping, rinsing, blowing, and oiling. And being disappointed with the carb kit I bought from Black Dragon, as it turned out to be minimal at best. Good quality, but skimpy on the parts - - not enough crush washers or cotter pins, and fiber washers for stuff that should be aluminum. Just goes to show, you get what you pay for, and sometimes you're lucky to get that! I mean really, how much can aluminum crush washers cost if they buy them in bulk?
Next few nights will be more dipping, brushing, spraying, hosing, wiping. Yay.
No martians were harmed during the making of this post.
Thread Starter
Joined: Jun 2008
Posts: 8,376
Likes: 28
From: Chino Hills, CA
Day Eight:
Other business kept me from doing any hand's-work this day, though I did research regarding carb kits.
Looks like AutoZone can get me a GP-Sorensen kit that, judging from the photo, is much more complete than the no-name kit I got from Black Dragon. Yet, it's the same price.
I think I'll retire the Black Dragon kit to the "repair parts" drawer, and order the Sorensen. Last re-build I did years back used the Sorensen kit (I still have the box... yeah, I should clean more often) and I recall it having everything needful in it, including the aluminum washer gaskets.
Ticks me off to have to buy twice... but it will still come to less than the cost of the kit MazdaTrix is offering, which is (I think) Original Mazda, based on the part number.
Still no martian issues... though we did have a raccoon invade the kitchen last night, going for the cat food. Damn thing opened the sliding screen door to do so, which was latched.
Last edited by DivinDriver; Jul 18, 2008 at 12:18 PM.
Thread Starter
Joined: Jun 2008
Posts: 8,376
Likes: 28
From: Chino Hills, CA
Day Nine:
Stopped by AutoZone; the counter tech assured me that if the kit did not contain the parts in the picture (clearly including all the crush washers) he'd give me a refund, so I ordered one. Should arrive by Wednesday, and I may be ready to start assembly by then.
Got home and pulled out the box from my old GP Sorensen kit. Yep, I saved the old crush washers when I did the last rebuild, so I'll have a fresh set.
Didn't have a great deal of working time tonight, but did discover a fairly important problem: the power valves in the bottom of the bowls were so mired in dried-out gas goop that they wouldn't close - - the stems wouldn't pop back up.
Using parts dip, brake cleaner, and penetrating oil, I talked one of them into coming out, but it's still sticky. The other wasn't going to budge. I even tried using my hand vacuum pump and brake-bleed jar to suck a lil solvent in thru the microscopic jet port in the side. No dice.
Having read thru the archives, I had one final ace in the hole. I boiled them in clean water. Did the trick neatly; both now moving freely.
I do need to get that pan cleaned before the wife comes home, though.
Still more cleaning ahead.
Oh, and regarding that expensive Berryman "Parts Dip" I bought a gallon of: the stuff they sell nowadays is damn wimpy; back in the day, that stuff used to eat right thru latex gloves, paint, and most any goo known to man in about 15 mintues. The formula they make now wouldn't even take the Sharpie marks off of the air adjust screw after a half-hour soak. Feh.
Too old to act my age
Joined: Feb 2005
Posts: 3,164
Likes: 0
From: Tulsa, Ok.
Chem-dip has lost a lot of it's original power, that's for sure. 15-20 years ago, you didn't dare reach into the bucket with a bare hand, unless there was soap and water close. Using it in a closed area was a good way to get some sleep. These days, you could prolly drink it, and not even get a buzz........
Thread Starter
Joined: Jun 2008
Posts: 8,376
Likes: 28
From: Chino Hills, CA
Yeah, They've been thru at least three formulations that I know of; there was even one that had a layer of light oil or some other low-volatile liquid on top, to keep the working liquid from evaporating.
I have some older cans about, but they are pretty well used up, saturated with dissolved goo. Need to get them to the next "hazardous waste pickup."
I have some older cans about, but they are pretty well used up, saturated with dissolved goo. Need to get them to the next "hazardous waste pickup."
Thread Starter
Joined: Jun 2008
Posts: 8,376
Likes: 28
From: Chino Hills, CA
Day Ten:
Carb work paused while I got my busted headpipe out of the car, so I could weigh it and see just how busted it is. About 13 lbs. Pretty busted.
I finished cleaning the power valves finally; moving well, no sticking, and sealing tight when closed. A leaky power valve would bollux my attempts to pass smog, that's for sure.
I wonder if anyone has ever tried to disassemble them? they are screw-slotted at both ends, but I only have the two, and as I have no idea how rare they may be, I'm not risking them.
Took the secondary diaphragm housing apart & got the diaphragm out safely, so it could get cleaned. Started woking my way through cleaning jets and bleeds.
The perpetrator of the late-night catfood breakin on day eight returned to the scene of the crime, but found herself stymied by a pane of glass this time.
Thread Starter
Joined: Jun 2008
Posts: 8,376
Likes: 28
From: Chino Hills, CA
Day Eleven:
More parts cleaning, & some painting of brackets. Nothing remarkable.
The original "B-9 Chem Dip" (Blue letters on white label) was primarily Methylene Chloride - - the Drinking Bird molecule!
Current stuff (multi-colored label) is a mixture of "primary amines." It's thick enough to float aluminum washers on top of, and sticky to boot. Neither are ideal features in a solvent (prevents penetration) but I'm sure it makes it oh so much safer. At least, dirt seems safe from it. And it doesn't do anything about oxydation. Supposedly has an affinity for carbon, though you couldn't prove it by me.
Looks like they did away with the original formula in 2006: http://www.berrymanproducts.com/Port...01,%200905.pdf
Last edited by DivinDriver; Jul 22, 2008 at 09:38 AM.
Thread Starter
Joined: Jun 2008
Posts: 8,376
Likes: 28
From: Chino Hills, CA
Day Twelve:
Busy tonight, shopping parts and suff; no wrench time.
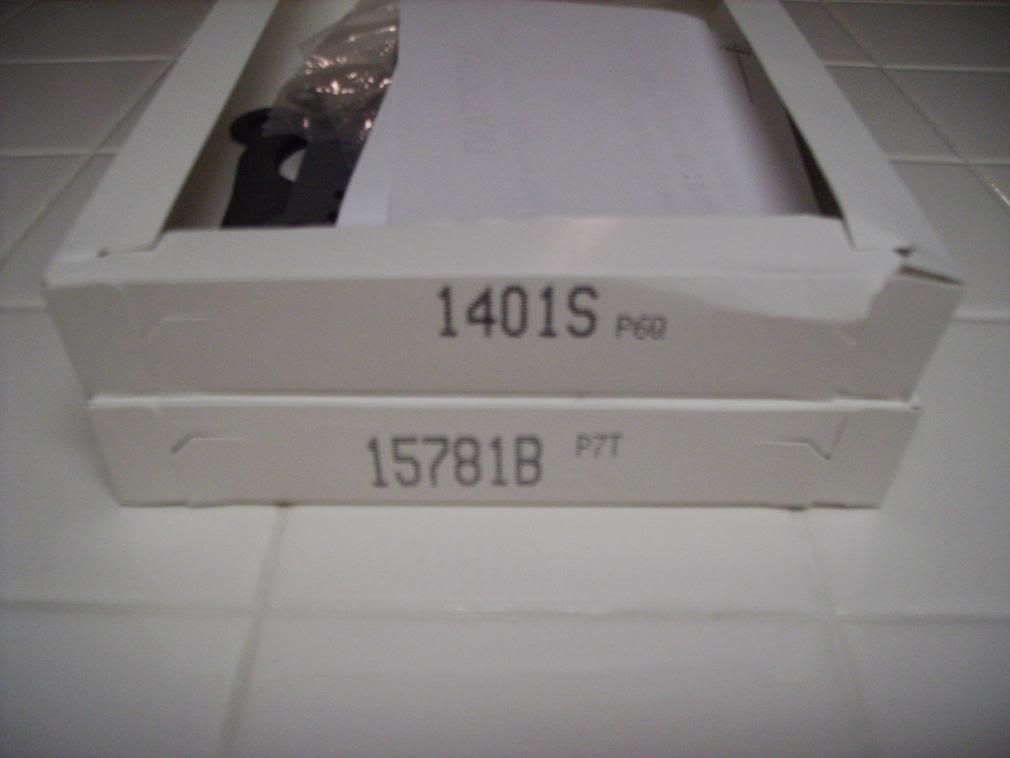
I did pick up the GP Sorenesen carb kit from AutoZone; See comparative pix below:
1) looks like both kits actually originate on the same assembly line: Check out the inside packaging & labelling. Sorensen kit on top (outer box says "made in USA"; BD kit had no outer box.)
2) Heres the contents of the kit from Black Dragon. Only three of the replacement rounds are aluminum; the rest are red or black fiber. The sight glass seals look to be fuel-safe o-rings:

3) Here's the contents of the GP Sorensen kit. Same price wtihin a few cents, but I didn't have to pay shipping. Did have to pay sales tax, though.
Note that all of the round seals are aluminum crush washers, except for the four used to seal the jet access covers. Those are copper. One additional cotter pin, one less e-clip. Couple extra gaskets that must be for a differing appication. Sight glass seals are proper flat-cut rubbers.
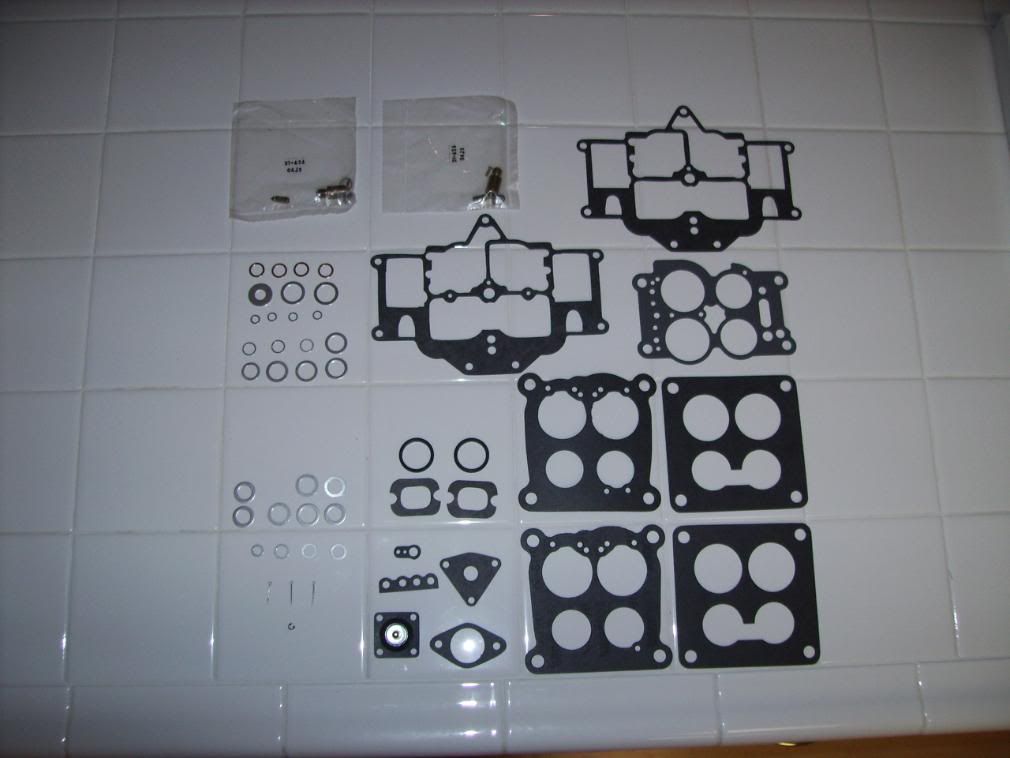
Between the two, I'm liking the Sorensen kit a bit better. Both gasket sets seem well-cut and clean, though - - I'm sure either would work. I just like having the aluminums.
Instructions and the lil cardboard float ruler omitted from picture; the Sorensen instructions looked a bit better, though I'm using the Mazda carb manual.
Oh, and the needle kits have the exact same part numbers, only differ in date code.
Busy tonight, shopping parts and suff; no wrench time.
I did pick up the GP Sorenesen carb kit from AutoZone; See comparative pix below:
1) looks like both kits actually originate on the same assembly line: Check out the inside packaging & labelling. Sorensen kit on top (outer box says "made in USA"; BD kit had no outer box.)
2) Heres the contents of the kit from Black Dragon. Only three of the replacement rounds are aluminum; the rest are red or black fiber. The sight glass seals look to be fuel-safe o-rings:
3) Here's the contents of the GP Sorensen kit. Same price wtihin a few cents, but I didn't have to pay shipping. Did have to pay sales tax, though.
Note that all of the round seals are aluminum crush washers, except for the four used to seal the jet access covers. Those are copper. One additional cotter pin, one less e-clip. Couple extra gaskets that must be for a differing appication. Sight glass seals are proper flat-cut rubbers.
Between the two, I'm liking the Sorensen kit a bit better. Both gasket sets seem well-cut and clean, though - - I'm sure either would work. I just like having the aluminums.
Instructions and the lil cardboard float ruler omitted from picture; the Sorensen instructions looked a bit better, though I'm using the Mazda carb manual.
Oh, and the needle kits have the exact same part numbers, only differ in date code.
Thread Starter
Joined: Jun 2008
Posts: 8,376
Likes: 28
From: Chino Hills, CA
Day Thirteen:
Another night where everyone wanted part of my time, it seemed.
Cleaned more jets and parts, and spent some time going over my ACV, making sure the failure of my exhaust headpipe didn't cook it, after discussing pipes with AZRotor. Looks intact, and diaphragms checked out OK via vac pump. Relieved; these damn things are rarer than hen's teeth and expensive as hell, and absolutely indespensible for passing smog.
I have officially dubbed it the Ahnalt Governator Valve.
Thread Starter
Joined: Jun 2008
Posts: 8,376
Likes: 28
From: Chino Hills, CA
Days Fourteen and Fifteen:
14) Mostly a quiet evening cleaning parts, and packing tools for a survey of the local pickkapart places. Discovered a strange amount of wear on the accelerator pump linkage (independant post about it here: https://www.rx7club.com/1st-generation-specific-1979-1985-18/question-nikki-sensei-s-774084/ )
15) Hit three boneyards, looking for a good headpipe and possibly some other things; slim pickings. The only SA I found, with a serial # only a few hundred from mine, had it's headpipe sliced in half by some yardmonkey retard that thought the heat excahnger was a catalytic converter. Ruined a rare sellable part to get at platinum that wasn't there - - great business practice, that.
Cut the heat sheilds off of my old headpipe to see what went wrong; the welds at the first bend were melted/boiled away:
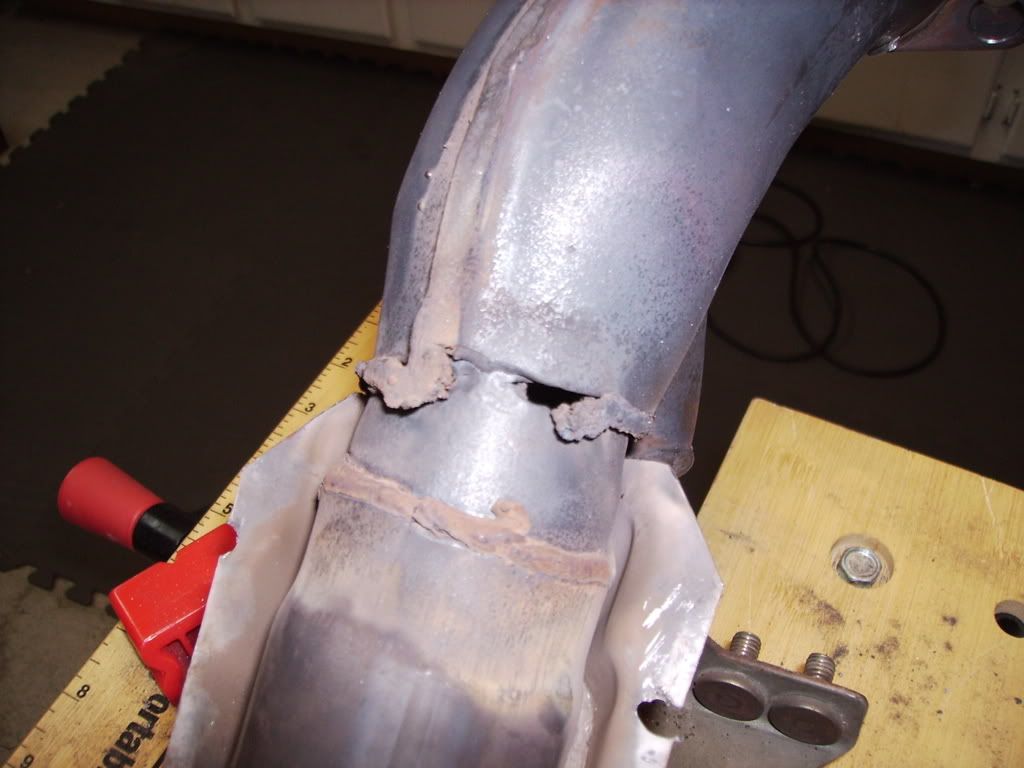
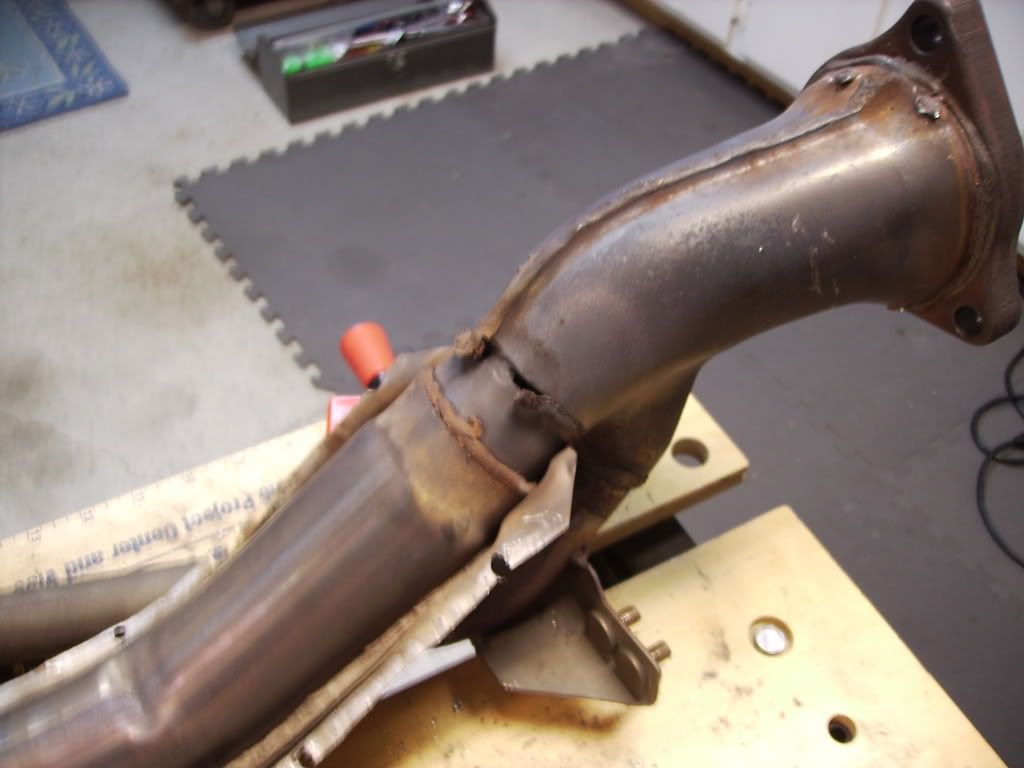
Failure of cooling air to reach the pipe, apparently. Need to sort that out, before I burn up any replacement I may find. Possibilities are failed thermal reactor, loose/mismounted insert, bad ACV or solenoids or air pump, blocked vent pipe, maybe a couple more. Time to pull the TR off & check it.
14) Mostly a quiet evening cleaning parts, and packing tools for a survey of the local pickkapart places. Discovered a strange amount of wear on the accelerator pump linkage (independant post about it here: https://www.rx7club.com/1st-generation-specific-1979-1985-18/question-nikki-sensei-s-774084/ )
15) Hit three boneyards, looking for a good headpipe and possibly some other things; slim pickings. The only SA I found, with a serial # only a few hundred from mine, had it's headpipe sliced in half by some yardmonkey retard that thought the heat excahnger was a catalytic converter. Ruined a rare sellable part to get at platinum that wasn't there - - great business practice, that.
Cut the heat sheilds off of my old headpipe to see what went wrong; the welds at the first bend were melted/boiled away:
Failure of cooling air to reach the pipe, apparently. Need to sort that out, before I burn up any replacement I may find. Possibilities are failed thermal reactor, loose/mismounted insert, bad ACV or solenoids or air pump, blocked vent pipe, maybe a couple more. Time to pull the TR off & check it.
Thread Starter
Joined: Jun 2008
Posts: 8,376
Likes: 28
From: Chino Hills, CA
Days Sixteen through Twenty-Three
In general, little time to work on the project this last week.
Most all carb internals cleaned and ready for reassenbly. Now working on stripping/cleaning/painting the external bracketage and stuff; much of hte old chromate coating has eroded with years, so we're going blue anodized clearcoat. Slow stuff.
The cam on the throttle shaft that I wanted to replace due to excess wear is a different shape on my spare carb, so it'll stay in place for now. Looking at it carefully, the wear won't be an issue for several years at least, given the age of the part. The linkage side was a direct match, so it's been swapped.
Pulled my TR; cursory inspection doesn't seem to show any gross failure, but it's clear that exhaust gas was making it into the cooling air jacket; MTBE deposits don't lie. This may mean that, the last time I was actually running the stock exhaust, I had the TR insert in backwards. No way to prove it, but it would cause the symptoms I'm seeing.
Still no joy on a headpipe; there's a chance I may be able to get my old one rewelded, as one of the guys in my dive club is a pipefitter for the oil refineries & may be able to do the fancy work needed. Or, I may get lucky from the couple people I've contacted thru the board, as their projects move along. the waiting may kill me.
Appears there's something wrong with my fuel gauge sender, or wiring; gauge is on empty, so I thought the tank was near dry. Prepairing to replace the fuel filter, I figured I'd pump it the rest of the way dry first. Pumped more that two gallons out, still shows dry, still fuel in it. Oh, goody; another task.
I'll need to test the entire emissions system, too, part by part.
Thread Starter
Joined: Jun 2008
Posts: 8,376
Likes: 28
From: Chino Hills, CA
Days Twenty-Three through Twenty-Six
I'm finally satisfied with the condition of the carb parts I have, and have started re-assembling the carb. Still working on refinishing some of the brackets; painting in parallel with working on the internals.
This carb hasn't been this clean since it left Hiroshima. Everything working smoothly. All brass parts polished. Got all the way through verifying and reinstalling the jets and bleeds last night.
One minor issue with the Sorensen gasket kit, which has otherwise been excellent; the exterior (paper) gaskets that go between the sight glasses and their retainers were oversized, to the point that I had to trim their outside edges down by about an eighth of an inch total in order to get them to fit smoothly.
Carb will be done in a couple more evenings (busy til weekend with other stuff) and then I'll start electrical and vacuum testing of non-carb emissions parts. No sense in mounting the carb until I get my exhaust parts sorted. Tricky enough to get the Thermal Reactor off without removing the intake as it is; the carb just gets in the way.
Thread Starter
Joined: Jun 2008
Posts: 8,376
Likes: 28
From: Chino Hills, CA
Day Twenty-Seven
Finished the main body reassembly last night, with the exception of the dashpot bracketage, which needed repainting.
Only good thing I've discovered about the gold accent paint I used last time is that it melts away like cotton candy, when exposed to brake cleaner. Stripping it off consists of a couple aquirts, wait 30 seconds, then wipe it down with a paper towel.
Otherwise, the gold stuff was a bust. Looked great when I did it, but now, yuck.
Still need something to protect the metal, though, as the original chromate passivation is quite corroded on many of these parts. I suspect that the car's early life (back before I bought it in '89) was spent near the beach, as a lot of the chromated parts show the distinct signs of salt air exposure.
I'm using a blue anodized-look lacquer this time. It stood up well to engine-compartment heat on the other parts I used it for, cleans easily (nothing much seems to stick to it) with a dry rage, and it looks quite nice. Store used to carry it in a gold color as well, but I can't find any now. The gold was the closest to the original chromate color I'd seen, but you had to have the part near-perfect polished first to make it look right. The blue is dark enough that it covers a lot of imperfections in finish.
Took some pics of the build in-progress; will post 'em up tonight.
Brake cleaner deserves a place in the "most useful items in the universe" pantheon, just down from duct tape.