
Project Resurrection: Running Log

Thread Starter
Joined: Jun 2008
Posts: 8,376
Likes: 28
From: Chino Hills, CA
Days 84 through 114
I've sort of left this thread slide last month, in part because life's been busy, and when it comes down to having a couple hours to either work on the car, or write about working on the car, actual wrench time wins.
Also, because of the screwy rules attached to smog checks in California, I have to delay getting my certificate, to avoid having to do it twice.
My car was originally registered in mid-March, so all renewals are likewise tied to that same mid-March date.
CA smog check requirements actually vary county to county, and in a couple counties (including mine) from ZIP code to ZIP code. In my particular case, I get nailed for a full visual and dyno/tailpipe test every two years, based on original registration date (March 1980).
However, since my car has been registered "planned non-operation" for the last few years while it was stored, It needs a smog check in order to get back on the road.
Here's the kicker: Although registrations are good for a year, and smog checks are only required every two years, the actual smog certificates are only good for 90 days. This means that you have to pass the test within 90 days of registration date, or you have to re-test to register.
Simple, huh? (/facepalm)
The upshot is, if I get my car to pass smog & register it now, more than 30 days before its March registration date, then I'll have to renew my registration AND get ANOTHER SMOG CHECK for March next year. But if I wait until I'm within 30 days of my March re-registration, I won't need another smog check for two years (unless I sell the car).
This means I'm served best by dragging my feet on the re-start date, since it'd cost me more to put it back on the road now.
So, I'm going slow, due to my state's asinine rules. I don't want to get it running and re-fuelled, and then not be able to drive it to keep it fresh.
On the technical front:
I cut, extended, welded, and re-wrapped the lower air tube, and it fits perfectly now. Exhaust is now physically complete, and should function as designed. (pics will posts in a couple days). The re-wrap was a biatch; I had to cut the old woven fiberglas (actually, I think the inner layers are asbestos, so I was masked), then wrap it back on, and hold it in place with wire. The stuff was falling apart as I handled it; crap was getting everywhere. I knew it would never last on the road without protection, so I bought some glass cloth and clamps, and made an outer jacket for it.
I'm now in the midst of going through the ratsnest and relays, and making sure everything is functional. Along the way, I'm stripping the old gold spraypaint I used previously, and replacing it with my colored clear-laquer paint, which takes heat better.
Along the way, I have found a couple ratsnest vacuum valves that no longer work electrically, and have spares & replacements (used) inbound in the next couple days.
Once the ratsnest is refurbed and in, I'll re-mount the carb and set up the OIV link, then get the air pump back in.
Pix to follow - - they are on the other computer!
Sounds like you are making progress there that is good, but those Smog laws have to be the most absurd things on the planet I swear. Having to jump through so many hoops to drive a 28 year old car really sucks.... Good luck with everything!
Thread Starter
Joined: Jun 2008
Posts: 8,376
Likes: 28
From: Chino Hills, CA
OK: some photos to liven up the process.
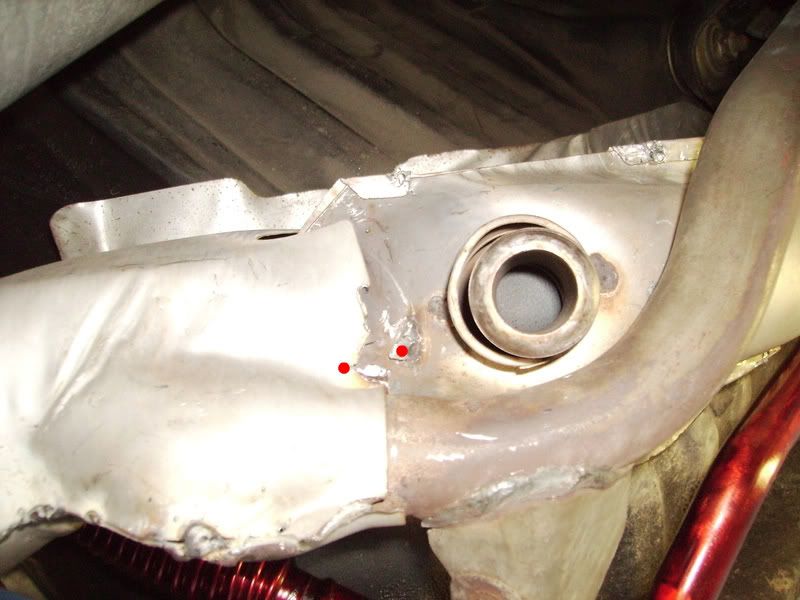
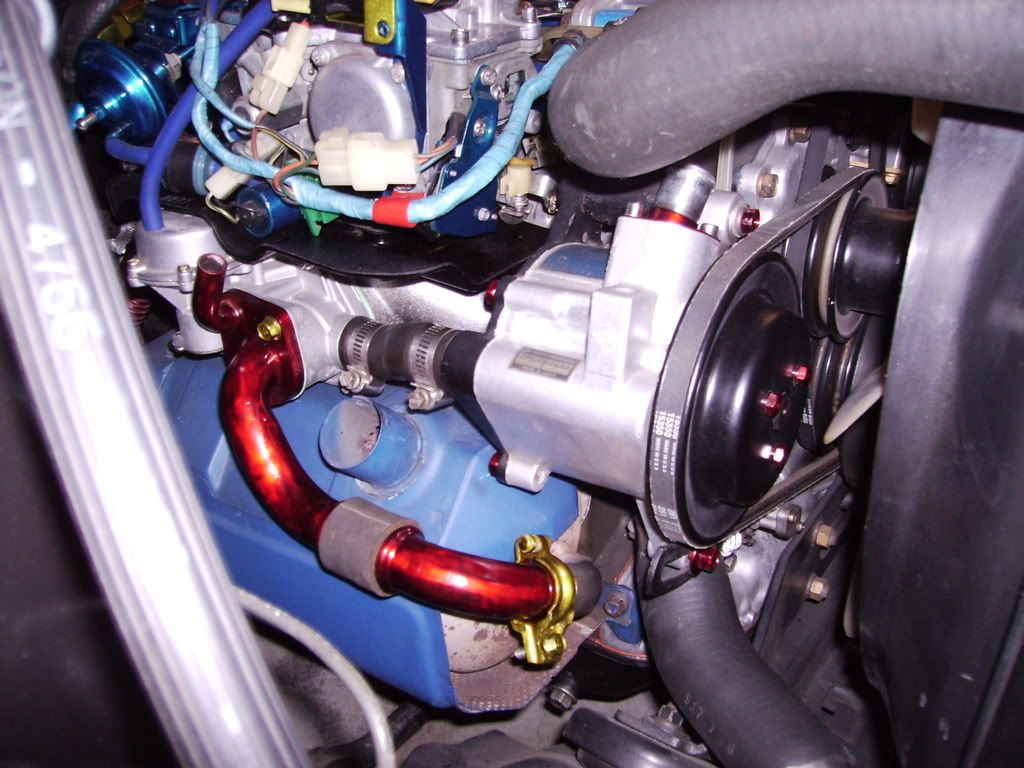
Here's a closeup of the repaired headpipe. You can see by how the cut spotweld on the heat shield no longer matches up, that the finished pipe ended up about a quarter inch longer than it should have been (the two red dots should touch)
You can see the "top" air tube, which goes from the intake manifold back to the heat exchanger, in the background. Red laquer.
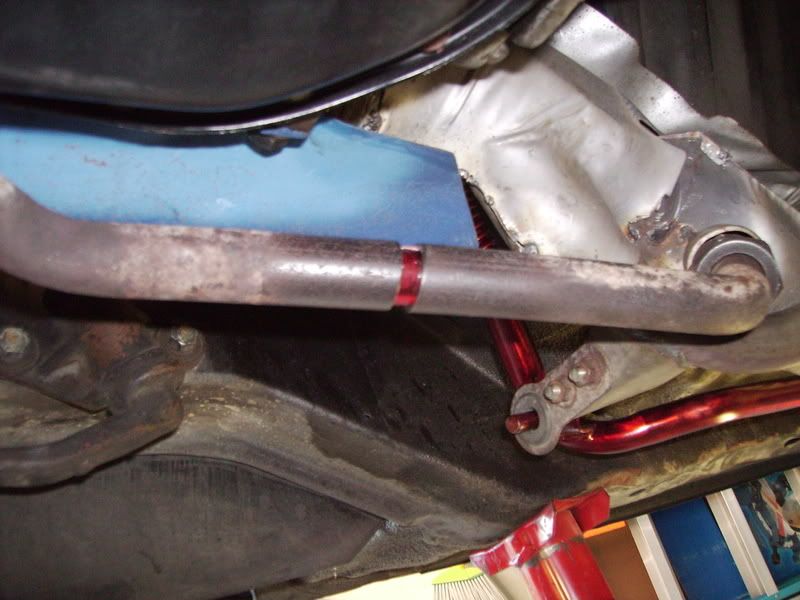
Here's the lower hot-air tube that carries heated air forward from the heat exchanger, into the Air Injection ports. I've cut it, and placed a piece of red cardboard inside, to show how much longer it needed to get:
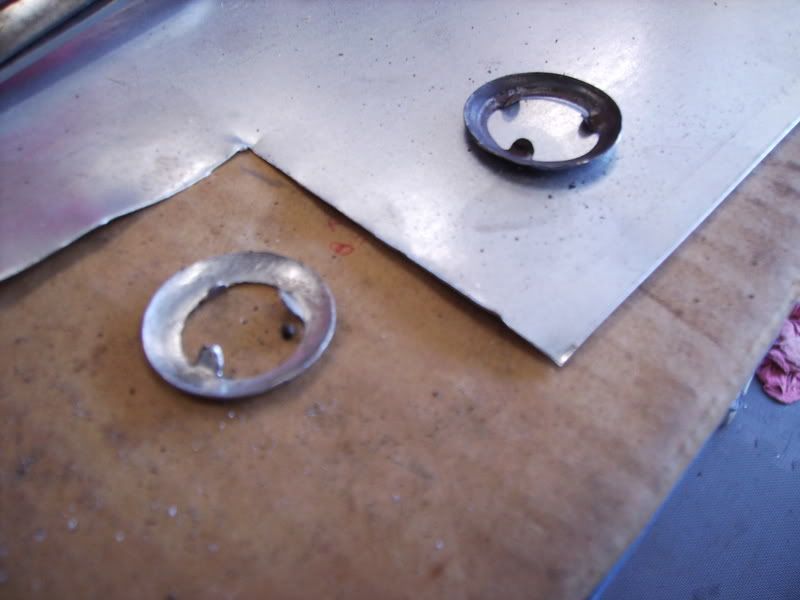
Here; Ive fitted a steel sleeve (had to hand-form it due to odd inside diameter) into the gap, which was then welded in place and filleted for strength.

I needed to make a new steel sealing washer, too, for the pivot juncture; cut from thin sheet, hammered to shape with a ball peen, and the dremelled to fit.
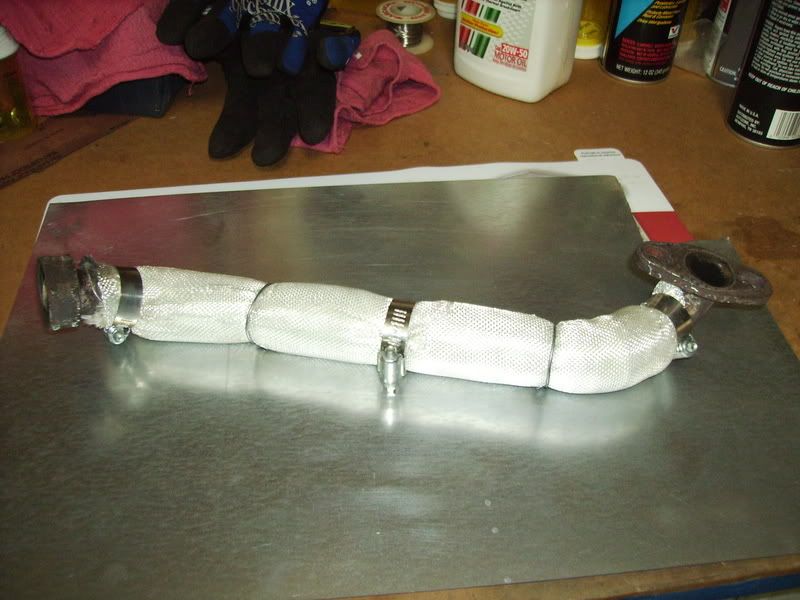
The completed air tube, with its clean new glass cloth over its icky old insulating fiber. We'll see how long it lasts. This tube doesn't carry full exhaust-heat gasses, so it has a chance.
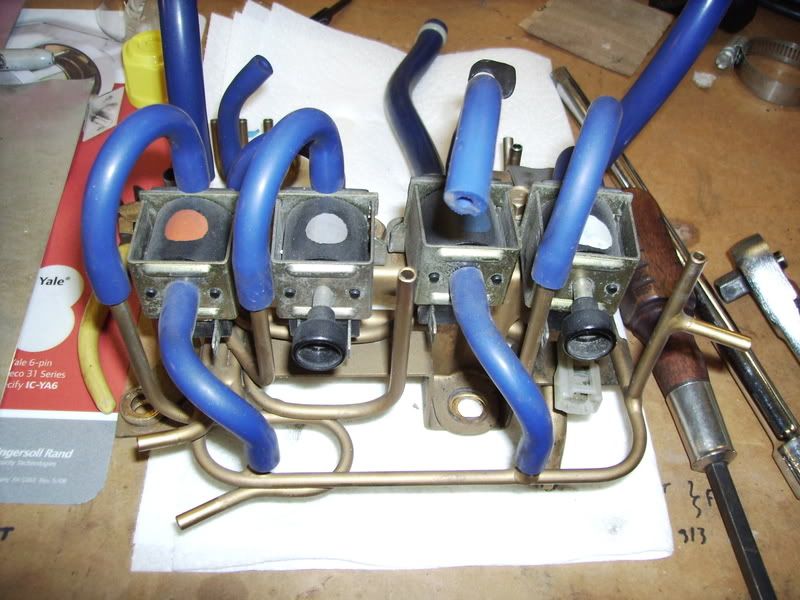
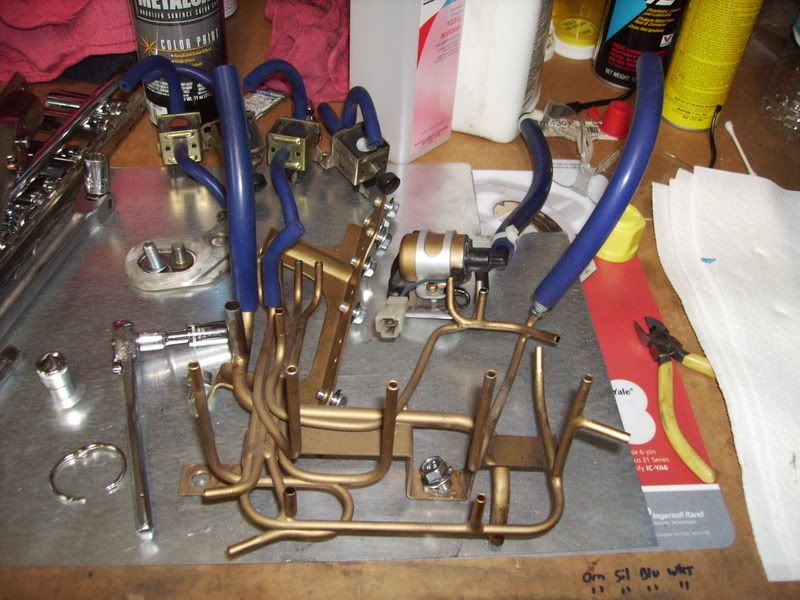
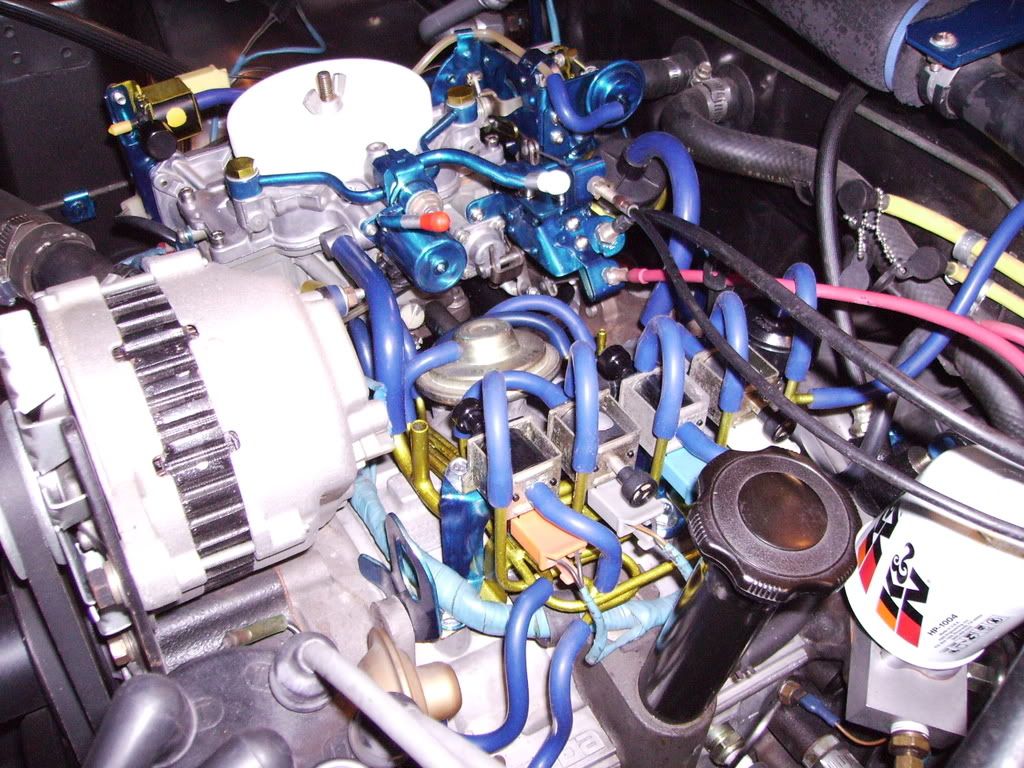
Here's my original ratsnest, with the old heat-damaged gold paint - - all the original gloss faded after just a few weeks of engine heat. Two of the solenoids are also dead; coils are open, no operation. Luckily, I have a few junkyard spares:
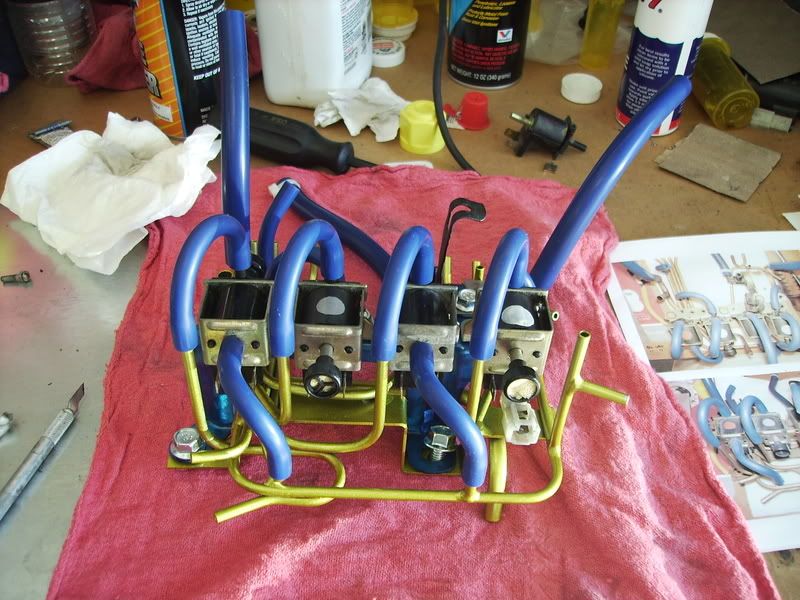
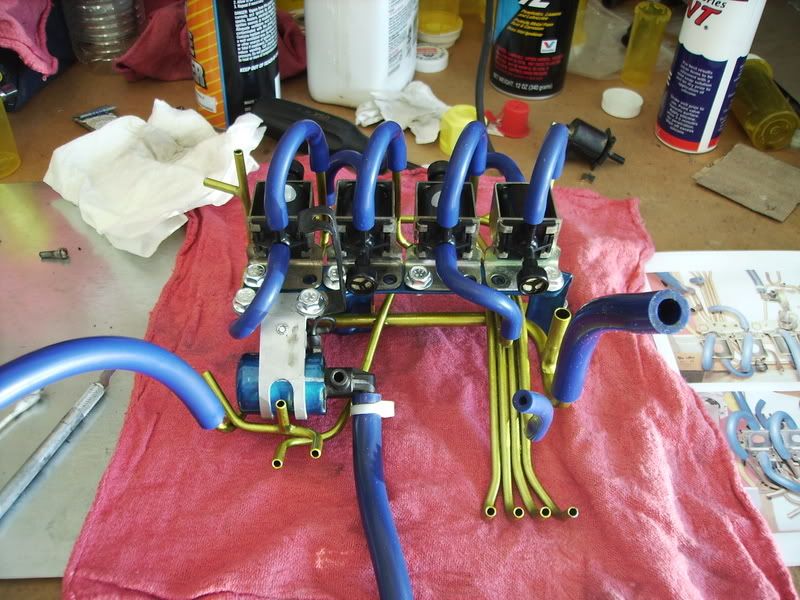
Rejuvenated "Hollywood" ratsnest; stripped, cleaned, sprayed with anodize-look base and laquer, and all bolts replaced with new shiny hardware. All cleaned up, fully functional, and ready to go in the car.
That's where I'm at, as of now.
I did find a safe way to disassemble the solenoid valves for repainting & replacing the o-rings which can make for vacuum leaks, and I may pull them back off to clean them up (the chromate is really scaled) but they are easy to do anytime, as they are right on top.
Here's a closeup of the repaired headpipe. You can see by how the cut spotweld on the heat shield no longer matches up, that the finished pipe ended up about a quarter inch longer than it should have been (the two red dots should touch)
You can see the "top" air tube, which goes from the intake manifold back to the heat exchanger, in the background. Red laquer.
Here's the lower hot-air tube that carries heated air forward from the heat exchanger, into the Air Injection ports. I've cut it, and placed a piece of red cardboard inside, to show how much longer it needed to get:
Here; Ive fitted a steel sleeve (had to hand-form it due to odd inside diameter) into the gap, which was then welded in place and filleted for strength.
I needed to make a new steel sealing washer, too, for the pivot juncture; cut from thin sheet, hammered to shape with a ball peen, and the dremelled to fit.
The completed air tube, with its clean new glass cloth over its icky old insulating fiber. We'll see how long it lasts. This tube doesn't carry full exhaust-heat gasses, so it has a chance.
Here's my original ratsnest, with the old heat-damaged gold paint - - all the original gloss faded after just a few weeks of engine heat. Two of the solenoids are also dead; coils are open, no operation. Luckily, I have a few junkyard spares:
Rejuvenated "Hollywood" ratsnest; stripped, cleaned, sprayed with anodize-look base and laquer, and all bolts replaced with new shiny hardware. All cleaned up, fully functional, and ready to go in the car.
That's where I'm at, as of now.
I did find a safe way to disassemble the solenoid valves for repainting & replacing the o-rings which can make for vacuum leaks, and I may pull them back off to clean them up (the chromate is really scaled) but they are easy to do anytime, as they are right on top.
Last edited by DivinDriver; Nov 8, 2008 at 08:25 PM.
Thread Starter
Joined: Jun 2008
Posts: 8,376
Likes: 28
From: Chino Hills, CA
The paint is DupliColor MetalCast; it's a two-layer paint that's supposed to look like anodized cast aluminum when done. There's a metallic silver base layer, and then a clear colored laquer topcoat. Supposed to be good to 500 degrees.
I've been using the blue for a lot of stuff, and the yellow for highlights. I did all the smog air-tubes in red, just for the hell of it. Kind of looks like the Old School Star Trek color scheme, heh.
I've been using the blue for a lot of stuff, and the yellow for highlights. I did all the smog air-tubes in red, just for the hell of it. Kind of looks like the Old School Star Trek color scheme, heh.
Thread Starter
Joined: Jun 2008
Posts: 8,376
Likes: 28
From: Chino Hills, CA
Days 115 through 124
Not much wrench time recently; schedule disruptions and other tasks got in the way.
With a little luck, I'll start reinstalling the carb tonight. I have to go through the bench adjustments first.
Last night, I scored a sweet glass moonroof from greddyii (thanks, sir!) that is solid shape; the hinges and bolt caps need a little love, but it looks great on the car. Required 3 hours of rush-hour driving to pick it up, but worth it. I've wanted one of these ever since I bought the car.
Eventually I'll need to make a pair of roof storage bags; one for use in the car (for topless days), and one for the spare roof. Mine will include hanging grommets for easy garage storage, & web-strap reinforcements.
Thread Starter
Joined: Jun 2008
Posts: 8,376
Likes: 28
From: Chino Hills, CA
Days 125 through 131
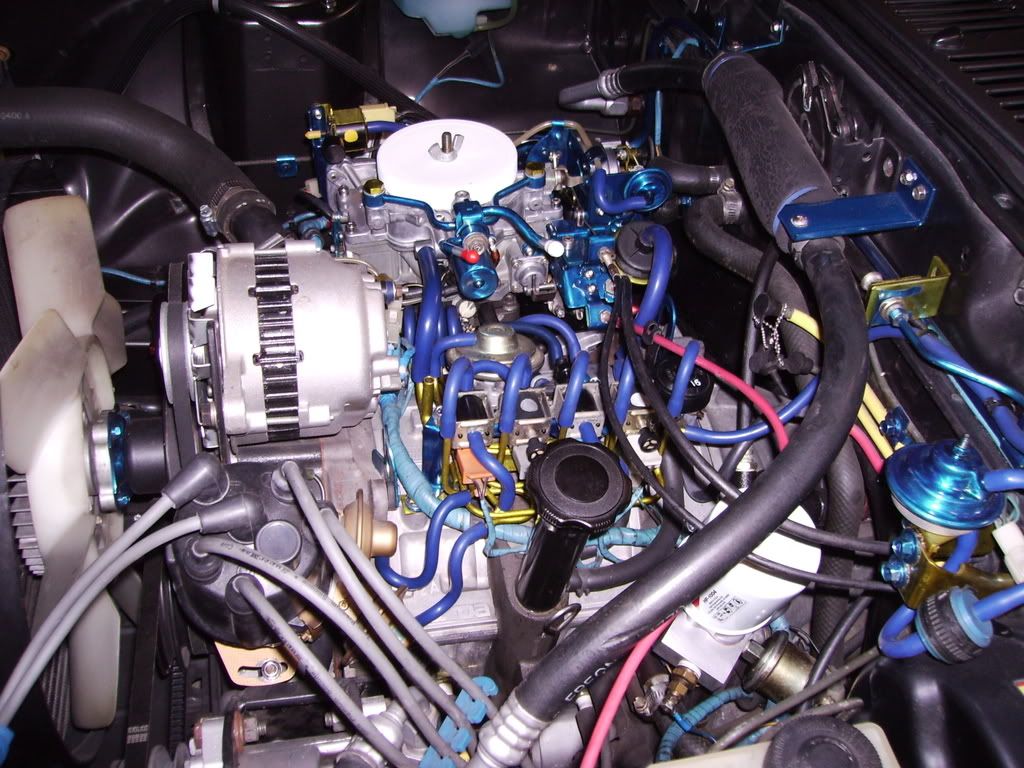
Well, after losing an entire week due to fires, evacuations, and the aftermath, I finally got the chance last night and tonight to get the bench adjustments done on the carb, and get it reinstalled.
I also reinstalled my smog pump, air control valve, related plumbing, and all cabling and hoses with the exception of the fuel lines: I need some new fuel hose as the old ones seem a little dried out.
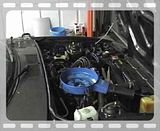
Pictures:
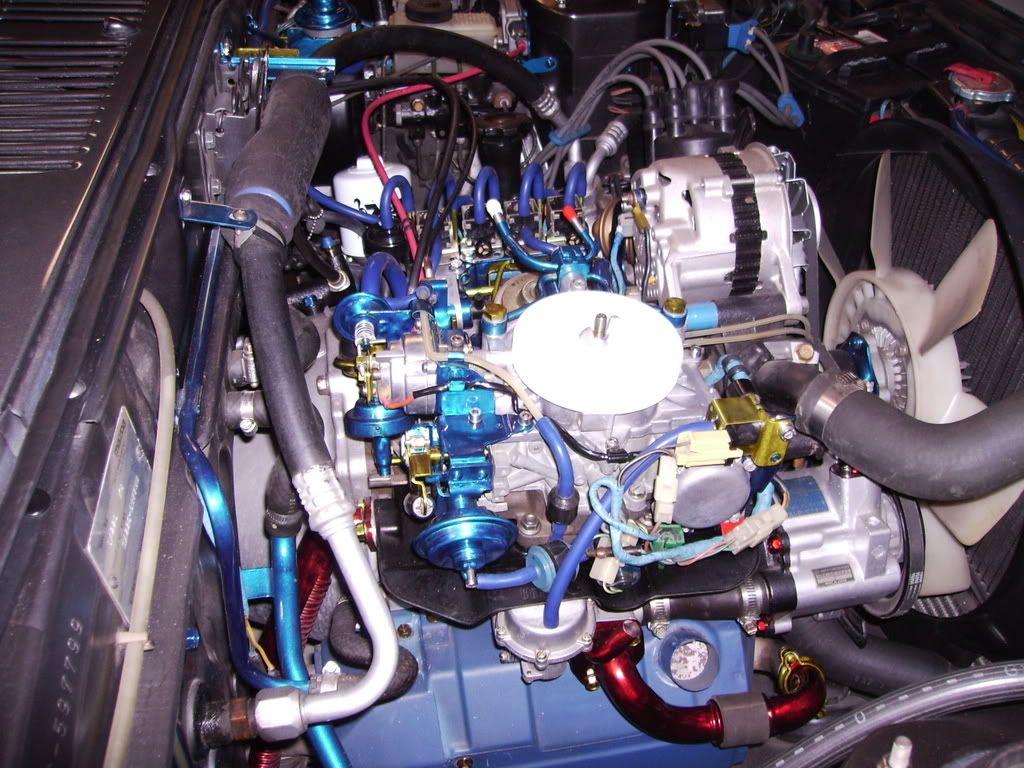


I have some nice,shiny stainless steel nuts I was going to use to mount the carb, but thought better of it at the last minute. Stainless steel is non-magnetic, and considering the way that left rear carb nut goes in, it would be foolish to use a nut that cannot be retrieved with a magnetic probe.
Next up, ignition cleanup, new plugs, and fluid swap.
Well, after losing an entire week due to fires, evacuations, and the aftermath, I finally got the chance last night and tonight to get the bench adjustments done on the carb, and get it reinstalled.
I also reinstalled my smog pump, air control valve, related plumbing, and all cabling and hoses with the exception of the fuel lines: I need some new fuel hose as the old ones seem a little dried out.
Pictures:
I have some nice,shiny stainless steel nuts I was going to use to mount the carb, but thought better of it at the last minute. Stainless steel is non-magnetic, and considering the way that left rear carb nut goes in, it would be foolish to use a nut that cannot be retrieved with a magnetic probe.
Next up, ignition cleanup, new plugs, and fluid swap.
Nice work DD-
lots of eye candy in there!
Almost a shame to see so much restorative talent have to go into - gasp - emissions hardware. I am sure your car has - like mine - other more pressing cosmetic needs where this kind of Love would be appreciated too!
Stu Aull
80GS
Alaska
lots of eye candy in there!
Almost a shame to see so much restorative talent have to go into - gasp - emissions hardware. I am sure your car has - like mine - other more pressing cosmetic needs where this kind of Love would be appreciated too!
Stu Aull
80GS
Alaska
Thread Starter
Joined: Jun 2008
Posts: 8,376
Likes: 28
From: Chino Hills, CA
Days 132 through 143
(Thanks for the compliments, guys!)
Had family in town for Thanksgiving, so tonight was the first chance to work in the car in the last 10 days or so.
Changed out the plugs (the old ones are dirty but may be salvageable).
Whoosh test = 6 (no doubts there, the engine build only has about 3k miles on it)
Changed the oil (freash load of Castrol 20w50 from a case bought a number of years ago.) Old oil had no hints of antifreeze in it , which is real reassuring for a car that sat as long as this one did.
List of things left to do:
Essential:
Pump out remaining old fuel & get a couple gallons of fresh in the tank.
E-test about a dozen relays
Charge battery back up (sitting since July)
Cycle brakes and clutch about 50 times to make sure all is smooth after repairs
Re-install air cleaner & stock snorkel (skip CAI until after smog test)
Start, test, & tune (yeah, one easy step, hahah)
Pass smog test over Xmas holiday; less than 90 days before registration due.
Register & enjoy!
Cosmetic/minor:
Strip and re-paint hatch latch, & install new RX-7 logo
Troubleshoot electric hatch release intermittent
Clean, touch up, and install rear inside hatch trim
Strip and re-paint air cleaner (maybe) Anodized blue w/ chrome lettering
Discover way to fuse craxed shift **** insert
Couple small inside trim touchups
Wash & wax
Make sunroof storage bags
Thread Starter
Joined: Jun 2008
Posts: 8,376
Likes: 28
From: Chino Hills, CA
Days 143 through 151
Eight days elapsed, one short evening free to work on the car. Sigh. Down with a cold until yesterday.
New fuel lines are in. Return line check valve checks okay, and has been polished to a high gloss.
Air cleaner is back on (though it still needs detailing, perhaps painting) and all lines hooked up, so engine is essentially complete.
Started going thru the emissions relays; haven't found any bad ones so far.
Busy tonight, but Friday night will involve pumping out the tank to get rid of the last of the stale gas, & checking to see if it really needs to be dropped & boiled out. I'd rather not have to if it doesn't need it - - I don't have any easy way to move the tank to a shop for cleanout.
Looks like the stars may line up to go for first restart on Saturday.
Thread Starter
Joined: Jun 2008
Posts: 8,376
Likes: 28
From: Chino Hills, CA
Day 152
Pumped out the tank tonight, with a hand transfer pump, and opened up the tank sender port to check cleanliness.
Amazingly, with an original tank that's never been cleaned, I had virtually no residue. I dragged a q- tip around on the end of telescope probe, and it came out with only the slightest of yellowish residues.
Cool!
Tomorrow, weather and schedule permitting, I'm gonna get a couple gallons of fresh gas in her, and start pre-start checks (fuel leaks, fill the OMP lines, etc).
If the battery is up for it & all looks good, we'll go for "Main Engine Start." Hopefully not too NASAlike.
Wish me luck!


Junior Member
Joined: Jan 2006
Posts: 29
Likes: 0
From: St. Louis, Missouri, USA
Thread Starter
Joined: Jun 2008
Posts: 8,376
Likes: 28
From: Chino Hills, CA
Days 153 and 154
Saturday was supposed to be the "start day..." but the final fuel-level check before hitting the starts showed massive flooding from the front bowl overflowing into the venturis.
I've pulled the air horn off twice so far, but still haven't found anything that would cause it. I've got a couple tests in mind for tomorrow, but at this point I think I may have a bad (new) needle valve seat. I have new spares, but am tempted to swap the needles front to back & try it to see if it floods. But I'm getting tired of taking it apart and putting it together, too.
Good thing I did the helicoil work early on - - I at least don't have to worry about stripping the threads!
dude I wish I had your patience I have a 80 siting in the basement that needs a lot of work done to it but I just cant make my self to get down there and start working on it.
Thread Starter
Joined: Jun 2008
Posts: 8,376
Likes: 28
From: Chino Hills, CA
Days 155 and 156
OK, we're on the brink, now...
Last night, I did some serious mad-scientist testing:
I got out the lower section from my spare carb, and filled both the bowls with gas to just below the bottom edge of the windows. This is about where I've noticed a normal float and needle will leave the gas level, once the air horn is taken off.
Then, I took my air horn assembly, with floats and needles in place, and lowered it into the full bowls. the floats going into the gas raised the fuel levels up near to the top of the windows (mild flood condition.)
Now, under these conditions, both needles should be closed, because the floats are maxxed up well above the normal shutoff line at mid-window.
I took a hand transfer pump, and teed a pressure gauge into the line, then attacched the line to the fuel inlet, and capped the return line.
Setup looks like this:
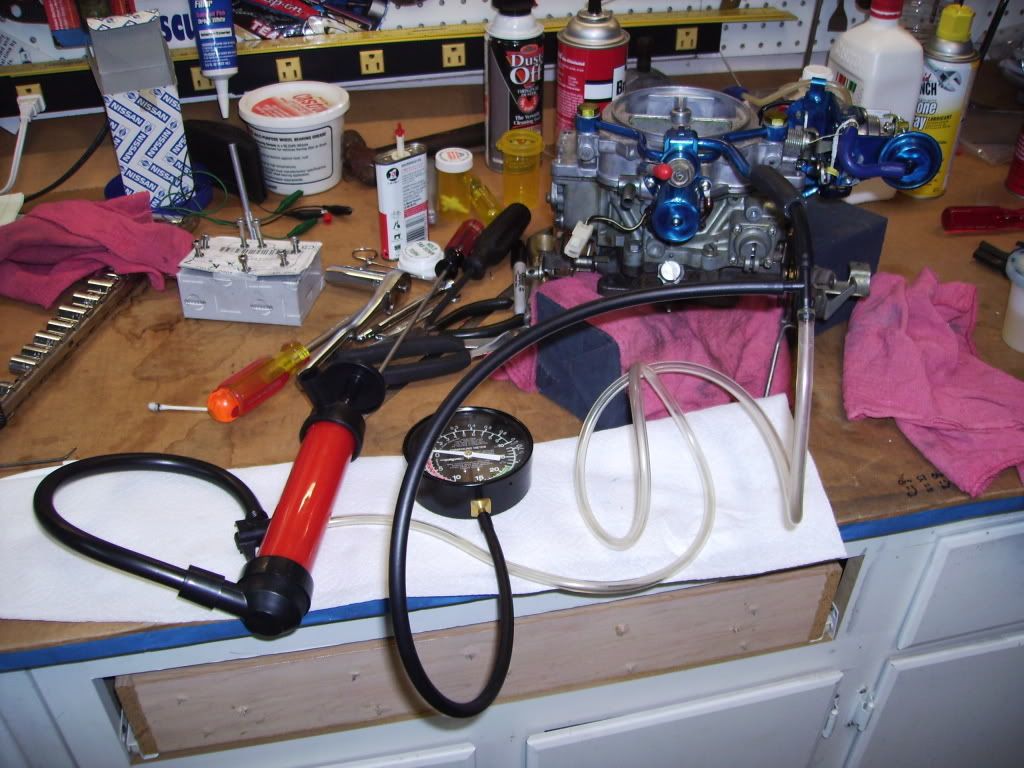
With this setup, I can "simulate" fuel pressure into the fuel inlet by pressing on the pump, and monitor that pressure on the gauge. Any air flow into the carb will make a hiss, and the pressure will drop.
Since both bowls are initially over-filled, I should not get any airflow past the needles unless I'm well above normal fuel pump pressure (which is less than 4 PSI.)
SO, I hit the pump.
Psssssssssss, from the front (leaky) needle, at anything over 2PSI.
Ah hah, culprit confirmed.
To double check, I lower the fuel levels with a syringe (the difference in fuel volume between 'normal' and 'flooded' is only a couple CC) to where the fuel is right on the line, and hit the pump again.
The front needle is hissing continuously (trying to fill the bowl with 'fuel'); the rear needle stays tight til past 6PSI.
To double-check, I swapped the needles and seats, made required float adjustments, and tried it all again.
At mild flood conditions, now the rear valve was hissing. The symptom followed the needle and seat. Solid confirmmation that this is not a float issue.
Just for ***** and giggles, I swapped only the needles, leaving the seats in place.
Suddenly, at normal fuel levels, both valves were holding up to near 6PSI.
So, apparently, I have one needle that doesn't like one seat, but is fine with the other.
Double checked everything, same results. All is now working fine in simulation.
So late last night, I started putting the air horn back on the car. Almost finished when I had to crash (alarm clock at 5am = I don't work too late during the week.)
Tonight, I had promised the wife, we'd get the christmas cards out... so I didn't get to finish the hookup til after 9:30.
Turned on the fuel pump, and closely watch the levels rise... and stop, halfway up the glass, both sides.
No flood. Eureka!
The front bowl is SLIGHTLY high on fuel level; the bottom of the fuel meniscus (I used a science word!) is at the top of the embossed line at the bowl center. The rear bowl is dead-on centered. I don't think the difference is enough to matter; maybe 2mm.
It's too late tonight to go ahead and start up; so I get to sleep and work tomorrow feeling like a kid on Christmas eve... knowing that I can finally give that key the final twist tomorrow night, and hopefully, finally, bring Spry Beastie back from the dead.
Then, tuning begins.
Wish me luck.
OK, we're on the brink, now...
Last night, I did some serious mad-scientist testing:
I got out the lower section from my spare carb, and filled both the bowls with gas to just below the bottom edge of the windows. This is about where I've noticed a normal float and needle will leave the gas level, once the air horn is taken off.
Then, I took my air horn assembly, with floats and needles in place, and lowered it into the full bowls. the floats going into the gas raised the fuel levels up near to the top of the windows (mild flood condition.)
Now, under these conditions, both needles should be closed, because the floats are maxxed up well above the normal shutoff line at mid-window.
I took a hand transfer pump, and teed a pressure gauge into the line, then attacched the line to the fuel inlet, and capped the return line.
Setup looks like this:
With this setup, I can "simulate" fuel pressure into the fuel inlet by pressing on the pump, and monitor that pressure on the gauge. Any air flow into the carb will make a hiss, and the pressure will drop.
Since both bowls are initially over-filled, I should not get any airflow past the needles unless I'm well above normal fuel pump pressure (which is less than 4 PSI.)
SO, I hit the pump.
Psssssssssss, from the front (leaky) needle, at anything over 2PSI.
Ah hah, culprit confirmed.
To double check, I lower the fuel levels with a syringe (the difference in fuel volume between 'normal' and 'flooded' is only a couple CC) to where the fuel is right on the line, and hit the pump again.
The front needle is hissing continuously (trying to fill the bowl with 'fuel'); the rear needle stays tight til past 6PSI.
To double-check, I swapped the needles and seats, made required float adjustments, and tried it all again.
At mild flood conditions, now the rear valve was hissing. The symptom followed the needle and seat. Solid confirmmation that this is not a float issue.
Just for ***** and giggles, I swapped only the needles, leaving the seats in place.
Suddenly, at normal fuel levels, both valves were holding up to near 6PSI.
So, apparently, I have one needle that doesn't like one seat, but is fine with the other.
Double checked everything, same results. All is now working fine in simulation.
So late last night, I started putting the air horn back on the car. Almost finished when I had to crash (alarm clock at 5am = I don't work too late during the week.)
Tonight, I had promised the wife, we'd get the christmas cards out... so I didn't get to finish the hookup til after 9:30.
Turned on the fuel pump, and closely watch the levels rise... and stop, halfway up the glass, both sides.
No flood. Eureka!
The front bowl is SLIGHTLY high on fuel level; the bottom of the fuel meniscus (I used a science word!) is at the top of the embossed line at the bowl center. The rear bowl is dead-on centered. I don't think the difference is enough to matter; maybe 2mm.
It's too late tonight to go ahead and start up; so I get to sleep and work tomorrow feeling like a kid on Christmas eve... knowing that I can finally give that key the final twist tomorrow night, and hopefully, finally, bring Spry Beastie back from the dead.
Then, tuning begins.
Wish me luck.
Thread Starter
Joined: Jun 2008
Posts: 8,376
Likes: 28
From: Chino Hills, CA
DAY 157
Houston, We Have Main Engine Start!
(Film at 11...)
With less than 3 seconds cranking, Spry Beastie drew her first breaths in over a year, and fired up beautifully.
A good bit of smoke from the fuel flooding she got the last couple of days, and she's off.
Came down off choke on her own, to a somewhat fast idle (900 RPMs), which I'd expect, as the mix screws are at the factory-start position, and she's untuned. Timing on the lead looked a degree or two early, too, but I need to check it properly, with the advances capped, etc. That's a job for the next couple nights, and/or the weekend.
Sadly, it is bucketing rain here tonight, so I can't take my victory lap just yet, but that too will come soon enough.
But she lives!
Now, to get her tuned, and out of smog prison.
Thread Starter
Joined: Jun 2008
Posts: 8,376
Likes: 28
From: Chino Hills, CA
The video of the deed:
Short version (30 sec, start ony):

Long version (3 mins, start, warmup, exhaust, walkaround, Drop to idle, some revs up to 4k)
I've got some tuning to do, and I still think that front float level is a bit high, but damn, it's good to have it running!
Short version (30 sec, start ony):
Long version (3 mins, start, warmup, exhaust, walkaround, Drop to idle, some revs up to 4k)
I've got some tuning to do, and I still think that front float level is a bit high, but damn, it's good to have it running!
Thread Starter
Joined: Jun 2008
Posts: 8,376
Likes: 28
From: Chino Hills, CA
Day 160
First Drive around the neighborhood... I forgot how much fun that was! Sneaked out for some gas, too. Hot start with foot off gas = no problem.
Some issues with tuning the idle being discussed in another thread (following the tuning procedure seems to make for a stinkier exhaust, which just ain't right) but by and large, running pretty well.
More tweaking tomorrrow, and working thru the emissions tests. Might be ready for the probulator by early next week.
Thanks for the applause, gents... it is SO nice to be back among the ranks of the rotards!
Last edited by DivinDriver; Dec 20, 2008 at 07:43 PM.