
Spic Racer GT40R

Thread Starter


Joined: Mar 2002
Posts: 1,621
Likes: 505
From: The Elysian Fields (Texas)
It's like deja vu all over again!
Rebuild parts are starting to come together... 2mm Mandeville balanced and clearanced rotors. Only 9 grams difference when the Mazda Motorsports listed Maximun Rotor Unbalance is 50 grams. I thought the weight/location stamps were also a very nice touch. Enjoy!
Last edited by Gen2n3; Dec 31, 2020 at 06:15 PM.


Thread Starter
Joined: Mar 2002
Posts: 1,621
Likes: 505
From: The Elysian Fields (Texas)
Rebuilding dual master cylinders (AP Racing CP2623)
I know there are a few other lucky FD owners with Mark Valskis' uber-cool dual AP Racing master cylinder setup (hi Sean  ), so figured I share my recent travials.
While trying to bleed the brakes, I noticed neither of the front passenger in or outer bleeders were flowing normally. Both sides of the rear calipers were bleeding normally. So after a little troubleshooting I noticed that the front master cylinder (MC) was not fully stroking, and that it's resevoir had a cystalline-like residue at the bottom of the resevoir. I assumed whatever it was had made it into the master cylinder and was interfereing with proper operation. So out came the whole assembley.
I ordered from Essex Parts a pair of the rebuild kits (AP p/n CP2623-90RK; Essex p/n 08 05 301) for both 5/8" MC's . The kits were very inexpensive and came within two days. So, out came the entire MC cage and and individual MCs.
The rebuilds only took about hour to do both; most of that time was spent figuring out how to get the piston out. Here's a hint: push it in and let it pop out.
Anyways, when I dissassembled the first MC, the piston came out covered in the same cyrstalline substance that was in the resevoir. Worse yet, the residue had worked its way into and clogged the tiny feed ports. At least the root cause was now obvious. Rebuilt the MC and problem solved.
I've shared a few pictures below:
The Repair Kit components are pictured below between the Repair Kit plaquard and instruction. Also in that picture are all of the individual components are arranged in sequence below the MC. If you look closely at the piston on the bottom(below the sping), you can see the two (replaceable) seals on either side of the piston. Those are the two black seals that come in the Repair Kit.
I've also included a picture of the individual bore size stamp on the back for reference in case size if ever in question. As they come from the factory, the individual sizes are also indicated by a color-coded ziptie around all MC bodies:
Only real question I have left would be what cause that residue in the resevoir and what was it exactly? Any ideas?
), so figured I share my recent travials.While trying to bleed the brakes, I noticed neither of the front passenger in or outer bleeders were flowing normally. Both sides of the rear calipers were bleeding normally. So after a little troubleshooting I noticed that the front master cylinder (MC) was not fully stroking, and that it's resevoir had a cystalline-like residue at the bottom of the resevoir. I assumed whatever it was had made it into the master cylinder and was interfereing with proper operation. So out came the whole assembley.
I ordered from Essex Parts a pair of the rebuild kits (AP p/n CP2623-90RK; Essex p/n 08 05 301) for both 5/8" MC's . The kits were very inexpensive and came within two days. So, out came the entire MC cage and and individual MCs.
The rebuilds only took about hour to do both; most of that time was spent figuring out how to get the piston out. Here's a hint: push it in and let it pop out.
Anyways, when I dissassembled the first MC, the piston came out covered in the same cyrstalline substance that was in the resevoir. Worse yet, the residue had worked its way into and clogged the tiny feed ports. At least the root cause was now obvious. Rebuilt the MC and problem solved.
I've shared a few pictures below:
The Repair Kit components are pictured below between the Repair Kit plaquard and instruction. Also in that picture are all of the individual components are arranged in sequence below the MC. If you look closely at the piston on the bottom(below the sping), you can see the two (replaceable) seals on either side of the piston. Those are the two black seals that come in the Repair Kit.
I've also included a picture of the individual bore size stamp on the back for reference in case size if ever in question. As they come from the factory, the individual sizes are also indicated by a color-coded ziptie around all MC bodies:
- Color - Bore Size
- Black - 15.9mm (5/8")
- Blue - 17.8mm (0.70")
- Green - 19.1mm (3/4")
- Orange - 20.6mm (13/16")
- Red - 22.2mm (7/8")
- White - 23.8mm (15/16")
- Yellow - 25.4mm (1.0")
Only real question I have left would be what cause that residue in the resevoir and what was it exactly? Any ideas?
Last edited by Gen2n3; Dec 31, 2020 at 06:15 PM.
Thread Starter
Joined: Mar 2002
Posts: 1,621
Likes: 505
From: The Elysian Fields (Texas)
Truth be told, that Motul that was orginally in there was about 4-5 years old - about the time the car had been down. However, the lids on the AP resevoirs have a diaphram to preclude water from getting in, so I assume it wasn't a cas for the absorded water craeting the precipitate. Of course, we all know what happens when we assume.
Thread Starter
Joined: Mar 2002
Posts: 1,621
Likes: 505
From: The Elysian Fields (Texas)
vers 4.0
... and out the other side pops out a new "keg."
Basics include:
- IRP intake (Street Ports) and exhaust ports
- Mandeville balanced assemblies
- Mazda 2-piece 2mm seals
- Mazda Comp oil control springs
- and the usual littany of new seals, oil mods, blah, blah, blah.
BTW, the GZ/Xcessive created a HUGE pain in the **** due to compressor housing cover and oil filler pipe interferences as well as requiring lengthening some of the fuel hoses. Suspect there will be more when the engine is in and the IC piping has to be adjusted.
Last edited by Gen2n3; Dec 31, 2020 at 06:15 PM.
Thread Starter
Joined: Mar 2002
Posts: 1,621
Likes: 505
From: The Elysian Fields (Texas)
Other than the sticking side seal on the front rotor, I'm pretty darn happy with the initial compression test. After only about 20 minutes of idle:
I gave lots of thought to tearing back in to the engine to fix the imperfection, but decided against it since the rotor face in question is well within Mazda specs for absolute compression and differential compression.
I'm planning to go ahead with the dyno in anticipation that the stress will help work out the sea side. Sure would appreciate any feedback from those who have had similar post-build issues.
- Front rotor chambers are 105/120/121
- Rear chambers are all at ~129 psi
I gave lots of thought to tearing back in to the engine to fix the imperfection, but decided against it since the rotor face in question is well within Mazda specs for absolute compression and differential compression.
I'm planning to go ahead with the dyno in anticipation that the stress will help work out the sea side. Sure would appreciate any feedback from those who have had similar post-build issues.
Last edited by Gen2n3; Dec 31, 2020 at 06:15 PM.
I didn't rebuild mine myself but I did find that my motor increased compression after some break-in. I'd definitely let it run without much stress for a while if you can, your sticking seal will likely loosen itself up.
My story: I ran it probably about 200 miles before I tried to take it in for emissions testing. Didn't pass and I freaked out a bit cause it was a new motor. I then talked to a rotary mechanic and he said that everything probably wasn't seated yet. I handed him the keys and let him do some break in. Couple days later and it passed as one of the cleanest FD's he said he'd ever seen, no other changes. I'm a firm believer in more break-in time vs less.
Can't wait to see the car in action though.
Thread Starter
Joined: Mar 2002
Posts: 1,621
Likes: 505
From: The Elysian Fields (Texas)
Thanks for the encouraging words Gents. My conviction to run it as is has only grow since the post above. Just waiting on my new shoes to come in so I can get it on the trailer and out to the dyno now.
Toroids: Thanks for the insight. Agree that more break-in is mostly better. I'll try to make one of the next couple of Friday events. My time is growing short here since I'm transferring mid-July. Hope we can cross paths then and maybe even bring the car.
BTW, my garage now smells like a throng of drunken sailors pukes in it.... gotta love E85!
Thread Starter
Joined: Mar 2002
Posts: 1,621
Likes: 505
From: The Elysian Fields (Texas)
13B-REW vers 4.1
In an effort to keep up my motivation, I took a couple of pics of the the "vers 4.1"engine installed...
Last edited by Gen2n3; Dec 31, 2020 at 06:15 PM.
Nothing to see here.
Joined: May 2001
Posts: 1,255
Likes: 1
From: Jacksonville, FL
Thread Starter
Joined: Mar 2002
Posts: 1,621
Likes: 505
From: The Elysian Fields (Texas)
Rxse7en: Though traditionally it's Guinness and Bass Ale, I'm glad you still got the Black & (modified) Tan motif... Cheers!! 
Crispy: Thanks, but it's still not as clean as these inbound goodies...
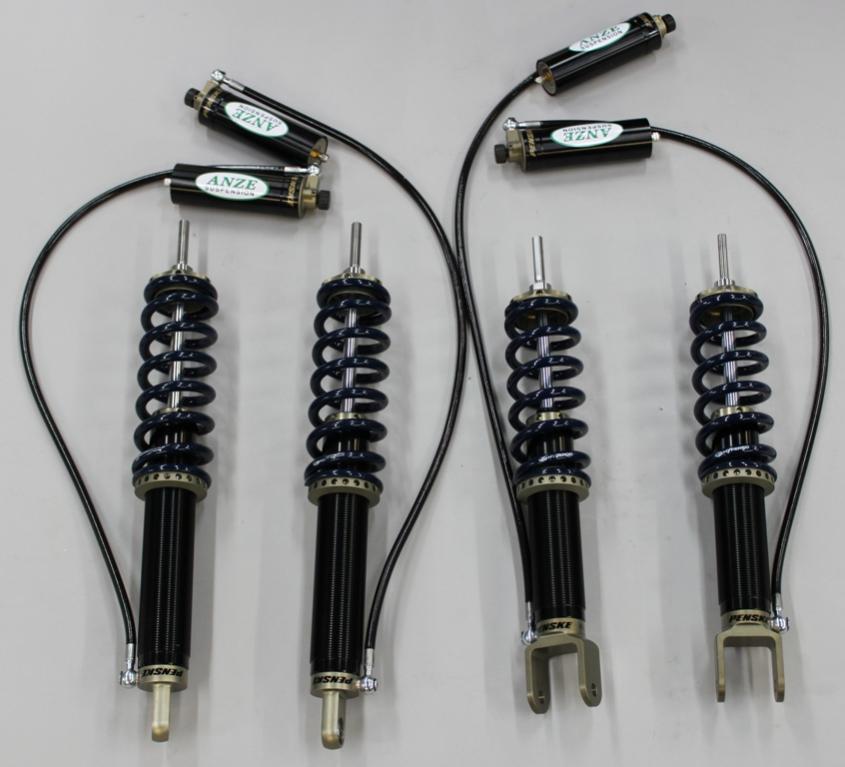
ANZE engineered Penske 8300 coilovers
Crispy: Thanks, but it's still not as clean as these inbound goodies...
ANZE engineered Penske 8300 coilovers
haha... very nice Carlos. Didn't mean to rain on the parade the other day. Just curious what you were going with and what you thought of them. I picked up some 8665's. Are these double adjustable dual bleed? What spring rates did you go with? Shock top mounts?
You should try to make it out to VIR at the end of July. Would love to see this thing!
You should try to make it out to VIR at the end of July. Would love to see this thing!
Thread Starter
Joined: Mar 2002
Posts: 1,621
Likes: 505
From: The Elysian Fields (Texas)
haha... very nice Carlos. Didn't mean to rain on the parade the other day. Just curious what you were going with and what you thought of them. I picked up some 8665's. Are these double adjustable dual bleed? What spring rates did you go with? Shock top mounts?
You should try to make it out to VIR at the end of July. Would love to see this thing!
You should try to make it out to VIR at the end of July. Would love to see this thing!
As for VIR, between needing to get the engine retuned and our family moving , I unfortunately don't expect to get out on track until August. Hopefully we can paths then as I would love to see your kindred CYM in person.
Nice choice in upper mounts 

Bummer about VIR. July will prob. be my last time at VIR for a while. I'm also in the process of PCSing. Heading to TX. Look forward to seeing some in car video's of the car when you are able to get it on track.
Bummer about VIR. July will prob. be my last time at VIR for a while. I'm also in the process of PCSing. Heading to TX. Look forward to seeing some in car video's of the car when you are able to get it on track.
Thread Starter
Joined: Mar 2002
Posts: 1,621
Likes: 505
From: The Elysian Fields (Texas)
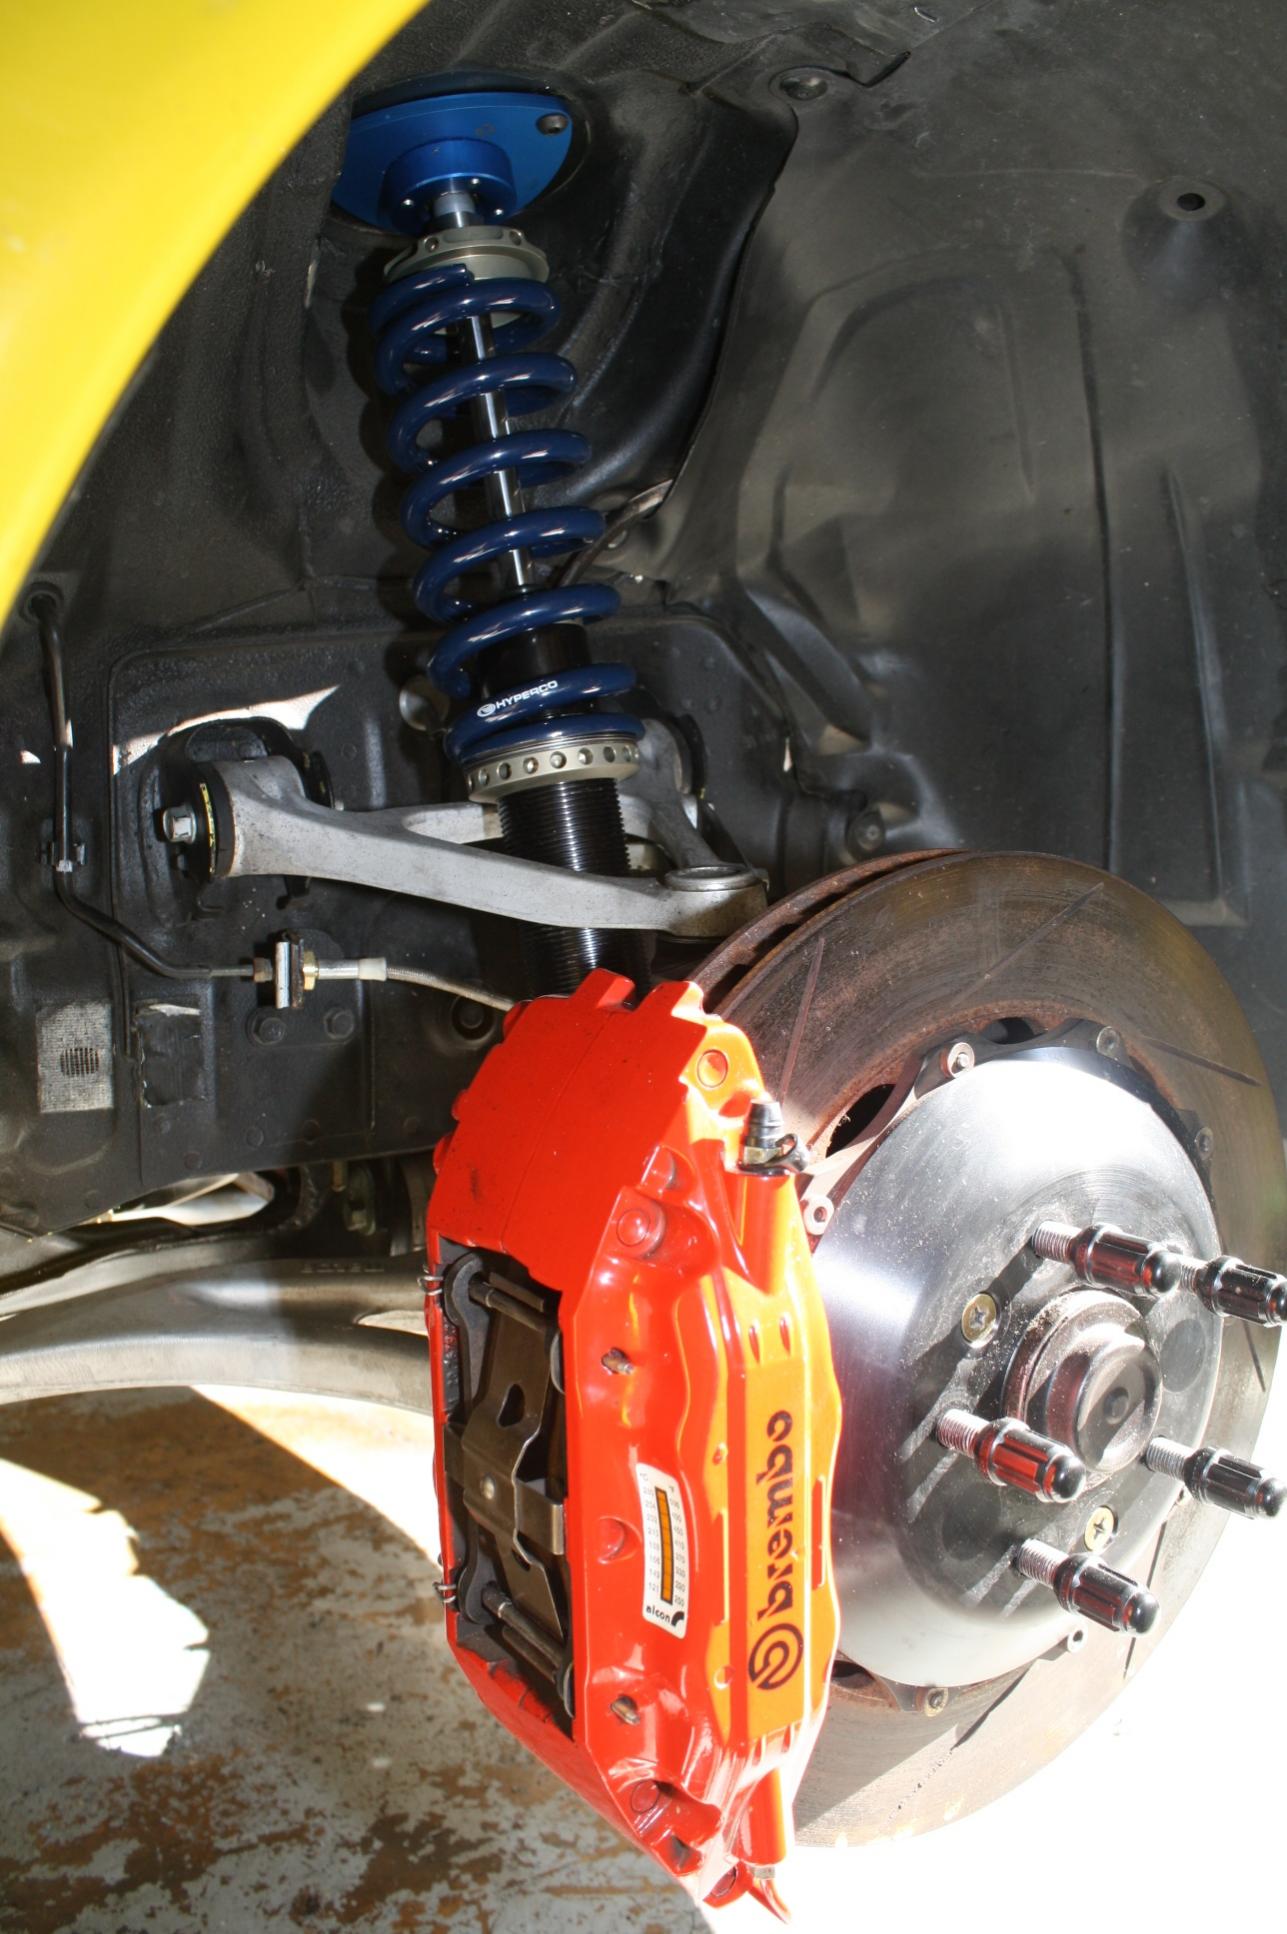
Got the new legs installed. Starting with 800F/700R. Hope to have the canisters installed in the next day or so.
Sorry about the over-sized pics!
FRONT COILOVER
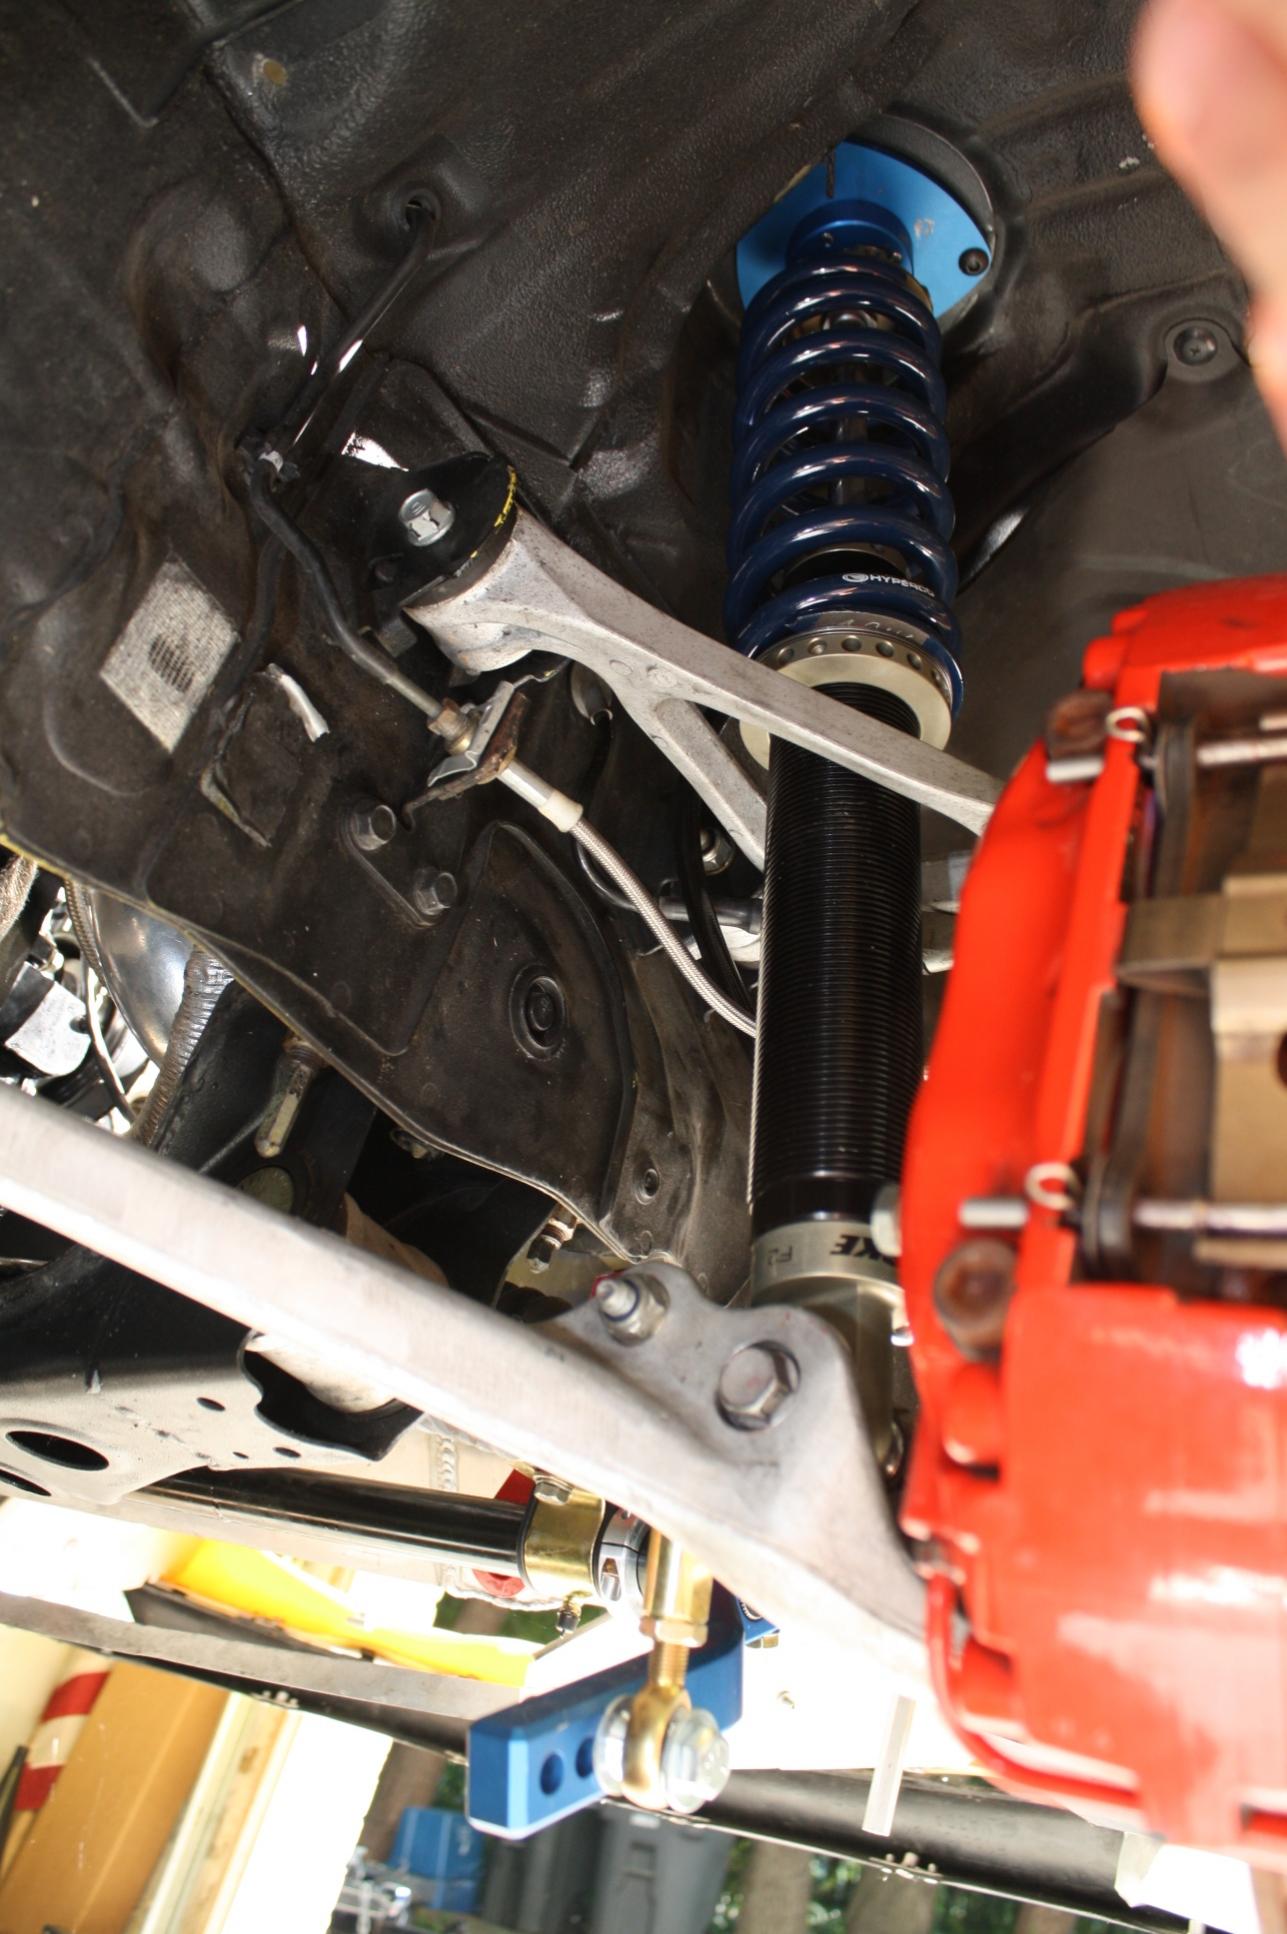
REAR COILOVER


Sorry about the over-sized pics!
FRONT COILOVER
REAR COILOVER
Carlos,
Looks good! Question: in the rear would it have been better to mount the dampers with the canister line on the forward side to avoid any potential interference problems with the sway bar end link? For your consideration.
Crispy
- so jealous
Looks good! Question: in the rear would it have been better to mount the dampers with the canister line on the forward side to avoid any potential interference problems with the sway bar end link? For your consideration.
Crispy
- so jealous
Nothing to see here.
Joined: May 2001
Posts: 1,255
Likes: 1
From: Jacksonville, FL
I'm guessing your kids are going to community college after this build?  Beautiful stuff. I'm putting together the meet here in Jax on July 9th if you find that you need to break in the engine in a day or two.
Beautiful stuff. I'm putting together the meet here in Jax on July 9th if you find that you need to break in the engine in a day or two.
Thread Starter
Joined: Mar 2002
Posts: 1,621
Likes: 505
From: The Elysian Fields (Texas)
Peter: Ya, hat's off to you and your PKBP�... worked out like a champ! Appreciate all of other installation insight as well.
Crispy: Nice catch... as always! Though the picture does not clearly show it, the fittings are clear of any interference (i.e. the swaybar and linkage.) It's definitely tight, but after jacking the suspension through full range, it does not have rub anywhere. Orienting it so that the fitting is facing forward brings issues with clearing the canister line of the the coilover/springs. For now, I'm going to run it as is and validate the lack of interference in a few miles. Other than re-jacking the car, it won't take any additional time to do it later.... I say in foolish optimism!
Brian: Community College?!? Are you kidding... I'm thinking more like truck drivin school for the kid! Anyways, it should would be cool if I could make it down for the meet, but with the pending move I'm not doing much other than packing and a little wrenchin when the opportunity arises. However, please send my best to all of the Jax rotorheads.
Thread Starter
Joined: Mar 2002
Posts: 1,621
Likes: 505
From: The Elysian Fields (Texas)
Remote canister mounts
I'd like to thank Angelo and Andrew over at ANZE Suspension again for the exceptional purchase process. Their impressive service focus and bespoke engineering created one of those rare "WOW!" experiences.
Also thanks to prodding by trusted track cohorts (i.e. Crispy and Peter), I went ahead and reoriented the rear coilovers with the hose banjo facing forward to preclude any interference with swaybar links. Thankfully it was disarmingly easy to do, especially give the imparted peace of mind. THANKS guys for the reality check!!!
Finally, the canisters are mounted:
Front Canisters
 s
s

Rear Canisters


Also thanks to prodding by trusted track cohorts (i.e. Crispy and Peter), I went ahead and reoriented the rear coilovers with the hose banjo facing forward to preclude any interference with swaybar links. Thankfully it was disarmingly easy to do, especially give the imparted peace of mind. THANKS guys for the reality check!!!
Finally, the canisters are mounted:
Front Canisters
Rear Canisters
Last edited by Gen2n3; Dec 31, 2020 at 06:15 PM.