
totally pointless fuse box relocation

totally pointless fuse box relocation
Currently I have the engine out of the car for numerous reasons (it's not blown  ), while the engine was out I figured I'd relocate the battery to the passenger bin. Okay thats no problem. I found a nifty battery box to hold the odysee battery (pics below).
Since I really didn't want to leave the fuse box that attaches to the battery just hanging there, I decided to move that as well. Obvously this is a totally pointless mod, and is totally unnecessary. With the assitance of Charlie (stokedxiv), we pulled the bins out in about twenty minutes and got to work.
The battery box I ordered only covered 3 of the 4 sides of the battery. The bin needed to be cut out in order to hold the battery flush. But this left one side of the battery un-supported, so I had to fabricate a backing plate to keep the battery from falling through.
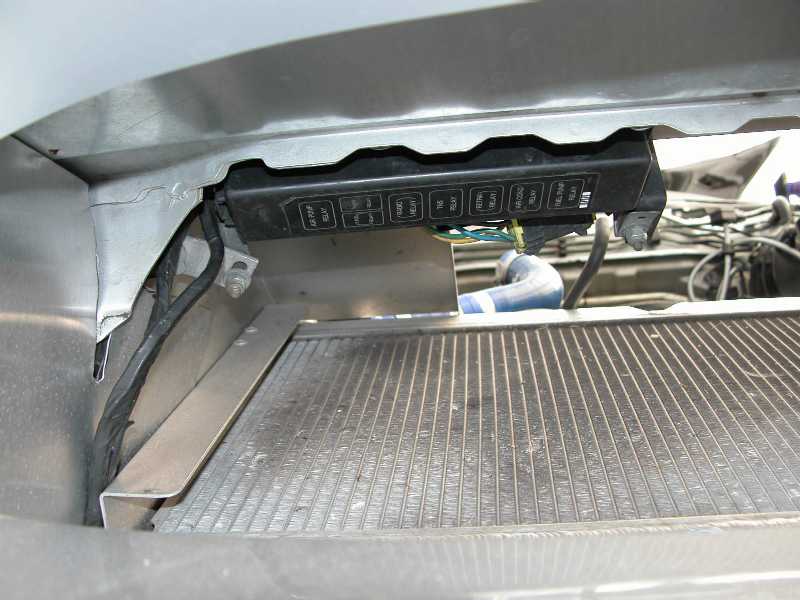
Once the battery was mounted securely I was able to test fit the fuse boxes on either side. Suprisingly the fit pretty much perfectly. The battery fuse box will be held to the battery via a bolt. For the other fuse box i used the factory mounting tab, and fabricated a custom bracket to bolt it to the bin.
The last thing that was mounted in the bin was the headlight relay. Charlie just cut a little aluminum bracket to hold it to the bin. It came out nice if you ask me.
I'm going to put the bin back in the car in the next few days and run the cables to the engine bay through the firewall. I'll be sure to post more pictures once it's all completed. Here is what i have so far....


since I'm not a welder, and JB weld does a good job...thats what I used Call it ghetto, call it what you want...it worked


I'll have to snap a better picture of the mounting tab for the fuse box later


), while the engine was out I figured I'd relocate the battery to the passenger bin. Okay thats no problem. I found a nifty battery box to hold the odysee battery (pics below). Since I really didn't want to leave the fuse box that attaches to the battery just hanging there, I decided to move that as well. Obvously this is a totally pointless mod, and is totally unnecessary. With the assitance of Charlie (stokedxiv), we pulled the bins out in about twenty minutes and got to work.
The battery box I ordered only covered 3 of the 4 sides of the battery. The bin needed to be cut out in order to hold the battery flush. But this left one side of the battery un-supported, so I had to fabricate a backing plate to keep the battery from falling through.
Once the battery was mounted securely I was able to test fit the fuse boxes on either side. Suprisingly the fit pretty much perfectly. The battery fuse box will be held to the battery via a bolt. For the other fuse box i used the factory mounting tab, and fabricated a custom bracket to bolt it to the bin.
The last thing that was mounted in the bin was the headlight relay. Charlie just cut a little aluminum bracket to hold it to the bin. It came out nice if you ask me.
I'm going to put the bin back in the car in the next few days and run the cables to the engine bay through the firewall. I'll be sure to post more pictures once it's all completed. Here is what i have so far....
since I'm not a welder, and JB weld does a good job...thats what I used
Call it ghetto, call it what you want...it workedI'll have to snap a better picture of the mounting tab for the fuse box later
Last edited by Scrub; Apr 11, 2005 at 11:33 PM.


Rotary Enthusiast
Joined: Jun 2004
Posts: 1,457
Likes: 0
From: Gallatin, TN
That's badass man!! Personally, I don't really like cutting/hacking away any parts on my car, but with how that turned out, I just might consider doing that myself!! Good job man!
-Alex
Good job man!-Alex

Trending Topics

Yup, Charlies car will be next for this totally useless mod...well the battery relocation has a small advantage.
Coolduke, I actually am all done with soldering! instead of soldering the joints in the engine bay I will be using raychem splices. The splices I am using are heat shrinkable and they also have a plastic liner that melts and seals the splice from water, oil, and everything else. Personally I feel this route is much better then soldering and heat shrinking when you have a joint that would be open to the elements.
Coolduke, I actually am all done with soldering! instead of soldering the joints in the engine bay I will be using raychem splices. The splices I am using are heat shrinkable and they also have a plastic liner that melts and seals the splice from water, oil, and everything else. Personally I feel this route is much better then soldering and heat shrinking when you have a joint that would be open to the elements.


development
Joined: Aug 2002
Posts: 5,714
Likes: 7
From: Lafayette, LA
Nice looking work! How easy does the battery come out if you need to replace it? A circuit breaker would be a nice add on...so when you put the motor back in, you can kill electrical power with one button.
VVThat's meVV
Joined: Oct 2003
Posts: 610
Likes: 0
From: Austin, TX
So you ran wireing all the back to the stock locations? Overall, how long did the whole thing take? I might do this when I go ls1 (:flamesuitactivated: ) to make the engine bay have more room for things like a big twin turbo kit....
Man that is a LOT of extra wiring to run back to the bins. I'd like to see the wiring, how'd you get it through the firewall and run it through the passenger compartment.
I hope you did a good job with the wiring, that is generally where these type of projects end up causing problems over the long run.
I hope you did a good job with the wiring, that is generally where these type of projects end up causing problems over the long run.
Originally Posted by Klar
So you ran wireing all the back to the stock locations? Overall, how long did the whole thing take? I might do this when I go ls1 (:flamesuitactivated: ) to make the engine bay have more room for things like a big twin turbo kit....
Charlie
Originally Posted by turbojeff
Man that is a LOT of extra wiring to run back to the bins. I'd like to see the wiring, how'd you get it through the firewall and run it through the passenger compartment.
Charlie
Originally Posted by KINETIK_FD3S
looks clean, you should put the front relay box and fan relays in the bins too.
Nice looking work! How easy does the battery come out if you need to replace it? A circuit breaker would be a nice add on...so when you put the motor back in, you can kill electrical power with one button.
Originally Posted by turbojeff
Man that is a LOT of extra wiring to run back to the bins. I'd like to see the wiring, how'd you get it through the firewall and run it through the passenger compartment.
I hope you did a good job with the wiring, that is generally where these type of projects end up causing problems over the long run.
I hope you did a good job with the wiring, that is generally where these type of projects end up causing problems over the long run.
I'll put together a list of all the supplies I used as well, if anyone is interested. As of right now I do not have any engine bay shots since the engine is out, and the wiring is not completed. I'll post some before and after pics once everything is back in.
Last edited by Scrub; Apr 12, 2005 at 12:43 PM.
Senior Member
Joined: Dec 2003
Posts: 299
Likes: 0
From: Delaware
Dan,
Looks good dude! I can't wait to see the finished product, your engine bay will look very clean (and no, you don't need to have your engine bay repainted you idiot!).
However, I promise you that I will win the competition for the emptiest engine bay
Infact, I'm gonna need you to either show me how or help me do it with my 240 eventually!
Can't wait to see that beast back on the roads....I haven't ridden shotty in a long time....way too long
-Adam
Rotary Enthusiast
Joined: Jun 2004
Posts: 1,457
Likes: 0
From: Gallatin, TN
Originally Posted by Scrub
actually that relay box is mounted upside down and hidden due to the V-mount, so you can't see it anyway. Eventually I plan on moving the fan relays, but right now I just want to get my car back on the road so I can enjoy this beautiful weather.
-Alex
Originally Posted by TT_Rex_7
Could you take a picture of that?! I'm just about finished with my own v-mount, and can't figure out what the hell to do with the relay box!
-Alex
-Alex
The ducting is Charlies handy work
Last edited by Scrub; Apr 12, 2005 at 04:32 PM.
Dan, very VERY nice. Really. Awesome job.
Yes, I can def. vouch for that. I can't even BEGIN to mention the great pains Dan went to to get my wiring right. All I know is, I don't think I've ever worked on a car for that long at one time. Wow. 
Originally Posted by Scrub
I like to think I did a good job on the wiring, I usually don't half *** things...just not my style.
update!
Well all I have to do now is put the bins in and route the wires. I'll probably tackle that tomorrow. Here are some updated pictures for everyone to see, isn't it wonderful?