
totally pointless fuse box relocation

Originally Posted by XSTransAm
maybe im just unlucky then?
Senior Member
Joined: Aug 2002
Posts: 587
Likes: 0
From: DC
Very cool work! Wish I had that kind of energy and patience.
Seems like it would introduce alot of electrical gremlins though, since instead of having a large amount of current flowing through the lower gauge wire, you now have lower current traveling longer distances to its final destination. Plus, I'd hate to be the one to debug a problem should one of those wires get nicked and short along its path to the front...
Seems like it would introduce alot of electrical gremlins though, since instead of having a large amount of current flowing through the lower gauge wire, you now have lower current traveling longer distances to its final destination. Plus, I'd hate to be the one to debug a problem should one of those wires get nicked and short along its path to the front...

Originally Posted by jayk
Very cool work! Wish I had that kind of energy and patience.
I'd hate to be the one to debug a problem should one of those wires get nicked and short along its path to the front...
I'd hate to be the one to debug a problem should one of those wires get nicked and short along its path to the front...
I wanta be with the BUC!
Joined: Jan 2003
Posts: 2,305
Likes: 0
From: Knoxville, TN
you're an idiot - stop posting ignorant remarks about things you have zero knowledge.
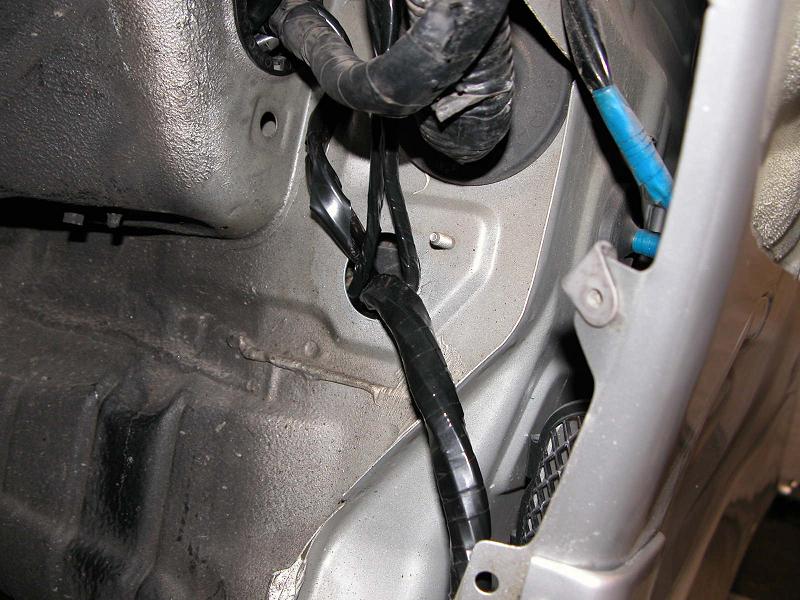
you can't even see where he extended the wires for the fuse boxes, it's all nicely tucked under the driver side front fender. Also there is a large grommet hole behind the fuse box by the hood release that you can route all the wire through. Dan will post pictures later, but he did not drill a single hole in the firewall.
you can't even see where he extended the wires for the fuse boxes, it's all nicely tucked under the driver side front fender. Also there is a large grommet hole behind the fuse box by the hood release that you can route all the wire through. Dan will post pictures later, but he did not drill a single hole in the firewall.
And your a ******* dirty **** rag.... but hey, I was going to leave that in the closet.
There is no picture of the harness, which is all I wanted to see, so shut the fuckup!
Cory man chill out....don't bring that kind of stuff into this thread. I'll post pictures of everything here in a few days. I have all the wires wrapped with loom, or most of them. I have yet to tuck everything up behind the headlight, but it shouldn't bulge out at all. If it does it will be very minimal.
Stokedxiv is right about me not drilling any holes. I ran all the wires through a pre-existing hole in the driver side fire wall, except the starter wire which ran through the shifter boot. I have tested the headlights, blinkers, and pretty much all accessory functions. So far everything seem to work well. I did not leave them on for an extended period of time though. I've had my battery sitting for about a month or more now and it still had 12 volts in it.
I'll post pictures of the track I used to route the wires along with everything else.
VIP - Very Irish Person
Joined: Jan 2002
Posts: 1,458
Likes: 0
From: NC State
Originally Posted by Cory Simpson
And your a ******* dirty **** rag.... but hey, I was going to leave that in the closet.
There is no picture of the harness, which is all I wanted to see, so shut the fuckup!
There is no picture of the harness, which is all I wanted to see, so shut the fuckup!
Originally Posted by Cory Simpson
And your a ******* dirty **** rag.... but hey, I was going to leave that in the closet.
There is no picture of the harness, which is all I wanted to see, so shut the fuckup!
There is no picture of the harness, which is all I wanted to see, so shut the fuckup!

Update time!
I've finished wrapping all the wires to my satisfaction. It's not very easy to get in behind the wires near the headlight, but I did my best. Anyway I'll let the pictures speak for themselves. In the picture it my look like the loom bulges out, but it really doesn't. I don't think you would notice it if you didn't know to look for it.
Note: I still have to find some sort of gromet and seal for the wires coming through the firewall. I haven't found anything sufficient yet.
Last edited by Scrub; Apr 27, 2005 at 11:28 PM.

Rotary Enthusiast
Joined: Jun 2004
Posts: 1,457
Likes: 0
From: Gallatin, TN
Looking good Scrub!!
I just got started on this yesterday! The only thing I did diffrent was rip up the white plastic peice along the door sill and I ran my wires through it. I also wrapped all the wires in electrical tape like they are in the engine compartment. Only bad part is if something goes wrong, ima have alot of sticky **** all over the place!
-Alex
sounds good Alex, I don't think my wires would fit in that plastic thing. There are just too many. If you can get them all to fit, then more power to ya
Good luck with your relocation
-Dan
Edit: Charlie suggested i post a pic from further away.....HERE!!
Good luck with your relocation
-Dan
Edit: Charlie suggested i post a pic from further away.....HERE!!
Last edited by Scrub; Apr 27, 2005 at 11:57 PM.
Rotary Enthusiast
Joined: Jun 2004
Posts: 1,457
Likes: 0
From: Gallatin, TN
Originally Posted by Scrub
sounds good Alex, I don't think my wires would fit in that plastic thing. There are just too many. If you can get them all to fit, then more power to ya
Good luck with your relocation
-Dan
Good luck with your relocation
-Dan
I got a question though...I can't figure out how you relocated the harness, or where exactly you relocated it to. The only thing I can come up with is that you removed the fender, and placed it in there instead of the engine compartment?! If you have any pictures/comments on how/where you put it, i'd GREATLY appreciate it!!
-Alex
almost done
Joined: Dec 2001
Posts: 1,049
Likes: 0
From: 250 HZ
TT_Rex_7 , instead of electrical tape use Vinyl tape got a link for you.
http://www.eastwood.com/shopping/pro...1&keyword=tape
http://www.eastwood.com/shopping/pro...1&keyword=tape
Kinetik FD3s, I think i have some of that stuff laying around. 3M also makes it I believe. If im not mistaken though, the tape is a lot thicker then regular electrical tape.
Alex,
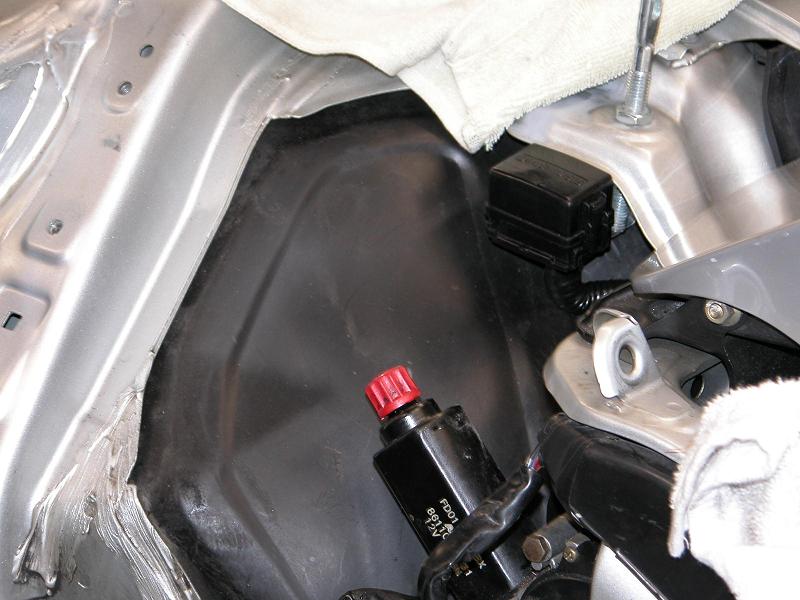
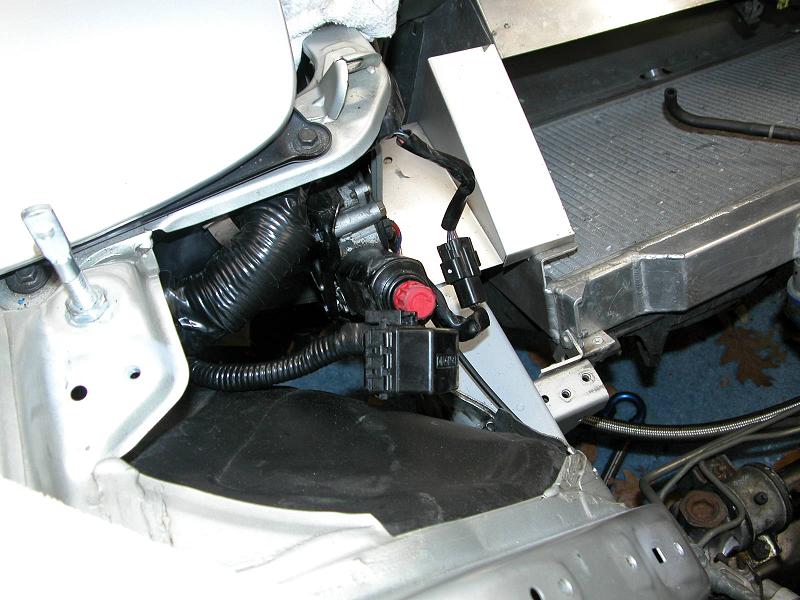
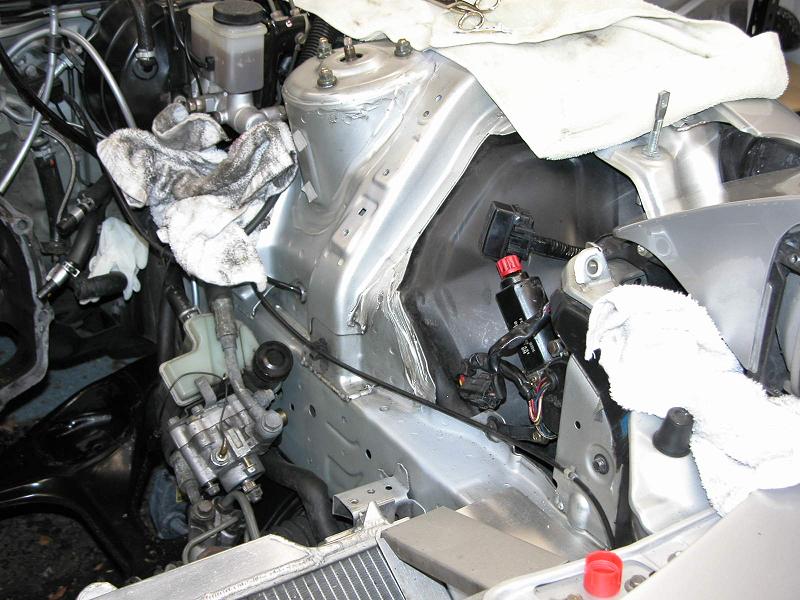
As for the wiring harness. I am guessing you are talking about the driver side engine harness? If you are, I just extended the connecters up under the fender. If you take the fender liner off you will see a frame that runs with the fender. I routed the harness wires through that and pushed the connectors through the hole under the brake booster. I can try to take some pictures of that, but I don't know how well they will come out.
Alex,
As for the wiring harness. I am guessing you are talking about the driver side engine harness? If you are, I just extended the connecters up under the fender. If you take the fender liner off you will see a frame that runs with the fender. I routed the harness wires through that and pushed the connectors through the hole under the brake booster. I can try to take some pictures of that, but I don't know how well they will come out.
Rotary Enthusiast
Joined: Jun 2004
Posts: 1,457
Likes: 0
From: Gallatin, TN
Ok Scrub, i'm about to have a nervous breakdown!! How the HELL did you get the connectors off of the larger relay box?! The one that you have placed next to the negative (-) side of your battery.
-Alex
-Alex
I won't let go


Joined: Aug 2002
Posts: 3,871
Likes: 23
From: Chi -> Maidstone
Very nicely done. I think this is what I'm going to tackle this winter. With the motor out as well, this should make for a pretty easy project, especially following your lead. Who needs bins anyway? 
Railgun, the bins are too small to fit pretty much anything...you're right who needs them?! Now I just need to find a place to store some tools just in case.
Alex,
Don't be so hard on yourself; Scissors will do the job nicely. Actually I cut that box off about 3-6 inches down to allow extra room for error to lengthen the wires.
I put the finishing touches on the bin lastnight, if I had to do it again I wouldn't try to run the alternator and starter wire through the hole I cut in the bottom of the bin. You can't see how the wires come through unless you like jump in the car, but I think the wires would have fed through easier if the hole was in the side next to the rest of the wires. I'll snap a few more pictures and post them when I get a chance. Alex, if you need pictures of anything let me know.
-Dan
Now I just need to find a place to store some tools just in case. Alex,
Don't be so hard on yourself; Scissors will do the job nicely. Actually I cut that box off about 3-6 inches down to allow extra room for error to lengthen the wires.
I put the finishing touches on the bin lastnight, if I had to do it again I wouldn't try to run the alternator and starter wire through the hole I cut in the bottom of the bin. You can't see how the wires come through unless you like jump in the car, but I think the wires would have fed through easier if the hole was in the side next to the rest of the wires. I'll snap a few more pictures and post them when I get a chance. Alex, if you need pictures of anything let me know.
-Dan
How do I made boost?
Joined: Jan 2004
Posts: 155
Likes: 0
From: VA
i think thats the coolest relocation ive ever seen, i never liked the idea of hacking up a bin JUST for the battery but putting all those fuses and relays seems to make more use of the space... someday i'll have to do that myself 
Man, this is just what i needed to see. i'm in the middle of a 20b project and just finished painting my engine bay last night. it looks all spic and span except for those wires and fuse boxes on the drivers side. this relocation just might be the ticket, and i already have most of the car torn apart to do it too! the write up, pictures, and materials list is GREATLY appreciated. see how much better the pass. side looks than the drivers side, that will be remedied with help from you guys!!! Thanks!

Rotary Enthusiast
Joined: Jun 2004
Posts: 1,457
Likes: 0
From: Gallatin, TN
Originally Posted by Scrub
Alex,
Don't be so hard on yourself; Scissors will do the job nicely. Actually I cut that box off about 3-6 inches down to allow extra room for error to lengthen the wires.
-Dan
Don't be so hard on yourself; Scissors will do the job nicely. Actually I cut that box off about 3-6 inches down to allow extra room for error to lengthen the wires.
-Dan
 I was hoping I could solder all the wires outside of the car, wrap them in loom, and tape them. Then all i'd have to do is push the connectors through the hole that's in the firewall from the factory. It would have been easier to keep track of what wire goes to which that way. This would have been alot easier with the motor out of the car!
 -Alex
Senior Member
Joined: Oct 2002
Posts: 336
Likes: 0
From: Portland, OR
Thanks for the links and writeups. I think I'll be using that battery and tray or one of the other combos listed on that site for my soon to be done battery relocation. Will probably do the big job of putting things in the bin later on.
-ray
-ray
Originally Posted by TT_Rex_7
I was afraid of that! I was hoping I could solder all the wires outside of the car, wrap them in loom, and tape them. Then all i'd have to do is push the connectors through the hole that's in the firewall from the factory. It would have been easier to keep track of what wire goes to which that way. This would have been alot easier with the motor out of the car!
-Alex
I was hoping I could solder all the wires outside of the car, wrap them in loom, and tape them. Then all i'd have to do is push the connectors through the hole that's in the firewall from the factory. It would have been easier to keep track of what wire goes to which that way. This would have been alot easier with the motor out of the car! -Alex
I did solder the wires outside of the car and then push them through. It's so much easier that way. I thought you were asking how to get the fuse box off, maybe I'm just confused now.
Paximus, man that sure looks clean, except that jumble on the driver side
Rotary Enthusiast
Joined: Jun 2004
Posts: 1,457
Likes: 0
From: Gallatin, TN
Originally Posted by Scrub
Alex,
I did solder the wires outside of the car and then push them through. It's so much easier that way. I thought you were asking how to get the fuse box off, maybe I'm just confused now.
I did solder the wires outside of the car and then push them through. It's so much easier that way. I thought you were asking how to get the fuse box off, maybe I'm just confused now.
-Alex