
Smoking wiring in my interior

Thread Starter

Joined: May 2004
Posts: 519
Likes: 28
From: San Pedro, California
Smoking wiring in my interior
So I had an issue with my dash light and taillight fuse blowing out. There is quite a bit of messy wiring in the car and for the first time today something under the steering column started smoking with a strong burning smell. but we discovered there is this old school kill switch key under the steering column (like a chip you remove to disable the car). It seems that the wires were switched positive to negative so we switched them back. The smoking seemed to go away and the car was driven fairly hard for 1.5 hours.
after letting the car rest for an hour, I started it and the smoking happened again... I shut off the car but haven�t been able to replicate the smoking again. I drove the car about 60 miles looking for the signs the whole time but didn�t see it again.
What other steps should I take to find the source of this problem?


You probably want to remove a lot of that bad wiring. Any time you get a smoking wire it's from a short - positive touching negative. That can be two wires touching, a positive wire touching the chassis of the car, etc.
I would probably try and remove that kill switch system entirely.
Dale
I would probably try and remove that kill switch system entirely.
Dale

Do you know what systems are affected by the mess of wires? Did you inherit this mess of wires? What was added/removed in this area? Did you do any electrical work in this area?
I would recommend that you remove the steering column shroud, lower dash valence, and the instrument cluster in order to get the most visibility as possible. Inspect all the wiring as much as possible. Chances are you should see some charred or melted wires. Take a look at these wires from different angles. Take pictures and post when possible.
My other recommendations are to disconnect the battery, inspect your fuse box in the footwell and in the engine bay for any blown fuses, and do NOT drive/power the car until this problem is solved. This electrical problem could potentially cause a fire. Refer to the wiring diagram manual for a particular system to troubleshoot/read wires.
Cheers,
George
Thread Starter
Joined: May 2004
Posts: 519
Likes: 28
From: San Pedro, California
I did indeed inherit a lot of these problems. Last night I discovered that the carshopglow front running lights dim and brighten when I give it brake or throttle input...or turn on the AC, or anything in the car really.
mkiv,
The dimming of external lights is indicative of excessive current draw or the alternator cannot regulate voltages any longer. Given the ball of snakes wiring, I'd lean towards your electrical system is overtaxed. Figure out where and what those wires affect then determine if you really need the extra bells & whistles. Did this kill switch have a key? It could be an old Prolock auto security/anti-theft device. They are fairly easy to remove.
Do keep us posted on your progress!
Cheers,
George
Thread Starter
Joined: May 2004
Posts: 519
Likes: 28
From: San Pedro, California
Found this nice bunch behind the stereo!!
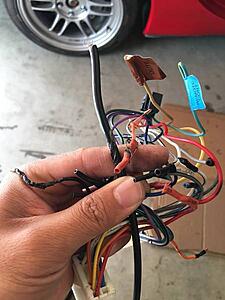
I'm still going to take everything apart and try to find anything else causing issues...but this is probably the bulk of it. I wonder if this is the cause of the dimming or if it's separate from another issue...

I'm still going to take everything apart and try to find anything else causing issues...but this is probably the bulk of it. I wonder if this is the cause of the dimming or if it's separate from another issue...
mkiv,
Interesting find! Where does that white connector (in your palm) come from? At least you quickly found the culprit of the short circuit. Checking the rest of the wiring will take much longer. Can you figure out which wires made contact with one another? I wonder if the current flowing through those wires exceeded their designed limits. Thanks for sharing the 1st pic!
Cheers,
George
Trending Topics
The dimming lights with the brakes is not uncommon. The brake lights draw a lot of current and at idle the alternator isn't putting out that much juice.
I would check the voltage at your battery with a multimeter and see how healthy the alternator is. Also, if you have an under drive pulley on the alternator that will contribute to the issue.
The thing that finally TOTALLY fixed it for me was going to LED brake light bulbs. They draw a lot less current so you don't need as much. Remember, when you hit the brakes, you are lighting up SEVEN bulbs in the back at high brightness - two on each side and 3 in the high mount light.
Dale
Thank you, Dale!
As an exercise, I calculated the current draw on the brake light circuit. This only accounts for the brake lights illuminated. According to wiring diagram F-3, the wattage for each stop light bulb is 27W. There are a total of 4 of these bulbs paired in 2 parallel circuits. The third parallel circuit is the High-3 brake lights. Each High-3 bulb is rated at 18.4W
Basic principles of electricity state:
1. Voltage in parallel circuits remains constant. In this case, we assume +12V.
2. Current in parallel circuits is additive.
3. Power, measured in Watts, is the product of the current multiplied by the voltage. In formula version that is P=IE.
Armed with these 3 bits of info, let's calculate the total current consumed by the tail light when the brake pedal is pressed:
1. Power source = +12V applied to each branch.
2. Bulb wattage = 27W
3. P=IE
4. 27W = I(12V)
5. 27W/12V=(I*12V)/12V
6. 27W/12V = I
7. 2.25A = I; Each 27W bulb draws 2.25A of current
Now, let's calculate the current draw of the High-3 stop lights when the brake pedal is pressed:
1. Power source = +12V applied to each branch.
2. Bulb wattage = 18.4W
3. P=IE
4. 18.4W = I(12V)
5. 18.4W/12V=(I*12V)/12V
6. 18.4W/12V = I
7. 1.53 = I; Each 18.4W bulb draws 1.53A of current
Moving on to calculate the total current draw of each branch of stop light, each branch represents 2 bulbs per left and right tail lights:
1. I-Left = I-left1 + I-left2
2. I-Left = 2.25A + 2.25A
3. I-Left = 4.5A
The formula and result is identical for the right side, therefore:
1. I-Right = 4.5A
On to the High-3 Stop Light current draw:
1. I-High3 = I-high1 + I-high2 + I-high3
2. I-High3 = 1.53A + 1.53A + 1.53A
3. I-High3 = 4.59A
Now to sum the total of each branch's current draw:
1. I-total = I-Left + I-Right + I-High3
2. I-total = 4.5A + 4.5A + 4.59A
3. I-total = 13.59A
In conclusion, the total power typically consumed for the stop light circuit is 13.59A. It is also important to note that the Stop Light circuit protection (fuse) is rated at 20A. That's 6.49A of wiggle room!
I hope this was interesting to Members!
Cheers,
George
Thread Starter
Joined: May 2004
Posts: 519
Likes: 28
From: San Pedro, California
mkiv,
Interesting find! Where does that white connector (in your palm) come from? At least you quickly found the culprit of the short circuit. Checking the rest of the wiring will take much longer. Can you figure out which wires made contact with one another? I wonder if the current flowing through those wires exceeded their designed limits. Thanks for sharing the 1st pic!
Cheers,
George
Interesting find! Where does that white connector (in your palm) come from? At least you quickly found the culprit of the short circuit. Checking the rest of the wiring will take much longer. Can you figure out which wires made contact with one another? I wonder if the current flowing through those wires exceeded their designed limits. Thanks for sharing the 1st pic!
Cheers,
George
For the stop light fuse, that means I can use any fuse above 20A, but not below 15A, correct?
I first knew of an electrical problem when my dash light/tail lights fuse kept blowing.
I would keep the correct size fuse. Go too low and it can blow with normal load, too high and that means it takes more load to blow the fuse and that gives more time for wires to get hot and melty. 20amp fuses are available cheap at any auto parts store.
Dale
Dale
mkiv,
Dale is correct! Never install a fuse (or circuit breaker) rated higher than the original. A lower rated fuse may be used in a pinch. However, 20A fuses are easily obtained at any auto parts store. Always use the recommended fuse for each specific circuit. Otherwise, severe damage to the wiring may result when using a fuse above the rated circuit protection. Furthermore, fuses below the rated circuit protection may cause circuits not function at all or properly.
What fuses failed in your car? Was it just the TAIL & ROOM fuses? Refer to the Wiring Diagram Manual, Diagram W on Pg Z-20 for the circuits affected by specific fuses. If this is the case then I would recommend that you inspect the wiring to the circuits affected by these fuses. The ball of snakes that you removed may be the only problem but it would be prudent to inspect the rest of the wires for any hidden damage.
Cheers,
George
Thread Starter
Joined: May 2004
Posts: 519
Likes: 28
From: San Pedro, California
mkiv,
Dale is correct! Never install a fuse (or circuit breaker) rated higher than the original. A lower rated fuse may be used in a pinch. However, 20A fuses are easily obtained at any auto parts store. Always use the recommended fuse for each specific circuit. Otherwise, severe damage to the wiring may result when using a fuse above the rated circuit protection. Furthermore, fuses below the rated circuit protection may cause circuits not function at all or properly.
What fuses failed in your car? Was it just the TAIL & ROOM fuses? Refer to the Wiring Diagram Manual, Diagram W on Pg Z-20 for the circuits affected by specific fuses. If this is the case then I would recommend that you inspect the wiring to the circuits affected by these fuses. The ball of snakes that you removed may be the only problem but it would be prudent to inspect the rest of the wires for any hidden damage.
Cheers,
George

Thread
Thread Starter
Forum
Replies
Last Post
RevUp13b
3rd Generation Specific (1993-2002)
8
Jul 23, 2006 02:51 PM
lemonade
1st Generation Specific (1979-1985)
14
Aug 22, 2004 07:17 PM
JavaMan
2nd Generation Specific (1986-1992)
18
Feb 11, 2002 06:00 AM