Rotary-Works V-mount Install
 07-25-11, 05:31 PM
#51
Boost makes cars smile.
iTrader: (5)
Join Date: May 2005
Location: ...
Posts: 1,424
Likes: 0
Received 0 Likes
on
0 Posts
If you look on the RW site, there isn't a delineation to WHICH 13B it's produced for (12A/13B/20B).
If you read that email, I sent, you'll see where I had the issue(s).
How would the direction of travel of the pump, proper, have any affect upon the ability of the pulley? Lol. I guess their site omits more than I thought.
If you read that email, I sent, you'll see where I had the issue(s).
How would the direction of travel of the pump, proper, have any affect upon the ability of the pulley? Lol. I guess their site omits more than I thought.

 07-25-11, 11:49 PM
#55
Boost makes cars smile.
iTrader: (5)
Join Date: May 2005
Location: ...
Posts: 1,424
Likes: 0
Received 0 Likes
on
0 Posts
Ditto, here.
No A/C, No P/S.
I have half of that equation, down... Made my own (only needed the RW kit for the oil cooler mounting bracket.... FAIL), but much like you, wouldn't even try to accommodate periphery such things as ac or ps.
Got pics of the vmount of yours? I'll show everyone mine (no pun intended), once I get it all together.
07-26-11, 04:43 AM
#56
yerp, these are some old ones when i was in the process... ill post better ones up tomorrow when i take the car out and try firing it up (fingers crossed)
my "mounts"
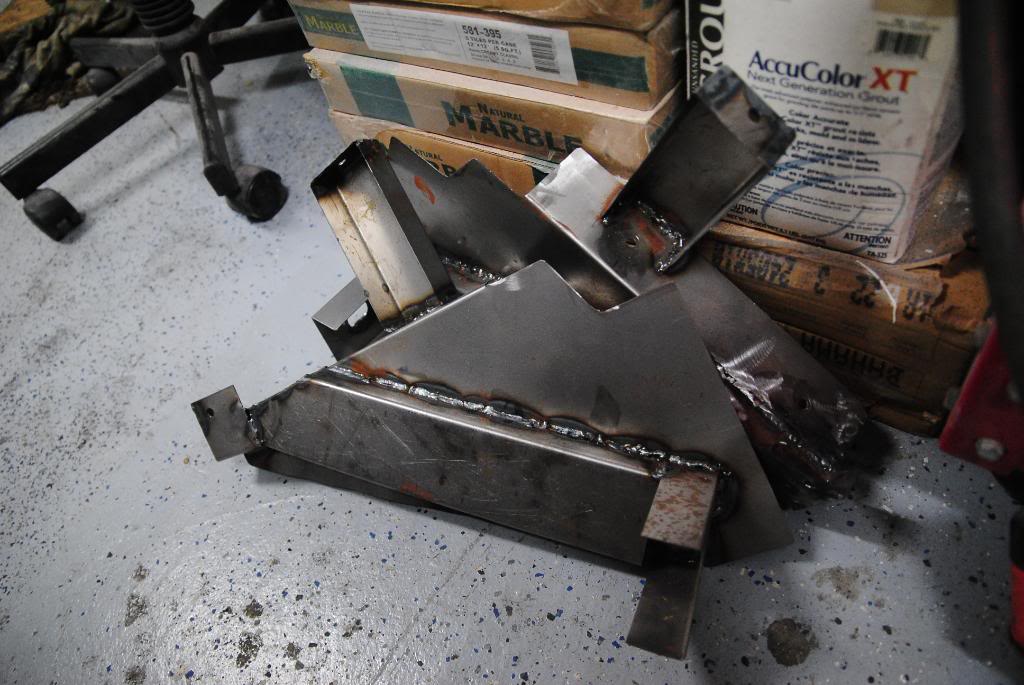
the gap is smaller, this is just mock up, and the sides have support to narrow the gap of the rad.
ill eventually make ducting but i dont think i need it since the design has very tiny gaps...

my "mounts"
the gap is smaller, this is just mock up, and the sides have support to narrow the gap of the rad.
ill eventually make ducting but i dont think i need it since the design has very tiny gaps...
07-26-11, 06:22 AM
#57
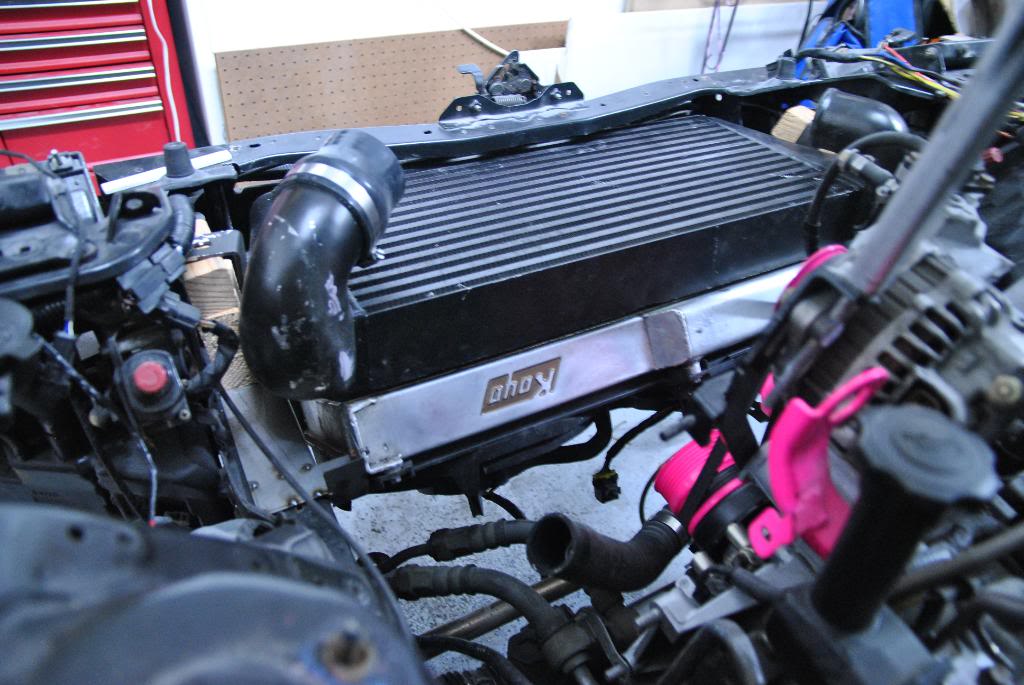
hahaha, omg, pink parts, it looks cool man, really.
you can see my fc vmounts in my sig, it took forever but i was able to keep everything, a/c, ps, and i even made hood dampers and a mini battery kit.
but your pics are of an FD, do you have pics of your Fc stuff?
you can see my fc vmounts in my sig, it took forever but i was able to keep everything, a/c, ps, and i even made hood dampers and a mini battery kit.
but your pics are of an FD, do you have pics of your Fc stuff?
07-26-11, 11:00 AM
#58
haha yesss the pink... i couldnt image how hard it was to fab those up... retaining all that junk in the engine bay and fabbing around it cant be to easy! i like the second one but they both look good
Lol yeah they are in the FD... this is the ermm 3rd gen section? i dont own an fc haha although id love to mod one of those.......
Lol yeah they are in the FD... this is the ermm 3rd gen section? i dont own an fc haha although id love to mod one of those.......
07-27-11, 02:01 AM
#60
haha yesss the pink... i couldnt image how hard it was to fab those up... retaining all that junk in the engine bay and fabbing around it cant be to easy! i like the second one but they both look good
Lol yeah they are in the FD... this is the ermm 3rd gen section? i dont own an fc haha although id love to mod one of those.......
Lol yeah they are in the FD... this is the ermm 3rd gen section? i dont own an fc haha although id love to mod one of those.......
Thanks, it was very time consuming to do it right, this thread is for the RW Fc vmount.
But for the money the RW FC vmount kit is a great buy.
I might offer a limited edition pink kit in your honor..lol
Ben
02-23-13, 04:25 AM
#61
Full Member

Join Date: Jan 2011
Location: Sweden
Posts: 94
Likes: 0
Received 0 Likes
on
0 Posts
Lifting an old thread
bought the RW v-mount radiator f�r about 1,5 year ago, already had a IC I was going to use...
now finnaly Im soon to get my car running... BUT the drain plug leaks!! and since I live in sweden and only have M-threading on the rest of the car and wanna replace that shitty plastic plug with a bolt and washer, my question then is what Threading is the plug?? so I can order a correct one
not very many hardware stores have a large UNC storage, and to me it looks to be fine threading UNC as well
anybody that can help? RW hasn't answered my email I sent 2-3 weeks ago...
02-23-13, 11:33 AM
#62
Lifting an old thread
bought the RW v-mount radiator f�r about 1,5 year ago, already had a IC I was going to use...
now finnaly Im soon to get my car running... BUT the drain plug leaks!! and since I live in sweden and only have M-threading on the rest of the car and wanna replace that shitty plastic plug with a bolt and washer, my question then is what Threading is the plug?? so I can order a correct one
not very many hardware stores have a large UNC storage, and to me it looks to be fine threading UNC as well
anybody that can help? RW hasn't answered my email I sent 2-3 weeks ago...
bought the RW v-mount radiator f�r about 1,5 year ago, already had a IC I was going to use...
now finnaly Im soon to get my car running... BUT the drain plug leaks!! and since I live in sweden and only have M-threading on the rest of the car and wanna replace that shitty plastic plug with a bolt and washer, my question then is what Threading is the plug?? so I can order a correct one
not very many hardware stores have a large UNC storage, and to me it looks to be fine threading UNC as well
anybody that can help? RW hasn't answered my email I sent 2-3 weeks ago...
alternate method if you cant find the correct bolt, take it to any shop that can weld aluminum and make your own drain plug.
1. get a threaded aluminum bung with matching bolt with rubber or teflon washer, you can get this in your countries metric system.
2. have the shop install it in the right location and weld the other one shut.
02-23-13, 11:50 AM
#63
alternate method if you cant find the correct bolt, take it to any shop that can weld aluminum and make your own drain plug.
1. get a threaded aluminum bung with matching bolt with rubber or teflon washer, you can get this in your countries metric system.
2. have the shop install it in the right location and weld the other one shut.
02-23-13, 06:43 PM
#64
Full Member
Join Date: Jan 2011
Location: Sweden
Posts: 94
Likes: 0
Received 0 Likes
on
0 Posts
alternate method if you cant find the correct bolt, take it to any shop that can weld aluminum and make your own drain plug.
1. get a threaded aluminum bung with matching bolt with rubber or teflon washer, you can get this in your countries metric system.
2. have the shop install it in the right location and weld the other one shut.
1. get a threaded aluminum bung with matching bolt with rubber or teflon washer, you can get this in your countries metric system.
2. have the shop install it in the right location and weld the other one shut.
went all day to figure out it is 9/16" UNF threading... now on the hunt for a bolt, to bad all hardware stores with any kind of UNF/UNC bolts in the area are closed weekends

had the rewelding option in my head all day, but that is more work and money then a bolt and washer/rubber seal
 02-24-13, 11:28 PM
#65
went all day to figure out it is 9/16" UNF threading... now on the hunt for a bolt, to bad all hardware stores with any kind of UNF/UNC bolts in the area are closed weekends 
had the rewelding option in my head all day, but that is more work and money then a bolt and washer/rubber seal
had the rewelding option in my head all day, but that is more work and money then a bolt and washer/rubber seal
 10-10-17, 12:25 PM
#68

I know this is an old thread but i didn't find this bolt info easily so i figured id post it here for others looking.
If you are running the Rotary-Works/ cxracing / ebay / chinese made radiator with the plastic drain plug, please do yourself a favor and replace it, preferably before installing everything. It's not a standard bolt thread pattern. It is a 1/4in pipe plug that you can find down the plumbing isle at home depot or ace.
I got mine at Ace, so here is the item number (4504999). Ace also carries a hex head plug if you dont want the square head.
Home depot also has it, dont know the part number but i believe the size is labeled as 1/4 MIP.
The following users liked this post:
Spalato (11-16-17)
10-22-17, 03:36 PM
#69
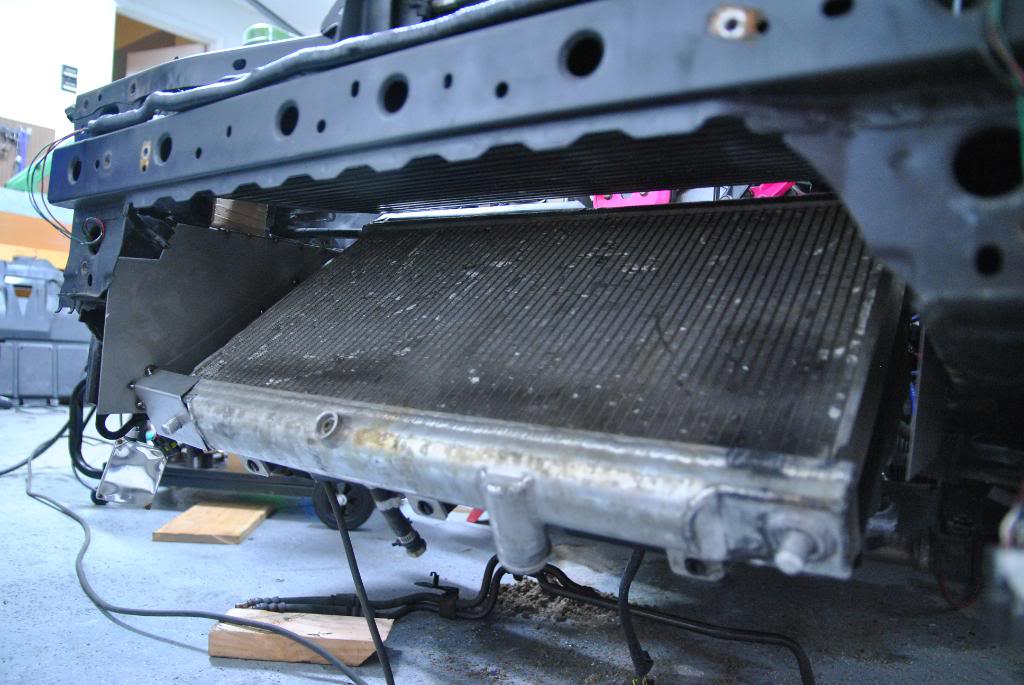
Here's some pictures of how I have it all mounted. As well as a small review of problems/issues/ things you need to know for this kit.
Kinda dark out when I took the pic's so if needed I can take more tomorrow.
1. On the back of the rad, the stock fans did not lign up at all. Fan shroud had to
be coerced to even go in the tabs at the bottom. Also only two of the holes ligned
up at the top bolt mounts. the 3rd isn't even remotely in the right spot.
2. I have the touring model with only the driver side oil cooler, the return line for the
rad pointed straight down into the hardlines for the oil cooler with about 1mm to
spare. It had to be removed and a 90* elbow welded in. Odd that this wasn't
considered as the other side of the rad already had a 90* elbow for the inlet.
Also, AC does hold charge. Even with the "snakey" look of the hard lines.
Had to find a rubber rad hose for the inlet. Return has a 4'' section of alu in
between two rubber couplers. No rad hoses provided.
On the plus side..my car runs cold. 85-93*C W, 22-28*C Air
�readjust "snakes" the AC lines.
Is the inlet for rad necessarily needs to be readjusted for the rad hose to connect?
what else do I need to keep in mind once I decide to go with this kit?
-sorry for bumping up an old thread
10-22-17, 10:08 PM
#70
�So brackets need to modified as far as what I have read on this thread by others for radiator and the IC
�readjust "snakes" the AC lines.
Is the inlet for rad necessarily needs to be readjusted for the rad hose to connect?
what else do I need to keep in mind once I decide to go with this kit?
-sorry for bumping up an old thread
�readjust "snakes" the AC lines.
Is the inlet for rad necessarily needs to be readjusted for the rad hose to connect?
what else do I need to keep in mind once I decide to go with this kit?
-sorry for bumping up an old thread
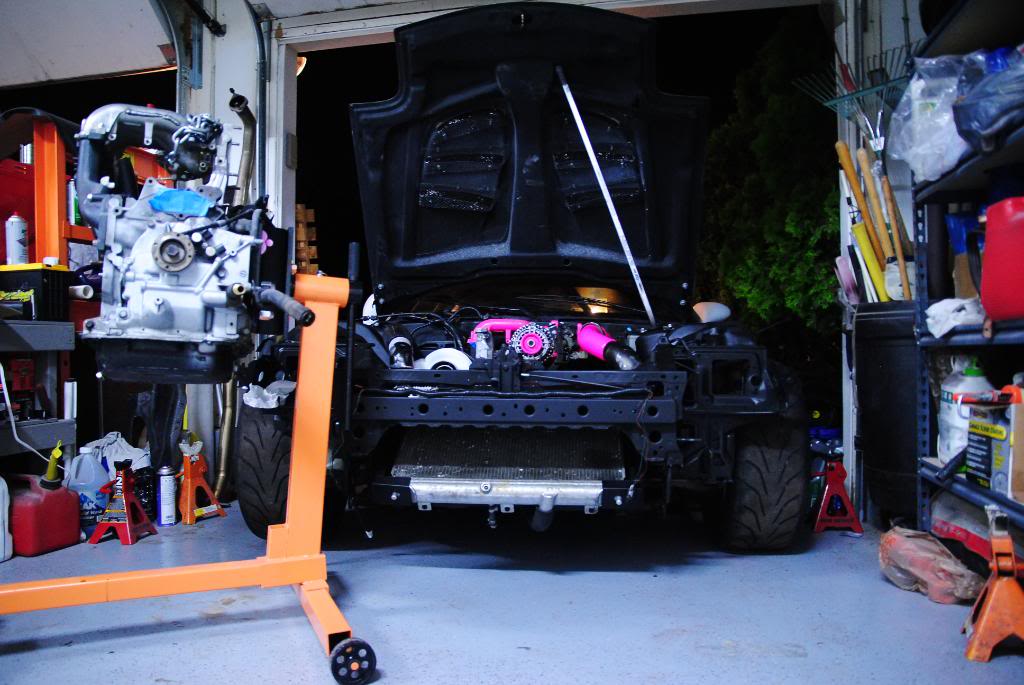
I just did this install like last month. Here are some quick notes.
- IC and Rad brackets do need to be modified. Usually just some trimming and maybe extending the hole some more if necessary.
- The L brackets are fine, as i didnt need to alter those.
- You will more than likely have to buy bolts to mount the rad mount to the frame rail on the passenger side. I dont remember the size on the bolt but is it bigger than the other side and any other bolts.
- You will need to replace the rad drain plug. This is a must as the plastic pos will constantly leak. I put the size of that bolt in the post above.1
- There is a good chance you will need to buy the appropriate bolts to fit in the rad and IC.
- Stock fans will not fit on the rad without some cutting and trimming. Near the inlet and outlet for the rad on the fan needs to be trimmed, and the feet on the bottom to fit into the slots on the radiator. Also, only one screw hole lined up with my rad after i opened that hole up some more.
- As for radiator hoses, you will need to grab some flex hose from the auto store. I wish i kept the part numbers for the hoses that I got but i completely forgot to write it down. For the inlet side (side with the oil cooler) if you get a flex hose that goes straight then to a 90 degree bend, it will fit with barely touching the oil cooler line. You will have to make sure you trim down the fan shroud enough though. For the other side, you can grab a straight flex hose and that should do the trick no problem.
- As for the condenser, just carefully bend the line so that they work with however you are trying to set things up. I will say to do this slowly and try to think it out so you are just bending stuff over and over. I think i leaked out freon at the connection point to the condenser because when i was moving the lines it started to unscrew itself, so just make sure you check that if you dont plan on having the system drained ahead of time.
- Mounting the condenser is a project by itself. You will have to come up with your own thing for this, i just used some zipties and varies pieces of metal to make sure that it stays away from hitting the rad.
- One of the lower hard lines on the condenser will interfere with the lower rad mount, I just cut some of that mount out as having all that excess metal is pointless imo.
- Dont forget you will have to extend the fan wires.
- IC doesnt involve much adjusting to get to fit properly.
- I put some foam between the IC and the drier (believe that's what the part is called) as the IC will press up against it.
- You will prob also need some IC piping, unless the supplied pipes work for your set up.
I think i pretty much hit all the main things. It seems like a lot but honestly if you are fine with doing some fab work then it's not to much. Def worth it imo for the price.
01-18-18, 08:51 PM
#71
I just did this install like last month. Here are some quick notes.
- IC and Rad brackets do need to be modified. Usually just some trimming and maybe extending the hole some more if necessary.
- The L brackets are fine, as i didnt need to alter those.
- You will more than likely have to buy bolts to mount the rad mount to the frame rail on the passenger side. I dont remember the size on the bolt but is it bigger than the other side and any other bolts.
- You will need to replace the rad drain plug. This is a must as the plastic pos will constantly leak. I put the size of that bolt in the post above.1
- There is a good chance you will need to buy the appropriate bolts to fit in the rad and IC.
- Stock fans will not fit on the rad without some cutting and trimming. Near the inlet and outlet for the rad on the fan needs to be trimmed, and the feet on the bottom to fit into the slots on the radiator. Also, only one screw hole lined up with my rad after i opened that hole up some more.
- As for radiator hoses, you will need to grab some flex hose from the auto store. I wish i kept the part numbers for the hoses that I got but i completely forgot to write it down. For the inlet side (side with the oil cooler) if you get a flex hose that goes straight then to a 90 degree bend, it will fit with barely touching the oil cooler line. You will have to make sure you trim down the fan shroud enough though. For the other side, you can grab a straight flex hose and that should do the trick no problem.
- As for the condenser, just carefully bend the line so that they work with however you are trying to set things up. I will say to do this slowly and try to think it out so you are just bending stuff over and over. I think i leaked out freon at the connection point to the condenser because when i was moving the lines it started to unscrew itself, so just make sure you check that if you dont plan on having the system drained ahead of time.
- Mounting the condenser is a project by itself. You will have to come up with your own thing for this, i just used some zipties and varies pieces of metal to make sure that it stays away from hitting the rad.
- One of the lower hard lines on the condenser will interfere with the lower rad mount, I just cut some of that mount out as having all that excess metal is pointless imo.
- Dont forget you will have to extend the fan wires.
- IC doesnt involve much adjusting to get to fit properly.
- I put some foam between the IC and the drier (believe that's what the part is called) as the IC will press up against it.
- You will prob also need some IC piping, unless the supplied pipes work for your set up.
Did you evaporated the refrigerant out first and then readjusted the AC lines after or had it mounted the way they are and did it the way they are without evaporating?
01-23-18, 03:59 AM
#72
Here's some pictures of how I have it all mounted. As well as a small review of problems/issues/ things you need to know for this kit.
Kinda dark out when I took the pic's so if needed I can take more tomorrow.
1. On the back of the rad, the stock fans did not lign up at all. Fan shroud had to
be coerced to even go in the tabs at the bottom. Also only two of the holes ligned
up at the top bolt mounts. the 3rd isn't even remotely in the right spot.
2. I have the touring model with only the driver side oil cooler, the return line for the
rad pointed straight down into the hardlines for the oil cooler with about 1mm to
spare. It had to be removed and a 90* elbow welded in. Odd that this wasn't
considered as the other side of the rad already had a 90* elbow for the inlet.
Also, AC does hold charge. Even with the "snakey" look of the hard lines.
Had to find a rubber rad hose for the inlet. Return has a 4'' section of alu in
between two rubber couplers. No rad hoses provided.
On the plus side..my car runs cold. 85-93*C W, 22-28*C Air
Kinda dark out when I took the pic's so if needed I can take more tomorrow.
1. On the back of the rad, the stock fans did not lign up at all. Fan shroud had to
be coerced to even go in the tabs at the bottom. Also only two of the holes ligned
up at the top bolt mounts. the 3rd isn't even remotely in the right spot.
2. I have the touring model with only the driver side oil cooler, the return line for the
rad pointed straight down into the hardlines for the oil cooler with about 1mm to
spare. It had to be removed and a 90* elbow welded in. Odd that this wasn't
considered as the other side of the rad already had a 90* elbow for the inlet.
Also, AC does hold charge. Even with the "snakey" look of the hard lines.
Had to find a rubber rad hose for the inlet. Return has a 4'' section of alu in
between two rubber couplers. No rad hoses provided.
On the plus side..my car runs cold. 85-93*C W, 22-28*C Air
Not too sure if I�m seeing if the condenser is mounted in with tabs or just that the AC lines are holding in up. Do you happen to have any more pictures just to clarify the confusion. Sorry to bother but this would help me a ton.
01-23-18, 07:48 AM
#73
I didn't evaporate the system but with that being said I do think one of my connectors to the confessor came loose and leaked everything out anyways. That or I made a hole somewhere (doubt it). It's not to hard to bend, you just have to make sure you dont kink any of that line and that's the part that gets annoying. I used a combination of a few metal pieces and some zip ties to hold the condenser up off the rad. I would take some pics for you but everything sits under the intercoler and I'm in the middle of a move so dont have the tools available to take it off.

Thread
Thread Starter
Forum
Replies
Last Post
24seven_dada
3rd Generation Specific (1993-2002)
20
11-10-18 12:03 PM
Jeff20B
1st Generation Specific (1979-1985)
73
09-16-18 07:16 PM
[For Sale] Scratch & Dent, Used, and Open-Box Sale!
SakeBomb Garage
Vendor Classifieds
5
08-09-18 05:54 PM