
Need help Identifying hose's path & or name. (FD3S)


Thread Starter
Junior Member
iTrader: (1)
Joined: Jun 2014
Posts: 44
Likes: 0
From: Long Beach, California
Need help Identifying hose's path & or name. (FD3S)
Can anybody please help me identify or tell me what these are for?
Are they necessary for full-none sequential twins?
And what size rubber caps are needed to cap off the system?
Refer to this website for sizes. (mcmaster.com/#epdm-rubber-caps/=wrlqvk)
Just installed stock twins, Pineapple pulley Kit and i'm not 100% if I've finished correctly.
Thank you so much for taking your time to help.

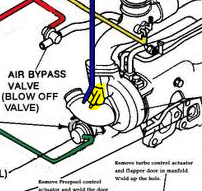
^^ I installed an aftermarket elbow, the elbow does not have a bung like the OEM does. now I have a hose (of uknown diameter) just floating around shooting oil into the engine bay. where am I to route this hose?


green:
Are they necessary for full-none sequential twins?
And what size rubber caps are needed to cap off the system?
Refer to this website for sizes. (mcmaster.com/#epdm-rubber-caps/=wrlqvk)
Just installed stock twins, Pineapple pulley Kit and i'm not 100% if I've finished correctly.
Thank you so much for taking your time to help.
^^ I installed an aftermarket elbow, the elbow does not have a bung like the OEM does. now I have a hose (of uknown diameter) just floating around shooting oil into the engine bay. where am I to route this hose?
green:
Last edited by kvttrs; Apr 15, 2015 at 05:54 PM. Reason: add question pertaining to Elbow. & picture
Have you referenced the diagrams in this thread for non sequential?
https://www.rx7club.com/3rd-generati...-turbo-749702/
I ordered caps from there as well, can't remember what size, I'll have to check, but I'm pretty sure I have about 20 left over.
https://www.rx7club.com/3rd-generati...-turbo-749702/
I ordered caps from there as well, can't remember what size, I'll have to check, but I'm pretty sure I have about 20 left over.
Thread Starter
Junior Member
iTrader: (1)
Joined: Jun 2014
Posts: 44
Likes: 0
From: Long Beach, California
Have you referenced the diagrams in this thread for non sequential?
https://www.rx7club.com/3rd-generati...-turbo-749702/
I ordered caps from there as well, can't remember what size, I'll have to check, but I'm pretty sure I have about 20 left over.
https://www.rx7club.com/3rd-generati...-turbo-749702/
I ordered caps from there as well, can't remember what size, I'll have to check, but I'm pretty sure I have about 20 left over.
the rest is still a mystery do me. thanks for your help.
red: solved goes to block.
green:
blue:
brown:
pink: solenoid valve pressure regulator
yellow:
orange:
purple: (note i have this blocked, is this okay?)
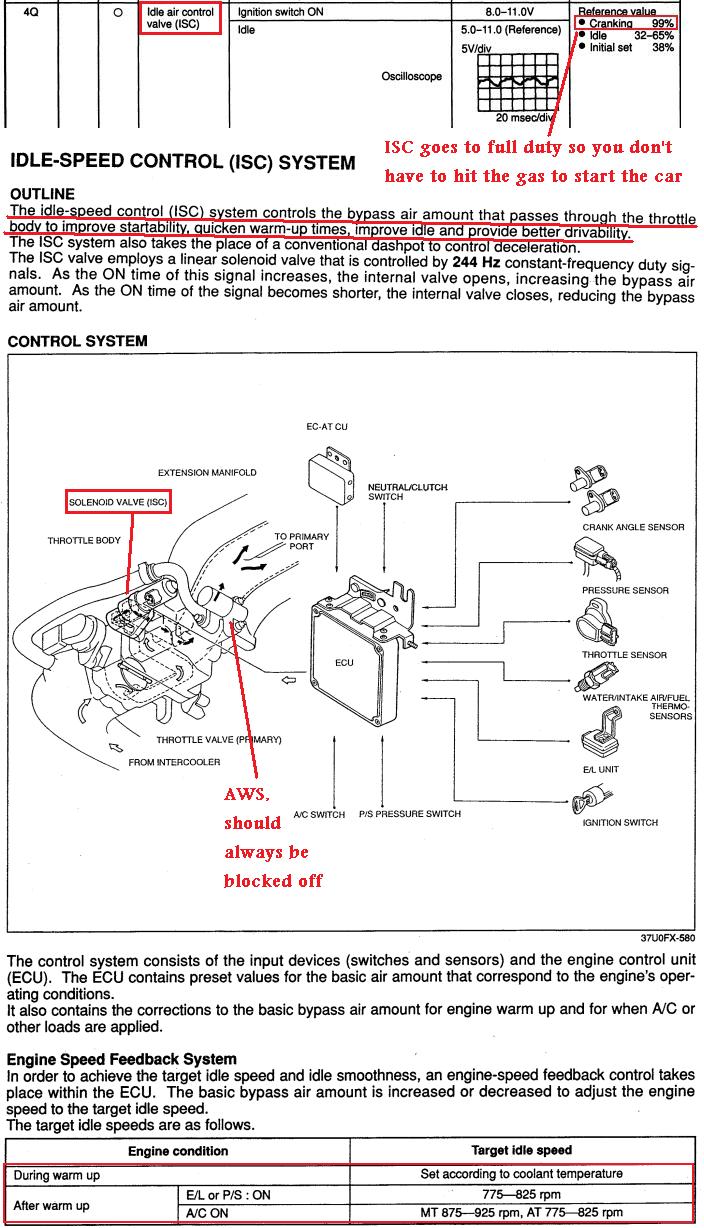
That hose spewing oil is your AWS.
Did you remove the emissions and other "unnecessary" components from the car?
You should probably look into getting the block off kit from Banzai
FD3s RX-7 Block Off Plates
Did you remove the emissions and other "unnecessary" components from the car?
You should probably look into getting the block off kit from Banzai
FD3s RX-7 Block Off Plates
Some people also get them laminated so they last a bit longer.
Definitely worth it if you stay with the stock setup. Once you go single, the vacuum lines are quite simplified.
I checked out the diagrams again and went and looked at my engine in the garage. That green one is what I've highlighted in yellow. As long as that has some new vacuum line in that section that you have green, the rest is hardline back to the engine.
Trending Topics
Thread Starter
Junior Member
iTrader: (1)
Joined: Jun 2014
Posts: 44
Likes: 0
From: Long Beach, California
I printed out a few copies on 11x17 paper. Very helpful.
Some people also get them laminated so they last a bit longer.
Definitely worth it if you stay with the stock setup. Once you go single, the vacuum lines are quite simplified.
I checked out the diagrams again and went and looked at my engine in the garage. That green one is what I've highlighted in yellow. As long as that has some new vacuum line in that section that you have green, the rest is hardline back to the engine.
Thread Starter
Junior Member
iTrader: (1)
Joined: Jun 2014
Posts: 44
Likes: 0
From: Long Beach, California
woah, turns out the shop is in my city lol. thanks for your help man!!! Did you run into any problems plugging up the system? Maybe something I should look out for?
Are you replacing all of the vacuum lines as well?
Thread Starter
Junior Member
iTrader: (1)
Joined: Jun 2014
Posts: 44
Likes: 0
From: Long Beach, California
Printed out OEM & full non-seq vac diagram in 11x17 paper at work.
If I cap em, it wont trigger a CEL unless i unplug the harness to any of the solenoid(s), right?
There's two options for the rats nest/solenoids.
1. Cap and leave plugged in
2. Cap, remove rats nest, install resistors.
Either option works, I just left mine plugged in and capped the ends.

Thread
Thread Starter
Forum
Replies
Last Post
24seven_dada
3rd Generation Specific (1993-2002)
20
Nov 10, 2018 12:03 PM