
Making way for airflow

There has been a lot of excellent discussion on this board lately about reducing CCPs, EGTs, and AITs using AI and possibly other acronyms I'm not yet aware of... the bottom line is heat, and it's damaging affect on the rotary engine.
There are also obviously heat related issues regarding the cooling system and latent heat in the engine compartment; these are the two issues I tackled first. So while a second oil cooler (thx Rotor3), water injection and a larger intercooler are on deck... I wanted to do what I could (DIY) to help what I have work better.
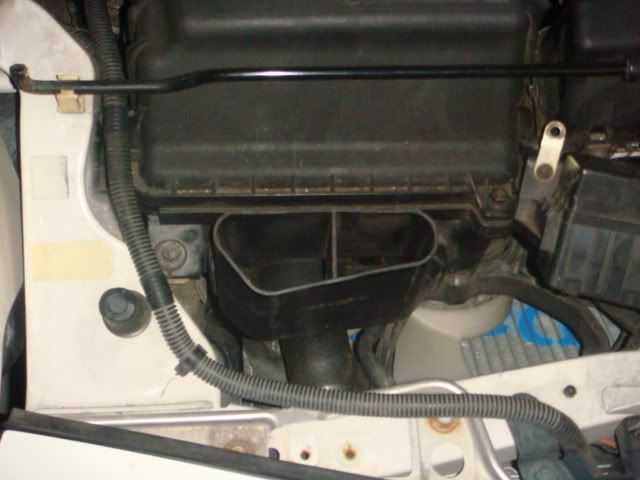
It's dark, but this is the basically stock looking engine compartment, similar to many others...

After opening the hood above the intake as detailed in another post, the original induction system was not sufficient.
The airbox sits directly over roughly half of my Mazda Comp radiator. The mouth of the airbox ultimately bottle necks at a roughly 4.5 sq in triangle inlet.
So, I fabricated an airbox to utilize the hood duct and make way for the airflow from the radiator to go up through the hood. The result is a hybrid between a Pettit style and M2 style box. Check it out...
I cut the stock airbox along one of the ribs


There are also obviously heat related issues regarding the cooling system and latent heat in the engine compartment; these are the two issues I tackled first. So while a second oil cooler (thx Rotor3), water injection and a larger intercooler are on deck... I wanted to do what I could (DIY) to help what I have work better.
It's dark, but this is the basically stock looking engine compartment, similar to many others...
After opening the hood above the intake as detailed in another post, the original induction system was not sufficient.
The airbox sits directly over roughly half of my Mazda Comp radiator. The mouth of the airbox ultimately bottle necks at a roughly 4.5 sq in triangle inlet.
So, I fabricated an airbox to utilize the hood duct and make way for the airflow from the radiator to go up through the hood. The result is a hybrid between a Pettit style and M2 style box. Check it out...
I cut the stock airbox along one of the ribs


Yes, I do everything in my apartment and in the subterranean parking garage 


Here's the top piece...

I added two collars for the filters, 2.25" O.D.

Here's a check to make sure everything fits inside...

Here's the top piece...
I added two collars for the filters, 2.25" O.D.
Here's a check to make sure everything fits inside...
Weatherstripping between the two halves to fill in for the missing panel air filter...

After fitting the box to the engine bay, I marked the top of the panel and trimmed it to meet up with the hood... the end result is a really tight fit to the hood.

Then I covered the back and side of the box with Thermo-Tec Aluminized heat barrier to deflect radiant heat. Here's a shot of the sticky side, it seems to be woven fiberglass or another textile.


I also had to create a .75"x.75"x1" tee for the filter for the ABV and CRV
After fitting the box to the engine bay, I marked the top of the panel and trimmed it to meet up with the hood... the end result is a really tight fit to the hood.
Then I covered the back and side of the box with Thermo-Tec Aluminized heat barrier to deflect radiant heat. Here's a shot of the sticky side, it seems to be woven fiberglass or another textile.
I also had to create a .75"x.75"x1" tee for the filter for the ABV and CRV
Finally in the car, look at how much radiator is exposed, almost the whole fan...


Through the hood duct, the wall of the box meets up with the right corner of the duct... shockingly

From above, the FG wall of the box is about .25" from the hood all the way down...


A lot of the radiator, almost a whole fan, has been exposed and now vents more easily through the hood. There is now more space for an intercooler, too! The total cost was about $120, mostly for the three K&N filters.
The smallest point of the stock airbox inlet was about 4.5 sq in. The new combined opening area of the two mounts for the filters is 6.3 sq in, a 40% increase! Further, the flat panel K&N panel in the stock airbox was about 10.875in x 10.25in, 111.5 sq in of surface area... The two new filters combine for 131.9 sq in of surface area for an 18% increase.
My next goal is to move and shrink that heavy, heat sink of a battery out of the engine bay to further expose the radiator and move wight to the back. After that will be to follow Howard Coleman's thread on repurposing a driver side oil cooler to the passenger side. Besides keeping internal temperatures down, and partly as a result, I think it is critical to help the cooling system (water and oil) perform it's best to ensure a happy motor
Through the hood duct, the wall of the box meets up with the right corner of the duct... shockingly
From above, the FG wall of the box is about .25" from the hood all the way down...
A lot of the radiator, almost a whole fan, has been exposed and now vents more easily through the hood. There is now more space for an intercooler, too! The total cost was about $120, mostly for the three K&N filters.
The smallest point of the stock airbox inlet was about 4.5 sq in. The new combined opening area of the two mounts for the filters is 6.3 sq in, a 40% increase! Further, the flat panel K&N panel in the stock airbox was about 10.875in x 10.25in, 111.5 sq in of surface area... The two new filters combine for 131.9 sq in of surface area for an 18% increase.
My next goal is to move and shrink that heavy, heat sink of a battery out of the engine bay to further expose the radiator and move wight to the back. After that will be to follow Howard Coleman's thread on repurposing a driver side oil cooler to the passenger side. Besides keeping internal temperatures down, and partly as a result, I think it is critical to help the cooling system (water and oil) perform it's best to ensure a happy motor


Trending Topics


Good work.
I think a better source of air for your filters would be to draw air from the mouth of the front bumper alongside the radiator. A few people have done a heat shield - Pettit, Damian's version of the the Pettit heat shield and adam_c (for the stock airbox). Damian even had a template that you could use to trace and cut onto the metal.
I think a better source of air for your filters would be to draw air from the mouth of the front bumper alongside the radiator. A few people have done a heat shield - Pettit, Damian's version of the the Pettit heat shield and adam_c (for the stock airbox). Damian even had a template that you could use to trace and cut onto the metal.
your custom airbox is very similar to the M2 airbox - except your airbox draws through the hood whereas the m2 airbox draws from the front bumper opening.
nice work, but you could also consider modifying it to draw from the front bumper opening as well - there should be about 1.5" of space between the frame & the radiator to make a scoop/duct in the bottom of the airbox as well.
here is the m2 box's duct:

nice work, but you could also consider modifying it to draw from the front bumper opening as well - there should be about 1.5" of space between the frame & the radiator to make a scoop/duct in the bottom of the airbox as well.
here is the m2 box's duct:
That's a good idea... I want to make it as functional as possible. Ditto everything else. I'll keep posting here as that progresses.

Thread
Thread Starter
Forum
Replies
Last Post
ray green
1st Gen General Discussion
2
Sep 2, 2015 06:35 AM
rx8volks
Canadian Forum
0
Sep 1, 2015 11:02 PM
rx8volks
Canadian Forum
0
Sep 1, 2015 10:46 PM