
Summer 2011 Pics and Updates On My Bridgeported Turbo-NA Project (Project Tina)

Thread Starter
Joined: Feb 2001
Posts: 29,798
Likes: 128
From: London, Ontario, Canada
Summer 2011 Pics and Updates On My Bridgeported Turbo-NA Project (Project Tina)
It seems like it's been about a year since my last Project Tina bridgeported-turbo-NA thread. I said in that thread I can "stick a fork in the car, because it's done". Well, that's only partially true. Is a car ever really done?
Even though I've been busy working on my '76 Mazda Cosmo restoration (which if you have not seen, you should certainly check out) there was still some work done on the RX-7 this spring/summer. Some of it necessary, some of it just tying up a few loose ends.
Last summer I enjoyed driving the car with it's brand new suspension and other improvements until a visit to the drag strip in mid September. It was only the 2nd time I had been to the strip that year and on the first launch of the evening, I blew up my NA differential (a freshly built LSD) by snapping the driver side stub shaft. You can read about it here, and the carnage will be shown later in this thread as well. So with my Cosmo taking up my shop (it was brought in just a week earlier), I decided that my season was now over and I parked the RX-7 for the remainder of the fall. At least I was able to prep it for winter storage while the weather was still somewhat warm and lacking in snow.
Which brings us around to this spring, and the work in this thread. Without further rambling, let's get to that now...
I left off in the last thread with a picture of the AWR Racing engine mounts. I had to modify the passenger side to allow my turbo manifold to clear, while the driver side just bolted right in place (as expected).
NA stuff at this point is just too weak for a car putting out a little more than 500 RWHP. Since I installed a TII transmission previously, it seemed logical to just complete the rest of the TII drivetrain, so I purchased a low mile '87 TII rear end from a forum member as well as the matching axle shafts. The price was quite reasonable and mechanically the parts were tight and solid.
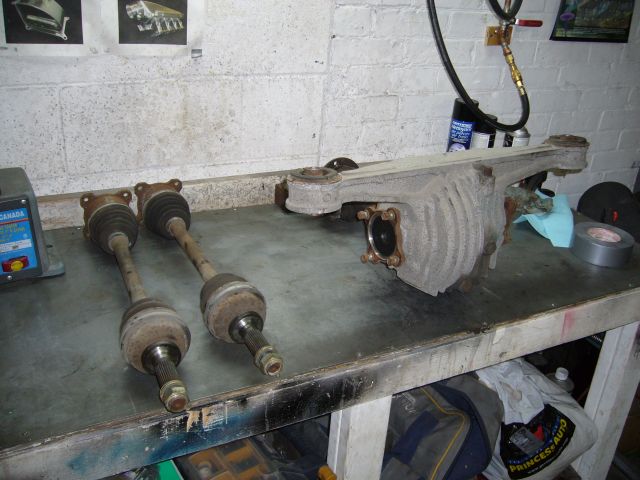
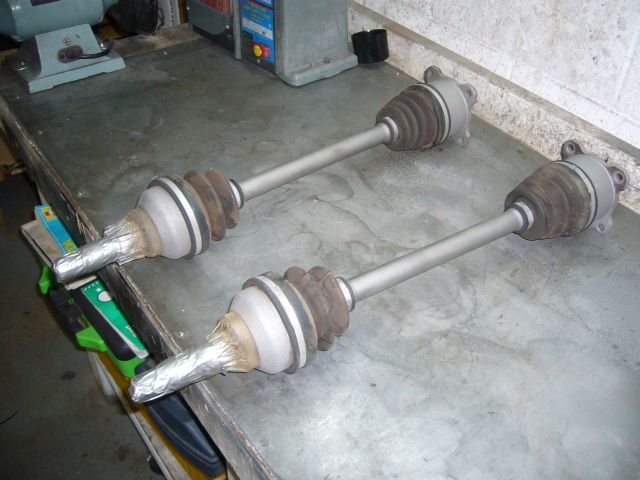
Aesthetically however, the parts were 24 years old so first they got a decent degreasing with brake cleaner, and then I media blasted. The axles were blasted with copper slag in the blast cabinet and after a few minutes all that rust and filth was just a fleeting memory.
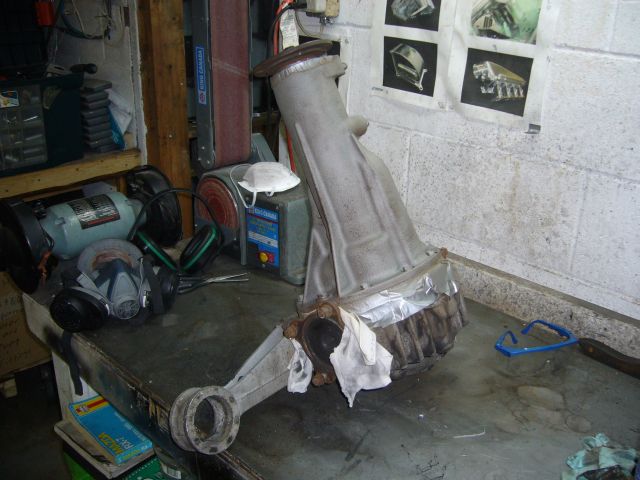
The differential was a bit more involved. Since it was far too large to fit in the blast cabinet I took it into the alley beside the shop and blasted it against the wall. Copper slag was used on the cast nose, while crushed glass was used on the rear aluminum housing. Actually, while I was blasting the aluminum housing, so much dust was created (my crushed glass had been already run through the blasting pot several times, so it was pretty dusty at this point) that a douchebag crackhead neighbor called the fire department. He thought that the dust was smoke and that the media blaster was some kind of infernal pyromaniac device! Just as I was finishing, 3 fire trucks rolled up in full alert. They were very much not amused when they found that instead of a fire, they were called out for dust caused by media blasting. All was not lost because after showing one of the firemen around the shop, the next he brought me a box of parts to be blasted from his '69 Mustang.
I started spraying the diff and axles with POR-15, a process of which I do not have pictures. The camera stays out of the painting area because last time I got paint on it, 2 hours was wasted getting it off the lens...
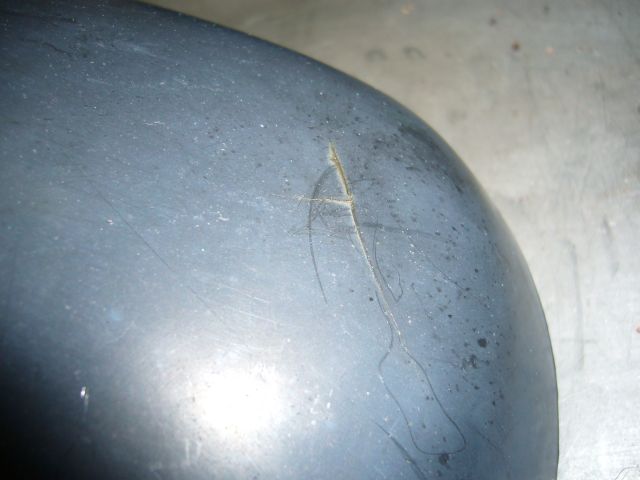
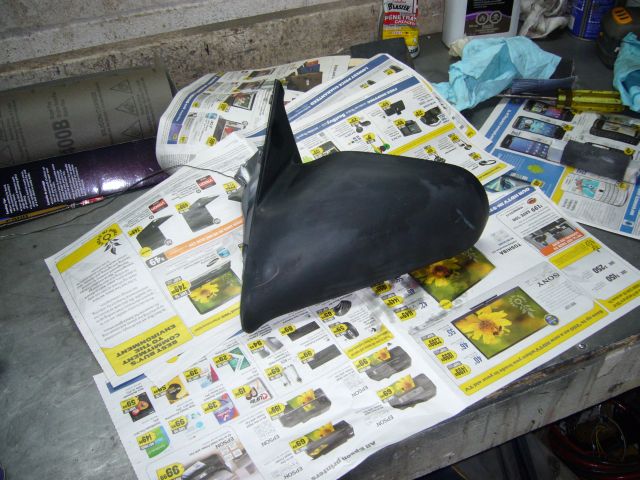
So while alternately spraying paint and waiting for it to dry, I moved on to the mirrors. The casing of my passenger mirror has had a chunk broken off for years, a consequence of pushing the car out of the garage without looking for clearance. And the driver side was pretty cracked as well. So I purchased a good used set of manual S4 style mirrors locally. They were in good shape, but there were a few minor cracks to be repaired on the driver side. A crack like this isn't really a big deal and can be fixed in about 10 minutes (not counting the time it will take the epoxy to dry).
Even though I've been busy working on my '76 Mazda Cosmo restoration (which if you have not seen, you should certainly check out) there was still some work done on the RX-7 this spring/summer. Some of it necessary, some of it just tying up a few loose ends.
Last summer I enjoyed driving the car with it's brand new suspension and other improvements until a visit to the drag strip in mid September. It was only the 2nd time I had been to the strip that year and on the first launch of the evening, I blew up my NA differential (a freshly built LSD) by snapping the driver side stub shaft. You can read about it here, and the carnage will be shown later in this thread as well. So with my Cosmo taking up my shop (it was brought in just a week earlier), I decided that my season was now over and I parked the RX-7 for the remainder of the fall. At least I was able to prep it for winter storage while the weather was still somewhat warm and lacking in snow.
Which brings us around to this spring, and the work in this thread. Without further rambling, let's get to that now...
I left off in the last thread with a picture of the AWR Racing engine mounts. I had to modify the passenger side to allow my turbo manifold to clear, while the driver side just bolted right in place (as expected).
NA stuff at this point is just too weak for a car putting out a little more than 500 RWHP. Since I installed a TII transmission previously, it seemed logical to just complete the rest of the TII drivetrain, so I purchased a low mile '87 TII rear end from a forum member as well as the matching axle shafts. The price was quite reasonable and mechanically the parts were tight and solid.
Aesthetically however, the parts were 24 years old so first they got a decent degreasing with brake cleaner, and then I media blasted. The axles were blasted with copper slag in the blast cabinet and after a few minutes all that rust and filth was just a fleeting memory.
The differential was a bit more involved. Since it was far too large to fit in the blast cabinet I took it into the alley beside the shop and blasted it against the wall. Copper slag was used on the cast nose, while crushed glass was used on the rear aluminum housing. Actually, while I was blasting the aluminum housing, so much dust was created (my crushed glass had been already run through the blasting pot several times, so it was pretty dusty at this point) that a douchebag crackhead neighbor called the fire department. He thought that the dust was smoke and that the media blaster was some kind of infernal pyromaniac device! Just as I was finishing, 3 fire trucks rolled up in full alert. They were very much not amused when they found that instead of a fire, they were called out for dust caused by media blasting. All was not lost because after showing one of the firemen around the shop, the next he brought me a box of parts to be blasted from his '69 Mustang.
I started spraying the diff and axles with POR-15, a process of which I do not have pictures. The camera stays out of the painting area because last time I got paint on it, 2 hours was wasted getting it off the lens...
So while alternately spraying paint and waiting for it to dry, I moved on to the mirrors. The casing of my passenger mirror has had a chunk broken off for years, a consequence of pushing the car out of the garage without looking for clearance. And the driver side was pretty cracked as well. So I purchased a good used set of manual S4 style mirrors locally. They were in good shape, but there were a few minor cracks to be repaired on the driver side. A crack like this isn't really a big deal and can be fixed in about 10 minutes (not counting the time it will take the epoxy to dry).
Thread Starter
Joined: Feb 2001
Posts: 29,798
Likes: 128
From: London, Ontario, Canada
First I ground out the crack with a rotary file mounted to the Dremel. You can see that I ground well past the ends of the crack and made sure the area was wide enough to get a good hold on the epoxy.
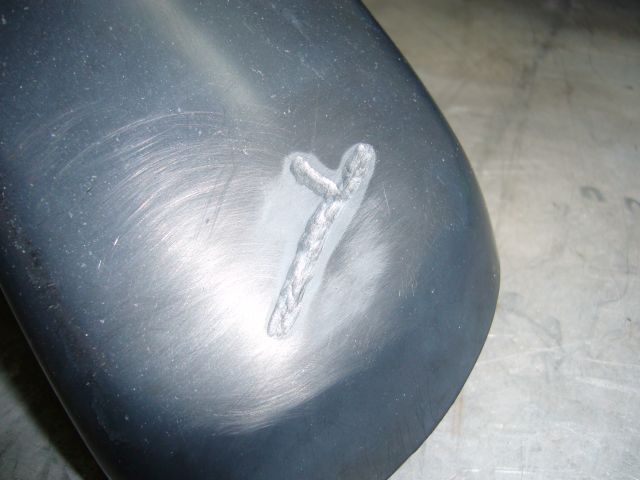
The epoxy I used is Permatex PermaPoxy Plastic Weld, a high strength epoxy designed specifically for plastics such as ABS. The packaging says "5 minute" but it took at least 45 minutes to firm up when mixed according to the included instructions. And holy sweet hell, does it ever stink! Within a minute I had my respirator on to block out the odor and keep the inside of my nose from burning. The MSDS says "Exposure to vapors or mist may result in irritation of the respiratory tract" and they weren't kidding. As you can see in the picture, I also filled a few imperfections near the mounting flange area. They were just chips, probably caused by stones.

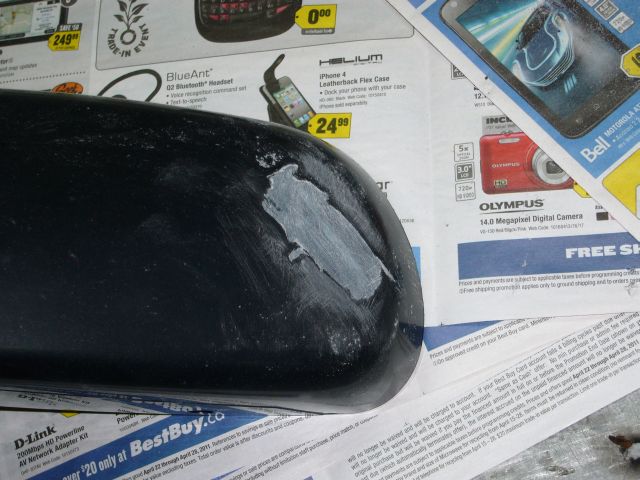
I let the epoxy cure for about 4 days and then began sanding it down. Starting with 320 grit, I took of the majority of extra epoxy after first scraping it with a razor blade.
The area was then sanded with 600 grit.
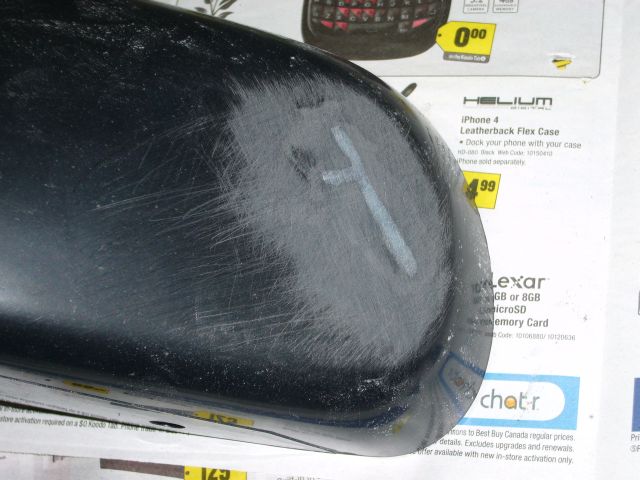
Finally, the whole mirror was wet sanded with 800 grit paper to both smooth out any remaining imperfections and provide a good surface for the paint to bond. The new passenger mirror didn't need any repair work, so it was just treated to an 800 grit wet sanding.
There is something here worth mentioning; a warning to anyone who buys used parts. After I purchased these mirrors I put them on the passenger foot well of my Insight and then drove home. It was a cool and dark evening. The next day, they were still on the floor when I went to work. By early afternoon the day had warmed up, the sun was shining nicely into the car, and I was driving down the highway on the way back from a service call. Something was in my hair so I swatted it away. Only to have it return in another moment. After swatting again I noticed what was flying around my head; bees! Actually, WASPS! Looking down at the mirror, yellow jacket wasps were popping out of it in disturbing quantities. I quickly pulled over, opened up all the windows and the rear hatch, then put the mirror into a plastic bag. When I got home and opened the bag I counted 17 wasps. It's unnerving to think what would have happened if one had stung me in the face/eye while I was driving. Just goes to show you: if you buy used exterior parts, check for flying stinging insects!
The epoxy I used is Permatex PermaPoxy Plastic Weld, a high strength epoxy designed specifically for plastics such as ABS. The packaging says "5 minute" but it took at least 45 minutes to firm up when mixed according to the included instructions. And holy sweet hell, does it ever stink! Within a minute I had my respirator on to block out the odor and keep the inside of my nose from burning. The MSDS says "Exposure to vapors or mist may result in irritation of the respiratory tract" and they weren't kidding. As you can see in the picture, I also filled a few imperfections near the mounting flange area. They were just chips, probably caused by stones.
I let the epoxy cure for about 4 days and then began sanding it down. Starting with 320 grit, I took of the majority of extra epoxy after first scraping it with a razor blade.
The area was then sanded with 600 grit.
Finally, the whole mirror was wet sanded with 800 grit paper to both smooth out any remaining imperfections and provide a good surface for the paint to bond. The new passenger mirror didn't need any repair work, so it was just treated to an 800 grit wet sanding.
There is something here worth mentioning; a warning to anyone who buys used parts. After I purchased these mirrors I put them on the passenger foot well of my Insight and then drove home. It was a cool and dark evening. The next day, they were still on the floor when I went to work. By early afternoon the day had warmed up, the sun was shining nicely into the car, and I was driving down the highway on the way back from a service call. Something was in my hair so I swatted it away. Only to have it return in another moment. After swatting again I noticed what was flying around my head; bees! Actually, WASPS! Looking down at the mirror, yellow jacket wasps were popping out of it in disturbing quantities. I quickly pulled over, opened up all the windows and the rear hatch, then put the mirror into a plastic bag. When I got home and opened the bag I counted 17 wasps. It's unnerving to think what would have happened if one had stung me in the face/eye while I was driving. Just goes to show you: if you buy used exterior parts, check for flying stinging insects!
Thread Starter
Joined: Feb 2001
Posts: 29,798
Likes: 128
From: London, Ontario, Canada
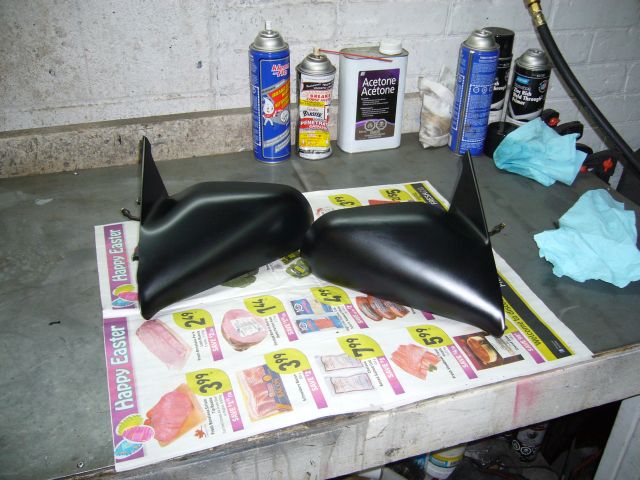
Once de-wasped, repaired and sanded, the mirrors were each shot with 5 coats of DupliColor Trim Paint. This paint is quite thin, and it took 5 coats to hide even the very fine 800 grit sanding scratches. I should have used some kind of high build primer first, because in just the right light, the very faint line of where I made my repairs can be seen. However for 99% of the time that is not an issue so I'm basically happy. Next time, I'll prime first. DupliColor recommends and adhesion promoter when using this paint over plastic, but I've never found that necessary over a properly cleaned and sanded surface.
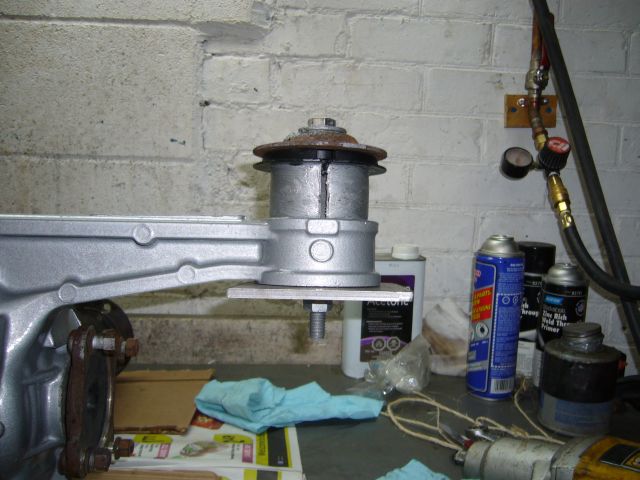
The paint on the drivetrain parts was at this point fully dry, so it was time to press in the new MazdaComp differential mounts. Lacking a press, I didn't want to lug that differential all the way to a machine shop, so instead I improvised a little. From the hardware store I picked up a fairly large 1/2" bolt, nut and assorted washers. I then drilled a hole through a small piece of 1/4" steel plate. Positioning the mount on top of the differential ear bore, I used an old 1st gen RX-7 transmission mount washer to support the top of the mount. The bolt was then lubed up with anti-seize, put through the mount, and the nut tightened below against the plate (with a washer in between). Once the mount was anti-seized, I used an impact gun to run down the bolt. Not quite sure if this would work, I was quite happy indeed to see the mount slowly sink into the differential and then bottom out with very little effort. All in all, it took about 5 minutes to make the press and install both mounts.
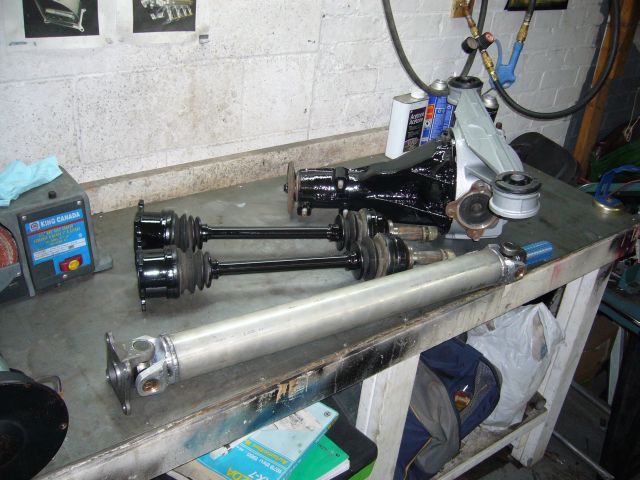
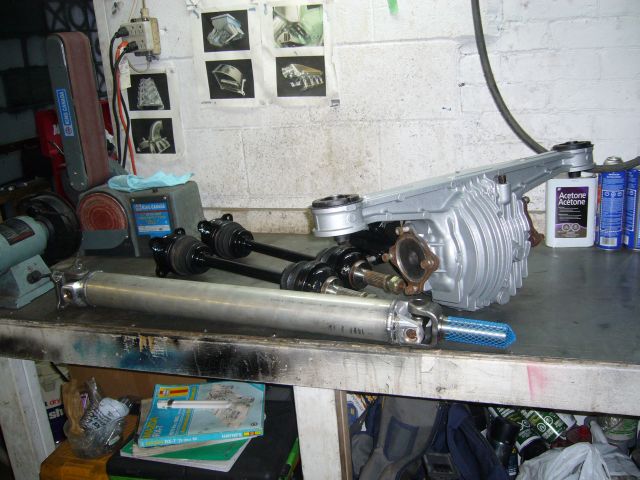
Finally, the drivetrain parts were ready for installation. From Mazdatrix I picked up an aluminum TII driveshaft. Normally I purchase my driveshafts from the local driveline shop but I needed to order the competition mounts anyway. It was about the same cost to get the aluminum shaft from Mazdatrix as it would have been to have a steel shaft made since the exchange rate with the US dollar favored the Canadian dollar so much at the time.
The Mazdatrix comes with what must be the worst condom ever on its snout. I like to call it the “Pregg-O-Matic”.
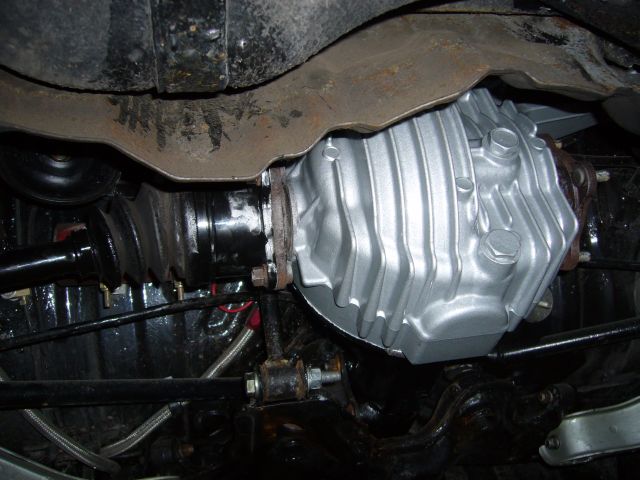
This is actually the first time I have ever sprayed POR-15 and I must say that I'm impressed by how well it laid down. The orifice on my spray gun is a little small, at only 0.8MM so a thick paint like POR-15 didn't result in a very good spray pattern. If you are going to spray, I'd recommend using a primer gun with a big orifice since you can't thin POR-15 more than 5% (with their thinner) according to the instructions. However its inherent self-leveling capabilities made up for the poor spray pattern and it ended up glass smooth. Each part received three coats with about a day drying time in between. I didn't prep the surfaces with MetalReady as once blasted, they were rust free and had quite a “tooth” for the paint to grip. Obviously the rear of the differential, being aluminum, didn't need the corrosion protection of POR-15 but I chose to spray it with silver POR-15 to give it that clean, powder coated look.
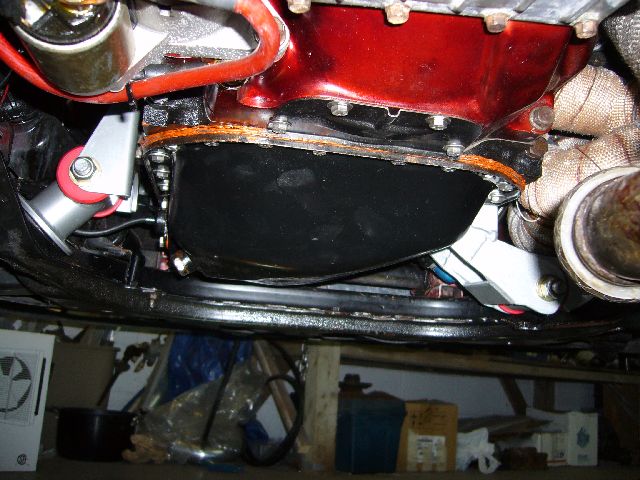
Once the paint was dry I began the task of removing the broke NA differential. Since my shop was full of my '76 Cosmo and another car, I was stuck doing the work in my driveway. Then again, I built the car is my driveway anyway, so it was just like old times...
I pulled the broken differential in the standard way by dropping the subframe. It's not really that big of a job, but the logistics of doing it on a driveway instead of a shop make it quite annoying.
The paint on the drivetrain parts was at this point fully dry, so it was time to press in the new MazdaComp differential mounts. Lacking a press, I didn't want to lug that differential all the way to a machine shop, so instead I improvised a little. From the hardware store I picked up a fairly large 1/2" bolt, nut and assorted washers. I then drilled a hole through a small piece of 1/4" steel plate. Positioning the mount on top of the differential ear bore, I used an old 1st gen RX-7 transmission mount washer to support the top of the mount. The bolt was then lubed up with anti-seize, put through the mount, and the nut tightened below against the plate (with a washer in between). Once the mount was anti-seized, I used an impact gun to run down the bolt. Not quite sure if this would work, I was quite happy indeed to see the mount slowly sink into the differential and then bottom out with very little effort. All in all, it took about 5 minutes to make the press and install both mounts.
Finally, the drivetrain parts were ready for installation. From Mazdatrix I picked up an aluminum TII driveshaft. Normally I purchase my driveshafts from the local driveline shop but I needed to order the competition mounts anyway. It was about the same cost to get the aluminum shaft from Mazdatrix as it would have been to have a steel shaft made since the exchange rate with the US dollar favored the Canadian dollar so much at the time.
The Mazdatrix comes with what must be the worst condom ever on its snout. I like to call it the “Pregg-O-Matic”.
This is actually the first time I have ever sprayed POR-15 and I must say that I'm impressed by how well it laid down. The orifice on my spray gun is a little small, at only 0.8MM so a thick paint like POR-15 didn't result in a very good spray pattern. If you are going to spray, I'd recommend using a primer gun with a big orifice since you can't thin POR-15 more than 5% (with their thinner) according to the instructions. However its inherent self-leveling capabilities made up for the poor spray pattern and it ended up glass smooth. Each part received three coats with about a day drying time in between. I didn't prep the surfaces with MetalReady as once blasted, they were rust free and had quite a “tooth” for the paint to grip. Obviously the rear of the differential, being aluminum, didn't need the corrosion protection of POR-15 but I chose to spray it with silver POR-15 to give it that clean, powder coated look.
Once the paint was dry I began the task of removing the broke NA differential. Since my shop was full of my '76 Cosmo and another car, I was stuck doing the work in my driveway. Then again, I built the car is my driveway anyway, so it was just like old times...
I pulled the broken differential in the standard way by dropping the subframe. It's not really that big of a job, but the logistics of doing it on a driveway instead of a shop make it quite annoying.
Thread Starter
Joined: Feb 2001
Posts: 29,798
Likes: 128
From: London, Ontario, Canada
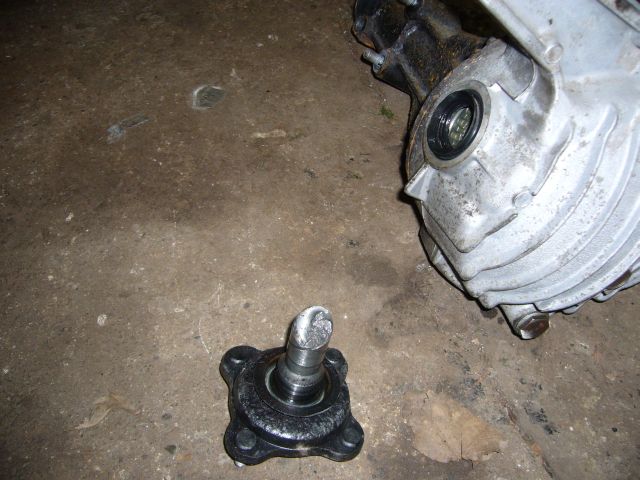
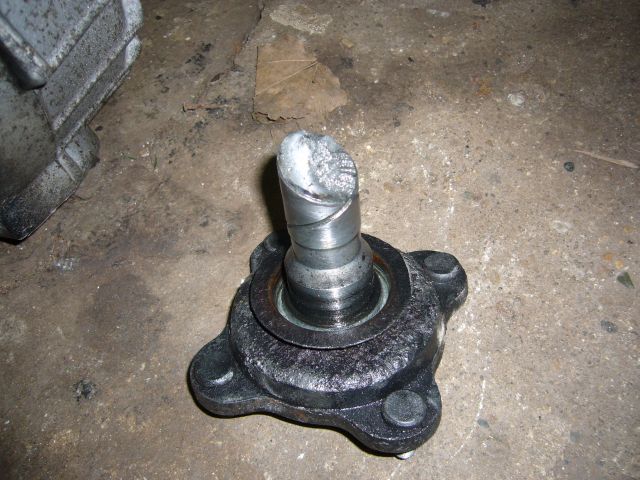
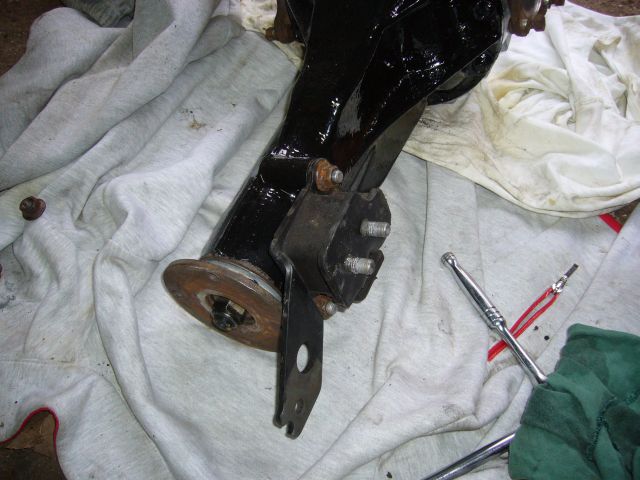
500HP on an S4 NA LSD does this.
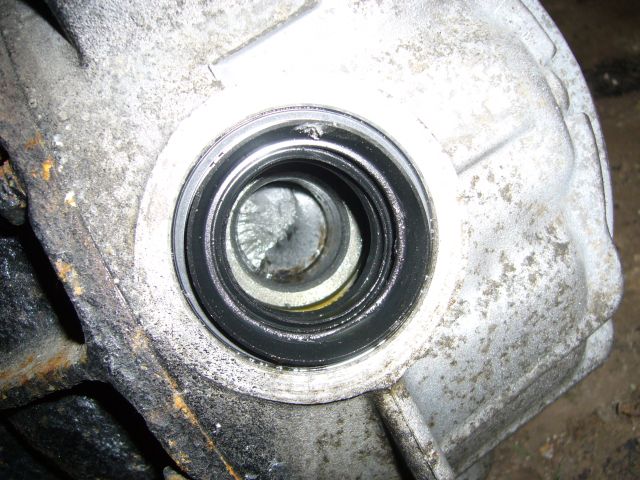
I suspect the differential became damaged during a late summer autocross last year. After running that course it had a bit of an odd noise to it a week after. Then I went to the � mile, and promptly broke the stub shaft.
Since I already had a competition front differential mount, I just swapped it over to the new TII differential. I guess I could have spent a little more time masking the thing up for paint, but honestly, it's a differential and that area is hidden by the subframe anyway.
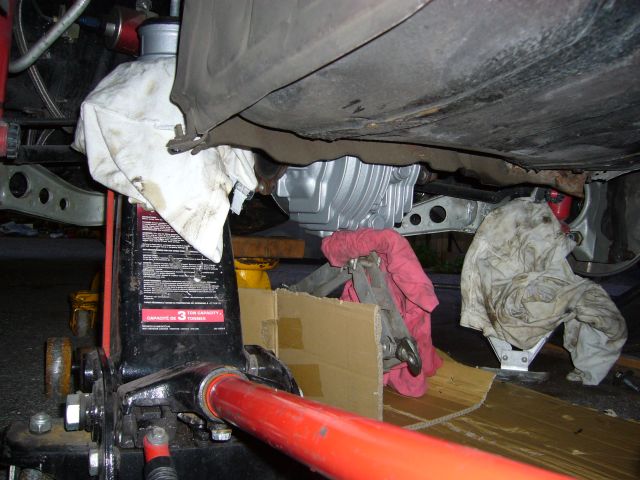
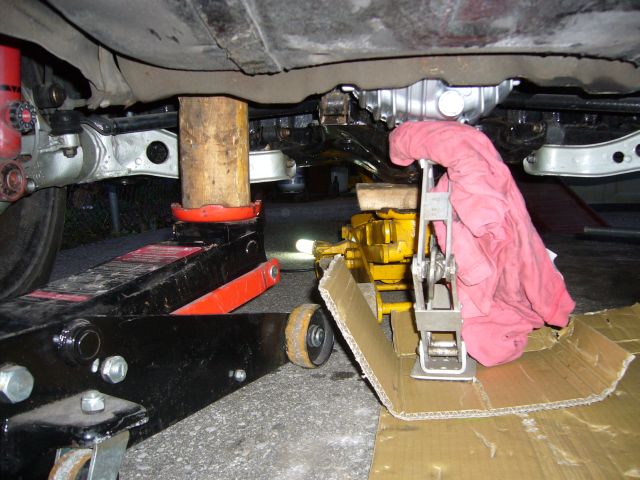
The key to getting the differential and subframe back up is a good selection of jacks. Here I'm using a floor jack to support the subframe, another to support one side of the diff, and my FC tire change jack to hold up the other side. It's then about inching all the jacks up while keeping the assembly stable and level.
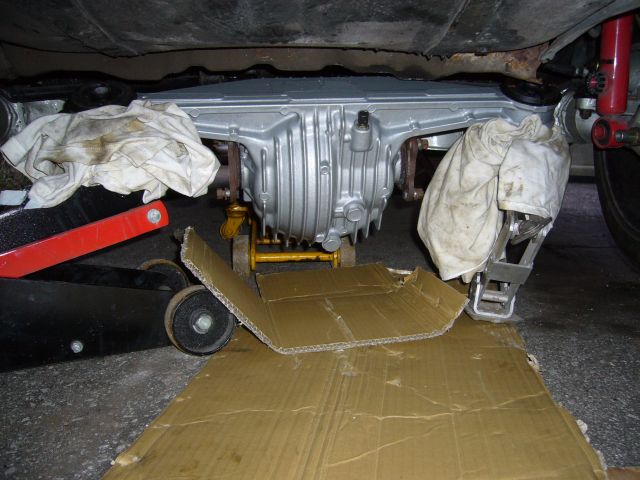
I had to add a fourth jack to hold the center of the pumpkin because it wanted to flop down. At first I tried to just bench press it into place, but go figure, I couldn't operate 3 jacks while bench pressing a TII differential at the same time.
It took some wiggling and pushing, but as soon as I found the sweet spot it slid right in...and that's what she said.
I suspect the differential became damaged during a late summer autocross last year. After running that course it had a bit of an odd noise to it a week after. Then I went to the � mile, and promptly broke the stub shaft.
Since I already had a competition front differential mount, I just swapped it over to the new TII differential. I guess I could have spent a little more time masking the thing up for paint, but honestly, it's a differential and that area is hidden by the subframe anyway.
The key to getting the differential and subframe back up is a good selection of jacks. Here I'm using a floor jack to support the subframe, another to support one side of the diff, and my FC tire change jack to hold up the other side. It's then about inching all the jacks up while keeping the assembly stable and level.
I had to add a fourth jack to hold the center of the pumpkin because it wanted to flop down. At first I tried to just bench press it into place, but go figure, I couldn't operate 3 jacks while bench pressing a TII differential at the same time.
It took some wiggling and pushing, but as soon as I found the sweet spot it slid right in...and that's what she said.
Thread Starter
Joined: Feb 2001
Posts: 29,798
Likes: 128
From: London, Ontario, Canada
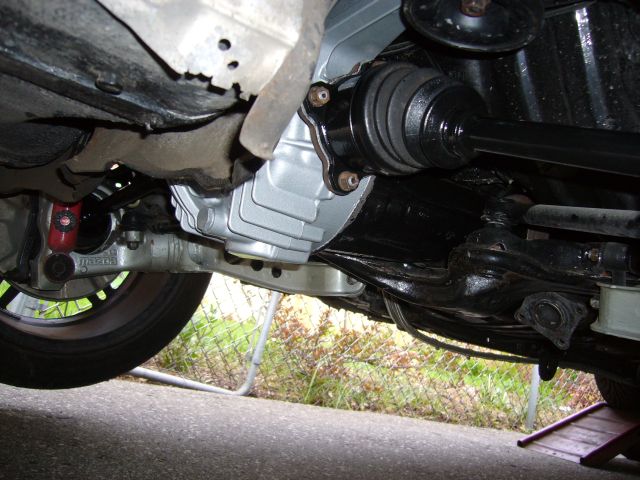
Once the diff and subframe are back up it's just a matter of bolting it into position and reattaching all those things removed; lower strut bolt, subframe link bar, subframe mount brackets, etc. Plenty of anti-seize needs to go onto all the fasteners to make sure they will come back off in the future.
Finally the damn thing is installed and torqued, so the axles can now be installed. Just so people are clear, these are TII axles going into 4 lug hubs. There is some confusion as to whether they fit and it's safe to say that yes, they do. Hmm...guess I could have painted my subframe link bar.
With a little lube, the spline of the axle slides right into the hub. From memory the torque spec is about 150 FT-Lbs, but I just knock it on with the impact until it's good and tight, then punch down the locking tab on the nut. These used axles were very tight so all I did was change the grease in the CV joints before installation.
Driveshaft time! Here's a comparison of my original driveshaft (TII trans to NA diff) and the Mazdatrix aluminum TII driveshaft. Both use the same big Spicer u-joints but of course, the Mazdatrix shaft is less than half the weight. Really I doubt that a few points of rotating mass on an object with such a small diameter really matters much to the overall performance of the car, but it can't hurt.
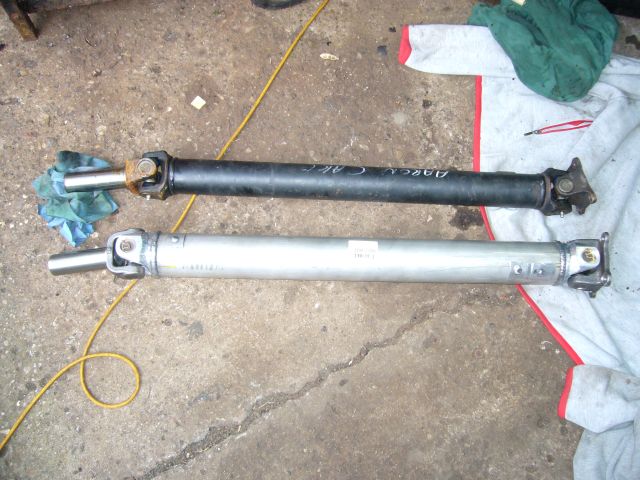
Time for a rant: Those who have been following my build know that I rarely buy bolt-on stuff for my car. Nearly everything I've done has been hand fabricated by yours truly. So it really chaps my *** when on the rare occasion of buying a bolt-on item, it doesn't actually bolt on! I had a TII transmission and a TII differential, and this is a TII driveshaft. So it fits perfectly, right? Not so much. The snout slid right into the transmission no problem but the flange would not bolt to the differential evenly. After some investigation, I found that the nut on the differential flange was hitting the recess on the driveshaft flange. I had to grind about 1/8” off of the threads protruding from the differential flange nut before the driveshaft would fit. Now it is possible that there was a simple machining error on the flange, or that perhaps the threads on my differential extended out past the point they would normally, but either way it was a major pain in the *** to discover at 9PM at night and caused me to have to drive to my shop for a grinder.
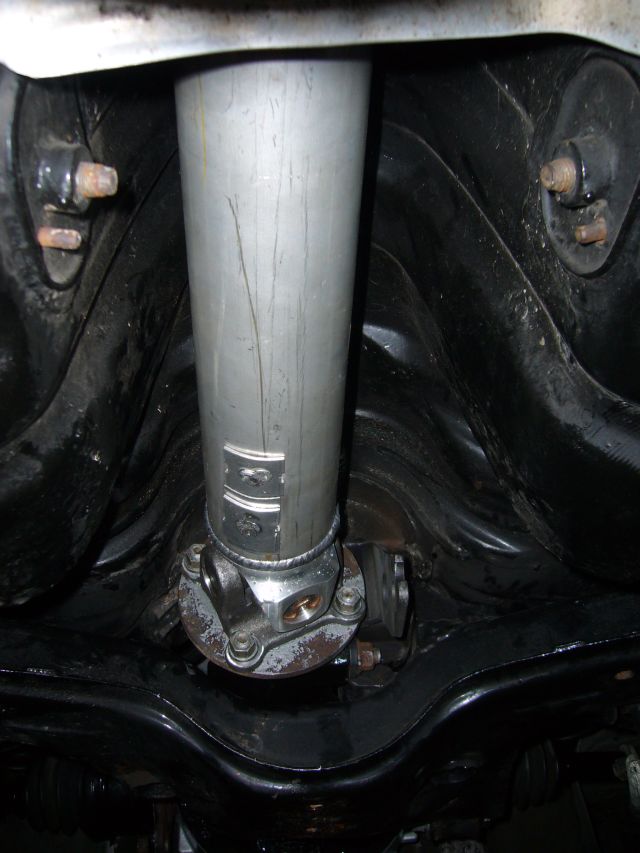
With the shaft installed I could then reinstall the heat shields, midpipe and cat-back. The wheels went back on and the car was dropped to the ground after the differential was filled with Amsoil Synthetic 75W-90 gear oil. I was back on the road for the season!
Finally the damn thing is installed and torqued, so the axles can now be installed. Just so people are clear, these are TII axles going into 4 lug hubs. There is some confusion as to whether they fit and it's safe to say that yes, they do. Hmm...guess I could have painted my subframe link bar.
With a little lube, the spline of the axle slides right into the hub. From memory the torque spec is about 150 FT-Lbs, but I just knock it on with the impact until it's good and tight, then punch down the locking tab on the nut. These used axles were very tight so all I did was change the grease in the CV joints before installation.
Driveshaft time! Here's a comparison of my original driveshaft (TII trans to NA diff) and the Mazdatrix aluminum TII driveshaft. Both use the same big Spicer u-joints but of course, the Mazdatrix shaft is less than half the weight. Really I doubt that a few points of rotating mass on an object with such a small diameter really matters much to the overall performance of the car, but it can't hurt.
Time for a rant: Those who have been following my build know that I rarely buy bolt-on stuff for my car. Nearly everything I've done has been hand fabricated by yours truly. So it really chaps my *** when on the rare occasion of buying a bolt-on item, it doesn't actually bolt on! I had a TII transmission and a TII differential, and this is a TII driveshaft. So it fits perfectly, right? Not so much. The snout slid right into the transmission no problem but the flange would not bolt to the differential evenly. After some investigation, I found that the nut on the differential flange was hitting the recess on the driveshaft flange. I had to grind about 1/8” off of the threads protruding from the differential flange nut before the driveshaft would fit. Now it is possible that there was a simple machining error on the flange, or that perhaps the threads on my differential extended out past the point they would normally, but either way it was a major pain in the *** to discover at 9PM at night and caused me to have to drive to my shop for a grinder.
With the shaft installed I could then reinstall the heat shields, midpipe and cat-back. The wheels went back on and the car was dropped to the ground after the differential was filled with Amsoil Synthetic 75W-90 gear oil. I was back on the road for the season!
Thread Starter
Joined: Feb 2001
Posts: 29,798
Likes: 128
From: London, Ontario, Canada
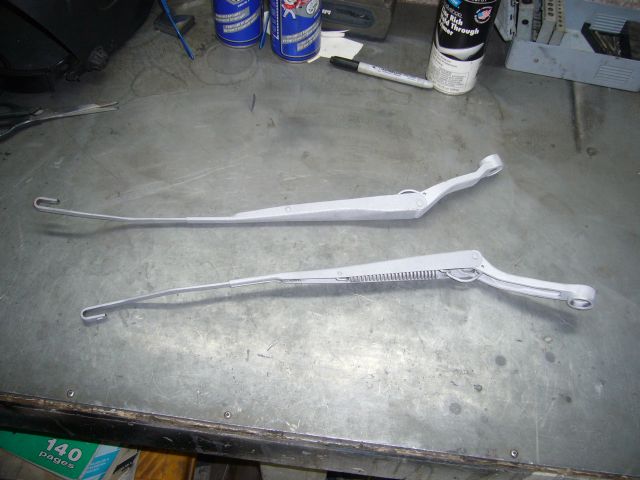
I waited for a week where no rain was forecast, and then removed the wiper arms. I had repainted them several years earlier with DupliColor trim paint but I guess I screwed up, because it didn't hold up very well. By this time the arms were rusting and flaking pretty badly and since they were directly in my field of view when driving the car, it was getting damn annoying. This time I decided to prep them properly, so the first step was to blast them with crushed glass. This took off all the old paint and rust, leaving a perfect rough surface for paint.
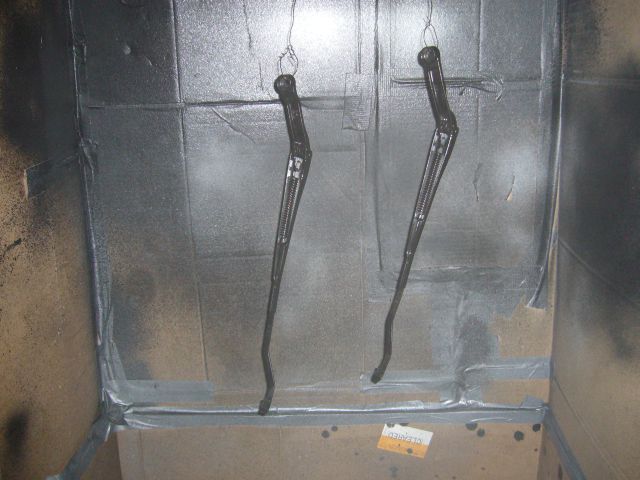
Then, I sprayed on two coats of POR-15. While the 2nd coat was still slightly tacky, I began spraying the trim paint. 5 coats of DupliColor trim paint were applied and then the arms were put aside for 5 days to cure.
Yes, I have a cardboard paint booth. The landing at the bottom of the stairs leading to the basement at my shop has been converted into a convenient spot for painting small items because I was sick of having to mask off half the shop and everything in it when spraying paint.
Once cured, the wiper arms were reinstalled. I'm overall very happy with how they came out and highly doubt that I will be facing chipping, flaking or rusting problems for quite a while.
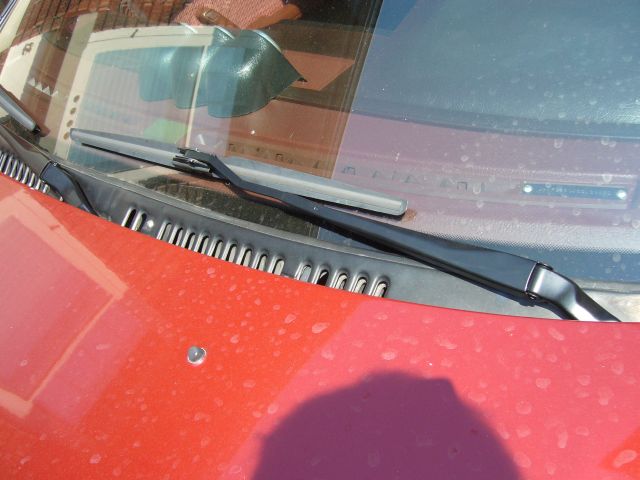
And that's about it. I've been driving the car all summer and quite enjoying it. I'm always tweaking the tune, chasing a slightly better air/fuel ratio here, a timing improvement there, and overall a much better driving car. It's a continual process of refinement and pretty soon I should book some dyno time to get some updated numbers as the car hasn't been on the rollers for years.
OK, so I have two complaints. One, the pan bolts on my transmission don't want to stay tight. They seem to loosen up every month or so. I'm going to have to drop the pan, replace the gasket, then reinstall all the bolts with a little Loctite. Two, my bloody clutch slips. My clutch guy assured me that the 3 puck Kevlar clutch would handle the power, but I guess not. This I am not happy about, because it means dropping the sodding transmission yet again. But, since it only slips under high traction conditions (at the drag strip), I will live with it until I can bring myself to drop the transmission.
Then, I sprayed on two coats of POR-15. While the 2nd coat was still slightly tacky, I began spraying the trim paint. 5 coats of DupliColor trim paint were applied and then the arms were put aside for 5 days to cure.
Yes, I have a cardboard paint booth. The landing at the bottom of the stairs leading to the basement at my shop has been converted into a convenient spot for painting small items because I was sick of having to mask off half the shop and everything in it when spraying paint.
Once cured, the wiper arms were reinstalled. I'm overall very happy with how they came out and highly doubt that I will be facing chipping, flaking or rusting problems for quite a while.
And that's about it. I've been driving the car all summer and quite enjoying it. I'm always tweaking the tune, chasing a slightly better air/fuel ratio here, a timing improvement there, and overall a much better driving car. It's a continual process of refinement and pretty soon I should book some dyno time to get some updated numbers as the car hasn't been on the rollers for years.
OK, so I have two complaints. One, the pan bolts on my transmission don't want to stay tight. They seem to loosen up every month or so. I'm going to have to drop the pan, replace the gasket, then reinstall all the bolts with a little Loctite. Two, my bloody clutch slips. My clutch guy assured me that the 3 puck Kevlar clutch would handle the power, but I guess not. This I am not happy about, because it means dropping the sodding transmission yet again. But, since it only slips under high traction conditions (at the drag strip), I will live with it until I can bring myself to drop the transmission.
No One Important
Joined: Aug 2011
Posts: 35
Likes: 0
From: Edmonton, Kanata
looks good, nice mirror repair. Must be time consuming to be doing 2 major projects at the same time. Just finished watching parts 10-17 of Cosmo resto over the last couple nights getting ready to start on my FC
Trending Topics


you did lots of work to the car since last year lol
It seems the driver side of the n/a diff stubs tend to break, mines also broke, but that was from massive wheel hop
Glad to see the car so well kept.
That reminds me, I have to Por-15 my underside and replace my diff mounts.
It seems the driver side of the n/a diff stubs tend to break, mines also broke, but that was from massive wheel hop
Glad to see the car so well kept.
That reminds me, I have to Por-15 my underside and replace my diff mounts.
sweet progress.
I have to tackle the bottom of my car soon with POR-15 to stop some rust down there, and I'm going to drop the subframe and replace the diff mounts.
Good to know I don't need a press to put new mounts on! I'll be using your pics as a reference when I start my next project.
I have to tackle the bottom of my car soon with POR-15 to stop some rust down there, and I'm going to drop the subframe and replace the diff mounts.
Good to know I don't need a press to put new mounts on! I'll be using your pics as a reference when I start my next project.
Thread Starter
Joined: Feb 2001
Posts: 29,798
Likes: 128
From: London, Ontario, Canada
You watched parts 10 - 17 in a row?! Holy hell.

That reminds me, I have to Por-15 my underside and replace my diff mounts.
On the fasttrack!
iTrader: (22)
Joined: Oct 2006
Posts: 2,494
Likes: 2
From: virginia beach, virginia
seems like a lot more work to get the diff in with 4 jacks lol
i was able to get my whole powder coated subframe w/solid bushings, and diff w/solid bushings with just a jack, just gotta balance everything
Lloyd
i was able to get my whole powder coated subframe w/solid bushings, and diff w/solid bushings with just a jack, just gotta balance everything
Lloyd
Joined: May 2006
Posts: 3,881
Likes: 3
From: Jacksonville, Tampa & Tallahassee
Balancing the entire assembly w/ one jack (and no helpers) ....ha! Vid or it didn't happen.
Its definitely easier to drop the whole assembly, but since I didn't have enough extra jacks or a friend to help lift/stabilize the assembly, I loosened the subframe bolts and pulled the difff w/o removing the subframe, getting it out was relatively simple, but bench pressing it back in at the right angle while simultaneously prying the subframe away from the chassis....THAT was a bitch!
Its definitely easier to drop the whole assembly, but since I didn't have enough extra jacks or a friend to help lift/stabilize the assembly, I loosened the subframe bolts and pulled the difff w/o removing the subframe, getting it out was relatively simple, but bench pressing it back in at the right angle while simultaneously prying the subframe away from the chassis....THAT was a bitch!
On the fasttrack!
iTrader: (22)
Joined: Oct 2006
Posts: 2,494
Likes: 2
From: virginia beach, virginia
how about a finished product pic? ive done a trans on my back, by myself, with just 1 jack, on the ground....
***** doable, just not easy.
keep up the good work aaron
Lloyd
***** doable, just not easy.
keep up the good work aaron
Lloyd


~!@#$%^&*()_+
Joined: Oct 2001
Posts: 461
Likes: 0
From: Mpls, MN
Bought a floor tranny jack for $50 on CL, dont even want to think about the old days, now I just strap the tranny on with chains and adjust the angles and stuff slides right in. Makes taking the rear end out pretty easy also makes taking out large 4wd trannys a snap. Its whored out quite a bit so its not taking up much space most of the time.
Lots of awesome cheap tools on CL.
Lots of awesome cheap tools on CL.
Balancing the entire assembly w/ one jack (and no helpers) ....ha! Vid or it didn't happen.
Its definitely easier to drop the whole assembly, but since I didn't have enough extra jacks or a friend to help lift/stabilize the assembly, I loosened the subframe bolts and pulled the difff w/o removing the subframe, getting it out was relatively simple, but bench pressing it back in at the right angle while simultaneously prying the subframe away from the chassis....THAT was a bitch!
Its definitely easier to drop the whole assembly, but since I didn't have enough extra jacks or a friend to help lift/stabilize the assembly, I loosened the subframe bolts and pulled the difff w/o removing the subframe, getting it out was relatively simple, but bench pressing it back in at the right angle while simultaneously prying the subframe away from the chassis....THAT was a bitch!

that axle stub snapping like that is a classic shock load, I deal with heavy vehicle systems product development and quality engineering. I can't count how many truckers snap axles like that at either a 45 or 90 degree angle. The rough crystalline finish shows an instantaneous overload. Straight textbook.
anywhoo
an easy way I've found by yourself to get the subframe back in is with two jacks
1. on the pumpkin of the diff
2. the other in linear correlation with it on the subframe.
then you just both jack them up together (alternate every few pumps) and line it up as you go, the hard part is getting all 4 bolts lined up off the bat.
it does help when you got a second hand to help the lining up but I've done diff swaps/jobs in these FCs too many times now, takes about an hr or two tops.
Thread Starter
Joined: Feb 2001
Posts: 29,798
Likes: 128
From: London, Ontario, Canada
Two people make it very easy. I've done enough of them with assistance that it's now under an hour to remove and reinstall. One person on a driveway though...less easy. 
Shock load for sure was the cause of the demise of the diff. When launching I had significant wheel hop and by the time my brain said "BACK OFF!" to my foot, it was too late.
Meh, the TII diff is pretty strong and won't brake. Last Friday I was at the 1/4 mile and ran a 12.75 @ 113 with a 2.02-something 60 foot time after a mild burn out on 215/17 street tires. Next year with a non-slippy clutch and set of street slicks, low 11s should be easy.

Thread
Thread Starter
Forum
Replies
Last Post