When you click on links to various merchants on this site and make a purchase, this can result in this site earning a commission. Affiliate programs and affiliations include, but are not limited to, the eBay Partner Network.
The pics of Sprocket eviscerated and laid bare for all to ogle make me sad and happy.
Sad because it seems likely that the collapsed cat was the actual problem and the engine could have limped even further down the road and happy because some of her soul may live on in Hiko's car.
Yes, I anthropomorphize my hardware.
I am having a hard time coming to grips with the new setup.
"Hard time" in a good way mind you, it's quite a remarkable difference and the difficulty is deciding how much is due to the (presumably) stronger engine and how much is the flywheel and headers.
I'm sure there's some "This thing better be great after all the effort and money!" too.
I've put about 75 miles on so far- no leaks, no real driveability issues (although there are adjustments still to be made) and except for the noise, she's happy to rev. I did not realize how much I missed driving her, it's so much more fun than the Focus I've been using.
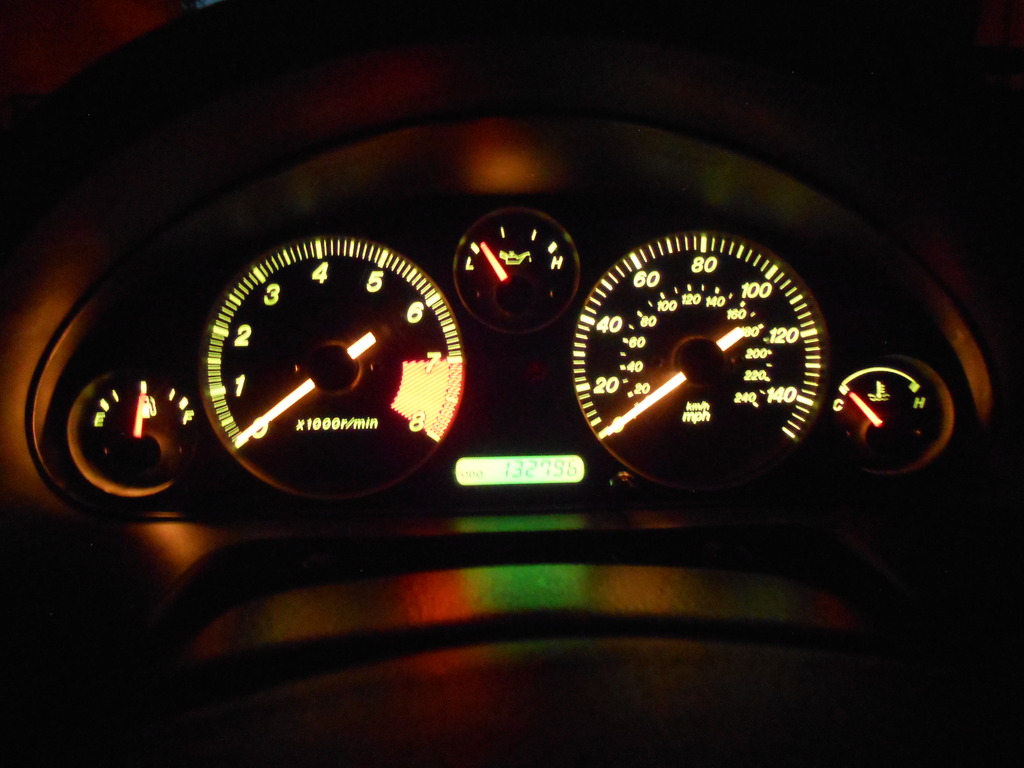
The new gauge cluster arrived and that will be the next project. Be nice to see the oil pressure and water temp for the first time, not to mention how much fuel I have.
I am conflicted as to how best to build it this time- specifically, how to deal with the VDO temp/pressure gauges.
Last time I used VDO guts with OEM dials and needles, so the cluster looked Miata original...and that was great. However, it always bothered me that removing the needles ruined the factory calibration...the gauges worked fine but was 190� indicated really 190�?
This time I'd hoped to keep the VDOs intact but that presents a host of construction problems and may well be too much work for too little return.
I was comfortable with the setup (possibly inaccurate gauges and all) because I was so familiar with the old engine...the readings I was getting seemed consistent with the performance and the way she behaved.
But I have no history with this engine, no baseline to start with...and no base of trust yet.
Last time, I had also checked the calibration of the fan trigger and knew for certain that LO kicked in a 195�, so when I set the needle on the gauge face (remember, the OEM Mazda dials have no numbers, just some hashmarks), I ran the car till the fan started and placed the needle dead center.
Trouble is, VDO gauges are not linear, so I never really knew how close disaster lay once the needle crept past center.
I did not verify the new BMW fan switch...I know the fan works (I've triggered it several times) but I don't know for a fact that it comes on at the nominally specced 195�.
While I ponder this issue, I'll just prep the cluster and install it stock.
See what kind of readings I get with the VDO sending units (already installed on the keg) and the OEM Mazda gauges.
That is exactly how we're running the Z and it's pretty good.
I also have an exhaust leak at the cat.
I tried using the Pacesetter supplied gasket (I used OEM Mazda for the engine/manifold gasket) and it seems to have disintegrated already. I figured it might, it was only thick paper but I didn't expect to go so quickly.
Use the mazda gasket. It's metal + fiberglass like filler ish. The old stock gaskets are metal with asbestos in the center.
I got the new gaskets when I "replaced" my cat with another "presilencer that looks like a cat". and the new OEM gaskets work fine. I have even took it down a few times and the gaskets seal right back up.
At least the VDO gauges are more linear than OEM. The OEM gauges are trash. My volt gauge is way off, my oil pressure gauge is way off...The only gauge that works correctly is the water temp gauge and it always sits just under the middle point, but we all know that when it goes above that, there should be replace engine light.
I always wanted to make a circuit that could turn on an LED to alert me if the engine got over a specific temperature even if the needle doesn't move, just never got into it.
Playing with the gauges again and not really liking my options.
It's tough with aging eyes...the black faced cluster is great at night but under certain conditions during the day, it just disappears into the black hole of the binnacle.
The white faced cluster is better in sunlight but the OEM Mazda lighting is dim and fuzzy at night.
And white gauge faces strike me as kind of JDM-cheezy.
Personally I have always liked black face AutoMeter gauges - I never like white face gauges, unless they were in maybe a Cobra kit car. There are a few other options, possible silver brushed aluminum face or if you found a bag in your front yard with stacks of $20 bills inside, you could always go this route;
At least the VDO gauges are more linear than OEM. The OEM gauges are trash. My volt gauge is way off, my oil pressure gauge is way off...The only gauge that works correctly is the water temp gauge and it always sits just under the middle point, but we all know that when it goes above that, there should be replace engine light.
I always wanted to make a circuit that could turn on an LED to alert me if the engine got over a specific temperature even if the needle doesn't move, just never got into it.
With the stock ECU, your easiest option is to get something like the gauges from Speedhut. They have programmable warning lights that activate at a certain set point. Or, maybe all you need is to measure what the ohms are at a specific temperature and have the circuit trigger the light at a certain ohm value. I think I've heard of such a circuit but I'm not sure what it is. Perhaps something that would (combined with a variable pot) would provide enough voltage to trigger a relay coil or logic-level circuit.
I'm bragging here: With a MegaSquirt MS3 with MS3x expansion, I actually already have all the sensors I need (and easily added a few others including fuel and oil pressure and oil temperature) and the outputs to drive warning lights.
This past Winter, I pulled the dash to do some cleanup on the wiring harness (adding accessories over the years had made a bit of a mess and there was the crumbling foam and dirt in the HVAC) and reworked it to reinstate the stock idiot cluster (from an S5 with a check engine light) and used the Add Coolant and Oil Level as temperature warning lights. Programming the set points and outputs in the MegaSquirt was simple (be sure to use diodes to isolate one output from another). With a working buzzer in the cluster, it's easy to tell if the warning light is on because of temperature or oil pan level (light with cluster buzzer). It worked well for me earlier this week on my way home and found that the oil temp was hovering at the 200-degree point in hot weather in heavy traffic, though I think that I was too cautious in temperature warning. If I wanted to know actual temperature/pressure readings, I can just display them on a tablet or log them.
The pics of Sprocket eviscerated and laid bare for all to ogle make me sad and happy.
Sad because it seems likely that the collapsed cat was the actual problem and the engine could have limped even further down the road and happy because some of her soul may live on in Hiko's car..
i dunno, if you look at the exhaust ports of the rotor housings, one is black, and one is a nice tan color. the one that is black was the one with a problem, not sure what, but something was wrong
I've been secluded in the Z-cave below Chateau Sigfrid for the past week, just came up for air.
(His elitist PC refuses to acknowledge my salt-o-the-earth (erf?) camera, so pics will have to wait till I get home next Thursday...)
I'm using the time to knock off the six remaining jobs on the punchlist and actually drive the car in daily life (instead of quick test trips around the block).
So far, I've completed four projects:
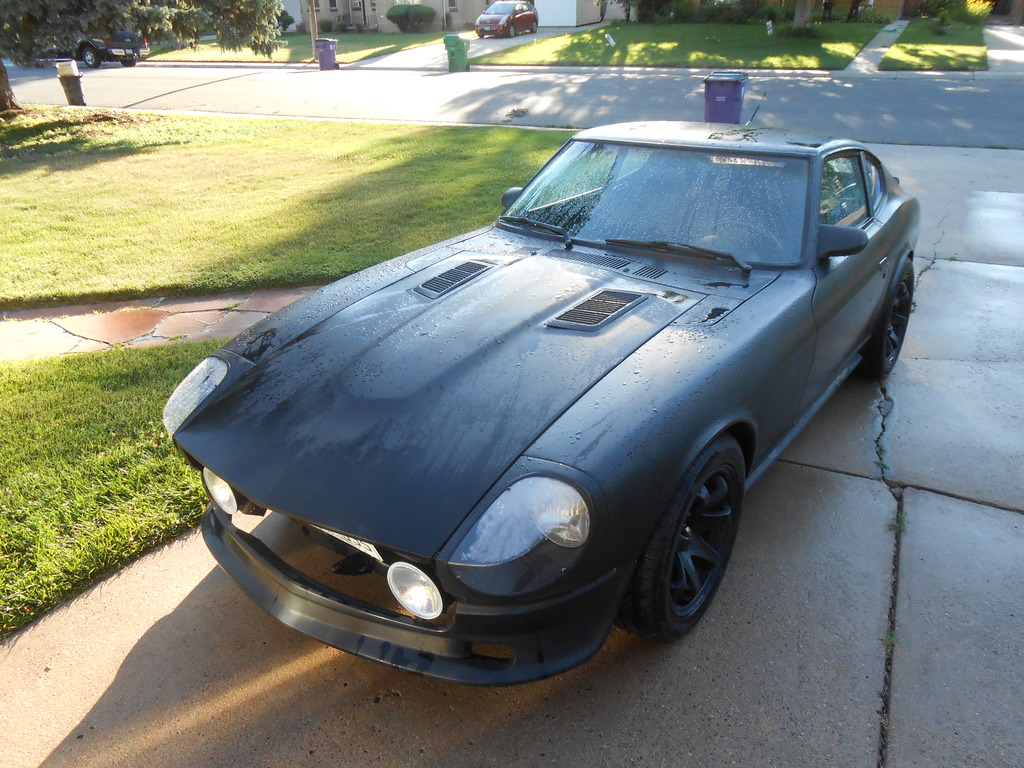
-the aero headlight covers are installed. These actually will improve highway fuel economy but we got them mostly to protect the headlamps and because they look bitchin. Optically they are pure crap but then again, so are our lights.
For a long time aftermarket product (I put a set on my 240Z fifteen years ago), the directions are awful and actually, wrong. Since drilling is involved, this is kinda a big deal. The trick is not just getting them to fit, it's getting the cover bolted to the three mount brackets without stress/tension.
That took me a day and a half and I replaced almost all of the supplied hardware but I'm pleased with the result.
-I finally got the horn AND the turn signal self-cancel to work at the same time. This was just a correction of my design flaw...I'd known what had to be fixed but never got around to it. It was an ugly Dremel operation (which is totally hidden) and my machinist sensibilities are appalled but **** it, it works.
-The hatch release mechanism is finally installed. We have been holding the cable and yanking the end because we weren't sure how/where we wanted the release until the interior was more finished. I finally made an executive decision and installed a Kia setup that I salvaged well over a year ago. It's more or less just like the setup on the FC and like everything else, looks fairly OEM/original.
-Redid the gauge cluster. Installed VDO water temp and oil pressure gauges (using Miata dials and needles).Got a bit blingy and swapped the white needles for red on the three small sub-gauges, so along with the green tint to the black dials (the green is on the dial back, not the lighting, which is white) it's vaguely Christmas-sy in there now.
Left to do:
-Wire in the rear defrost relay. I never did find a self-timed relay, so this will just be the normal Volvo relay as used elsewhere on the car and you'll be responsible for turning it off manually. And hell, we don't even know of the window grid is intact.
-Figure out a wiring glitch in the dash lighting relay.
And that more or less will finish off the mechanical parts of Stage 1, leaving only some interior cosmetics (like door panels) to figure out.
She drives/runs beautifully.
I have noticed a few ergonomic weaknesses but most are just personal preference and Sigfrid might fit better than I. For instance, I'd like the center console armrest to be about 1.5-2" taller.
We both agree though that the deadpedal is far too low and essentially useless, so that's something I'll ponder and look out for.
I haven't touched the FC since I came over here but will probably get back to her on Monday.
She too gets new gauges and the front lip needs remounting.
Among other things.
-Figure out a wiring glitch in the dash lighting relay.
Ah yes, the "glitch"...
This has been a bugaboo from day one, especially vexing because it only happens under very specific circumstances, which is why it wasn't discovered sooner.
Bear in mind that I designed (a generous description) and built the entire harness and it's not based on a stock system, so this is all on me.
The Z has no ignition switch, it was supplanted with two buttons and a Honda push START button...very racy. The first button powers up the ignition, the starter relay and the fuel pump- the car will start and run on just this setting. The second button powers all the subsystems- wipers, heater, radio, etc. The main lighting circuit is always hot, you can turn on the headlights any time you like.
There is a discrete relay just for gauge/dash lights and it all works just fine.
Until...
If you don't turn off the lights before deactivating the power button, the little gauge light relay somehow backfeeds into the headlight circuit and the lights won't go off no matter the light switch setting. You must power up the car, turn off the lights, then depower it again to get back to normal.
As long as you use the proper shutdown sequence, you're fine but do it wrong and you'll eventually kill the battery (because the taillights are blazing away).
I have no idea how the hell I did this.
And of course, now that the harness is fully installed with the dash on top of it, it ain't that easy to get to.
I spent some quality ohmmeter time trying to figure out what was going on but the results made no sense to me at all...which is kinda scary.
Being unwilling to remove the dash and deloom the harness, I decided to completely bypass this problematic relay and install a standalone relay/harness for these pesky little lights. As long as that original relay is unplugged, everything is fine and I'm kinda afraid to screw around with it, so this seems like the safest/easiest way to solve the problem.
New gauge setup. The oil and water are VDOs under Miata dials and needles. I mixed/matched and have red needles on the little guys and white on the speedo/tach. With the watery green dial tint, it's vaguely Chistmassy now...
Hatch release mechanism (Kia, I think):
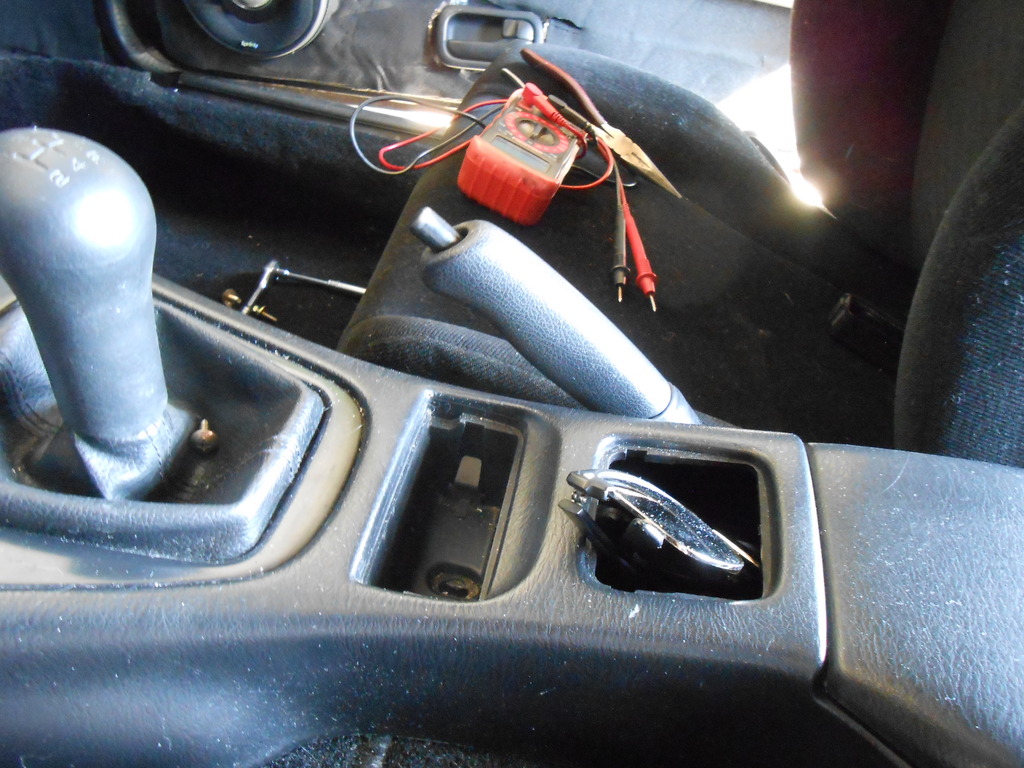
BMW ebrake handle:
Need to pretty up the button now.
Not pictured:
-Horn and TS cancel both now fully functional
-New deadpedal installed. The original is so close to the floor it may as well not be there at all.
-New TNS relay installed and the rear defroster is wired and (theoretically) working.
I went over to Cory's last night, got to see the old engine torn down.
I'm amazed how clean it is- I granny drive and she rarely saw over 6k rpm, but there was no significant carbon buildup at all. The rotors actually look like they've been nicely painted in satin black.
He has a nice S5 GTUs and using it as a guide (and his better eyes) we were able to straighten out my vac spider. Didn't seem to make any difference and it's still showing a MIL, so I guess it's time I learned to pull codes and see what she thinks is wrong.
Seems to drive OK though, she pulls clean, idles well and doesn't judder/backfire/stall- but Cory thought it was gutless down low. Neither of us has much experience with other FCs and his S5 is not currently running, so it's hard to tell.
When his motor gets done and the car is driving, we'll see how they compare.
And it's still obnoxiously loud...gotta get that fixed.
I guess it's time I learned to pull codes and see what she thinks is wrong.
So, I spent a tedious 30 seconds reading up on the procedure and another exhausting 30 seconds reading the codes.
There are three:
-#11...intake air thermosensor (manifold)
-#13...manifold air pressure
--#8...AWS solenoid
The first two are easily fixed (I have spares and can check the wiring if the new ones don't clear the codes) but #38 is a puzzler. I haven't had a AWS solenoid for a long while, but no codes before now.
How can I make the ECU stop bitching about a non-existent solenoid? What happens if I jumper the two wires at the connector?
I have never had hot/cold start issues, despite the deleted AWS rig- the car still revs to @2k rpm when cold, I assume the BAC is responsible for that extra air and she doesn't seem to miss the extra supply.
Don't jumper the two wires together. You will blow the main relay fuse, and possibly damage the PCM in a big way.
Are you sure you never had codes? Or was the check engine light simply not on?
I pulled the DTC trouble tree off Alldata, which takes it's source from the FSM
For code 11
I personally dislike Ohm testing parts. Ohms tests can lie. If a part has failed an Ohm check, the part is faulty. Period.
If a part "passes" an Ohm check, then it might be ok. This applies to loads and wires.
Thermisters, on the other hand, can be accurately tested with an ohmmeter.
Follow the above, except with the wire harness check. I do not trust ohm tests to test wires. A single strand of wire can have 0 resistance, but will not flow any current. A battery cable and a single strand of wire have the same resistance, but a load will show that a single strand will not start a car.
I use a small 12v battery I got out of a Mercedes Benz shift interlock that is nice and small. I hook up the battery to the two wires in question and the other ends of the wires to a sealed beam headlamp. If the lamp is bright, I know the wires are good to go. I also go overkill and hook up my amp clamp to the wire and measure the draw and the voltage, as well as the voltage drop. That way I can use an ohms law calculator and determine the exact resistance of the wire under a load.
For code 13
For this test, make it simple. Check the connections in step 1. Ignore step 2 for now, it's a waste of time.
Here is why:
You can somewhat verify circuit integrity by making measurements with a voltmeter at the sensor and again at the PCM. As long as you get the values above, you should be fine if you check at both places.
You can also check with the engine running for this test, make it easy on yourself. Just backprobe the sensor signal with it at idle, write down the voltage. Do a snap throttle and see if the number changes. I don't know which way the sensor reads, if close to 5v is atmospheric pressure, or close to 0v is atmosphere.
You can check with the engine off, key on to check barometric pressure voltage, or at least the maximum(or minimum) voltage the sensor should see.
According to your location, you are in the lovely area of Denver. The reason they want you test the sensor with a small vacuum is to take away the variances of barometric pressure. Obviously at elevation, it's going to be lower than those of us down here at sea level. YOu can get a really cheap Mity-Vac tester at harbor freight to put the sensor under an external vacuum through the sensor hose. The gauge on the Mity-Vac unit is pure trash, however so I tee in to mine with a good gauge (https://www.picoauto.com/products/pr...ure-transducer).
Not everyone has a very nice pressure transducer setup, so a decent engine vacuum gauge should be fine, provided it's accurate at low pressure variances.
I really hope you use a DVOM and not an old school analog multimeter. The old ones can let the smoke out of a PCM and last I checked, smoke is tough to get back inside a PCM once it's let out.
For code 38
If you do not have the solenoid installed, ignore it. You can plug a solenoid back into it to trick the PCM into thinking it lives there. I would not install a resister or anything like that here, because the PCM will trigger it and a resister will get hot under a 12v load.
The PCM does not have the sophisticated logic of newer controllers. It simply does an integrity check to make sure they are all attached, and that's about it. Newer controllers will actuate a solenoid and then look at other sensor values to determine if the desired outcome was achieved, if not then the MIL is illuminated.
I specialize on european vehicles at work and the wiring schematics are difficult at best to get through. Diagnostic information can be sparse and the logic levels in the controllers can be rather "unique". Good luck
A bit of progress, leavened with the requisite bit of weirdness.
Of the three codes, only #11 and #13 really concern me, although to get through emissions in March, I'll need a clear MIL, so I'll have to deal with the AWS delete eventually but for now, I'm only worried about the two issues that affect performance.
Code 11, the intake air temp sensor, has been cleared.
That was the easy one, so naturally that's where I started.
Code 13, the MAP sensor, is where it gets weird. There is nothing obviously wrong with the part or the wiring, so I put it back and hark!, no MIL.
But wait...why not?
The AWS is still missing, why isn't that showing up as a MIL warning?
I took a short drive and sure enough, MIL comes on but only sporadically.
Mostly it's off but then it flickers for a while. Got home and she's now displaying codes 13 and 38 again.
I dug out my spare MAP sensor and realized it's "spare" because the hose nipple is broken off, so that's under repair now.
I'm concerned about the inconsistent MIL activation though.
Why is it not constantly bitching about the lack of an AWS solenoid?
I guess my next move is to find a solenoid to plug in and definitively clear the #38 code, leaving only #13 to deal with.
It's hard to diagnose problems when you can't trust the data delivery system and right now, the MIL doesn't seem very accurate.
To be clear...all the warning lights -including the MIL- come on with the key and when jumpered, the MIL delivers codes exactly as expected, so that part seems OK but what's this flickering business?
In theory, shouldn't the missing AWS and (theoretically) bad MAP sensor trigger a constant MIL?
The first two are easily fixed (I have spares and can check the wiring if the new ones don't clear the codes) but #38 is a puzzler. I haven't had a AWS solenoid for a long while, but no codes before now.
How can I make the ECU stop bitching about a non-existent solenoid? What happens if I jumper the two wires at the connector?
I have never had hot/cold start issues, despite the deleted AWS rig- the car still revs to @2k rpm when cold, I assume the BAC is responsible for that extra air and she doesn't seem to miss the extra supply.
So, what to do?
if you really read the fine print in the FSM code #38 will store in the ECU, but it does not actually turn on the CEL. the ACV solenoid codes are like this as well.
if you really read the fine print in the FSM code #38 will store in the ECU, but it does not actually turn on the CEL. the ACV solenoid codes are like this as well.
Sweet!, thank you.
That makes life much simpler.
That means the flickering MIL is entirely the MAP sensors fault...which I guess tells me something.
We'll see what happens when I replace it later.
Fingers are crossed because those damn things are expensive.
That means the flickering MIL is entirely the MAP sensors fault...which I guess tells me something.
We'll see what happens when I replace it later.
Fingers are crossed because those damn things are expensive.
Keep us posted. I didn't dive too deep into the logic of the code 38, because AWS deletes are stupid common and generally did not turn a MIL on.
The PCM flickers the light when it sees the fault, so a continuous fault keeps the light on and an intermittent turns it off. At least it stores a code.
The two wires associated with the ECU (v-ref & ground) check out fine (which relieves an anxiety I didn't even know I had) but the signal is way out of spec.
I wasn't applying any vacuum, so I expected the reading to be slightly different but instead of 2.8>3.2v, my "good" sensor shows 4.4v.
Under the same conditions, the repaired sensor reads 1.1v.
Both sensors generate a code.
I'm thinkin I needs me a new one.
I wonder if I can find a less ridiculously priced real, live new part from another car...Mazda wants $350 and even Rock Auto is getting $150 but the sensor for our LT4 was only $30.
That just ain't right.
I have just lobbed a fluffly wiffleball up for Ben, who can now step in with a comment about "cheap FC owners"...and he'll have me dead to rights, too.
The MAF's for the S5 FC are mostly all re-manufactured units, so your two "cores" have some value. That also means they can be repair and the calibration confirmed.
If you think the FC S5 MAF is expensive, try pricing the; MAP, IAC or TPS. That is why there are folks out there that specialize in parting out RX7's. You may end up having to source a good used MAF.
I would not try to adapt a MAF from another application, the calibration would not even be close. You would need a transfer function at best to get it to work. It would be easier to switch to a stand alone after market speed density EFI setup.
It's not only because of blown apex seals and the lack of torque that folks give up on the magic spinning Doritos, the cost of rotary replacement parts can force them switch to a less expensive piston engine option as you have already pointed out. If you live in an area where you didn't have deal with emissions checks and inspections, I can also understand why folks would forgo the factory EFI system for a Holley or Weber carb setup. Just like what you did for the Z-car.

 06-20-16, 08:48 AM