She Followed Me Home, Honest
 06-12-16, 08:02 PM
#2301
I have yet to pull the cat out as I wanted to make some positive progress before confronting the next potential roadblock.
I have twice douched the mounting bolts with PB blaster, using that as an excuse for not actually removing the cat. "Preplanning as procrastination", a real artform.
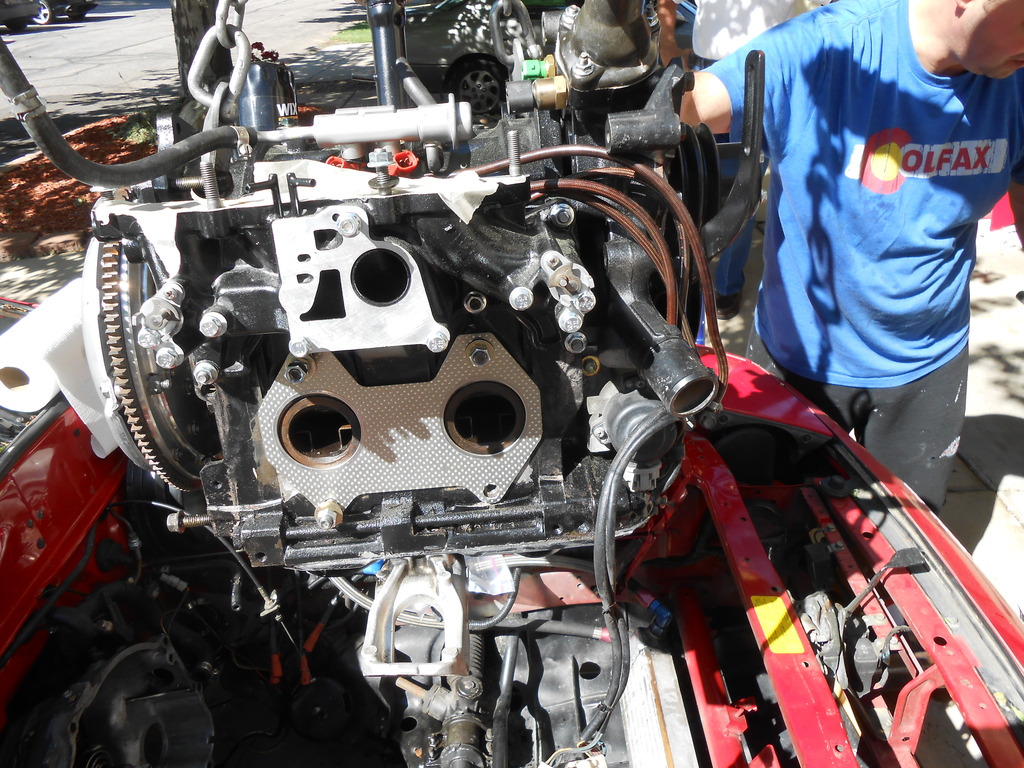
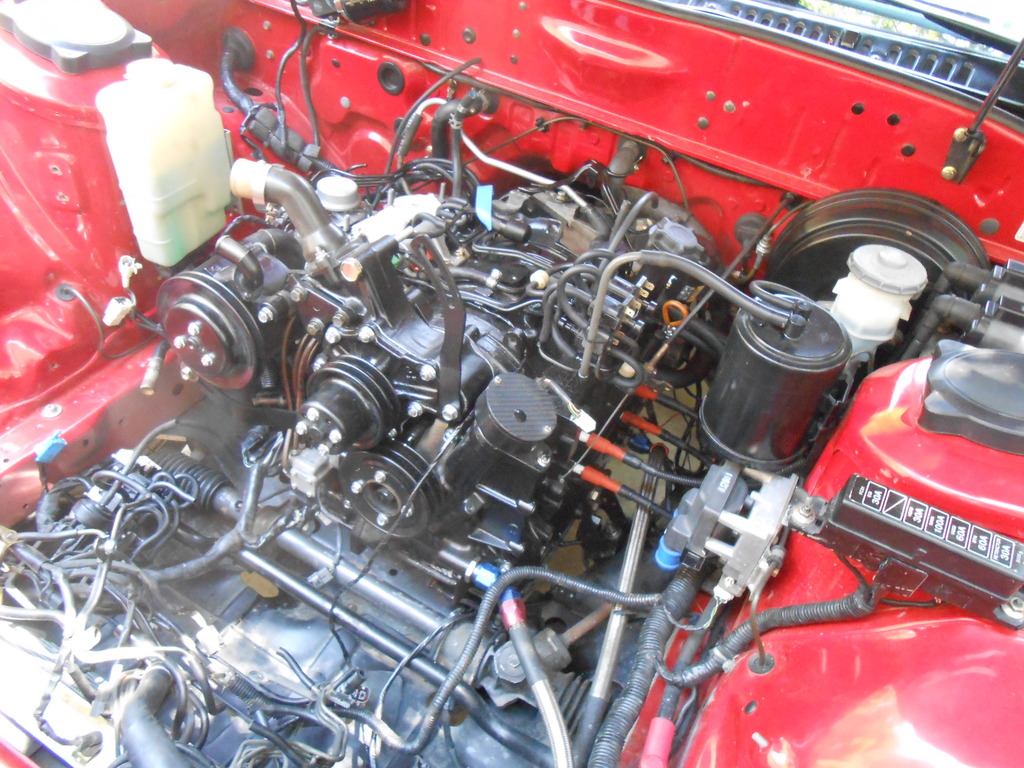
I did button up nearly all the bottom end stuff though.
Because I'm a sanctimonious idiot, I paid no attention to the proper bellhousing bolt locations and had to jigger them around to get the right bolt in the right hole. With anti-seize, which we neglected yesterday. I did the engine mount bolts as well.
Starter is in and connected as are the oil cooler hoses.
The header is in but not final bolted down.
About the Pacesetter headers:
The flange did not fit- more precisely, the holes were undersized and were almost an interference fit on the studs. They were too small to allow for the fact that the studs are not perfectly perpendicular to the block...there was no wiggle room to get the flange started on all four studs at once. I had to ream the holes by drilling two sizes up on all four corners and even then it was tight. When finally pressed to the block, the flange has a millimeter or three of freeplay as it slides on the enlarged holes. I don't think it'll be a problem. Other than that, they were exactly as expected for basic headers, after wrestling the flange into position the rest of the pipe fits the body well. The paint looks good and I expect it to last about ten minutes before it begins patinating.
("Patina" is what gentlemen call rust and is perfectly acceptable on a Jaguar XK120. "Rust" affects peons and is a sign of inferiority and a shoddy lifestyle.
The ability to differentiate between patina and rust is a subtle and nuanced art and requires years of applied refinement. In other words, your average working yokel has neither the time nor the resources to devote to the journey.
There are no Frodos bumbling onto Pebble Beach.)
The swap process went so smoothly there was little chance for documentation.
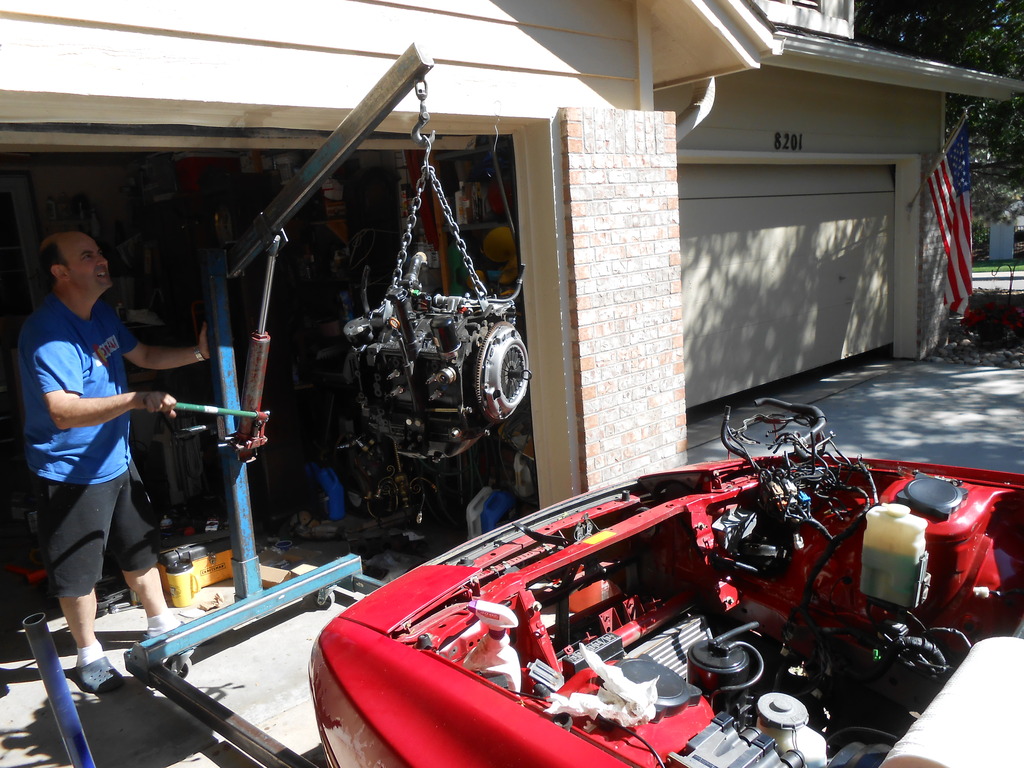
Despite outward appearance, Sigfrid is an animal worker.
Very much a "git-r-dun" opposed to my "let's have a smoke and think about this" approach, he just dervishes through, which in this case worked perfectly.
Yes, we removed the clutch centering tool about now:
Nestled in place:
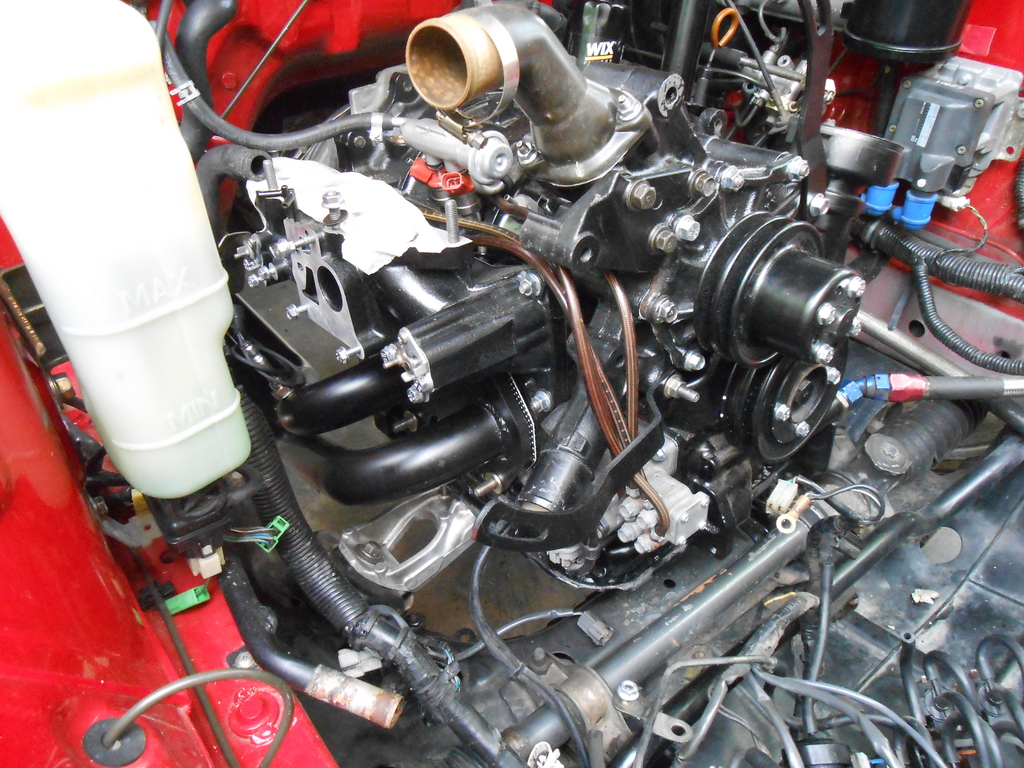
Once the exhaust is done I have some decisions to make.
Mentally and philosophically I'd like to redo the engine vacuum spider and electrical harness but it's a semi-big project and I'm not sure this is the best time to do it.
Because I'm lazy.
And I know nothing about the base condition of this engine.
On the other hand, there's this thing that just jumps out and insults me every time I see it.
The O2 sensor lead.
The stock harness exits the firewall and goes foreward to the strut tower, which it climbs before jumping to the engine. Right around the landing point, the O2 sensor wire splits off and travels back towards the firewall, where it meets the sensor lead and connects somewhere near the ACV.
Thing is, the O2 sensor lead is nearly long enough to get to the firewall grommet all by itself- it's probably not more than eight inches or so from the ECU, but the stock harness runs it five feet all over creation to finally connect.
Also, there are a lot of connectors in the same general area on the front top of the engine and it gets crowded in there. Seems like that could be better arranged.
I'm kinda talking myself into it now...
I have twice douched the mounting bolts with PB blaster, using that as an excuse for not actually removing the cat. "Preplanning as procrastination", a real artform.
I did button up nearly all the bottom end stuff though.
Because I'm a sanctimonious idiot, I paid no attention to the proper bellhousing bolt locations and had to jigger them around to get the right bolt in the right hole. With anti-seize, which we neglected yesterday. I did the engine mount bolts as well.
Starter is in and connected as are the oil cooler hoses.
The header is in but not final bolted down.
About the Pacesetter headers:
The flange did not fit- more precisely, the holes were undersized and were almost an interference fit on the studs. They were too small to allow for the fact that the studs are not perfectly perpendicular to the block...there was no wiggle room to get the flange started on all four studs at once. I had to ream the holes by drilling two sizes up on all four corners and even then it was tight. When finally pressed to the block, the flange has a millimeter or three of freeplay as it slides on the enlarged holes. I don't think it'll be a problem. Other than that, they were exactly as expected for basic headers, after wrestling the flange into position the rest of the pipe fits the body well. The paint looks good and I expect it to last about ten minutes before it begins patinating.
("Patina" is what gentlemen call rust and is perfectly acceptable on a Jaguar XK120. "Rust" affects peons and is a sign of inferiority and a shoddy lifestyle.
The ability to differentiate between patina and rust is a subtle and nuanced art and requires years of applied refinement. In other words, your average working yokel has neither the time nor the resources to devote to the journey.
There are no Frodos bumbling onto Pebble Beach.)
The swap process went so smoothly there was little chance for documentation.
Despite outward appearance, Sigfrid is an animal worker.
Very much a "git-r-dun" opposed to my "let's have a smoke and think about this" approach, he just dervishes through, which in this case worked perfectly.
Yes, we removed the clutch centering tool about now:
Nestled in place:
Once the exhaust is done I have some decisions to make.
Mentally and philosophically I'd like to redo the engine vacuum spider and electrical harness but it's a semi-big project and I'm not sure this is the best time to do it.
Because I'm lazy.
And I know nothing about the base condition of this engine.
On the other hand, there's this thing that just jumps out and insults me every time I see it.
The O2 sensor lead.
The stock harness exits the firewall and goes foreward to the strut tower, which it climbs before jumping to the engine. Right around the landing point, the O2 sensor wire splits off and travels back towards the firewall, where it meets the sensor lead and connects somewhere near the ACV.
Thing is, the O2 sensor lead is nearly long enough to get to the firewall grommet all by itself- it's probably not more than eight inches or so from the ECU, but the stock harness runs it five feet all over creation to finally connect.
Also, there are a lot of connectors in the same general area on the front top of the engine and it gets crowded in there. Seems like that could be better arranged.
I'm kinda talking myself into it now...
 06-12-16, 10:33 PM
#2302
Moderator
iTrader: (3)
Join Date: Mar 2001
Location: https://www2.mazda.com/en/100th/
Posts: 30,829
Received 2,597 Likes
on
1,845 Posts
Thing is, the O2 sensor lead is nearly long enough to get to the firewall grommet all by itself- it's probably not more than eight inches or so from the ECU, but the stock harness runs it five feet all over creation to finally connect.
Also, there are a lot of connectors in the same general area on the front top of the engine and it gets crowded in there. Seems like that could be better arranged.
I'm kinda talking myself into it now...
Also, there are a lot of connectors in the same general area on the front top of the engine and it gets crowded in there. Seems like that could be better arranged.
I'm kinda talking myself into it now...
i used a RHD harness on mine, and its the same as the LHD harness except that the main bulk comes out by the oil filter, to go over to the passenger side, and this leaves only the AFM and diagnostic plug to go to the airbox.
other than that, the JDM harness doesn't have the wiper stuff in it.
or basically it went on the engine, came out behind the oil filter, and then goes along the firewall.
06-13-16, 11:02 AM
#2303
Sounds like a typical Pacesetter header install for any application. The CorkSport shorty header (meant to eliminate the pre-cat, but is designed to mate up to the main cat) installed better than I expected on my S5 - even though the main cat is a Catco replacement, not a factory original unit. Since the CorkSport header is made of extra thick 300 grade stainless tubing, I wrapped it with DEI Titanium header wrap to help lower the engine compartment temps as well as help reduce cat light off time by keeping the heat inside the header. I suppose a Jet Hot coating or something similar would be best, but the wrap was inexpensive and quicker.
Speaking of O2 sensor wiring, I had to extend the lead wire to the relocated O2 sensor because its location is now move further down stream in the header collector area. Luckily this is just a simple 1-wire O2 sensor setup - these extra long lead lengths and moving the O2 sensor that far away from the exhaust ports, would wreck havoc with the mixer control on a late model 4-wire or 5-wire application.
Speaking of O2 sensor wiring, I had to extend the lead wire to the relocated O2 sensor because its location is now move further down stream in the header collector area. Luckily this is just a simple 1-wire O2 sensor setup - these extra long lead lengths and moving the O2 sensor that far away from the exhaust ports, would wreck havoc with the mixer control on a late model 4-wire or 5-wire application.
Last edited by DeaconBlue; 06-13-16 at 11:05 AM.
06-13-16, 01:03 PM
#2304
I'm waiting to see if any coating/wrapping/shielding will be necessary, right now I'm more concerned about noise.
As Sigfrid reported, my cat was deceased.
The matrix had turned to chunks and powder and it's now a mere shell of it's former self (see what I did there?)...in essence, a crude resonator.
I hope this combination isn't too obnoxious.
Had it not started raining the exhaust would be all buttoned up but it did and I still have the airpipe (now decorative only) to bolt in.
For what it's worth, the clutch pedal feels smooth and completely normal, so that's nice.
Now we move on to the vac spider and finish bolting on electrical stuffs. The alternator harness is standalone, so that can remain off and out of the way but I need the solenoids and sensors in place to plan the wiring harness reroute.
Fun stuff.
06-13-16, 04:14 PM
#2305
I'm waiting to see if any coating/wrapping/shielding will be necessary, right now I'm more concerned about noise.
As Sigfrid reported, my cat was deceased.
The matrix had turned to chunks and powder and it's now a mere shell of it's former self (see what I did there?)...in essence, a crude resonator.
I hope this combination isn't too obnoxious.
As Sigfrid reported, my cat was deceased.
The matrix had turned to chunks and powder and it's now a mere shell of it's former self (see what I did there?)...in essence, a crude resonator.
I hope this combination isn't too obnoxious.
Borla on my car;
But it does sound better than the stock replacement exhaust system
I have no idea how this may compare to say a Racing Beat system.
I have even considered an oval shaped one inlet, dual outlet resonator/muffler in place of the Y-pipe design - just doubt that even the 4" oval case size would fit under the car vs. the Y-pipe.
06-13-16, 08:48 PM
#2306
Moderator
iTrader: (3)
Join Date: Mar 2001
Location: https://www2.mazda.com/en/100th/
Posts: 30,829
Received 2,597 Likes
on
1,845 Posts
my friend found that resonance was in the spare tire well, i forget how he fixed it, but i wanna say he put something in there (2x4? big tire?) to physically stop the resonance.
06-14-16, 09:16 AM
#2307
Most of the aftermarket sound deadening / barrier material out there is fairly expensive. I had read on a forum somewhere that someone had used a home building sound deadening / barrier material inside their car with very good results.
United Plastics Corporation - Plastic Profile Extrusions, Flexible Sheet
So I order a 48" x 96" roll for about $48. I removed all the carpet, loose factory sound insulation and interior trim pieces from the hatch area. I used 64" of the sheet and completely covered the area of the rear hatch, along with the sides and rear panel extending down into the vertical spare tire well. This worked out to about 16 lbs of material that I added to the rear of the car. As a side note I did not remove the backing film because I didn't want this material to be permanently adhered to the car.
The different was amazing - the sound pressure, the resonance and droning are all gone! The exhaust is still way too noisy on the outside, but inside the car with the windows up, down or open a couple inches and the sun roof either closed or open it seems like a different car. I coukld actually enjoy driving the car again on the freeway or in town!
06-14-16, 10:11 AM
#2308
MECP Certified Installer
Could be since it is located down between the two "so-called" mufflers.
Most of the aftermarket sound deadening / barrier material out there is fairly expensive. I had read on a forum somewhere that someone had used a home building sound deadening / barrier material inside their car with very good results.
United Plastics Corporation - Plastic Profile Extrusions, Flexible Sheet
So I order a 48" x 96" roll for about $48. I removed all the carpet, loose factory sound insulation and interior trim pieces from the hatch area. I used 64" of the sheet and completely covered the area of the rear hatch, along with the sides and rear panel extending down into the vertical spare tire well. This worked out to about 16 lbs of material that I added to the rear of the car. As a side note I did not remove the backing film because I didn't want this material to be permanently adhered to the car.
The different was amazing - the sound pressure, the resonance and droning are all gone! The exhaust is still way too noisy on the outside, but inside the car with the windows up, down or open a couple inches and the sun roof either closed or open it seems like a different car. I coukld actually enjoy driving the car again on the freeway or in town!
I like cheap, I am the king of cheap, but you just cannot beat Dynamat. Yes, it is expensive, but it works so well!. I installed 36 sq. ft. of Dynamat in a Toyota Tundra yesterday, inside the door on the outside door skin, and doubled it up. When I was done, with the doors shut and windows up it was eerily quite in the truck and you couldn't hear the hustle and bustle of the shop nor the shop radio, dead silent.
Dynamat Extreme is the absolute best sound deadening, resonance killing product there is for an automotive application. Don't however get too caught up with other dynamat products like dynapad, as there are WAY cheaper alternatives.
Dynapad is just closed cell foam with an adhesive backing. Do you want to spend $250 on closed cell foam or $40? It's the same stuff with the only difference being that you need your own adhesive, so it's just a matter of convenience.
My recipe for killing resonance and sound is this...
Lay down strips Dynamat on a panel until you have covered most of it. For example, if you have a sheet of Dynamat, lay it down long ways and cut strips about 4-5 inches in width and apply it to a surface ALL IN THE SAME DIRECTION. For an example, I always apply my first layer long ways, in a horizontal fashion, for a door skin. The second layer needs to be OPPOSITE. You'll need to eyeball your space and cut accordingly but you want to lay the second layer of strips perpendicular to the first layer. Doing it this way reduces wasted product and maximizes coverage by filling in gaps and closing off the first layers seams.
The above works very well without going with closed cell foam but, if you add the foam, it's a plus.
In my vert I went excessive method and did this...
Dynamat extreme in the spare tire area behind the seats, on the back hump. I laid down strips of Dynamat Extreme longitudinal followed by another layer on top laid out in horizontal strips. I then laid down Large sections of 3/4 inch dynapad (I had it laying around and it was free). I only did the back hump in the spare tire area in my vert and there was a 90% noise reduction inside the car from the exhaust.
Stock manifold to a full custom "stock sized" tubing with no cats, a short resonator and 2 borla straight through 14"x2 mufflers, which is super loud and I got a 90% noise reduction inside the car versus not doing anything.
06-14-16, 10:29 AM
#2309
I was (and still am) super impressed with the sound package Sigfrid got for the Z...no idea of cost compared to Dynamat but the results were spectacular.
If necessary, I'll use it or something similar in the FC.
There is a potential deal looming for the old keg- a local forum member could use it (being fully aware that it could be total trash) and has promised to fully document the teardown for all you forum vultures.
It's a win-win...it's out of my garage, I don't have to touch it and we'll get to see the gory details later.
Meanwhile, progress slogs forward on the new install.
Today is the vac spider.
I'm thinking first start on Friday.
06-14-16, 11:55 AM
#2310
Rotary Enthusiast

I've used products from RAAMaudio RAAMaudio - Automotive sound deadening products, particularly Ensolite foam and BXT Mat. I used both to line the doors and floors and it has done pretty well. The doors shut with a more solid thunk and they make pretty effective speaker enclosures for the Boston Acoustics SX50 component speakers. I've also used Second Skin Audio products, the Luxury Liner and their Thermal Block (I think) mat to redo an underhood mat back in 2009. Second Skin is a bit on the expensive side though, so I'd only use those for specific areas and only buy what you absolutely need.
Tip: A combination of the Luxury Liner foam (not the Pro) and a layer of Ensolite gives you the same thickness as the factory jute backing (allowing you to replace the sometimes damp backing) and you can use the foam sheets sandwiching a sheet of aluminium to make a new cover for the spare tire jack/tools area. The same with the removable mat in the hatch area; the jute backing sticks in clumps to the factory deadening material. You can also line the backs of plastic panels with a thin sheet of closed cell foam. Also, for improved acoustics, you can also glue a small panel of acoustic foam directly behind a speaker driver in the door.
I don't need to tell you to keep your scraps :-) I used some of the remaining bits to stiffen up some factory speaker brackets and improve acoustics in another car.
Last edited by cluosborne; 06-14-16 at 12:00 PM.
06-15-16, 08:38 AM
#2311
Can you see the progress?
Yup, I added oil...good eye, Sparky.
Non-car stuff intervened and yesterday's progress was frustratingly minimal. I was able to clean/paint the vac spider, so that should get things rolling again. Meanwhile, I hit a bit of a snag, hopefully not a big deal but something that requires immediate attention.
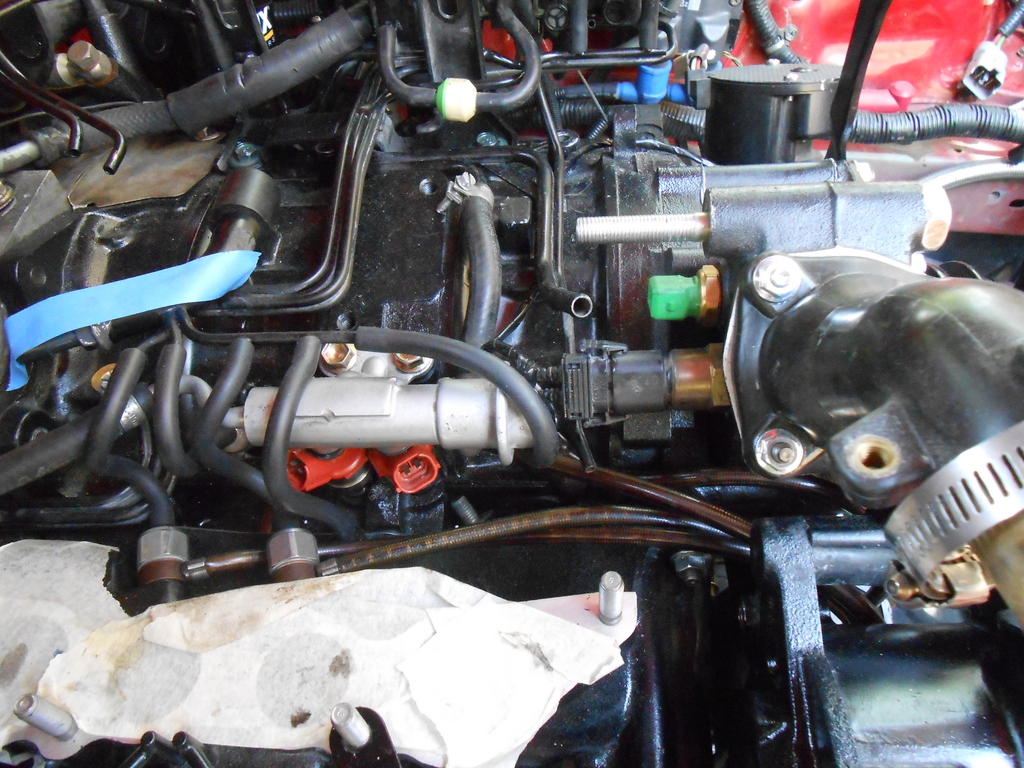
I had previously confirmed that the BMW fan switch (now located on the back of the WP housing) does not interfere with the exten manifold, what I didn't check was the primary fuel rail. Turns out, it clears but you can't actually insert/remove the plug. I'm hoping that loosening the rail bolts will allow enough wiggle room to squeeze the connector through but I'll have to detour to some electrical rigging to find out. So, first thing up is to fix the new fan wiring and get that installed because once the mainifolds start stacking up there's no access.
I'm also (slightly) rejiggering the main spider to reroute the metered air feed source for the OMP/fuel injector bleeds. The stock intake has two feeds off the intake tract- one for the BAC and a second for the AWS and air bleeds. I had previously combined the two but am going back to discrete feeds. It's not a big deal but like the fan wiring, it's got to be done before the next manifold goes on.
Once all this "lower layer" is complete, the rest should go rather quickly.
Then comes the wiring harness.
The old engine gets picked up tonight, details will follow.
06-15-16, 09:01 AM
#2312
MECP Certified Installer
I'd go ahead and replace that thermostat neck. The second you clamp the new hose on, it's likely to crack.
Been there and done that.
Took me a few months to figure out why my coolant buzzer would go off every 7-10 days, the crack was microscopic.
Been there and done that.
Took me a few months to figure out why my coolant buzzer would go off every 7-10 days, the crack was microscopic.
06-15-16, 10:49 AM
#2313
Good advice, I've oft thought of doing just that and the next spare $70 I have will probably go there.
Right now I'm hating my previous self- the person who, four years ago, made up this front chassis harness.
My old fan trigger was sited in the upper rad hose, so the lead came all the way across the rad support and back to the driver headlight area where the relay/controller is. I had to unloom this whole thing to extract the fan wires and I had wrapped the harness with tape, enclosed that in plastic sheathing and then wrapped that with tape. Took me an hour and a half to to free the fan leads and now I have to redo that front section again.
The good news is that the harness was/is in great shape and the quality 3m tape (#88, I think) was still pliable and sticky...that harness was safe.
After that's done I can make up the new fan harness and continue with the vac spider.
I'm kinda kicking myself for not doing this last week, while I twiddled my thumbs waiting to install the engine. I knew it had to happen but completely underestimated the effort involved.
Silly wabbit.
06-16-16, 08:39 AM
#2314
Well, local forum member Hiko has picked up the old motor and has promised documentation of the teardown, which starts this weekend.
T'was nice to meet another enthusiast and Hiko seems capable and excited enough to tear into this project, so we can all watch together as my disaster is exposed.
Progress on my car proceeds at a leisurely but steady pace.
The vac spider is about 80% done, the solenoid rack took the longest as I actually tested each solenoid and sanded its contacts before installing and hosing it.
I'll be finished with the vac/fuel soon and then have to decide if I'm wading into the harness now or waiting till later.
I'd really like to do it but my brain is saying no.
It actually may not be my decision to make, the new fan trigger I installed on the wp housing hogs a lot of the space the harness trunk used to occupy...I'm not sure I can even install it as is.
Hmmm...
06-16-16, 03:55 PM
#2315
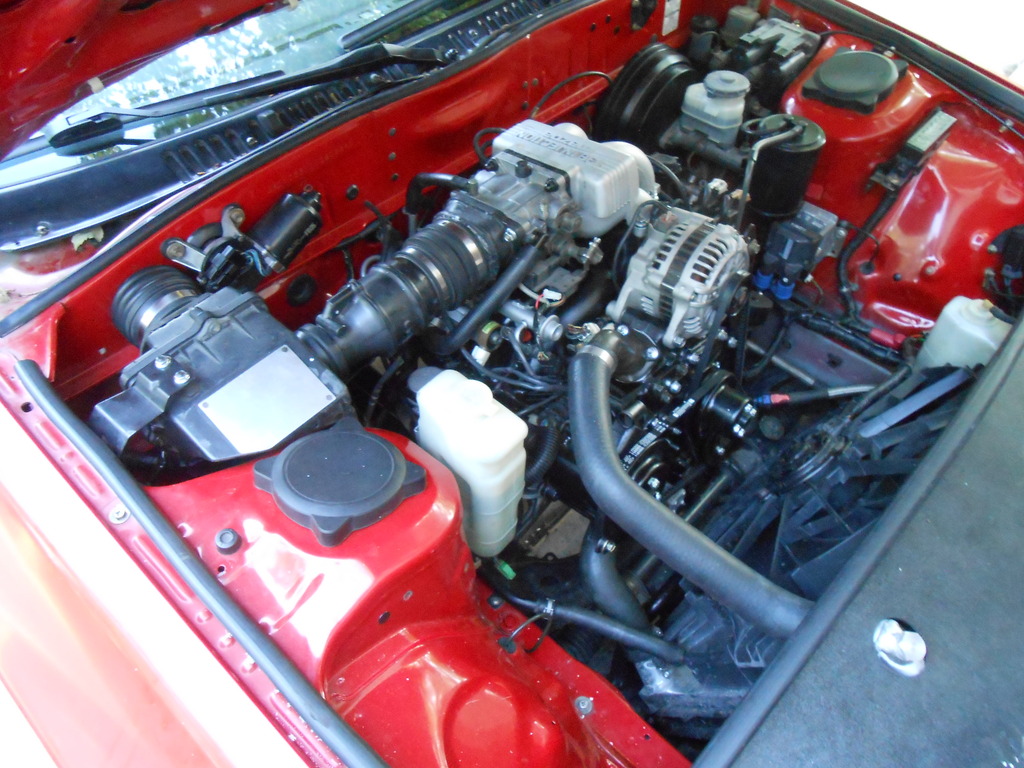
This is how I define progress:
It's a real PITA to assemble all this nonsense.
All the hunching over the bay ain't doing my back/neck any favors either.
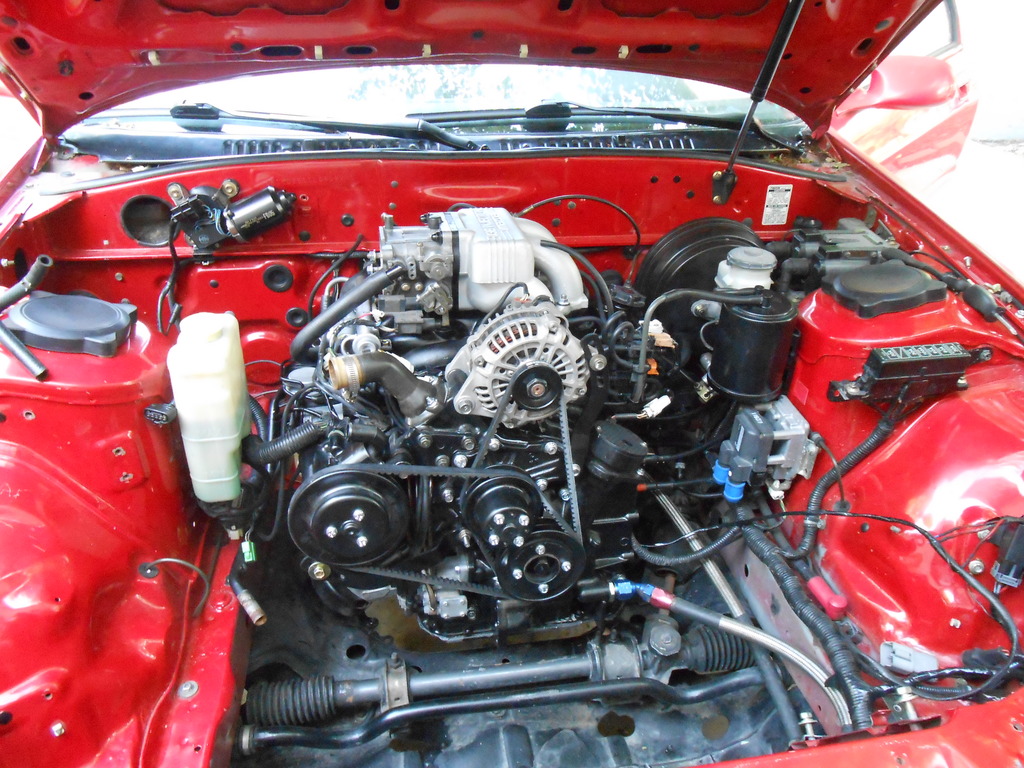
Fortunately, the spider is basically done save for the hoses that will connect to manifold/throttle body and all the requisite tweaks and adjustments have been made.
As previously feared, it looks like the fan switch will force the harness mod...there's just not room for the OEM routing.
Here is the area in question:
You can see how close the switch connector is to the primary fuel rail and how the switch roadblocks the path the harness used to follow.
In the first pic you can see the original vacuum spider, which I kept as intact as possible, laying in the belly pan. I have two complete intakes, so I used the original as a guide...that saved a lot of time. I also have a nice, apparently unravaged, engine harness and that's what I'll rip into, leaving the original in place till the very last moment.
Optimistically, I don't think it'll be that difficult.
A minor rant...
For the most part, I think Mazda designed this pretty well (and my simplifications have helped) but there were two things that struck me as infuriatingly incongruous.
First was the weird horseshoe shaped spacer on the air pump mount. WTH, Mazda?
Right next to it is the alternator, which mount normally with no odd, drive home with a drift, spacer.
The other is the booster vac line source fitting on the LIM.
There are dozens of good ole hose bungs all over the engine and then you get to this vac fitting and boom!, a banjo setup.
How is this in any way better or necessary?
I had actually considered drilling/tapping for a standard bung but lost the thread and forgot.
Now I wish I had.
But anyway...boo, Mazda.
It's a real PITA to assemble all this nonsense.
All the hunching over the bay ain't doing my back/neck any favors either.
Fortunately, the spider is basically done save for the hoses that will connect to manifold/throttle body and all the requisite tweaks and adjustments have been made.
As previously feared, it looks like the fan switch will force the harness mod...there's just not room for the OEM routing.
Here is the area in question:
You can see how close the switch connector is to the primary fuel rail and how the switch roadblocks the path the harness used to follow.
In the first pic you can see the original vacuum spider, which I kept as intact as possible, laying in the belly pan. I have two complete intakes, so I used the original as a guide...that saved a lot of time. I also have a nice, apparently unravaged, engine harness and that's what I'll rip into, leaving the original in place till the very last moment.
Optimistically, I don't think it'll be that difficult.
A minor rant...
For the most part, I think Mazda designed this pretty well (and my simplifications have helped) but there were two things that struck me as infuriatingly incongruous.
First was the weird horseshoe shaped spacer on the air pump mount. WTH, Mazda?
Right next to it is the alternator, which mount normally with no odd, drive home with a drift, spacer.
The other is the booster vac line source fitting on the LIM.
There are dozens of good ole hose bungs all over the engine and then you get to this vac fitting and boom!, a banjo setup.
How is this in any way better or necessary?
I had actually considered drilling/tapping for a standard bung but lost the thread and forgot.
Now I wish I had.
But anyway...boo, Mazda.
06-16-16, 06:53 PM
#2316
Retired Moderator, RIP
iTrader: (142)
Join Date: Sep 2005
Location: Smiths Falls.(near Ottawa!.Mapquest IT!)
Posts: 25,581
Likes: 0
Received 131 Likes
on
114 Posts
Hmmm.
With your attention to detail I sort of notice that the OMP lines look like Rattle Snake hide..lol!
I'm wondering how long did it take you to dry and hollow out 4 Snakes..and if you grabbed the venom and exchanged it to currency to acquire parts?..
I like builds like this and it shows dedication to ones' craft.
I salute you General Clokker!
06-16-16, 10:29 PM
#2317
Moderator
iTrader: (3)
Join Date: Mar 2001
Location: https://www2.mazda.com/en/100th/
Posts: 30,829
Received 2,597 Likes
on
1,845 Posts
The other is the booster vac line source fitting on the LIM.
There are dozens of good ole hose bungs all over the engine and then you get to this vac fitting and boom!, a banjo setup.
How is this in any way better or necessary?
I had actually considered drilling/tapping for a standard bung but lost the thread and forgot.
Now I wish I had.
But anyway...boo, Mazda.
not as bad as ford though, they use the same calipers on both sides, which means that half the bleeder screws point down...
06-17-16, 09:35 AM
#2318
yeah that one is weird. the RHD cars also have a banjo, and it ends up in basically the same place as the NA. you would think that the turbo would then just have something similar, that way all the LHD cars use the same setup, but the LHD T2 has a fitting in the back of the intake (which is a PITA to get to), and a whole different pipe setup, its pointlessly weird.
not as bad as ford though, they use the same calipers on both sides, which means that half the bleeder screws point down...
not as bad as ford though, they use the same calipers on both sides, which means that half the bleeder screws point down...
06-17-16, 08:08 PM
#2319
Moderator
iTrader: (3)
Join Date: Mar 2001
Location: https://www2.mazda.com/en/100th/
Posts: 30,829
Received 2,597 Likes
on
1,845 Posts
Almost every car uses the came castings for left and right calipers. They just drill the bleeders for whichever size. Mad a Miata at the shop with two left calipers on the front. Just unbolted the caliper and bled it with a 2x4 in it to get the air out without blowing out the piston.
06-17-16, 11:01 PM
#2320
Well, I was hoping for first start today, but it didn't happen.
There's a sequence to assembling the outside of the FC engine and I obviously didn't know it because I was putting things on only to remove them a while later to do something else. I swear I had the BAC valve on/off four times.
So this took me a while.
Ben can probably do it in a few hours.
Anyway, as darkness encroached, here's where we stand:
Besides the obvious big stuff, there are only three things left to do:
-Solder/terminate two wires
-Find/buy a hose for the metered air bleed system (it's custom)
-Figure out where the last two vac lines go.
I swear, stare at the Mazda vac diagram long enough and it looks like MC Escher drew it.
I did get the radiator in:
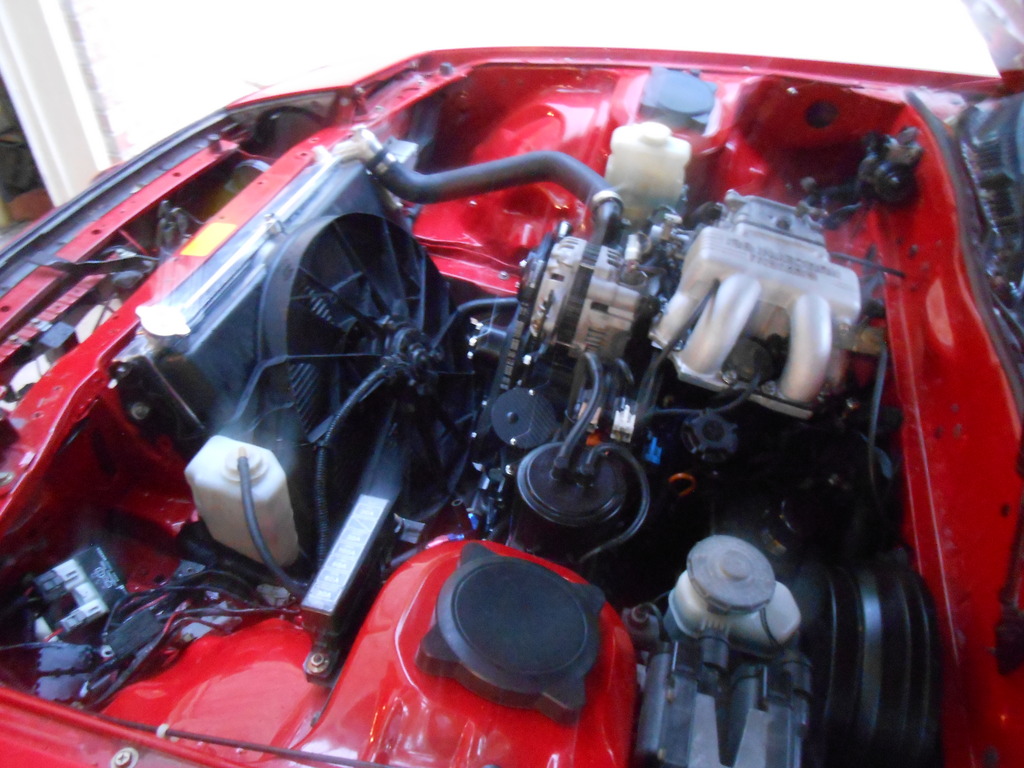
And she's full of oil and water now.
Pulled the EGI fuse and turned her over several times, just to see what would happen.
No fires or terrible noises.
Tomorrow I'll check for leaks and grind through the punchlist and then, start the damn car!
There's a sequence to assembling the outside of the FC engine and I obviously didn't know it because I was putting things on only to remove them a while later to do something else. I swear I had the BAC valve on/off four times.
So this took me a while.
Ben can probably do it in a few hours.
Anyway, as darkness encroached, here's where we stand:
Besides the obvious big stuff, there are only three things left to do:
-Solder/terminate two wires
-Find/buy a hose for the metered air bleed system (it's custom)
-Figure out where the last two vac lines go.
I swear, stare at the Mazda vac diagram long enough and it looks like MC Escher drew it.
I did get the radiator in:
And she's full of oil and water now.
Pulled the EGI fuse and turned her over several times, just to see what would happen.
No fires or terrible noises.
Tomorrow I'll check for leaks and grind through the punchlist and then, start the damn car!
06-18-16, 09:26 AM
#2322
Moderator
iTrader: (3)
Join Date: Mar 2001
Location: https://www2.mazda.com/en/100th/
Posts: 30,829
Received 2,597 Likes
on
1,845 Posts
its really not good enough, i either leave the vacuum rack alone, or pop the hose off at both ends and make sure it connects. if you like i make sure it goes from the solenoid to whatever its going too. with a turbo you have to do that because there is a sub rack and the diagram is just a blob. the T2 rookie mistake is to hook up the fuel pressure regulator to the wrong nipple, and then it doesn't see boost, so it runs fine in vacuum but when you boost it it tends to fall on its face because its so lean
06-18-16, 05:59 PM
#2323
Clokker is now 2 for 2 on first time engine startups.
Yes, she runs.
Didn't really want to, took a good five minutes of cranking to get a hint of life but then boom!...a running engine!
The idle is high, I need to check the timing and the TPS but she was good enough to drive, so I did.
I have no gauge cluster ATM, so my first stop was the gas station, just to make sure she wasn't dry.
Then a bit of a highway loop to see what happened.
(Bear in mind, no gauges, so temps and pressures are unknown...which is kinda scary)
First of all, she's loud and obnoxiously chainsaw like, that gutted cat is doing me no favors.
That must be addressed, sooner rather than later.
What about the 10lb lighter flywheel and stock clutch?
Absolutely lovely.
In fact, based on feel and takeoff, it's one of the easiest driving cars ever.
And boy howdy, she zings through gears now.
Speaking of zinging through gears, I'm not sure how high she did rev but I know for sure it was over six or so and there was no hesitation or staging...no infamous 3800 rpm hesitation, in other words.
In fact, she runs pretty good, all things considered.
The new fan trigger (switch and location both changed) is confirmed working.
Tomorrow she'll drive over to Sigfrid's where I can get my new gauge cluster (long story) and it'll be her first extended shakedown.
It's good to be home and fingers are crossed.
 06-18-16, 11:16 PM
#2325
Junior Member
iTrader: (2)

Join Date: Aug 2009
Location: Denver
Posts: 32
Likes: 0
Received 0 Likes
on
0 Posts


I've got a *lot* more pictures, but it was actually a pretty uneventful teardown, nothing seemed truly broken (unless my untrained eyes are missing something). The irons all look like the rear in the picture, and the housings are the only things that look at all worn, not bad though for 200k+ miles though!
Only other things of note were that the oil pump chain was *very* loose, and there was some gasket material in the oil pickup. So yeah, pretty uneventful.
If anyone wants more of the photo album posted, let me know and I'll happily provide
