She Followed Me Home, Honest
 03-25-14, 05:42 PM
#1051
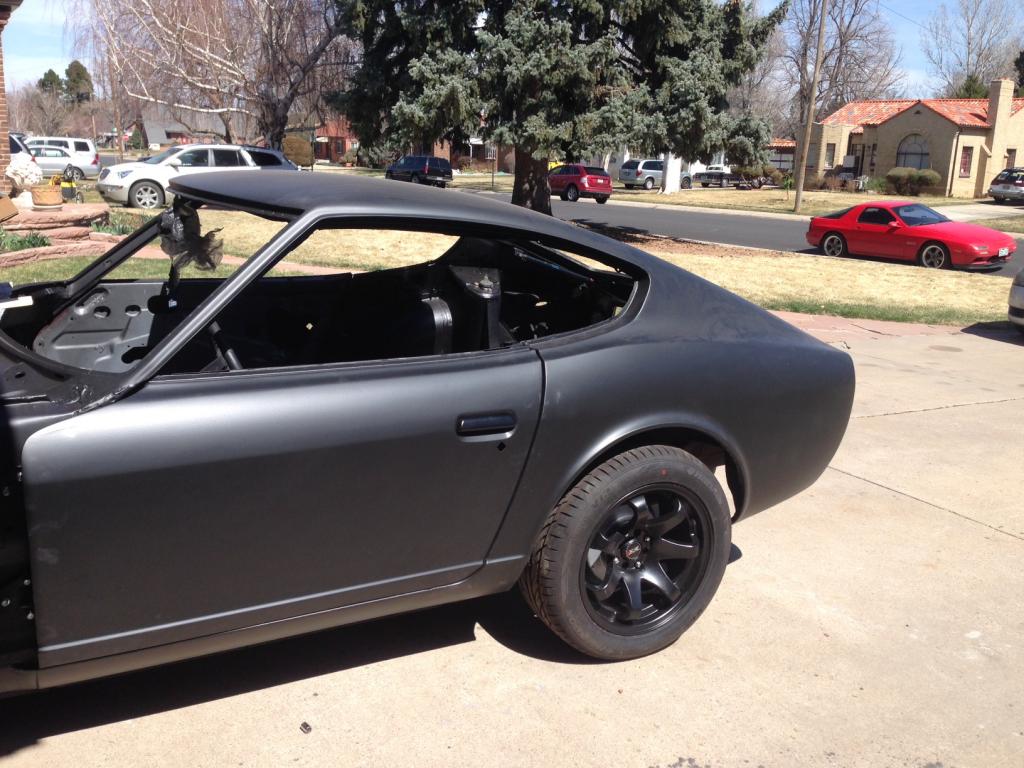
The black lower really slims down the profile.
It's not that I can't find the part I want, it's that I don't yet know what the part is.
I need to take a good hard look at the Z and then roam the yard to see what pops up, looks possible and easy.
To preempt speculation, yes, I have already considered Aerocatch (or similar) latches, but even that solution presents real difficulties, if possible at all.
Maybe Velcro?

 03-27-14, 09:02 AM
#1053
Ah, the hatch lock.
Allow me to continue the tradition of explaining trivialities in excruciating detail.
Here is the problem:
We need the 40 year old lockset replaced/rebuilt and that has turned out to be much more expensive than planned. Insultingly expensive, IMO.
The kind of insult that has driven good men into junkyards for decades, a path I am following.
Finding an ignition switch and matching doorlocks from a newer donor car will be relatively simple, in fact, I've been considering the ignition change for a while as it will simplify the column switchgear swap I have planned.
The fly in our ointment is the hatch.
Consider the hatch on a RX-7...the strikers are on the hatch and the lock is mounted inside the cabin on the rear body panel.
On the Z, all this is reversed- the striker is on the outside of the body and the lock is in the hatch. Operating the lock requires pushing down on a spring loaded button...a big chrome uglybit right in the center of the hatch.
None of the potential donor cars have a lock anything like this and the whole point of this exercise is to have a single key system, so the plan is to delete the lock altogether by grafting in a cable release set from something else.
"Something else" as in a Honda CRX, for instance.
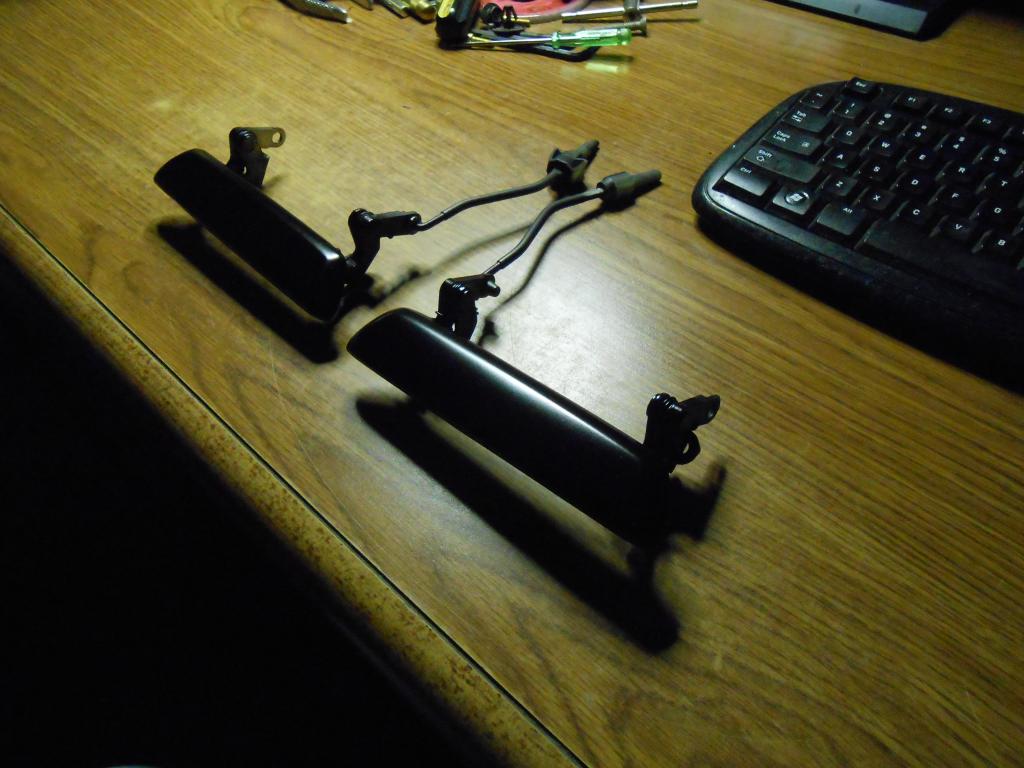
I grabbed the striker/lock yesterday because it looks basically like what I want and at least gives me a starting point.
If all goes typically, this part is only the beginning and I consider it sacrificial as it will be tortured into shape as I see how it might fit.
There is actually a lot going on in that particular space, even if the lock somehow fits, how will it effect the license plate light that also mounts in that general area?
This project could easily cascade into a slew of mods...very dangerous as it's an area I'm already unhappy with and predisposed to changing.
Must stay focused...
Allow me to continue the tradition of explaining trivialities in excruciating detail.
Here is the problem:
We need the 40 year old lockset replaced/rebuilt and that has turned out to be much more expensive than planned. Insultingly expensive, IMO.
The kind of insult that has driven good men into junkyards for decades, a path I am following.
Finding an ignition switch and matching doorlocks from a newer donor car will be relatively simple, in fact, I've been considering the ignition change for a while as it will simplify the column switchgear swap I have planned.
The fly in our ointment is the hatch.
Consider the hatch on a RX-7...the strikers are on the hatch and the lock is mounted inside the cabin on the rear body panel.
On the Z, all this is reversed- the striker is on the outside of the body and the lock is in the hatch. Operating the lock requires pushing down on a spring loaded button...a big chrome uglybit right in the center of the hatch.
None of the potential donor cars have a lock anything like this and the whole point of this exercise is to have a single key system, so the plan is to delete the lock altogether by grafting in a cable release set from something else.
"Something else" as in a Honda CRX, for instance.
I grabbed the striker/lock yesterday because it looks basically like what I want and at least gives me a starting point.
If all goes typically, this part is only the beginning and I consider it sacrificial as it will be tortured into shape as I see how it might fit.
There is actually a lot going on in that particular space, even if the lock somehow fits, how will it effect the license plate light that also mounts in that general area?
This project could easily cascade into a slew of mods...very dangerous as it's an area I'm already unhappy with and predisposed to changing.
Must stay focused...
03-27-14, 12:53 PM
#1054
Moderator
iTrader: (3)
Join Date: Mar 2001
Location: https://www2.mazda.com/en/100th/
Posts: 30,832
Received 2,601 Likes
on
1,846 Posts
maybe you have the hatch lock replaced/rebuilt and replace all the others? i guess its asking a lot for nissan to use the same key this whole time, so you could key everything to the rear hatch...
actually if the nissan door locks are anything like the FC, you might be in luck, the FC locks are actually really easy to take apart and clean/lube and rekey.
actually if the nissan door locks are anything like the FC, you might be in luck, the FC locks are actually really easy to take apart and clean/lube and rekey.
03-27-14, 01:03 PM
#1055
Sounds like to me, best option with least hoops is ditching the single idea...look at it like this. You driving, and for some frankenberry reason you need to go into trunk, with a separate key, you won't have to turn off car. Idk- your skills appear to be above par, so if this dilemma has egged you for this long, taking the high road really doesn't seem that bad (IMO). Good luck- awesome details again. Maybe you should think about writing novels or how to books, your stories are intriguing and educational trouble shooters. Cheers!
03-27-14, 02:11 PM
#1056
I find it amusing that not only am I obsessing over a 40 year old hatch mechanism, but have managed to draw others into the discussion.
You people are weird...
The hatch has gained a momentum separate from the ignition/doorlock project and will continue no matter what we decide about them.
We have always had a strong objection to the hatch lock on purely aesthetic grounds and indeed, it is the last of the obvious trim left on the car. All the rest of the external detailing has either been deleted or muted, the hatch lock was a remaining sore thumb we'd kind of put off til the mythical "Stage Two" began.
Now I've turned my Sauron-like eye on it though, it shall not stand.
03-28-14, 02:43 PM
#1057
I just returned from my third junkyard ramble in as many days and boy oh boy, it's so much more productive and fun when the weather isn't actively trying to kill you.
It's also easier when you concentrate on one specific area (in my case, the hatch) instead of the whole car.
I now have four different latches and four different strikers (all from different models) and the operating lever from a fifth car. All I lack is a cable but need to semi-install the hard parts before I know how long it must be.
I also took a flyer and gambled on some hatch struts and a weird plastic piece that may turn into something. If it's not insanely stupid I'll brag and crow, if it is as ridiculous as I fear, we'll never speak of it again.
My thread, my rules.
03-29-14, 08:13 PM
#1058
Well guys, today was the day that made all the past crappy, cold, miserable days worth it.
Not only was the weather overwhelmingly pleasant but both my junkyard projects worked.
Worked perfectly.
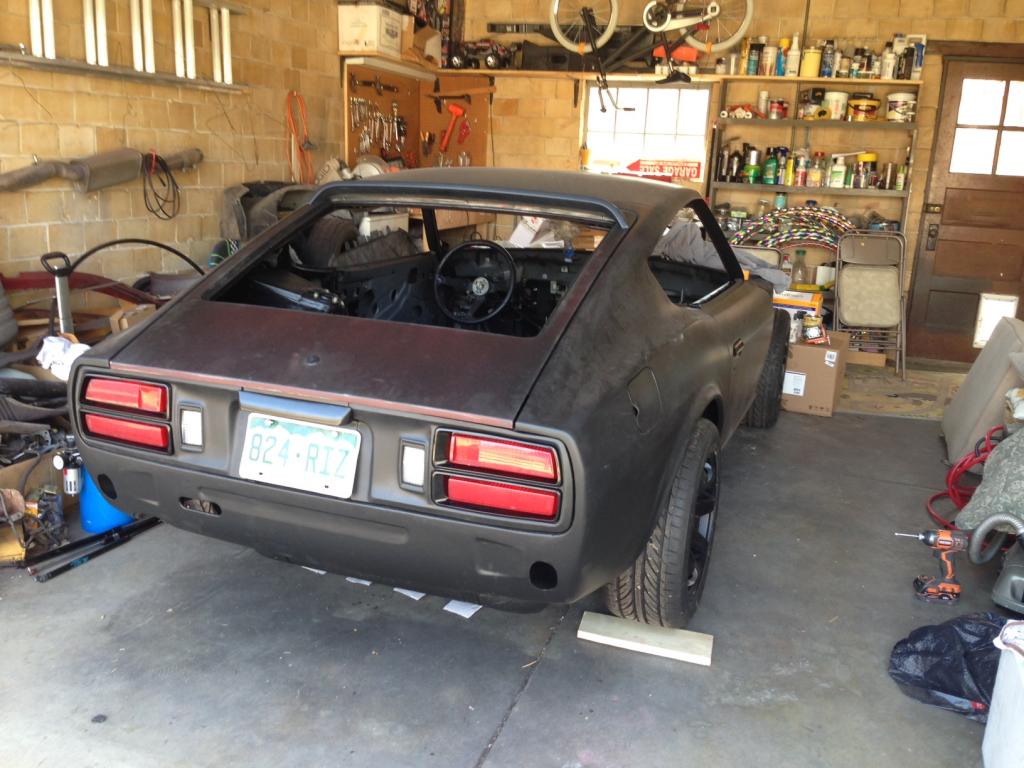
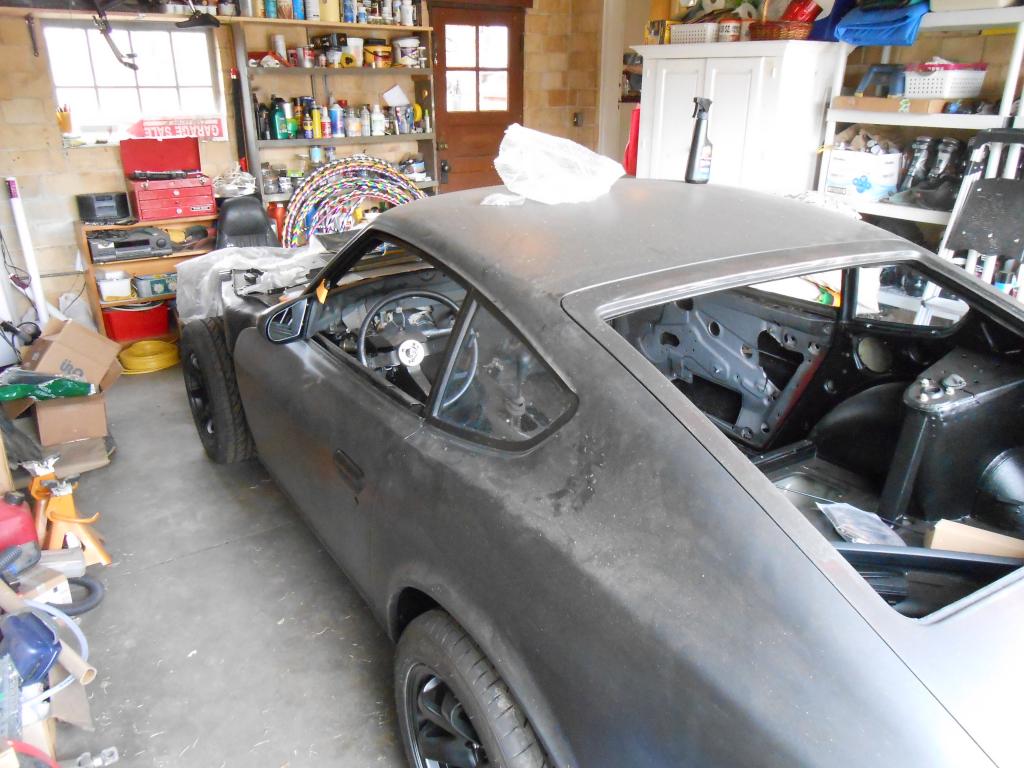
Finally, here's a shot of the car in the sun.
It is very dusty but at least kinda shows what the plastidip looks like.
Also note the doorhandles, newly satin black, are in place.
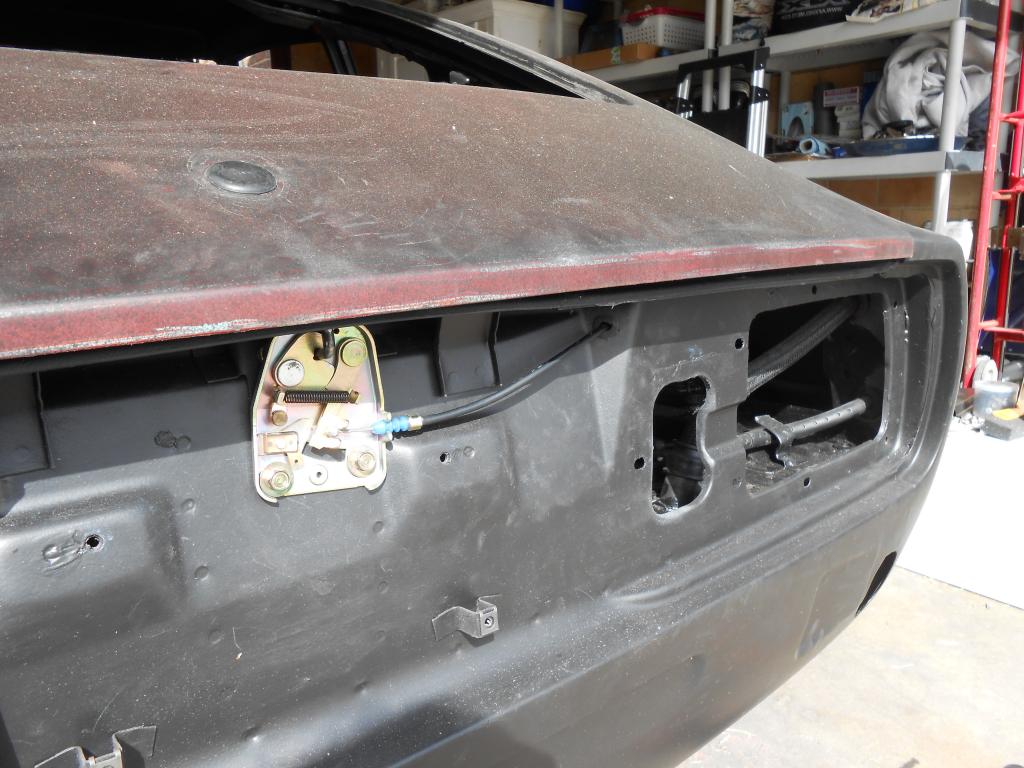
This is the only shot that shows the new hatch strut in place:
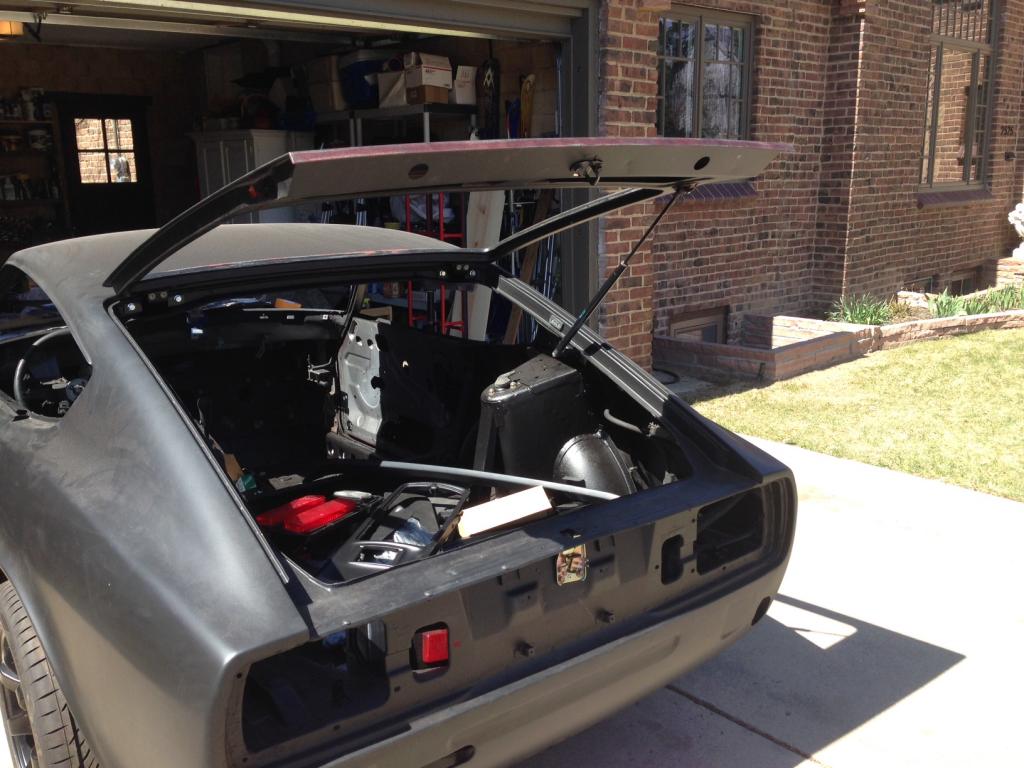
It doesn't look like much but is a major personal victory for my imagination.
You can't see it but the body end of the strut is bolted to a simple bracket welded to the chassis.
In stock form this is not how it works...Datsun has another bracket bolted to the first and the strut bolts to it. Bracket bolted to bracket, what kind of nonsense is this?
When I first took the hatch apart I casually looked it over, then put it way down the list of things to contemplate.
I realized at the junkyard that NOW was the time to start worrying but did not have a Z at hand to look at, nor even a clue of the strut length/stroke, etc.
Looking down a row of cars, my eye was drawn to a roof spoiler of some sort and I walked down to check it out. Turned out to be a Volkswagon and I was strangely attracted to the spoiler/shade/whatever it is and decided to gamble on it.
Now, that wing was just a flight of fancy and I was being indulgent (although it only cost $3) but then the oddest thing happened.
Right next to the VW I'd just assaulted was a Hydunai, it's hatch closed but the glass broken out.
I could only see a bit of the struts but was absolutely convinced they were what I needed. Took some work to extract them but I grabbed the pair.
We had to modify the hatch-side bracket a bit, but even accounting for multiple fit ups in different positions, the strut was installed in under a half hour and works perfectly. Even though the glass is not yet in, I'm confident that a single strut will be more than adequate to self-raise the hatch. If not, we have the mate and can put it in.
Right now, in it's glassless lightweight state, releasing the lock throws the hatch upward.
I thought it would be interesting to fling one of Sigfrid's cats...like a real "cat"apult...but neither of them were really into the idea.
His dog would have done it I bet, because dogs are cool and cats are ********.
So, the strut thing was sweet.
Next up was the latch mechanism and I was pretty sure I had that covered.
I rooted around in my box, pulled out the striker and latch I figured were the best shot and basically, bolted them right up.
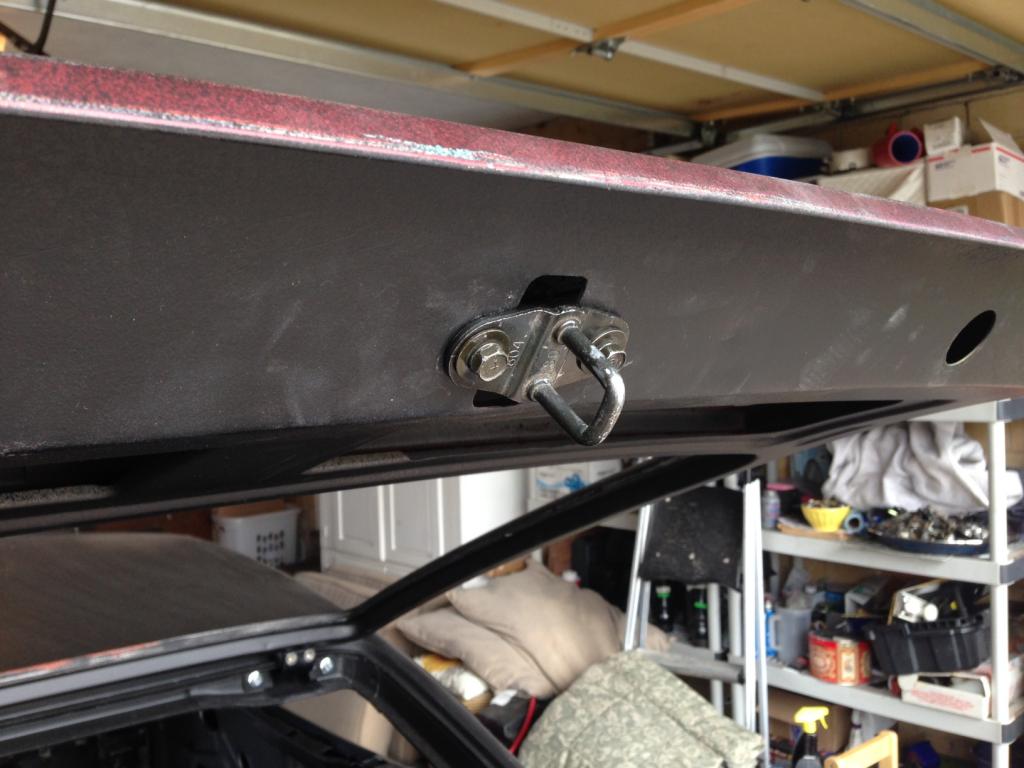
Seriously, the striker went right into the capture bolts that used to hold the latch:
Drilled two holes and mounted the latch:
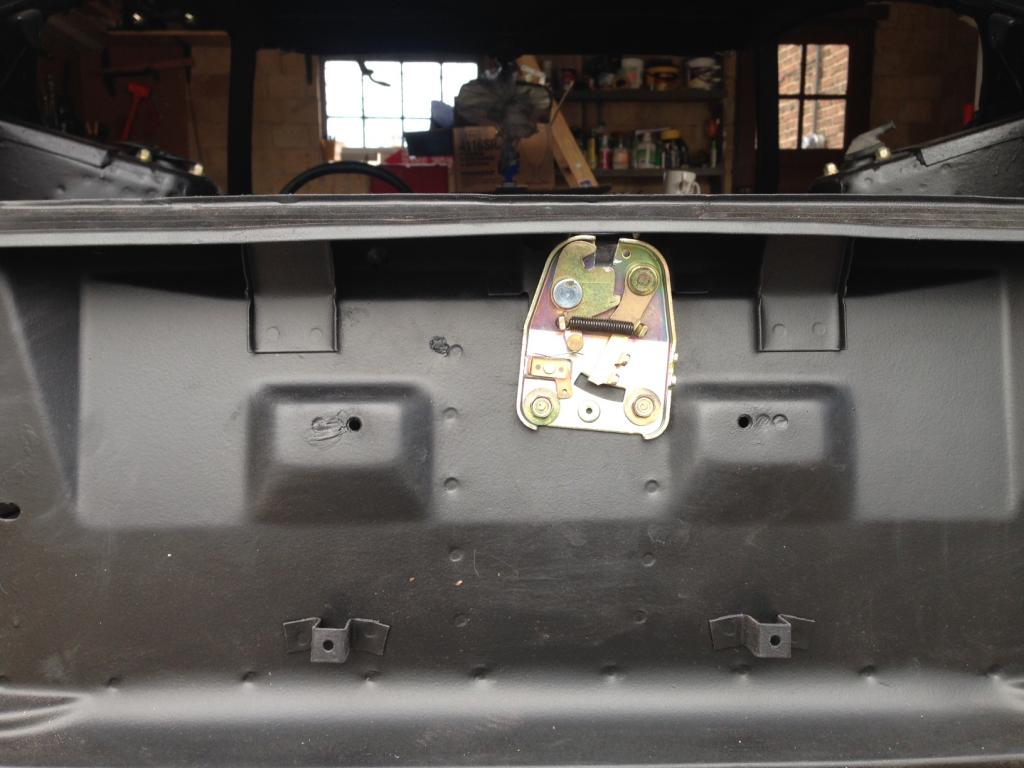
And the hatch clicked closed the first time, no adjustments or fiddling.
I had also snagged the cable operating lever from a KIA but have yet to get a cable.
That stuff is easy though, the "hard part"- which took about fifteen minutes- is done.
This completely eliminates the original push button lock which so besmirched the hatch from the factory.
It also greatly simplifies my search for a different lockset...nothing was going to be like the OEM hatch lock.
Even more amazing to me is that this all fits behind the original license light and center trim panel, with a perfect space for the cable to transition to the interior.
I'll show that when I get a cable:
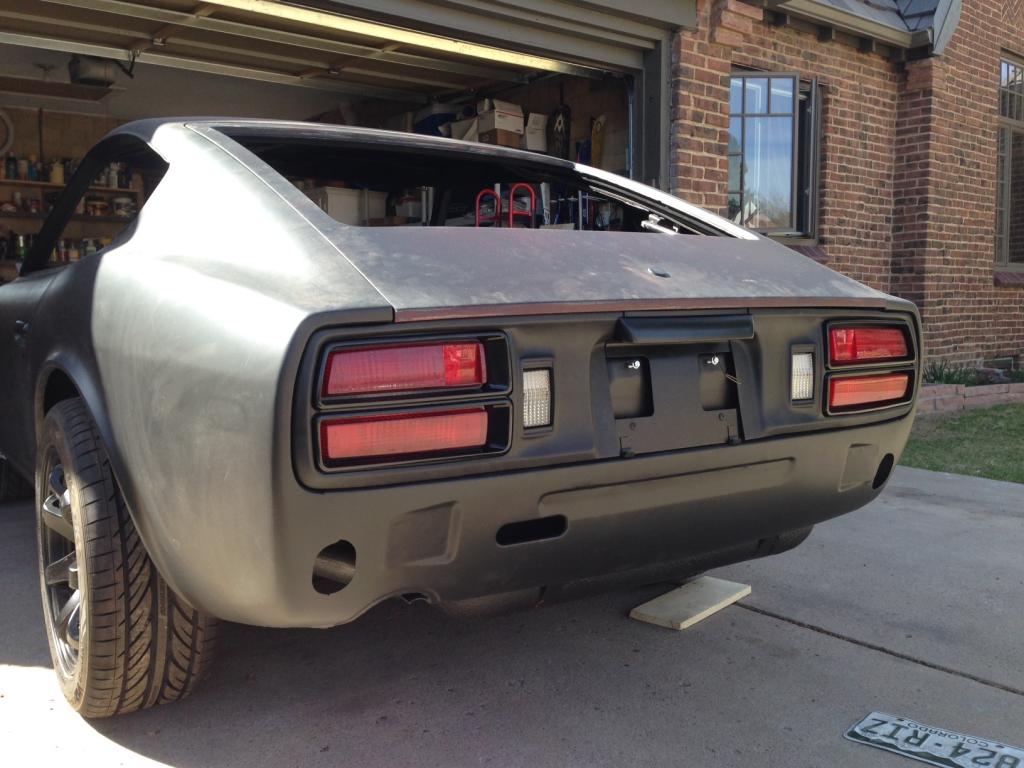
This is the "final" tailight setup, paintwise.
It is all completely screwed together and installed and much to our surprise, doesn't look half bad.
Today felt like a big step for the project and for me.
No doubt next week will suck but for now, I'm content.
Not only was the weather overwhelmingly pleasant but both my junkyard projects worked.
Worked perfectly.
Finally, here's a shot of the car in the sun.
It is very dusty but at least kinda shows what the plastidip looks like.
Also note the doorhandles, newly satin black, are in place.
This is the only shot that shows the new hatch strut in place:
It doesn't look like much but is a major personal victory for my imagination.
You can't see it but the body end of the strut is bolted to a simple bracket welded to the chassis.
In stock form this is not how it works...Datsun has another bracket bolted to the first and the strut bolts to it. Bracket bolted to bracket, what kind of nonsense is this?
When I first took the hatch apart I casually looked it over, then put it way down the list of things to contemplate.
I realized at the junkyard that NOW was the time to start worrying but did not have a Z at hand to look at, nor even a clue of the strut length/stroke, etc.
Looking down a row of cars, my eye was drawn to a roof spoiler of some sort and I walked down to check it out. Turned out to be a Volkswagon and I was strangely attracted to the spoiler/shade/whatever it is and decided to gamble on it.
Now, that wing was just a flight of fancy and I was being indulgent (although it only cost $3) but then the oddest thing happened.
Right next to the VW I'd just assaulted was a Hydunai, it's hatch closed but the glass broken out.
I could only see a bit of the struts but was absolutely convinced they were what I needed. Took some work to extract them but I grabbed the pair.
We had to modify the hatch-side bracket a bit, but even accounting for multiple fit ups in different positions, the strut was installed in under a half hour and works perfectly. Even though the glass is not yet in, I'm confident that a single strut will be more than adequate to self-raise the hatch. If not, we have the mate and can put it in.
Right now, in it's glassless lightweight state, releasing the lock throws the hatch upward.
I thought it would be interesting to fling one of Sigfrid's cats...like a real "cat"apult...but neither of them were really into the idea.
His dog would have done it I bet, because dogs are cool and cats are ********.
So, the strut thing was sweet.
Next up was the latch mechanism and I was pretty sure I had that covered.
I rooted around in my box, pulled out the striker and latch I figured were the best shot and basically, bolted them right up.
Seriously, the striker went right into the capture bolts that used to hold the latch:
Drilled two holes and mounted the latch:
And the hatch clicked closed the first time, no adjustments or fiddling.
I had also snagged the cable operating lever from a KIA but have yet to get a cable.
That stuff is easy though, the "hard part"- which took about fifteen minutes- is done.
This completely eliminates the original push button lock which so besmirched the hatch from the factory.
It also greatly simplifies my search for a different lockset...nothing was going to be like the OEM hatch lock.
Even more amazing to me is that this all fits behind the original license light and center trim panel, with a perfect space for the cable to transition to the interior.
I'll show that when I get a cable:
This is the "final" tailight setup, paintwise.
It is all completely screwed together and installed and much to our surprise, doesn't look half bad.
Today felt like a big step for the project and for me.
No doubt next week will suck but for now, I'm content.
03-29-14, 09:40 PM
#1059
Rotary Enthusiast
iTrader: (1)

Join Date: Nov 2012
Location: bloomington, mn
Posts: 1,100
Likes: 0
Received 0 Likes
on
0 Posts
Looking **** clokker. I am trying to remember the engine mount in the Z. was it slightly close/similar to the KA series? if so, might be worth looking into an SR20Det conversion as I recall you were still undecided on the power plant of this one. I remember seeing one of these converted with a stylish fender flare and an sr20.... I will hunt for the link, you probably already know the one in which I speak. Was blue with black fender flares.
03-30-14, 06:54 PM
#1060
I know nothing about KA engines or mounts, so have no idea about fit.
We'll be trying to start with the stock drivetrain but if it's sketchy, the plan to swap to something will be a go.
A turbo rotary still tops the list but only in a fantasy sense, I doubt we'll really go that way.
Lots and lots of Z's are flared and it's an awkward look that gained validity/acceptance over time.
The popularity is increased due to the fact that 75% of Z's have totally rotten wheelarches and doglegs and it's an easier cheaper fix to cut out the rust, stitch the skins together and cover the whole mess with a bolt on flare.
The last pic above shows how pristine the rear arches are and that one fact adds about $1500 to the value of the car.
If we can ever get the car sitting lower, I hope we don't have to mess with the arches although I have no problems bolting on flares if we can. We would probably be using the flares more to disguise wheel gap than accommodate wider rubber.
03-30-14, 07:46 PM
#1061
 03-30-14, 07:58 PM
#1062
There are four "alignment" devices, two per side, and neither they nor the weatherstripping is in place yet.
At this stage I was only interested in latching, not alignment.
The hatch has to come off for paint anyway and all the fitting will be done when it goes back on.
At this stage I was only interested in latching, not alignment.
The hatch has to come off for paint anyway and all the fitting will be done when it goes back on.
03-31-14, 09:26 AM
#1064
Yeah, junkyards are a treasure trove of ideas and hardware...my favorite resource.
The commonality of parts becomes obvious when you start seeing similar things on different cars.
There is no reason to reinvent the wheel for basic hardware, so it's not a surprise, really.
I noticed that my VW "wing thing" didn't make it into any pics.
I doubt we'll be using it but it's fun to think about.
Because it has mounting studs, it won't sit properly and it's difficult to get an accurate idea of how it would look unless we drilled holes...a commitment we're unlikely to make right now.
I was pleased to see though that my estimate in the yard was spot on, this thing is exactly the width of our hatch, almost to the millimeter.
The profile is not really appropriate as as roof wing but very similar to the period spoilers of the day and we've positioned it as such to examine also.
Like I said, we probably won't use it but I show it as an example of the possibilities to be found in the yard...sometimes they are genius, sometimes just stupid and you can't really tell till you try.

It may ultimately be useful for something, although I'm not sure what, and will probably float around for a while until it finds a place or I get tired of looking at it.
The commonality of parts becomes obvious when you start seeing similar things on different cars.
There is no reason to reinvent the wheel for basic hardware, so it's not a surprise, really.
I noticed that my VW "wing thing" didn't make it into any pics.
I doubt we'll be using it but it's fun to think about.
Because it has mounting studs, it won't sit properly and it's difficult to get an accurate idea of how it would look unless we drilled holes...a commitment we're unlikely to make right now.
I was pleased to see though that my estimate in the yard was spot on, this thing is exactly the width of our hatch, almost to the millimeter.
The profile is not really appropriate as as roof wing but very similar to the period spoilers of the day and we've positioned it as such to examine also.
Like I said, we probably won't use it but I show it as an example of the possibilities to be found in the yard...sometimes they are genius, sometimes just stupid and you can't really tell till you try.
It may ultimately be useful for something, although I'm not sure what, and will probably float around for a while until it finds a place or I get tired of looking at it.
03-31-14, 08:28 PM
#1065
wankeler
iTrader: (2)

Join Date: Jan 2012
Location: Des Moines
Posts: 76
Likes: 0
Received 0 Likes
on
0 Posts
Wow you really are a genius at the yard scavenge. My 2 cents on the wing thing are I like that it doesn't stick out like a sore thumb. Although im not to sure if I like the exact piece in question or the idea of it breaking up the what I see large flatish rear hatch area. Definitely a nice eye. Hopefully when I grow up I can learn the art of the yard like a master picker like you.
Last edited by jesseluck; 03-31-14 at 08:29 PM. Reason: Grammer
03-31-14, 10:07 PM
#1066
We really couldn't evaluate the wing-thing until the rest of the bodywork is on and we have a complete profile to look at.
I was back at the yard again today, mostly to get a cable for the new hatch lock (which I did) but lucked into a set of door trims pretty much by chance.
You know, those strips at the bottom of the glass that seal to the door?
They were another item I had put in my mental to do file and they popped to mind today.
I had already been through this with the same pieces for my 7 and was not optimistic.
Similar as you might initially think all cars are, that stupid trim piece turns out to be very model specific.
Here are some conditions that these parts must meet (the same for a 7 or the Z, actually):
-Our doors are very long compared to a four door car, so out of say three hundred foreign cars in the yard, you've just eliminated over 200 candidates because pretty much everything is a four door.
-The trim has to fit like ours does, on a flange. Most Euro cars aren't like that and many Japanese aren't either, so out of your pool of 100, you just knocked out another 75.
-The rubber has to be in good condition (rare) and the car must have both sides intact (also rare), you just eliminated 20 more donors.
Congratulations!
You now have one more hurdle...get the bastards off without trashing 'em.
Bear in mind that most cars have power windows and the ones in the yard don't gots no batteries, so it isn't easy to get the windows down and out of the way. Also, you're usually guessing at the nature/location of any clips or fasteners...do you keep prying or is there a screw somewhere?
Oh, and lets add to your misery.
You'll only have what tools you feel like lugging around in a giant dirt field, which of course, gets pretty crappy in the rain or snow.
And finally...you only get to see what's actually on hand, the exact part you want may show up in two days but how would you know?
I don't know why I think this is fun.
Oh wait, yes I do.
I found the strips I think will work on a Mitsubishi Eclipse.
They are probably the nicest wiper strips I've ever seen, very elaborate rubber placement, and I really, really hope they'll work.
In the past week I've grafted parts from Honda, Kia, Toyota, Mitsubishi and Nissan onto the poor Z.
It really is a melting pot.
04-06-14, 08:45 AM
#1069
I worked solo yesterday as Sigfrid attended to a "honey-do" list that would cripple Hercules.
I'd scheduled a lot of smaller tasks and didn't anticipate any trouble...and was wrong.
Of course.
First up was installing the cable for the new hatch release:
Now we need to figure out where the release lever will go but that must wait till more interior work is done. I've got a lever assembly from a Kia (I think) that would site just like the hatch/gas release in the FC but I'm thinking it would be cooler if it was in the center console.
Which doesn't exist at this point.
So for now, the cable will float free, one end anchored in the reality of the installed hatch release and the other adrift in a theoretical future interior.
I loosely bolted the freshly painted upper door frames in, although they will come out again later, on the door is the safest place for them now.
That's my logical justification, the real reason was to finally see how the mirrors look.
Ever since we acquired the car I've been slowly evolving a vision of the "look" I wanted and it's been difficult to see through the current state to a coherent conclusion.
Now that we're finally at the assembly stage, bits are starting to come together and the mirrors are an integral part of the theme.
I knew when we ordered these that I'd have to make the triangle/mount piece myself, it was the mirror housing I wanted.
Right now they're just taped into rough position but it's enough to get the idea.
They will be perfect.
Of course, I have no idea if they'll be usable, but they'll look good and for now, that's enough.
After a bit of intoxicated discussion, I was able to convey my concept to Sigfrid, the mirrors finally providing a physical manifestation to work with.
As a result of our talk, features I've advocated from the beginning but S. was dubious about are back on the table.
I'll save that for later.
The day's real work was assembling the quarter windows, the first glass to go back on the car.
A big deal, in my mind.
Sigfrid decided to just pay a pro to tint the glass (I think he wishes he'd gotten darker tint too, so that probably factored in) and since there was no difference in price for bare glass/installed glass, **** it, let 'em crawl around in the tiny cabin and do it like a normal car.
That meant I could finish them off and although I had anticipated difficulty, I underestimated the threat level.
Compared to modern glass, the Z quarter windows are more akin to wooden house windows...they just don't make 'em like that anymore.
For good reason.
The glass is surrounded by a thick rubber gasket and then crammed into a metal frame.
The frame is fastened with six 5mm fine thread screws, all installed as the new rubber tries to explode the frame you're trying to assemble.
Around the outside of the frame is glued another rubber (actually, more "foamy" than rubber) gasket and then the whole thing is wedged into position and fastened (again, under lots of pressure) with four more itty-bitty screws.
Presumably, the rubber all takes shape and settles in over time but it's quite cranky when new.
Lots of soapy water helped and I also used a large wood clamp and a ratcheting tie down for various squeeze/hold maneuvers.
And, as Meercat will appreciate, I had to do all this manhandling on freshly painted parts.
Big fun.
It worked out in the end though:
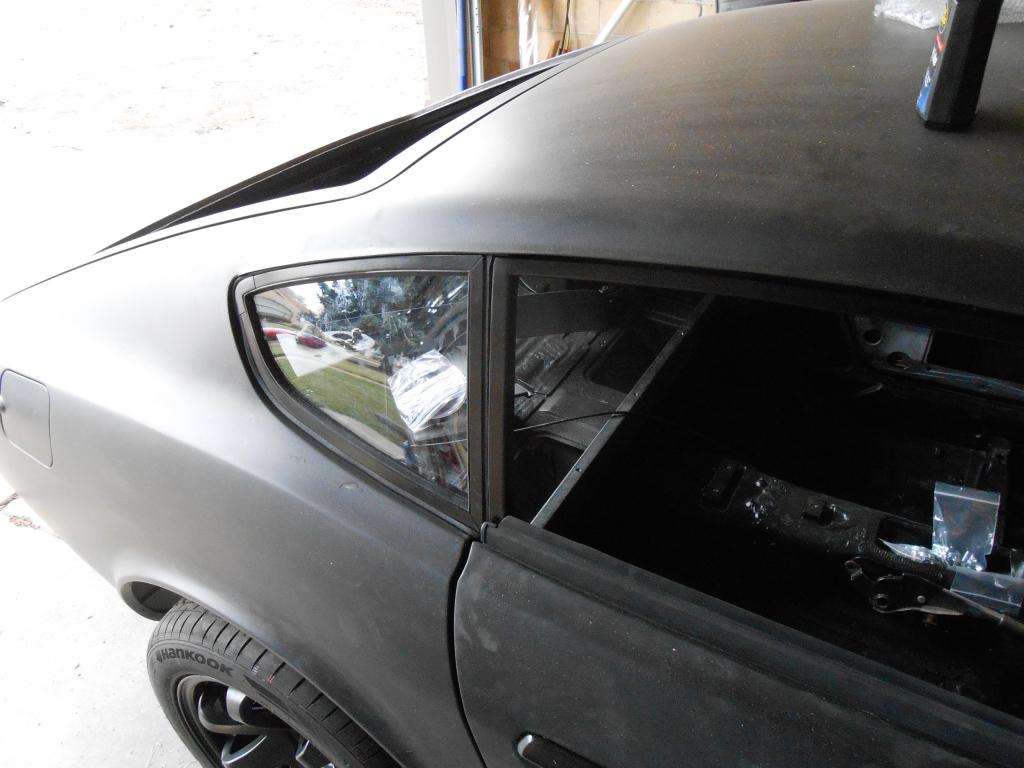
Each side took about two hours.
My next home project will be painting the windshield/hatch trim and sourcing the gaskets for the door frames.
The next "hands on" job will be assembling the inner door mechanisms.
Electrical rises ever higher on the list.
Almost time to start making decisions in that area.
I'd scheduled a lot of smaller tasks and didn't anticipate any trouble...and was wrong.
Of course.
First up was installing the cable for the new hatch release:
Now we need to figure out where the release lever will go but that must wait till more interior work is done. I've got a lever assembly from a Kia (I think) that would site just like the hatch/gas release in the FC but I'm thinking it would be cooler if it was in the center console.
Which doesn't exist at this point.
So for now, the cable will float free, one end anchored in the reality of the installed hatch release and the other adrift in a theoretical future interior.
I loosely bolted the freshly painted upper door frames in, although they will come out again later, on the door is the safest place for them now.
That's my logical justification, the real reason was to finally see how the mirrors look.
Ever since we acquired the car I've been slowly evolving a vision of the "look" I wanted and it's been difficult to see through the current state to a coherent conclusion.
Now that we're finally at the assembly stage, bits are starting to come together and the mirrors are an integral part of the theme.
I knew when we ordered these that I'd have to make the triangle/mount piece myself, it was the mirror housing I wanted.
Right now they're just taped into rough position but it's enough to get the idea.
They will be perfect.
Of course, I have no idea if they'll be usable, but they'll look good and for now, that's enough.
After a bit of intoxicated discussion, I was able to convey my concept to Sigfrid, the mirrors finally providing a physical manifestation to work with.
As a result of our talk, features I've advocated from the beginning but S. was dubious about are back on the table.
I'll save that for later.
The day's real work was assembling the quarter windows, the first glass to go back on the car.
A big deal, in my mind.
Sigfrid decided to just pay a pro to tint the glass (I think he wishes he'd gotten darker tint too, so that probably factored in) and since there was no difference in price for bare glass/installed glass, **** it, let 'em crawl around in the tiny cabin and do it like a normal car.
That meant I could finish them off and although I had anticipated difficulty, I underestimated the threat level.
Compared to modern glass, the Z quarter windows are more akin to wooden house windows...they just don't make 'em like that anymore.
For good reason.
The glass is surrounded by a thick rubber gasket and then crammed into a metal frame.
The frame is fastened with six 5mm fine thread screws, all installed as the new rubber tries to explode the frame you're trying to assemble.
Around the outside of the frame is glued another rubber (actually, more "foamy" than rubber) gasket and then the whole thing is wedged into position and fastened (again, under lots of pressure) with four more itty-bitty screws.
Presumably, the rubber all takes shape and settles in over time but it's quite cranky when new.
Lots of soapy water helped and I also used a large wood clamp and a ratcheting tie down for various squeeze/hold maneuvers.
And, as Meercat will appreciate, I had to do all this manhandling on freshly painted parts.
Big fun.
It worked out in the end though:
Each side took about two hours.
My next home project will be painting the windshield/hatch trim and sourcing the gaskets for the door frames.
The next "hands on" job will be assembling the inner door mechanisms.
Electrical rises ever higher on the list.
Almost time to start making decisions in that area.
 04-08-14, 09:42 AM
#1071
I assume you could only read 140 characters at a time but I thank you for the perseverance and dedication as I wade through the minutiae of a car this forum isn't about.
I've been spending hours looking at weatherstrip profiles, trying to match the Datsun inner/outer door seal trim without buying OEM.
The "original" trim, which is now actually a reproduction, would cost @$100 for both sides, which seems excessive for what is essentially a generic profile. I vaguely recall dealing with this same issue on my first Z and am exploring options.
The weather will be nice tomorrow and I plan on working solo again.
I have the proper screws (which I forgot about before...) to install the door latches, so that can be done and alignment begun. I also want to bedliner the inner door skins, just for the sake of completism.
Getting the doors finished will be a milestone in the project and a big step in cabin integrity.
A big but boring step...not everything is fun.
04-08-14, 11:33 AM
#1072
Moderator
iTrader: (3)
Join Date: Mar 2001
Location: https://www2.mazda.com/en/100th/
Posts: 30,832
Received 2,601 Likes
on
1,846 Posts
i like the mirrors! they look like they are exactly right.
you're doing a great job of showing all the little choices that go into making a whole, um thing...
on the subject of hatch cables, with the race cars, we always mount the hood release cable so it is near the front corner of the drivers windshield, makes it easy to get to with the cage. the current honda is quite dumb as the jichas on the end of the cable broke, so its just the cable end with a ziptie on it.
i think miata style with the release in the center console is probably the way to go, easy to get to, but out of sight...
04-09-14, 06:43 AM
#1073
They're in the ballpark, maybe not "exactly right".
At least I have something physical to work with and they were cheap enough that I can experiment without too much fear.
Engineering the mount will be interesting.
It's serendipitous you mention Miata because they've been much on my mind of late.
The Z center console is pathetic in every respect, there is no storage and no arm rest.
This dysfunctional console (really more of a trans tunnel cap) flows into a dash even more specific than the FC's...specific in the sense that it's not easily modified.
I'm already looking for a new HVAC unit and a Miata was one car I examined. Sadly, that donor car was absent the dash but I did take some measurements and a Miata dash would be a close fit in the Z- very doable, I think.
So we may end up with a Miata center console after all.
The whole interior is up for grabs at this point.
All we really have is a new carpet kit, we're basically starting from scratch.
At least I have something physical to work with and they were cheap enough that I can experiment without too much fear.
Engineering the mount will be interesting.
The Z center console is pathetic in every respect, there is no storage and no arm rest.
This dysfunctional console (really more of a trans tunnel cap) flows into a dash even more specific than the FC's...specific in the sense that it's not easily modified.
I'm already looking for a new HVAC unit and a Miata was one car I examined. Sadly, that donor car was absent the dash but I did take some measurements and a Miata dash would be a close fit in the Z- very doable, I think.
So we may end up with a Miata center console after all.
The whole interior is up for grabs at this point.
All we really have is a new carpet kit, we're basically starting from scratch.
04-09-14, 10:27 PM
#1074
troubleshooting sucks
nice work so far! good to see the Z looking sunkissed as well. i have to give my ten cents (or pence? kronor? �re?) on the hatch wing. it fits so well it could easily be mistaken for an factory extra and not from a "folk wagon". i say go with it dude.
any progress on your wheel considerations?
yours truly
mr no wheels
 04-10-14, 07:29 AM
#1075
When I survey the project and see all that we lack (like an electrical system), the fact that I hate our wheels pales in comparison.
At least they're new.
I began work on the doors yesterday, purchased and installed the glass channel seal (both sides) and installed the passenger door latch...we have one functioning doorhandle!
Many moons ago I devoted a junkyard trip to weatherstripping and yesterday I dug out my samples and started experimenting on the now functional door.
It's going to be a problem.
The OEM piece is NLA from Datsun/Nissan, so that's off the table and people bitch and moan about the repro stuff, so I'm ignoring that as well.
I have three different profiles to play with and they all kinda work...but not perfectly.
My favorite gave good contact all around the perimeter of the door but was so thick the door wouldn't close properly. The other two allowed the door to close but left gaps in various places, mostly around the upper window frame.
A weatherstrip with one consistent profile will give good sealing but poor fit, or vice-versa, but not fit AND seal together, it seems.
This will require some thought.