She Followed Me Home, Honest
 08-08-14, 09:13 PM
#1276
Just so.
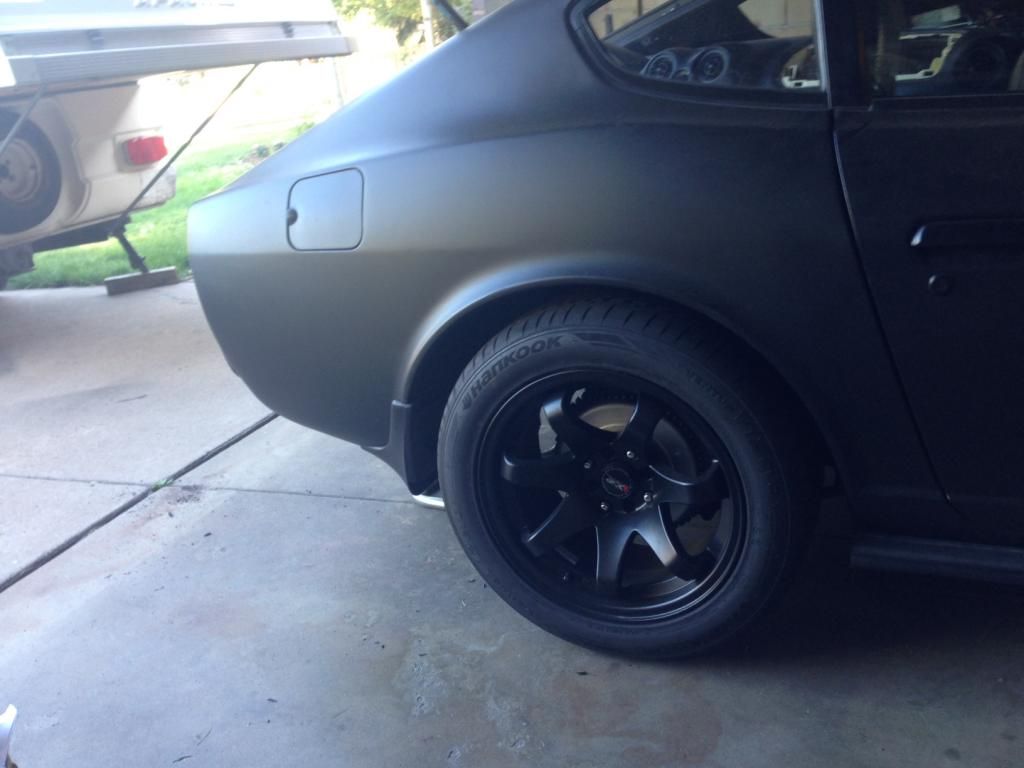
Even back in the day I recall Z owners being desperate for wheel choices and in the mid-90s when I got mine, the situation had gelled into about 5 or 6 options, the Cyclones being one.
I guess the Z suffers from it's age...nowadays there are a plethora of wheel options for even the most mundane shitbox but back then wheels were a much more exotic item and not so easily sourced.
Even though the Z was a roaring sales success, by the time cheap wheel manufacturing was a thing, the Z was no longer a market worth exploiting.
We're lucky the FC has a popular lug pattern and can use a lot of modern wheels.
 08-09-14, 10:22 PM
#1277
The eagle eyed might have noticed that the wiper mechanism is missing from the recent pics.
I removed it to figure out a modern replacement option and spent this AM at the yard in pursuit of a donor.
And I now officially give up.
My original parts are too unlike new(ish) stuff to easily swap in and the extra work does not justify the payoff. I'm really at the mercy of the yard and their stock is quite low at the moment, so my browsing options are limited.
So it's back to stock, time to move on.
We like the Miata wiper arms (specifically, we'll be using two passenger side arms because they lay more nicely on the glass) but they are too long and force a shorter blade (we'd have to use 15", stock is 17").
So, we're going to cut the arms and reshape the J-bend, which will allow for 20" blades (maybe 19").
I've also formulated a plan of attack on the short shifter and the first step begins tomorrow.
I've ordered the required new bushings and rubber boot and they'll arrive later this week.
Slowly but surely.
08-09-14, 11:02 PM
#1278
Red Pill Dealer
iTrader: (10)

Just so.
Even back in the day I recall Z owners being desperate for wheel choices and in the mid-90s when I got mine, the situation had gelled into about 5 or 6 options, the Cyclones being one.
I guess the Z suffers from it's age...nowadays there are a plethora of wheel options for even the most mundane shitbox but back then wheels were a much more exotic item and not so easily sourced.
Even though the Z was a roaring sales success, by the time cheap wheel manufacturing was a thing, the Z was no longer a market worth exploiting.
We're lucky the FC has a popular lug pattern and can use a lot of modern wheels.
This ties into your question of unidirectional, because I looked at a set of Hurricane "Teardrops" for my '86 Toyota 4x4 Hilux. They were backwards on the one side. Sorry man, takes some time for the old brain to filter some times.
A lot of factory manufacturers do it right though.
08-11-14, 10:23 AM
#1279
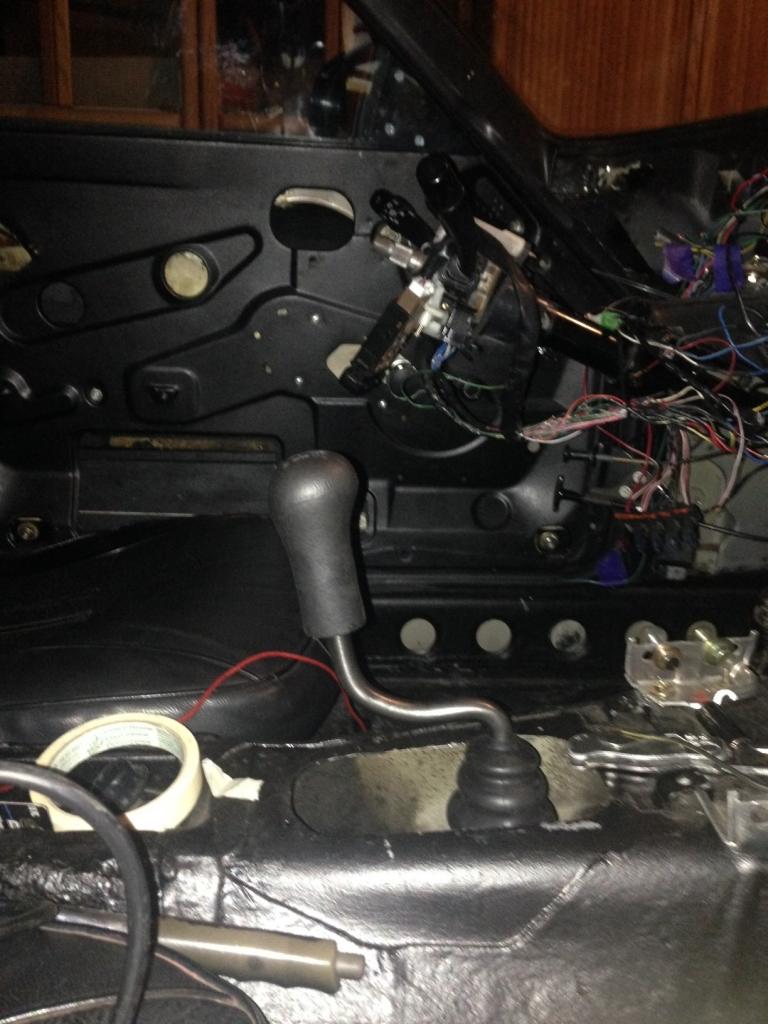
Spent a relaxing few hours on the Z yesterday, only had two goals and achieved them both.
First was the short shift assembly, a fiddly but ultimately straightforward job.
As a part sold to the public, this kit requires more care/attention than normal and I can see why the PO(s) screwed it up. The hardware supplied (military surplus Boeing panel fasteners) was just slightly wrong (the unthreaded shank about .1" too long) and could not be fully tightened.
Rather than discover and fix the issue, they just left the whole thing loose, which is how we got it.
Even had they installed it correctly, as supplied, the lever was an atrocious shape and the ergonomics were awful. We've reshaped the lever and a test fit seems like we got it right but it may need a bit of fine tuning once our real seats are installed.
(We don't know what the "real seats" are yet but the originals are a definite no-go)
With the lever temporarily in place, I was able to shift into reverse and confirm the backup lights work. That's 100% of the exterior lighting done now...everything works great.
The new shift bushings will arrive this week and the shifter will be final installed (and photographed) then.
I also installed the wiper linkage and cut/reshaped the wiper arms.
All we need are some 19" beam-style blades (they conform to curves better than the normal "frame" type) and that's done, too.
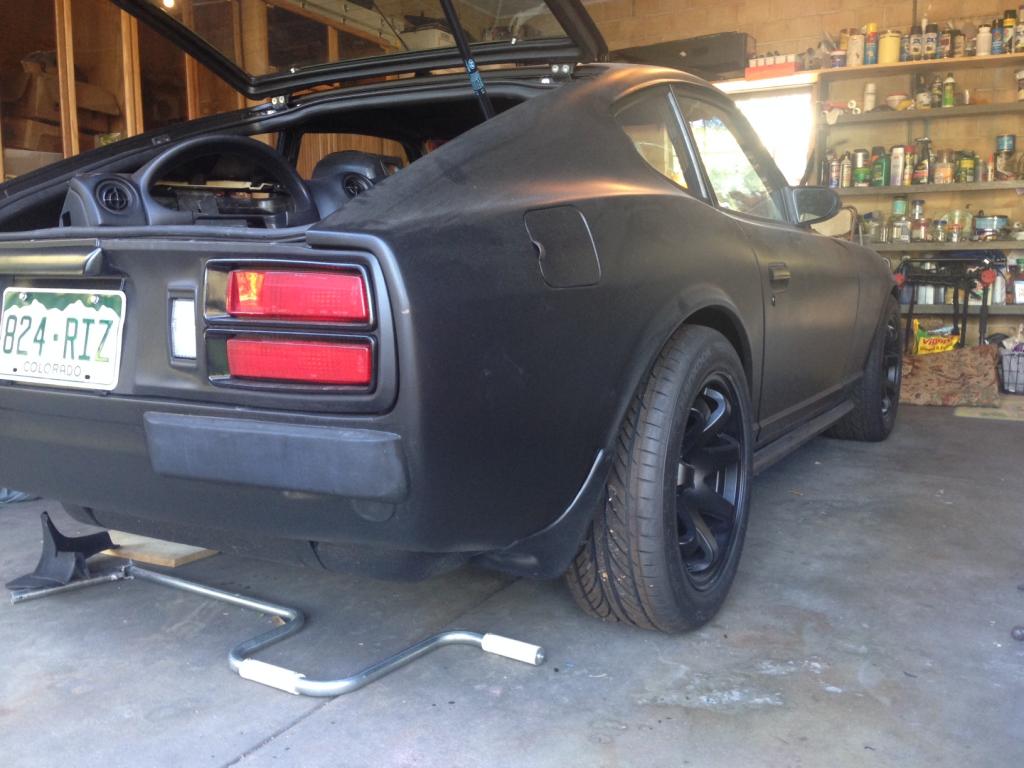
Meanwhile, Sigfrid has been working on the hood and all the recent damage has been eradicated.
It's in better shape than ever actually.
He's also been fiddling with panel gap and although she'll never be show quality, they are now at least straight and fairly consistent.
It's one of the straightest, best fitting Z bodies I've ever seen, truth be told.
It was good to ignore the overall project and concentrate on two easily achieved goals...the sense of accomplishment was invigorating.
Sometimes it seems like no matter what you get done, the list of remaining jobs just gets longer.
Awaiting the shifter bushes, I'll be trying to get an engine harness schematic together.
We've made so many changes that the stock diagram is almost useless.
For instance, gone are the original alternator with its external voltage regulator and the distributor with the external ignition box. The TPS is from a 240SX (as is the larger throttle body) and the MAF is a FC part...basically, it's all different.
Once I figure how it all connects, it should be much simpler than the original but it'll take some effort to suss it out.
Fortunately, the harness rather neatly divides into two branches- the injectors and everything else.
Here's something odd...the injectors are powered through two dropping resistors, one feeds four injectors, the other, two.
Why not have two identical resistors each feeding three injectors instead of this "unbalanced" setup?
Who the hell knows.
First was the short shift assembly, a fiddly but ultimately straightforward job.
As a part sold to the public, this kit requires more care/attention than normal and I can see why the PO(s) screwed it up. The hardware supplied (military surplus Boeing panel fasteners) was just slightly wrong (the unthreaded shank about .1" too long) and could not be fully tightened.
Rather than discover and fix the issue, they just left the whole thing loose, which is how we got it.
Even had they installed it correctly, as supplied, the lever was an atrocious shape and the ergonomics were awful. We've reshaped the lever and a test fit seems like we got it right but it may need a bit of fine tuning once our real seats are installed.
(We don't know what the "real seats" are yet but the originals are a definite no-go)
With the lever temporarily in place, I was able to shift into reverse and confirm the backup lights work. That's 100% of the exterior lighting done now...everything works great.
The new shift bushings will arrive this week and the shifter will be final installed (and photographed) then.
I also installed the wiper linkage and cut/reshaped the wiper arms.
All we need are some 19" beam-style blades (they conform to curves better than the normal "frame" type) and that's done, too.
Meanwhile, Sigfrid has been working on the hood and all the recent damage has been eradicated.
It's in better shape than ever actually.
He's also been fiddling with panel gap and although she'll never be show quality, they are now at least straight and fairly consistent.
It's one of the straightest, best fitting Z bodies I've ever seen, truth be told.
It was good to ignore the overall project and concentrate on two easily achieved goals...the sense of accomplishment was invigorating.
Sometimes it seems like no matter what you get done, the list of remaining jobs just gets longer.
Awaiting the shifter bushes, I'll be trying to get an engine harness schematic together.
We've made so many changes that the stock diagram is almost useless.
For instance, gone are the original alternator with its external voltage regulator and the distributor with the external ignition box. The TPS is from a 240SX (as is the larger throttle body) and the MAF is a FC part...basically, it's all different.
Once I figure how it all connects, it should be much simpler than the original but it'll take some effort to suss it out.
Fortunately, the harness rather neatly divides into two branches- the injectors and everything else.
Here's something odd...the injectors are powered through two dropping resistors, one feeds four injectors, the other, two.
Why not have two identical resistors each feeding three injectors instead of this "unbalanced" setup?
Who the hell knows.
08-15-14, 05:44 AM
#1280
Shifter in:
Not much, but something.
It falls naturally to hand (as L.J.K. Setright might have written) and shifts with minimal effort.
Even had we not swapped dashes, I can't imagine the unbent lever would have been too comfortable, it was absurdly tall and far away.
Not much, but something.
It falls naturally to hand (as L.J.K. Setright might have written) and shifts with minimal effort.
Even had we not swapped dashes, I can't imagine the unbent lever would have been too comfortable, it was absurdly tall and far away.
 08-15-14, 09:18 AM
#1282
I'm planning on a FC surround/boot.
1. Because I already have one.
2. It mates almost perfectly with the Miata centerstack bottom
3. Since we have to custom build the trans console anyway (the Miata console has the ebrake on the wrong side and the Z console looks like ***), the easy pop-in mounting of the FC part makes it attractive.
I can't wait to get to the interior...I like doing that kind of stuff.
Meanwhile, the electrical is still killing me.
I'm getting such weird results that I can't even frame a diagnostic path to follow.
I've made a fundamental mistake somewhere and have garbaged up the harness trying to figure it out. I think it'd be best to redo it.
Not the whole thing mind you, just the steering column end where the controls interface with the outgoing branches.
I expect the second try to be much better and much easier as well. After all, I've had every circuit working (all at once even!), so it's not like I have to figger it all out from scratch.
The problem is in my "ignition" circuit and the way power is distributed/controlled.
I am (was?) trying to duplicate the function of the ignition switch without actually using an ignition switch, just push buttons and relays.
Seemed easier than I'm finding it to be.
Oh well, it's not the destination, it's the journey...right?
08-15-14, 07:02 PM
#1284
With the console in place you'll never see that the lever is bent, it's gonna look normal.
Although I'm always happy to hear recommendations for Subie parts because out here the junkyards are loaded with 'em.
Speaking of junkyards...
I went again today, more as a ruminative ramble than a search for something specific and wandered into a little copse of motorcycle carcasses. It's tucked away at the end of the trucks and I haven't had much cause to check it out before but gave it a go today.
Why have I not done this before?
Even with the limited selection (both number and quality) it was obvious that motorcycles had a lot of useful stuff.
I found the fusebox of my dreams (well, almost) after giving up on car parts.
The major circuits are already relayed/fused and what remained were the devices on the ACC power line...wipers, turn signals, backup lights, gauge/panel lights, gauge power, HAZARD and one other I can't recall right now...but seven in total.
I have (for some reason) a 240Z fusebox which is perfect in every way save one, it uses glass tube fuses. There are apparently adaptors which allow for blade style fuses but that seems clunky and the cover would no longer fit. I'm still of half a mind to use it because looking back, I don't recall ever having trouble with the old style glass tubes and they're definitely period correct and retro looking.
That box has ten slots, so a bit of room for expansion if necessary.
It's also very simply configured with a keyed and unkeyed power feed and ten exit wires.
This Kawasaki box has seven slots, uses blade fuses and has two gang connectors and a circuit board mount for the fuse holders. There are sixteen wires for seven fuses, so something is going on and I'll have to ohm it out and see.
At any rate, one of these boxes is going to be a key feature in the Mark II version of the harness.
I'm completely rethinking component location and construction method and begin tomorrow morning.
08-16-14, 04:21 PM
#1285
Moderator
iTrader: (3)
Join Date: Mar 2001
Location: https://www2.mazda.com/en/100th/
Posts: 30,829
Received 2,597 Likes
on
1,845 Posts
i actually haven't blown a fuse without screwing up the wiring somewhere, in a really long time. even glass fuses, my amps use them and they are fine for like 30+ years, and in the guitar amp they see a lot of vibration
08-17-14, 08:12 AM
#1287
Not only is the Z fusebox going in but I'm redoing the whole dash area again- basically ripping out the last 30% of the harness.
I've rethought a design decision and also made a construction error and the combination is forcing a major revamp.
The design is more centralized, all the relays and fuses are now located on one panel (which I made yesterday and will probably remake again today...I'm a slow learner). I had underestimated the amount of clutter that the previous design would entail and now, instead of spreading all across the firewall, it's confined to one spot.
This time I'll also be much more careful to loom the harness as I go, so it doesn't turn into the rats nest of the current harness.
Today I'm going to reevaluate my "panel", decide if it needs redoing (who am I kidding?) and see what I'll need from the junkyard tomorrow.
Much to Sigfrid's dismay, I'm still obsessing over the single arm wiper mod.
He sees a perfectly functional system and wonders why I can't let it go but to me, the mod has always been a part of the overall "look" and I'm loathe to abandon it.
Especially now that I've discovered rear window systems that do exactly what I want (essentially, a 170� sweep) without a linkage.
Thing is, it would be cruel to install a full function system like we now have (2-speed, adjustable INT, one touch wash) and replace it with a single speed unit, just to satisfy my aesthetic compulsions.
So I started to wonder if a fancier vehicle might have a fancier rear wiper.
According to my sister, her Lexus RX350 has a two-speed rear motor, which sounds very encouraging. I'll need to dig up some diagrams and see if it could be used with our switchgear (which is NOT changing again if I can avoid it).
We plan on painting again sometime in September and the mod would require bodywork on the valence panel. I think S. is hoping to skate free with no more hole filling but I'm afraid if we don't do it now, we never will.
Unfortunately, I really need to have the part in hand to evaluate how possible this might be and there aren't a lot of Lexus's in the junkyard to look at and scavenge from.
It's a dilemma.
I'll keep pondering as I once again wade into the electrical morass.
08-18-14, 07:46 AM
#1288
Well, I redid the relay/fuse panel...it was a foregone conclusion that I would, really.
I rarely keep the first attempt at anything, so I'm neither surprised nor disappointed, it's just the process.
I also "depinned" the Z fusebox so I won't be soldering onto a pigtail, just running new wires directly in.
I've been trying to devise a plan of attack that doesn't involve just chopping the harness and starting anew. Everything works and I'd rather just transfer one wire/circuit at a time so I don't have to figure it all out again. But it's a mess in there and running a new harness through the carcass of the old one ("old" being a relative term here) will be difficult.
I think I just start and see how it goes.
And of course, the day begins with a yard trip (the junkyard being the project's Walmart...one stop for all your car building needs).
08-19-14, 09:06 AM
#1290
I'll interrupt the long string of me whining about electrics (without pictures, even!) to report that while at the yard yesterday, I got sidetracked thinking about how to terminate the rocker profile behind the rear wheels.
The airdam and Honda rocker trim establish a strong character line along the lower body edge but it dies in front of the rear wheel and the back of the body looks slightly unfinished.
If I could find a set of G35 rear spats, that would be a start, but they're rare in my yard and I'd like to actually see them before buying. I suspect they're a bit too "swoopy" to fit our design.
So I was looking for something/anything to put back there, just as a start point for our conversation.
Enter the mudflaps from a Toyota Corolla, which struck me for some reason as being close to our arch/quarterpanel profile.
And surprisingly, they fit almost perfectly.
The "flap" part itself is laughably out of place, but the rest looks pretty nice.
I'm thinking we mount them and then beltsand the flap to make it blend better, use them as a visual stop for that lower design element.
Hopefully, Sigfrid will move his damn camper (which currently blocks the Z from leaving the garage) so we can get her out and view from a distance...I can't move far enough away inside the garage to gain any perspective.
I prepped for the re-wire project and get serious about it today.
With this new relay/fuse panel, about 30-40% of the wiring can be done on the bench (which is nice for me), since it's just stuff connecting to other stuff on the same panel.
This will also free up a ton of space and I'm considering moving the injector dropping resistors into the cabin, which would simplify the wiring considerably.
They were originally placed so deeply into the corner of the firewall (outside of the clutch MC and behind the washer reservoir) that S. didn't even know they existed, so I can't believe airflow was a consideration or requirement.
We'll see.
08-20-14, 08:14 AM
#1291
Once at the garage I'll be able to see if it's feasible (it will be...) and whether I feel it's worth the effort (probably...).
This car may never run but it's going to have a beautiful wiring harness.
08-20-14, 06:00 PM
#1293
Well, it's more ambitious than most but it's definitely "shadetree" quality.
Some of the guys on norotors do bloody NASA level harnesses that I can only aspire to.
I did indeed make a third version of the main panel, convenient as it was, the Z fusebox and glass fuses were just a step too far. It is complete and ready for install tomorrow.
I'm quite looking forward to this next step; primarily because it's going to be one of those moments where everything comes together seemingly quickly. The whole rats nest goes away in one fell swoop, replaced by something that looks like a sentient being made it.
You know how you beaver away and nothing changes till right at the very end?
Yeah, that's what I'm hoping for.
 08-21-14, 11:21 AM
#1296
Senior Member

They fit the body lines well, but I kinda agree, they could stand to be longer, highly impressed with what you all have done with what you can find in the yards.
 08-21-14, 12:37 PM
#1298
Moderator
iTrader: (3)
Join Date: Mar 2001
Location: https://www2.mazda.com/en/100th/
Posts: 30,829
Received 2,597 Likes
on
1,845 Posts
those mudflaps are a lot more subtle than i was expecting, which is probably good!
08-22-14, 07:28 AM
#1299
Well, we both agree the car looks better with the flaps- or something like them- but until we can get her outside and view from a distance, it's hard to say.
I put in a solid twelve hour day and got the harness about 95% finished.
Everything is connected and working- finally.
Today I have some final adjustments and a few connectors to add, then start wiring in the gauges.
I'll also hook up the driving lamps and the exterior lighting will be completely finished.
I wish I felt a bigger sense of accomplishment but right now, the electrical is just one more thing checked off a seemingly endless list.
08-24-14, 07:49 AM
#1300
Chassis harness complete.
At long bloody last.
Made up new brackets and mounted/wired the driving lights, so all exterior lighting is functional.
I used about a zillion zipties this time to keep the harness in shape (all will be removed when the harness is wrapped later) and it doesn't look nearly as elaborate as I know it to be.
I'll try to get S. to take some pics today.
(Sigfrid's parents arrived three weeks ago for vacation- being French, to them "Vacation" means "month of August". Sigfrid and his father have been embroiled in honey-do projects ever since and he hasn't touched the car. That's why I've been spending every day over there...if this thing is going to run before winter, I'm the one who will make it happen.)
I was about halfway through wiring the gauges when I discovered problems with the cluster's soft circuit board. There are a couple of tears and broken traces, I have no clue how that would happen or how to fix it. S. is going to look into that as I begin the engine harness.
Ah, the engine harness.
I finally dug it out and began flaying it to expose the innards (basically, the Blood Eagle with wires and tape instead of blood and lungs...).
And all the wires are the same color...black.
I'm hoping to use the harness mostly intact, only changing out the end connectors, but there are several circuits (cold start solenoid, EGR solenoid, etc.) that get deleted and the harness gets separated into two legs instead of one. This means detangling a wad of all black wiring without inadvertently cutting something important.
For the first time in a year, I dug out the ECU and it's now in place.
Pure 70's tech, it's in a metal box that looks like it came from Radio Shack and it's giant- about the size of the FC's.
Because of its size there were no viable alternate mounting locations, so it's on the driver footwell where Datsun wanted it.
The resistor pack has been relocated right above it.
I hope this will allow the harness to follow my revised routing without having to extend any wires...we'll see.
For some reason, we've decided that the car should be ready to start (and hopefully, run) by next Sunday...so I have a deadline.
It's a laughable but worthy aspiration.